| This topic discusses: |
Links to related topics: |
| Search Online Doc | |
| Current Release Notes | |
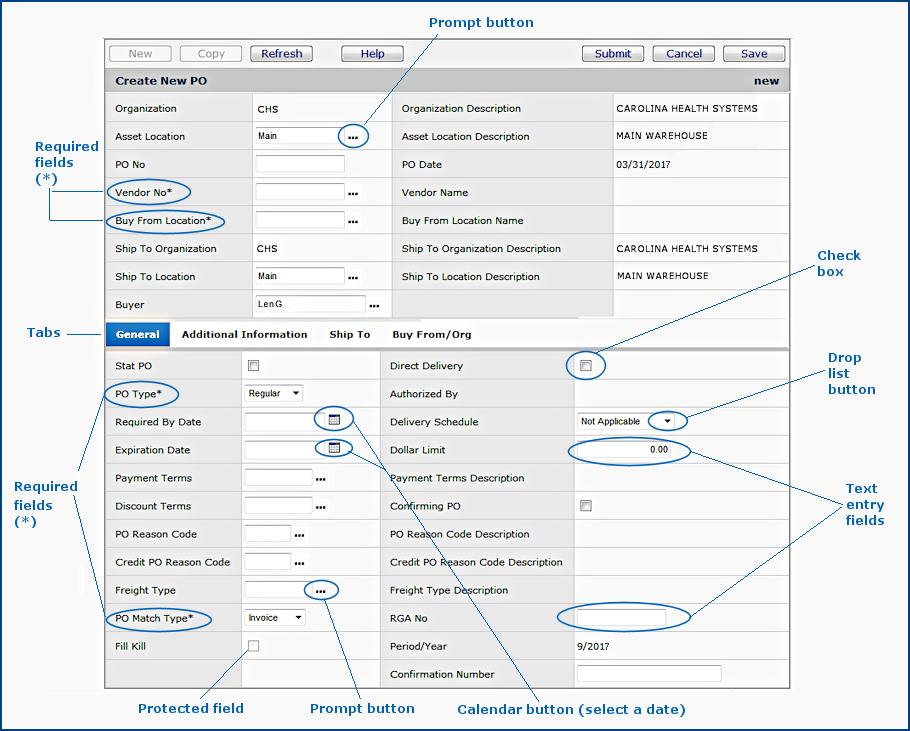
You use edit panels to do much of your work with the system. Edit panels, for example, allow you to create purchase orders and requisitions, create pick lists, enter and match invoices, create journal vouchers, create accounts, and many other activities. Edit panels contain fields -- areas where specific information is required. For example, the PO Number field specifies the purchase order number; the Required by Date field contains the date an order is needed, etc. Figure 1 is an example of an Edit panel that shows different kinds of fields.
You must enter information in required fields. Required fields
are marked with an asterisk ( * ). If you do not complete these
fields, the system will not accept the edit panel when you submit it.
You may chose to enter information in an optional field --
or not -- depending on what you are using the edit panel for.
Drop list fields have a
small down arrow button on the right side. Clicking the arrow displays a list
of items that you can enter in the field. Click a list item to select it.
The system enters the item in the field.
Selection fields contain an ellipsis ( . . . ) button
on the right side. Click the button to get a new window that shows values for
the field. Click a value to select it.
Automatic Lookup and Population of Fields
You can key a value in to a "... "
prompted field or select a value from the prompt. The system fills
in other required fields.
When you key a value in the field (Figure 2), use the tab key or an arrow key to leave the field. The system fills in associated fields on the panel with default values (Figure 3).
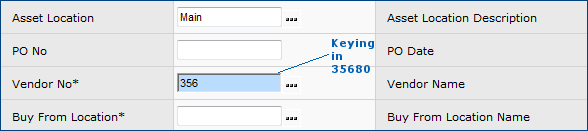
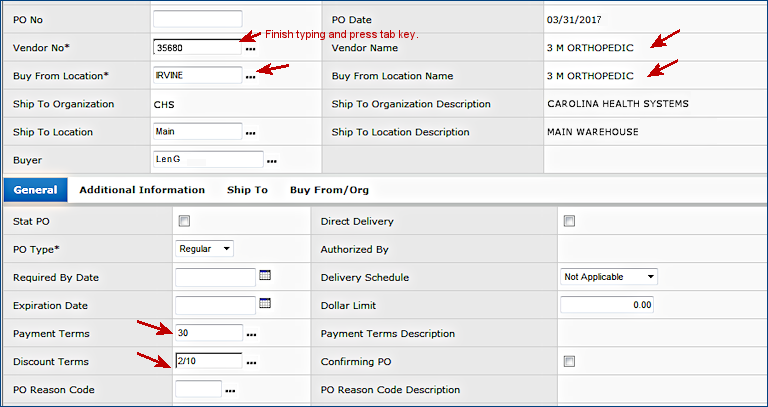
Note: When you key in
a value, the tab/arrow keys (not the Enter key) activate
the lookup/populate feature.
When you select the value from the "..." prompt,
the system populates the other fields immediately before you leave the field.
Calendar fields contain a small calendar button on the right side. Click the button to get a calendar. Double click the space for the date that you want to select. Use the arrow buttons on the calendar to move back and forward from month to month.
Check boxes turn a field on and off, or indicate yes or no.
For example, to mark a requisition as "stat," you would check a box
next to the word "STAT" on the requisition request.
Radio buttons work just like check boxes. The difference is that they are circles that show a bullet inside when selected. Also, radio buttons occur together, and you can select only one in a group.
Text fields are spaces for you to type text. Some text fields are completed automatically by the system. Text fields may be protected after the system enters a value in them. In this case, you cannot change what is in the text field.
Protected fields are fields where you cannot enter information at all. They are colored light gray. They can be any type of field, including a check box or text field. They may contain a value, or be empty. A protected field may contain information that you entered in a previous edit panel, or the field may not be relevant for the particular task you are performing with the edit panel.
Automatic fields contain information that the system provides. These fields are populated by the system automatically.
Action buttons are on the top left and right of some panels. Examples of action buttons are: Submit, Save, Copy, Refresh, Back, Finish Now, Finish Later, and special commands, depending on the panel. For example, Authorize Now and Authorize Later for purchase orders. Each procedure discusses the action buttons it uses.
Some panels are split into several related subpanels. You access the subpanels using tabs. Clicking a tab opens the subpanel.
Copyright © 2023 by Premier Inc. All rights reserved.