Create Department Inventories Version
Contents
Overview
The department inventory feature allows customers to perform inventory counts for supplies stored at various locations within a department. Users can select which inventory locations to count within a department or within multiple departments, count and record counts of inventoried items, and enter the counts into the system. Reports can be created for departmental inventories.
When a departmental inventory is completed, it produces an inventory value that can be compared to a previous inventory. This feature allows a hospital to get a more accurate picture of its total supply inventory value by assessing department inventories, as well as asset location inventories.
Several report objects are available for completed inventories.
Security
The role object "DeptInv" controls access to maintenance for departmental inventories. The initial setting of this role object is None (no access). The Create setting (or All) allows users to create departmental inventories.
To access organization, department, or asset location data, the organization, department, or asset location must be included in your data profile.
Setup
Identify an organization default valuation method, if needed.
Valuation Methods are used to calculate the inventory value of an item. These valuation methods are available:
- Average Cost - The average of different unit prices for an item over time. See How Average Cost Is Determined.
- Last Receipt Cost - The unit cost from the last receipt for each item in the inventory.
- Current Vendor Cost - The unit cost from the item vendor records.
- Last Invoice Cost - The unit cost from the last invoice for each item.
A valuation method can be defined for an organization. When an organizational default valuation method is defined, all department inventories in the organization use the method. No alternate method can be selected for any departmental inventory.
If no default valuation method is specified for the organization, a valuation method can be selected when creating a departmental inventory.
To set a default valuation method for an organization:
- From
the main Contents in Materials Management, General Ledger, or Accounts Payable, select Tables >
Organizations.
- The Organizations list appears.
- Locate the organization of interest on the list.
- Click the edit icon
 or Menu > Edit next to the organization. The Organization edit panel appears.
- Click the MM Information tab. The MM Information panel appears (Figure 1).
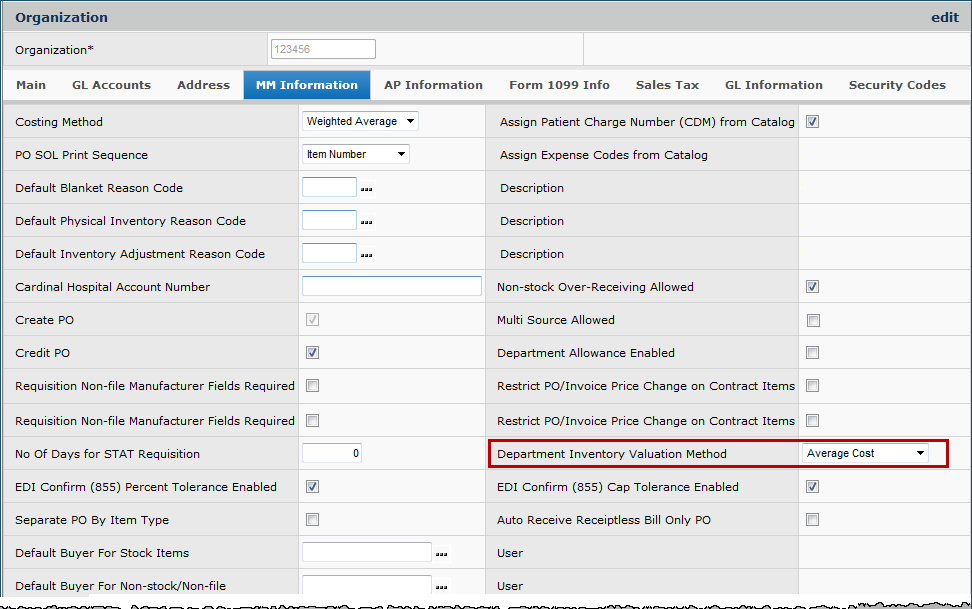
Figure 1 - The Organization MM Information Edit Panel
- Click the down arrow next to Department Inventory Valuation Method to select a valuation method.
-
The choices are: No Default, Average Cost, Last Receipt Cost, Current Vendor Cost, or Last Invoice Cost.
- Or you can leave the value as No Default. In this case, the department can select a valuation method.
- Click Submit.
Permit a departmental inventory to add items to the item catalog
You can add one or more non-file items to the item catalog directly from a departmental inventory. A field on the Asset Location enables this capability.
To enable users to add non-file departmental inventory items to the item catalog:
-
From
the Materials Management main Contents, click Tables > Asset Locations.
- The Asset Locations list appears.
- Find the asset location of interest on the list.
- Click the edit icon or Menu > Edit next to the asset location. The Asset Location edit panel appears (Figure 2).
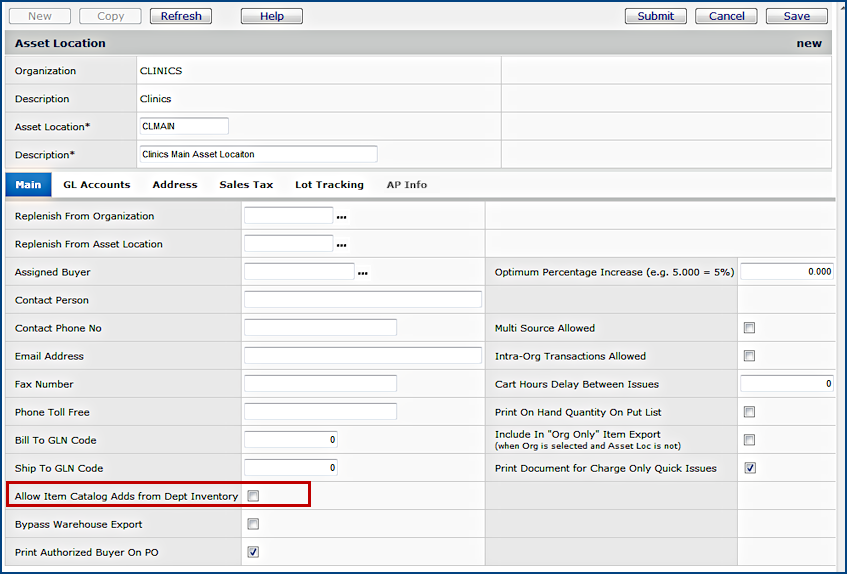
Figure 2 - The Asset Location Edit Panel
- Select the box next to Allow Item Catalog Adds from Dept Inventory.
- Click Submit.
Allow Users to Add Items to a Par Cart/Order Guide From a Departmental Inventory
A field on the User Profile Authorities panel allows the user working with a department inventory to add file items to an order guide and/or par cart from a department inventory when the inventoried file items do not exist on the par cart/order guide (Figure 3).
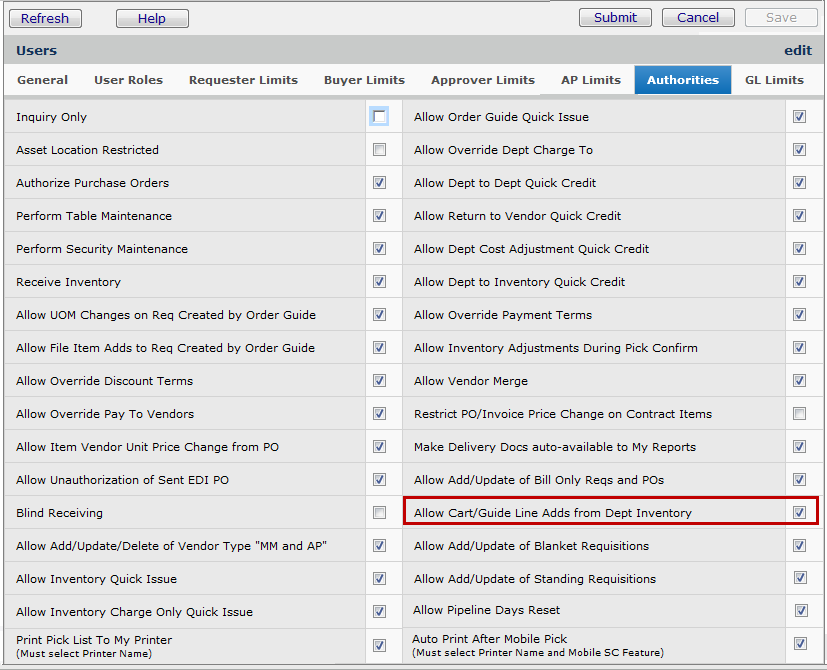
Figure 3 - Allow Cart/Guide Line Adds from Dept Inventory Field on User Profile Authorizations Panel
To allow a user to add departmental inventory items to an order guide/par cart:
- From Work in Administration on the main Contents, select Administration
> Users. The list of users appears.
- Locate the user of interest.
- Click the edit icon or Menu > Edit next to the user ID. The Users edit panel appears (Figure 3).
- Click the Authorities tab.
- Select the field Allow Cart/Guide Line Adds from Dept Inventory.
- Click Submit.
Order Guides/ Par Carts for Inventory Only
You can set a flag on a new order guide or a new par cart to specify "inventory only." The order guide/par cart is then available for creating a departmental inventory, but not available to departments for requisitioning supplies. If you have an existing par cart or order guide that you wish to use for departmental inventory, you can copy the par cart/order guide, and set the "inventory only" flag on the copy.
To set the order guide flag "for inventory only:"
- From
the main Contents, select Warehousing > Order Guides - All Locations.
The Order Guides list appears.
- Click New. The Order Guide Edit panel appears (Figure 4).
- Complete
the required fields: Order Guide, Description, and Default
Reason Code. Enter information in other fields as needed.
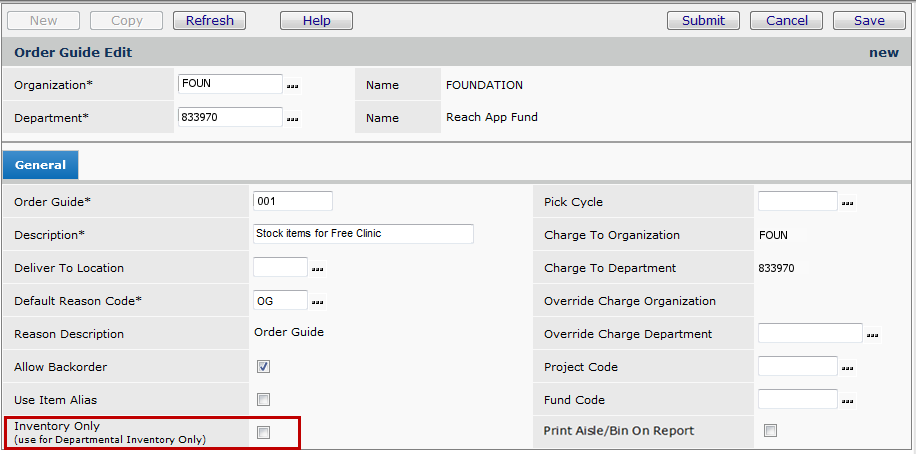
Figure 4 - The Order Guide Edit Panel
- Click the box next to the Inventory Only field.
- Click Submit.
To set the par cart flag "for inventory only:"
- From
the Materials Management main Contents, click Warehousing > Par Carts
- All Locations. The list of par carts appears.
- Click New. The Par Cart panel appears (Figure 5).
- Complete
the required fields: Par Cart, Description, and Default Reason
Code.

Figure 5 - The Par Cart Edit Panel
- Click the box next to the Inventory Only field.
- Click Submit.
To copy a par cart/order guide for "inventory only:"
- From
the Materials Management main Contents, click Warehousing > Par Carts
- All Locations, or for order guides, Warehousing > Order Guides - All Locations.
- A list appears.
- On the list, locate the par cart/order guide of interest.
- Click Menu > Copy. The Copy Par Cart / Copy Order Guide panel appears. Figure 6 is an example for an order guide.
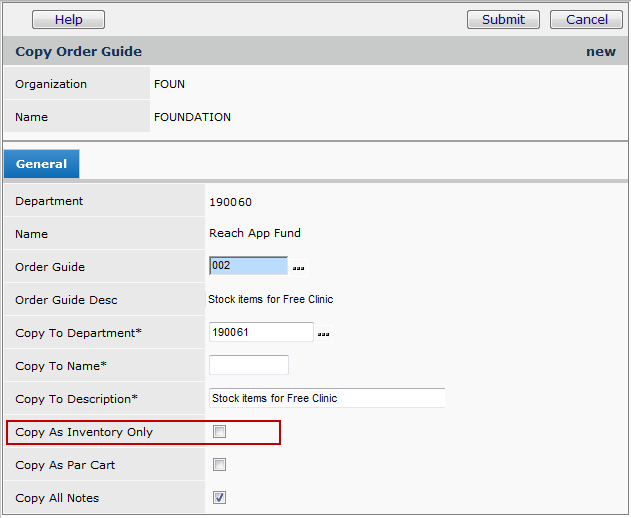
Figure 6 - Copying an Order Guide for Use in Departmental Inventories
- Select the field Copy as Inventory Only.
- Click Submit. The par cart/order guide items can now be used in a departmental inventory.
Create a Department Inventory
Once you have the appropriate permissions set in your user profile, you can create a departmental inventory.
Inventory Status
As you are creating and running a departmental inventory, a status indicator is set by the system.
Status values are:
- Open – The departmental inventory has been created and is ready for adding par carts and order guides.
- In Progress – Par carts and order guides have been selected for counting and the departmental inventory is ready for the inventory process.
Count sheets can be printed and inventory counts can be entered.
- Complete – All inventory counts have been entered and inventory values have been calculated. You can view the inventory using Inquiry.
Report objects only include completed inventories.
To create a department inventory
Create the header:
- From the Materials Management main Contents, select Warehousing > Departmental Inventory.
- If any inventories have been created, a list appears. Otherwise, No Data appears.
- Click New.
- The Create Departmental Inventory panel appears (Figure 7).
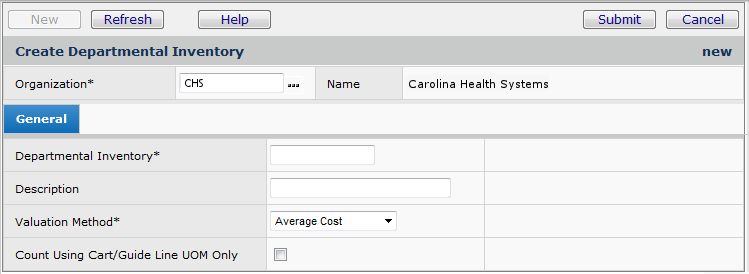
Figure 7 - Create Departmental Inventory Header Panel
The Organization field defaults to the Current Settings value. You can change the organization to any organization that is valid in your data profile.
- Enter a name for the inventory in the Departmental Inventory field.
- Enter a Description, if you wish. The Description is optional.
- Select a Valuation Method. If a default is provided by the organization, (see Setup) it cannot be overridden.
Options are:
- Average Cost - The average of different unit prices for an item over time. (Default setting.) See
How Average Cost Is Determined.
- Last Receipt Cost - The unit cost from the last receipt for each item in the inventory.
- Current Vendor Cost - The unit cost from the item vendor records.
- Last Invoice Cost - The unit cost from the last invoice for each item.
- Counts can be done using just the UOMs of the par cart/order guide line.
Select Count Using Cart/Guide Line UOM Only if you wish to count in this way. Otherwise, ....
- Click Submit to create the departmental inventory header.
A new page appears with two new panels.
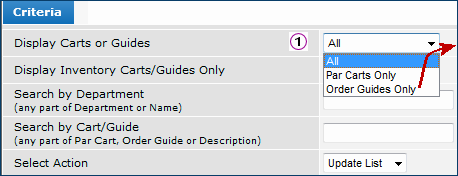
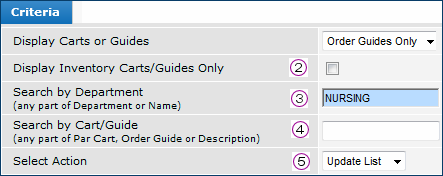
The bottom panel contains order guides and par carts for selection. The center panel -- Criteria -- (Figure 8) contains fields for searching the list
or order guides/par carts, and for refining your search so that you can locate and select the correct par carts/order guides.
Figure 8 - Working with the Search Criteria
Using Search Criteria to Locate Par Carts/Order Guides for the Inventory:
Refer to Figure 8 for the circled numbers.
- Select a value for the field Display Carts or Guides.

- All is the default, but you can set this field to list only order guides (as in Figure 8) or par carts.
- You can filter the list for order guides/par carts flagged as "inventory only" by selecting Display Inventory Carts/Guides Only.

- Otherwise, all par carts/order guides are available for selection.
- Enter any part of the department name or description to search for order guides/par carts for the department.

- Embedding a % sign in the search characters lets you "wildcard" the search. For example, 601%Admin returns departments beginning with 601 that contain the phrase Admin.
- Enter any part of the par cart/order guide name or description to search for particular order guides/par carts.

- When the search criteria are set the way that you wish, in the Select Action field,
 accept the default action Update List by clicking Enter.
The list of order guides/par carts refreshes. The new list is filtered according to your selection criteria. Figure 9 is an example of the list that results from the criteria in Figure 8.
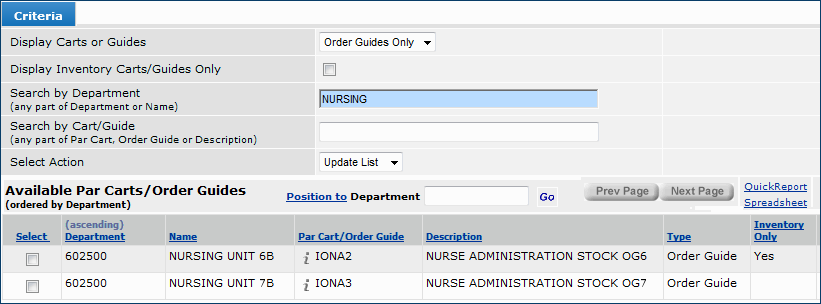
Figure 9 - Sample List of Order Guides/Par Carts Filtered Using Criteria
- Select order guides/par carts for the departmental inventory:
- To automatically include all entries displayed on the list, in the Select Actions field, click the down arrow and choose Select All.
- Deselect All unselects previously selected entries.
- To select individual order guides/par carts from the list, click the Select checkbox. Click Save.
- Click Finish Now when the content of the departmental inventory is correct.
- A confirmation panel is displayed.
-
Click Submit. When you click Submit, the inventory status is set to In Progress. You can print count sheets for the inventory items.
- If you have not finished selections for the inventory, click Finish Later.
- You can return to the inventory, edit it, and change or add to your selections.
- To cancel the inventory, click Cancel. A confirmation panel appears for you to confirm the cancellation.
Printing a Count Sheet
Once your departmental inventory is in progress, you can print a count sheet for manually counting items.
To print a count sheet for an In Progress departmental inventory:
- From the Materials Management main Contents, select Warehousing > Departmental Inventory.
- A list of departmental inventories appears.
- Locate the departmental inventory of interest.
- Click Menu > Print Count Sheets (Figure 10) .
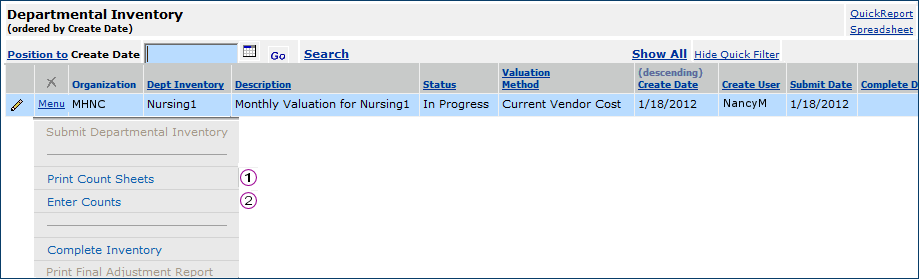
Figure 10 - Printing Inventory Count Sheets
A message tells you that the count sheets are available for printing from Reports > My Archived Reports.
Enter Item Counts
Once all items on the count sheets have been counted and their quantities noted, you can enter the counts on the inventory.
- From the Materials Management main Contents, select Warehousing > Departmental Inventory.
- A list of departmental inventories appears.
- Locate the departmental inventory of interest.
- Click Menu > Enter Counts (Figure 10) .
- The count page appears (Figure 11).
- The items are displayed in the same order as the count sheet (by par shelf location).
- One or more of the count fields contains quantities that default from the par quantities for lines on the selected Order Guide(s), if par levels are specified. You can change or enter quantities in the count fields. You can enter an quantity for an item in any of the three count fields (Figure 11):
- Inventoried Lowest Qty for the lowest unit of measure.
- Inventoried Issue Qty for the default issue unit of measure.
- Inventoried Purchase Qty for the default purchase unit of measure.
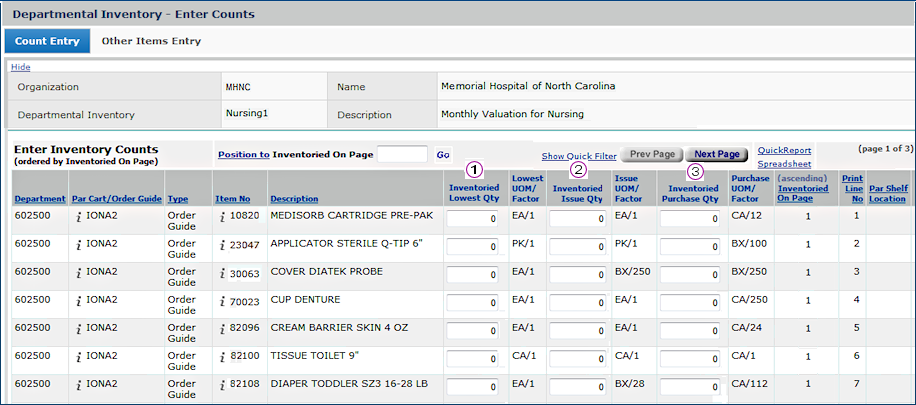
Figure 11 - Count Entry Panel for Departmental Inventory
- Enter counted quantities for each item.
- Click Save periodically.
Enter Counts for Items Not in the Count List
- If you have items that are not listed on the inventory count page, click the Other Items Entry tab to enter the items and counts.
- Two tabbed panels - Items and Supply -- appear.
- On the Items panel (Figure 12), complete information for the item to be counted.
- In the field Par Cart or Order Guide (top of the panel) , select a par cart or order guide.
- You can optionally enter a Par Shelf location for the item in the department being inventoried.
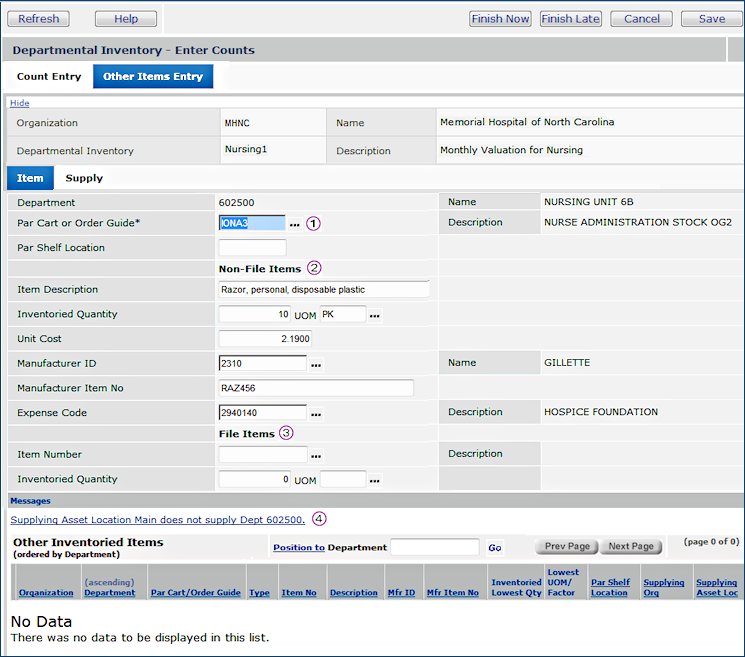
Figure 12 - Entering Items for the Count That Are Not in Any Par Cart or Order Guide
- For non-file items, complete the fields under Non-File Items .
- Click Save. If the supplying asset location is set up so that non-file items are copied to the item catalog (see the Setup section), a panel appears for you to enter information for the item.
-
To add the item to the item catalog and to the asset location inventory, enter fields on the panel and click Submit.
- Note: Be sure to enter at least the lowest unit of measure for the vendor, or the item record will be incomplete.
- When you click Save, the item you entered appears on the lower panel: Other Inventoried Items (Figure 12A).

Figure 12A - Other Inventoried Items List
- For file items, under File Items (Figure 12) , enter the fields Item No and Item Description.
- Click Save. If the par cart/order guide entered in the Par Cart or Order Guide field is set up to allow adding of inventoried items (see the Setup section), the item is added. A message appears.
- Click OK.
- When you click Save, you may get the message: "Supplying Asset Location XXXX does not supply Dept YYYYY" .
- In this case, click the Supply tab and enter the correct department and asset location information.
- Click Save after your last entry.
Complete a Departmental Inventory
After you finish entering item counts, you can submit a departmental inventory for completion.
Note: Completed inventories can be copied, but not deleted.
Completing a departmental inventory changes the Status to Complete, and performs all the inventory value calculations. The Valuation Method chosen (or defaulted, if set by the organization) determines what unit cost is used to calculate value. Average cost, last receipt cost, and last invoice cost are derived from the values stored in the item inventory record for each item. Vendor unit cost is derived from the primary supplier’s item vendor price at the lowest unit of measure.
Items that may have existed for previous inventories but are no longer present on a current par cart or order guide are also recorded so that current and previous value calculations are consistent. New items are included in current inventory value calculations.
To complete an inventory:
- Click Finish Now when all counts have been accurately recorded. A confirmation prompt appears.
-
Click Yes. The application sets the inventory Status to Complete and calculates the inventory values. You can inquire on the inventory and print reports.
- Click Finish Later when the count entry is not complete and may need to be continued later.
Click Cancel to delete the department inventory. A confirmation panel appears.
- Click Delete.
Completed inventories can be reopened by selecting the Enter Counts menu option. Once the contents of a department inventory are superseded by a subsequent inventory, the Enter Counts option is no longer available.
To print a final adjustment report
For complete inventories, you can print a final adjustment report.
- From the Materials Management main Contents, select Warehousing > Departmental Inventory.
- A list of inventories appears.
- Use the Quick Filters and the Position To box to locate the inventory of interest.
- Next to the completed departmental inventory, click Menu > Print Final Adjustment Report.
- A message tells you that the report is available for printing from Reports > My Archived Reports.
The Departmental Inventory/Final Adjustment report provides this information:
For each inventoried item: item number and description; manufacturer ID, manufacturer name, MIN (manufacturer item number),
inventoried quantity and UOM, current vendor cost, and total cost (quantity X unit cost.)
For each par cart/order guide: the total inventory valuation.
For the entire department: the total inventory valuation.
Inquiring on a Departmental Inventory
The Departmental Inventory Inquiry lets you display inventory values.
To inquire on a completed departmental inventory:
- From the Materials Management main Contents, select Warehousing > Departmental Inventory.
- A list of inventories appears.
- Use the Quick Filters and the Position To box to locate the inventory of interest. (You could filter the list on the Status column set to Completed.)
- Next to the inventory of interest, click i.
- The Inquiry panels appear (Figure 13, Figure 14, and Figure 15).
The overall inventory value is displayed at the top next to Total Value, and other summary values are available by par cart/order guide, department, and item.
Each panel displays the inventory total value , the previous total value (if any) , and the variance amount and percent between the current and previous values.
The Carts/Guides tab contains the data for the par carts and order guides in the inventory (Figure 13). When the valuation method is different between the current and previous inventories for cart/guide and item summaries, the valuation method used for the previous inventory is noted. No difference exists and the Valuation Method (if different) column is empty.
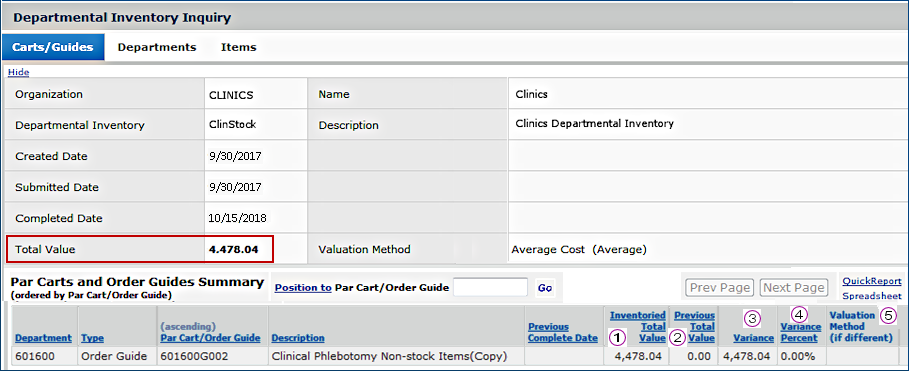
Figure 13 - Department Inventory Inquiry: Summary for Par Carts and Order Guides
Since an inventory can contain items from multiple departments, the Departments tab displays total values by department (Figure 14). (The figure only has one department.)
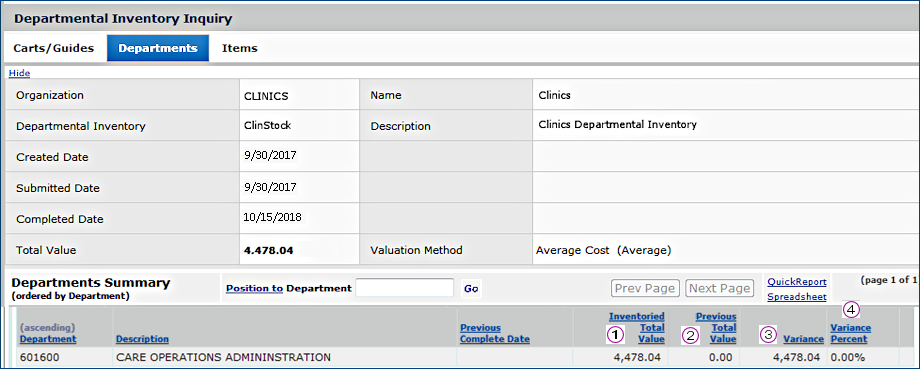
Figure 14 - Department Inventory Inquiry: Summary for Each Department
The values for each individual item in the inventory is displayed on the Items tab (Figure 15). Note that for each item, the extended value (unit price X quantity) is used for the current and previous inventory .
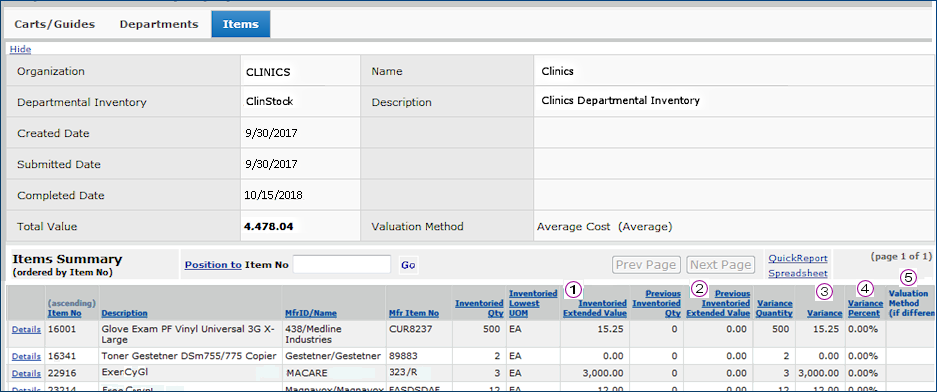
Figure 15 - Department Inventory Inquiry: Summary for Each Item
Report Objects for Departmental Inventories
Several report objects are available for writing reports on departmental inventories. The report objects provide different types of summary and detail analyses. Each contains fields that allow comparison of the “current” value vs. “previous” value.
The report objects are in Figure 16.
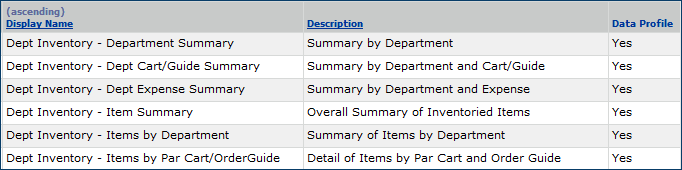
Figure 16 - Report Objects for Departmental Inventories
The report objects can be displayed from the Materials Management main Contents menu Reports > Browse Report Dictionary.
Copyright © 2023 by Premier Inc. All rights reserved.