| This topic discusses: |
Links to related topics: |
| Search Online Doc | |
| Current Release Notes | |
Accounts Payable contains tables where you can record and maintain information that you use to create and match invoices, make payments, and perform other AP activities. The AP Tables include:
When you begin to use Accounts Payable, you or your system administrator will need to enter information in your AP tables. Materials Management also contains tables, and information in those tables - such as the Units of Measure table - is used by Accounts Payable as well. Other table records are unique for just AP or just MM. (See Using Materials Management Tables.)
System Administrators responsible for user access and security should read Set Up and Maintain Users.
The ability for any user to view, change, and create values in AP tables is controlled by the role object "APTables." Your assigned role's "APTables" security object must be set to Modify, Create, or All for you to edit AP tables.
A separate role object -- "DistributionProfiles" -- controls the Distribution Profiles table. Initially, this role object has the same setting for a user as the role object "APTables." However, you can change the "DistributionProfile" role object setting to give users access to the Distribution Profiles table, without giving the users access to other AP tables, such as Payment Terms and Discount terms.
To access organization, department, or asset location data, the organization, department, or asset location must be included in your data profile. Additionally, for any asset location, you must have permission to maintain the asset location record. See "Restricting Users from Editing Asset Location Records."
From the Accounts Payable main Contents, select AP Tables.
Click
on the table name that you wish to use.
- For an explanation of the columns on a table, click Help.
Below are the tables in Accounts Payable. You can view or edit these tables, or add new elements.
1099 codes are categories used to report vendor payments for tax purposes. If a vendor has a 1099 code, this code is carried forward to the invoice lines. (You can, however, override the code when you enter an invoice for the vendor.) The 1099 Codes table is provided and maintained by the system, with annual updates.
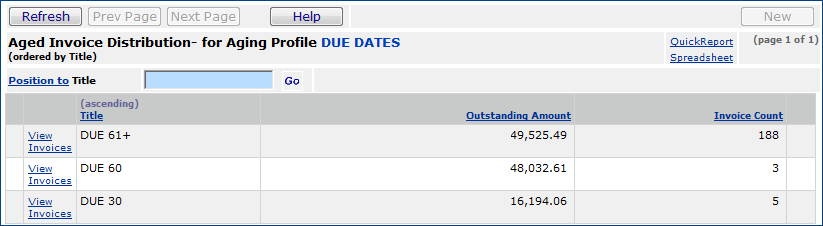
The Aging Profiles table contains the different profiles your site uses for aging invoices. Each profile specifies the aging basis (payment due date, discount date, or invoice date) and the payment priority.
The Banks table contains information about the banks and associated bank accounts used at your site for making payments.
Calendars define fiscal years and accounting periods within fiscal years. You can set up both AP and materials management calendars.
This table lists the charge types used at your site and a description of each type; for example, FOB - Freight on Board. See Creating Manual Invoices for details on how charge types are used.
The Currency table contains the list of national currencies that your site may use; e.g., dollars, Euros, etc.
The Departments table contains information for all the departments at your site. The Departments table is available from the Materials Management main Contents. Select Requisitioning > Departments.
Discount Terms contains up to three discount schedules that you can associate with vendors; for example:
5% within 10 days.
2% within 30 days.
1% within 45 days.
You can create new discount terms in the table as needed.
The applicable terms of a discount schedule are used for a partial payment that
is the first payment on an invoice.
However, subsequent payments pick up the same terms as the first payment.
For example, suppose your discount schedule has two terms -- one that expires
in 5 days and one that expires in 10 days.
You make a partial payment on an applicable invoice within 5 days, and another
payment after 5 days, but before 10 days.
The system picks up the 5-day term for the second payment. When you set up the
second payment, you will need to make a manual change, in this case, to the
discount amount.
Invoices for items that you have received may contain charges such as freight, sales tax, and postage. A distribution profile "pre-builds" distribution lines for charges. Each distribution line contains either a percentage to be calculated, or a specific dollar amount. A default distribution profile can be associated with a vendor. You can also select a distribution profile when you create an invoice for a purchase order. See Set Up Charge Types and Distribution Profiles. How to use distribution profiles is outlined in the section "Distribute Charges," which is part of matching invoices with receipts.
Security for creating distribution profiles is controlled by the role object "DistributionProfile." Initially, this role object has the same setting for a user as the role object "APTables." However, you can change the "DistributionProfile" role object setting to give users access to the Distribution Profiles table, without giving the users access to other AP tables, such as Payment Terms and Discount terms.
Note: The account code that you enter in the GL Account field for a distribution line on a Distribution Profile cannot be a statistical account.
You can delete a Distribution Profile from the Table, even if the Distribution Profile is specified on one or more invoices.
A Distribution Profile must be removed from any vendor records before you can delete it. When you delete a Distribution Profile from the Table, the system removes the Distribution Profile from invoice headers and retains any invoice lines created from the profile. Supply Chain writes a System Note for each invoice whose Distribution Profile is deleted.
Security: The user role object "'CanDeleteDistProfile" must be set to ALL to authorize a user to delete Distribution Profiles.
From the Accounts Payable or Materials Management main Contents, select Tables > Funds.
The table contains abbreviations for names of funds that can be associated with requisitions lines, purchase order lines, order guides, and other application elements.
You can set a Status of Active or Inactive for fund codes.
A report object "Fund Code Inactive References" is available to write report definitions that locate application elements (e.g., order guide lines) with inactive Fund Codes.
You can export the list of fund codes to Excel using the Spreadsheet link on the Fund Code List.
See the discussion of Project Codes which contains export/import process information for both funds and projects.
The accounts table contains a list of accounts from the General Ledger relevant to the Accounts Payable process; for example: Freight, PO Liability, State Sales Tax Expense. Information for each account includes the account code, a description of the account, the type of account (expense, liability, asset, or income), the status of the account (active or suspended), and the organization that owns the account.
Shows GL transactions and the source of each transaction, among other details.
Contains a list of Review Statuses for exception invoices. Users can select a status value on exception invoices that can be updated when editing the invoice, and displayed on the Invoices in Exception list.
This table contains
information for all the organizations at your site. To edit an organization's
information, or create a new organization, see Identify
Administrative and Operational Units
A payment profile may be associated with a payment run for a particular vendor or vendors. A payment profile contains bank account information for payments. A payment profile also contains fields where you can enter the characteristics of specific invoices that you wish to select for payment. Examples are:
- All invoices within the discount period, up to $500.00
- All invoices older than 30 days, and less than $100.00
- All invoices whose vendor is assigned a particular Payment Priority.
You may specify a Payment Profile for a payment run. When you create a payment run, you may select a Payment Profile from the prompt, the application completes several fields with values from the Payment Profile. If the Vendor Pay-To Location uses EFT (electronic file transfer) for payments, a payment profile is not required but can be used to provide default values.
If you are using EDI 820 payments, you can define a Payment Profile specifically for that purpose. Select the field EFT Only. For the field Send AP Check Output To, select EDI Payment (820). You will also need to set up the bank and bank account for EDI 820. See Using EDI 820 Payment Documents for details.
Also, see Paying a group of OneTime vendors using a single Payment Profile.
Payment terms are a payment schedule -- an agreement between a paying organization and a vendor. Your site may have several sets of payment terms for different vendors and organizations. Once you define a set of payment terms in this table, you can associate the terms with any vendor who offers them.
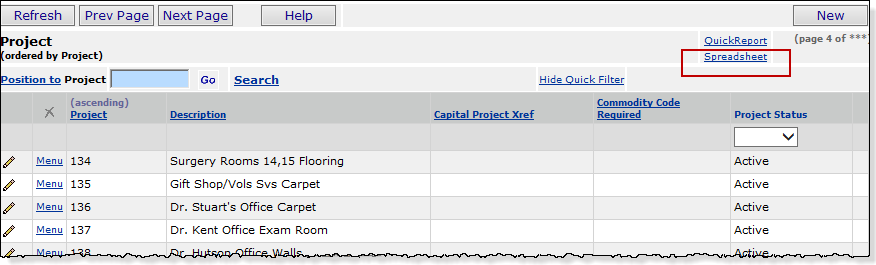
From the AP main Contents, select Tables > Projects.
This table contains abbreviations for names of special projects that can be associated with requisitions lines, purchase order lines, order guides, and other application elements.
You can require a Project Code to be entered on requisitions expensed to particular General Ledger accounts. When such an account is assigned to an item inventory record, and a requisition is opened for the item, a message appears instructing the user to enter a Project Code. You can also require any requisition line with a Project Code to contain only commodity-coded items.
You specify whether a project code and/or fund code is active or inactive by setting the Status field for the code to Active or Inactive. On the Project Codes and Fund Codes tables, the Project Status column and the Fund Status column display the status.
Inactive project/fund codes are not available for selection on panels that allow you to specify a project/fund code; for example, on a par cart requisition header or order guide requisition line. If you key in an inactive project or fund code, you get a warning, but the you can still proceed. The warning is only for your information.
Two report objects -- "Project Code Inactive References" and "Fund Code Inactive References" -- are available to help you find inactive project codes and fund codes in application elements.
You can export the list of project codes and the list of fund codes to Excel using the Spreadsheet link on the Project Code List or the Fund Code List. Once exported, you can save the spreadsheet and edit it to change the value of the Project Status or Fund Status column. Then, using the standard upload process from the Project Imports list or the Fund Imports list, you can upload the project/fund codes to the application. The examples below use project codes, but the process for fund codes is the same.
Project and fund lists on spreadsheets are imported using the standard import process.
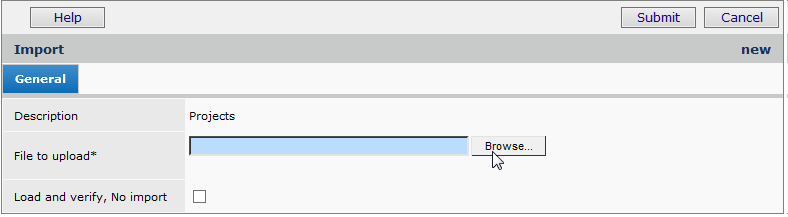
For new users of this feature,
we recommend the two-stage import approach. The two-stage approach first loads the file and
validates it.
Once the file has successfully loaded, you process it manually to import it into the application.
Click Help on the Import panel for details on the two-stage approach.
Tip: You should have the same set of reason codes available to all organizations. This strategy covers the situation for example,
a document (such as a quick credit) for a department in one organization is created by a user (perhaps, warehouse staff) in another organization and department.
You can always create new reason codes for organizations, but initially setting up the same codes for all is more efficient.
Contains Reason Codes and Descriptions used by users who approve invoices.
This table lists reasons and reason codes for making inventory adjustments.
Lists the tax rates used by taxable organizations and vendor AP locations. Tax Rates are normally grouped in Tax Groups.
Tax groups contain multiple tax rates that may apply to particular transactions. For example, a tax group may contain state, city, and local tax rates, all applicable to invoices from a particular vendor.
Several tables in Materials Management contain records that Accounts Payable also uses. They are:
The User Defined Fields table lists application tables for which you can define your own columns.
This table contains all the units of measure used at your site; for example, EA - Each.
From the main Contents, select AP Tables > [table name].
Locate
the row in the table that you wish to edit. Click the pencil icon
![]() (or select Menu > Edit).
(or select Menu > Edit).
Make
any changes as needed.
- Click Help for information about fields on the Edit panel.
When you are finished, click Submit. The application returns you to the table.
Click Refresh to see the changes you made.
Copyright © 2023 by Premier Inc. All rights reserved.