Working with Contracts in Materials Management Version
This document describes how to use the basic contract feature in ERP - Materials Management.
- If you are currently using Sourcing and Contract Management, this document is not the information you need: use the documentation for that application, available by clicking ? in the top right margin of any Sourcing and Contract Management panel.
Contents
Overview
Your hospital may
have established contracts with manufacturers or vendors for items in your
item catalog. Associating a contract with items in the Item Catalog can help you take advantage of favorable contract terms. The application provides contract statistics that can help you estimate spending and study your spending patterns. And, most importantly, activating contract prices lets you instruct the system to use new contract item prices on purchase orders when the new prices become available.
Security
To access organization, department, or asset location data, the organization, department, or asset location must be included in your data profile.
The "Contract" role object controls access to the Materials Management Contracts area. This is the "old" contract feature available from the core materials management module.
The Sourcing and Contract Management application has a separate set of role objects that control its features.
View or record contract information:
-
From
the Materials main Contents, select Purchasing > Contracts. The
Quick Click menu for contracts appears.
Viewing existing contract information
-
To
view a list of existing contracts,
- Under I would like to..., select View
the Contracts List.
- Click
Show All. The list of contracts appears. If you have no contracts
recorded, No Data appears.
- To view information about any contract,
- Locate the contract of interest on the list.
- Select Menu > Inquiry or i on the Contracts List next to the Contract No.
(You can also enter the contract number on the Quick Click menu and click Inquiry.)
Contract information appears in the Inquiry (Figure 1).
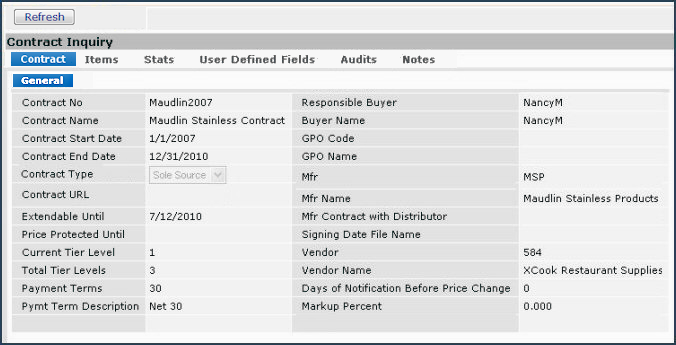
Figure 1 - Contract Inquiry Panel
The following sections describe how to use the Contract, Items, and Stats tabs. The User Defined Fields, Audits, and Notes tabs contain the same types of data as these same tabs on other inquiry panels.
Items tab
-
The Items tab displays the item catalog items that are on the contract (Figure 2).
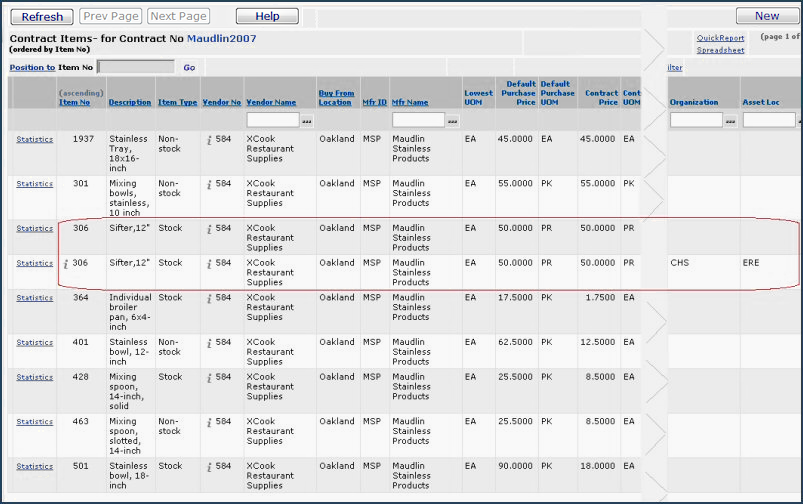
Figure 2 - List of Contract Items
-
In column three of the list, an Item No with a Quick Inquiry icon (i) is multi-sourced. For these items, the system maintains both the Item Catalog record, and a separate record for the inventory location that multi-sources the item.
Thus, for multi-sourced items, multiple entries
for an item appear in the Contract Items list. Scrolling to the far right displays the Organization and Asset Location for any multi-sourced item.
You can click the i to view the inventory record.
- In column five of the Contract Items list, clicking i next to a Vendor No inquires on an item vendor. Then, on the Vendor Inquiry panel, selecting the Items tab (Figure 3) lets you view a list of all items (contract and non-contract) that the vendor supplies (Contracts > Items tab > Vendor Inquiry > Items Tab). Notice, in Figure 3, the multi-sourced item (306, Sifter) listed twice, as in Figure 2.
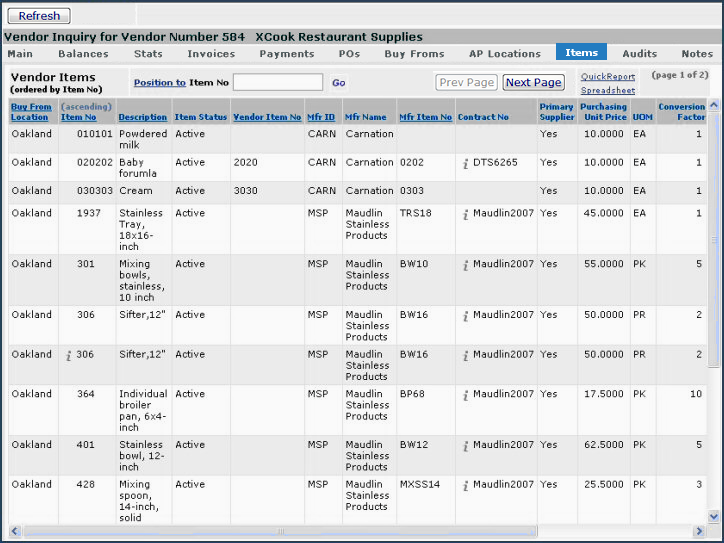
Figure 3 - Viewing Items from the Vendor Item Inquiry
Stats tab
-
The Contract Inquiry panel Stats tab (Figure 4) displays statistics such as the total lines and total dollar amounts for purchase orders, receipts, returns, and "killed" orders. The totals include all categories of information: years, months, items, organizations, asset locations,
vendor / buy from locations, manufacturers, class / sub classes, inventory
groups, UNSPSC codes, and commodity codes for the selected contract (i.e., all purchase order lines
that include the selected contract).
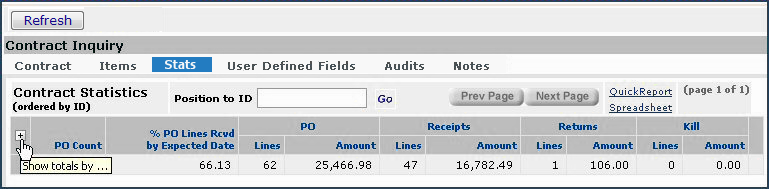
Figure 4 - The Contract Inquiry Stats Panel
You can drill down to view totals for one or more individual categories of information by clicking the "plus sign" (Figure 4). The Contract Statistics Totals by/for panel opens on the left (Figure 5).
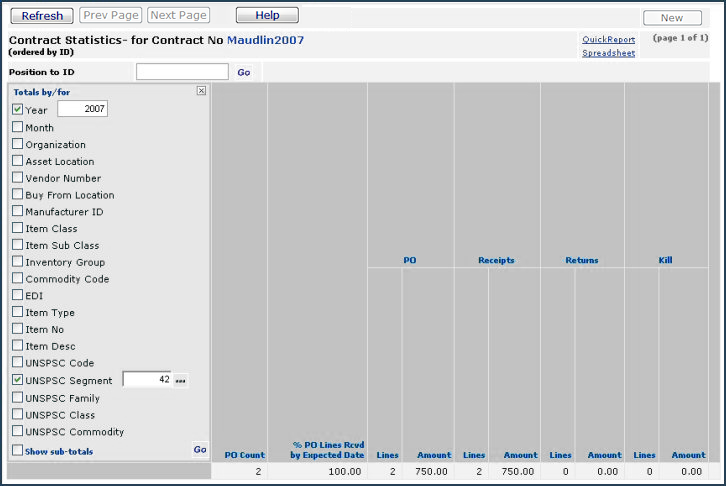
Figure 5 - Contract Statistics Totals by Category
- On the Totals by/for panel, select the box next to one or more fields to view contract totals summarized by the field(s).
Figure 5 displays the selected fields Year and UNSPSC Segment.
When you select a field, a new field opens for you to specify a value.
- In the new field, click the prompt and select a value.
Figure 5 shows the values 2007 and 42 specified for the Year and UNSPSC Segment fields, respectively.
- Click Go (on the bottom right of the Totals by/for box).
The statistics appear with totals summarized for the value(s) you entered.
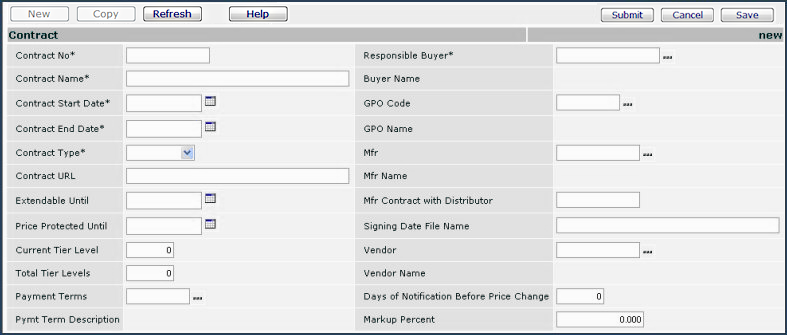
Creating a new contract record
Creating a new contract has two elements. First, you create the contract header. Then, you assign items in the Item Catalog to the contract.
To create a new contract header:
- From
the Materials main Contents, select Purchasing > Contracts. The
Quick Click menu for contracts appears.
- Click New. The Contracts panel appears
(Figure 6).
Figure 6 - Create the Contract Header
-
Enter
information in the Contracts panel fields as needed. (Click Help on the Contracts panel for field information.)
- When you have completed
the Contracts panel fields, click Save. The application refreshes the Contracts panel with the data that you entered.
Note: If you enter a contract URL,
the system builds a link from the contract number to the contract document
and displays the link in lists that contain the contract.
- Click Submit.
The system returns you to the Contracts list.
- Click Refresh
to view your contract information on the list.
To
associate an item with a contract:
-
From
the Materials main Contents, select Inventory > Item Catalog.
The Inventory Quick Click menu appears.
- Locate the item that you wish to associate with a contract.
- Select Menu > Item Vendors..
One or more vendors for the item appear. Locate the contracting vendor.
- Click the edit icon
 or select Menu > Edit . The Item Vendor Edit panel appears (Figure 7)
-
If you know the
contract number, enter it in the Contract No field..
Otherwise, click the prompt in the Contract No field and select a contract.
- Click Save and Submit.
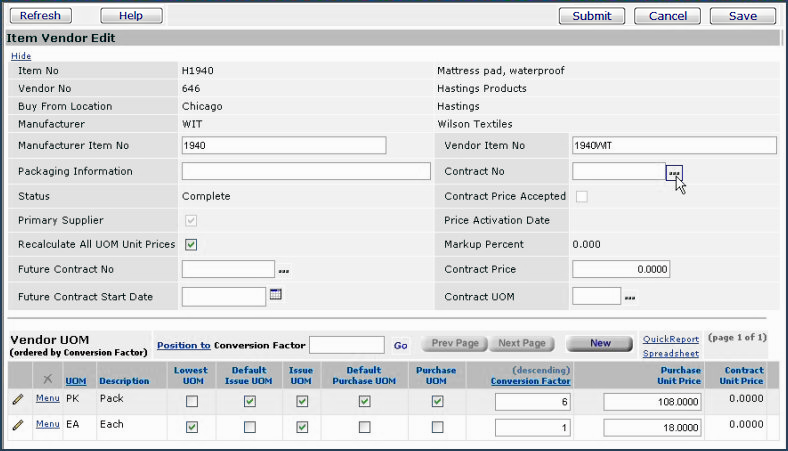
Figure 7 - Associate a Contract with an Item
Other Fields on the Item Vendor Edit panel
Enter a Future
Contract No (if you know it) to associate the item with a future contract. Enter a Future Contract Start Date for the upcoming contract.
You can also enter a Contract Price and a Contract Price UOM if you have a new contract price to activate. See the section Activating Contract Prices.
You
can also associate contract information with an item when you enter the item
into the Item Catalog for the first time. See "The Contract Information Panel" in the topic "Create an Item Record in the Item Catalog." (You can use full-text Search to locate the topics.)
To add an item to the Item Catalog,
- From the Materials main
Contents, select Inventory > Consolidated Item Add.
- Select the Contract Information tab on the Consolidated Item Add panel. See "Create an Item Record in the Item Catalog" for details.)
The application creates the item record in the Item Catalog. The application also associates the item record with the inventory identified in Current Settings.
When a vendor catalog is updated or added to the system's
item records, the contract number for any items governed by a contract is included in the update.
Activating Contract Prices
Contract Price Activation lets you review contract prices for items, and instruct the system to begin using the prices on a specified date, when the prices are effective.
Security
- Authority to access the Price Activations menu and activate prices is controlled by the "PriceActivation" role object.
Contract Price Activation requires the setting All on the "PriceActivation" role object.
- Price Activation is not secured by the user's data profile. For this reason, the system uses the "PriceActivation" role object to let hospitals control who can use the feature.
Important: Price Activation activates all items in a contract, regardless of the user's data profile.
If you use the the system (core) Contracts Activation feature, your system administrator can adjust your user profile as needed. See "Set Up and Maintain Users" in the online documentation for details.
How Price Activation Works
Price Activations run as scheduled jobs, so you will want to set them up in the application's Job Scheduler. You should set up price activation jobs to run at night, after midnight. See "Set Up Schedules for Batch Jobs" in the online documentation for details.
Note: Before you can activate a contract price, the contract item record must contain the Contract No, the Contract Price, and the Contract UOM. You may need to edit the item records to make sure these pieces of information are on the records.
Example of Using New Contract Prices
Figure 8 displays the items on manufacturer contract WIT2007-2. No contract prices or units of measure have been entered on the Item Vendor Record. (The Contract Price for every item is 0.0 and no Contract UOM appears for any item.)
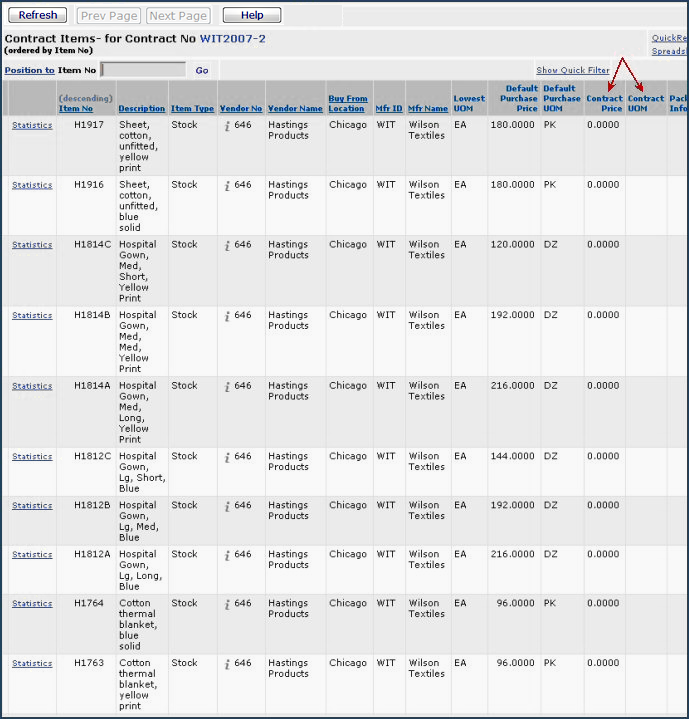
Figure 8 - Items on a Sample Contract WIT2007-2
Figure 9 displays the Item Vendor Edit panel for one of the items on the contract. Since the contract vendor/manufacturer has recently published a price for the item, the user has entered the Contract Price and the Contract UOM. Once price activation is enabled for the contract, and the specified Price Activation Date arrives, the application uses the Contract Price on purchase orders.
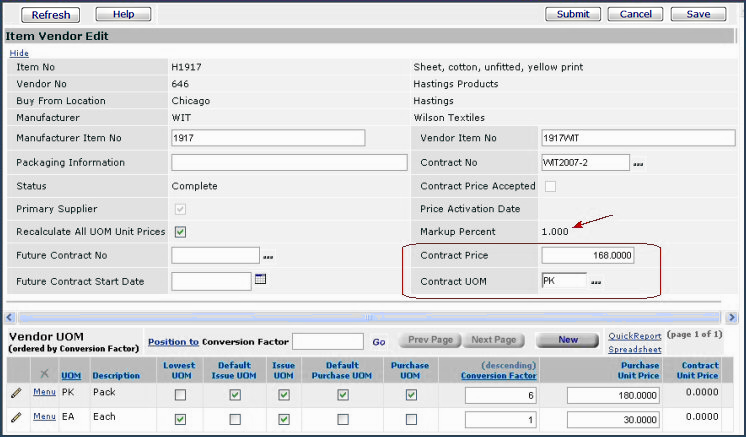
Figure 9 - Vendor UOM Edit Panel for a Contract Item
- The top part of the panel (Figure 9, on the right) displays the Contract Price of $168.00 with a Contract UOM of PK. The vendor Markup Percent is 1.
- On the bottom right of the panel, notice that the default Purchase Unit Price is $180.00 and the default purchase UOM is PK. This price is the current manufacturer's price plus the vendor's markup (Markup Percent). The Purchase Unit Price will change once the Contract Price is activated.
On a purchase order for the item, the system uses the current Purchase Unit Price of $180.00 because the contract price has never been activated. (Figure 10 is the Purchase Order Inquiry panel).
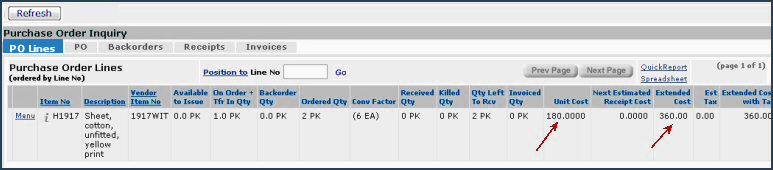
Figure 10 - Purchase Order Inquiry for a Contract Item before New Price Activation
Once the contract price of $168.00 (PK) is activated, purchase orders for the item will use the contract price plus the markup of 1%, equal to $169.68 per PK. Figure 11 shows the purchase order inquiry for the item with the new price after activation.
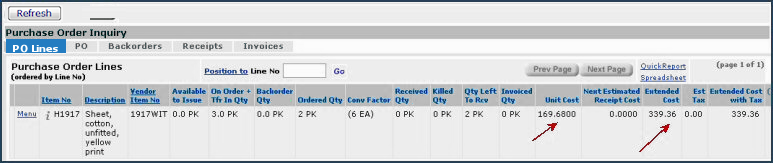
Figure 11 - Purchase Order Inquiry for a Contract Item with New Price Activated
General Steps in Activating New Prices
- Make sure the item with the price that you wish to activate has an associated Contract Number.
(See the previous topic: To associate an item with a contract.)
- Enter the new Contract Price and the Contract UOM in the Item Vendor UOM Edit panel.(See Figure 9.)
- In Materials Management, go to Purchasing > Contracts, locate the contract, and open Menu > Price Activation.
- Create a new price activation by clicking New.
- Enter a date in the Price Activation Date field on the Contract Price Activation edit panel, and select Contract Price Accepted.
- Use the job scheduler to run the Price Activation job at night, after midnight.
When the Price Activation Date arrives, the system begins using the contract price that you entered.
Detailed steps are in the next section.
Detailed steps - To activate a new contract price for an item:
Once you have the Contract Price and Contract UOM entered for the item, and you know when the price becomes effective, you can set up the price activation.
- Enter the new Contract Price and Contract UOM on the Item Vendor Edit panel. (See Figure 9.)
- From the Materials Management main Contents, select Purchasing > Contracts.
The
Quick Click menu for contracts appears.
- Under I would like to..., select View
the Contracts List.
- Enter the contract of interest in the Starting With... field and click Go.
The application displays the Contracts list with the contract you specified at the top
.
- Next to the contract, click Menu > Price Activation.
A list of price activations appears, or No Data if none exist.
-
Figure 12 displays the Price Activations list for the contract WIT2007-2.
- The list contains one previous activation.

Figure 12 - Contract Price Activations List for a Contract
- Click New.
The Contract Price Activation panel appears (Figure 13)
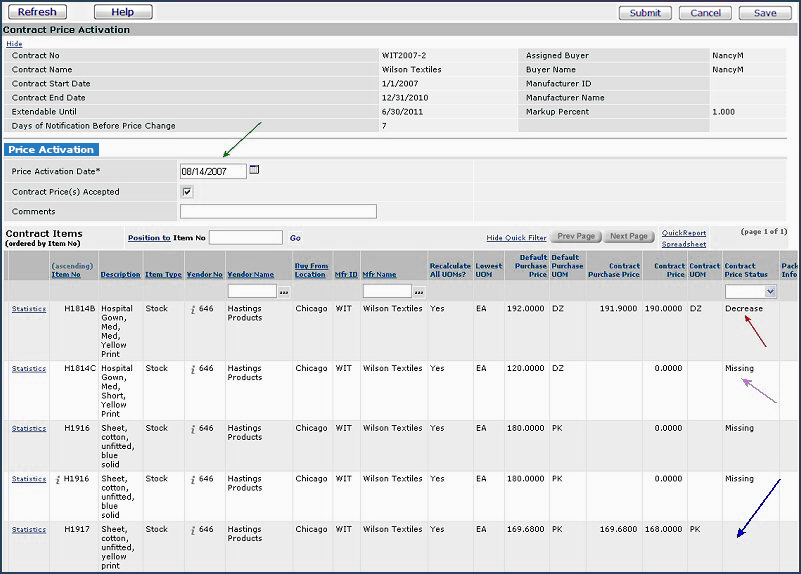
Figure 13 - Contract Price Activation Panel
-
The center of the panel contains the Price Activation Date (Figure 13, green arrow), the Contract Price(s) Accepted check box, and a field for optional comments.
- The bottom of the panel contains the list of all the items on the contract. The Contract Price Status column provides more information for each item.
- Items with new prices to activate have either Decrease or Increase in the Contract Price Status column, to indicate if the new contract price is an increase or decrease compared to the old price. For example, item H1814B (red arrow) in Figure 13 has a new contract price to activate that is a decrease from the previous price.
- Items with no Contract Price (at all) on the item vendor record are designated Missing in the Contract Price Status column; for example in Figure 13, item H1814C (purple arrow).
- For items with activated contract prices, but no new prices to activate, the Contract Price Status column is blank; for example, in Figure 13, item H1917 (blue arrow).
- In the Price Activation Date field, enter the date when you want to start using new contract prices.
-
If the price is currently effective, or became effective in the recent past, enter today's date. (The application cannot activate prices retroactively if you enter a past date.)
- Select the field Contract Price(s) Accepted.
- If you wish to run the activation at a later time, leave this field unchecked.
- When you decide to run the activation, select the field.
- At the bottom of the panel, review the items whose contract prices have not been activated.
- After you have entered the Price Activation Date and reviewed the item list, click Submit.
The system displays the Price Activations list again.
- Click Refresh to view the new activation job on the list.
The system displays the activation job at the top of the list (Figure 14), with an Activation Status of Pending.
When the activation date arrives and the job runs, the Activation Status changes to Complete.
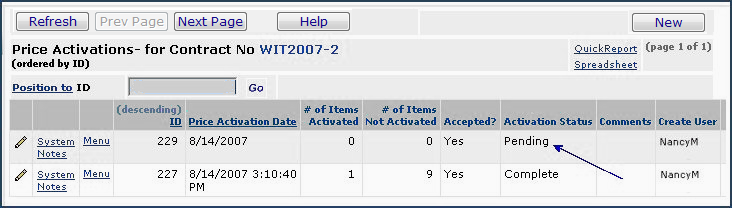
Figure 14 - Price Activations List with New Pending Activation Job
Viewing Price Activation System Notes
On the Price Activations list, clicking System Notes for a Complete activation tells you when the price activation job ran. (Figure 15).
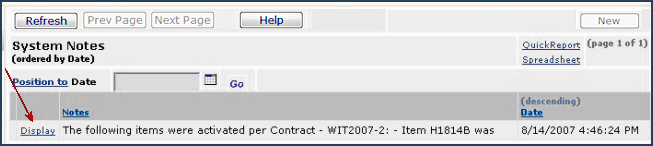
Figure 15 - System Notes for a Contract Price Activation
Clicking Display next to a line of system notes provides detailed information about item price activations. Since the system runs all the items in a contract through the activation process, when you Display the system notes for a price activation, you will see entries such as those in Figure 16:
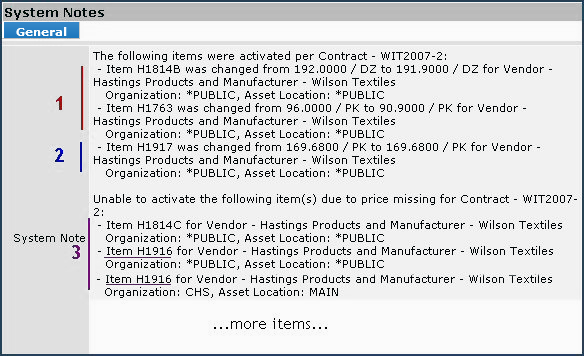
Figure 16 - Sample of Contract Activation System Notes Display
- For items such as Item H1814B and H1763, whose prices have changed, the changed dollar amounts are provided.
- Since the system runs all items through the activation, items with no price changes are displayed in the notes with the same "before and after" price. Item H1917 is an example.
- Items H1814C and H1916 have no Contract Price (at all) on their item records. Also, item H1916 is multi-sourced, and therefore has two records.
One of the H1916 notes has an organization and asset location designated by the code *PUBLIC. *PUBLIC means the Item Catalog record, which is also used by the default asset location. The other H1916 note (CHS, Asset Location: Main) is the multi-sourced item record.
Notes and Considerations for Contract Price Activation
- Important: For contract items, you should not change the item Purchase Price on the Item Vendor Record. The reason is that the system activates all items with a Contract Price specified. For example, suppose an item has a Contract Price -- current or new -- and you change the Purchase Price. The next time you run an activation for the contract, the Contract Price will overwrite the Purchase Price, and purchase orders will be created at the Contract Price.
- Different Vendors: The application will not allow you to have have different vendors for items in different activations of the same contract.
- Contract Expiration: When you create a new price activation, the system checks to see that the contract has not expired. If it has, the system displays an error message.
- Adding Items to an Activation: You can add items to an activation as long as its Status is Pending or Incomplete .
- Deleting Activation Jobs: You can delete (Menu > Delete) Price Activation jobs whose Status is Pending or Incomplete.
- Activation Date Validation: If you edit a price activation and change the Price Activation Date, the system validates the changed date against the Contract End Date and the Extendable Until Date for the contract. The application also checks that the contract has not expired.
- Items Not Activated: You may decide to activate some new prices for items on a contract, and not to activate others . Once the activation date arrives, the system displays the number of items activated and not activated (# of Items Activated, # of Items Not Activated) in columns on the Price Activations list. (See Figure 12.)
Using Contracts for Non-File POs and Requisitions
Contract
information for stock and non-stock items is populated by the system when you
create a requisition or purchase order. However, in creating purchase orders
or requisitions for non-file items governed by a contract, you need to enter
the contract number on the item line. For example, in Figure 17, the item line
panel for a non-file requisition has the contract field circled in red.
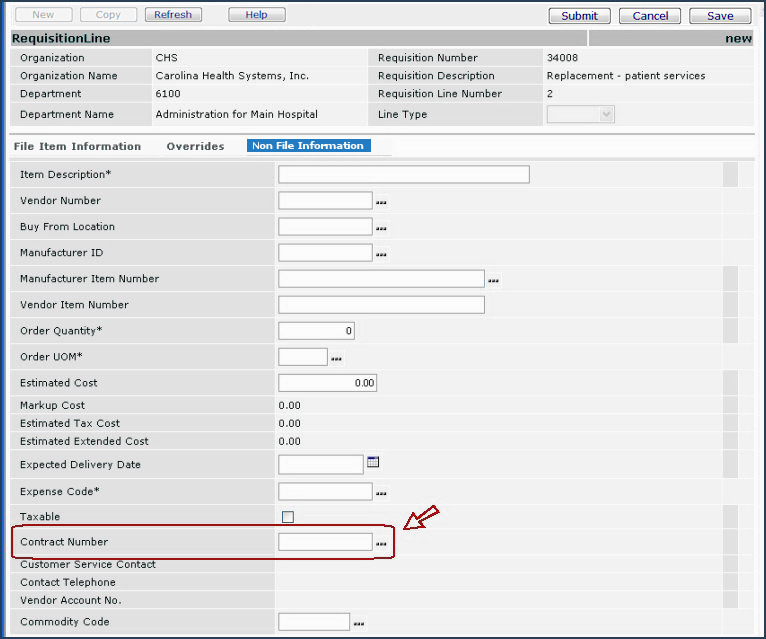
Figure 17 - Contract Field on Requisition Non-File Item Line Panel
Similarly,
when you create a purchase order for a non-file item governed by a contract,
enter the Contract Number on the Item Line (Figure 18, circled in
green).
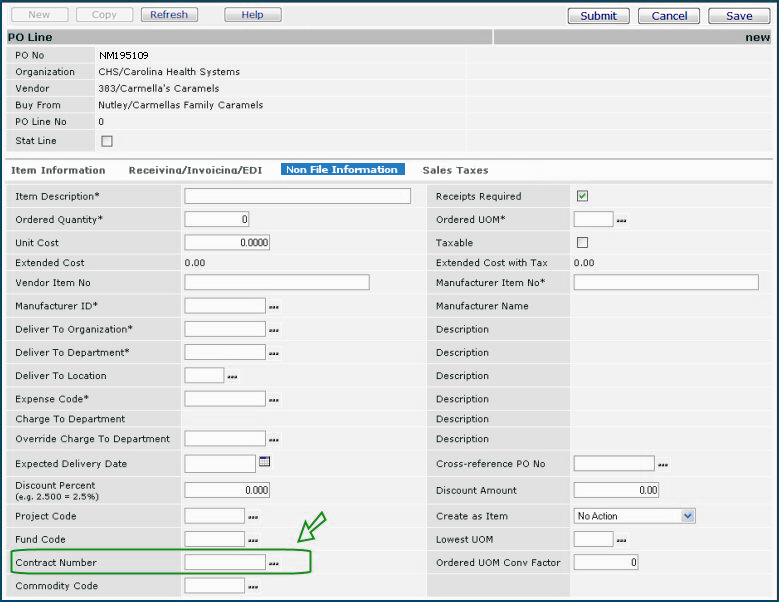
Figure 18 - Contract Field on Purchase Order Non-File Item Line Panel
Viewing Contract Data and Statistics
Using Contract Inquiry, you
can view key information for each of your contracts, including
the contract name and number, the beginning and ending dates, the vendor name,
the buyer responsible for the contract, and more. From the list of contracts,
you can also view contract statistics.
To
view contract statistics:
-
From
the Materials Management main Contents, select Contracts > Contracts. The
Quick Click menu for contracts appears.
You can also view contract statistics from the Contract Inquiry Stats tab, as described in a previous section.
-
Locate
the contract that you need.
To view existing contracts, under I would like to..., select View
the Contracts List. Click Show All. Look
for your contract in the list that appears.
Or, if you know the contract number, contract name, buyer, or other details
on the Quick Click menu, enter it in the Contract Number field, and click
Go.
- On the list next to the contract, select Menu
> Statistics.
Summary statistical information for the contract appears (Figure 4 ).
You can drill down on the summary information to get statistics by category, such as by UNSPSC code. See the previous section.
To
view contract items and item statistics:
-
From
the main Materials Contents, select Contracts > Contracts. The
Quick Click menu for contracts appears.
-
Locate
the contract that you need.
- On the list next to the
contract, select Menu > Items.
A list of items governed by the contract appears.
Note that an item may be displayed more than once if, for the same item and
the same contract number, the item has different vendors/manufacturers.
- To get summary statistical information
for any one item, click Statistics next to the item.
A panel containing summary statistics on the item appears (similar to Figure 4).
- You can drill down to view totals for one or more individual categories of information by clicking the "plus sign" on the top left.
The Contract Statistics Totals by/for panel opens (Figure 5).(Instructions for using Totals by/for panel follow Figure 5.)
Copyright © 2023 by Premier Inc. All rights reserved.