Set Up Schedules for Batch Jobs Version
Contents
Overview
Activities such as
generating reports and importing / exporting files are performed using batch processing.
With batch processing, the system bundles data from files together and processes
several bundles at a time. Batch jobs run in asynchronous mode. You establish
a schedule for running your batch jobs and the system does the processing without
user intervention.
All scheduled
batch jobs are automatically set to a low priority so that interactive users do not have to compete
with batch jobs for system time. You can also enable and disable scheduled
jobs.
This topic describes how to use the Job
Scheduler to set up schedules for batch jobs to run.
Security
The "ScheduleJobs" role object governs security for creating and editing batch job schedules. The default security level for "ScheduleJobs" is None.
Users who have job scheduling responsibility must have this role object included and set appropriately in their user profiles.
- The "ScheduleJobs" role object must be set to All or Create, and included in your Role.
Alternately, you can use the scheduler if you have Administrator privileges in the system.
For details on working with user profiles, see Set Up and Maintain Users.
Also, a user can only set up scheduled jobs for the organizations specified in his/her data profile. A person creating scheduled jobs must also have the correct organization settings in his/her data profile to create jobs for the various organizations.
See Set Up and Maintain Users for details.
Currently, you can assign schedules to
these types of jobs, and others:
- Approval Reminders and Redirects
- Recurring invoice processing
- Contract price activation
- General Ledger transactions export
- Accounts Payable transactions export
- Item information exports
- Inventory activity
- Invoice exports
- Patient charge exports
- Purging obsolete data
- Backorder processing.
- Processing EDI 810 Invoice imports
- Mass item assignments
- Reports
- Custom exports
- Process automatic authorization of EDI, FAX, and email purchase orders.
- Quick release of requisitions
If you are using Sourcing and Contract Management, and wish to schedule contract price activation, see the subsequent section on Sourcing and Contract Management security.
Priority of Batch Jobs on Async Server
Batch jobs run on the async server according to different priority levels assigned in the system.
The Table of Priority Jobs displays these levels.
Document Retention Time
The system has retention times for various elements coded in an internal table.
For example, the retention time for archived reports is 30 days. Reports older
than 30 days are removed from the system every time the "purge" job runs. As explained
in this topic, you can schedule the purge job to run as needed, for example,
daily.
- Keep in mind, however, that the schedule for the purge job
is not related to the retention time of elements
that are purged.
If a hospital wishes to keep reports longer than 30 days, the hospital needs
to download the reports to a local network directory, where they can be accessed
as needed. Table 1 shows retention times for other types of data that
the system purges.
Table 1 - Retention Times for Data Elements
Type of Data |
Retention Time
(days) |
| Reports |
30 |
| Patient ADT information for patients discharged more than
five days previously |
5 |
| GL exports with a complete Status |
60 |
| Invoice exports with a complete Status |
45 |
| Par cart iPad imports with a complete
Status |
45 |
| Patient charge exports with a complete Status |
45 |
| PO exports with a complete Status |
45 |
| Complete requisition imports |
45 |
| Advance replenishment exports with a Status of download
complete |
45 |
| Confirmed pick lists |
45 |
| User Activity data |
7 |
| Processed EDI 810 data |
30 |
To view the list of scheduled jobs:
- From the Work in Administration Contents, select
Administration > Scheduled Jobs. A list appears showing you the
job types and current schedules for running each type (Figure 1).
- Alternately, you can select Misc Functions > Scheduled Jobs from the main Contents.

Figure 1 - Scheduled Jobs List
-
To view the history of jobs that were run,
for any of the jobs in the list, click History. A list showing jobs
and the run Status of each appears (Figure 2). If any job had problems
running, a link to error messages appears.
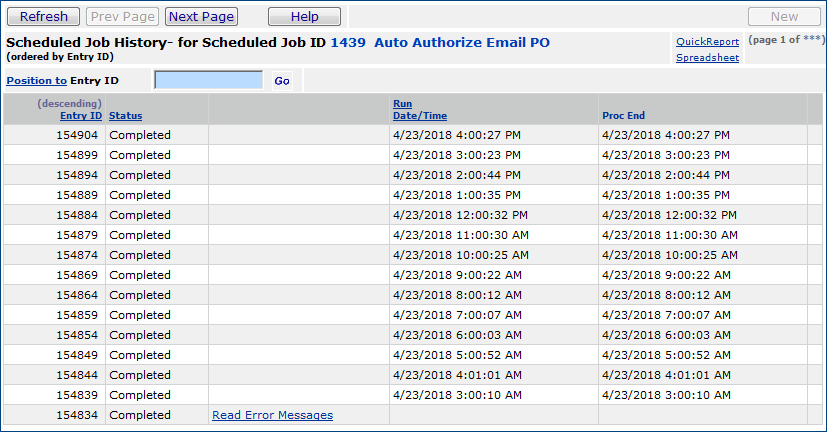
Figure 2 - History for a Scheduled Job
To enable/disable scheduled jobs:
- From the Work in Administration Contents, select
Administration > Scheduled Jobs. The Scheduled Jobs list appears
(Figure 1)
- Alternately, you can select Misc Functions > Scheduled Jobs from the main Contents.
-
Scan the Job Desc field to locate the job whose schedule you wish
to disable or enable.
-
Click the edit icon  or select Menu > Edit next to the Job Desc
on any row.
or select Menu > Edit next to the Job Desc
on any row.
The Scheduled Jobs tabbed panel appears.
-
To enable the job schedule, click the Enabled box. A check appears
in the box. (See Figure 3).
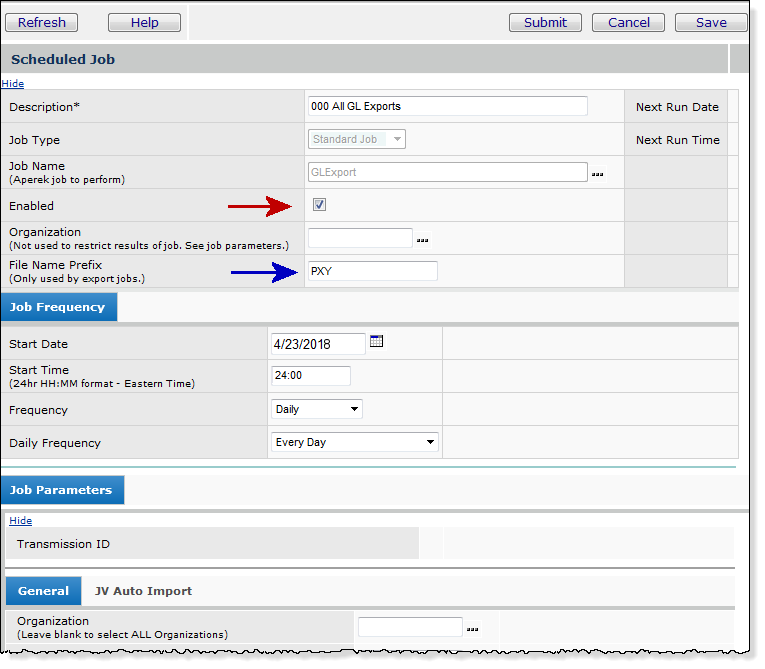
Figure 3 - Enable (or Disable) a Scheduled Job
-
To disable an enabled job schedule, click the
Enabled box (which contains a check) (Figure 3, red arrow). The check disappears.
- If you are scheduling an export, you can enter characters in the File Name Prefix field (Figure 3, blue arrow) to have the system generate an export file that begins with the characters.
Note: The fields on tabs under Job Parameters differ, depending on the type of scheduled job.
Figure 3 displays Job Parameters for a GL Export.
- Click OK. You are returned to the
Scheduled Jobs list. Click Refresh to view the change in the Enabled
column.
To schedule General Ledger
export jobs:
- From the Work in Administration Contents, select
Administration > Scheduled Jobs. The Scheduled Jobs list appears
(Figure 1).
- Alternately, you can select Misc Functions > Scheduled Jobs from the main Contents.
- Click New. The Create New Scheduled Job panel appears (Figure
4).

Figure 4 - Create New Scheduled Job
- Enter a description for your general ledger export
job (for example: "General Ledger Exports") in the Job Desc
field.
- In the Job Name field, select GLExport.
- Click Next. The Scheduled Job Edit tabbed panels appear
(Figure 5). (The fields on tabs under Job Parameters differ, depending on the type of scheduled job.)
Figure 5 displays Job Parameters for a GL Export.
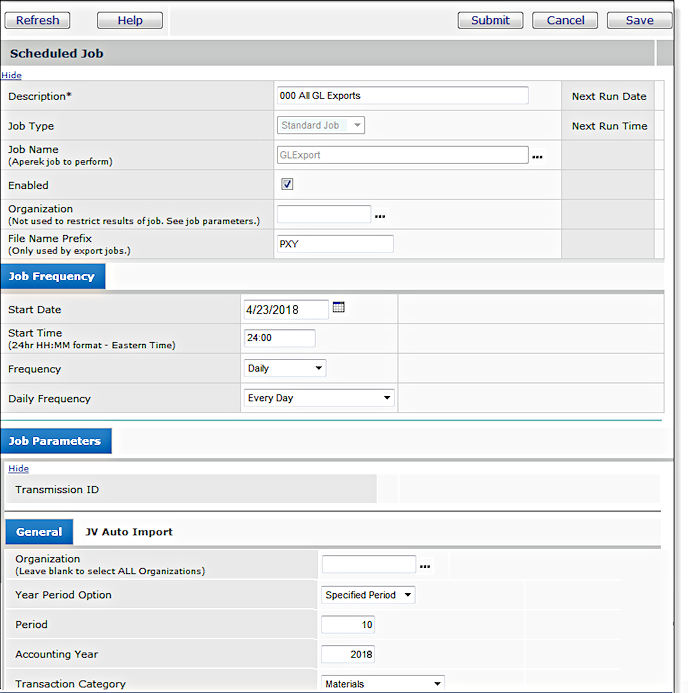
Figure 5 - Schedule a General Ledger Export Job
-
Enter information in the Scheduled Job Edit tabbed
panels as needed.
- Click Help for information on the fields in the Scheduled
Job and Job Frequency tabs.
- On the Job Parameters - General tabbed panel, enter
- Organization: The organization that owns the GL Exports for
which you are creating the export schedule.
- Year Period Option: The period for the GL Exports to be included
in the job.
The choices are:
Specified Period - GL Exports from the period you specify.
If you select Specified Period, enter the period in the
Period field.
Current Period - The current period
Prior Period - The previous period.
- Enter the Accounting Year for the GL transactions, according
to your site's financial calendar.
- Select the Transaction Category.
This field specifies the type of General Ledger account transactions that
the system will build in the export file.
Options are:
Materials: selects account transactions for materials
transactions such as "Issue," "Receipt," "Inventory
Adjustment," and so on.
Invoices: selects account transactions for invoice transactions
such as "Approve Invoice."
Payment: selects account transactions for payment transactions
such as "Pay Invoice."
Invoices and Payments: selects account transactions for
both payments and invoices.
- The JV Auto Import tab only appears if you have Financials General Ledger
enabled. Use the JV Auto Import panel if you wish to create journal
vouchers as part of the export/import process. For details, see Export
Materials and Accounts Payable Transactions.
Note: When you use the Job Scheduler to create
journal vouchers for exported transactions, you cannot specify a journal
voucher number.
- Click Save.
- Click OK. You are returned to the Scheduled Jobs List.
- Click Refresh to see your new GL export job on the list
of scheduled jobs.
Note: In addition to scheduling
General Ledger transactions exports, you can generate General Ledger exports
manually. To export GL information manually...
- From the Materials Management or Accounts Payable main Contents,
select Imports/Exports > GL Export.
See Export General Ledger and Accounts
Payable Transactions.
To schedule Accounts Payable
export jobs:
- From the Work in Administration Contents, select
Administration > Scheduled Jobs. The Scheduled Jobs list appears
(Figure 1).
- Alternately, you can select Misc Functions > Scheduled Jobs from the main Contents.
- Click New. The Create New Scheduled Job panel appears (Figure
4).
- Enter a description for your accounts payable export job (for
example: "Accounts Payable Exports") in the Job Desc field.
- In the Job Name field, select AP Transactions Export.
- Click Next. The Scheduled Job Edit tabbed panels appear.
The Scheduled Job Edit tabbed panels are similar to Figure 5, with one new
field
on the Job Parameters - General panel: External System (Figure 6).
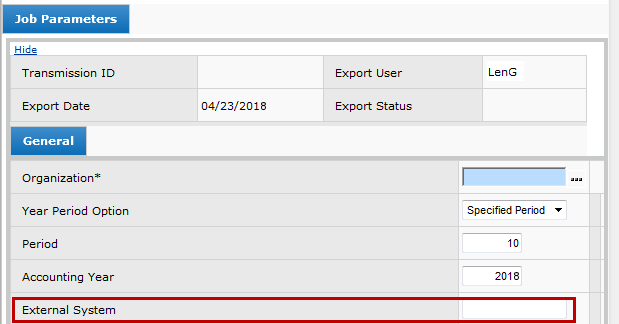
Figure 6 - Job Parameters General Panel for an AP Transactions
Export Job
- For an export file destined to an external system, enter the name of the
external system (for example, PBAR) in this field.
- Follow the instructions in Steps 6 through 9
for General Ledger Exports to complete fields on the tabbed panels and
schedule the job.
(Note that different from General Ledger Exports, AP Exports uses no Transaction
Category field.)
Note: In addition to scheduling
Accounts Payable transactions exports, you can generate Accounts Payable exports
manually. To export AP information manually...
- From the Accounts Payable main Contents, select Imports/Exports
> AP Transactions Export.
See Export General Ledger and Accounts
Payable Transactions.
To schedule item information export
jobs:
- From the Work in Administration Contents, select
Administration > Scheduled Jobs. The Scheduled Jobs list appears
(Figure 1).
- Alternately, you can select Misc Functions > Scheduled Jobs from the main Contents.
- Click New. The Create New Scheduled Job panel appears (Figure
4).
- Enter a description for your item export job (for example: "Item Exports")
in the Job Desc field.
- In the Job Name field, select ItemExport.
- Click Next. The Scheduled Job Edit panel appears (Figure
7).
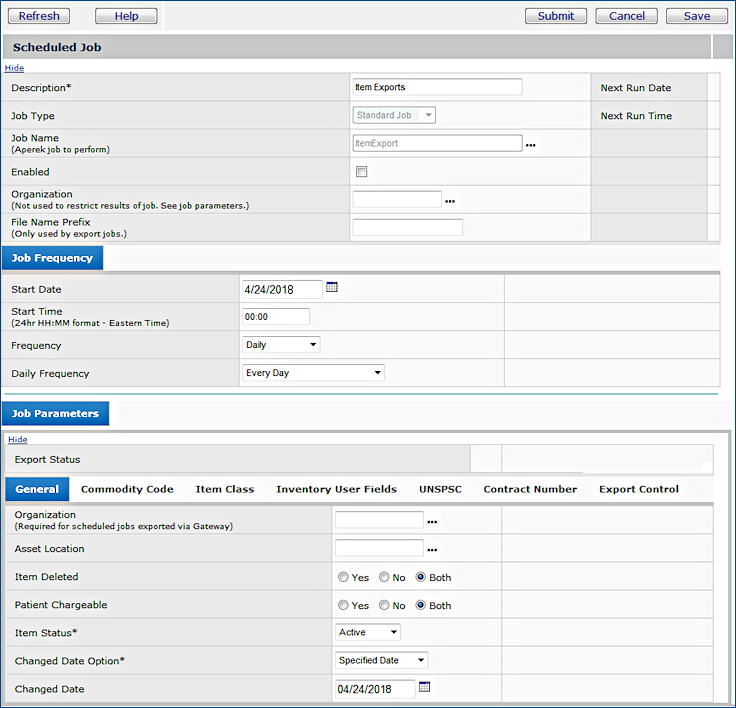
Figure 7 - Schedule an Item Information Export Job
- Enter information in the Scheduled Job Edit tabbed panels as needed.
- Click Help for information on the fields in the Scheduled
Job and Job Frequency tabs.
- On the Job Parameters - General tab, enter
- The Organization whose items are being exported.
- The Asset Location whose item information is being exported.
- A selection for Deleted items.
Yes - exports information for deleted items.
No - exports information for existing items.
Both - exports both.
- A selection for Patient Chargeable items.
Yes - exports information for patient chargeable items.
No - exports information for non-patient chargeable items.
Both - exports both.
- A selection for the Item Status of items being exported.
Active - exports items that can currently be ordered/requisitioned.
Inactive - exports items that cannot be ordered/requisitioned.
Incomplete - exports items whose information is not complete.
These items cannot be activated.
- The Changed Date Option selects items whose information was
last modified at a certain point. Options are:
Specified Date - indicates that there is a date in the
Changed Date field.
Today - selects items whose information was changed today.
Since Yesterday - selects items whose information changed
since yesterday.
This Week - selects items whose information changed during
the current week.
Since Last Week - selects items whose information changed
since last week.
This Month - selects items whose information changed
this month.
Since Last Month - selects items whose information changed
since last month.
- If you select Specified Date for the Change Date
Option, enter a Changed Date to select items whose information
has changed since the date.
- On the Commodity Code panel, if you wish, enter one to six Commodity
Code(s) associated with items whose information you wish to export.
- On the Item Class panel, enter one to six item classes that categorize
the items. For each Item Class, you can enter an Item Sub
Class.
- On the Inventory User Fields, enter a Field Name and a Field
Value for any user-defined fields associated with items whose information
you are exporting. You can enter up to six Field Names and Field
Values.
- On the UNSPSC tab, you can enter an UNSPSC code, or an UNSPSC Segment, Family, Class, or Commodity value for the items whose records you are exporting. For details on UNSPSC codes, see Using UNSPSC® Codes.
- On the Contracts tab, you can enter up to six Contract Numbers that contain the items whose records are being exported.
- Click Save.
- Click OK. You are returned to the Scheduled Jobs List.
- Click Refresh to see your new item export job on the list
of scheduled jobs.
Note: In addition to scheduling
item information export jobs, you can generate item exports manually.
To export
item information manually...
- From the Materials Management main Contents, select Imports/Exports
> Item Export.
To schedule inventory activity batch jobs:
- From the Work in Administration Contents, select
Administration > Scheduled Jobs. The Scheduled Jobs list appears
(Figure 1).
- Alternately, you can select Misc Functions > Scheduled Jobs from the main Contents.
- Click New. The Create New Scheduled Job edit panel appears
(Figure 4).
- Enter a description for your job in the Job Desc field.
- In the Job Name field, select Inventory Activity.
- Click Next. The top two Scheduled Job Edit tabbed panels
appear (similar to Figure 5).
(The Job Parameters panel does not appear.)
- Enter information in the Scheduled Job Edit tabbed panels as needed.
Click Help for information on the fields in the Scheduled
Job and Job Frequency tabs.
- Click Save.
- Click OK. You are returned to the Scheduled Jobs list.
- Click Refresh to see your new inventory activity job on
the list of scheduled jobs.
To
schedule invoice exports:
- From the Work in Administration Contents, select
Administration > Scheduled Jobs.
The Scheduled Jobs list appears (Figure 1).
- Alternately, you can select Misc Functions > Scheduled Jobs from the main Contents.
- Click New. The Create New Scheduled Job edit panel appears
(Figure 4).
- Enter a description for your invoice export job (for example: "Invoice
Exports") in the Job Desc field.
- In the Job Name field, select Invoice Export.
- Click Next. The Scheduled Job Edit tabbed panels appear
(similar to Figure 5).
- Enter information in the Scheduled Job Edit tabbed panels as needed.
- Click Help for information on the fields in the Scheduled
Job and Job Frequency tabs.
- On the Job Parameters - General tabbed panel, enter
Organization: The organization that owns the invoices for which you
are creating the export schedule.
Year Period Option: The period for the invoices to be included in the
job.
The choices are:
Specified Period - invoices from the period you specify.
If you select Specified Period, enter the period in the Period
field.
Current Period - The current period
Prior Period - The previous period.
Period and Accounting Year - The period and year for the
invoices, according to your site's financial calendar.
- Click Save.
- Click OK. You are returned to the Scheduled Jobs list.
- Click Refresh to see your new invoice export job on the
list of scheduled jobs.
Note: In addition to scheduling
invoice export jobs, you can perform invoice exports manually.
To export invoices
manually...
- From the Materials Management main Contents, select Invoicing
> Invoice Export.
To schedule
export of patient charges:
- From the Work in Administration Contents, select
Administration > Scheduled Jobs. The Scheduled Jobs list appears
(Figure 1)
- Alternately, you can select Misc Functions > Scheduled Jobs from the main Contents.
- Click New. The Create New Scheduled Job edit panel appears
(Figure 4).
- Enter a description for your patient charge export job (for example: "Patient
Charge Exports") in the Job Desc field.
- In the Job Name field, select Patient Charge Export.
- Click Next. The Scheduled Job Edit tabbed panels appear
(similar to Figure 5).
- Enter information in the Scheduled Job Edit tabbed panels as needed.
- Follow the instructions in Steps 6 through 9 for General
Ledger exports to complete fields on the tabbed panels and schedule the job.
(The Transaction Category field does not appear because it is not
applicable for patient charges.)
- Notice that the Job Parameters - General panel for patient charge exports
contains the field: User ID.
You can enter a user ID if you wish.
- In the From Batch ID and To Batch ID fields, enter
the beginning and ending Batch IDs for the range of patient charge
batch jobs that you wish to export.
- You can view patient charge batch jobs eligible for export from the
Materials Management main Contents.
Select Imports / Exports & Financials > Patient Charge Entry.
Note: In addition to scheduling
patient charge export jobs, you can perform patient charge exports manually.
To export patient charges manually...
- From the Materials Management main Contents, select Imports/Exports
> Patient Charge Export.
For details, see To export patient charges manually.
To schedule purges:
- From the Work in Administration Contents, select
Administration > Scheduled Jobs. The Scheduled Jobs list appears
(Figure 1).
- Alternately, you can select Misc Functions > Scheduled Jobs from the main Contents.
- Click New. The Create New Scheduled Job edit panel appears
(Figure 4).
- Enter a description for your purge job (for example:"Weekly Purge Job")
in the Job Desc field.
- In the Job Name field, select Purge Process.
- Click Next. The top two Scheduled Job Edit tabbed panels
appear (similar to Figure 5).
(The Job Parameters panel does not appear.)
- Enter information in the Scheduled Job Edit tabbed panels as needed.
Click Help for information on the fields.
- Click Save.
- Click OK. You are returned to the Scheduled Jobs List.
- Click Refresh to see your new purge process job on the
list of scheduled jobs.
Note: In addition to scheduling
information purges, you can perform an information purge manually. The topic
Periodic Maintenance Tasks-Purging Obsolete
Information discusses how. To perform a manual purge...
- From the Work in Administration main Contents, select Administration
> Weekly Purge.
To schedule backorder processing:
- From the Work in Administration Contents, select
Administration > Scheduled Jobs. The Scheduled Jobs list appears
(Figure 1).
- Alternately, you can select Misc Functions > Scheduled Jobs from the main Contents.
- Click New. The Create New Scheduled Job edit panel appears
(Figure 4).
- Enter a description for your backorder processing job in the Job Desc
field.
- In the Job Name field, select Process Backorders.
- Click Next. The Scheduled Job Edit tabbed panels appear
(Figure 5).
(The Job Parameters panel only contains the fields Organization and
Asset Location.)
- Enter information in the Scheduled Job Edit tabbed panels as needed.
- Click Help for information on the fields in the Scheduled
Job and Job Frequency tabs.
- On the Job Parameters panel, enter the Organization and the
Asset Location for which you are releasing backorders
- Click Save.
- Click OK. You are returned to the Scheduled Jobs list.
- Click Refresh to see your new backorder processing job
on the list of scheduled jobs.
The topic: Release Backorders discusses
the manual process of releasing backorders.
To schedule recurring invoice processing batch jobs:
- From the Work in Administration Contents, select Administration > Scheduled Jobs. The Scheduled Jobs list appears
(Figure 1).
- Alternately, you can select Misc Functions > Scheduled Jobs from the main Contents.
- Click New. The Create New Scheduled Job edit panel appears
(Figure 4).
- Enter a description for your job in the Job Desc field.
- In the Job Name field, select Process Recurring Invoices.
- Click Next. The Scheduled Job Edit, Job Frequency, and Job Parameters tabbed panels
appear (similar to Figure 5).
- Enter or edit information in the tabbed panels as needed. On the Job Parameters panel, enter the Date that you want on the invoices to be processed, the Year and the Period. The Job Parameters panel also lets you specify the type of recurring invoices that you wish to process. The job will process recurring invoices that contain the attributes that you specify; for example, invoices with a specified Frequency. You may have set up several scheduled jobs to run for all of your different recurring invoice frequencies; e.g., for invoices that recur every month (specified in Frequency on the Job Parameters panel), create a scheduled job that runs monthly (specified in Frequency on the Job Frequency panel).
Click Help for information on the fields in the Scheduled
Job and Job Frequency tabs.
- Click Save.
- Click OK. You are returned to the Scheduled Jobs list.
- Click Refresh to see your new job on
the list of scheduled jobs.
To schedule processing of
EDI 810 Invoice imports:
- From the Work in Administration Contents, select
Administration > Scheduled Jobs. The Scheduled Jobs list appears
(Figure 1).
- Alternately, you can select Misc Functions > Scheduled Jobs from the main Contents.
- Click New. The Create New Scheduled Job edit panel appears (Figure
4).
- Enter a description for your EDI 810 job in the Job Desc field.
- In the Job Name field, select Process 810 Imports..
- Click Next. The top two Scheduled Job Edit tabbed panels
appear (similar to Figure 5).
(The Job Parameters panel does not appear.)
- Enter information in the Scheduled Job Edit tabbed panels as needed.
- Click Help for information on the fields in the Scheduled
Job and Job Frequency tabs.
- Click Save.
- Click OK. You are returned to the Scheduled Jobs list.
- Click Refresh to see your new EDI 810 imports job on the
list of scheduled jobs.
See Importing and Processing EDI 810
Invoice Files for details on processing EDI 810 files manually.
Auto-Authorize EDI, FAX, or email POs by Buy-From Location
This feature automatically authorizes POs for buy-from locations that use either the FAX, email, or EDI transmission method. To use this feature, you create one or more scheduled jobs that run the authorization.
Hospitals that use auto-authorization often find it efficient to create a daily scheduled job to run the authorization before the earliest vendor order cutoff time. You can schedule jobs for groups of vendors so that you process authorizations before any order cutoff times. You create a scheduled job, give it a Scheduled Job Group identifier that you have created in the Scheduled Jobs Group table. Then, you assign the identifier to one or more vendor buy-from locations, depending on the cutoff times you need to accommodate. Only POs from those locations are authorized at the scheduled time. You can create multiple Scheduled Job Groups and scheduled jobs.
If you wish, you can set a delay in the auto-authorization process. The delay lets you make any last minute changes to a PO before it is authorized -- such as a correction in a quantity or unit of measure. For example, in a job that runs hourly, a delay of thirty minutes would auto-authorize only those POs created more than a half hour before the next job run.
Automatic authorization works together with the Vendor Order Cycle established
for a vendor buy-from location. For each purchase order to be automatically
authorized, when the auto-authorization job runs, the system looks for a Vendor
Order Cycle for the PO's buy-from location.
- If no Vendor Order Cycle is established, the system assumes "today" and authorizes the PO, unless there is a delay established (in the scheduled job). If a delay is defined, the PO authorizes in the next cycle after the delay has passed.
- If a Vendor Order Cycle exists and is valid for the current day, the system
authorizes the purchase order; again, factoring in any specified delay.
- Otherwise, the system does nothing until the auto-authorize job runs again (factoring in any delay).
Then the PO is evaluated again, and compared with the Vendor Order Cycle value.
When you define a job for a Scheduled Job Group, and use an authorization delay, purchase orders that were recently created may not be authorized due to the “Delay Minutes” period. So, you need to be conscious of the vendor's cutoff time, and build in any authorization delay accordingly.
Security: To set up automatic authorization, you need permission established in your user profile for purchase order authorization and for scheduling jobs. You may also need permission to edit vendor records and tables.
The scheduled job setup steps are:
- Create the Scheduled Job Group identifier.
- Edit buy-from location records whose POs you wish to auto-authorize.
- The PO Transmission Method must be FAX, Email, or EDI.
Important: If EDI, Email or FAX is not selected, the system
cannot auto-authorize POs for the buy-from location. In this situation, the system writes a System Note to the PO.
- Select the corresponding Auto Authorize ... field.
- On the buy-from locations' panels, assign a Scheduled Job Group identifier.
You can leave the field blank, but to pick up POs for the buy-from location(s), you must also leave the field blank on the job scheduler.
- Create the scheduled job.
- Assign the Scheduled Job Group identifier to the scheduled job. You can also add a Scheduled Job Group identifier to an existing job.
To define a Scheduled Job Group identifier,
- From the Materials Management main Contents, select Tables > Scheduled Job Groups.
- Click New (Figure 8).
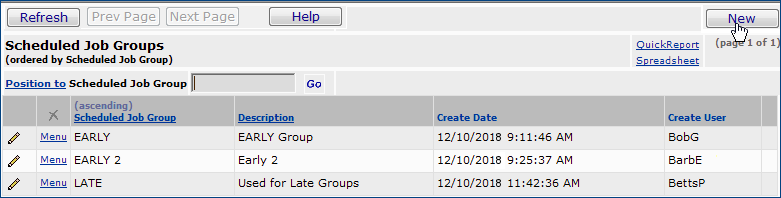
Figure 8 - List of Scheduled Job Groups Established for a Site
-
A panel appears for creating a group (Figure 9).

Figure 9 - Creating a New Scheduled Job Group Identifier
- Enter an identifier for the Scheduled Job Group.
- Enter a Description for the group.
- Click Submit.
The group identifier is available to use on scheduled jobs and buy-from locations.
To set up the the vendor buy-from location,
- From the main Materials or AP Contents, select Vendors > Vendors.
- Locate the vendor that you need.
- Select Menu > Buy From Locations.
- Locate the buy-from location of interest
- Next to the buy-from location name, click Menu > Edit, or click
the pencil icon. The Buy From Location Edit panel appears (Figure 10).
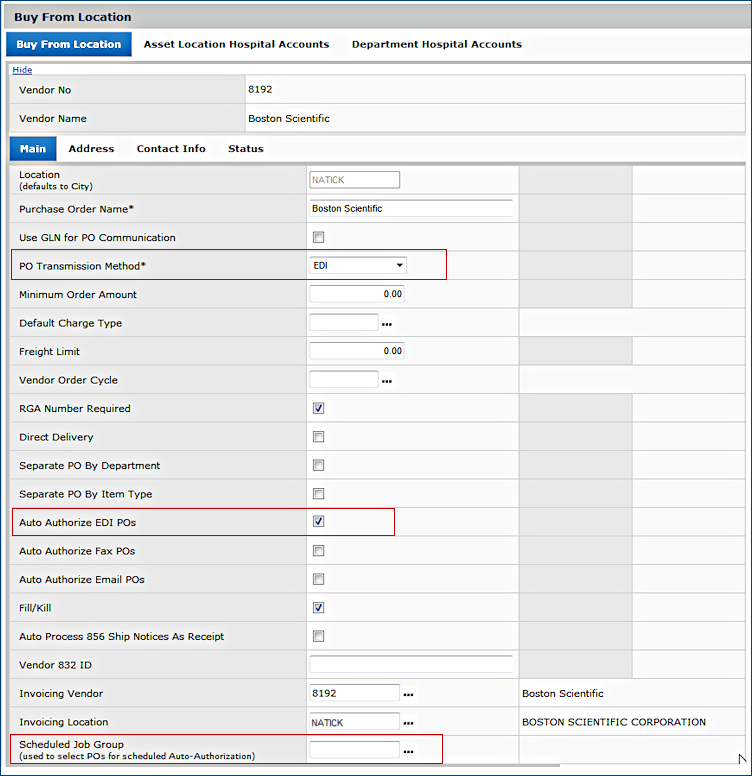
Figure 10 - Vendor Buy-From Location Edit Panel
- Make sure that the PO Transmission Method is EDI, Email, or FAX.
- Select the box next to Auto Authorize... (EDI POs, Fax POs, Email POs), as appropriate for the PO Transmission Method.
- If you are using Scheduled Job Groups, click the prompt to assign a group to the buy-from location.
- Click Save.
- Click Submit.
To create a scheduled job for authorizing EDI, FAX, or email POs automatically
- From the Work in Administration Contents, select Administration > Scheduled Jobs.
- Alternately, you can select Misc Functions > Scheduled Jobs.
The Scheduled Jobs list appears.
- Click New. The Create New Scheduled Job panel appears (Figure
4).
- Enter a description for your job in the Job Desc field.
- In the Job Name field, select the appropriate job type -- one of the following:
-
Process Auto-Authorize EDI PO
- Process Auto-Authorize FAX PO
-
Process Auto-Authorize Email PO.
- Click Next. The Scheduled Job Edit panel appears (Figure
11). This example is for Email POs. FAX and EDI POs are the same, except for the Job Type.
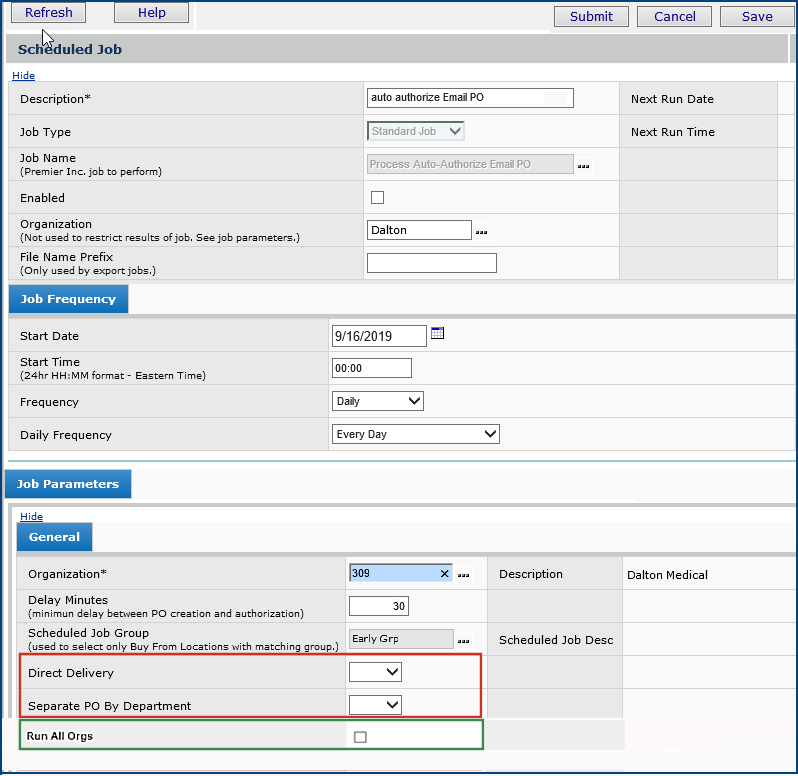
Figure 11 - Create and Schedule a Batch Job for Automatic EDI
PO Authorization
- Enter information in the Scheduled Job Edit tabbed panels as needed.
- Click Help for information on the fields.
- Select the Enable box if you wish the job to begin running
on the first scheduled opportunity.
- On the Job Parameters panel:
- Enter the Organization for
which the authorizations are to be made. This field runs the job for POs belonging only to the specified organization.
- If desired, set a time delay. Enter the number of minutes in the Delay Minutes field.
The Delay Minutes is the amount of time after creating a PO before the PO can be automatically authorized. The PO will not be authorized during the delay period,
even if the authorization job is scheduled to run. The PO will be authorized, in this case, during the next run of the job.
- Select a Scheduled Job Group, or leave this field blank. If you leave the Scheduled Job Group identifier field blank, only buy-from locations without a Scheduled Job Group assignment are included in the job.
- To auto-authorize Direct Delivery POs, click the down arrow and select Yes.
Selecting No excludes direct delivery POs. Leaving the selector blank selects all POs as filtered by the other selection fields.
- To auto-authorize POs that are Separate PO by Department, click the down arrow and select Yes.
Selecting No excludes separate POs by department. Leaving the selector blank selects all POs as filtered by the other selection fields.
- To run jobs for all organizations, select Run All Orgs. To specify individual organizations, uncheck this field and select the organization(s) on the top part of the panel.
In Figure
11, the automatic authorization is limited to POs from Organization Dalton. An auto authorization job with a thirty minute delay is being scheduled. The Scheduled Job Group is Early Grp.
- Click Save.
- Click OK.
You are returned to the Scheduled Jobs list.
- Click Refresh to see your job appear on the list.
Mass Assignment of Items to Asset Locations
Mass assignment of items to asset locations can be performed manually or as
a scheduled job. Once you have created and named an item assignment job (see Mass
item assignments), you can schedule it to run, as described below.
To schedule mass item assignment jobs:
- From the Work in Administration Contents, select
Administration > Scheduled Jobs. The Scheduled Jobs list appears
(Figure 1).
- Alternately, you can select Misc Functions > Scheduled Jobs from the main Contents.
- Click New. The Create New Scheduled Job edit panel appears (Figure
4).
- Enter a description for your mass item assignment job in the Job Desc
field.
- In the Job Name field, select Mass Item Assignment.
- Click Next. The top two Scheduled Job Edit tabbed panels
appear (similar to Figure 5).
The Job Parameters panel contains only one field: Assignment Name.
- Enter information in the Scheduled Job Edit tabbed panels as needed.
- Click Help for information on the fields in the Scheduled
Job and Job Frequency tabs.
- On the Job Parameters panel, select the Assignment Name for
the job that you wish to schedule. The system only displays mass assignment
jobs that have a status of Ready. These jobs have been
set up to perform mass assignment of items to asset locations, but have
not been run.
- Click Save.
- Click OK.
You are returned to the Scheduled Jobs list.
- Click Refresh to see your new mass item assignment job
on the list of scheduled jobs.
Scheduling a Report to Run
You can schedule running of reports defined in Reports > Report
Definitions or reports that you have set up under Reports > My Report
Definitions. A user does not need to be able to view reports in order to schedule report jobs.
- From the main Contents, click
Reports > My Report Definitions or Reports > Report
Definitions.
The list of available report definitions appears (Figure 12).
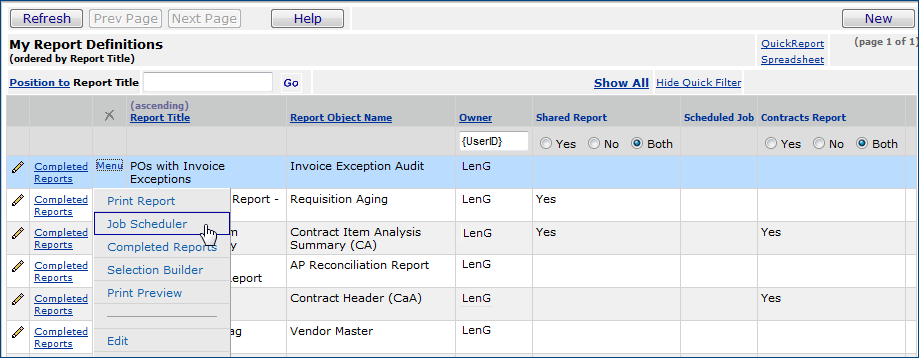
Figure 12 - List of Report Definitions
- Next to the report definition for the report that you wish to
run, click Menu > Job Scheduler.
The top two Scheduled Job Edit tabbed panels appear (similar
to Figure 5).
(The Job Parameters panel does not appear.)
Note: The shortest time period for Daily Frequency is Every Day. If you need to run a report twice a day, set up two daily schedules for the report with different job descriptions and with different Start Time values.
- Enter information in the Scheduled Job Edit tabbed panels
as needed.
Click Help for information on the fields in the Scheduled Job and Job
Frequency tabs.
- Click Save.
- Click OK. You are returned to the Report Definitions list.
Quick Release of Requisitions
- From the Work in Administration Contents, select Administration > Scheduled Jobs.
- Alternately, you can select Misc Functions > Scheduled Jobs.
The Scheduled Jobs list appears.
- Click New. The Create New Scheduled Job panel appears (Figure
4).
- Enter a description for your job in the Job Desc field.
- In the Job Name field, select Requisition Quick Release.
- Click Next. The Scheduled Job Edit tabbed panels appear.
The top two Scheduled Job Edit tabbed panels are similar to Figure 5.
- On the Job Frequency tab, enter the Start Date and Start Time for running the quick release job. Use a 24-hour clock value when you enter data in these fields.
- Select the Frequency -- how often and when the job will run. Depending on the Frequency you select, other options appear. For example, if you select a Monthly Frequency, you can specify the day of the month to run the job, and the month(s) that you wish to run it.
- On the Job Parameters tab, enter the Organization and Asset Location whose requisitions you wish to release.
- Select/enter any further characteristics of the requisitions that you wish to release. The bottom tabs contain more selection options:
Pick Cycle Selections: you can specify up to five of your site's defined pick cycles that apply to requisitions for release.
Stat Selection: You can specify STAT requisitions for release.
From and To Selections:
-
Department range: You can enter a range of department numbers using the From Department field for the first department in the range, and the To Department field for the last department in the range.
-
Priority range: You can enter a range of priorities using the From Priority and To Priority fields.
Reason Code Selections: You can specify requisitions with particular Reason Codes in them. Up to four Reason Code choices are available.
- Click Save, Submit to complete set up of the scheduled job.
Warehouse Exports
Some sites choose to export documents such as picks from asset locations to an external distribution system. The ability to export data from an asset location is controlled by a field on the Asset Location record: Bypass Warehouse Export. This field is only relevant for sites that export warehouse data. When unchecked, warehouse export is available. When checked, the field turns off warehouse export. See "Data on the Asset Location Main Panel."
- From the Work in Administration Contents, select Administration > Scheduled Jobs.
- Alternately, you can select Misc Functions > Scheduled Jobs.
The Scheduled Jobs list appears.
- Click New. The Create New Scheduled Job panel appears.
- Enter a description for your job in the Description field.
- In the Job Name field, select Warehouse Export.
- Click Next. The Scheduled Job Edit panel appears. The top two tabs are similar to Figure
11.
- Enter information in the Scheduled Job Edit tabbed panels as needed.
- Select the Enable box if you wish the job to begin running
on the first scheduled opportunity.
- Select the Organization.
- Enter a value in the File Name Prefix field. Characters entered in this field are prefixed on to the download file name. This option makes it easier to distinguish one download file from another.
- On the Job Frequency tab, enter the Start Date and Start Time for running the export job. Use a 24-hour clock value when you enter data in these fields.
- Select the Frequency -- how often and when the job will run. Depending on the Frequency you select, other options appear. For example, if you select a Monthly Frequency, you can specify the day of the month to run the job, and the month(s) that you wish to run it.
The
Job Parameters tab fields are not available, or relevant to this export. You can ignore them.
- Click Save, Submit to complete set up of the scheduled job.
GTIN Exports
The GTIN Export option within Imports/Exports & Financials is available to export GTIN data to external systems. The contents of the exported file are based on changes made to GTIN data only, and the export includes only those items that are accurately matched to GTIN data. If the system cannot match GTIN data to an actual item, then any unmatched rows of data are not exported.
The GTIN Export creates a comma delimited (CSV) file that includes all fields currently in the standard Item Export as well as these additional GTIN fields:
- Identifier Number
- Identifier Type
- Mfr ID
- Mfr Item No
- UOM
- Conversion Factor
Parameters are available to define the export of all GTIN data, or GTIN data for a given date or timeframe. The primary export selection parameters include Organization, Asset Location, and Changed Date Option. The Changed Date Option is based on when changes or additions are made to any of the GTIN fields noted above
Setup procedures for GTIN exports are outlined in the topic "Export GTIN Data to an External File." You can create a scheduled job to do the export as follows.
- From the Work in Administration Contents, select Administration > Scheduled Jobs. The Scheduled Jobs list appears
(Figure 1).
- Alternately, you can select Misc Functions > Scheduled Jobs from the main Contents.
- Click New. The Create New Scheduled Job panel appears (Figure
4).
- Enter a description for your GTIN export job in the Job Desc field.
- In the Job Name field, select GTIN Export.
- Click Next. The Scheduled Job Edit panel appears. The top two tabs are similar to Figure
11.
- Enter information in the Scheduled Job Edit tabbed panels as needed.
- Select the Enable box if you wish the job to begin running
on the first scheduled opportunity.
- Select the Organization.
- Enter a value in the File Name Prefix field. Characters entered in this field are prefixed on to the download file name. This option makes it easier to distinguish one download file from another.
- On the Job Frequency tab, enter the Start Date and Start Time for running the export job. Use a 24-hour clock value when you enter data in these fields.
- Select the Frequency -- how often and when the job will run. Depending on the Frequency you select, other options appear. For example, if you select a Monthly Frequency, you can specify the day of the month to run the job, and the month(s) that you wish to run it.
You can ignore the Job Parameters fields. These are not selectable.
- On the General tab, enter information as follows, as needed. These are the export fields:
| Field |
Explanation |
| Manufacturer ID |
The ERP application's ID for the manufacturer. |
| Manufacturer Item No |
The manufacturer's identifier for the item. |
| Identifier Number |
The value of the GTIN or SSCC code assigned to the item. |
| Organization |
The code and name for the organization that supplies the item. |
| Asset Location |
The code for the item's supplying asset location. |
| Item Deleted |
Yes - selects deleted item information.
No - selects current item information.
Both - selects information for both current and deleted items. |
| Item Status |
Active - the item can currently be ordered/requisitioned.
Inactive - the item cannot currently be
ordered/requisitioned.
Incomplete - the item is in the catalog, but there is not
enough information about the item to requisition/order it. |
| Lowest UOM |
When checked, exports only the lowest unit of measure for the item.<br> Unchecked, all units of measure are exported. If an item has multiple GTIN’s for a UOM or Conversion Factor,<br> then the export will contain a row for each GTIN Item UOM/Conversion Factor match. |
| Changed Date Option |
Select the type of change date that you wish to use.
You can export on a given date or particular timeframe.
The Changed Date Options are:
- Specified Date
- Today
- Since Yesterday
- This Week
- Since Last Week
- This Month
- Since Last Month
- All* - Selects all GTIN data regardless of any changes. Your data profile determines which organizations and asset locations are available to you.
The Changed Date Option is based on when any changes or additions are made to any of the following GTIN fields:
- Manufacturer ID
- Manufacturer Item Number
- Unit of Measure
- Conversion Factor
- Identifier Type
- Identifier Number
|
| Changed Date |
Appears when the Changed Date option is Specified Date.
Select a date. |
- Click Save, Submit to complete set up of the scheduled job.
Running a Scheduled Job Immediately
In some situations, you may wish to run a normally scheduled job outside of the schedule.
- For any enabled, scheduled job that is not currently running, click Menu > Run Now to run the job (Figure 13).
- A confirmation panel appears. Select Yes to run the job.
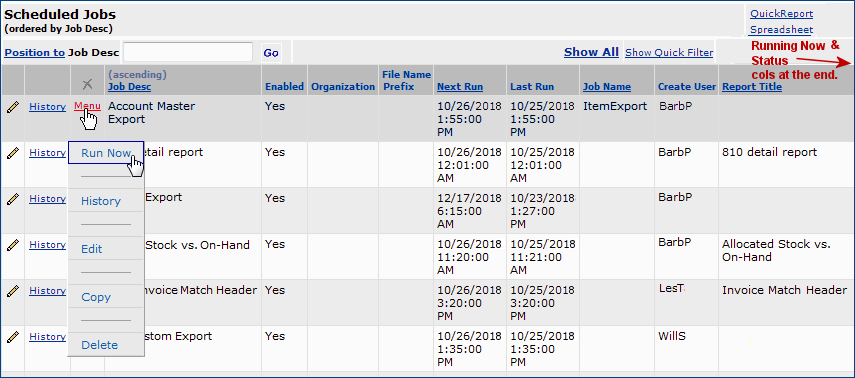
Figure 13 - Running an Enabled Scheduled Job At Will
On the Scheduled Jobs panel, the columns Running Now and Status indicate that a scheduled job is "running now" and its run status.
-
When a job is running, the Running Now column displays Yes. This column can be sorted and filtered.
-
The Status column indicates either "running" or "pending" for a job run that you have initiated.
The queue processor for scheduled jobs pick up and runs jobs initiated with the new Run Now command. These jobs may not start immediately, but will run with the next cycle of the queue monitor.
This feature is only available for core products administration (Materials Management, Accounts Payable, and General Ledger). Sourcing and Contract Management as a stand-alone product does not support this feature.
Scheduling Custom Exports
Custom exports are files that you create using report objects, such as Account
Master, Contract Statistics, GL Ledger Transactions (and many others). Once
created, the system exports the files using the Pulse appliance, set up to a export to a network location.
Creating a custom export is much like defining a report. You identify the fields
for the export file, specify their order, identify any that are selection fields,
and so on. Once you have configured the file, you can schedule generation and
export of the file using the scheduler. The process is the same as scheduling
other types of exports.
To schedule a custom export:
- From the main Contents, select
Imports / Exports > Custom Exports.
The list of custom exports appears (or No Data if none exist). See
Figure 14.
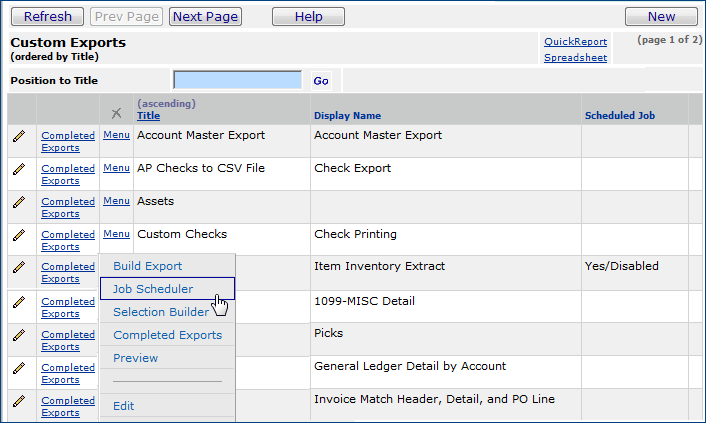
Figure 14 - Schedule a Custom Export Job
- Next to the custom export that you wish to run, select Menu
> Job Scheduler.
The top two Scheduled Job Edit tabbed panels appear (similar
to Figure 5).
- Enter information in the Scheduled Job Edit tabbed panels
as needed.
Click Help for information on the fields in the Scheduled Job and Job
Frequency tabs.
- Click Save.
- Click OK. The Custom Exports list is re-displayed.
Setting Up Contract Price Activation Jobs in Sourcing and Contract Management
After importing a new contract (or an updated version of a current contract) into Sourcing and Contract Management and matching items, you select the item prices that you accept, and set a date when you wish to activate the prices. On the price activation date, the items are available for purchase on the contract.
Price activations run as scheduled jobs.
You set up price activations in the Job Scheduler. You should set up price activation jobs to run at night, after midnight.
This topic describes how to use the Job
Scheduler to set up price activation batch jobs.
Security for Scheduling Price Activation Jobs in Sourcing and Contract Management
Supply Chain users:
- Working with Sourcing and Contract Management requires the setting All on the "Contract" role object for users doing price activation.
- Contract price activation requires the setting All on the "PriceActivation" role object.
- Supply Chain Users: Price Activation is not secured by the user's data profile.
Important: Price activation activates all selected items in a contract, regardless of the user's data profile.
- To use the job scheduler, you need either...
- Administrator
privileges in the system; or
- The "ScheduleJobs" role object set to All or Create, and included in your user Role.
- Also, a user can only set up scheduled jobs for the organizations specified in his/her user profile. A person creating scheduled jobs must also have the correct organization settings in his/her data profile to create jobs for the various organizations.
Your system administrator can adjust your user profile as needed.
To view the list of scheduled Price Activation jobs:
From the Administration Contents, select Scheduled Jobs. A list appears showing you the
jobs and current schedules.
To disable
or re-enable scheduled Price Activation jobs:
- From the Administration contents in Sourcing and Contract Management, select Admin > Scheduled Jobs.
The list of jobs appears.
- Scan the Job Desc field to locate the job whose schedule you wish
to disable or enable. The job name is Activate Contract Prices.
- Click the edit icon or select Menu > Edit next to the Job Desc.
The Scheduled Jobs tabbed panel appears.
- To enable the job schedule, click the Enabled box. A check appears
in the box.
- To disable an enabled job schedule, click the Enabled box (which contains a check). The check disappears.
- Click OK. You are returned to the
Scheduled Jobs list. Click Refresh to view the change in the Enabled column.
To create a new scheduled price activation job:
- From the Administration contents in Sourcing and Contract Management, select Admin > Scheduled Jobs.
The Scheduled Jobs list appears.
- Click New. The Create New Scheduled Job panel appears.
- Enter a description for the price activation job
in the Job Desc field.
- In the Job Name field, click the prompt (...) and select Activate Contract Prices.
- Click Next.
- Enter information in the Scheduled Job Edit tabbed panels as needed.
- Click Help for information on the fields in the Scheduled
Job and Job Frequency tabs.
- Click Save.
- Click OK. The Scheduled Jobs list is displayed. s
- Click Refresh to see the activation job on the list
of scheduled jobs.
- To run the job, set the Enable field as described previously.
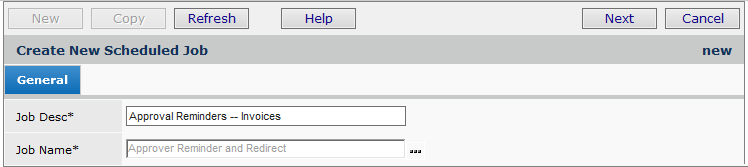
Approval Reminders and Approval Redirects
- Open the list of scheduled jobs (Miscellaneous Functions > Scheduled Jobs).
- Click New to create a new scheduled job.
- Enter header information (Figure 15) for the new approval reminder job.
- Enter a job description (Job Desc).
- Select the Job Name Approver Reminder and Redirect.
Figure 15 - Scheduled Job Header Panel
- Click Next. The Scheduled Job panel appears (Figure 16). This panel contains the setup fields for approval reminders.
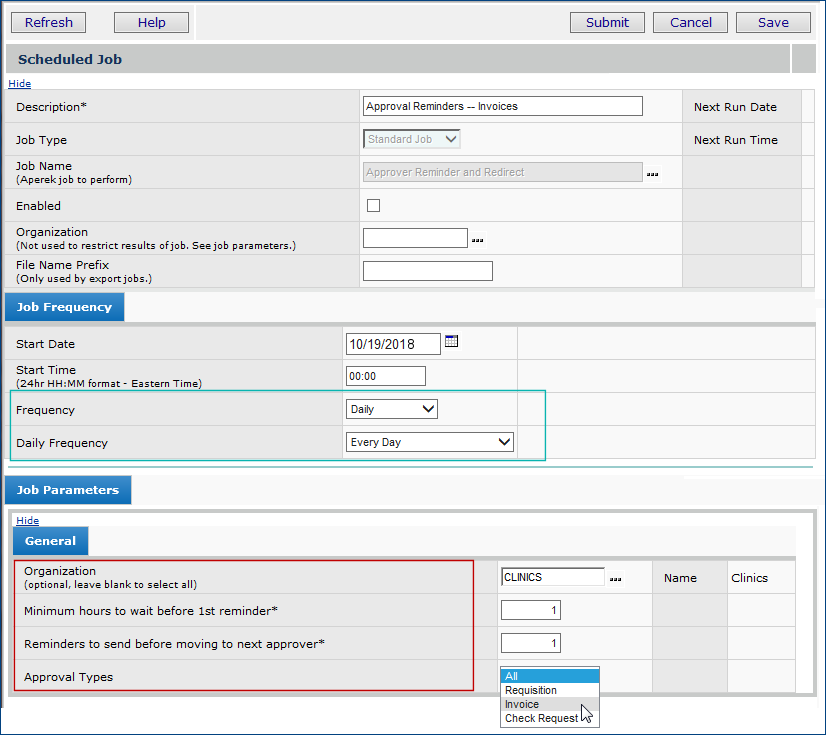
Figure 16 - Scheduled Job Panel with Job Parameters Fields
- In the Job Frequency panel (Figure 16, blue box), enter values for the Start Date and other fields. The frequency of reminders sent is equal to the job frequency of the scheduled job.
- In the Job Parameters, General tab (Figure 16, red box), set up the reminders.
Organization - You can create an approval reminder job for any organization: select the organization. If you wish to set up the job for all organizations, leave this field blank.
Minimum hours to wait before 1st reminder - The number of hours that can elapse between an approval being required, and the first reminder notice being sent. In other words, when a user creates a requisition and sends it to approval, the requisition appears in an approver's queue. This field is the time interval (in hours) that must elapse before the approver gets a reminder message. Enter the number of hours.
Reminders to send before moving to next approver - An integer used with reminders in an approver group situation. This value is the number of reminder messages to be sent to a delinquent approver before redirecting to the next approver in the group. Enter an integer.
Approval Types - The types of documents for which the approval reminders are to be used. The options are: invoice, requisition, check request, or all types. Select an approval type.
Note: Be sure to enable the job. (Select the Enabled box.)
When an approver is delinquent in acting on approval queue entries, a formatted reminder message appears in his/her email. The message contains a count of each type of approval awaiting the user in the specified organization. The count includes entries that have been in the user's approval queue longer than the time frame defined in the scheduled job. The counts are broken down by approval type(s), as specified in the job. See Figure 16.
Tips in setting up reminders:
- When you enter the Minimum number of hours..., give approvers enough time to locate and review their approval queue entries. Reminders should not be set to occur too soon.
- The Reminders to send... field should not be set so high as to continually include the same queue entries before allowing the system to auto-approve for a delinquent approver group member.
- The scheduled Job Frequency (Figure 16, blue box) controls how often the system checks for unreviewed entries in approval queues. For this reason, setting a too-frequent schedule will cause more emails and potentially create over use of the auto-approval feature.
- The Approval Type field can be All, so that all reminders occur together. But a "one size fits all" job may not be what you want. You should consider setting approval reminders by organization, and/or for a single approval type. Multiple approval reminder jobs are possible.
- Be careful in creating multiple scheduled jobs. If the jobs overlap by organization and approval type, you will have more approval reminders, and more frequent emails and automatic approvals.
Details on using approval reminders are in the topic Approval reminders and redirected approvals
Copyright © 2023 by Premier Inc. All rights reserved.