Contact the Help Desk for other suggestions.
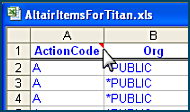
To add new item records, open blank worksheet template(s) on Excel, and enter data for the new items.
For each item record, enter A In the ActionCode column. Then, upload the worksheet(s) to Supply Chain.
Tip for adding records: Put a blank row between item records that you are adding. Finding data input errors will be easier.
To change or delete item records, you can use either method below:
- Download the item records from Supply Chain to Excel. By default, when you download item records, the ActionCode is set to C. (To delete item records, set the ActionCode to D.) Edit the item data worksheet(s) to change data. When you finish making changes, upload the worksheet(s) back to Supply Chain.
Note:
This method is the more accurate, and involves less keying in of data. See the discussion of downloading item records.
or
- Create blank worksheet template(s) in Excel and enter the item data from scratch.
For each item record row, enter C (update) or D (delete), as appropriate, in the ActionCode column. Then, upload the worksheet data.
Using Excel Item Record Templates
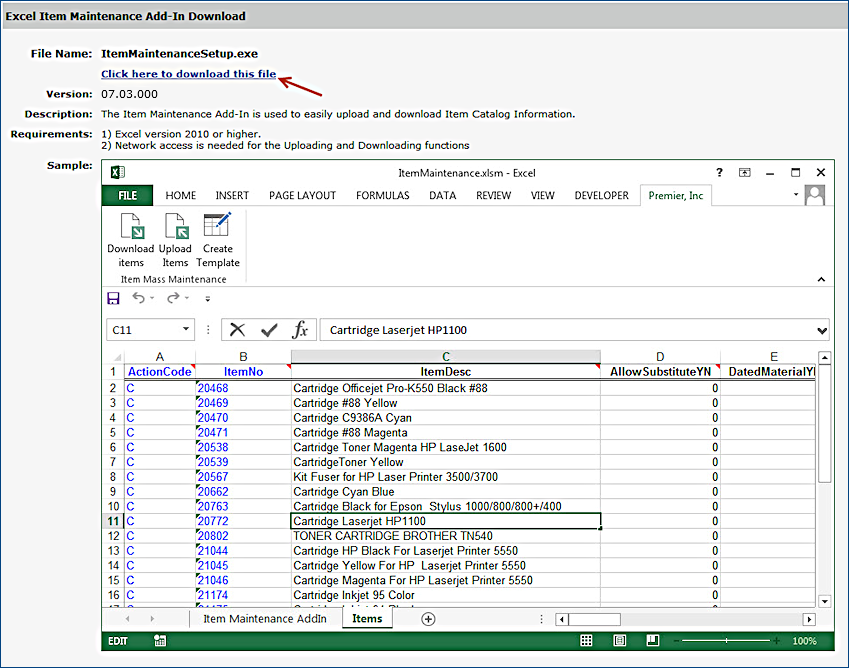
When you download item records from Supply Chain, Excel displays the records in one or more worksheets. You can open blank item record worksheets in Excel if you need to add item records, for example.
To open a blank Excel item record template:
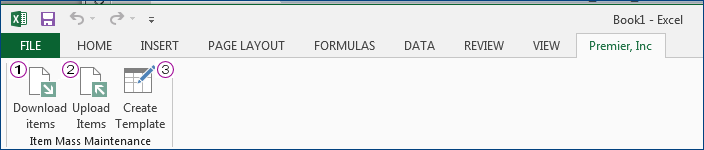
- From an Excel worksheet (with the item import add-in activated) click Create Template
(Figure 17).
The Create Template panel appears (Figure 17).
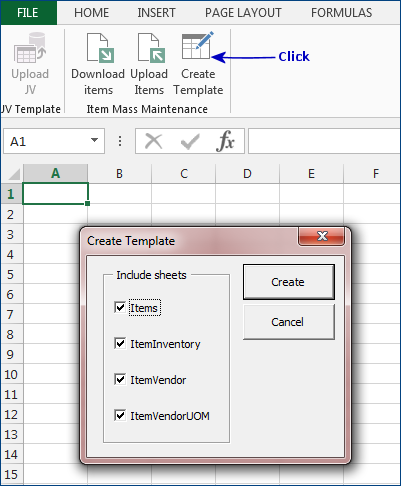
Figure 17 - Opening a Template for Item Import
- Under Include sheets, select the type(s) of item records that you wish to create. In Figure 17, all four template types are selected.
- Click Create.
- Excel asks you to verify that you wish to open the template worksheets, which will overwrite any other open worksheets.
- When you click OK, a worksheet for each selected template appears.
- Figure 18 is a sample workbook that includes all four worksheet templates.
Each worksheet is on a separate tab (green arrows). In Figure 18, the Items worksheet is on top.
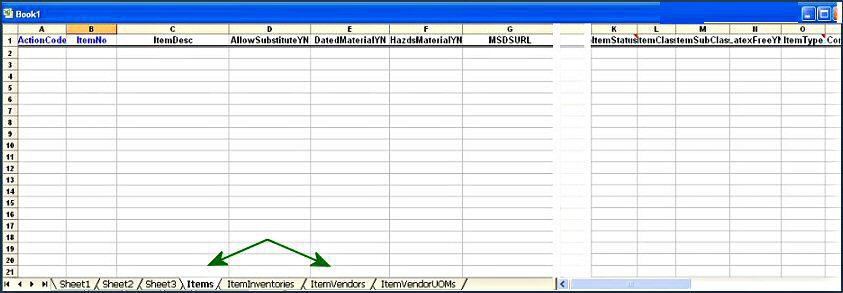
Figure 18 - Worksheet Templates for Items
Entering Data on the Worksheet Templates
In general, the columns on the worksheet templates match the editable fields in Supply Chain item records. For example, you will not see an "On Hand Quantity" field on a worksheet item template because that field in Supply Chain is not editable.
 Key database columns on the worksheets have blue headers.
Important: When you are using a worksheet to change downloaded, existing item information, do not alter data in blue columns (except to specify the correct ActionCode). Unexpected consequences could result. You can enter data in these columns when you are creating new items, of course.
Comments Indicators
Worksheet comments display the type of data for each column. Normally, you will want the comment indicators  enabled so that you can check the column data type and number of characters. If you do not see the comment indicators on a Supply Chain item template worksheet, they probably have been turned off.
- To enable comments settings:
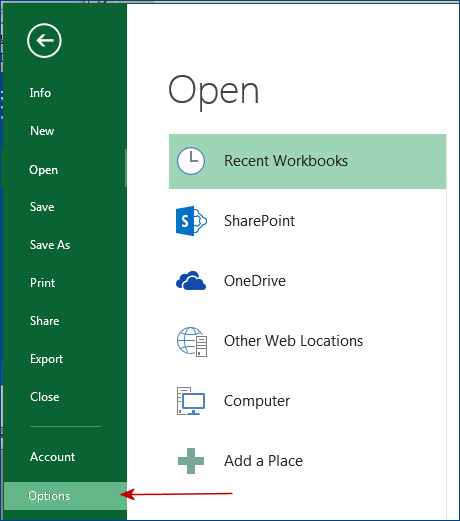
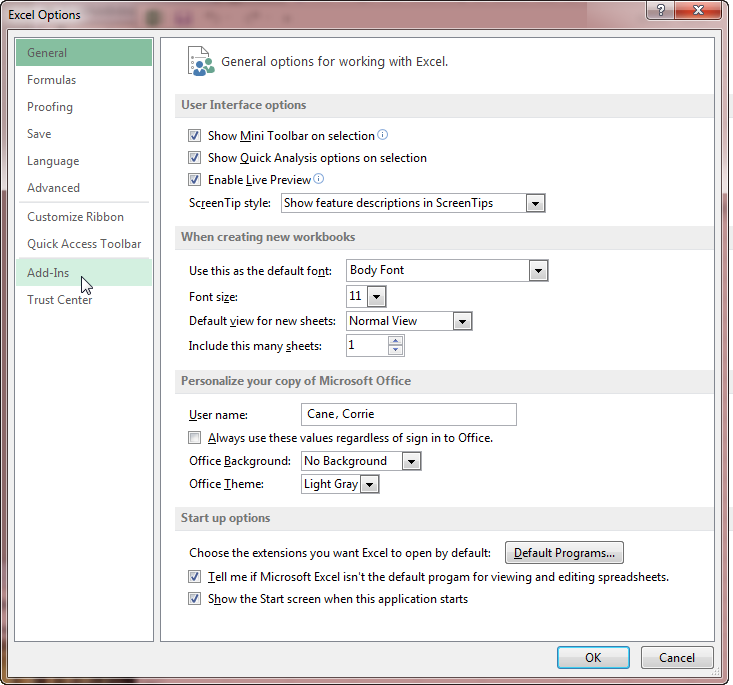
- From the Excel toolbar, click File > Options > Advanced.
- Scroll down to the heading: Display.
Several fields let you manage the appearance of comments and comment indicators.
- To view a comment for a column,
mouse over the indicator .
|
Mouse over |
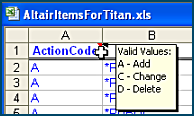
Values for the column appear |
- To view all comments (or hide all comments),
With comment indicators enabled, on the Excel toolbar, click Review > Show/Hide All Comments. This link toggles comments on and off. In the Supply Chain item template, comments contain the type of data values that you can enter in each column.
Columns with drop-down selection lists: Columns such as Item Status and Item Type provide a drop-down selection list when you click in the cell. Make a selection from the list. If you leave a cell in one of these columns empty, Excel will display an error message.
Text and Numeric Columns: Text columns contain a single character, or a "string" of characters. Numeric columns contain decimal or integer values.
"No value" entries in text and numeric columns: If you want an item record to have no entry for a particular field, use the following rules for entering "no value" in worksheet cells.
- For "no value," in a numeric column, either enter zero or delete the current column value, if a value is present.
In a numeric column, do not key a space into the column (to blank the column out), because a blank is interpreted as text, and the worksheet will give you an error message.
- For "no value" in a text ("string") column, enter *blank or (*Blank).
(Alternately, you could enter spaces in a text cell to get an empty item record field. However, it will not be obvious that the cell is blank intentionally. Using *blank is better.)
Note: *blank is only supported for the Item Import feature. Other Supply Chain features that use worksheets (e.g., ProSheet) do not support *blank.
Yes/No Columns: Columns with a header ending in YN (for example, AllowSubstituteYN in Figure 20) are yes-no fields. Enter zero (0) for no or 1 for yes.
(The format type for these columns is called Boolean. You will see the word "Boolean" for the column type when you put the cursor on the column header.)
Deleting columns: You can delete columns that are not required and that you do not need, but you cannot delete columns with blue headers. If you do, you will get upload errors. You can also delete rows that you do not need. Deleting unneeded rows and columns can save time.
Changing column headers: If you change the header in any column, on import, Supply Chain ignores the column. This tactic is useful if you are updating values in a column such as ItemClass, but need to keep another column, such as ItemDesc, unchanged, but available for reference. Altering the ItemDesc header to, say, ItemDescXXX prevents the column from importing.
Renaming worksheets: You can also rename a worksheet. This technique is useful, for example, if you have made changes to a worksheet, but for some reason, may need to download the worksheet again, and do not want the download to overwrite your changes.
A table describing all the columns on the four templates is at the end of this topic.
Importing Item Records to Supply Chain from Excel
This section uses an example to illustrate the worksheet templates. The example starts with blank worksheets. Typically, for changing item record data, or deleting records, you would not begin with empty worksheets, but instead would download item data from Supply Chain, change the data, and then import it back to Supply Chain.
A general word about adding items using a worksheet template:
Adding items using the worksheet templates requires you to keep track of the values that you enter on the different templates. For example, if you enter the value 1 in the Item worksheet for the Item Status column, you must enter the same value for the same item in the Item Status column on the Item Inventories worksheet. This type of cross checking can be tedious when you are keying in unstructured data.
- Generally, adding items using a template is most efficient when you have many items to add. If you have data that is already structured in another worksheet, you can copy and paste it into columns on the Item Import worksheet templates.
- If you are only adding one or two items to your item catalog, and keying in data from scratch, you may find it more efficient to use Consolidated Item Add in the Supply Chain application.
Caution: Using copy and paste to enter data on a worksheet template should only be done by experienced Excel users.
Copying and pasting data into Supply Chain Excel templates can cause problems, depending on what you copy and where you are copying from.
For example, if you copy a column from, say, a vendor's worksheet to a Supply Chain Excel template, the data format of the vendor's column may be different from the format in the Supply Chain Excel column. Also, data elements from an external source can contain hidden characters, including initial or trailing spaces. If you paste data to a Supply Chain template, exercise caution, and verify that the data you paste is compatible with what Supply Chain expects.
When you paste data to a Supply Chain Item Import template from another worksheet, use the Excel Paste Special feature. Paste only the values, not the other worksheet's cell formats.
Hint: Contents of the columns on each worksheet are documented in a subsequent section in detail. However, you may find it useful, if you are adding items, to first download item records for similar items from your item catalog. You can then study the worksheets for the downloaded items to get a better idea of what each column contains.
Default values
When an organization creates a new item, the values of several fields can be set as defaults and written automatically to item inventory records.
The fields are: CDM, Pass-Through Code, and Billable/Non-Billable Expense Code.
To use these fields as defaults for any inventory record -- when the item is assigned to an inventory -- an organization sets the flags Assign Patient Charge Number (CDM) from Catalog and Assign Expense Codes from Catalog on its organization record. The default values for CDM, Pass-Through Code, and Billable/Non-Billable Expense Code are then retained on the item catalog record, and used to automatically populate any future inventory assignments. If your organization flags are set, you can establish default values for these fields on the Items spreadsheet when you upload a new item or change an item. If you use the defaults, however, you cannot alter the values in the item inventory directly: entering values for these fields on the Item Inventories panel will have no effect.
Using Worksheets: An Example
Imagine that you have activated the Excel add-in for upload and download, and have opened four templates to enter and import some item records. You have several items (Figure 19) with no UNSPSC codes, and you wish to add the UNSPSC codes to the item records. Also, you wish to import a new item record for the same vendor.

Figure 19 - Items from the Item Catalog that Need UNSPSC Codes
The Items Template
Figure 20 is a sample Excel Items worksheet, with data being entered in its columns. (In Figure 20, spreadsheet comment indicators are turned off so that you can see the column headers.)

Figure 20 - Excel Items Template with Data Being Entered
Entering Data on the Items Template
- The key columns (with blue headers) are: ActionCode and ItemNo.
A value in each of these columns is required.
- Other required columns are: ItemDesc (when adding an item), ItemStatus, and ItemType.
See Columns on the Item Record Worksheets for a complete list of columns on the Items template.
Changing item records:
- If you are updating existing item records, do not change the values in any of the columns with blue headers; except to delete an item, change the ActionCode to D. The existing items in Figure 20 have an ActionCode of C.
- You can enter or change data in columns with black headers.
- You can also delete values in any non-required columns with black headers if you have no changes to their data. See Columns on the Item Record Worksheets for details on which columns can be deleted.
Adding item records:
- If you are adding new item records, enter values in the columns with the blue headers, and in other required columns (ItemDesc, ItemStatus, and ItemType).
For a new item, enter A in the ActionCode column.
- You can specify your own item numbers or you can let Supply Chain assign the item numbers when the item records are imported.
To specify your own item numbers, enter the item numbers in the rows under the ItemNo column (Figure 20).
To let Supply Chain assign item numbers, do the following:
- In the ItemNo column for a new item, enter the following code: *ItemNo_number where number is a number, such as 1, 2, etc.
For example, if you were building a worksheet with data for two new items,
for the first item, you would enter *ItemNo_1 and
for the second item *ItemNo_2. If there were a third item being added, it would be *ItemNo_3, and so on. Figure 21 is an example.
Important: You cannot use both system-assigned item numbers and user-specified item numbers in the same spreadsheet. Your item numbers must all follow the *ItemNo_1, *ItemNo_2, *ItemNo_3 pattern, or must all be identifiers that you create; e.g., syringe20, 1356A. You cannot mix the two types.

Figure 21 - The Items Worksheet Template with New Items for Automatic Item Numbers
When the worksheet is imported, Supply Chain assigns the next two sequential item numbers to the two items.
- For new items to be automatically numbered, on the other worksheet templates, use the same code for each ItemNo that you used in the Items template. The goal is to have worksheet templates each use the same code for the same item.
Figure 22 is an example of the ItemInventories, ItemVendors, and ItemVendorUOMs worksheets that would go with the Items worksheet (Figure 21) for the two new items.
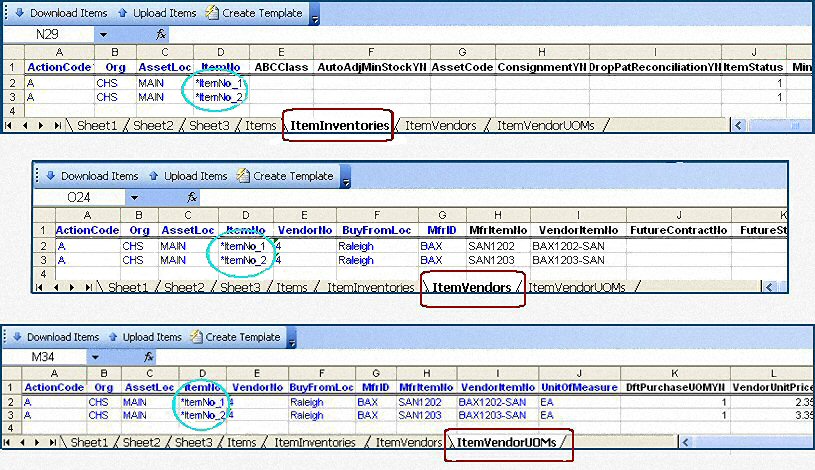
Figure 22 - Worksheet Templates with the Corresponding Item Codes on the Items Template
Note: The next time that you add items, if you want Supply Chain to assign numbers, you can start again on a new worksheet with *ItemNo_1.
- For ItemStatus and ItemType in Figure 22, the template provides a drop box for selecting a value. Click in a cell in either of these columns and the drop box appears.
- In adding a new item to the item catalog, set the ItemStatus column to 1 (active). Then, when you import data from the ItemInventories, ItemVendors, and ItemVendorUOMs worksheets and the item data is complete, the item Status will be Active.
-
Single-sourced item :
- On the Items worksheet, no entry is needed in the column VendorOverrideYN for a single-sourced item.
However, on the ItemInventories worksheet, you will need to enter 0 in the column VendorOverrideYN.
- Multi-sourced item:
- On the Items worksheet, no entry is needed in the column VendorOverrideYN for a multi-sourced item.
However, on the ItemInventories worksheet, you will need to enter 1 in the column VendorOverrideYN. (See "Multi-Sourcing an Item" in the online documentation.)
- On the ItemInventories worksheet, be sure to enter the organization and asset location that multi-sources the item.
- On the ItemVendors and ItemVendorUOMs worksheets, enter the vendor information for the asset location that multi-sources the item.
The ItemVendors Template
Figure 23 is a sample Item Vendors worksheet, with data for the new (single-sourced) item from (Figure 22) entered -- the ActionCode is A.
No changes are needed on this worksheet for the existing items, so their records are not included.

Figure 23 - Excel Item Vendors Template with Data
Entering Data on the ItemVendors Template
- The key columns (with blue headers) are: ActionCode, Org, AssetLoc, ItemNo, VendorNo, BuyFromLoc, and MfrID.
A value in each of these columns is required.
- A single-sourced item shares its item record with each asset location that supplies the item. No asset location has a different item vendor record.
- A multi-sourced item has at least one unique item vendor record for at least one asset location.
(See "Multi-Sourcing an Item" in the online documentation for details.)
- When adding an item, an entry is required in these columns as well: MfrItemNo, VendorItemNo, ItemVendorID.
- ItemVendorID is discussed in subsequent paragraphs.
- For existing items, you cannot change the ItemNo, VendorNo or/and BuyFromLoc. Changes to these fields are not processed by the application, and trigger an error message on the import. You are allowed to change the MIN and VIN for an existing item, however.
- PrimarySuppYN: For a new item, if you leave this column blank (and thereby, accept the default of zero), you will not have defined a primary vendor, and the item vendor record will be Incomplete.
- Substitute item:
- On the ItemVendors worksheet, to flag an item as an approved substitute, enter 1 in the column ApprovedSubYN (column S). Several rules about approved substitute items apply. See "Automatic Item Substitution by Vendors in EDI Purchase Orders" for details.
See Columns on the Item Record Worksheets for a complete list of columns on the ItemInventories template.
Changing item records:
- If you are updating item records, do not change the values in any of the columns with blue headers, except to delete an item, change the ActionCode to D.
- You can enter or change data in columns with black headers.
- When you are changing item data (on a downloaded worksheet), leave the ItemVendorID column on the worksheet; do not delete it. (This column holds an internal Supply Chain value, and is populated when you download item data that you wish to change or delete.)
- You can delete any non-required columns with black headers if you have no changes to their data. See Columns on the Item Record Worksheets for details on which columns can be deleted.
Adding item records:
- If you are adding new item records, enter values in the columns with the blue headers and in other required columns.
- For an item being added, set the value in the ItemVendorID column to zero.
- Single-sourced item:
Create one record for each vendor that supplies the item.
-
Multi-sourced item:
- Create the unique Item Vendor Record for any asset location that multi-sources the item.
Note: You will also need to create an ItemVendorUOMs record for the multi-sourced location.
The ItemVendorUOMs Template
Figure 24 is the ItemVendorUOMs worksheet, with information entered for the new (single-sourced) item. Without item vendor UOM information, an item cannot be ordered, and the item record is Incomplete.
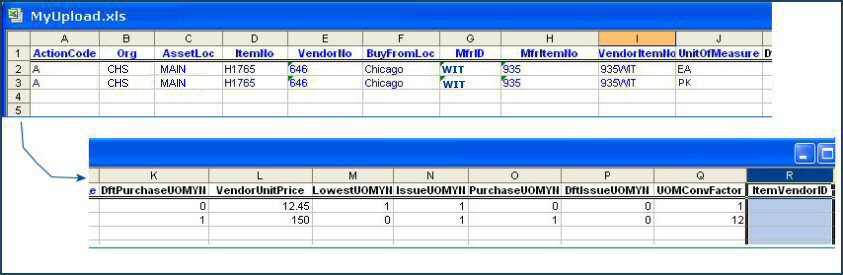
Figure 24 - Excel ItemVendorUOMs Template with Data
Entering Data on the ItemVendorUOMs Template
- The key columns are ActionCode, Org, AssetLoc, VendorNo, BuyFromLoc, MfrID, MfrItemNo, VendorItemNo, and UnitOfMeasure.
A value in each of these columns is required.
- When adding an item, an entry is also required the following columns for each item's unit(s) of measure. UnitOfMeasure, DftPurchaseUOMYN, VendorUnitPrice, LowestUOMYN, IssueUOMYN, PurchaseUOMYN, DftIssueUOMYN, and UOMConversionFactor.
The template uses a row for each unit of measure. You can enter multiple items and multiple units of measure for each item.
- Additional required columns are: ItemVendorID (discussed in the next paragraphs).
See Columns on the Item Record Worksheets for a complete list of columns on the ItemInventories template.
Changing item records:
- Do not alter the values in any of the columns with blue headers (except: to delete a record, change the ActionCode value to D).
- You can change the values in columns with the black headers.
- When you are changing item data (on a downloaded worksheet), leave the ItemVendorID column on the worksheet. This column holds an internal Supply Chain value, and is populated when you download item data that you wish to change or delete.
Note: For imports of item vendor UOM records, if you change the default issue UOM (DftIssueUOMYN) or the default purchase UOM (DftPurchaseUOMYN) and the item is held for physical inventory, Supply Chain will not import the record, and displays an error message.
Sourcing and Contract Management users: If you change any Purchase Unit Price for a contract item, Supply Chain will not accept the change. Contract item prices are set by the contract, and cannot be altered on import.
- You can delete values in any non-required columns with black headers if you have no changes to their data. See Columns on the Item Record Worksheets for details on which columns can be deleted.
Adding item records:
- If you are adding new item records, enter values in the columns with blue headers, and in other required columns. You must enter a value in every column for each item's unit of measure.
- When you are adding a new item, set the value in the ItemVendorID column to zero.
- Single-sourced item:
- Enter an item vendor UOM record for each vendor that supplies the item for each unit of measure.
- Multi-sourced item:
- For
each asset location that multi-sources the item, enter the item vendor UOM records.
The ItemInventories Template
Figure 25 is a sample of part of an ItemInventories worksheet template for the new item record. (The comments on the worksheet are turned off so that you can see the column headers.) Use the ItemInventories worksheet to assign the item to an asset location.
Note: The item must be Complete -- i.e., the item must have all the information needed for purchasing -- before you can assign it to an inventory. Use the ItemVendorUOMs worksheet template to create units of measure for purchasing and issuing the item.

Figure 25 - Excel ItemInventories Template with Data
Entering Data on the ItemInventories Template
- The key database columns (in blue) are ActionCode, Org, AssetLoc, and ItemNo. A value in each of these columns is required.
The Org and AssetLoc columns must contain organization and asset location identifiers.
- When adding an item,
- A value is required in either PatBillableExpense or in PatNonBillableExpense.
The value must correspond to the setting in PatientChargeableYN: 1 = Yes or 0 = No. If you leave PatientChargeableYN blank, Supply Chain uses the default (0). In this case, the item inventory record will have the value 0 so that the patient is not charged for the item.
-
When you take the default, enter a value in the column PatNonBillableExpense.
- Additional required columns are: ItemType, Item Status, and ABCClass.
See Columns on the Item Record Worksheets for a complete list of columns on the ItemInventories template.
Changing item records:
- Do not alter the values in any of the columns with blue headers (except, to delete a record, change the ActionCode value to D).
- You can change the values in columns with black headers.
- You can delete any non-required columns with black headers if you have no changes to their data. See Columns on the Item Record Worksheets for details on which columns can be deleted.
Adding item records:
- If you are adding new item records, enter values in the blue columns, and in other required columns.
- Set the ItemStatus to 1 (active) to so that the asset location can issue the item.
- Single-sourced items:
-
Enter a record for each Org and AssetLoc that inventories the item.
- Enter 0 in the column VendorOverrideYN.
- Multi-sourced items:
-
Enter a record for each Org and AssetLoc that inventories the item.
- Enter 1 in the column VendorOverrideYN.
-
Check to be sure that you also have included each multi-sourcing Org and AssetLoc on the ItemVendorUOMs worksheet and the ItemVendors worksheet.
Worksheet Uploads
New Item Records:
You can upload all four record type worksheets at the same time. Behind the scenes, the system processes the worksheets in the following sequence, so that information for items is added or changed in the correct order:
1 - Items
2 - ItemVendors
3 - ItemVendorUOMs
4 - ItemInventories.
- The ItemVendors worksheet is processed before the ItemVendorUOMs worksheet. The reason is that the vendor needs to be identified before purchasing information can be specified.
- The ItemInventories worksheet is processed last. If an item is new; for example, Supply Chain must create the item and populate the vendor information before the item can be assigned to an inventory.
Updates and deletions of item records: Worksheet templates for items being changed or deleted must contain the columns with the blue headers. If you are working on an ItemVendorUOM worksheet that you downloaded, leave the ItemVendorID column in place. If you are entering item data on a blank worksheet, set the value in the ItemVendorID column to zero.
Note: When you import item records, Supply Chain updates the audit data for any changed field that is normally audited.
To upload item record worksheets to Supply Chain:
- Save the worksheets containing the item data by selecting File > Save As.
Excel prompts you for a Save in folder and File name for the worksheet.
- Enter the folder and file name.
- Click Save.
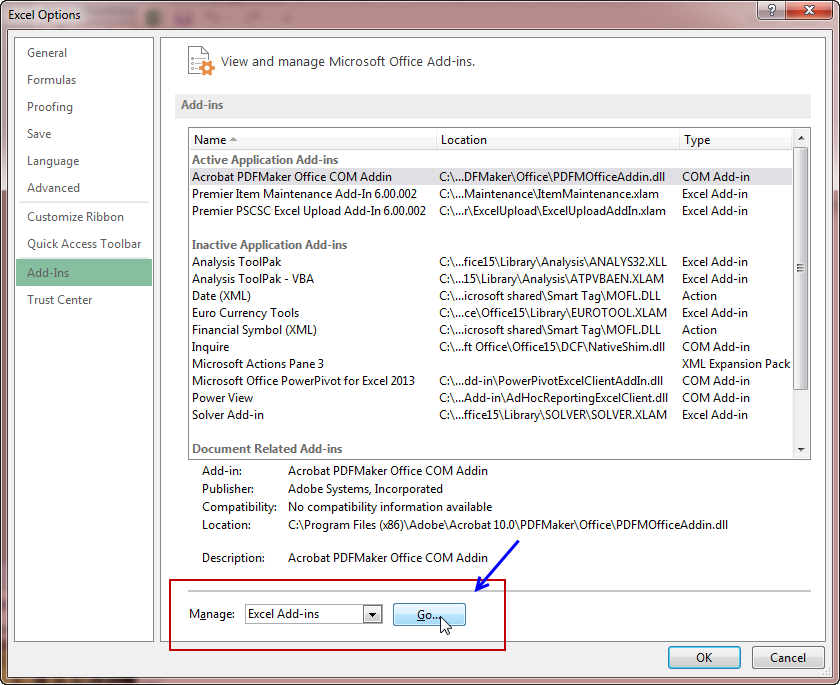
- Click Upload Items (Figure 10,
 ).
).
The Upload Items panel appears (Figure 26)
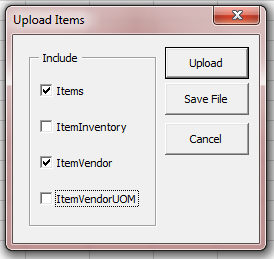
Figure 26 - Excel Upload Items Panel
- On the Upload Items panel, select the worksheets that you wish to upload.
- You can select one, several, or all of the worksheets.
- Before you upload the ItemInventories worksheet, make sure that the Status of the new item(s) is Active (1) . (The ItemStatus column is on the Items worksheet, in case you wish to review it.) Supply Chain cannot assign an item to an inventory unless the item is Active.
Viewing Item Import Jobs:
When you upload a worksheet from Excel, Supply Chain
performs these steps:
-
Validates the file
- Reads the file
- Processes the file to import item records based on the information
in the uploaded worksheet(s).
If Supply Chain cannot complete any step because of errors,
it logs the errors. You can view the
errors.
To view item import jobs
- From the Materials Management main Contents, select Imports
/ Exports & Financials > Item Imports . The Item Imports list appears.
- Locate the job corresponding to the worksheets that you uploaded.
- Use the Import Date column (which includes the system time) and the Import User column to find the import job.
- Review the entry for your job. The following fields provide status data:
- Import Status - The successful or unsuccessful status of
the upload.
Complete: The file was successfully imported.
Ready for Processing: Either, the file is still being processed; or processing is finished, but the file is Incomplete.
- Processed - The number of data records processed out of the total
uploaded. This number shows how many of the import file records successfully
updated Supply Chain data tables.
n of X: X is the number of data records
uploaded and n is the number of records processed
- Message - This column is blank when processing is successful, or contains the value Incomplete when the import was not successful.
To get detailed information about your uploaded worksheets
You can view import details for any of your uploaded worksheets from the Item Imports list.
- From the Materials Management main Contents, select Imports
/ Exports & Financials > Item Imports . The Item Imports list appears.
- On the Imports list, locate the job corresponding to the worksheets that you uploaded.
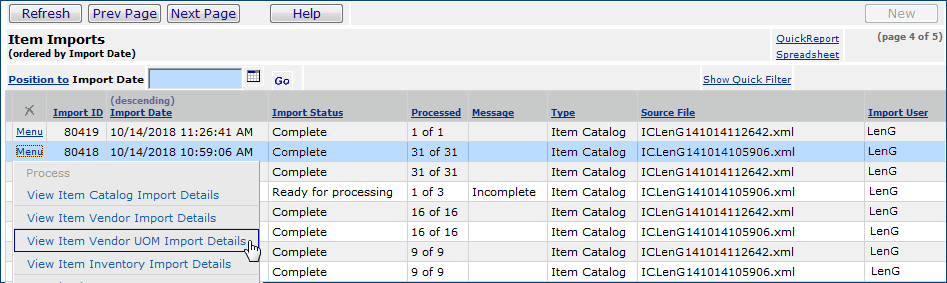
- In the row next to the Import ID, click Menu. A list of menu options appears (Figure 27).
Figure 27 - Selecting Item Import Details to View
- Each menu option corresponds to a different type of imported item record.
- On the menu next to an Item Import job (Figure 27), notice the Process option (grayed out).
Clicking Process reprocesses an item record that contained errors, once you correct the errors. Since the import in Figure 23 was successful (no errors), the Process option is not available.
- Clicking Download downloads the .xml item record file to your network.
- Also, notice that the New button in the upper right is grayed out. You cannot import item records by clicking New. You can only import item records from an Excel worksheet by uploading the worksheet data using the Item Maintenance Add-In.
- Select the menu option that corresponds to the type of item record that you uploaded.
For example, in Figure 27, the item vendor UOM record details (from the ItemVendorUOMs worksheet) is being selected.
Supply Chain displays the record(s) (Figure 28).
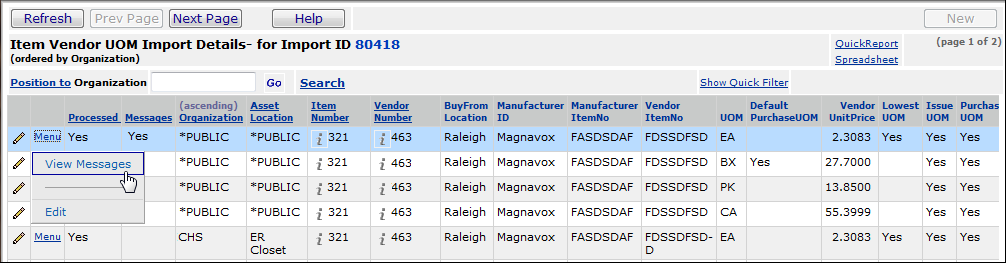
Figure 28 - Viewing Details for an Item Record Import
- If the Messages column contains Yes, the import detail has error messages. Click Menu > Messages to view them.
- Click Menu > Edit to edit the detailed item record and correct any problems.
Once the errors are corrected, you can re-process the upload.
(Or, you can correct the problems on the Excel worksheet, and upload the worksheet again.)
Downloading Item Records
The Excel add-in provides buttons that let you download item records from Supply Chain. The download process requires setting up a Selection Profile. A Selection Profile filters item records, identifying those to download. You tell Supply Chain which Selection Profile to use when you request a download.
You can create and save a Selection Profile, and use it over and over. On any download request, you can also create a new Selection Profile, or edit and save a pre-defined Selection Profile. When you click the Download button, Excel prompts you for a Selection Profile.
Hint: Downloading item records to Excel is a good way to make mass changes in the records. You can make changes as needed, and then upload the records back to Supply Chain. However, you can also download item records purely for analysis in Excel, and never upload them back to Supply Chain. Excel provides useful tools for analytical purposes.
Limits
Multiple worksheets: When you download multiple worksheets, the download limit on any single worksheet is 5,000 unique item numbers, which may, in fact, take up much more than 5,000 Excel rows. In other words, suppose you download the Items worksheet, the ItemVendors worksheet, and ItemVendorUOM worksheet. You will get records for no more than 5,000 actual items (if you have that many). However, since your ItemVendorUOM worksheet could easily have two or three Units of Measure (and prices) per item, for the limit of 5,000 unique items, you may have 10,000 or 15,000 rows in Excel.
One worksheet: When you download only one worksheet, the download limit is Excel's row limit: a maximum of 65, 636 rows.
To download item records:
- From an Excel worksheet (with the item import add-in activated) click Download Items (Figure 10,
 ).
).
The Item Selection Download panel appears (Figure 29).
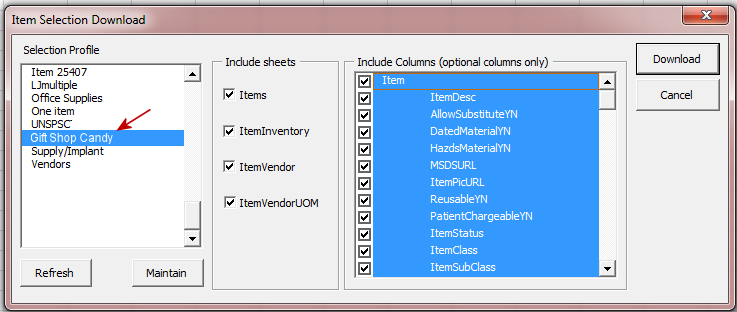
Figure 29 - Item Selection Panel for Downloading Item Records to Excel
- Specify the Selection Profile, the Include Sheets, and (if you wish), the worksheet Include Columns for the download.
Selection Profile: On the left side of the Item Selection Download panel is the list of Selection Profiles.
If no Selection Profiles have been created, the list box is blank, and you will need to create a Selection Profile. See Creating a Download Selection Profile.
- To use an existing Selection Profile, highlight the Selection Profile. For example, in Figure 29, Gift Shop Candy is highlighted.
Include Sheets: In the center of the panel under Include Sheets is a list of item record worksheet types that you can download.
- Select the item record worksheet type(s) that you wish to download. In Figure 29, all four types are selected.
Include Columns: On the far right of the panel is the Include Columns list.
You can scroll the list to see the four item record worksheet types and the names of columns.
For any worksheet type that you download, you can optionally select the columns that you want to see, or not see, on the worksheet.
- To get all the columns on a worksheet, select the box for the worksheet type; for example Item.
- To get only some of the columns on a worksheet, unselect the box for the worksheet type, and select the names of the columns that you want.
-
In Figure 30, for example, the box next to the Item worksheet is blank, and the columns selected are ItemDesc, AllowSubstituteYN, DatedMaterialYN, ItemPictURL, PatientChargeableYN, and ItemStatus. The downloaded Items worksheet will only contain these columns (in addition to the columns with the blue headers).
- The worksheet will not contain the columns HazdsMaterialYN, MSDSURL, ReusableYN, ItemClass, and ItemSubclass.
- Click Download (on the upper right of the Item Selection Download panel).
The system downloads the item record worksheets that you specified, according to the criteria in the Selection Profile.
- If the download is unsuccessful, the system displays messages that help you identify the problem. Problems often involve the selection criteria specified in the Selection Profile. You may need to edit the Selection Profile to change some of the criteria.
Creating / Editing a Download Selection Profile
Selection Profiles contain criteria that Supply Chain uses to identify items for download to an Excel worksheet. Using the maintenance feature on the Item Selection Download panel, you can create new Selection Profiles, or edit and save existing ones.
To create or edit a Selection Profile:
- On the Item Selection Download panel (Figure 30), click the Maintain button.
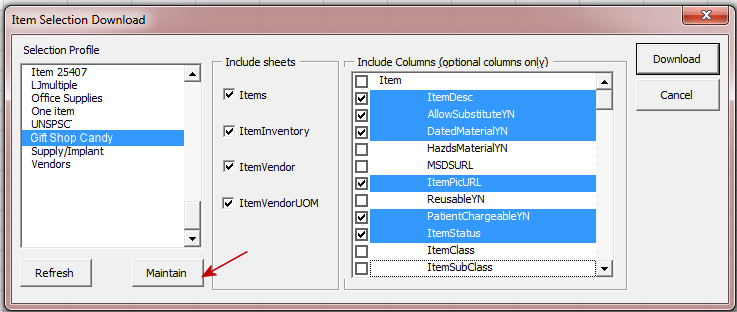
Figure 30 - Item Selection Download Panel Showing Maintain Button
A panel appears with a list of existing Selection Profiles (Figure 31), or No Data if none have been created.

Figure 31 - List of Item Selection Profiles
- Open a Selection Profile panel for editing, or create a new profile.
- To edit a Selection Profile, click the edit icon (
 ) or select Menu > Edit next to the Selection Name.
- To create a new Selection Profile, click New.
A set of four tabbed panels for entering item selection criteria appears (Figures 32 - 35). Each tabbed panel (explained in the next paragraphs) corresponds to one of the four types of item records that you can download.
-
The Catalog panel, which corresponds to the Items worksheet is the top tab.
- the Inventory panel (which corresponds to the ItemInventories worksheet),
-
the Item Vendor panel (corresponding to the ItemVendors worksheet),
-
and the Item Vendor UOM panel (which corresponds to the ItemVendorUOMs worksheet.)
- Enter criteria on the tabbed panels to identify the item records that you wish to download. See the detailed paragraphs about the panels below.
Selection Profile Fields - General
Data Entry Fields: The four Selection Profile panels contain blank data entry fields. You key data in to the fields, or choose a value from a list. Data entry fields are of two types: text and numeric.
- Text fields can contain number and letters.
- Numeric fields can only contain numbers.
In most cases, it's clear which sort of field is which. For example, the Item No, Description, Search words, Alias, and AssetLoc fields are text; Purchase Unit Price is numeric.
- In a text or numeric field, Supply Chain selects item records that match the value entered. For example, if you enter the value ID966 in the Manufacturer Item No field, the system searches for records whose manufacturer item number is ID966.
- In a text selection field, use the % with characters as a "wild card." Supply Chain looks for values that contain the characters. The position of the % determines where "wild card" characters are allowed.
12% - Supply Chain searches for records where the value in the selection field begins with 12.
%12 - Supply Chain searches for records where value ends with 12.
%12% - Supply Chain searches for records where the value contains 12.
For example, if you entered %1812% in the selection field for Item Number (which is a text field), the system would return item records with the following item numbers:
H1812
ZY1812m
1812345B.
For example:
Suppose that you have several item catalog records that contain the Search words: Gloves Exam NonSterile.
» Entering Exam by itself in the Search words or Alias field on the Item Selection panel will not find the item records.
In the Search words field (and also in the Alias field), you need to specify %Exam%,
which tells the system:
"Look for Exam, when it has anything (or nothing) in front of it, and anything (or nothing) after it.
- An empty text or numeric selection field means "all." The system selects records with any value in the field. For example, if you leave the Inventory Group field empty, Supply Chain returns item records that meet criteria in the selection profile -- from all inventory groups.
- To select records with empty or null values, enter *BLANK in the appropriate text or numeric field. For an aisle or bin field, enter *BLAN (with no K).
- To get records containing any value, enter a percent sign (%) by itself in the selection field. Supply Chain will select records containing a value, but not empty (blank or null) fields.
Check Boxes: For check box fields, no selection means "all." For example, the Item Type field has the options Stock, Non-stock. If neither value is selected, Supply Chain returns item records for both stock and non-stock items.
Selection Buttons: For selection buttons that contain the choices Yes, No, Both, the default value is Both.
Comparison Fields: Some fields, such as Create Date contain spaces for a comparison operator and a value. For the comparison operator, click the down arrow and select an operator from the list. The choices are:
EQ - "equal to"
NE - "not equal to"
GT - "greater than"
LT - "less than"
GE - "greater than or equal to"
LE - "less than or equal to"
UNSPSC code field:
The UNSPSC Code selection field supports partial and full UNSPSC code selections. The UNSPSC code is a character field on the Selection panel.
- If you enter an UNSPSC code that is less than eight characters, Supply Chain selects item records that begin with the entered value.
- When you enter a full, eight-character UNSPSC code, the system selects item records with only that UNSPSC code.
Examples:
| Enter: |
The system selects: |
| 42 |
Any UNSPSC Code beginning with 42, such as 42000000, 42120000, 42121500, 42121501, etc. |
| 42000000 |
Returns only 42000000 |
| 4216 |
Any UNSPSC Code beginning with 4216, such as 42161500, 42161501, 42161502, etc. |
| 42121506 |
Returns only 42121506 |
Notes on entering information in the panels' fields follow each figure in the next section.
Selection Profile Panels
This section reviews each selection profile panel, with tips about entering data in fields. Click Help for detailed information about each field.
Catalog Selections Panel
Figure 32 is the Catalog selections panel.
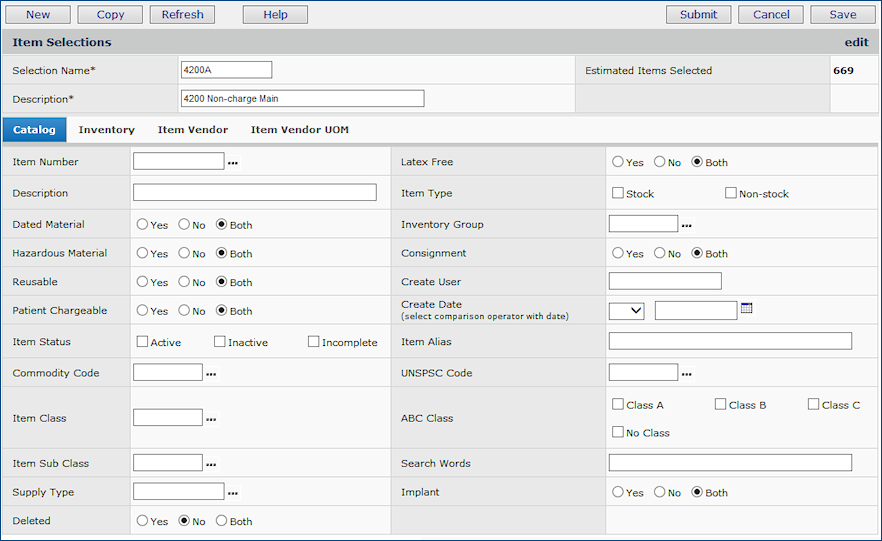
Figure 32 - Item Selections Panel for Downloading Item Catalog Records
Tips for the Catalog selections panel:
- Use the Item Number field to download the item catalog record for a single item.
- An entry in the Description or the Search Words field downloads any items whose descriptions or search words contain the entry.
- You can enter characters from the Catalog's Description of the item, the Item Alias, or any Search Words for the item that you wish to download.
- Enter the all the words in the description or all of the search words or the entire alias.
- Or, you can enter the first word, or part of the first word, followed by the % character. (% is a "wild card").
For example, to find "Halstead Mosquito Tip Forceps - Straight - 5" DSP," you could enter Hal%, Halstead%, %Mosquito%, or %DSP.
- Similarly, in the Search Words field, you can enter any search words from the item catalog record. The wild card % works the same way as for the Description field.
- In the Item Alias field, enter an item alias from the item catalog record. You can use the wild card % as well.
- Create Date requires both a comparison operator and a date. For the comparison operator, click the down arrow and select an operator from the list. The date is the key time point. The comparison operator directs the system to return items created on the date (EQ), on any date but the one you entered (NE), after the date (GT), before the date (LT), after or on the date (GE), before or on the date (LE).
Inventory Selections Panel
Figure 33 is the Inventory selections panel.
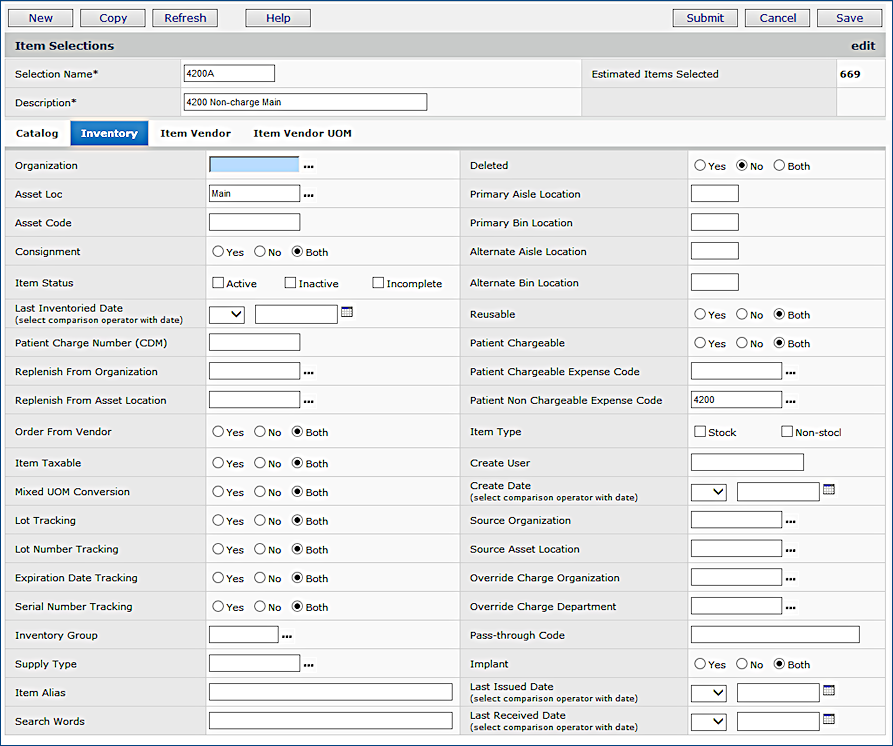
Figure 33 - Item Selections Panel for Downloading Item Inventory Records
Tips for the Inventory selections panel:
- The Search Words and Item Alias fields work the same way as these fields on the Catalog tab, except that the filtered data is from the Inventory (not from the Catalog). So, for example, if you have one Alias defined for an item on the item catalog record, and another Alias defined in an asset location, use the Inventory tab find the asset location item record with its alias.
- If you leave the Organization and Asset Loc fields blank, item records that meet the other criteria for all asset locations in all organizations are downloaded.
- Last Inventoried Date and Create Date both require a comparison operator and a date value. If you make no selection, the system searches for item records across all dates.
- Last Issued Date and Last Received Date require both a comparison operator and a date. For the comparison operator, click the down arrow and select an operator from the list. The comparison operator directs the system to return items issued on the date (EQ), on any date but the one you entered (NE), after the date (GT), before the date (LT), after or on the date (GE), before or on the date (LE).
- You can use Last Issued Date to select items that have never been issued. Enter an old date in the Last Issued Date selection field, for example LT 01/01/1999. Supply Chain will select records with a blank date field -- i.e., with no issue date -- because the system interprets the blank date field as zero, and zero is less than 01/01/1999. (Of course, if you have dates in your system older than 01/01/1999, you will need to chose another, still earlier date.)
Note: This technique works with any of the Date fields, for example if you wanted to find items that have never been received, or never inventoried, you would enter LT an old date in the Last Received Date or Last Inventoried Date, respectively.
Item Vendor Selections Panel
Figure 34 is the Item Vendor selections panel.
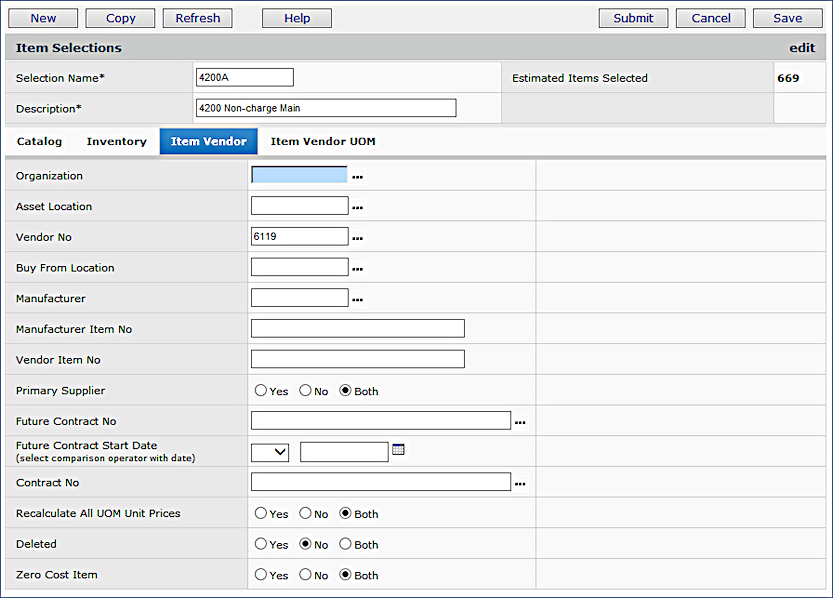
Figure 34 - Item Selections Panel for Downloading Item Vendor Records
Tips for the Item Vendor selections panel:
- As with the Inventory selections panel, on the Item Vendor selections panel, if you leave the Organization and Asset Loc fields blank, item records that meet the other criteria for all asset locations in all organizations are selected. the item catalog record's default organization and asset location are also selected.
- You can enter a Vendor No without a Buy From Location, and vice versa.
- The Future Contract Start Date requires a comparison operator and a date. Click the down arrow to select a comparison operator.
Item Vendor UOM Selections Panel
Figure 35 is the Item Vendor UOM selections panel.
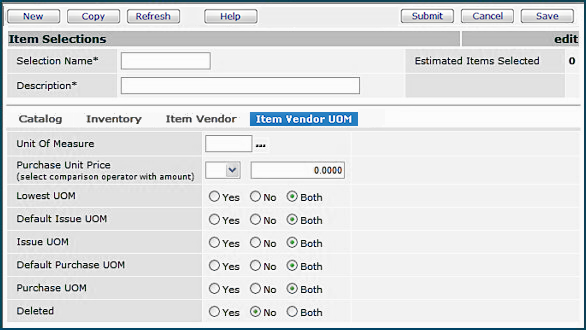
Figure 35 - Item Selections Panel for Downloading Item Vendor UOM Records
Tips for the Item Vendor UOM Selections Panel
- If you leave Unit of Measure blank, the system returns item records for all units of measure, according to any other specified criteria.
- Purchase Unit Price requires a comparison operator followed by a dollar amount. Click the down arrow to select a comparison operator.
Setting Items as Multi-Sourced / Resetting Items to Single Source
To set items as multi-sourced using mass maintenance:
- Create the items as usual using the item mass maintenance spreadsheets.
- Download the item inventory record for the items that you wish to multi-source. This step captures the ItemVendorID that Supply Chain assigned the items when they were created in the application. See Download Item Records for details.
- On the ItemInventories spreadsheet, set the column VendorOverride to 1 for each item that you wish to multi-source.
- Make sure that the Actioncode column for the items that you wish to multi-source contains C for "change."
- Leave the Actioncode column blank for items that you are not changing so that their item records will be ignored when the spreadsheet is uploaded.
- Upload the ItemInventories spreadsheet. The process is described in Worksheet Uploads.
If you wish, you can check the item records in Supply Chain to verify that they have been set to multi-source.
To reset multi-sourced items to single source:
- Follow steps 2, 3, 4, and 5 for multi-sourcing as explained previously; except: on the ItemInventories spreadsheet, set the column VendorOverride to zero (0).
- Upload the ItemInventories spreadsheet. See Worksheet Uploads for details.
You can set an item inventory item from multi-source back to single- source, even when inventory transactions exist for the item.
When you set a multi-source item to single-source, the Multi-Source flag will be set to Single-Source for the following:
- Item Inventory
- Inventory Quick Issue
- Inventory Quick Credit
- Order Guides
- Par Carts
- Pick Lists
- Requisitions for stock or non-stock items, regardless of status
All of the multi-source data that did not exist in the single-source structure will be copied to the single-source structure so that the following transactions may process:
- Requisitions for non-stock items that are Open, Rejected, Pending Approval, Approved, or Released
- Requisitions for non-stock items that are Backordered or Part-Received
- Requisitions for stock items, whether unapproved, approved, or released for picking
- Purchase Orders.
Multi-sourcing is explained in the online documentation topic: Multi-Sourcing an Item.
Columns on the Item Record Worksheets
An alphabetical list of columns on the four Item Record worksheet templates is in Table 1.
If you are using item record worksheets, you can download item records containing data in the following columns: VendorUnitPrice, FutureContractNo, FutureStartDate, ContractPrice4, ContractNo, and ContractUOM. However, for a contract item, if you make changes to these columns, on upload, Supply Chain ignores the changes.
Key to Table 1:
Column Name - The worksheet column heading.
Description - The function of the column/field in Supply Chain
Worksheet(s) - Excel worksheet templates that contain the column.
Value Required for New Item?
Y - In creating a new item, this column must contain a value
N - In creating a new item, the column can be left empty, and the system will use the default value.
Values - The type and length of values for the column.
Table 1 - Columns on Item Record Worksheets
A B C D E F G H I J K L M N O P Q R S T U V W X Y Z
Column Name |
Description |
Worksheet(s) |
Value Required? |
Values |
| ABCClass |
A classification for an item based on a percentage of
the annual expense for all items. Typical percentages are:
A
= 20% (the 20% of the items that carry 80% of the expense)
B = 30%
C = 100% - Class B% - Class A%
Sites can define ABC classes based on annual item expenses.
Any item can then be assigned the appropriate
letter class according the percentage of the expense that it carries.
|
ItemInventories |
Y |
Drop down selection. Select the cell; a down arrow appears. Click the arrow for a selection box and select the appropriate value.
1 = A
2 = B
3 = C
4 = No class. |
| Action Code |
Tells Supply Chain what to do with each uploaded item record. |
All |
Y |
A - New item record: add the item record to Supply Chain
D - Current item record: delete the item record from Supply Chain
C - Current item record: update the item record with information from the worksheet.
blank (no code entered) - Supply Chain skips the row when you upload the worksheet. This option is useful if you have many records on a worksheet, but only need to update a few. |
| AllowSubstituteYN |
Yes (1) - Supply Chain looks up an out-of-stock item on a substitute table to issue a similar item in its place. |
Items
ItemInventories |
N
N |
Boolean. 1 (yes) or 0 (no)
Default is 0. |
| AlternateAisleLoc |
If the item also has a secondary
location, the aisle identifier. |
ItemInventories |
N |
Text. Maximum length = 5 characters.
Default is "blank." |
| AlternateBinLoc |
If the item also has a secondary
location, the bin identifier. |
ItemInventories |
N |
Text. Maximum length = 5 characters.
Default is "blank." |
| ApprovedSubYN |
Flags the item as an approved substitute for a catalog item with the same item number. Vendors for EDI 850 POs can automatically substitute the item, which will appear on the EDI 855. |
ItemVendor |
N |
Boolean. 1 (yes) or 0 (no)
Default is 0. |
| AssetCode |
The asset code for the item, if assigned. Reports can be run against various
Asset Codes. |
ItemInventories |
N |
Text. Maximum length = 15 characters.
Default is "blank." |
| AssetLoc |
The asset location responsible for the item. |
ItemVendors
ItemInventories
ItemVendorUOMs |
Y
Y
Y |
Text. Maximum length = 15 characters.
ItemVendors
ItemVendorUOMs
If an item is single sourced, for the primary asset location enter the primary asset location.
If an item is multi-sourced, enter the asset location code for the multi-sourced inventory organization.
ItemInventories
Enter the asset location code for the inventory that you are assigning the item to. See the previous discussion. |
| AutoAdjMinStockYN |
Yes (1) - Supply Chain
will recalculate the Minimum Stock Level as follows: If Days
Between Delivery is specified, then:
Minimum Stock Level = Days Between Delivery * Average
Daily Usage
otherwise:
Minimum Stock Level = Pipeline Days * Average Daily
Usage
If No (0), Supply Chain allows an authorized user to determine the Minimum Stock
Quantity. Use Auto Adjust Minimum Stock level for stock items only. |
ItemInventories |
N |
Boolean. 1 (yes) or 0 (no)
Default is 0. |
| BuyFromLoc |
The primary vendor location that the item is usually purchased from. |
ItemVendors
ItemVendorUOMs |
Y
Y |
Text. Maximum length = 15 characters. |
| ChrgDeptOvrd |
The department charged for the item. This department overrides the
usual charge-to department. |
ItemInventories |
N |
Text. Maximum length = 15 characters.
Default is "blank." |
| CommodityCode |
A code that may be required and specified by local regulations to track certain types of commodities. It is a high-level classification of items into different groups for reporting. Examples: IV Solutions, Radioactive Materials. Commodity codes are user defined. |
Items |
N |
Text. Maximum length = 10 characters.
Default is "blank." |
| ConsignmentYN |
Yes (1) - Indicates that the item is a consignment item.
See Processing Consignment Items. |
Items
ItemInventories |
N
N
|
Boolean. 1 (yes) or 0 (no)
Default is 0. |
| ContractNo |
The number of any current contract that governs the item.
With Sourcing and Contract Management, changes made to this column are ignored. |
ItemVendors |
N |
Text. Maximum length = 15 characters.
Default is "blank." |
| ContractPrice4 |
The price of the item according to the current contract.
With Sourcing and Contract Management, changes made to this column are ignored. |
ItemVendors |
N |
Numeric: decimal value greater than zero with a maximum of four decimal places.
Default is "blank." |
| ContractUOM |
The unit of measure for the Contract Price.
With Sourcing and Contract Management, changes made to this column are ignored. |
ItemVendors |
N, unless Contract Price is
entered. |
Text. Maximum length = 2 characters.
Must be entered if Contract Price4 is entered.
Default is "blank." |
| DatedMaterialYN |
Yes (1) - The item has a "use-by" date. |
Items |
N |
Boolean. 1 (yes) or 0 (no)
Default is 0. |
| DaysBetweenDelivery |
Specifies the number of
days between deliveries by the vendor for this item. If a value is
entered in this field, and Auto Adjust Minimum Stock Quantity is Yes (1), Days Between Delivery will be used in the
calculation of Minimum Stock Quantity. |
ItemInventories |
N |
Numeric: Positive whole number between 0 and 9999999.
Default is 0. |
| DftIssueUOMYN |
Yes (1) - The unit of measure is the default unit of measure in which the item is issued. |
ItemVendorUOMs |
Y |
Boolean. 1 (yes) or 0 (no) |
| DftPurchaseUOMYN |
Yes (1) - The unit of measure is the default unit of measure in which the item is purchased. |
ItemVendorUOMs |
Y |
Boolean. 1 (yes) or 0 (no) |
| DropPatReconciliationYN |
Yes (1) - the item should be dropped from the lost
charge reconciliation report for every department.
Patient
charges are not reconciled with issues of the item. |
ItemInventories |
N |
Boolean. 1 (yes) or 0 (no)
Default is 0. |
| Export Control Code 1 thru 10 |
Any export control codes from the item inventory record. |
ItemInventories |
N |
|
| FutureContractNo |
The number of any future contract that governs the item.
With Sourcing and Contract Management, if the item is a contract item, on upload, Supply Chain ignores changes made to this column. |
ItemVendors |
N |
Text. Maximum length = 10 characters.
Default is "blank." |
| FutureStartDate |
The start date for any future contract that governs the item.
With Sourcing and Contract Management, if the item is a contract item, on upload, Supply Chain ignores changes made to this column. |
ItemVendors |
N |
Date: m/d/yyyy
Default is "blank." |
| HazdsMaterialYN |
Yes (1) - The item is hazardous material. The item is reportable on a standard hazardous material sheet. |
Items |
N |
Boolean. 1 (yes) or 0 (no)
Default is 0. |
| InventoryGroup |
Site-defined high-level classification of goods within an asset location. |
Items
ItemInventories |
N
N |
Text. Maximum length = 10 characters.
Default is "blank." |
| Implant |
Designates an implant item. |
Items
ItemInventories |
N
N |
|
| IssueUOMYN |
Yes (1) - The item may be purchased in the unit of measure. |
ItemVendorUOMs |
Y |
Boolean. 1 (yes) or 0 (no) |
| ItemAlias |
An alternate description or name for the item.
- The Items worksheet contains the alias from the item catalog record.
- The ItemInventories worksheet contains the alias from the item inventory record.
The item catalog and item inventory aliases may be different, or one may not be specified. |
Items
ItemInventories |
N
N |
Text. Maximum length = 100 characters.
Default is "blank." |
| ItemClass |
The item class. Item Classes are defined by a hospital in the Item Class Table. |
Items |
N |
Text. Maximum length = 10 characters.
Default is "blank." |
| ItemDesc |
A description of the item. |
Items |
Y |
Text. Maximum length = 100 characters. |
| ItemNo |
The item number. This is your site's identifier for the
item. |
All |
Y |
Text. Maximum length = 15 characters.
Note: You cannot mix system-assigned and user-specified item numbers in the same template.
All the item numbers must either follow the pattern *ItemNo_1, *ItemNo_2, *ItemNo_3,
or must all be identifiers that you create; e.g., syringe20, 1356A. |
| ItemPicURL |
The Internet location (URL) of a picture of the item. If you enter the URL, Supply Chain builds a link from the item number in the item catalog and Item Inventory lists to the web page that contains the item picture. Users can click the link to view the picture. |
Items |
N |
>Text. Maximum length = 250 characters.
Default is "blank."
|
| ItemStatus |
Active - The item is currently issued, ordered, and used at your site.
Inactive - The item is not currently used. An inactive item can be changed to active.
Incomplete - Vendor or other information about the item is missing. |
Items
ItemInventories |
Y
Y |
Drop down selection. Select the cell; a down arrow appears. Click the arrow for a selection box and select the appropriate value.
1 = Active
2 = Inactive
3 = Incomplete |
| ItemSubClass |
A sub classifier for an item, used for a finer distinction than Item Class. |
Items |
N |
Text. Maximum length = 10 characters.
Default is "blank." |
| ItemTaxableYN |
Yes (1) - the item is taxable. |
ItemInventories |
N |
Boolean. 1 (yes) or 0 (no)
Default is 0. |
| ItemType |
The item type: stock or non-stock.
Stock and non-stock items are listed in the item catalog. Stock items are inventoried. Non-stock items are not inventoried.
|
Items
ItemInventories |
Y
Y |
Drop down selection. Select the cell; a down arrow appears. Click the arrow for a selection box and select the appropriate value.1 = Stock;
2 = Non-stock
|
| ItemVendorID |
An internal Supply Chain designator for the vendor. |
ItemVendors
ItemVendorUOMs |
Y
Y |
Adding a new item - enter zero in the field.
Changing an existing item - leave the value untouched. |
| LatexFreeYN |
Yes (1) - The item does not contain latex. |
Items |
N |
Boolean. 1 (yes) or 0 (no)
Default is 0. |
| LotTrackingYN |
Yes (1) - The item is lot tracked (serial number, lot number, or expiration date). |
ItemInventories |
N
|
Boolean. 1 (yes) or 0 (no)
Default = 0 |
| LowestUOMYN |
Yes (1) - The unit of measure is the lowest unit of measure for the item.
This field is required for the item to be active. |
ItemVendorUOMs |
Y |
Boolean. 1 (yes) or 0 (no) |
| MaximumQty |
The maximum quantity of
an item that can be ordered at any one time. Backorders are
not included in the MSQ. |
ItemInventories |
N |
Numeric: Positive whole number between 0 and 9999999.
Default is 0. |
| MfrID |
The Supply Chain identifier for the manufacturer. |
Item Vendors
ItemVendorUOMs |
Y
Y |
Text. Maximum length = 15 characters. |
| MfrItemNo |
The manufacturer's identifier (item number) for the item. |
ItemVendors
ItemVendorUOMs |
Y
Y |
Text. Maximum length = 15 characters.
|
| MinStockQty |
A calculated value equal
to:
Days
Between Delivery * Average Daily Usage
if Days
Between Delivery > 0. Otherwise, it equals Pipeline
Days * Average Daily Usage. See
the Suggested
Order List. |
ItemInventories |
N
|
Numeric: Positive whole number between 0 and 9999999.
Default is 0. |
| MSDSURL |
MSDS means Materials Safety Data Sheet. The MSDS URL is the Internet location of the sheet. If Hazardous Materials is checked, under the Defaults tab, then enter information in the MSDS URL field. |
Items |
N |
Text. Maximum length = 250 characters.
Default is "blank." |
| OptimumPct |
A site-determined optimum stock level percentage used to
modify reorder quantity as additional safety stock. For example, if the Optimum Percentage
Increase is set at 75%, then when the item comes up for reorder of
100, the optimum percentage increase would apply and make the
order 175. |
ItemInventories |
N |
Numeric: Decimal value between 0 and 9999.999.
Default is 0. |
| OrderFromVendorYN |
Yes (1) - the item is ordered from a
vendor.
No (0) - the item is replenished via system transfer from the
organization
and asset location specified in ReplenishFromOrg and ReplenishFromAssetLoc. |
ItemInventories |
N |
Boolean. 1 (yes) or 0 (no)
Default is 1. |
| Org |
The organization in the hospital that the asset location for the item belongs to.
|
ItemVendors
ItemInventories
ItemVendorUOMs |
Y
Y
Y |
Text. Maximum length = 15 characters.
ItemVendors
ItemVendorUOMs
If an item is single sourced, enter the organization code for the primary organization.
If an item is multi-sourced, enter the organization code for the multi-sourced inventory organization.
ItemInventories
Enter the organization code for the inventory that you are assigning the item to. See the previous discussion. |
| PackagingInfo |
Notes or instructions about packaging for the item. |
ItemVendors |
N |
Text. Maximum length = 100 characters.
Default is "blank." |
| PassThroughCode |
A code used for insurance billing purposes, such as a Medicare code.
If your organization is set up for automatic copying of default values to item inventory records:
- For additions or changes, the value in this field on the Items worksheet is copied to any new or existing item inventory records. See the discussion in the Organization topic: Assign Patient Charge Number (CDM) From Catalog.
- If you change this value on the Item Inventories worksheet, there is no effect on the item inventory record, there is no effect on the item inventory record because the item catalog default value takes precedence. |
Items
ItemInventories |
N
N |
Text. Maximum length = 40 characters.
Default is "blank." |
| PatBillableExpense |
An Expense Code for expenses
that are directly billed to patients. This field is required
if PatientChargeableYN is Yes (1).
The Expense Code corresponds to the materials expense segment of an account code in the Chart of Accounts. When the item is requisitioned or purchased, the cost of the item is entered in the account.
If your organization is set up for automatic copying of default values to item inventory records:
- For additions or changes, the value in this field on the Items worksheet is copied to any new or existing item inventory records. See the discussion in the Organization topic: Assign Expense Codes From Catalog.
- If you change this value on the Item Inventories worksheet, there is no effect on the item inventory record , there is no effect on the item inventory record because the item catalog default value takes precedence. |
Items
ItemInventories |
Y
Y
If Patient
ChargeableYN
is 1. |
Text. Maximum length = 15 characters.
Default is "blank."
A value must be supplied in either PatBillableExpense or in PatNonBillableExpense that corresponds to the value in PatientChargeableYN. |
| PatChargeItemNo |
Also called the CDM.
The hospital-assigned Patient Charge Number passes to the patient billing system for patient bills and/or insurance compliance.
Patient
chargeable items issued to a department print on the patient reconciliation report.
If your organization is set up for automatic copying of default values to item inventory records:
- For additions or changes, the value in this field on the Items worksheet is copied to any new or existing item inventory records. See the discussion in the Organization topic: Assign Patient Charge Number (CDM) From Catalog.
- If you change this value on the Item Inventories worksheet, there is no effect on the item inventory record because the item catalog default value takes precedence.
|
Items
ItemInventories |
N
N |
Text. Maximum length = 15 characters.
Default is "blank." |
| PatientChargeableYN |
Yes (1) - The item is charged to patients. |
Items
ItemInventories |
N
N |
Boolean. 1 (yes) or 0 (no)
Default is 0. |
| PatNonBillableExpense |
An Expense Code for expenses that are not directly billed to patients.
This field is required
if PatientChargeableYN is No (0). See PatBillableExpense and PatientChargeableYN.
If your organization is set up for automatic copying of default values to item inventory records:
- For additions or changes, the value in this field on the Items worksheet is copied to any new or existing item inventory records. See the discussion in the Organization topic: Assign Expense Codes From Catalog.
- If you change this value on the Item Inventories worksheet, there is no effect on the item inventory record, because the item catalog default value takes precedence.
|
Items
ItemInventories |
Y
Except, can be left blank for a changed item. |
Text. Maximum length = 15 characters.
Default is "blank."
A value must be supplied in either PatBillableExpense or in PatNonBillableExpense that corresponds to the value in PatientChargeableYN. |
| PrefOrderFactor |
The minimum divisor for an ordered quantity of an item on a purchase order.
If the PrefOrderFactor is specified, the PrefOrderUOM must be specified.
When values exist in these fields, the ordered quantity must be evenly divisible by the preferred order factor. If not evenly divisible, the quantity is rounded upwards to the next evenly divisible quantity. |
ItemInventories |
N |
Integer |
| PrefOrderUOM |
The unit of measure for the PrefOrderFactor. |
ItemInventories |
N |
Text. Must be a valid unit of measure for the site. |
| PrimaryAisleLoc |
The storeroom aisle where the item is
kept as the item's main location |
ItemInventories |
N |
Text. Maximum length = 5 characters.
Default is "blank." |
| PrimaryBinLoc |
The storeroom bin where the item is
kept as the item's main location. |
ItemInventories |
N |
Text. Maximum length = 5 characters.
Default is "blank." |
| PrimarySuppYN |
If the item is supplied by multiple vendors, this column indicates that the vendor listed is the main supplier of the item. |
ItemVendors |
N
See Caution
 |
Boolean. 1 (yes) or 0 (no)
Default is 0.
Caution: If you leave this column blank or delete the column (and thereby, accept the default of zero), you will not have defined a primary vendor, and the Item Vendor record will be Incomplete. |
| PrtPatientLabelsYN |
Yes (1) - Patient labels are printable for
the item. |
ItemInventories |
N |
Boolean. 1 (yes) or 0 (no)
Default is 0. |
| PurchaseUOMYN |
Yes (1) - The item may be purchased in the unit of measure. |
ItemVendorUOMs |
Y |
Boolean. 1 (yes) or 0 (no) |
| RecalcAllUOMPricesYN |
This field recalculates all UOM prices based on a new price for the lowest UOM.
|
ItemVendors |
N |
Boolean. 1 (yes) or 0 (no)
Default is 1. |
| ReplenishFromAssetLoc |
The asset location that orders or
replenishes the item if OrderFrom VendorYN is zero. Supply Chain defaults to the ReplenishFromOrg and ReplenishFromAssetLoc specified in Current Settings. |
ItemInventories |
N |
Text. Maximum length = 15 characters.
Default: Supply Chain uses the Asset Location in Current Settings. |
| ReplenishFromOrg |
The organization that replenishes or orders the item if OrderFrom VendorYN is zero. |
ItemInventories |
N |
Text. Maximum length = 15 characters.
Default: Supply Chain uses the Asset Location in Current Settings. |
| ReusableItemFee |
The charge for processing a reusable
item (e.g., sterilization) so that it can be issued. |
ItemInventories |
N |
Numeric: Decimal value > 0, with a maximum of four decimal places.
Default is 0.0. |
| ReusableYN |
Yes (1) - The item is reusable. Departments issued reusables are not charged for the purchase cost. |
Items
ItemInventories |
N
N |
Boolean. 1 (yes) or 0 (no)
Default is 0. |
| SafetyStockQty |
The minimum acceptable stock quantity
for an item. The Safety Stock Quantity is site-defined. |
ItemInventories |
N |
Numeric: Positive whole number between 0 and 9999999.
Default is 0. |
| SearchWords |
Words that users may associate with the item. For example, gauze pads might have the search words "gauze," "dressings," "pad," etc. |
Items |
N |
Text. Maximum length = 250 characters.
Default is "blank." |
| Supply Type |
A supply type defined in the site's supply type table. |
Items
ItemInventories |
N
N |
|
| TrackExpDtYN |
Yes (1) -Expiration Date
tracking is in effect. |
ItemInventories |
N |
Boolean. 1 (yes) or 0 (no)
Default = 1. |
| TrackLotNoYN |
Yes (1) - Lot Number tracking is in effect. |
ItemInventories |
N
|
Boolean. 1 (yes) or 0 (no)
Default = 1. |
| TrackSerialNoYN |
Yes (1) - Serial Number tracking is in effect. |
ItemInventories |
N |
Boolean. 1 (yes) or 0 (no)
Default = 0. |
| UnitOfMeasure |
A unit of measure for the item. |
ItemVendorUOMs |
Y |
Text. Maximum length = 2 characters. |
| UNSPSCCode |
The UNSPSC®, United Nations Standard Products and Services Code®, associated with the item. The code has four levels of classification: segment, family, class, and commodity. Two digits are available for each level. See Using UNSPSC Codes. |
Items |
N |
Numeric: Positive whole number between 0 and 9999999.
Default is "blank." |
| UOMConvFactor |
The multiple of the smallest Unit of Measure contained in each larger Unit of Measure. |
ItemVendorUOMs |
Y |
Numeric: Positive whole number between 0 and 9999999. |
| VendorItemNo |
The vendor's identifier (item number) for the item. |
ItemVendors
ItemVendorUOMs |
Y
Y |
Text. Maximum length = 40 characters.
|
| VendorNo |
The vendor number. This number identifies the vendor to Supply Chain. |
ItemVendors
ItemVendorUOMs |
Y
Y |
Text. Maximum length = 15 characters. |
| VendorOverrideYN |
Yes (1) on the ItemInventories worksheet - The item is multi-sourced and has a different set of vendors, vendor units of measure, etc. for one or more asset locations.
On the Items worksheet, this column is ignored by Supply Chain. |
ItemInventories
Items
|
N - ignored
N
|
Boolean. 1 (yes) or 0 (no)
Default is 0.
|
| VendorUnitPrice |
The price of the item per unit of measure, including any vendor markup. (Zero is allowed.)
With Sourcing and Contract Management, changes made to this column are ignored. |
ItemVendorUOMs |
Y |
Numeric: a decimal value greater than zero with a maximum of four decimal places. |