Organization and department records for your medical center are set up in the system based on your materials management process. From time to time, you may need to change information in the system's records as you add new departments or reorganize. This topic explains how to identify your site's organizations and departments to the application.
Medical center departments have continuing supply needs that the system handles through asset locations. An asset location is a processing center for supply transactions and supply records. It contains item inventory data, vendor and contract information, requisitions and issues to departments, purchase orders, and so on. For example, if a hospital prefers to handle supplies according to the surgical and patient care functions, it might set up an asset location for an OR and another for nursing stations.
At some hospitals, asset locations may have actual physical inventory. Others sites may use asset locations in a stockless supply environment. Asset locations can be associated with actual warehouse areas, but are also central to item management in stockless environments. You will need to define one or more asset locations and assign items to them, as explained in the following sections.
Your medical center structure may include multiple organizations, each with some autonomy in managing supplies. An organization may have only one asset location, or several asset locations. Medical centers that contain multiple organizations and asset locations can perform requisitioning, purchase ordering, and other activities across the different organizations and asset locations. Inter-organizational permissions must be set for each organization, as described in this topic. Inter-organizational processing is covered in detail in Processing Items Across Organizations.
A Group Purchasing Organization (GPO) is a purchasing collective, often owned by member hospitals or hospital associations. The GPO negotiates purchase agreements for supplies, drugs, food, services, capital equipment, software, etc. If your medical center has a contract with a GPO for purchasing discounts on items, you can define the GPO to the system.
Suggestion for using this topic: The sections below contain a great deal of detailed information. It may be helpful to read the relevant discussion for an organization, asset location, department, or GPO — depending on your interest — before you begin to work with the application panels.
To access organization, department, or asset location data, the organization, department, or asset location must be included in a user's data profile.
The ability for any user to view, change, and create values in tables is controlled by the "Tables" role object. The security setting to create or copy an organization must be set to Create or All. To edit an existing organization record, the setting must minimally be Modify.
The ability to create or edit asset locations is controlled by the "MMTables" role object. To create or copy an asset location, the minimum setting is Create.
Creating or editing departments is governed by the "DeptReq" role object. The minimum setting to create or copy a department is Create.
See Work with user roles for details on roles and role objects.
The process of creating a data record for an organization is described below. The same panels are used for editing existing organization records.
Create Accounts and Identify Default Chargeable and Non-Chargeable Expense Codes Accounts:
Setting up an organization involves assigning accounts to the organization. The following accounts are typically used by organizations:
You may wish to look at the organization record for an existing organization to see which accounts are used at your site. Then, you must either create the accounts that you will need or verify that the accounts exist, and know the account codes.
Sales Tax Accounts:
Users must create Tax Rates before specifying the Sales Tax accounts on organization records because the rate is needed to set the account.
Patient Chargeable and Non-Chargeable expenses:
Organizations designate one account for patient chargeable expenses, and one account for non-chargeable expenses. The accounts are entered in the Expense Code table, and each is assigned an identifying code. The codes are then entered in the organization record. The instructions below explain how to create accounts and identify accounts for chargeable and non-chargeable expenses.
If you are using General Ledger:
If you are using Materials Management or Accounts Payable:
As you set up the accounts, a message appears.
Click OK to save the accounts, even though the organization does not yet exist to the system.
Important: After you create an organization, you will need to reset your user permissions so that you can access the organization's data. If you are a system administrator, you can set user permissions through the User Administration facility. If you are not a system administrator, you will need to contact that person for assistance.
You need to associate an Expense Code with each GL account expense segment.
When you create purchase orders and requisitions, the application uses the expense segment to construct the complete GL account number that contains items' costs. See the Overview to the topic "Using General Ledger Account Validation." (The Overview should be helpful, even if your site does not use account validation.)
Expense codes are also used in creating a department's Expense Code Allowances in organizations that have selected the field Department Allowance Enabled on the MM Info tab of the organization record. (See the discussion on Department Expense Code Allowances.)
Once you have created the accounts and associated expense codes with them, you use the expense code for chargeable expenses in the Patient Revenue Offset Account field on the GL Accounts panel for the organization.
This image shows the Organization Main edit panel for a customer with Consolidated Payments Exports enabled. For a customer without this feature, there would be no Security tab.
If you use Accounts Payable, be sure to enter accounts payable information on the AP Information and Form 1099 Information panels.
If you use Materials Management, enter materials management information on the MM Information panel.
If you use General Ledger, complete the fields on the GL Information panel, as needed.
For your organization to function properly with all of the application's features, you will need to enter information on several of the tabbed panels. The paragraphs below describe the Organization Edit panels. The panels are:
Several other capabilities are available for organizations.
Fields on the Main panel cover basic information about the organization, such as its description, how many licensed beds it has, and more. Table 1 is a summary of information provided by the Main panel. Notes follow the table.
Field |
Function |
Complete this field when... |
|
Description |
Describes the organization. |
Always. It is required. |
|
Organization GL Segment |
Provides the first segment in the account number mask. |
Always. It is required. |
|
Licensed Beds |
Provides the number of licensed beds. |
A count of licensed beds for the organization is needed on record. |
|
Inter-Org Transactions Allowed |
When set, allows the organization to participate in cross-organizational processing of materials. |
The organization is a participant in cross-organizational processing of supplies. See Processing Items Across Organizations. |
|
Calculate Tax For |
When checked, tax on requisitions and purchase orders is calculated. The Taxable field on requisitions and purchase orders is checked by default. (You can uncheck it, if needed.) |
The organization charges or is charged tax on requisitioned or purchased items. Sales taxes of different kinds can be set up in the system. See Using Sales Taxes for details. You can also set up and require tax on a departmental or asset location basis. Similar fields exist on both the asset location and department record. |
|
Print Tax on |
Prints the calculated materials tax on POs. |
You need to print a materials tax. |
|
Default Buyer |
Assigns a buyer for the organization. Buyers can also be assigned to departments, asset locations, item types, commodity codes, and vendors. Assigning buyers is covered in Set up approvers and approval groups. |
Always. It is required. |
Bill-To GLN Code |
The GLN code for the organization's bill-to location, if GLN codes are used. |
|
|
Ship-To GLN Code |
The GLN code for the organization's ship-to location, if GLN codes are used. |
|
|
Materials |
The name of the Materials calendar that the organization uses. |
Always. It is required. |
|
Materials |
Shows the current year, according to the Materials Calendar. The application populates this field. |
|
|
Materials |
Shows the current period, according to the Materials Calendar. The application populates this field. |
|
|
Financial |
The name of the Financial calendar that the organization uses. |
Always. It is required. |
|
Financial |
Shows the current year, according to the Financial Calendar. The application populates this field. |
|
|
Financial |
Shows the current period, according to the Financial Calendar. The application populates this field. |
|
|
Reporting Year |
Specifies the year (from your Financial calendar) to be normally used in running reports. If your organization occasionally needs reports for a different year, then users who run the reports can access the Misc Functions menu to change the year. See Notes. |
The organization runs reports for a year other than the current year. To change the year for which you run reports select Misc Functions > Change Reporting Period/Year. |
|
Reporting Period |
Specifies the normal period to be used (from your Financial calendar) in running reports. If your organization occasionally needs reports for a different period, users who run the reports can access the Misc Functions menu to change the period. See Notes. |
The organization runs reports for a period other than the current period. To change the period for which you run reports select Misc Functions > Change Reporting Period/Year. |
|
Default |
The year used on invoices, by default. This field is set to be the same as the Financial Current Year when your site converts to the system. If you enter a Default Invoicing Year or Default Invoicing Period that is different from the current financial period/year, you need to make sure that the Prior Period Entry and Future Period Entry fields coincide with the new default period/year. For example, if Future Period Entry = 0, Current Financial Period/Year = 11/2019, and Default Invoicing Period/Year = 12/2019, when you create an invoice, you get an error saying that Period/Year is invalid. This error occurs because you have set the organization to not allow future period entries. This constraint also applies in the reverse situation where you have the Default Invoicing Period/Year less than the Current Financial Period/Year and the Prior Period Entry = 0. If you make an entry in these fields, you need to monitor (and possibly change) the entry so that you do not have problems when you create invoices. This field can only be set on the Main panel when you create an organization. After the organization has been created, to change the Default Invoicing Year, select Misc Functions > Change Invoicing Period/Year from the Materials Management or AP contents. Security: The "InvoicingPeriodYear" role object must be set to Modify or higher in the user profiles of users who need to change the default. |
Your default invoicing year is not the same as the Financial Current Year or has otherwise changed. |
|
Default |
The period used on invoices, by default. See the discussion in the above row for Default Invoicing Year. This field can only be set on the Main panel when you create an organization. To change the Default Invoicing Period after the organization has been created, select Misc Functions > Change Invoicing Period/Year from the Materials Management or AP contents. Security: The "InvoicingPeriodYear" role object must be set to Modify or higher in the user profiles of users who need to change the default. |
Your default invoicing year is not the same as the Financial Current Period or has otherwise changed. |
|
Prior Period |
The periods before the current one for which data (such as invoices) can be entered for the organization. Note: Users also have prior- and subsequent-period-entry permissions set in their user profiles. See Notes. |
The organization creates invoices for periods earlier than the current one. If you use this field, be sure to set the appropriate permissions for users who are creating the data. See Set Up and Maintain Users, "Setting AP Limits". |
|
Future Period |
The periods after the current one for which data (such as invoices) can be entered for the organization. Note: Users also have prior- and subsequent-period-entry permissions set in their user profiles. See Notes. |
The organization creates create invoices for periods after the current one. If you use this field, be sure to set the appropriate permissions for users who are creating the data. See Set Up and Maintain Users, "Setting AP Limits". |
For each year, be sure to set up new calendars, and enter a new Materials Current Year on the Main panel. Otherwise, error messages will appear when you create purchase orders in the new year. Similarly, be sure to reset the Financial Current Year.
If your organization transfers items to another organization, you need to set the appropriate permission, as described in Table 1 (above). (See also Processing Items Across Organizations for more information.) When you are finished entering information on the organization panels for the new organization, you must open the inter-organization payables and receivables accounts record to define the accounts.
For asset locations that are part of your organization, you also need to set permission for inter-organizational processing. Each asset location involved in inter-organizational materials supply must be given permission, and accounts for payables and receivables set up. See the Asset Location discussion below.
The Reporting Year and Reporting Period fields (located on the Organization Main panel) specify the year and period that are used for reports for your organization based on your organization's financial calendar.
These fields specify whether you can create records, such as payments, budgets, journal vouchers, etc. for periods other than the current period. If only the current period is allowed, the values in the Prior Period Entry and Future Period Entry fields are zero. Otherwise, the value in Prior Period Entry shows the periods before the current period for which records can be created for the organization. Future Period Entry shows the periods after the current period for which records can be created for the organization.
You will need to identify your organization's accounts when you create the organization.
If your GL Accounts have been imported to the system during implementation, you will be able to access them when you create each organization. Otherwise, when you click each account prompt, you will get only the accounts that you set up in Critical First Steps. The fields located on the GL Accounts panel are listed in Table 2.
|
Field |
Function |
Complete this field when... |
|
AP Liability |
The GL account code that contains the amount owed on open Accounts Payable invoices. |
Always. It is required. |
|
AP Price Variance |
The GL account code for "in tolerance" differences between the purchase order unit cost and invoice unit cost during invoice matching. See Setting Tolerances for Invoice Matching for details on tolerances. |
Always. It is required. |
|
Freight Account |
The GL account code for freight charges on matched invoices. |
The organization has freight charges on purchase orders and invoices. If you enter a General Ledger account code for Freight, the system will pre-build a distribution line on invoices for amounts charged to the account. |
|
Invoice Accrual |
The GL account code for accumulated unapproved invoice liabilities. |
The organization accrues unapproved invoice liabilities until the invoice approval process is completed. |
|
Other Account |
The GL account code for any other charges that commonly occur in materials purchase or processing. |
The organization commonly records other financial data, such as charges of a particular type on purchase orders or invoices. If you enter a General Ledger account code for Other, the system will pre-build a distribution line on invoices for amounts charged to the account. |
|
Payment Discount |
The GL account code for payment discounts on invoices that are matched. |
The organization's invoices are subject to discount. |
|
Use Tax Account |
The GL account code for use tax liability. |
The organization's purchases are subject to use tax. |
|
Inventory Adjustment Account |
The GL account code for inventory adjustments. See Adjusting Item Inventory. You should not use the inventory account for this purpose. |
Always. It is required. |
|
Inventory Account |
The GL account code for inventory value. This asset account is increased (debited) when receipts are processed and decreased (credited) when issues are processed. |
Always. It is required. |
|
Markup Revenue |
The GL account code for markup on issues from inventory for departments with a specified markup. |
Always. It is required. |
|
Patient Revenue |
The GL account code for expenses charged to patients. The application transfers the issues for patient chargeable items from the departmental account to this account when patient charges are processed. Before you enter an account number in this field, you must set up the account in the system, and then associate an Expense Code with the account number. See the Notes following this table for instructions. |
Always. It is required. |
|
PO Liability Account |
The GL account code that accrues the amount owed on items received. This account is increased (credited) when receipts are processed. The amount in this account represents receipts that have not yet been invoice matched. |
Always. It is required. |
|
Retained Earnings |
The GL account code for retained earnings. |
The organization tracks accumulated retained earnings — the profit/loss component of materials purchase and use. |
If General Ledger account validation is enabled at your site, see Using General Ledger Account Validation for details about expense codes.
Click the Address tab for the organization's address. Fields on the Address panel are listed in Table 3.
|
Field |
Function |
Complete this field when... |
|
Organization Name for PO Bill To |
Gives the name that the organization uses for billing purposes. |
The name to be used for billing differs from the organization name recorded in the system. |
|
Address 1 |
Provides address information. |
Always. It is required. |
|
Address 2 |
Provides address information. |
The organization has more than one line of address information. |
|
Address 3 |
Provides address information. |
The organization has more than two lines of address information. |
|
City |
Records the city. |
Always. It is required. |
|
State |
Records the state. |
Always. It is required. |
|
Zip |
Records the zip code. |
Always. It is required. |
|
Country |
Records the country, if other than the US. |
Optional. |
Click the MM Information tab to enter materials management information for your organization. A summary of the fields is located in Table 4.
|
Field |
Function |
Complete this field when... |
|
Costing Method |
The currently supported Costing Method is Weighted Average. |
|
|
PO SOL Print Sequence |
Identifies the sort key for the Suggested Order List (SOL). Click here for an example of the SOL. |
The organization's staff have a preferred sort field. Select either Item Number to sort by item number or Aisle/Bin to sort by the aisle/bin code. |
|
Default Blanket |
The default reason that you use for blanket purchase orders. You need to define reasons and reason codes before you can use them. See Notes. |
The organization uses blanket purchase orders. See Notes for information about defining reason codes. See Working With Blanket Purchase Orders for details on blanket POs. |
|
Default Physical |
The default reason that you use for doing a physical inventory. You need to define reasons and reason codes before you can use them. See Notes. |
The organization does physical inventories. See Perform a Physical Inventory. |
|
Default Inventory Adjustment Reason |
The default reason that you use when making an inventory adjustment. You need to define reasons and reason codes before you can use them. See Notes. |
The organization makes ad-hoc adjustments to inventory. See Adjusting Item Inventory. |
Cardinal Hospital |
The hospital account number provided by Cardinal. This account number allows access to the Cardinal web site through the application. |
The organization sends purchase orders to Cardinal. |
|
Create PO |
Permits the organization to create purchase orders. |
The organization creates purchase orders. |
|
Credit PO |
Permits the organization to create credit purchase orders. |
The organization creates credit purchase orders. If the organization uses credit purchase orders, you set up reason codes for returned items in the Reason for Credit table. See Notes for information about defining reason codes. |
|
Credit PO Review Process Enabled |
Places Quick Credit Return-to-Vendor POs into a queue for buyer review and shipment confirmation. |
The organization requires review of Department-to-Vendor returns. Return-to-Vendor Quick Credits are routed through a process of buyer review followed by shipment confirmation. |
|
Requisition Non-file Manufacturer Fields Required |
When this field is checked, manufacturer information fields are required in requisitions of non-file items. |
The organization requires manufacturer ID and manufacturer item number on requests for non-file items. |
|
No Of Days for STAT Requisition |
Represents the time period (number of days) that determines a STAT requisition. A requisition is STAT based on the number of days between the request and the required date. If the difference is less than or equal to the value in No of days for STAT Requisition, the requisition is automatically designated as STAT. If you do not want the application to automatically designate requisitions as STAT, set the number of days in this field to zero. |
The organization uses STAT requisitions. |
|
EDI Confirm (855) Percent Tolerance Enabled |
If EDI (855) line dollar percentage tolerances have been set up in System Values, setting this flag allows the tolerance check to be performed. |
|
|
Separate PO |
Specifies that POs are separated for different item types (i.e., stock and non-stock.) |
The organization requires separate purchase orders for stock and non-stock items. Separating purchase orders and how to set up your organization for separate POs is a detailed topic. See Separating Purchase Orders/Using Direct Delivery Purchase Orders. |
|
Default Buyer For |
Specifies the user ID of the default person in your organization who buys stock items. |
The organization requires a separate buyer for stock items. See Assigning Buyers to Organizational Units and Vendors for details. |
|
Default Buyer |
Specifies the user ID of the default person in your organization who buys non-stock and non-file items. |
The organization requires a separate buyer for non-stock/non-file items. See Assigning Buyers to Organizational Units and Vendors for details. |
|
Allow Requesters to Approve Their Own Requests |
- Applies to requisitions and check requests only. The default setting is selected (i.e., "yes"). Selected: Approvers in an approver group who make requests can approve their own requests. Unselected: For a requester in an approver group, the application routes the approval automatically to the next highest approver in the group above the requester. |
The organization has users who are members of approver groups, and does not want those users to approve their own check requests and requisitions. |
| PO With Project Code: Comm Type Print | For capital POs, sets Comm Type to Print for a Project Code associated with the PO. | Used to avoid transmitting capital POs via EDI. |
|
Assign Patient Charge Number (CDM) From Catalog |
When selected, the default Patient Charge Number and Pass-Through number on the Item Catalog panel (Defaults tab) is automatically written to inventory records, when the item is assigned to a new inventory. |
|
|
Assign Expense Codes |
When selected, the default Billable and Non-Billable Expense Codes specified on the Item Catalog panel (Defaults tab) are automatically written to inventory records when the item is assigned to a new inventory. |
|
| Non-Stock Over Receiving Allowed |
Determines whether over-receiving of non-stock PO lines is permitted for the organization. By default, the field is checked, and overages are allowed. If the field is not checked, when clearing non-stock quantity exceptions with “Invoice Correct,” you must select a department for the overage. If a department is not selected to receive an overage, the overage is issued to item inventory OHQ. If a department is selected, the overage issued to the department. |
You wish to explicitly prevent or allow non-stock overages for an organization. |
|
Multi-Source Allowed |
Gives the organization permission to order supplies from multiple sources. |
The organization purchases the same item from multiple vendors. |
|
Department Allowance Enabled |
When selected, departments in the organization can set expense allowances, for both period and year, for specific expense codes. Allowances are set on the department record's Allowance tab (not visible if the Department Allowances flag is not selected). |
You plan to let departments track expense allowances. |
|
Restrict PO/Invoice |
Forces payment of an invoice for a contract item at the PO price. Members of the organization cannot change prices on purchase orders or invoices. |
You have contract items, and wish to pay invoices always at the contracted price (on the invoice). This field sets the restriction for members of an entire organization. |
|
Non-file Commodity Code Required |
When selected, a commodity code must be entered on non-file lines for requisitions and purchase orders. If this flag is checked, and you create a non-file line on a requisition or PO, the application displays an error message. You must enter a commodity code for the line. Note: The requirement to include a Commodity Code is not enforced for requisitions created via Punchout |
You wish to monitor and control non-file purchasing. |
|
Department Inventory Valuation Method |
Identifies the default inventory valuation method (if any) used by department inventories in the organization. Options are: |
Users in the organization are creating department inventories and you wish to specify a default valuation method for all the departments to use. No Default is the default method. See Create a Department Inventory for details. |
|
EDI Confirm (855) Cap Tolerance Enabled |
If EDI (855) line dollar amount tolerances have been set up in System Values, setting this flag allows the tolerance check to be performed. |
|
|
Auto Receive |
When selected, this field implements the auto-receiving feature for bill-only purchase order lines. |
For receiptless PO lines, the system normally creates a receipt during invoicing. The auto-receiving feature lets you automatically receive bill-only receiptless lines so that no receipt is created for the invoice, but is instead created when the PO is authorized. |
Auto-Create Picks for Secondary Supply Locations |
Select this field to automatically build picks for items in a secondary asset location when the picks are for items on a single, imported par cart or other imported requisition. Note: You also need to select a similar field on the secondary asset location record. |
Some of the fields on this panel are for reason codes. A reason is associated with elements such as blanket purchase orders, edits to an approved purchase order, and others. Notes on other fields are below.
You can provide a reason for a requisition, purchase, purchase change, inventory adjustment, credit, debit, or approval rejection, and others. Each reason has an associated code. Reasons and reason codes are organization-specific, and you will need to define them for each new organization before you can use them.
When the field Restrict PO/Invoice Price Change on Contract Items is selected, members of the organization are prevented from changing the PO Unit Cost and the Next Estimated Receipt Unit Cost on a purchase order line for a contract item. The setting also restricts users from selecting the Invoice Correct field in clearing exception prices for contracted items. The restriction forces payment of an invoice at the PO price.
Price changes to contract items on purchase orders and invoices can be restricted for individual users, organizations, or for an entire site.
Selecting the restriction field for an organization prevents any user in the organization from changing prices.
When this restriction is set...
- Modifying a PO Unit Cost or the Next Estimated Receipt Unit Cost on a purchase order for a contract item generates an error message.
- Selecting the Invoice Correct field in clearing exception prices for contracted items generates an error message.
Processing stops until the user acknowledges the message. The price cannot be changed.
- If the restriction is not selected for a user profile, a user in the organization can change cost/exception prices as long as the restriction is not set at either the organization or system values level.
- If the restriction field is selected for the organization, no user in the organization can change prices, regardless of the user profile setting.
For details on restricting individual users, see User Restriction Against Changing Prices on Contract Items.
- If the field is not selected at the System level, price changes can be controlled at the organization level and/or the user level.
- If the restriction field is selected in System Values, no one at the site can change a PO price for a contracted item.
For details on restricting an entire site, see Restrict PO/Invoice Price Change on Contract Items for an Entire Site.
Click the AP Information tab to enter materials management information for your organization. A summary of the fields is located in Table 5.
|
Field |
Function |
Complete this field when... |
|
Organization Type |
Specifies whether the organization create invoices, pays invoices, or both. |
The organization is only a paying organization, or only an invoicing organization. The default is both invoicing and paying. |
|
Default Paying Organization |
Specifies if a different organization pays the organization's invoices. If this field is blank, then the organization pays its own invoices. |
Another organization pays the organization's invoices. When an invoice for an organization is imported, responsibility for the invoice charges can belong to another organization. This field specifies a different organization for charges. On invoice imports, the column PayingOrgOverrideYN lets you override the value in this field. For example, for some types of invoice charges, AP staff may not wish to use a different paying organization (specified in this Default Paying Organization field), and instead have the organization listed on the invoice pay the charges. In this case, on invoice imports, you would set the column PayingOrgOverrideYN to 1 (yes). See Import Manual Invoices in Accounts Payable. |
| Number of Invoices in Group Required | Requires that a total number of invoices is specified for an Invoice Group. | The organization uses invoice groups and needs to specify the number of invoices in a group. |
| Total Amount of Invoices in Group Required | Requires that a total dollar amount for all invoices is specified for an Invoice Group. | The organization uses invoice groups and needs to specify a total dollar amount for the invoices in a group. |
| Accrue Invoices | If checked, the organization accrues unapproved invoices. | The organization accrues unapproved invoices. You will also need to enter Invoice Accrual Liability Account on the GL Accounts panel. |
| Auto Match EDI Invoices | If checked, specifies that EDI invoices are matched automatically. | The organization uses EDI for purchasing, and matches invoices automatically. If a vendor accepts EDI purchase orders, the vendor record must be also be set for EDI. See Working With Vendor Information - Basics and EDI Purchase Orders, Confirmations, and Invoice Matching. |
| Auto Print EDI Invoices | When selected, a Print Invoice is performed and the PDF is attached as a document to the processed invoice. | You need to be able to print processed 810 invoices from the Invoice list panel. |
| Invoice Match Missing PO Lines | Selecting this flag makes the Missing Lines tab available during invoice matching for the organization. The Missing Lines tab allows the addition of missing PO lines to an invoice, except in the case of consignment, credit, bill-only, fill-kill, or completed POs. | See Clearing Exception - PO Line Does Not Exist |
| AP Tax Enabled | When selected, "turns on" tax processing for accounts payable invoices. | The organization has taxable invoices to process. |
| Default Tax Group | A tax group is a collection of tax rates that are applicable to invoices. For example, invoices for items purchased in Los Angeles are subject to several taxes at different rates. These taxes can be combined as a single group, and applied to the invoice.
This field identifies a default tax group for the organization. |
The organization has taxable invoices to process. |
| Approval Required for Manually Created Invoices | When selected, organizational users creating manual invoices must specify either a direct approver or an approver group for each invoice. | You need to make sure that manual invoices go through an approval process. |
| Dist Review Enabled for Manually Created Invoices | When selected, organizational users creating manual invoices may specify a Distribution Review group and a Final AP Direct Distribution Approver for each invoice. | You need the ability to route the distribution lines on manual invoices through an review process. |
| Freight Taxable | This field sets the Taxable field on an invoice freight distribution detail record. When the Freight Taxable field is selected on the organization record, default freight tax distribution lines are created for each sales tax liability account found on each tax rate in the Tax Group. | You want any freight charges on invoices to automatically have tax calculated. |
| Create Blanket PO Expiration Date Exceptions | Enables Expiration Date validation on invoices created for blanket purchase orders. The default is unchecked.
When this option is checked, blanket purchase order Expiration Dates are validated during invoice matching, and an exception generated when an Expiration Date is less than the Invoice Date. |
You use blanket purchase orders. |
| Auto Payment Check Numbers | When selected, the organization auto-numbers checks processed for payment runs. The organization must have banking information, beginning check number, and increment set up in System Keys tables. | You process check for payments in Accounts Payable. |
| Automatically clear ACH and CCR Payment Types | Automatically clears payments for invoices with a payment method of "credit card" or any of the ACH types. The payment is marked as cleared using the current date/time and payment amounts, and the system creates the AP transactions. - Click the down arrow to select the type of payment to automatically clear. | You use credit card or ACH payments, and want them to clear automatically. |
| Facility Phone Number (Only visible to customers with consolidated payments enabled) |
A phone number that you wish to include in the consolidated payments export file that you send to a bank. The phone number is written to the Excel spreadsheet export file in a column on the far right. This field is only visible when consolidated payments are enabled for your site. | You use credit card or ACH payments, and want contact information on the export file. |
| Comments (Only visible to customers with consolidated payments enabled) |
Comments on consolidated payments that your organization exports to a bank. Text that you enter in this field is written to the Excel spreadsheet export file in the Comments column. This field is only visible when consolidated payments are enabled for your site. | You use credit card or ACH payments, and wish to include comments on the export file. |
| Bypass Zero Dollar 810 Invoice Lines | When selected, the system bypasses processing of zero-dollar invoice lines. |
For details, contact the Help Desk. |
| Bypass Incomplete 810 Invoice Errors |
|
For details, contact the Help Desk. |
| Create exception for missing tax on EDI Invoices | When selected, if the PO associated with an EDI 810 invoice has tax calculated, but the invoice does not, an exception is created at the line level for tax. | This field defaults to "unselected." This field is audited. |
| Invoice Approver for Blanket Req/PO Required | Unselected: The default setting is unselected. When the field is unselected, ERP uses any approver/approver group set up on the vendor record for automatic approval routing. Selected: When you select the field, any approver assignments set up on the vendor panel are ignored, and you must create approver assignments on the invoice (PO, or requisition). |
Note: This feature will be available in a future update or release, after Release 7.2. |
| Invoice Exception Owner Receipts | A person for the organization who reviews and clears invoice receipt exceptions. The system first looks for a exception owner for the asset location. If none is assigned there, the owner assigned at the organization level is used. If neither the organization nor asset location contains an assigned owner, then none is populated on the invoice. |
|
| Days to Delay 810 Processing from Import Date | Specifies a number of days during which the application will wait before processing EDI 810 invoices as imports. This value only applies when EDI 819 invoices are processed through scheduled jobs. |
If you use Federal 1099 codes, click the Form 1099 Information tab to enter 1099 information for your organization. A summary of the fields is in Table 6.
|
Field |
Function |
Complete this field when... |
Federal Tax ID |
Specifies the organization's federal tax ID. |
The organization uses 1099 codes. |
| State Tax ID | The organization's tax ID for state tax reporting. |
This ID is for sites that use the dual reporting program for 1099s, and want to be able to populate box 17 in the 1099 with their state ID to facilitate streamlined reporting to vendors. This program is available in several states, but not all. See IRS Publication 1220 for details. |
1099-Misc Form Legal Name |
Contains the "legal" name for the organization. |
The "legal" organization name used for IRS reporting of 1099 charges is not the same as the name that the organization normally uses. |
Address Line 1 |
Contains address information for 1099 forms. |
|
Address Line 2 |
Contains more address information, if needed. |
|
Address Line 3 |
Contains more address information, if needed. |
|
City |
Contains the address city. | |
State |
Contains the address city. |
|
Zip Code |
Contains the zip code. |
|
Country |
Contains the country, if not in the US. |
|
Contact |
Contains a 1099 contact person. |
|
| Contact Phone Number | Contains the contact person's phone number. |
|
Contact Fax Number |
Contains the contact person's FAX number. |
|
Contact Toll Free Number |
Contains the contact person's toll-free phone number, if applicable. |
|
Contact email Address |
Contains the contact's email address. |
Click the Sales Tax tab to enter sales tax information for your organization. A summary of the fields is in Table 7. See Using Sales Taxes for details.
If you are using sales tax, be sure to set up your tax rates before you try to enter up tax accounts on this panel. You need the tax rate to set up the account. The Use Tax liability account is on the GL Accounts tab (Table 7).
|
Field |
Function |
Complete this field when... |
State Tax Rate Code |
Contains the identifying code assigned to the state sales tax. The code has been associated with the organization's tax charges during Sales Tax Setup. If the organization is taxable, you cannot remove the State Sales Tax rate from this panel. |
|
State Sales Tax Rate |
Contains the state sales tax rate for the organization. The application populates this field. |
The organization's purchases are subject to state sales tax. See Notes on the Sales Tax Panel. |
State Sales Tax Expense |
Specifies the account for the state sales tax expense. The application populates this field with the account number associated with the tax rate for the organization. |
The organization's purchases are subject to state sales tax. |
State Sales Tax Liability |
Specifies the account for the state sales tax liability. The application populates this field with the account number associated with the tax rate for the organization. |
The organization's purchases are subject to state sales tax. |
City Tax Rate Code |
Contains the identifying code assigned to the city sales tax. The code has been associated with the organization's tax charges during Sales Tax Setup. |
|
City Sales Tax Rate |
Contains the city tax rate for the organization. The application populates this field. |
The organization's purchases are subject to city sales tax. See Notes on the Sales Tax Panel. |
City Sales Tax Expense |
Specifies the account for the city sales tax expense. The application populates this field with the account number associated with the tax rate for the organization. |
The organization's purchases are subject to city sales tax. |
City Sales Tax Liability |
Specifies the account for the city sales tax liability. The application populates this field with the account number associated with the tax rate for the organization. |
The organization's purchases are subject to city sales tax. |
County Tax Rate Code |
Contains the identifying code assigned to the county tax. The code has been associated with the organization's tax charges during Sales Tax Setup. |
|
County Sales Tax Rate |
Contains the county tax rate for the organization. The application populates this field. |
The organization's purchases are subject to county sales tax. See Notes on the Sales Tax Panel. |
County Sales Tax Expense |
Specifies the account for the county sales tax expense. The application populates this field with the account number associated with the tax rate for the organization. |
The organization's purchases are subject to county sales tax. |
County Sales Tax Liability |
Specifies the account for the county sales tax liability. The application populates this field with the account number associated with the tax rate for the organization. |
The organization's purchases are subject to county sales tax. |
The application calculates and displays estimated tax amounts when requisitions or purchase orders are created. You can enter tax information for organizations, as described, for vendor buy-from locations, and for asset locations. You can also specify that individual items are subject to tax. For details about sales taxes, see Using Sales Taxes.
If the organization uses the system's General Ledger, click the GL Information tab to enter information. A summary of the fields is in Table 8.
|
Field |
Function |
Complete this field when... |
JV Unposting Allowed |
When selected, allows you to "unpost" a journal voucher that has been posted to the general ledger. (Journal vouchers contain journal entries.) |
The organization uses the system's General Ledger to post journal entries. |
Auto Number JVs |
When selected, journal vouchers are automatically numbered. The system uses the values defined in System Values (Work in Administration > Administration > System Values) for numbering.
|
The organization creates General Ledger journal
entries, and you wish to automatically number journal vouchers. |
Balance Sheet Current Year |
Specifies the current balance sheet year. This year is the latest year that has beginning balance records for accounts. The application uses this field in year-end processing. |
The organization uses the system's General Ledger for year-end processing of accounts. |
Auto Create JV and Import after GL Export |
When you export Materials Management transactions to the General Ledger, journal vouchers are automatically created. |
You wish to create journal vouchers by default when you export transactions. If this field is unchecked, you can select it as needed when you set up an export. |
Auto Post Imported JVs |
Journal vouchers from external subsystems, MM, and AP are posted automatically. |
You want to automatically post imported journal vouchers. |
Default Budget Type For Inquiry |
In an account inquiry, the type of budget associated with the account that is displayed, by default. |
You expect to be inquiring on accounts in the system's General Ledger. |
| Organization JV Approver Group | The approver group for the organization. This group approves manual journal vouchers for designated source journals and/or account codes. |
You wish to assign an approver group to manual journal vouchers created for the organization. |
| Organization JV Direct Approver | The individual direct approver for the organization. This person approves manual journal vouchers for designated source journals and/or account codes. |
You wish to assign a direct approver (single individual) to manual journal vouchers created for the organization. |
| Profit Effect Threshold | For journal vouchers that have a profit effect, dollar values greater than the threshold (plus or minus) need approval. |
Journal vouchers with a profit effect need approval. |
| JV Approval Action Type | Specifies whether manual journal vouchers created by the organization need approval, and the type of approval. |
An organization wishes to specify general rules for approval for all of its manually-created journal vouchers. |
| Account Import Default Supplying Org | Contains the default supplying organization to be used on GL imports for new departments in the organization when GL Account Validation is enabled. This field is used with Account Import Default Supplying Asset Location. If a value is entered in this field, a value must also be entered in Account Import Default Supplying Asset Location. When a new account record is created for a department in the organization from a GL account import, the application sets the supplying organization to the value in this field. The asset location is set to the value in the field Account Import Default Supplying Asset Location. This assignment is made when: a. The account Type is expense or income. b. The account Type is asset or liability and the account is flagged as a "Materials" account. c. The imported GL account record is new or is being changed, and the department does not yet exist and needs to be created. Rules for using this field:
|
Your site has GL Account Validation enabled and you are importing new (or changed) GL accounts for new departments; i.e., departments that do not currently exist. |
| Account Import Default Supplying Asset Location | Contains the default supplying asset location to be used on GL imports for new departments in this organization when GL Account Validation is enabled. See the previous section Account Import Default Supplying Org for details. |
See the previous section Account Import Default Supplying Org for details. |
| Distribution Review/Check Request Account | This field turns on the Distribution Review/Check Request Account feature for the Organization. When you select this field, you must also designate distribution review accounts in General Ledger on each account record. (Edit the account.) Then, when users click the GL Account prompt on the invoice or check request Distribution panel, the application displays only accounts that are valid for the organization(s) and department(s) in the user's Data Profile and that are designated as Distribution Review Accounts. |
This tab is only visible for customers with Consolidated Payment Exports enabled. The fields are Security Code 1, Security Code 2, and Security Code 3. Security Codes can only be entered/changed by an administrator with the appropriate permissions.
This section includes setup instructions for asset locations. Asset locations are automatically defined as departments. You can search for asset locations in the Departments list.
Asset locations and multi-sourced items: All items in the item catalog have one item record which is used by the default asset location for the item. (This record is called the PUBLIC record.) The PUBLIC item record can be assigned to other asset locations as well.
Multi-sourced items have multiple item records. With multi-sourcing, multiple asset locations may contain some of the same items, but the items are sourced differently. The multi-sourced item records may have different vendors at different asset locations, or may have alternate UOMs or other characteristics used in ordering. Thus, each asset location has different item records for each single, multi-sourced item.
Important: After you create an asset location, you will need to reset your user permissions so that the asset location is included in the departments that you can access. If you are a system administrator, you can set user permissions through the User Administration facility. If you are not a system administrator, you will need to contact that person for assistance.
Deleting an asset location:
An asset location can only be deleted if there are no elements in the application, such as purchase orders, requisitions, item imports, etc. that refer to the asset location.
An error message appears if the asset location cannot be deleted.
Security: Before any user can edit existing asset location records, the asset location must be included in the user's data profile. Additionally, the user must have permission to maintain the asset location. See "Restricting Users from Editing Asset Location Records."
From
the Materials Management main Contents, click Tables > Asset Locations.
The Asset Locations list appears.
Complete
the required fields (indicated with an asterisk * ) on the header and tabbed
panels.
Detailed information on the fields is in the table below. Also, you can click Help for more information on the fields. Here are some additional notes:
Multi Source Allowed - When selected, the asset location can contain multi-sourced items. For details on multi-sourcing, see Multi-Sourcing an Item.
Cart Hours Delay Between Issues - Specifies the length of time that must elapse between the processing of par cart counts. Zero lets you process par cart counts as often as you wish. See Par Cart Delay for details.
Print On Hand Quantity on Put List - When selected, this field prints two additional columns on the "Put List" report.
See Printing PO Delivery Documents for details on printing put/pick lists.
Important: See Entering Asset Location Details below for detailed information about the tabbed panels.
Click Save periodically as you work to save information. (When you save your work, messages appear if additional information is needed for the asset location.)
When you have entered all the required data, click Submit.
The application returns you to the Asset Locations list.
Click Refresh to see the asset location that you added.
The Asset Location Main panel contains basic information about the asset location, such as whether it is supplied by (or supplies) another asset location, the contact person at the asset location, and more.
Table 9 summarizes Asset Location Main panel information. Notes follow the table.
|
Field |
Function |
Complete this field when... |
Replenish From Organization |
Specifies the organization responsible for maintaining levels of supplies in the asset location. |
The asset location is re supplied from another organization. You should also select the field Inter Org Transactions Allowed on this panel, and on the Organization's Main panel. You will need to set up payables and receivables accounts for the organization and the asset location. |
Replenish From Asset Location |
Specifies the asset location that re supplies the new asset location. |
The asset location is re supplied from another asset location. You will need to set up payables and receivables accounts for the re supplying asset location and for the asset location that you are creating. |
Assigned Buyer |
Identifies
the buyer assigned to the asset location.
|
A particular buyer handles purchasing for the asset location. Buyers can also be assigned to departments, item types, commodity codes, and vendors. A default buyer is assigned to each organization. Assigning buyers is covered in Set up approvers and approval groups. |
Contact Person |
Contains the name of the contact person for the asset location. |
A contact person is assigned to the asset location. |
Contact Phone No |
Contains the contact person's phone number. |
|
Email Address |
Contains the contact's email address. |
|
Fax Number |
Contains the contact person's FAX number. |
|
Phone Toll Free |
Contains the contact person's toll-free phone number, if applicable. | |
Bill To GLN Code |
The Global Location Number (GLN) for the organization's bill-to address. |
Your site uses GLN codes. |
Ship To GLN Code |
The Global Location Number (GLN) for the organization's ship-to address. |
Your site uses GLN codes. |
Allow Item Catalog Adds from Dept Inventory |
When selected, allows department inventories to add (non-file) items to the Item Catalog when the item(s) do not exist in the Item Catalog. |
Users at your site create department inventories, and may need to add non-file items to the item catalog. See Create Department Inventories for details. |
| Bypass Warehouse Export | This field is only relevant for sites that export warehouse picks to an external distribution system. The field turns off warehouse export. When this field is selected, - Manually-created par cart requisitions, imported par cart requisitions, and system-created requisitions can generate picks at the (supplying) asset location. - Manually-created requisitions from par carts bypass warehouse exports if any of the par cart lines are supplied by the asset location. - If an imported par cart requisition has some lines that should bypass warehouse export, and some that should not, separate requisitions are created for warehouse-exportable and non-exportable lines. |
|
| Print Authorized Buyer on PO | Controls whether the buyer or authorized buyer prints on the PO. The field is checked by default ("ON"). - If the field is checked, and the PO is authorized, then the authorized buyer's name, email, phone, and FAX are printed on the PO. - If the PO is not authorized, regardless of the field's setting, the buyer's contact information is used. |
|
| Auto-Create Pick When Secondary Supply Location | Select this field when this asset location is a secondary asset location for an organization, and you wish to build picks for this asset location. The picks must be for items on a single requisition, and the requisition is an imported part cart requisition, or other imported requisition. Note: You must select a similar field on the organization record, MM Info tab. |
|
Optimum Percentage Increase (e.g. 5.000 = 5%) |
Sets the percentage increase to the Minimum Stock Level within which you keep items' On Hand Quantity. |
Enough data about item usage exists to enter an optimum percentage increase for the new asset location. |
Multi-Source Allowed |
Gives the asset location permission to order supplies from multiple sources. |
This asset location purchases the same item from multiple vendors. |
Intra-Org Transactions Allowed |
When set, allows the asset location to participate in cross-organizational processing of materials. |
The asset location participates in cross-organizational processing of supplies. See Processing Items Across Organizations. |
Cart Hours Delay Between Issues |
Specifies the number of hours between par cart runs to replenish par areas. Zero lets you process par cart counts as often as you wish. See the discussion below. |
The asset location does par level replenishment of departments' supplies. |
Print On Hand Quantity on Put List |
When selected, this field controls printing of additional columns on the Put List report:
|
You wish to use the optional columns on put lists for restocking inventoried items. |
Include In "Org Only" Item Export |
When selected, this field includes an asset location in an item export for an organization. On an item export, when an organization -- but not an asset location -- is specified in the Item Export Selection Parameters panel, only items for asset locations with this field checked are exported. If you wish to exclude an asset location from an organization-specific item export, uncheck this field. Note: When you create an item export without specifying either an organization or asset location, the setting in this field is ignored. |
|
Print Document for Charge Only Quick Issues |
When selected, prints a document (similar to a pick document), by default, during processing of a charge-only quick issue batch. |
|
| Auto Authorize Stat POs | When selected, enables the automatic authorization of stat POs created from stat requisitions for vendors that receive POs via EDI, fax, or email. Auto-authorization of EDI/fax/email POs must also be enabled on the Buy From Location record. | You want stat requisitions that are backordered (placed on a purchase order) to automatically be authorized for vendors that receive POs electronically. |
| Print Req UOM Quantity on Receipt Pick List | When selected, prints the requisition quantity on the receipt pick list. |
This option avoids having distribution staff calculate conversions between the receipt quantity and the PO/requisition quantity when issuing items. |
| Calculate Tax for Materials Transactions | When selected, materials tax is calculated for the asset location's jurisdiction, not the ordering location's jurisdiction. Field must also be entered on the Sales Tax tab. The Sales Tax tab contains the same fields as the tab for the Organization. | The asset location to which orders are sent is has different tax rates than the ordering location. |
| AP Tax Enabled | When selected, "turns on" tax processing for accounts payable invoices. | The organization has taxable invoices to process. |
The organization must also have permission for inter-organizational processing. See the organization discussion above
Some sites set a delay for reissuing par cart items. If a par cart item has been issued to a given department within the hours specified, e.g., "4," the item quantity previously issued will not be reissued until the delay hours have passed.
The quantity issued can also be affected by whether a quantity of the item is "in transit" or otherwise allocated from a released requisition or backorder. Below are two examples of how par cart delay can affect the issued quantity.
In the first example (Figure 3), an in-transit quantity of 1 is en route to a department whose par count for an item is down by one. Since par is counted twice a day, the item cannot be reissued until the next day's count.
In the second example (Figure 4), par is counted twice a day. A quantity of a par item is in transit during both par counts. The department's first request of the day for 1 of the item is not filled, because 1 is in transit. The department's second request for two is filled by only 1 of the item, because one is in transit.
Below are some typical questions and answers about par cart scheduling.
The Asset Location GL Accounts panel is similar to the Organization GL Accounts panel. If your GL accounts have been imported to the system during implementation, you can access them when you create each asset location. Otherwise, when you click each account prompt, you will get No Data. In this case, enter the account code in each field by keying in the code from your keyboard. You can also use the GL Accounts panel to create accounts. See Table 2.
This panel is for the asset location's address. You must enter one line of address information, the city, state, and zip code for the asset location. This information will be used on purchase orders when a delivery address to the asset location is required.
The Asset Location Sales Tax panel is the same as the Organization Sales Tax panel. See Data on the Organization Sales Tax Panel.
Note: If you are using sales tax, be sure to set up your tax rates.
The Lot Tracking panel "switches on" lot tracking for an asset location and lets you specify what information is tracked: lot number, serial number, expiration date, and combinations or all three. These settings are the defaults for the asset location. See Using Lot Tracking for Items.
The AP Info panel lets you "switch on" tax calculations for invoices associated with the asset location.
If you select AP Tax Enabled for an asset location, ERP looks in the field Default Tax Group for the tax group. If none is specified, ERP looks for a Default Tax Group according to the hierarchy Vendor AP Location > Asset Location > Organization. For details, see How ERP identifies the correct tax rate to use to calculate AP tax.
If no tax group is found anywhere in the hierarchy, an error message informs you and directs you to enter a tax group in the Default Tax Group field.
When new asset locations are created, the AP Tax Enabled field defaults to the same setting as the organization, you can update the AP Tax Enabled field if needed.
The Invoice Exception Owner Receipts field is used to assign a person to work with the invoice if it contains a receipt exception.
When the invoice contains a receipt exception, and a receipt exception owner is assigned either at the organization
or asset location level, this field on the invoice is pre-populated with the receipt exception owner.
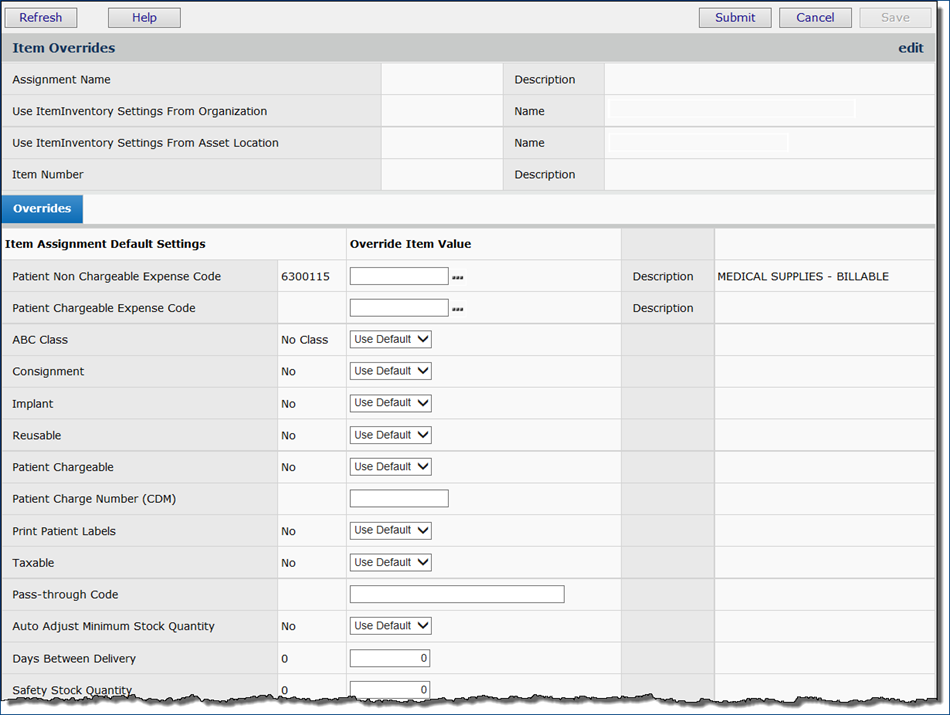
Once you have created asset locations, you can use Mass Item Assignment to identify and copy item information records to the asset locations. You can also assign an item to be sourced from other asset locations besides the Default Supplying Asset Location.
Mass Item Assignment has two parts:
A report object -- "Audit Item Assignment" -- lets you create reports that track item catalog assignments to asset locations.
Catalog Items lets you select items to assign from the complete item catalog.
Item Inventory Items restricts the list of available item catalog items to only those found in the item inventory for the organization and asset location specified in the fields Use Item Inventory Settings from Organization and Use Item Inventory Settings from Asset Location. Only non-deleted, active items are available for selection.
Order Guide Items lets you restrict the list of available items for assignment to those in a specified order guide.
When you use this option, you must also select the order guide.
- Click the prompt in the Order Guide field. The Order Guide prompt only shows order guides that are valid for the user's data profile departments.
Only non-deleted, active inventory items from the order guide's supplying organization and asset location are available for selection.
|
Panel |
What you can copy in Mass Item Assignment... |
Class Selections Panel |
Use this panel if you want to select items by the class. On the Item Class Selections panel, choose one or more item classes. The list displays the item class and a description. You can also select a sub class for each. |
Inventory Group Selections Panel |
Use this panel if you want to choose items by the inventory group. On the Inventory Group Selections panel, choose one or more inventory groups. The list includes inventory groups and descriptions. |
Commodity Code Selections Panel |
Use this panel if you want to select items by the commodity code. On the Commodity Code Selections panel, choose one or more commodity codes. The list includes commodity codes and descriptions. |
UNSPSC Code Selections Panel |
Use this panel if you want to choose items by the UNSPSC code. On the UNSPSC Code Selections panel, choose one or more UNSPSC codes. The list includes UNSPSC codes, and descriptions. Note: You can add a specific UNSPSC code to to the selections list, instead of searching for the code. For example, you can update the list with 42000000 - Medical Equipment and Accessories and Supplies.
|
Supply Type Selections Panel |
Use this panel if you want to select items by the supply type. On the Supply Type Selections panel, choose one or more supply types. The list includes supply types and descriptions. |
|
Panel |
What you can override in Mass Item Assignment... |
Item Override Definition |
This panel has supply information for different types of items and their charges. |
Item Override Stock Status Panel |
This panel shows stock information. |
Override Charge Panel |
This panel displays override charge information. |
Override Lot Tracking Panel |
This panel displays tracking information. |
This section describes how to view department records, and how to create records for new departments.
See Using General Ledger Account Validation.
From
the Materials Management main Contents, select Requisitioning > Departments.
The Departments Quick Click menu appears.
On the Quick Click menu, select View the Departments List.
Click
Show All. The Departments list appears.
Note: You can also create, edit,
and view department information from the General Ledger main Contents. Select
Tables > Departments.
From the Materials Management main Contents, click Requisitioning > Departments. The Departments Quick Click menu appears.
On the Quick Click menu, under I would like to..., check Edit.
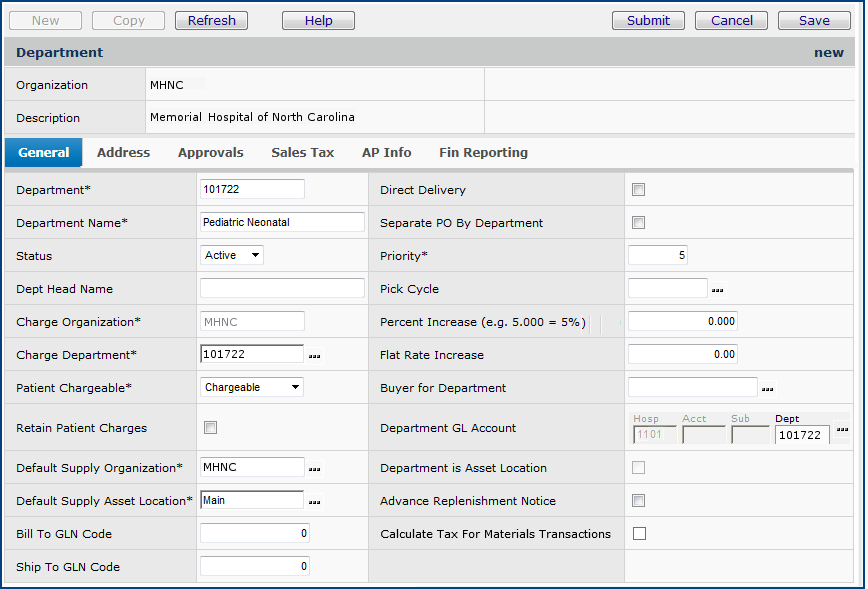
Enter the department code in the For... field. Click Go. The Department edit panel appears (Figure 10).
View the information, and click Cancel when you are finished.
To edit the information, change any fields as needed.
Click
Submit when you are finished.
The system makes the changes and returns you to Quick Click.
From
the main Contents, click Requisitioning > Departments.
The Departments Quick Click menu appears.
On
the Quick Click menu, next to Create a New Entry, click New.
The Department General edit panel appears (Figure 10).
After you create a new department, don't forget to add it to the user profiles of users who will need to access its information.
Use the Department edit panel to enter department information. This panel has several tabs.
The Department General panel contains the department name, code, and head, among other data. Table 12 contains an explanation of fields on the Department General panel.
|
Field |
Function |
Complete this field when... |
|
Department |
Shows the department code. |
Always. It is required. Enter the code (up to 15 characters) that you want to use for the department. |
|
Department Name |
Shows the department name or description. |
Always. It is required. Enter the department name (up to 50 characters). |
|
Status |
Specifies whether the department is currently using the application (Active) or not (Inactive). |
Access for the department needs to be turned on, or off. Select the appropriate setting. |
|
Dept Head Name |
The name of the person who heads the department. |
A department head needs to be recorded. |
|
Charge Organization |
The organization to which expenses for the department are charged. (On the Departments list, this field is called Charge To Org.) This field is populated by the system. |
|
|
Charge Department |
The code for the department to which items are expensed. Usually, sub-departments point this charge to their head department. Be sure to enter a value in Department GL Account consistent with the value you enter in the Charge Department field. On the Departments list, this field is called Charge To Dept. A department is a "charge to" department when this field and the Department field are the same. If those fields are different, the department is a "ship to" department. |
Always. It is required. |
|
Patient Chargeable |
Select Chargeable from the drop list if department items are billable
to patients. |
Always. It is required. |
|
Retain Patient Charges |
Normally, when patient charges are processed, issues of items are credited
to the department,
and debited to the Patient Revenue Office account for
the organization. |
The item expenses for patients are kept in the department's account. |
|
Default Supply Organization |
The organization that normally provides supplies for the department.
In an inter-organizational environment, the organizations displayed in
the select list allow inter-organizational processing and are "valid"
for your user ID. |
Always. It is required. |
|
Default Supply Asset Location |
The asset location that normally provides supplies to the new department.
|
Always. It is required. |
Bill To GLN Code |
Contains the Global Location Number (GLN) for the department's bill-to address. A GLN identifies legal entities, trading parties, and locations, and is used in electronic business, such as EDI document exchanges. GS1 is the international standards organization that creates and maintains GLN codes. See the GS1 website http://www.gs1.org for details. |
|
Ship To GLN Code |
Contains the Global Location Number (GLN) for the department's ship-to address. |
|
|
Direct Delivery |
When checked, the department is a direct delivery department. See Using Direct Delivery Purchase Orders for more information. |
The department receives items directly from the vendor in a marked tote. |
|
Separate PO by Department |
Check this box when the department requires separate purchase orders from vendors (i.e., the department's supply orders are not combined with other departments' on the same purchase order). See Using Direct Delivery Purchase Orders for more information. |
The department uses POs for one or more vendors that are separate from POs for other departments. See Separating Purchase Orders for more information. |
| Ignore PO Best Packaging | When selected, ERP uses the requisition UOM when generating an associated PO, instead of using best packaging so that the vendor has the correct UOM from the PO. Normally, a PO created from a requisition uses best packaging as the UOM. This field changes the behavior of UOMs for generated purchase orders that are separate PO by department, direct delivery, or both (direct delivery and separate PO by department). When the field is checked, and the purchase order is separate PO by department, direct delivery, or both, the requisition passes its Ordered Quantity and UOM to the purchase order when ERP creates the PO line. (Note: The ordered quantity must be specified in terms of the purchasing UOM on the requisition.) When the field is checked, but the PO is not a separate PO by department, direct delivery PO, or both, ERP uses the regular best packaging logic. Similarly, when the field is unchecked, best packaging logic is used. |
You want the exact same UOM that is on the requisition to go on the associated PO line. |
|
An integer that indicates the overall priority that should be assigned to requests from the department. Higher priorities have lower numbers; for example, priority 1 is highest. Priorities are set on a department basis for stock and non-stock items and can be changed for a department. Priorities are used by the storeroom in deciding which approved requisitions to fill when stock is too low to fill all requests immediately. |
Always. It is required. |
|
|
Pick Cycle |
The pick cycle that the supplying asset location should use to fill requisitions. (Pick cycle can also be changed for individual requisitions.) |
The pick cycle needs to be specified. |
|
Percent Increase (e.g. 5.000 = 5%) |
The per cent markup, if any, applied to patient-chargeable items. |
The department marks up patient-chargeable supplies using a markup percent. |
|
Flat Rate Increase |
The flat rate increase, if any, applied to patient-chargeable items |
The department marks up patient-chargeable supplies using a flat rate. |
|
Buyer for Department |
Assigns a buyer to the department. Buyers can also be assigned to asset locations, item types, commodity codes, and vendors. Assigning buyers is covered in Set up approvers and approval groups. |
A unique buyer is assigned to your department. See Assigning Buyers to Organizational Units and Vendors for details. |
|
Department GL Account |
The organization and department segments of the GL expense account code for the department. This account is the final destination for materials expenses charged to the department. This field is only valid if the department is a "charge department." See Charge Department. Note: If General Ledger Account validation is turned on for your site, the expense segment of the account code is not visible, and the department and organization segments cannot be changed. The expense segment is associated with an Expense Code. See Using General Ledger Account Validation. |
Required for a charge-to department. When General Ledger account validation is not enabled, enter the appropriate account segments. |
|
Department is Asset Location |
When checked, the department is an asset location. This field is populated by the system. |
|
|
Advance Replenishment Notice |
Indicates that a supply unit (such as Pyxis unit) uses advance replenishment notices. See the discussion of Advance replenishment notices. |
A supply unit is set up as a department (such as a Pyxis unit). When this box is checked, the application creates a replenishment notice for the supply unit's item information files. |
| Calculate Tax for Materials Transactions | When selected, materials tax is calculated for the department's jurisdiction, not the ordering location's jurisdiction. Field must also be entered on the Sales Tax tab. The Sales Tax tab contains the same fields as the tab for the Organization. | The department to which orders are sent is has different tax rates than the ordering location. Purchase orders for the department using its own tax settings must be "Separate PO by Department." |
This field sets up an overall priority for requisitions from a department. The priority setting (one is highest) is used by the warehouse to determine which requisitions to fill when not enough stock is available to fill all requests immediately. For example, in the table below, imagine three departments each request an item, and each department has a different priority setting:
| Department | Priority | Quantity of Item 45391 Requested |
OR - 1220 |
3 |
6 boxes |
Home Care - 1350 |
5 |
6 boxes |
Emergency - 1219 |
1 |
6 boxes |
To fill the requests, the warehouse needs 18 boxes of the item on hand. Suppose the warehouse only has 8 boxes of the item on hand. The priority setting determines which departments are issued the item immediately:
This panel is visible for departments within an organization that has enabled department allowances on the MM Information tab of the organization's record. (See Table 4 - Data on the Organization Materials Management Information Panel.) When enabled for the organization and set up for the department, allowances apply to requisitions, and are visible on the approval version of each requisition.
Security: The role object DeptAllowance controls the user's access to all Department Allowance panels. (Figure 11)
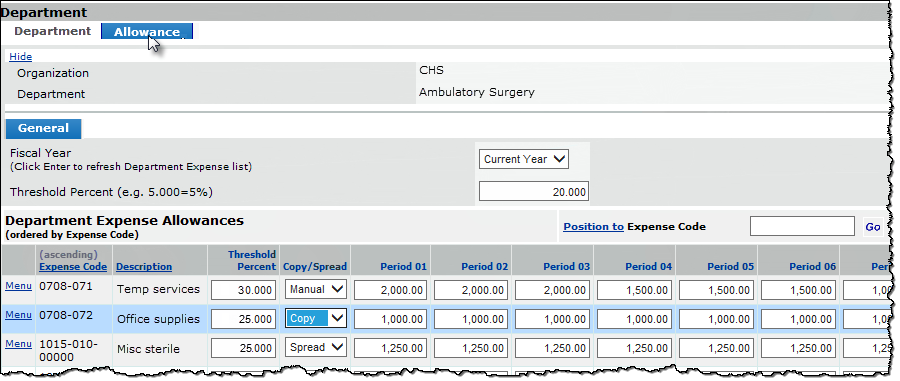
This panel displays the expense codes for which allowances have been defined for all periods within the year. Spend thresholds are also defined; warning messages will be displayed upon creation of requisition lines that will cause the threshold (or the allowance) to be exceeded. Warning messages are not errors; they do not stop the processing of the requisition. Thresholds can be changed.
Fields on Department Header |
Function |
| Fiscal Year | The fiscal year for which expense code allowances are defined for the department. |
| Threshold Percent | Percentage of the yearly expense code allowance, used to trigger warnings and calculate the Allowance Status (Good, Warning, Exceeded) on the Allowance Summary panel and the Requisition panel, Allowance tab. |
Fields under Department Expense Allowances |
Function |
| Expense Code | A code associated with a general ledger account code expense segment. |
| Description | A description of the expense code allowance being defined. |
| Threshold Percent | Percentage of the period expense code allowance, used to trigger warnings and calculate the Allowance Status (Good, Warning, Exceeded) on the Allowance Summary panel, Period tab. |
| Copy/Spread | Options for automatically filling the expense code allowance fields for each period. After selecting Copy or Spread and entering an amount in the Period 01 field, click Save. |
| Period 01 - Period 12 Allowance | The defined expense code allowance for each period in the fiscal year. |
A summary of the department's expense allowances for the year and for the period is available through the menu for the department on the department list (AP > Tables > Departments > Menu > Allowance Summary) (Figure 12).
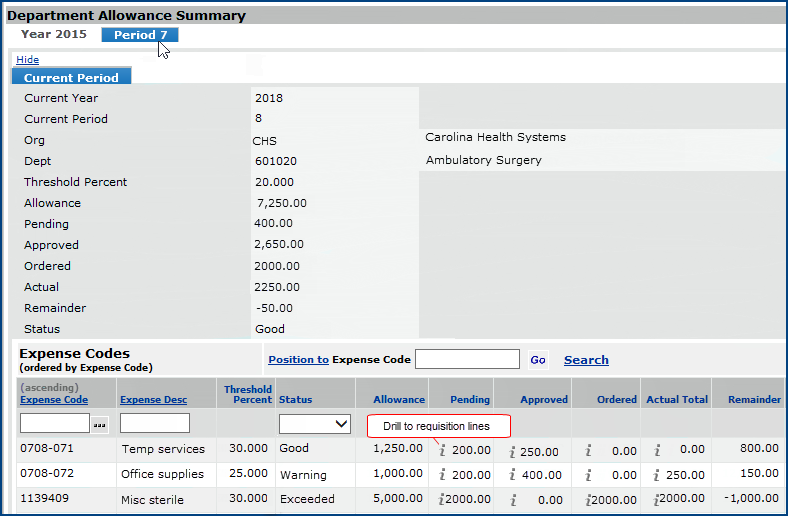
The Department Allowance Summary panel displays the yearly allowance, the amount on requisitions pending approval (Pending), the amount on approved requisitions (Approved), the amount on order (Ordered), the actual spend (Actual), and the amount remaining in the allowance for the year (Remainder).You can drill down to requisition lines for any of the amounts in the Pending, Approved, Ordered, or Actual columns by clicking the i (inquiry). Clicking the Details link displays the allowance amounts by period.
This panel is for the asset department's address. You must enter one line of address information, the city, state, and zip code for the department. This information will be used on purchase orders when a delivery address to the department is required.
Use this panel to assign approvers and an approval profile to the department, if desired. This approach lets you avoid maintaining approval data for multiple individual requesters in a department who all have the same approval settings. See Specifying Approval Item Types and Dollar Limits for details. Also, see Check Request Processing.
These fields set tax rates for purchase orders that are separate PO by department when the ordering location and the delivery location (the department) are in different tax jurisdictions. The fields are the same as those on the Sales Tax tab for the Organization. See Setting Up Sales Tax for a Department for details.
The AP Info panel lets you "switch on" tax calculations for invoices associated with the department. Departmental AP tax can only be calculated for invoices associated with POs when the department is specified "separate PO by department."
If you select AP Tax Enabled for a department, ERP looks in the field Default Tax Group for the tax group. If none is specified, ERP looks for a Default Tax Group according to the hierarchy Vendor AP Location > Department > Asset Location > Organization. For details, see How ERP identifies the correct tax rate to use to calculate AP tax.
If no tax group is found, an error message informs you and directs you to enter a tax group in the Default Tax Group field.
When new departments are created, the AP Tax Enabled field defaults to the same setting as the organization, you can update the AP Tax Enabled field if needed.
Your site may use financial reporting fields to associate types of financial information with requisition lines, invoice lines, etc.
Financial reporting fields are site-specific, and can be set up in System Values. Financial Reporting Fields, along with Project Code and Fund Code let you generate reports on non-account code fields.
Your site may define one to three financial reporting fields.
Approval profiles let you define how requisition lines qualify for approvals on a departmental basis, independently of individual users' settings. Approval profiles contain the item types (stock, non-stock, non-file) and dollar limits for requisitions. Once created, an approval profile can be assigned to an entire department for the department's requesters. Direct approvers or approver groups can also be assigned to departments. In this way, you can avoid maintaining approval data for multiple individual requesters who all have the same approval requirements because they belong to the same department.
Notes:
- If a user belongs to a department that has an approval profile assigned, the approval profile takes precedence over the individual user's settings.
- You must be a system administrator to access requester
limits information.
From
the Materials Management main Contents, click Requisitioning > Approval Profiles.
The list of approval profiles appears (Figure 13), if any have been created. Otherwise, No Data appears.
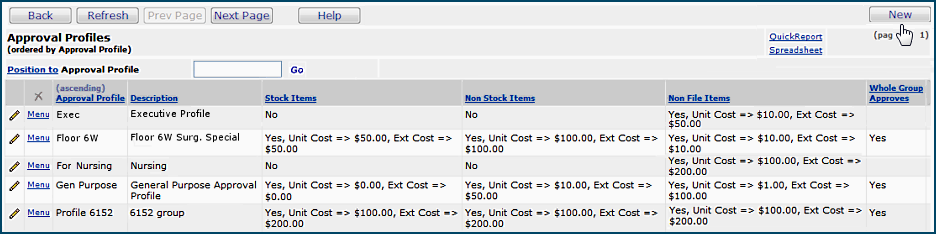
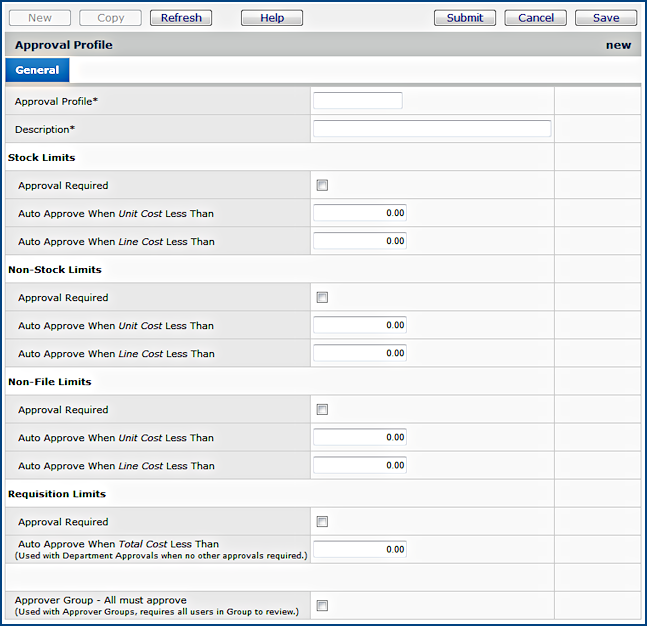
You can now assign the approval profile to a department.
You can assign an approval profile to a department from the Approval Profiles list (Figure 13) or from the Department Approvals edit tabbed panel (as described subsequently). On the Department Approvals edit panel, you can also designate a direct approver or an approver group for all the requesters in a department.
If a user belongs to a department that has an approval profile assigned, the approval profile takes precedence over the individual user's settings.
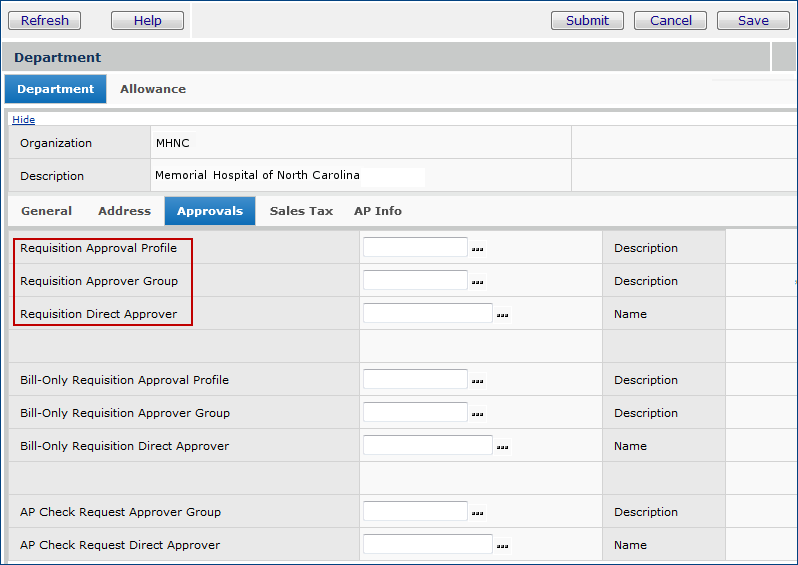
This feature lets you link an existing approver group or direct approver to an organization and department within your ERP application. The link is implemented via a download of a department's current approval setup parameters (approval profiles), followed by upload of approver groups and direct approvers. This capability supports acquisition of new units at a medical center, and quarterly audit compliance. The feature uses the standard import.
Prerequisites:
Approval Groups must exist before you can assign users to them via the mass import. The department must also have associated Approval Profiles.
Users assigned as direct approvers or members of approver groups must have the correct authorizations in their User Profiles, the appropriate security objects set in their roles, and the organization/department permitted in their Data Profiles.
Notes:
If a site wants an AP check request approver group at the department level, they select one from the invoice or requisition approver types.
Assigning departmental approvers has two steps:
- Downloading the department's approval settings. The download generates a template that you can use to enter approvers and approver groups.
- Entering approvers in the template, save it, and upload it to ERP.

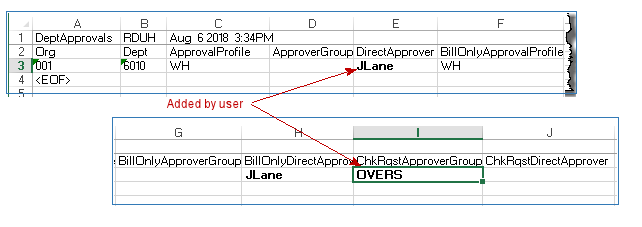
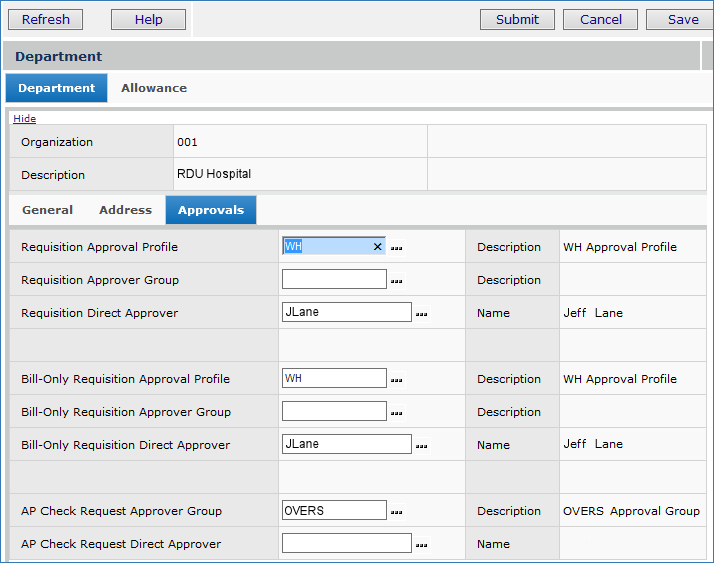
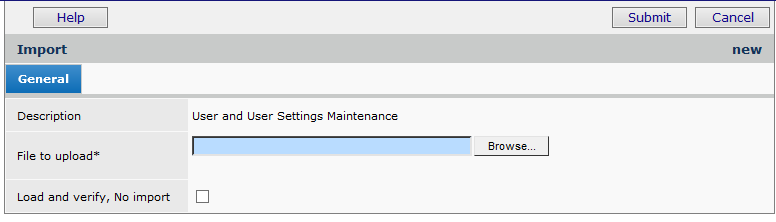
Handling Import Errors
Valid rows on the spreadsheet will import into the application. If some rows are valid, and other are not, the invalid rows will not be imported.
When the Import Status of the uploaded user record file is not Complete, the import encountered errors.
To work with errors, you need to review the import details, make corrections, and reprocess the data.
The Department Segment Utility lets you create missing departments in the system's Department Table from GL department account segments. A report object “Account Dept Segments Missing Depts” shows department segments for account codes that do not have a corresponding record in the department table. You can run this report to determine if a department is not listed in the table -- based on its account segment -- and then add the missing department using the utility.
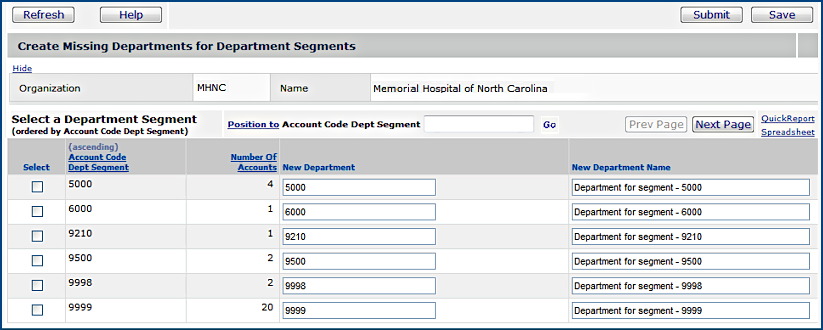
You can import department data to ERP to create new department records, to change department records, or to delete departments.
Administrators can control who has access to this feature with a security setting.
The first step is to export existing department data to an Excel worksheet. Then, using the worksheet as a template, make changes as needed to department data (Action code: C), or add new department information (Action code: A). You can also specify departments to delete (Action code: D). Save the worksheet as a .csv file, and finally upload it to the application.
The upload is the standard upload process. A new panel lets you work with uploaded department records.
The following steps upload department data.
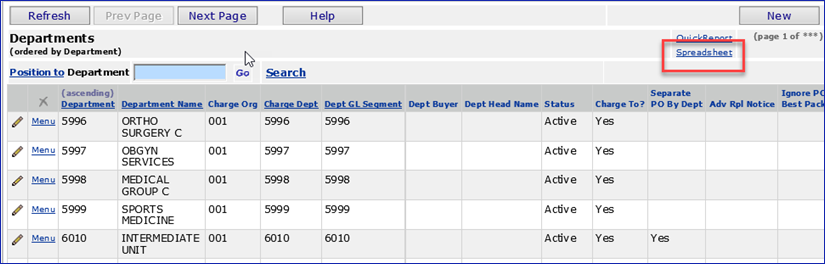
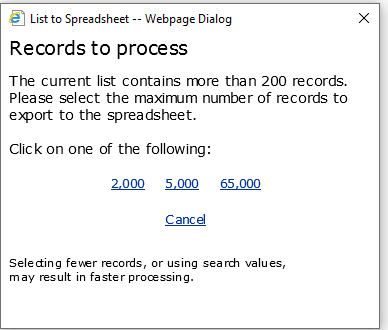
- A line appears at the bottom of the display asking how you would like to handle the Excel spreadsheet (Figure 23).
Figure 23 - Selecting the Disposition of the Excel Spreadsheet to Download
Figure 24 is an example of the Excel spreadsheet, filtered.
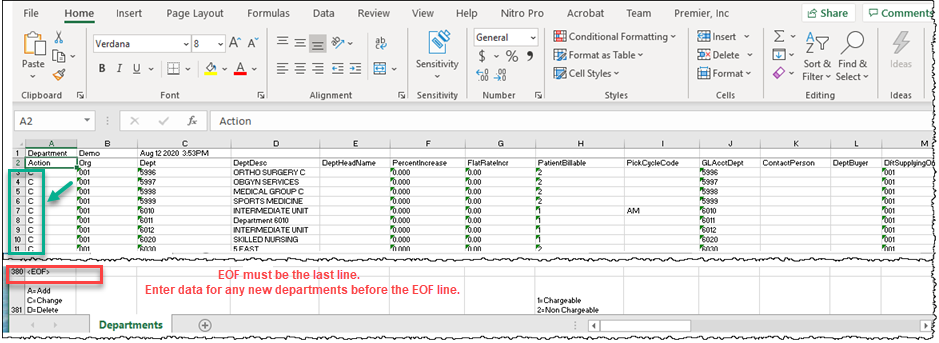
The first column -- Action -- contains the action that the application should perform. Enter an action:
A - New line. Add a new department.
D - Current line: delete the department record.
C - Current line: update the department record.
Leaving the Action column blank (no code entered) causes an error.- EOF must be the last data element in the worksheet.
Figure 25 is a summary of the fields on the downloaded Excel spreadsheet. (The image in Figure 24 is truncated on the left, for space.)

Department imports use the standard process, as outlined below.
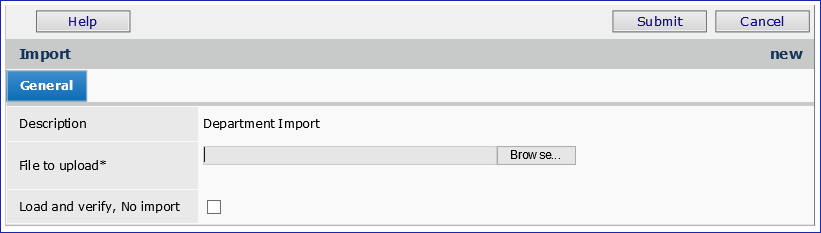
On the list of imports, each import has a Menu that lets you Reprocess, View Details, Download or Delete an import file.
Uploaded files that process completely with no errors have the Import Status of Complete.
To be able to import department data, users must have the role object "Department Import" (DeptImport) in their roles set to All, Create, or Modify, depending on what they are doing. (All allows deletion.)
The menu option Imports/Exports and Financials > Department Imports does not appear for users with "DepartmentImport" set to None.
From
the Materials Management main Contents, click Tables > Group Purchasing
Organization.
The Group Purchasing Organizations list appears.
Click
New.
The Group Purchasing Organizations Edit panel appears.
Complete the required fields - GPO Code and GPO Name (indicated with an asterisk * ).
Complete
the URL field, if needed.
The URL contains the Internet address of the home page (or other
key page) (Worldwide Web) for the GPO. This field value begins with http://
Click
Submit.
The system returns you to the Group Purchasing
Organizations list.
Click Refresh to see the group purchasing organization that you added.
This feature allows user to avoid changing organization records or creating organizations one-at-a-time, manually. You can create and change organizations via an import. This process is similar to importing department data.
The first step is to export existing organization data to an Excel worksheet. Then, using the worksheet as a template, make changes as needed to organization data (Action code: C), or add a new organization (Action code: A).
Next, save the worksheet as a .csv file, and finally upload it to the application.
The upload is the standard upload process. A new panel lets you work with uploaded organization records.
Note: Currently, this feature only handles add and change. Delete (Action code: D) is not yet supported.
Security: The user importing organization data must have the role object "OrgImport" minimally set to Modify.
Below is a summary of the steps.
The first column -- Action -- contains the action that the application should perform. Enter an action:
A - New line. Add a new department.
C - Current line: update the department record.
Leaving the Action column blank (no code entered) causes an error.- EOF must be the last data element in the worksheet.
Organization imports use the standard process, as outlined below.
On the list of imports, each import has a Menu that lets you Reprocess, View Details, Download or Delete an import file.
Uploaded files that process completely with no errors have the Import Status of Complete.
Here are the fields for organization records that you can use for imports.
| Organization | CustomerID | Time Stamp | |||
| Column Name | Max Character Length |
Max Numeric Length |
Decimal Positions |
Required | Notes |
| Action | 1 | Yes | A=Add C=Change |
||
| Org | 15 | Yes | |||
| OrgDesc | 50 | Yes | |||
| DftAsstLocBuyer | 20 | Yes | valid Buyer User ID | ||
| CalendarName | 10 | Yes | MM Calendar | ||
| LastClosedYear | 4 | 0 | Yes | Set to zero (0) if not entered | |
| LastCLosedPer | 2 | 0 | Yes | Set to zero (0) if not entered | |
| PriorPerEntry | 2 | 0 | Yes | Set to zero (0) if not entered | |
| FuturePerEntry | 2 | 0 | Yes | Set to zero (0) if not entered | |
| AddressName | 50 | Yes | |||
| AddressLine1 | 50 | Yes | |||
| AddressLine2 | 50 | No | |||
| AddressLine3 | 50 | No | |||
| City | 30 | Yes | |||
| StateCountry | 2 | Yes | State | ||
| ZipCode | 10 | Yes | |||
| ContactPerson | 50 | No | |||
| ContactTelNo | 30 | No | |||
| FaxNumber | 30 | No | |||
| PhoneTollFree | 30 | No | |||
| EmailAddress | 50 | No | |||
| StatNoOfDays | 2 | 0 | Yes | No Of Days for STAT Requisition Set to zero (0) if not entered |
|
| StateLocalTaxYN | 1 | 0 | Yes | 1=Yes, 0=No Set to zero (0) if not entered |
|
| POSOLPrintSeq | 1 | 0 | Yes | PO SOL Print Sequence 1=Item Number 2=Aisle/bin Number |
|
| InterOrgTransYN | 1 | 0 | Yes | 1=Yes, 0=No Set to zero (0) if not entered |
|
| MultiSourceAllowedYN | 1 | 0 | Yes | 1=Yes, 0=No Set to zero (0) if not entered |
|
| AutoMatchEDIYN | 1 | 0 | Yes | 1=Yes, 0=No Set to zero (0) if not entered |
|
| SepPOByItemYN | 1 | 0 | Yes | 1=Yes, 0=No Set to zero (0) if not entered |
|
| DftOrgBuyerforStock | 20 | No | valid Buyer User ID | ||
| DftOrgBuyerForNSNF | 20 | No | valid Buyer User ID | ||
| APCalendarName | 10 | Yes | AP Calendar | ||
| ReqMfrFldsRqdYN | 1 | 0 | Yes | Requisition Non-file Manufacturer Fields Required 1=Yes, 0=No Set to zero (0) if not entered |
|
| OrgType | 1 | 0 | Yes | 1=Invoicing 2=Paying 3=Invoicing/Paying |
|
| AccrueUnappInvYN | 1 | 0 | Yes | 1=Yes, 0=No Set to zero (0) if not entered |
|
| DftPayingOrg | 15 | Yes | valid Org, Org Type Paying or Invoicing/Paying | ||
| AddressLine1For1099 | 50 | No | |||
| AddressLine2For1099 | 50 | No | |||
| AddressLine3For1099 | 50 | No | |||
| CityFor1099 | 30 | No | |||
| StateCountryFor1099 | 2 | No | State | ||
| ZipCodeFor1099 | 10 | No | |||
| GLAcctOrgP1 | 15 | Yes | Segment value for Org in GL Account | ||
| GLAcctAPLiabilityP2 | 25 | Yes | Segmented part of GL (usually Dept part). If multiple segments, they must be hyphenated. | ||
| GLAcctAPLiabilityP3 | 25 | Yes | Segmented part of GL (usually Expense part). If multiple segments, they must be hyphenated. | ||
| GLAcctAPPriceVarP2 | 25 | Yes | Segmented part of GL (usually Dept part). If multiple segments, they must be hyphenated. | ||
| GLAcctAPPriceVarP3 | 25 | Yes | Segmented part of GL (usually Expense part). If multiple segments, they must be hyphenated. | ||
| GLAcctFreightP2 | 25 | No | Segmented part of GL (usually Dept part). If multiple segments, they must be hyphenated. | ||
| GLAcctFreightP3 | 25 | No | Segmented part of GL (usually Expense part). If multiple segments, they must be hyphenated. | ||
| GLAcctInvAccrualP2 | 25 | No | Segmented part of GL (usually Dept part). If multiple segments, they must be hyphenated. | ||
| GLAcctInvAccrualP3 | 25 | No | Segmented part of GL (usually Expense part). If multiple segments, they must be hyphenated. | ||
| GLAcctInventoryAdjP2 | 25 | Yes | Segmented part of GL (usually Dept part). If multiple segments, they must be hyphenated. | ||
| GLAcctInventoryAdjP3 | 25 | Yes | Segmented part of GL (usually Expense part). If multiple segments, they must be hyphenated. | ||
| GLAcctInventoryP2 | 25 | Yes | Segmented part of GL (usually Dept part). If multiple segments, they must be hyphenated. | ||
| GLAcctInventoryP3 | 25 | Yes | Segmented part of GL (usually Expense part). If multiple segments, they must be hyphenated. | ||
| GLAcctMarkUpRevenueP2 | 25 | Yes | Segmented part of GL (usually Dept part). If multiple segments, they must be hyphenated. | ||
| GLAcctMarkUpRevenueP3 | 25 | Yes | Segmented part of GL (usually Expense part). If multiple segments, they must be hyphenated. | ||
| GLAcctPOLiabilityP2 | 25 | Yes | Segmented part of GL (usually Dept part). If multiple segments, they must be hyphenated. | ||
| GLAcctPOLiabilityP3 | 25 | Yes | Segmented part of GL (usually Expense part). If multiple segments, they must be hyphenated. | ||
| GLAcctTaxUseP2 | 25 | No | Segmented part of GL (usually Dept part). If multiple segments, they must be hyphenated. | ||
| GLAcctTaxUseP3 | 25 | No | Segmented part of GL (usually Expense part). If multiple segments, they must be hyphenated. | ||
| GLAcctPymtDiscountP2 | 25 | No | Segmented part of GL (usually Dept part). If multiple segments, they must be hyphenated. | ||
| GLAcctPymtDiscountP3 | 25 | No | Segmented part of GL (usually Expense part). If multiple segments, they must be hyphenated. | ||
| GLAcctPatRevOffsetP2 | 25 | Yes | Segmented part of GL (usually Dept part). If multiple segments, they must be hyphenated. | ||
| GLAcctPatRevOffsetP3 | 25 | Yes | Segmented part of GL (usually Expense part). If multiple segments, they must be hyphenated. | ||
| GLAcctTaxStateP2 | 25 | No | Segmented part of GL (usually Dept part). If multiple segments, they must be hyphenated. | ||
| GLAcctTaxStateP3 | 25 | No | Segmented part of GL (usually Expense part). If multiple segments, they must be hyphenated. | ||
| GLAcctTaxLiabStateP2 | 25 | No | Segmented part of GL (usually Dept part). If multiple segments, they must be hyphenated. | ||
| GLAcctTaxLiabStateP3 | 25 | No | Segmented part of GL (usually Expense part). If multiple segments, they must be hyphenated. | ||
| GLAcctTaxCityP2 | 25 | No | Segmented part of GL (usually Dept part). If multiple segments, they must be hyphenated. | ||
| GLAcctTaxCityP3 | 25 | No | Segmented part of GL (usually Expense part). If multiple segments, they must be hyphenated. | ||
| GLAcctTaxLiabCityP2 | 25 | No | Segmented part of GL (usually Dept part). If multiple segments, they must be hyphenated. | ||
| GLAcctTaxLiabCityP3 | 25 | No | Segmented part of GL (usually Expense part). If multiple segments, they must be hyphenated. | ||
| GLAcctTaxCountyP2 | 25 | No | Segmented part of GL (usually Dept part). If multiple segments, they must be hyphenated. | ||
| GLAcctTaxCountyP3 | 25 | No | Segmented part of GL (usually Expense part). If multiple segments, they must be hyphenated. | ||
| GLAcctTaxLiabCountyP2 | 25 | No | Segmented part of GL (usually Dept part). If multiple segments, they must be hyphenated. | ||
| GLAcctTaxLiabCountyP3 | 25 | No | Segmented part of GL (usually Expense part). If multiple segments, they must be hyphenated. | ||
| GLAcctOtherP2 | 25 | No | Segmented part of GL (usually Dept part). If multiple segments, they must be hyphenated. | ||
| GLAcctOtherP3 | 25 | No | Segmented part of GL (usually Expense part). If multiple segments, they must be hyphenated. | ||
| JVUnpostingYN | 1 | 0 | Yes | 1=Yes, 0=No Set to zero (0) if not entered |
|
| AutoNumberJVsYN | 1 | 0 | Yes | 1=Yes, 0=No Set to zero (0) if not entered |
|
| GLAcctRetEarnP2 | 25 | No | Segmented part of GL (usually Dept part). If multiple segments, they must be hyphenated. | ||
| GLAcctRetEarnP3 | 25 | No | Segmented part of GL (usually Expense part). If multiple segments, they must be hyphenated. | ||
| BalSheetCurrentYear | 4 | 0 | Yes | ||
| TaxIDChar | 9 | No | |||
| AutoImportGLExportYN | 1 | 0 | Yes | 1=Yes, 0=No Set to zero (0) if not entered |
|
| APTaxEnabledYN | 1 | 0 | Yes | 1=Yes, 0=No Set to zero (0) if not entered |
|
| TaxGroup | 15 | No | valid Tax Group, if entered | ||
| StateTaxRateCode | 15 | No | valid Tax Rate Code, if entered | ||
| CountyTaxRateCode | 15 | No | valid Tax Rate Code, if entered | ||
| CityTaxRateCode | 15 | No | valid Tax Rate Code, if entered | ||
| AutoPostGLExportYN | 1 | 0 | Yes | 1=Yes, 0=No Set to zero (0) if not entered |
|
| BudgetTypeForInq | 1 | 0 | Yes | Default Budget Type For Inquiry 1=Budget1 (Operating) 2=Budget2 (Flexed) 3=Budget3 4=Budget4 5=Budget5 |
|
| StopPriceChgContItemYN | 1 | 0 | Yes | Restrict PO/Invoice Price Change on Contract Items 1=Yes, 0=No Set to zero (0) if not entered |
|
| PrtTaxOnPOYN | 1 | 0 | Yes | 1=Yes, 0=No Set to zero (0) if not entered |
|
| BTGLNCode | 13 | 0 | No | Bill To GLN Code | |
| STGLNCode | 13 | 0 | No | Ship To GLN Code | |
| InvoiceApprovalRqdYN | 1 | 0 | Yes | 1=Yes, 0=No Set to zero (0) if not entered |
|
| FreightTaxYN | 1 | 0 | Yes | 1=Yes, 0=No Set to zero (0) if not entered |
|
| LegalNameFor1099 | 50 | No | |||
| DeptInvValueMethod | 1 | 0 | Yes | Department Inventory Valuation Method 0=No Default 1=Average Cost 2=Last Receipt Cost 3=Current Vendor Cost 4=Last Invoice Cost |
|
| AutoRcvRcptlessBillOnlyYN | 1 | 0 | Yes | 1=Yes, 0=No Set to zero (0) if not entered |
|
| APPhoneNumber | 30 | No | used with Consolidated Payments | ||
| APComments | 50 | No | used with Consolidated Payments | ||
| CDMFromCatalogYN | 1 | 0 | Yes | Assign Patient Charge Number (CDM) from Catalog 1=Yes, 0=No Set to zero (0) if not entered |
|
| ExpCodesFromCatalogYN | 1 | 0 | Yes | Assign Expense Codes from Catalog 1=Yes, 0=No Set to zero (0) if not entered |
|
| InvMatchMissingLinesYN | 1 | 0 | Yes | 1=Yes, 0=No Set to zero (0) if not entered |
|
| EDI855PercentToleranceYN | 1 | 0 | Yes | 1=Yes, 0=No Set to zero (0) if not entered |
|
| EDI855AmtToleranceYN | 1 | 0 | Yes | 1=Yes, 0=No Set to zero (0) if not entered |
|
| DeptAllowanceYN | 1 | 0 | Yes | 1=Yes, 0=No Set to zero (0) if not entered |
|
| OrgJVApproverGroup | 15 | No | valid Approver Group | ||
| OrgJVDirectApprover | 15 | No | valid JV Approver User ID | ||
| JVApprovalActionType | 1 | 0 | Yes | JV Approval Action Type 0=No Approval Required 1=Approval Required Before Posting 2=Approval Required |
|
| CreditPOReviewYN | 1 | 0 | Yes | 1=Yes, 0=No Set to zero (0) if not entered |
|
| AutoPrintEDIInvoiceYN | 1 | 0 | Yes | 1=Yes, 0=No Set to zero (0) if not entered |
|
| AutoPaymentChkNumYN | 1 | 0 | Yes | 1=Yes, 0=No Set to zero (0) if not entered |
|
| StateTaxIDChar | 15 | No | |||
| AllowSelfApprovalsYN | 1 | 0 | Yes | 1=Yes, 0=No Set to zero (0) if not entered |
|
| GLImpDftSupOrg | 15 | No | Account Import Default Supplying Org (used to assign Department Defaults) |
||
| GLImpDftSupAssetLoc | 15 | No | Account Import Default Supplying Asset Location (used to assign Department Defaults) |
||
| NFCommodityCodeRqdYN | 1 | 0 | Yes | Non-file Commodity Code Required 1=Yes, 0=No Set to zero (0) if not entered |
|
| CreateSecondaryPicksYN | 1 | 0 | Yes | Auto-Create Picks for Secondary Supply Locations (Req and Par Cart Imports Only) 1=Yes, 0=No Set to zero (0) if not entered |
|
| DistReviewGLAcctYN | 1 | 0 | Yes | 1=Yes, 0=No Set to zero (0) if not entered |
|
| CreateExceptionEDITaxYN | 1 | 0 | Yes | 1=Yes, 0=No Set to zero (0) if not entered |
|
| BlanketAprvYN | 1 | 0 | Yes | 1=Yes, 0=No Set to zero (0) if not entered |
|
| POWithProjectCodeCommTypePrintYN | 1 | 0 | Yes | 1=Yes, 0=No Set to zero (0) if not entered |
|
| DaysToDelay810Processing | 2 | 0 | No | ||
| <EOF> |
Copyright © 2023 by Premier Inc. All rights reserved.
