Setting Up Vendor Access to Supply Chain Version
Contents
Overview
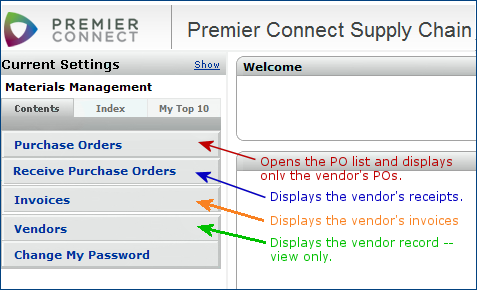
When a user at a vendor location signs on to Materials Management, the user needs to work with POs and receipts for the vendor. The menu options displayed in Figure 1 are those that the user accesses. The discussion below explains how to set up vendors’ users.
Figure 1 - Menu Options Available to Vendors' Users
Security
To set up vendors' users, you need administrator privileges. The Admin role object controls creation of a Vendor Security Code, needed in the setup.
HIPAA: User Authentication and Protection of Patient Data
Features are built into the system to ensure the privacy of electronic protected health records (ePHI), in compliance with HIPAA requirements.
Important: When you set up a new user, if the user is allowed to view patient information, you must actively set an authorization flag on the user record. By default, the user cannot see patient information.
A detailed discussion is in the chapter "Securing Electronic Protected Health Information."
Setup Summary
- Create a Vendor Security Code.
The Vendor Security Code allows a vendor's user(s) to access purchase orders and receipts that belong only to the vendor.
- Assign the Vendor Security Code to the vendor.
- Create a data profile for the vendor's user by copying and changing an existing data profile.
The data profile should contain the site's organizations, departments, and asset locations that generate POs for the vendor, and whose data you want the vendor to access.
- Assign the Vendor Security Code to the data profile.
- Create a user profile for the vendor's user by copying and changing an existing user profile.
Edit the copied user profile to....
- Assign a User ID and password.
- Enter the data profile that you set up for the vendor.
- Enter the role Vendor Access on the user profile.
This role includes menu options that the user can access. Only those allowed menu options appear on the Materials Management main Contents. (See Figure 1.)
For multiple users, you can build additional user profiles, if needed.
- Test the new user profile by signing in as the vendor user.
If you are unfamiliar with setting up users, data profiles, and role objects, read the online chapter Set Up and Maintain Users, Security, and Administration. Also, some definitions are at the end of this topic.
Create a Vendor Security Code
- From Work in Administration on the main Contents, select Administration
> Vendor Security Codes.
The Vendor Security Codes list appears, or No Data if none exist.
- Click New.
The Vendor Security Code edit panel appears (Figure 2).

Figure 2 - Vendor Security Codes Edit Panel
- Enter a Vendor Security Code.
- Enter a Description.
- Click Save, Submit.
- The list of codes appears. Click Refresh to display the new code on the list.
Assign a Vendor Security Code to a Vendor
- From the Materials Management main Contents, select Vendors > Vendors.
- On the Quick Click menu, under "I would
like to..." select Edit.
- Enter the Vendor Number in the box under For... and click Go.
Vendor information appears (Figure 3).
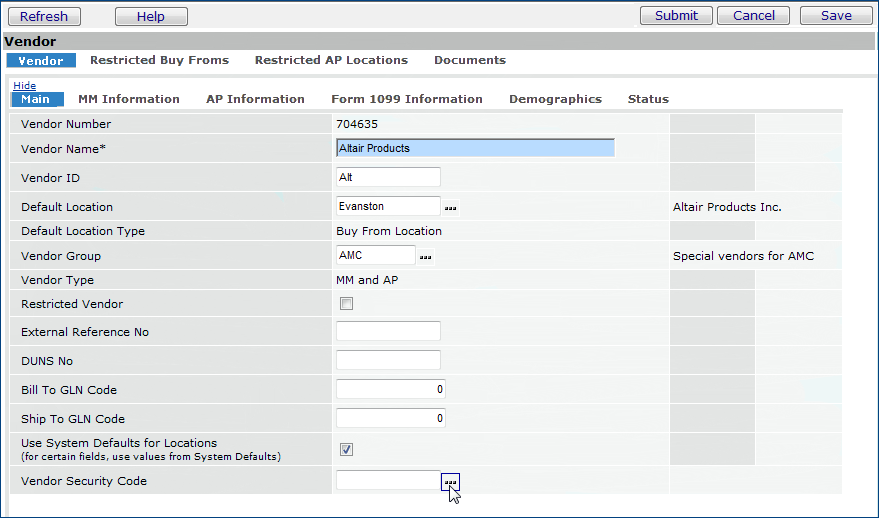
Figure 3 - Entering a Vendor Security Code on the Vendor Record
- Click the prompt next to Vendor Security Code and select a code.
- Click Save, Submit.
Create a Data Profile for a Vendor User
An efficient way to create a new data profile is to copy an existing data profile, rename it, and change it so that it applies to the vendor's users.
To copy a data profile:
- From Work in Administration, select Administration > Data Profiles. The Data Profiles list appears.
- Locate a data profile that is close to the type of profile that is appropriate for the vendor's users. (You can edit the profile once it is copied.)
- Next to the data profile of interest, click Menu > Copy.
The data profile header appears for editing (Figure 4).
- Blank out the values in the Data Profile field and in the Description field. Enter new values (Figure 4).
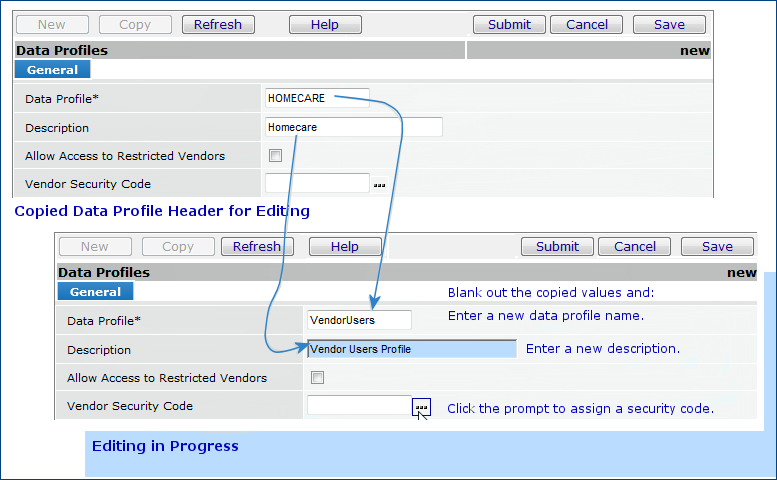
Figure 4 - Editing a Data Profile Header
To assign the Vendor Security Code to a Data Profile
- Click the prompt next to the Vendor Security Code field and select the appropriate code. (You created this code in the previous step.)
- Click Save, Submit.
The list of Data Profiles appears. Click Refresh to display the new data profile.
Edit a Copied Data Profile's Regions, Organizations, Departments, and Asset Locations
In the data profile that you are setting up for vendors' users, you should review those regions, organizations, departments, and asset locations carried over from the copied data profile, and delete any that are not relevant. You can also add any needed ones that are not included.
Regions and Organizations
- From Work in Administration, select Administration > Data Profiles. The Data Profiles list appears.
- Locate the data profile that you created for the vendor's user(s).
- Click Menu > Valid Regions/Organizations.
A list of regions and organizations appears.
- Review the list and click Delete next to any Region/Organization combination whose data the user should not be able to see.
- If you need to allow the user to see data in a Region/Organization that is not on the list, click New.
A list with two tabs appears: Regions and Organizations.
- Click the Region tab to select a new region; and/or click the Organization tab for new organizations.
- Click the select box next to the region/organization of interest.
-
When you finish adding regions/organizations to the data profile, click Save and Submit.
-
The master list of included regions/organizations for the data profile appears.
- Close the list.
Assigning departments and asset locations is similar to the steps for regions and organizations:
- Next to the copied data profile, click Menu > Valid Departments or Valid Asset Locations.
More detailed instructions are below, if needed.
Departments
- From Work in Administration, select Administration > Data Profiles. The Data Profiles list appears.
- Locate the data profile that you created for the vendor's user(s).
- Click Menu > Valid Departments.
A list of departments appears.
- Review the list and click Menu > Delete next to any Department whose data the user should not be able to see.
- If you need to allow the user to see data in a Department that is not on the list, click New.
A list of departments appears.
- Click the select box next to the department(s) of interest.
-
When you finish adding departments to the data profile, click Save and Submit.
-
The master list of included departments for the data profile appears.
- Close the list.
Asset Locations
You can allow vendors' user to view data for asset locations, if this is appropriate for your site.
- From Work in Administration, select Administration > Data Profiles. The Data Profiles list appears.
- Locate the data profile that you created for the vendor's user(s).
- Click Menu > Valid Asset Locations.
A list of asset locations appears.
- Review the list and click Menu > Delete next to any Asset Location whose data the user should not be able to see.
- If you need to allow the user to see data in an Asset Location that is not on the list, click New.
A list of asset locations appears.
- Click the select box next to the asset location(s) of interest.
-
When you finish adding asset locations to the data profile, click Save and Submit.
-
The master list of included asset locations for the data profile appears.
- Close the list.
When you finish reviewing, deleting, and adding regions, organizations, departments, and asset locations, the data profile is ready for assignment to the vendor's users.
Create a User Profile for a Vendor User
To set up users quickly, you can copy
user information, and change the copied information as needed for each new user. On a copied user profile, you must change the user name and password, specify a role and a data profile. Also, you can change other information such as the user's email address and phone number.
To
copy and edit a user profile:
- From
the Administration main Contents, select Administration > Users.
The Users List appears (Figure 5).

Figure 5 - Users List
-
Locate
the user whose information you would like to copy and use for creating a
new user.
- Next to the User ID, select Menu > Copy.
The system displays the Users panel for
the ID you specified, open to the General tab.
- On the General tab:
-
Blank out values for in the User ID, User
Name, Password, and Confirm Password fields, and enter new values for the new vendor user.
- You can also enter an email address, Expiration Date, User Phone Number, Fax Number, and Pager, if desired.
- Review the Default Organization and Default Department.
These values must be an organization and department listed in the data profile (created previously, as above) that you are going to assign to
the user. (Otherwise, you will get an error message when you click Save.)
- Make sure that the field Hide ePHI Data is checked.
- Make sure that the field Hide Financial Data is checked.
- Leave the other fields as they are.
- Click the User Roles tab.
- In the Role field, click the prompt and select Vendor Access.
- For the Data Profile, click the prompt and select the data profile that you set up in the previous step.
- You can ignore the other tabs, since those tabs involve features that a vendor's user will not be able to access.
- Click Save.
- When you are finished, click Submit.
The system returns you to the Users list.
The vendor's user is now set up to access Materials Management purchasing and receiving panels.
Testing
- Open Materials Management as you normally would.
- Sign in as the new user, by entering the new user's User ID and password.
- You should see a menu similar to that in Figure 1. If you wish, you can open the purchase orders list and verify that only the vendor's POs appear.
Definitions
User Profiles
For each user at a site,
a user profile is a record that contains the user's role, data profile, email address, phone number, permissions, limits, and authorizations. The authorizations and
permissions that you set for a user depend on the user's job, and on the role
you have assigned to the user. (For vendors' users, most of the permissions are not relevant since the users cannot access the associated features, regardless.)
Roles
A role is a collection of security objects ("role objects") that specify what features a user in a particular role (or job) can access, and at what level. An example of a role is Distribution Clerk. In this role, the role object "Purchasing" may be set to View so that users assigned the role can view purchase orders, but not create or change them. In the Buyer role, by contract, the role object "Purchasing" might be set to Create.
Vendor users are assigned the role Vendor Access.
Most roles are pre-defined at system implementation. (You can create new roles, however, but you do not need to do this for a vendor's users.)
A customized application menu can be created for
a role. The Vendor Access role displays the application menu in Figure 1.
Data Profiles
Data profiles specify the region, organization, department, and asset location data that a user may access. For example, a buyer's data profile identifies
which organizations/departments the buyer can make purchases for. Each organization
and department in a hospital has its own data records.
Each user profile includes the data profile assigned to the user.
Help Documentation for Vendors
A short document is available for vendor employees who access the purchase order list and other lists. The document is available in .pdf form.