The Work in Administration menu contains the tools for system administration at your site. In particular, the user administration panels allow you to define new users and give them access to the areas in which they will work. The user administration feature is located in the Administration contents, and includes several areas: Data Profiles, Report Profiles, Roles, Users, and User Settings. You must be a system administrator to access the Administration contents.
To set up a user at your site, you need to enter identifying information and system feature authorizations into the person's user profile. A user profile is the repository for user identity information, and for the security settings and permissions that give the user access to system capabilities and organizational/department data. A user profile includes the user’s name, ID, password, email address, etc. When you create a new user profile for a staff member, you assign the user a role and a data profile.
Note: If your site uses SSO (single sign on), user profile details are added once the single sign on credentials for the user are established. Your Premier Consultant can assist. (See the discussion below.)
A role specifies task and ERP feature areas -- called role objects -- that users assigned to the role may work with. For example, the Buyer role includes the Approval role object. The DistributionClerk role includes the role objects Distribution (picking/issuing) and Receiving, among others. Roles determine the features and functions that a user can access. Several roles are provided for your use when the system is implemented, but you can edit these, copy them, and create others.
Each user profile also has a data profile associated with it. A data profile specifies the regions, organizations, and departments whose data the user can work with.
A user's assigned report profile makes the appropriate reports accessible to the user. You will want to restrict users from creating and running certain types of reports, and allow them to create and run other reports. For example, check printing runs in the system as a report. Most likely, you will want to authorize only a few users to print checks. Similarly, only a few users in each department will need the Department Expense Report.
Users who do not have a report profile assigned can access all reports. When the System Values field All Users Have Authority to All Reports is set, users can access all reports that they created, and all shared reports. Active Reports (such as the Inventory Transaction Register in Materials Management) are not affected by the Report Profile value. All expense reports are governed by the Report Profile.
For any user, certain functions -- such as working with patient information, approving requisitions, and posting journal vouchers to the General Ledger -- need authorizations set in the user's profile. User authorization settings, limits, and similar types of user profile information are in this section as well.
Security for iPad ERP applications has some unique considerations, but also includes roles, data profiles, and user authorizations described in this document. You may wish to refer to the topic Mobile Application Security Administration.
Some sites may wish to give a vendor's users access to the vendor's purchase orders in their supply chain data. If you are the administrator responsible for this task, the steps are similar to setting up any other user, except that a Vendor Security Code must be created and included in the vendor record. The Vendor Security Code is also specified on the data profile assigned to the vendor's users. A new role (VendorAccess) is also available. Instructions for this setup situation are in a separate topic: Setting Up Vendor Access to Supply Chain. However, we recommend that you read the information below to get the "big picture" of user setup and to understand the different terms.
Features are built into the system to ensure the privacy of electronic protected health records (ePHI), in compliance with HIPAA requirements.
Key areas of the application have been designed to protect patient data:
A detailed discussion with examples is available in the chapter "Securing Electronic Protected Health Information."
When your system was implemented, several user roles were defined. You can assign these roles to users at your site, as needed, and you can create new roles as well. For quick setup of users, copy a role template. Then, edit the copy to tailor the role to your own needs. See Quick User Role Setup.
Role objects define the features that users in a particular role can access. For example, the APClerk role encompasses the role object Invoicing. This role object allows an AP clerk to match invoices. The Buyer role, for instance, includes the role object Approval. This role object allows a buyer to approve requisitions. Figure 2 is a list of role objects for the DistributionClerk role:

Users in different roles may have different levels of access set for the same role object. For instance, in some organizations, both a distribution clerk and a buyer may work with purchase orders (Purchasing is the role object.) But, the buyer needs to create POs, whereas the distribution clerk may only need to view POs occasionally. For the Purchasing role object, then, the Administrator defines a security level of View for the DistributionClerk role (Figure 2) and Create for the Buyer role. Security levels from greatest to least scope are:
All - Users can delete, create, modify, or view data.
Create - Users can view, modify, or create data. For Item Add, for example, users with the create security level can create new items, and can copy items as well, but they cannot delete items.
Modify - Users can change the data.
View - Users in the role can view the data, but not change it in any way.
None - Users have no access to the data or function.
If a user has a security level of None for a given role object (for example, the ItemAdd role object), then the functions (Consolidate Item Add and others) that the role object controls do not appear on the menu for that user. You can customize the menu for any user in other ways, as described in Customizing the Table of Contents for a Role.
A discussion of role objects for Sourcing and Contract Management is in the section Role objects associated with Sourcing and Contract Management.
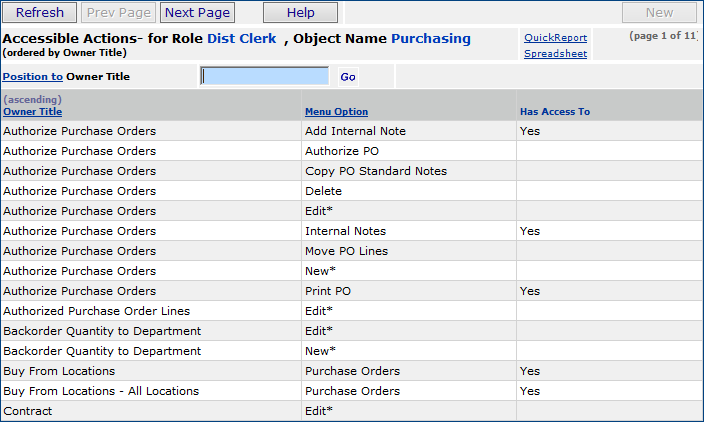
To view the actions/features allowed by each role object, click Menu > Has Access To... next to any role object in the list (Figure 2). The allowed actions/features for the role object appear (Figure 3). Figure 3 displays the first page of accessible actions for the Purchasing role object in the DistributionClerk role.
System administrators can view the role objects and the features for each in Microsoft Excel worksheet form. Worksheet details include the role object setting (e.g., View, Modify, Create, All, None) assigned to each user Role at a site. The features or activities that the setting allows are specified by check marks.
Note: The spreadsheet is read-only. You cannot modify its contents.
The Role Objects worksheet appears. Figure 4 is an example of part of the worksheet for a site.
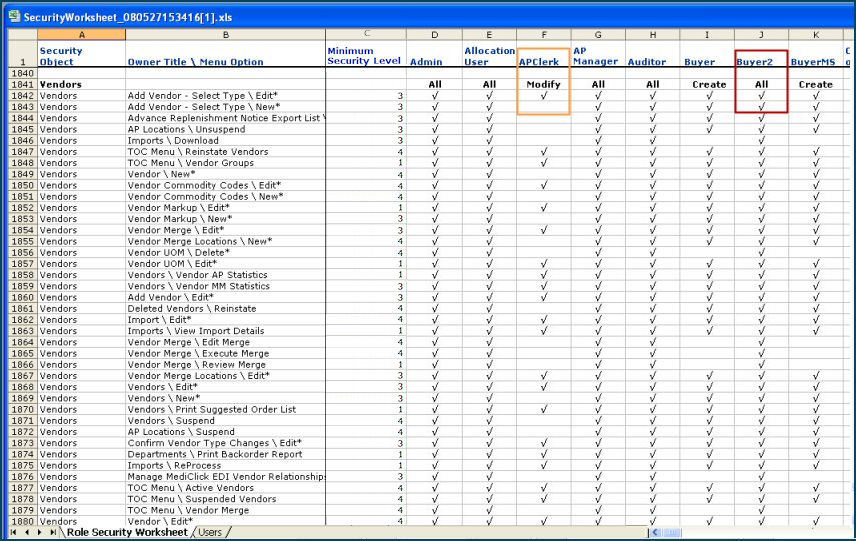
In the A column, the worksheet displays the role object "Vendors." The B column contains each feature/action that the role object controls. Subsequent columns are minimum settings for each role object and the different user Roles at the site. Under each Role is the role object setting for that role, and the features/actions that are "turned on" by the setting, specified as check marks.
In Figure 4, for example, two roles "AP Clerk" (orange) and "Buyer2" (red) have the settings Modify and All, respectively, for the role object "Vendors". Reading down the worksheet columns, AP Clerk has a check in the row Add Vendor Select Type\ Edit*, but not in the row Add Vendor Select Type\ New*. The Modify setting allows users with the AP Clerk role to edit vendor records, but not to create them.
Compare the AP Clerk role to the Buyer2 role. Buyer2 has the setting All for the "Vendors" role object. Buyer2 can edit vendor records, but can also create vendor records, as specified by the check in the row Add Vendor Select Type\ New*.
Note: With the role objects "Maintain Item Catalog" and "Maintain Item Inventory," a chart lists the panels and capabilities governed.
If you need to, you can create a customized main contents for a role. The customized contents lets users with that Role only see areas of the system that you want them to see.
Sites would like the ability to control which users are able to display and edit departmental data. Department records are available from this location: Materials Management main Contents > Requisitioning > Departments.
The role object DeptReqView controls users' ability to create, edit, and view department records. This new role object works in tandem with the role object DeptReq to provide access as follows in Table 1:
| Role Object Setting (All, Create, Modify, View, or None) | Results for User | |
DeptReq |
DeptReqView |
|
All |
View/None |
Cannot create a new department. |
Create |
View/None |
|
Modify |
View/None |
|
View |
View/None |
|
None |
View/None |
Will not be able to access a department. The Departments menu option is removed from the Contents. |
All |
Modify/Create/All |
Will be able to create, edit and delete departments. |
Create |
Modify/Create/All |
Can create and edit departments. |
Modify |
Modify/Create/All |
Can edit departments. |
View |
Modify/Create/All |
Cannot create a new department. |
None |
Modify/Create/All |
Will not be able to access a department. The Departments menu option is removed from the Contents. |
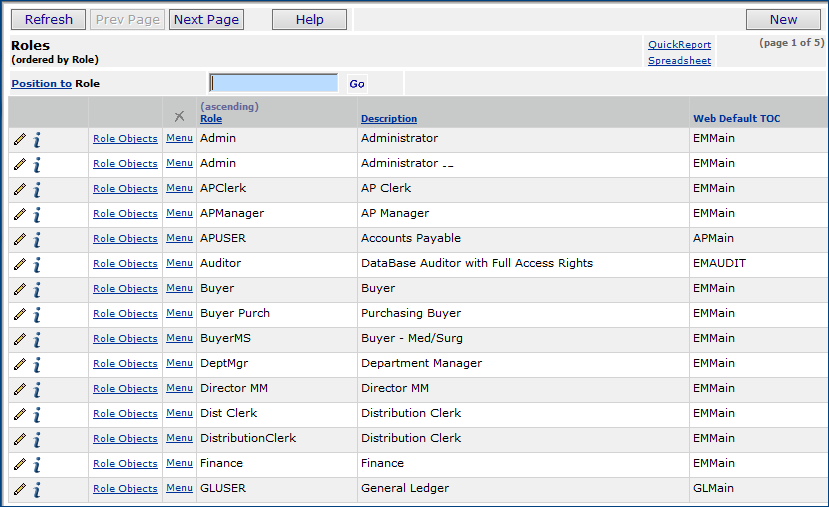
You can restrict users' access so that users in certain roles do not see parts of the system that they do not work with. The Contents that these users do see only contains the allowed features. Notice that the last column in the Figure 1 Roles list - Web Default TOC - contains the default table of contents for users assigned to each role. You customize the table of contents for a role by omitting menu areas.
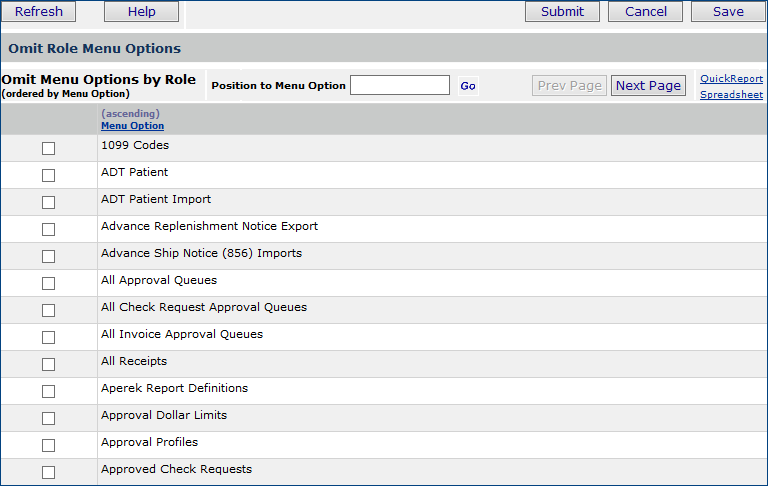
Select
the checkbox next to any menu item that you wish to exclude. Users
assigned to the role will not see menu items that you select.
If you wish to allow a user to access a menu item that is on this list, unselect the item.
Note: The menu options are listed on several pages. Be sure to scroll forward
so that you do not miss any.
You can create reports on the security roles and role objects defined for users at your site. The "Security Roles and Objects" Report Object is available for creating the reports. See the discussion of Creating Custom Reports for instructions.
Data profiles specify the region, organization, department, and asset location data that a user may access. For example, a buyer's data profile identifies which organizations/departments the buyer can make purchases for. Each organization and department in a hospital has its own data records.
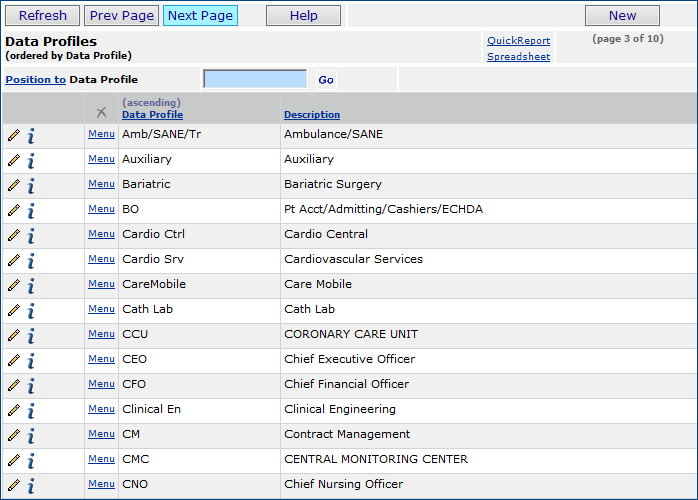
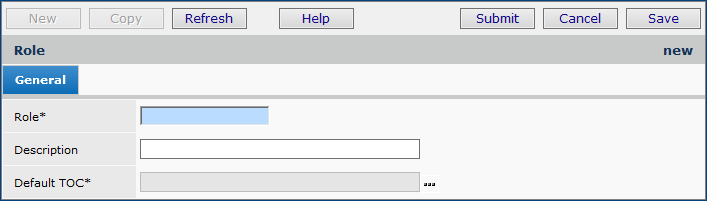
Click New. The Data Profiles header appears.
A vendor is designated as "restricted" on the vendor record. This field gives users with the data profile access to information for restricted vendors.
When a vendor is restricted, a user cannot see purchasing, invoicing, or vendor data unless the Allow Access to Restricted Vendors field is selected.
Specifically, if this field is not set, the following are not available for
restricted vendors for any user with the profile:
On the Purchasing menu:
- Purchase Orders
- Authorize PO
- View Deleted POs
On the Invoicing menu:
- Create Invoice From Purchase Order
- Invoices
- Exception Invoices
On the Vendors menu:
- Vendors
On the Quick Click menu (and other menus):
- PO Vendors
You cannot restrict a vendor unless at least one data profile allows
access to restricted vendors.
Likewise, you cannot remove the "allow access" flag from a data profile
if it is the last data profile where the restricted field is set
and a restricted vendor exists. You get a hard error in either of these
cases.
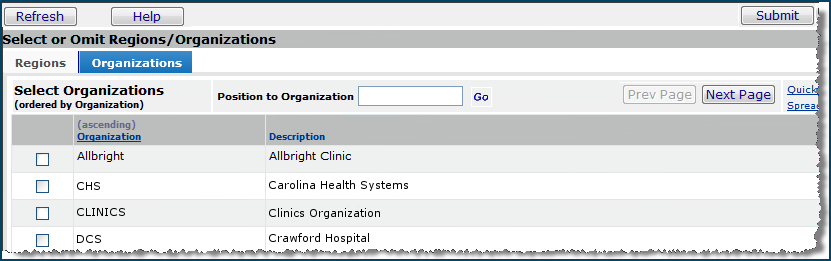
Several system
features (such as inter-organizational processing of inventory) require access
to multiple organizations' data. A user's job function (such as an accounts
payable manager) may also require access to several organizations' records.
Permissions for access to organizations' data are set in the user's
data profile.
Many users -- such as distribution clerks who do par cart processing, or financial staff who handle accounts -- need access to data for departments other than their own department. To access data for different departments, permissions must be set in the user's data profile. Similarly, some users -- such as warehouse staff who work with multiple inventories -- need access to multiple asset locations' data. This section explains setting permissions for department data access. Following this section are instructions for setting permissions to asset location data. (The instructions assume that you currently have no permissions set.)
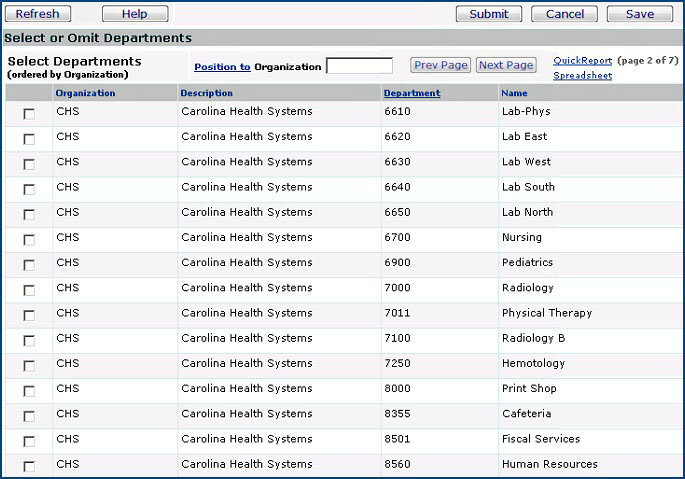
Select the checkboxes next to any departments that you wish to include in the data profile. Users assigned to the data profile will have access to information for the departments selected.

Select the checkboxes next to any asset locations that you wish to include in the data profile. Users assigned to the data profile will have access to the asset location(s) selected.
You can adjust user security so that a user can order items from multiple asset locations, without necessarily being able to maintain those asset locations.
The field Allow Changes to Asset Location and Inventory (Figure 11) on the Data Profile Asset Location panel controls the user's ability to edit asset location records and item inventory records for an asset location.

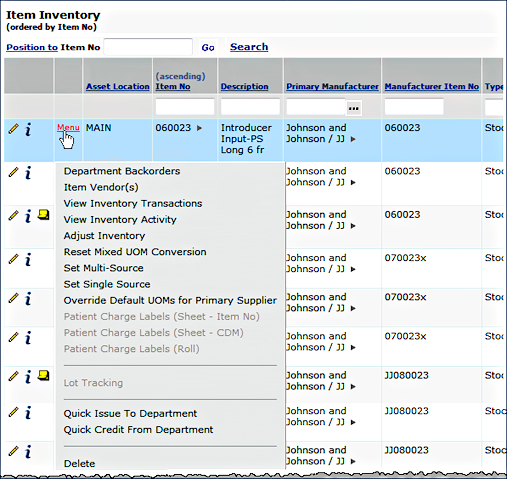
The field Allow Changes to Asset Location and Inventory also controls access to these menu options from the Item Inventory - All Locations menu (Figure 12):
Menu Option - Department Backorders |
Figure 12 - Item Inventory - All Locations Menu |
On the User Profile Authorities tab, the field Allow Pipeline Days Reset controls access to the menu option Reset Stock Item Pipeline Days on the item inventory menu (Figure 13).
For details, see Pipeline Days in the inventory edit chapter.
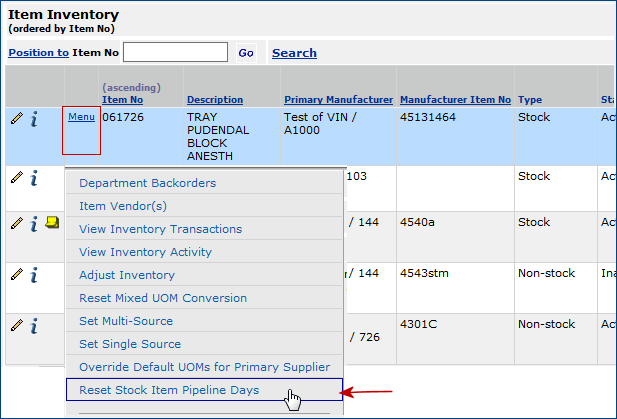
Note: Also, the Inventory role object (Maintain Item Inventory ) must have its security level set to View (or higher), and must be included in the role that is assigned to your User ID. To be able to change Item Inventory information, the Inventory role object (Maintain Item Inventory ) must be set to Modify (or higher).
(Note: This procedure requires System Administrator privileges.)
Security for payroll journal vouchers lets managers prevent a user from viewing imported journal voucher payroll data for specified organizations/departments, while retaining visibility to other types of journal vouchers for a department.
This security feature covers both payroll accounts and statistical payroll accounts, and applies to ERP departments only (not SCM departments). It applies to imported journal vouchers whose Journal Voucher Type is Payroll. (Manually created journal vouchers cannot be defined with the Journal Voucher Type of Payroll.)
Security is set in these areas:
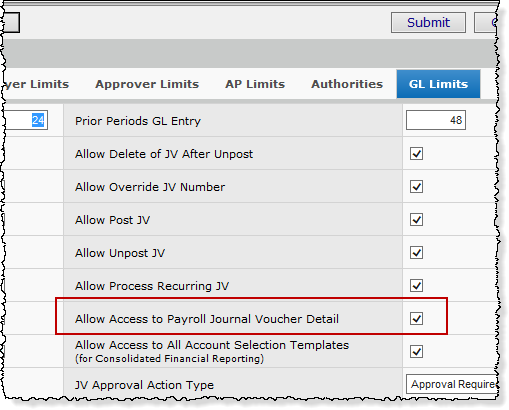
Important: The permission for payroll data by department (in a Data Profile), the appropriate values on the role objects, and the flag on the GL Limits panel must be set for a user to access payroll data.
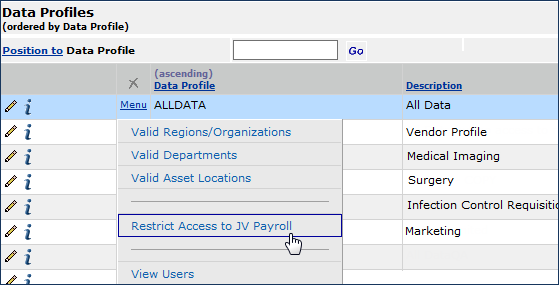
The Restrict Access to JV Payroll panel opens with a list of departments and organizations included in the Data Profile (Figure 16). In Figure 16, the departments where payroll data access is allowed are in the green box. The red box indicates departments where payroll data access is not allowed.
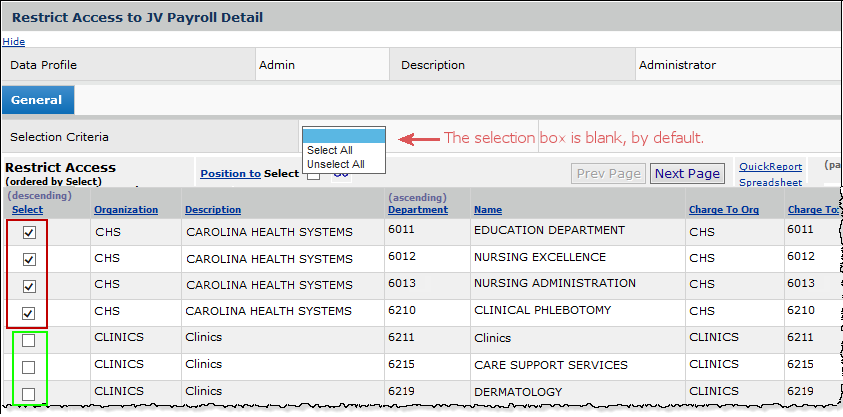
In the Restrict Access to JV Payroll panel General tab, in the center, the Selection Criteria box is initially blank. You can set the selection criteria to Select All, or when any departments are selected, UnSelect All.
Note: If you add an organization/department to a Data Profile, the new department’s flag for access to payroll data will be unselected; i.e., “allowed.” If you need to restrict access to payroll data for the newly added department, return to the Restrict Access to JV Payroll panel and check the Select box.
Access to payroll data for users who have department access is controlled in the application in several areas, outlined in the journal vouchers topic Application Areas Controlled for Payroll JV Access.
A user's ability to create, run, and view reports depends on whether a report profile is assigned to an User ID; and if so, which report profile. A report profile limits the reports that a user can access, so that not all users at a site will be authorized for all reports.
A report profile contains Report Objects that specify data areas for reports; for example, Discounts Taken and Lost, Check Printing, Department Expense Report, and Contract Statistics, among many others. Access options for reports for any user are:
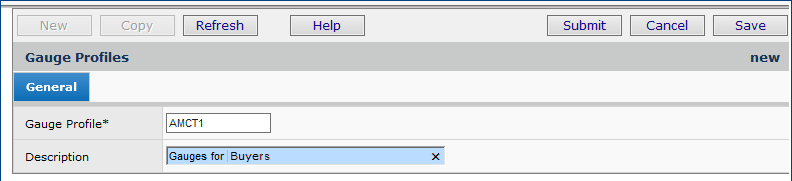
The ERP "Welcome Page" dashboard contains gauges -- charts and graphs -- that display supply chain key indicators. To be able to view gauges, a user must have the specific gauges of interest authorized in a gauge profile. Each gauge profile contains permission for one or more gauges. You can create gauge profiles as needed, and assign them to users. The "Welcome Page" dashboard is not visible to a user until the user has been assigned a gauge profile.
Note: If you wish to use the ERP "Welcome Page" dashboard feature, contact the Help Desk. This feature must be enabled via the Help Desk's administration setting Display ERP Gauges on Welcome Page. Once the Help Desk turns on the feature, you can begin setting up your own gauge profiles.
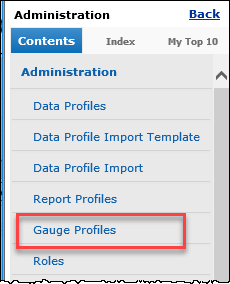
The list of available gauge profiles appears (Figure 18), or No Data if none have been created.


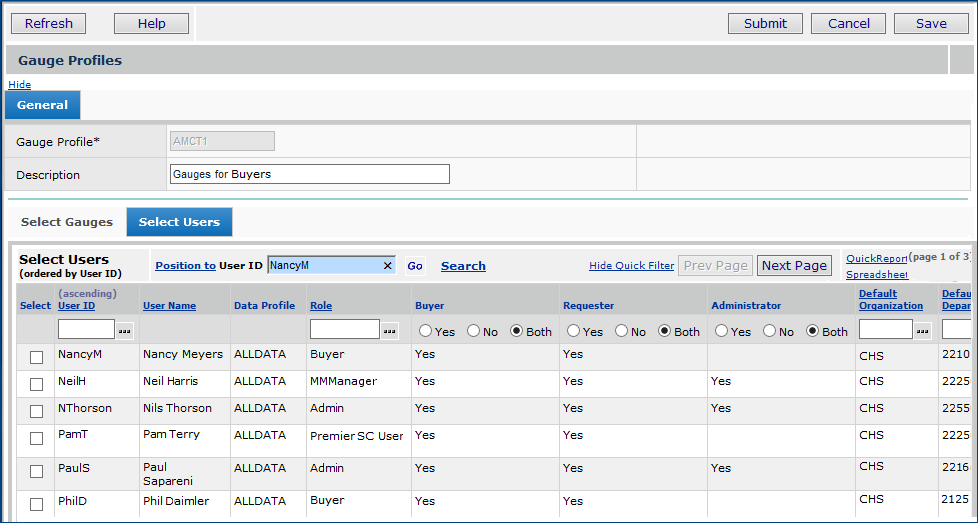
For each user at your site, you establish a user profile that contains the user's Role, Data Profile, Report Profile, Gauge Profile (if the "Welcome Page" gauges are enabled at your site), permissions, limits, and authorizations. The authorizations and permissions that you set for a user depend on the user's job, and on the role you have defined for the user. Previous sections of this topic explained how to create a role, a data profile, and a report profile, and a gauge profile. This section discusses how to view user information, create new user profiles, and specify the user settings.
The contents of user lists is restricted by data profile and default organization. Table 2 displays user lists that are subject to data profile organizations and departments. The path to each list is in the corresponding columns.
| List | Path |
| Users List | Work in Administration > Administration > Users |
| Users by Data Profile | Work in Administration > Data Profiles > Menu > View Users |
| Users by Report Profile | Work in Administration > Report Profiles > Menu > View Users |
| Users by Role | Work in Administration > Roles > Menu > Users |
| Users by Role (Inquiry) | Work in Administration > Roles > i > click Users tab |
Example
Carolina Health Systems has organizations 001, 002, 003, 004, 005.
- User X has the data profile "East Coast" which can access organizations 001, 002, and 004 only. When this user opens the Users list, she can only see users whose default organization is either organization 001, 002, or 004.
- User Y has the data profile "ALLDATA" which can access all 5 organizations. When User Y opens the Users list, he sees users for all five organizations.

This step shows you how to enter basic information for the user's profile.
Enter
information in fields on the General panel as needed. (The User
ID field is required.)
Click Help for an explanation of fields on the General panel.
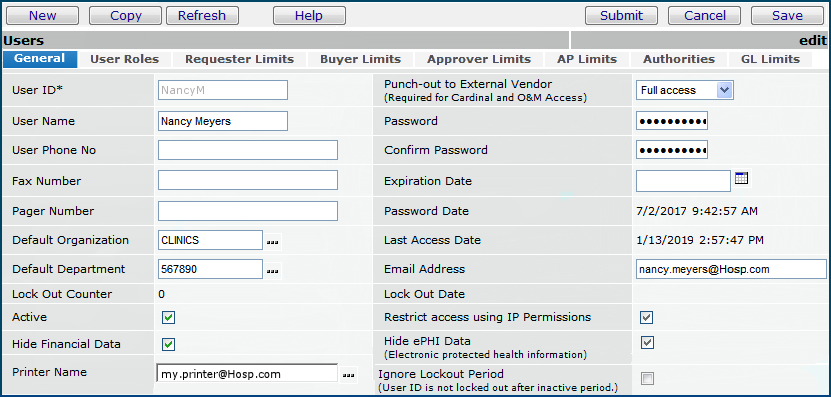
Important: By default when you create a new user profile, the Hide ePHI Data is selected. If you wish the user to have access to ePHI records, you must manually unselect the field. Also, when you copy a user profile, this field is selected in the copied version. Again, you must manually unselect it for the user if appropriate.
(Previously, this field was called Hide Medical Data.)
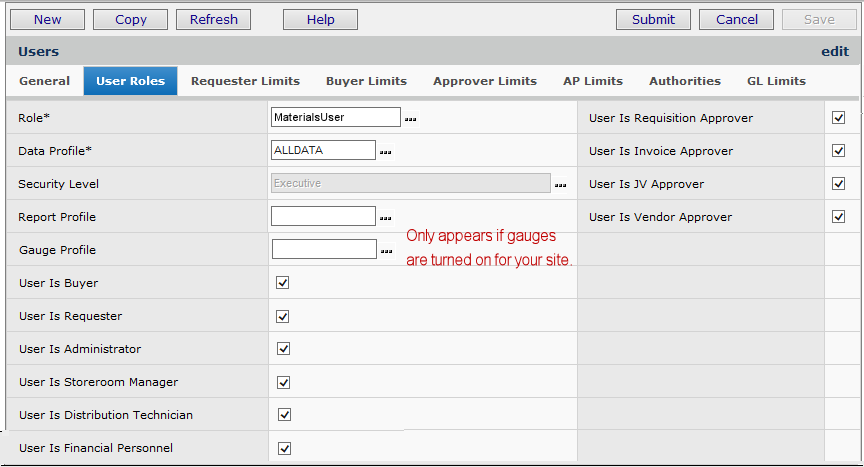
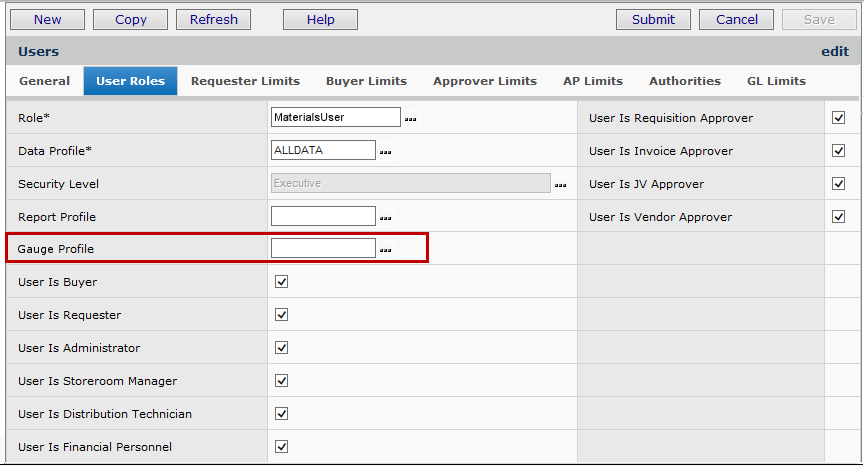
If the "Welcome Page" dashboard is turned on for your site, the Gauge Profile field appears under the Report Profile (Figure 25A). Otherwise, if the dashboard is not enabled, Gauge Profile does not appear.
Figure 25 - User Roles Panel- Gauge Profile Field
Notes about the relationship between roles and "User is ..." fields: If you have a role that identifies the user as a Buyer, for example, you might wonder why you should also select User is Buyer on the Users panel. The reason is that clicking User is Buyer puts the person on the select list of buyers. This list appears when the Buyer field prompt is clicked; for example, when someone creates a purchase order, and needs to identify the buyer. Similarly, for requisition approvers, invoice approvers, and journal voucher approvers, selecting the field on this panel makes the user available from a select list.
More Information on Approvals
The following topics provide details on setting up approvers and approver groups, and the types of application transactions that can be subjected to approvals.
- Journal voucher approvers, see the GL Limits tab (on this page) and the topic "Journal Voucher Approvals Processing."
- Buyers, Requisition Approvers, Invoice Approvers, Check Request Approvers, see "Set Up Approvers and Approver Groups."
- Requisition approvers, also see "Requisition Approval Processing by Cost, Commodity Code and Item Type."
- Invoice approvers, also see "Invoice Approval Processing."
The remaining tabbed panels -- Requester Limits, Buyer Limits, Approver Limits, AP Limits, Authorities, and GL Limits -- allow you to enter restrictions and permissions for the user. These restrictions and permissions depend on the user's role; whether the user is a buyer, approver, requester, etc.; the type of data the user works with; and the structure of your Materials and Financial organizations.
| Role | Tabbed Panels | Permission Fields |
| Admin | User Roles Authorities | User is Administrator Perform Table Maintenance Perform Security Maintenance Others as appropriate. |
| APClerk | General User Roles AP Limits Authorities GL Limits |
Hide
ePHI Data (if appropriate) User is Financial Personnel User is Invoice Approver (if appropriate). As appropriate As appropriate As appropriate |
| APManager | General User Roles Authorities AP Limits GL Limits |
Hide ePHI Data (if appropriate) User is Financial Personnel Perform Table Maintenance Allow Override Discount Terms Allow Override Payment Terms others as appropriate. All As appropriate. (Could include all.) |
| Buyer |
User Roles Authorities |
User is Buyer Other fields, as appropriate. As appropriate. Buyer requires special set up on several panels. See " Set Up Approvers and Approval Groups" for details. |
| DeptManager | User Roles Requester Limits Approver Limits Authorities |
User is Requester User is Requisition Approver,as appropriate. As appropriate, if User is Requester All, if User is Requisition Approver. See "Requisition Approval Processing by Cost, Commodity Code, and Item Type." Set Asset Location Restricted if appropriate. |
| DeptSecy | User
Roles: Requester Limits |
User is Requester As appropriate |
| DistributionClerk |
General User Roles Authorities |
Hide ePHI Data, if appropriate. Hide Financial Data User is Distribution Technician As appropriate: Asset Location Restricted Perform Table Maintenance Receive Inventory Blind Receiving Allow Inventory Quick Issue Allow Inventory Charge Only Quick Issue Allow Order Guide Quick Issue Allow Dept to Dept Quick Credit Allow Dept to Vendor Quick Credit Allow Inventory Adjustments During Pick Confirm |
| MMManager | General User Roles Requester Limits Approver Limits Authorities |
Hide Financial Data, if appropriate. As appropriate, depending on your Materials organization's structure. Set the dollar limits high enough to cover this user's authority. If this user approves requisitions, you will need to assign an approver buddy. As appropriate, depending on your Materials organization's structure, but likely fields include: Authorize Purchase Orders Perform Table Maintenance Perform Security Maintenance Receive Inventory Allow UOM Changes on Req Created from Order Guide Allow Override Discount Terms Allow Override Pay To Vendors Allow Item Vendor Unit Price Change from PO Allow Inventory Quick Issue Allow Inventory Charge Only Quick Issue Allow Order Guide Quick Issue Allow Override Dept Charge To Allow Dept to Dept Quick Credit Allow Dept to Vendor Quick Credit Allow Override Payment Terms Allow Inventory Adjustments During Pick Confirm Allow Vendor Merge |
| Receiver | General User Roles Authorities |
Hide ePHI Data, if appropriate. Hide Financial Data User is Distribution Technician As appropriate: Asset Location Restricted Perform Table Maintenance Receive Inventory Blind Receiving Allow Inventory Quick Issue Allow Inventory Charge Only Quick Issue Allow Order Guide Quick Issue Allow Dept to Dept Quick Credit Allow Dept to Vendor Quick Credit Allow Inventory Adjustments During Pick Confirm |
| Requisitioner |
General User Roles Requester Limits |
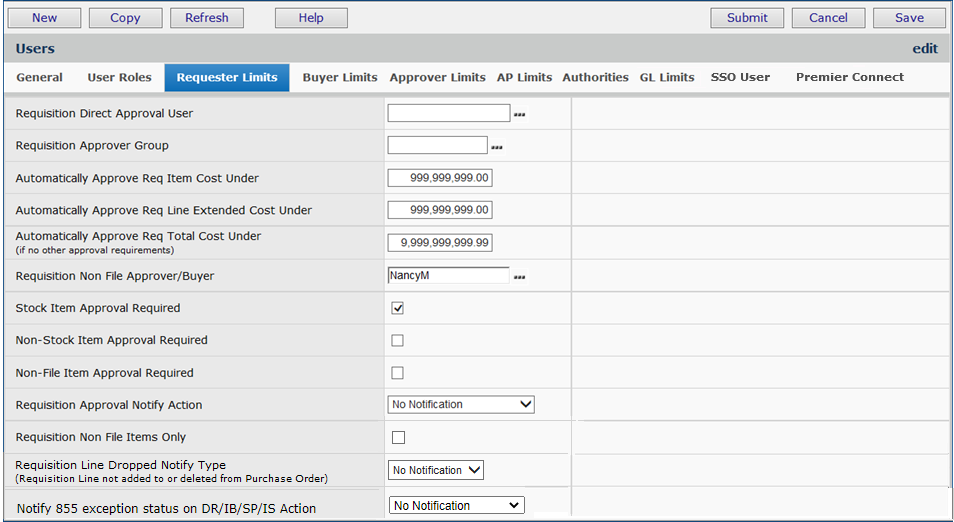
Hide ePHI Data, if appropriate. Hide Financial Data User is Requester - Set one of the following pair of fields (but not both): Requisition Direct Approval User or Requisition Approver Group - Enter dollar amounts in the following fields if you wish the requester to be able to make requests under those amounts without approval. - Zero dollars entered in these fields means approval is required for all amounts. - Very high values means that no approval is needed. (See the discussion below for specifics.) - The fields are: Automatically Approve Req Item Cost Under Automatically Approve Req Line Extended Cost Under Automatically Approve Req Total Cost Under Requisition Non File Approver/Buyer - If appropriate, select: Stock Item Approval Required Non-Stock Item Approval Required Non-File Item Approval Required - Select the Approval Notify Action. |
| WarehouseMgr | General User Roles Requester Limits Authorities |
Hide Financial Data, if appropriate. User is Storeroom Manager User is Requester (if the user opens requisitions) As appropriate, if User is Requester Perform Table Maintenance Receive Inventory Allow UOM Changes on Req Created from Order Guide Blind Receiving Allow Inventory Quick Issue Allow Inventory Charge Only Quick Issue Allow Order Guide Quick Issue Allow Override Dept Charge To Allow Dept to Dept Quick Credit Allow Dept to Vendor Quick Credit Allow Inventory Adjustments During Pick Confirm |
You can create user profiles with requisition approval requirements and limits. For example, some requesters may not need approval for stock item requisitions, but will need all non-stock item requests approved. Other requesters may need approval for stock items that cost more than a certain amount. A few requesters may only need non-file requisitions approved. For each user who creates requisitions, you assign one or more requisition approvers. Approvers review requisitions that are routed to them, and approve or reject the requisitions.
A Requisition Approver Group is a collection of users who approve requisitions and other application elements (such as invoices). Requisitions are routed through an approver group based on the cost of the requisition, and each member's approval dollar limit. See "Set Up Buyers, Approvers, and Approver Groups."
Some sites may also assign requests to approvers based on the commodity codes of items requested. This situation is covered by the commodity code processing area. You may wish to read "Requisition Approval Processing by Cost, Commodity Code and Item Type" to understand commodity codes and the requisition approvals process.
On a departmental basis, approval profiles let you define how a requisition line qualifies for approvals, independently of individual users' settings. Approval profiles contain the item types (stock, non-stock, non-file) and dollar limits for requisitions. Once created, an approval profile can be assigned to an entire department for the department's requesters. In this way, you can avoid maintaining approval data for multiple individual requesters who all have the same approval requirements because they belong to the same department. Details are in the section Settings for departmental requesters.
Note: If a user belongs to a department that has an approval profile assigned, the approval profile takes precedence over the individual user's settings for requisitions.
In Figure 26, note that the Stock Item Approval Required field is unselected. The Non-Stock Item Approval Required and the Non-Stock Item Approval Required boxes are selected. The defined dollar limits are: item cost under $75.00, extended line cost under $650.00, and total cost under $2400.00.
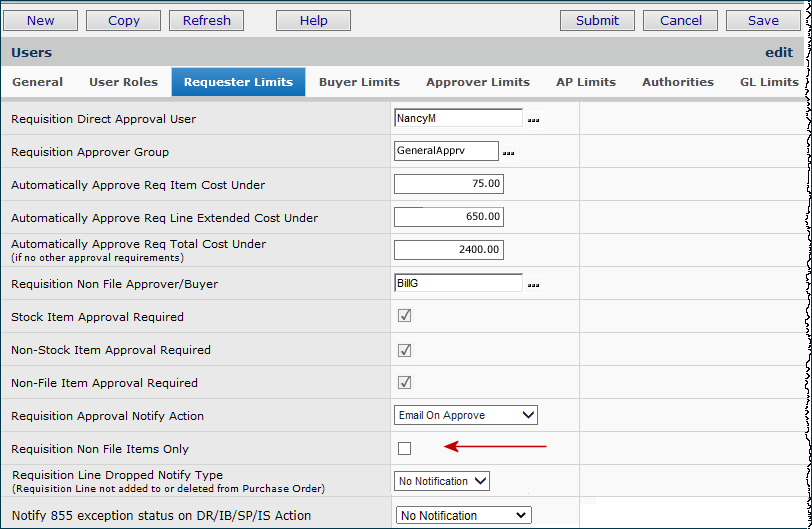
This user does not need approval for stock requisitions under the Total Cost dollar limit. The user also does not need approval for non-stock and non-file requisitions under the Item Cost and Extended Line Cost dollar limits.
This user does need approval for:
The red arrow indicates a flag that would limit the user to Non File Requisitions only.
Figure 27 has settings for a user who does not need request approvals on the basis of dollar limits for any item type. Notice that neither the Requisition Direct Approval User field nor Requisition Approver Group has a value. (Stock and non-stock item requisitions are automatically approved.)
Setting up buyers is a process that requires entries in several areas, as well as in the user profile. (For example, a buyer must be associated with each organization at your site.) See "Set Up Buyers, Approvers, and Approval Groups."
The steps below assign dollar limits to a buyer. The buyer can authorize purchase orders for items with an item cost up to the amount entered in the PO Item Cost Limit field. The limit for the line cost that a buyer can authorize is in the PO Line Extended Cost Limit. The total amount for a PO that the buyer can authorize is specified in the PO Total Cost Limit.
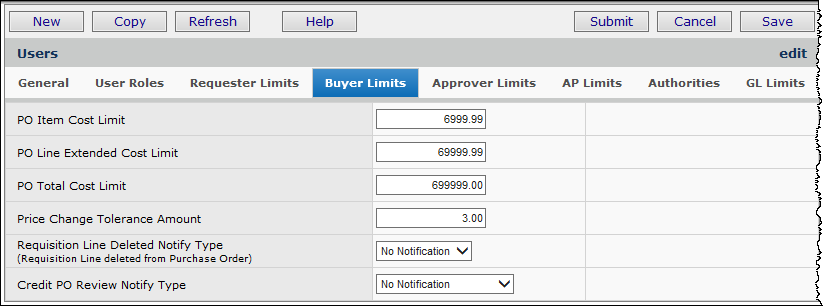
In Figure 28, the buyer can approve POs containing items that cost up to $6,999.00 per item. The total dollar amount for a line on a PO that the buyer can approve is $69,999.00. The buyer can approve purchase orders with a total up to $699,999.00. This buyer is allowed to approve price changes on items up to $3.00.
If you wish to give a buyer no dollar limit, enter 9,999,999.00 in the fields for PO Item Cost Limit, PO Line Extended Cost Limit, and PO Total Cost Limit.
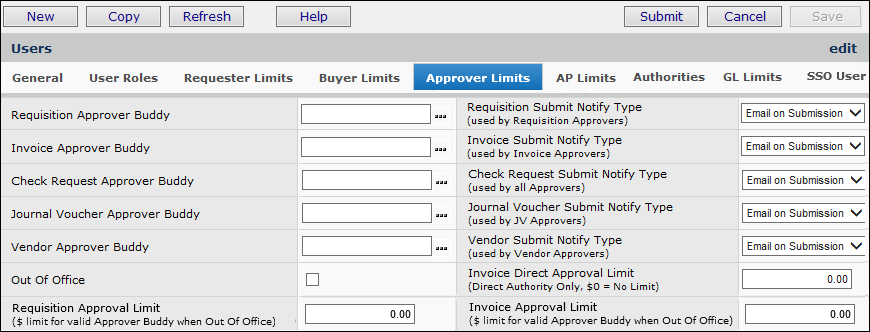
For each person who approves requisitions, invoices, check requests, journal vouchers, or vendors, you may wish to identify another user as an "approver buddy." An Approver Buddy performs the work of an approver if the approver is out of the office. The person can set his/her status as out-of-office when leaving for a vacation or trip, and the Approver Buddies will be routed the person's approvals.
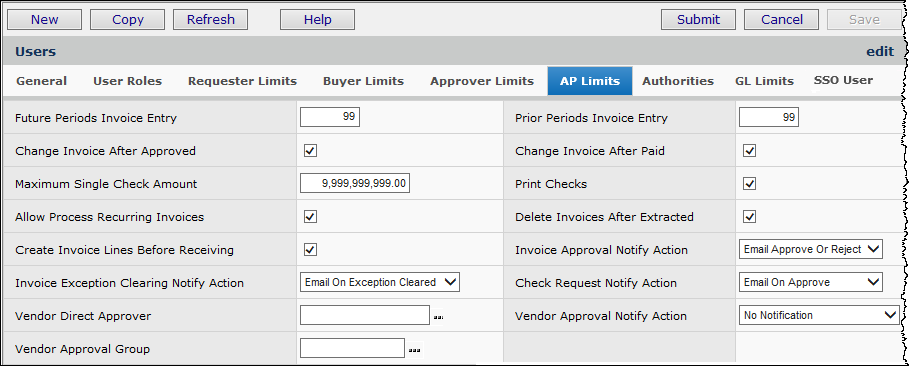
Users working in Accounts Payable need parameters set for invoices and checks. The fields that you need to enter for check and invoice permissions and limits are on the AP Limits panel.
The Authorities panel governs permissions for a variety of features. Fields on the panel set permissions for users as described in Table 4.
| Authority Field: | Function: |
| Inquiry Only | The user can only view information in the system, and may not edit or delete information. |
| Asset Location Restricted | Currently not used. |
| Authorize Purchase Orders | The user has permission to authorize purchase orders. |
| Perform Table Maintenance | The user can add, change, and delete table entries.
Tables are accessible from the main Contents of Materials, AP, or GL on the Tables menu. |
| Perform Security Maintenance | The user can add, change, and delete user security
information: user profiles, data profiles, report profiles, and roles. |
| Receive Inventory | The user can create inventory receipts. This field must be set for any user that is an invoice receipt exception owner. |
| Allow UOM Changes on Req Created from Order Guide | The user can change the unit of measure for items requested through an order guide. |
| Allow File Item Adds to Req Created by Order Guide | When selected, the user can add additional file item lines manually when creating a requisition from an Order Guide. Adding non-file lines is unrestricted. |
| Allow Override Discount Terms | The user can change the discount terms when
creating an invoice. (Discount terms default from the vendor to the PO to the invoice.) |
| Allow Override Pay To Vendors | On an invoice, the Paying Vendor and
Paying Location default from the PO. The user can override these defaults. |
| Allow Item Vendor Unit Price Change from PO | The user can approve unit price changes. |
| Allow Unauthorization of Sent EDI PO |
The user can unauthorize EDI purchase orders that have been sent. This setting is designed to allow you to delete EDI purchase orders created for testing (but any EDI PO can be unauthorized.) Once you unauthorize a PO, you can delete it. |
| Blind Receiving | The user can do blind receiving. |
| Allow Add/Update/Delete of Vendor Type "MM and AP" |
Controls whether a user can create and maintain "MM and AP" type vendors. The field is selected by default. Vendors can be designated as one of these types: "AP", "MM," or "MM and AP." This field works in concert with the role object "VendorsMMandAP." Security settings for this role object default from the values set for the role object "Vendors." Depending on the security setting for the "VendorsMMandAP" role object. When this field is selected, the role object must have the following minimum settings to perform these actions:
If the user tries to delete, undelete, suspend, or unsuspend an "MM and AP" vendor, |
| Allow Inventory Quick Issue | The user can create inventory quick issues. |
| Allow Inventory Charge Only Quick Issue | The user can create inventory charge-only quick
issues. Typically, a charge-only quick issue is used when items are issued to medical center staff on a "walk-in" basis. |
| Print Pick List To My Printer | Allows the user to auto-print requisition pick lists locally. Auto-printing applies only to requisitions released by clicking Menu > Release Req for Printing on the Requisitions list. A printer must also be specified on the Users General tab.
|
| Allow Order Guide Quick Issue | The user can create order guide quick issues. |
| Allow Override Dept Charge To | The user can override the normal charge-to department,
and specify a different charge-to department for a requisition or purchase order. When a user specifies charge override for a PO, item, order guide, or par cart, only those departments that have been identified in the user's data profile are valid for selection. |
| Allow Dept to Dept Quick Credit | The user can perform department-to-department credit processing of items. |
| Allow Return to Vendor Quick Credit | The user can create quick returns to vendors for credit. See "Return-to-Vendor Quick Credits." |
| Allow Dept Cost Adjustment Quick Credit | The user can perform quick credits for department item cost adjustments. |
| Allow Dept to Inventory Quick Credit | The user can perform quick credits for returning department items to inventory. |
| Allow Override Payment Terms | The user can override payment terms
on an invoice. (Payment terms default from the vendor to the PO to the invoice.) |
| Allow Inventory Adjustments During Pick Confirm | The user can adjust the on-hand quantity of an
item when picking an order. This situation occurs if the on-hand quantity is set higher than the actual shelf amount. For example, if 10 items need to be issued, but only 5 are on the shelf, selecting Adjust Quantity/UOM Issued from the Pick Confirmation panel confirms the issued amount (5) and sets the on-hand quantity to zero. |
| Allow Vendor Merge | Gives the user permission for the Vendor Merge feature. |
| Restrict PO/Invoice Price Change on Contract Items | Forces payment of an invoice for a contract item at the PO price. The user cannot change prices on purchase orders or invoices. See "User Restriction against Changing Prices on Contract Items." |
| Make Delivery Docs auto-available to My Reports | Allows automatic printing of a Receiving Delivery Document when a purchase order is received. |
| Allow Add/Update of Bill Only Reqs and POs | When selected, the user is authorized to create and update bill-only POs and requisitions. |
| Allow Cart/Guide Line Adds from Dept Inventory | Allows the user working with a department inventory to add file items to an order guide and/or par cart from a department inventory when the inventoried file items do not exist on the par cart/order guide |
| Allow Add/Update of Blanket Requisitions | Authorizes the user to create and edit blanket requisitions. |
| Allow Add/Update of Standing Requisitions | Authorizes the user to create and edit standing requisitions. |
| Allow Pipeline Days Reset | The user is allowed to edit the pipeline days on the item inventory record for stock items. |
| Auto Print After Mobile Pick (Must select Printer Name and Mobile SC Feature) |
This field is for users who work with picks on a mobile device. When selected, allows the user to auto-print pick lists locally as soon as a pick is finished. A printer must also be specified on the Users General tab. If the Mobile Pick Application feature is not enabled, this checkbox is grayed out |
General Ledger users need permissions for working with accounts and for creating and posting journal voucher entries to the General Ledger. The fields for General Ledger permissions and limits, including journal voucher approvals, are on the GL Limits panel.

The user's organization may have identified approvers for particular source journals and/or account codes.
Single sign on relies on your site's network sign on process to validate users' credentials when signing on to ERP.ingle signon, single sign-on, SSO
Note: This feature must be implemented by your Consultant, and users need to be set up with SSO credentials.
When new users are created as part of the single sign on implementation, they initially have a basic ERP User ID and password, but no user roles, data profiles, default organizations/departments, authorizations, or other required user profile elements. Until their user profiles are completed -- a step in the process -- they will not be able to sign in using SSO.
User information is considered incomplete when it missing any of the following:
Once a user is set up for single sign on, the Active flag on the User Profile Main tab disappears. Audit reports for users that are active in the system are based on the customer's Active Directory when SSO is enabled.
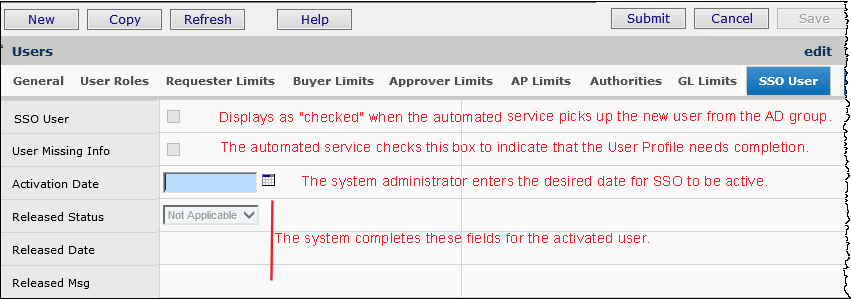
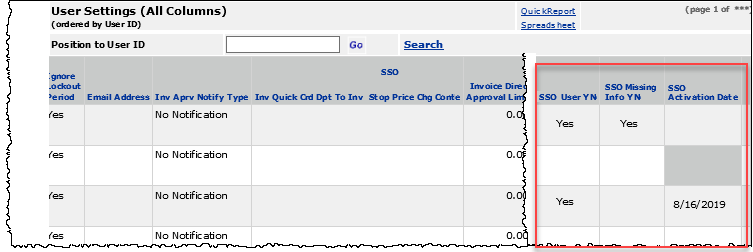
The field SSO Missing Info YN on the User Settings list indicates (Yes) if the required User Profile fields are not assigned (Figure 33). You can use this list to review users whose User Profiles need completion.
- To open the User Settings list, select Work in Administration > Administration > User Settings.
The Replicate feature copies an existing SSO User Profile to generate a new user profile. This is a time-saving feature for system administrators.
Note: The user eMail Address is not copied. Also, the Password is not copied if it is an SSO password for access to an external system.
A panel appears containing the user profile information. The lower part of the panel lists user profiles that were created for SSO only (Figure 34).
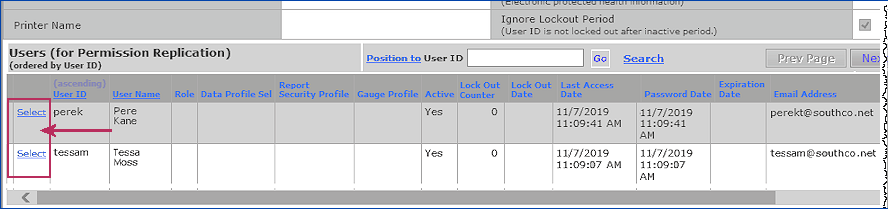
Note: Once a user is set up for single sign on, the Active flag on the User Profile Main tab is unavailable
This user data import is designed specifically for SSO users. It makes the process of setting up SSO users easier than using the standard User Maintenance tools.
Both a manual and an automated process are available for this import.
Security: Users working with this feature must have the role object "SSOUserMaintImport" set minimally to Modify.
When a user is provisioned for SSO, Premier staff create a "shell user profile." Once the user "shell" has been created, the site administrator must manually assign the role, data profile, default organization, default department, and other details. The process had relied on the existing user maintenance import template. That template has other fields in whose data the site administrator must manually key-in or copy. To improve the process, this a user data import template specifically for SSO users is available. This new import template and process handle more of the needed user data.
Manual import process
From the Administration menu, you can access a list of SSO users that are missing required information such as role, data profile, default organization, and department. A second menu element provides the import. See Figure 34.

An example of the SSO Users List is in Figure 35.
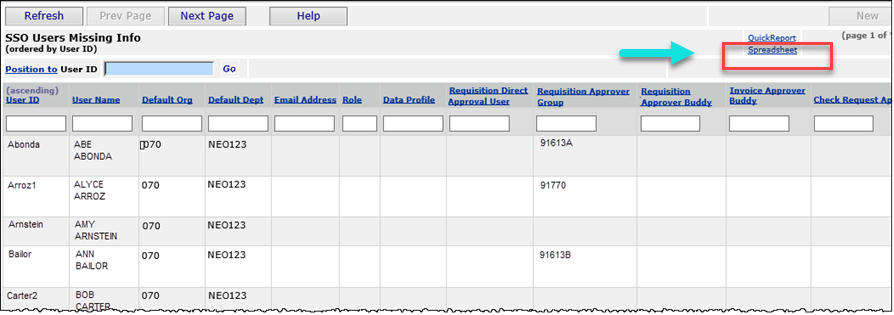
Administration main Contents > Administration > SSO Users Missing Info
On the list (Figure 34), the Spreadsheet link creates an Excel document in the format of a new SSO User Import. Administrators can open the spreadsheet and provide missing information, along with additional approval values, if needed by the user. Save the spreadsheet as a .csv file. The last field must be <EOF>.
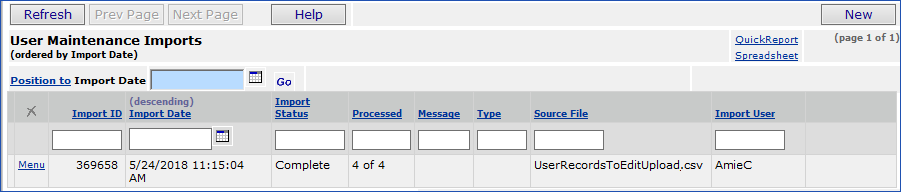
You can then upload the .csv file to ERP using the new SSO user data import function that will apply the changes to the user profiles. The menu option SSO User Maintenance Imports (Figure 35) opens a list of existing imports. Figure 35 is the import list where you can see current imports and create new ones.
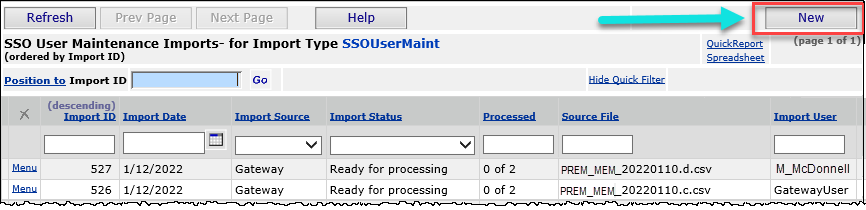
Administration main Contents > Administration > SSO User Maintenance Imports
On the Imports List, the standard import functions are available, including the ability to view the details of the import, see messages, etc. The import process applies the changes from the import to the user and user settings tables in the application. Existing validations already in the ERP ensure that only correctly formatted data is used to update the actual user values.
Automatic import process
The automated process occurs through the Gateway when template files with completed data from an external application are dropped in a Gateway in-box. The import is available from the Imports List (Figure 36). This process needs no action by your site administrator; except in the case of errors which may require a conversation involving a corrected re-import.
This tab contains fields for users who sign on to ERP/SCM through .
Important: When you copy a user, data on this panel is not included in the copy.
Update Status - For a user who accesses ERP/SCM through , this field indicates whether the user’s credentials have been updated (entered) in the Premier's User Management System. (Note: This system is also called CIAM: Customer Identity and Access Management.)
Update Date - The date when the user’s credentials were entered/updated in the User Management System.
Message - Any message related to the update.
You can reset a user record so that the user is no longer locked out
Note: You can also select Reset Lockout on the Quick Click menu to reset user access.
The system provides a grace period for inactivity so that users who do not sign on to the system every day are not deactivated. The grace period is determined by each site, and set at implementation or by the Help Desk.
A process in the nightly maintenance procedure sets active users to inactive if they fall outside the inactive grace period determined by their site.
The process checks whether any user IDs NoActivityLockoutPeriod has expired. If the period has expired, then
the Active YN flag is set to 0.
An audit record is created:
AuditSource = 'Routine Maintenance' and AuditReason = 'No activity lockout period exceeded.'
System administrators will also be able to view the sign-on history and security activity for their site.
For any given user, you can suspend the inactive lockout rule by setting a flag on the User Profile.
Several user features are relevant to sites where users also access Sourcing and Contract Management (SCM)
Price changes to contract items on a purchase order, or during invoice matching (clearing a price exception) can be restricted for individual users, organizations, or for an entire site.
The field Restrict PO/Invoice Price Change on Contract Items on the User Profile restricts the user from changing contract item prices. The user cannot modify the PO Unit Cost and the Next Estimated Receipt Unit Cost on a purchase order line. The setting also restricts users from selecting the Invoice Correct field in clearing exception prices for contracted items.
User:
- If the restriction is not selected in a user profile, the user can change cost/exception prices, as long as the restriction is not set at either the organization or system values level. Also, the user can select the Invoice Correct field when clearing price exceptions for contracted items.
- If the restriction field is selected, the user cannot change prices.
Organization:
Selecting the restriction field for an organization (on the Organization record) prevents any user in the organization from changing prices.
See "Organization Restriction for Contract Price Changes" for details.
System:
- If the field is not selected, price changes can be controlled at the organization level and/or the user level.
- If the restriction field is selected in System Values, no one at the site can change a PO price for a contracted item.
See "Restrict PO/Invoice Price Change on Contract Items for an Entire Site" for details.
Your site's operational structure may include several organizations, each with multiple departments. In Sourcing and Contract Management, one or more organizations can be assigned to a region. You can view, edit, and create organizations and regions from the Sourcing and Contract Management Administration feature. You can add regions and organizations to users' data profiles (see "Work with Data Profiles)."
Use Search on the "Create Organization" page.

The following role objects are used in Sourcing and Contract Management:
| Role Object | Controls access to: |
| Contract | The Supply Contract Workbench. Permits users to work with the key features of Sourcing and Contract Management. The setting must be View (at the minimum) to allow users to see the menu options. To import contracts, the setting must be Modify or higher. - The View setting allows users to search for a contract, and then drill down on the Items Found On count or the Matched Items Found On count. Also, users can view contract item details. |
| CATables | Tables containing contracts components: region, organization, vendor, manufacturer, and others. |
| CAAnalysis | The Analysis Workbench and analysis tools |
| CAProjects | Work with analysis projects. |
| ServicesContract | Work with services contracts. |
| SharedSvcsAnalysis | Analysis workbench for shared services contracts. |
| ContractSecurity |
|
| CAAlerts | Set up and edit alerts for other users. |
| PriceActivation | Vendor price activation for supply contracts. See the details below. |
| Dashboard | Lets users view and (depending on the setting) configure dashboards. |
| CARegistration | Lets user create entities and register them to manufacturers and vendors. Users who register local vendors or manufacturers will need this role object set to "Modify" or "All." (The default setting is "View.") |
| CADept | Allows the user to edit supply department names in the Departments table. (The default setting is "None.") |
| Contract Merge | Used during implementation of Sourcing and Contract Management. Otherwise, this role object is generally not applicable to normal user activities. to merge old and new supply contracts. |
| ContractDocuments | Work with documents attached to a supply contract (controls the Documents tab on the "Work with Contract" page). Also allows users to work with emails and notes on the Correspondence tab. |
| ServicesDocuments | Work with documents attached to a services contract (controls the Documents tab on the "Work with Services Contract" page). Also allows users to work with emails and notes on the Correspondence tab. |
| AnalysisProjectDocs | Work with documents attached to an analysis project (controls the Documents tab on the "Work with Project" page). Also allows users to work with emails and notes on the Correspondence tab. |
| CAFees | Incentive setup and monitoring. |
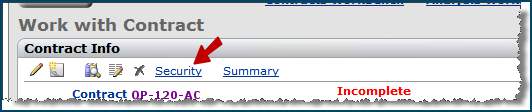
ContractSecurity (supply contracts) - provides access to the contract Security feature. The contract Security feature lets you identify the organizations/regions whose users are not allowed to view the contract. The list of organizations/regions is displayed when you click the Contract Info panel's Security link (Figure 38). Details about the contract Security feature are in the subsequent section "Restrict user access to a contract."
PriceActivation (supply contracts) - at the highest security settings (All, Create), allows the user to create vendor price activation headers for supply contracts. (Users with the role object Contracts set to View can select items for activation, once a header has been created.)
Activating prices on a supply contract is not secured by the user's data profile. Price activation activates all selected items in a contract, regardless of the user's data profile settings.The contract security feature lets you specify the organizations/regions whose users are not permitted to access the contract. The Security link on the Contract Info panel displays the organizations/regions for selection. If none are selected (the default), a contract can be accessed by all users.
System alerts displayed on the Contract Workbench My Alerts panel take into account the organization/region security restriction: Users do not receive alerts for contracts that they are not able to view.

Access to the Security link on the Contract Overview panel requires the setting Modify for the "Contract Security" role object, at minimum. If the role object setting is View or None, the security link is grayed out. A discussion of this role object is in the previous section "Role objects associated with Sourcing and Contract Management."
Your site probably has a key group of users who work with the system all the time. You may also need to grant access to the system to computers with IP addresses outside of the key group. For example, you may have users in another building, or in a remote location. Or, you may wish to give some users access from their home computers.
You may also wish to restrict access to an IP address that would normally belong to the main group. For example, you may have a special purpose computer that you do not want to be used for system work.
You can control access to the system based on a computer's IP address. The set up process for IP permissions has these components:
* Represents any value.
, (comma)
Separates individual values.
For example, 245.120,124.333.17 means 245.120.333.17
and 245.124.333.17.
: Indicates the beginning and end of a range.
For example, 245.120:124.333.17 means all the values between (and including) 120 and 124 in the second octet:
245.120.333.17, 245.121.333.17, 245.122.333.17, 245.123.333.17, 245.124.333.17? Positional wild card. Matches only as many elements as there are question marks.
For example, ? matches 0 to 9, but not 10 because 10 is two places. ?? matches 10 to 99.[ ] Optionally groups numbers and operators together, as needed, for clarity.
For example, 245.122.199,20?.[17,20:24].
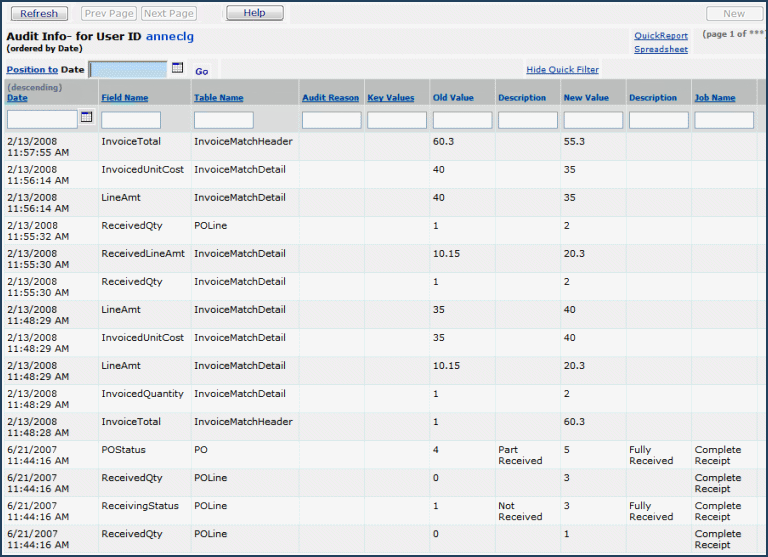
System administrators can view a log of users' activities with the system from a menu option on the Users list. User activity data is retained for seven days before it is purged.
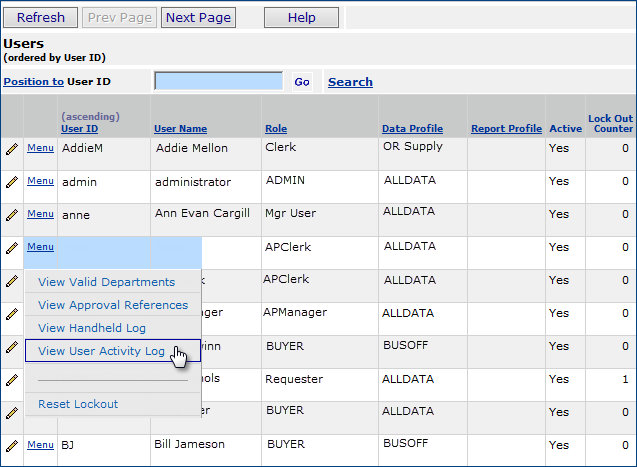
The user's activities appear (Figure 42), ordered by date. You can use the Quick Filters for Field Name (the name of a value that was changed by the user), Table Name (the data table where the value was changed), Job Name, Audit Reason, and Key Values. Click Help for detailed descriptions of the columns' contents.
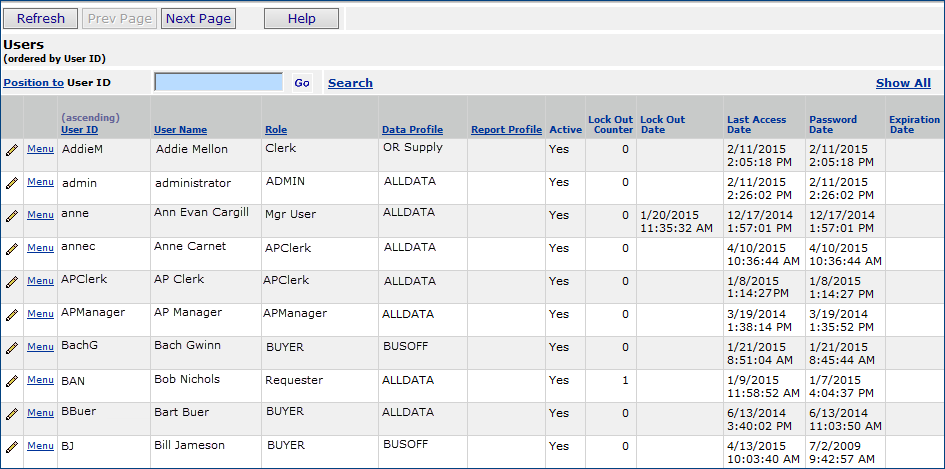
On the User list, by default, the system only displays users at a site. Clicking Show All displays users (Technical Support or development staff) who can access a site's database to track or fix problems.
Note: User activity data for user IDs is retained for a year.
See the discussion of "Access and Change Logs" for a discussion of patient information protections in log and audit displays.
System administrators can view a log of all users' activities with the system through the Administration menu. User Activity data is retained for seven days before it is purged.
From the main Table of Contents, select Administration. From the Administration menu, select Administration; then choose Activity log. (See Figure 43.)
The Activity Log - All list displays the same fields as the individual user's activity log, along with the name and user ID of each user listed.
Creating large numbers of new users and user maintenance is more efficient with the user record import and export. This feature allows a security administrator to create new users and to maintain and audit an existing user base without having to go into the ERP application and create or update each user record individually. Administrators can download and complete a template that sets up new user profiles when uploaded.
Some sites find it convenient to use the import to create one or more "generic" users with particular User Profile settings. Then, once in the application's Administration module, they copy the "generic" users and enter values for real, new users.
For maintenance purposes, administrators can export all user settings in the ERP application, make changes and import that data back into the ERP application to update users' profiles.
Security: This feature is controlled by the "Administrator" role object.
Single Sign On Sites: If the user you are creating (or updating) is a single sign on user; that is, if you enter Yes in the column Single Sign On User then the column for the single sign on Activation Date must also be completed with the date when you would like the user to have access to ERP.
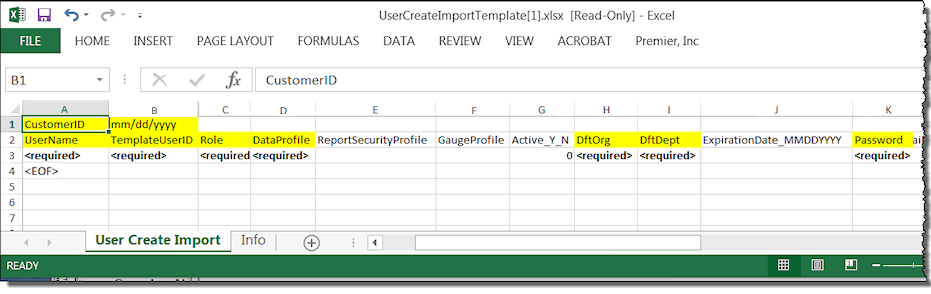
To create user records, an Excel template is available for entering fields that you will upload and import into new User Profiles.
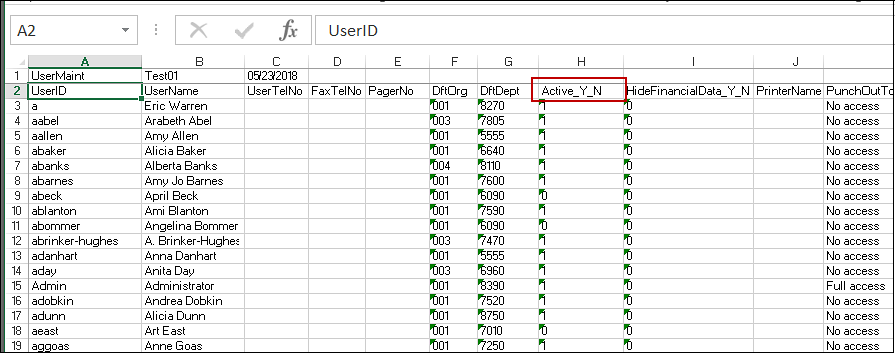
For maintenance, first export existing user records to an Excel worksheet. A new panel is available for the export task. Then, using the worksheet as a template, make changes as needed to the user data, Save the worksheet as a .csv file, and finally upload it to the application.
The upload is the standard upload process. A panel lets you work with uploaded user records.

Work in Administration > Administration > User Settings (All Columns)
You will need to save the file (Figure 46) as a .csv file for the export.

After you create or edit user records, you can import them back to ERP.
Important: The file you import must be in .csv (comma-separated values) format.
Follow these steps:
- This panel lists previous imports if any, and lets you create new imports.
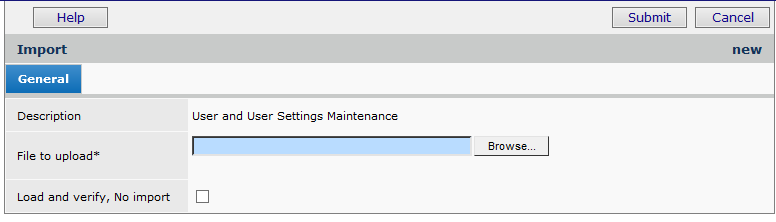
If you have uploaded files to the application before, use the one-stage approach, as follows:
- Click Submit. The system attempts to upload your file and validate it. The User Maintenance Imports or User Create Imports panel appears.
- Click Refresh to see your file listed.For users working with import files for the first time, we recommend the two-stage import approach. The two-stage approach first loads the file and validates it. Click Load and verify, no import.
Once the file has successfully loaded, you can process it manually from the User Maintenance Import panel appears to import it into the application.
- Click Help on the Import panel for details on the processing step.
The processed import will appear in the list of imports.
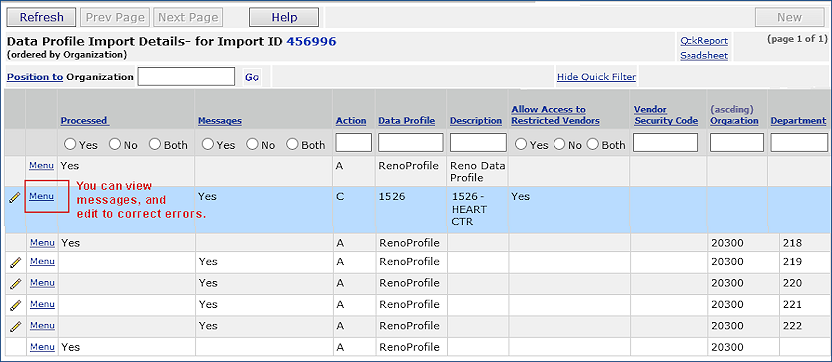
Each import has a Menu that lets you Reprocess, View Details, Download or Delete an import file.
Clicking Menu > View Details lets you display messages and edit the import record.
- For new user records, the import creates a new User ID with the settings from the uploaded template that you entered for each User ID on the template.
- For existing user records that you edited, the changes that you made are in the Users' Profiles.
Valid rows on the spreadsheet will import into the application. If some rows are valid, and other are not, the invalid rows will not be imported. When the Import Status of the uploaded user record file is not Complete, the import encountered errors.
To work with errors, you need to review the import details, make corrections, and reprocess the data.
The import/export feature for data profile record mass maintenance is now available. With the use of a template, this mass loader allows a security administrator to upload multiple new data profiles at one time instead of creating them manually in ERP. You can also maintain and audit existing data profiles without the necessity of updating each one individually within the application.
Usage Tips: Creating one or more "generic" data profiles is a convenient way to utilize this feature. From within the Administration module, an administrator can copy these "generic" profiles and make changes to the department, asset location, and organizations as needed.
Security: This feature is controlled by the "Administration" role object.
An Excel template is required for the data and fields that you will upload and import into ERP.

The template contains several tabs. The initial tabbed worksheet (Figure 50) is for your data. Detailed instructions,
including the colored columns are on the Info tab. Examples are on the Examples tab.
After you create or edit data profile records, you can import them back to ERP.
Important: The file you import must be in .csv (comma delimited) format.

Download and security information appears.


ERP checks that the data profile is not assigned to any user before it runs the delete. If it is assigned to someone, the delete fails and a message appears.
Here are additional rules for data profile records that are to be deleted:
- When a Delete (D) record doesn't have an organization, department, or asset location entered, then the entire data profile will be deleted.
- When a Delete (D) record has only an organization entered, then the organization and all the departments and asset locations for that organization will be deleted from that Data Profile.
- When a Delete (D) record has an organization and department entered, then the department for that organization will be deleted from that Data Profile.
- When a Delete (D) record has an organization and asset location entered, then the asset location for that organization will be deleted from that Data Profile.
- When a Delete (D) record has an organization, department, and asset location entered, an error message appears.
- When a Delete (D) record has a department entered, but no organization, an error message appears because the same department name can be present in multiple organizations.
- When a Delete (D) record has an asset location entered, but no organization, an error message appears, because the same asset location name can be in multiple organizations.
An audit facility is available on the Data Profiles lists and the Roles and Role Objects lists.
Changes to a data profile's general information or to organizations, departments, or asset locations assigned to a data profile are audited.
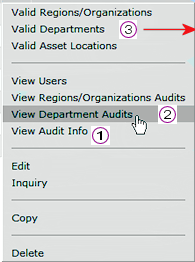
![]() Next to any data profile, click Menu > View Audit Info (Figure 55A,
Next to any data profile, click Menu > View Audit Info (Figure 55A, ![]() ).
).
![]() From the data profile, click Menu > View Regions/Organizations Audits or View Department Audits (Figure 55A,
From the data profile, click Menu > View Regions/Organizations Audits or View Department Audits (Figure 55A, ![]() ).
).
Or:
![]() Drill down to the department/organization/region and view an audit from there:
Drill down to the department/organization/region and view an audit from there:
- From the data profile Menu click Valid Regions/Organizations, or Valid Departments (Figure 55A
, red arrow,![]() ), or Valid Asset Locations.
), or Valid Asset Locations.
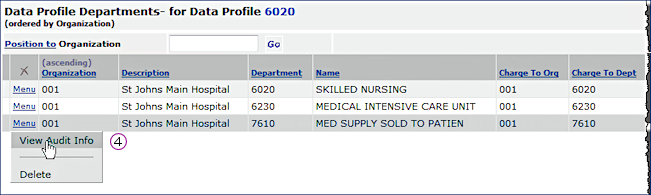
The relevant list appears. Figure 55B is an example for the departments assigned to the data profile 6020.
-
On the list, click Menu > View Audit Info (Figure 55B, ![]() ).
).
53A. Data Profiles List Menu |
|
For example, imagine that a fourth department 4460 Sports Medicine Outpatient was once assigned to the data profile 6020 in Figure 55B, and has been removed. Figure 56 displays the audited change.

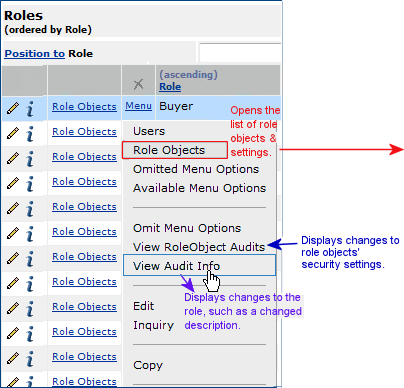
The audit displays changes to a role's general characteristics and to role objects' settings. Figure 57 is an example.
57A. The Roles List and its Menu Options |
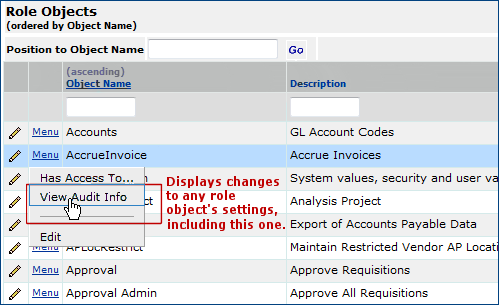
57B. The Role Objects List and its Menu Options |
![]() On Figure 57A for the role of Buyer, the menu options are:
On Figure 57A for the role of Buyer, the menu options are:
- Users -- displays users assigned to the role.
- Role Objects -- lists role objects. Clicking this option displays Figure 57B.
- Omitted Menu Options -- displays main Contents elements that users with the role cannot access.
- Available Menu Options -- displays main Contents elements that users can access.
- Omit Menu Options -- lets you omit main Contents elements so that the user cannot access them.
- View RoleObject Audits - displays changes to security object settings; for example, a change from Modify to All.
- View Audit Info -- displays changes to any general characteristics of the role.
- Edit -- lets you change the general role information, such as the role Description.
- Copy - lets you copy the role.
- Delete - deletes the role (Not shown).
![]() Figure 55B is part of the list of role objects for Buyer.
Figure 55B is part of the list of role objects for Buyer.
- Alternately, on the menu for the role (Figure 57A), click View RoleObject Audits.
List of audited fields links to a spreadsheet containing the fields and their locations.
In summary, these fields are audited on the user record:
Active YN
Role
Data Profile
Hide Financial Data YN
Hide ePHI Data YN
IP Restriction YN
Password
Lock Out Counter
Lock Out Date
Last Used User
Report Security Profile
Email Address
User Security Level
See the discussion of "Access and Change Logs" for a discussion of patient information protections in log and audit displays.
You can find out what security settings you need to use ERP features.
- Point the mouse over the feature of interest in the main Table of Contents (or in the Menu contents for any panel).
- Right click.
A pop up box displays the security object needed.
Copyright © 2023 by Premier Inc. All rights reserved.