View/Edit Item Inventory Information Version
Contents
Overview
The Item
Inventory is a list of items available for requisition from an asset location. Each item has a detailed
record that contains information such as stock status, vendor UOMs, authorized
and unauthorized POs for the item, usage statistics, order guides containing
the item, and more.
Asset locations are repositories for item records, including vendor, manufacturer, and contract information. The item data is available for requisitioning, purchasing, receiving, invoicing, and accounts payable activities, regardless of whether the hospital keeps inventories of items on hand, or uses a stockless supply process.
You can access item information for a single asset location -- the Asset Location specified in your Current Settings. You, or staff at your site, may also have access to multiple asset locations, and may also be able to view inventory information for those asset locations as well.
Security
- To access organization, department, or asset location data, the organization, department, or asset location must be included in your data profile.
- To be able to view item inventory information, you must
have the appropriate permissions set in your user profile. Specifically, the Inventory role object (Maintain Item Inventory ) must have its security level set to View (or higher), and must be included in the
role that is assigned to your User ID.
- To be able to change Item Inventory information, the Inventory role object (Maintain Item Inventory ) must be set to Modify (or higher).
- The role object "Inventory Value" allows you to work with inventory valuations. The minimum setting is View. If this role object is set to None, you will not see Inventory Value on the main Contents.
If your user profile restricts you from displaying financial data, fields on any of the item inventory panels that normally display financial information (such as unit prices, average cost, inventory value) contain "{restricted data}."
In addition, to be able to edit item inventory information at a particular asset location, the field Allow Changes to Asset Location and Inventory on the Data Profile Asset Location panel must be selected. This field controls permission to edit asset location records and edit item inventory records at the asset location. This field also controls permission for the following functions that you can perform for an inventory item:
- Department Backorders
- Item Vendor(s)
- Adjust Inventory
- Reset Mixed UOM Conversion
- Set Multi-Source
- Set Single Source
- Override Default UOMs for Primary Supplier (new)
- Delete
- Lot Tracking
- Edit
The functions are available from the Menu next to any item on the item inventory list.
The menu option Reset Stock Item Pipeline Days is grayed out unless the user has the authority to reset the pipeline days.
The topic Restrict Users from Editing Asset Location Records and Item Inventory Records outlines how to access and use the Allow Changes to Asset Location and Inventory field.
ePHI Features
Features are built into the system to ensure the privacy of electronic protected health information (ePHI), in compliance with HIPAA requirements.
On a User Profile, the Hide ePHI Data field determines whether a user can access patient data. When Hide ePHI Data is checked, a detailed series of restrictions apply to the user's access to ePHI records. Patient information is subject to restrictions governed by this user profile field.
In sum, if Hide ePHI Data is checked, the user cannot access or display patient-identifying information.
Patient information in printed documents or panels is either not displayed or not accessible (prompts for patient information and downloads that contain patient information are not available).
The list of restrictions and examples is outlined in the ePHI documentation.
Note: Any ePHI fields in this document's figures contain fictional values, and are not associated with any actual individual.
See your system administrator if you
need to maintain information in the Item Inventory.
To
view the item inventory list for your authorized asset location:
- To view inventory records for the Asset Location in your Current Settings, click Inventory > Item Inventory.
The Item Inventory List appears (Figure 1).
Note: To view the item inventory for all your authorized asset locations, from
the Materials Management main Contents, click Inventory > Item Inventory
- All Locations.
Be sure to click Help for details on columns for the Item Inventory list.
On the item inventory list,
- If a small arrow  appears
next to the Item No, clicking the arrow provides more information
about the item, such as a picture, MSDS, or contract number that governs
the item.
appears
next to the Item No, clicking the arrow provides more information
about the item, such as a picture, MSDS, or contract number that governs
the item.
- Clicking the arrow next to a Primary Manufacturer or Primary
Vendor takes you to the manufacturer's/vendor's web page.
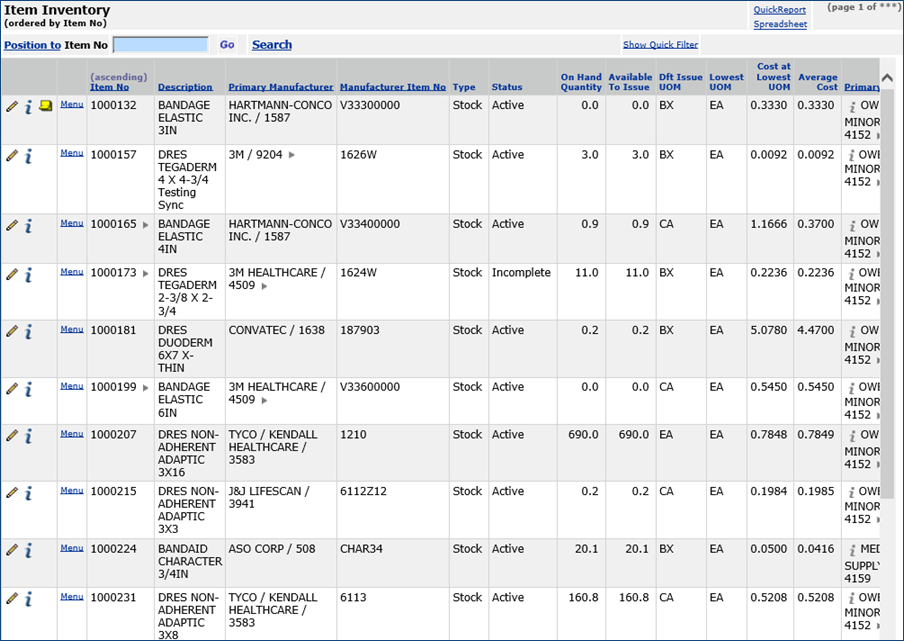
Figure 1 - Item Inventory List
To
view or edit item inventory information for a single item:
- If you need to change the Asset Location, in
the Current Settings menu, select the Asset Location from
the prompt (...).
- From the Materials Management main Contents, click Item Inventory.
- Enter the Item No in the Position To box.
- Click Go. The Item Inventory List displays.
- Next to the record you wish to view, click the i.
- The system displays the item inventory information on the Item Inventory Inquiry panel. The panel has top and bottom
tabs Figure 2.
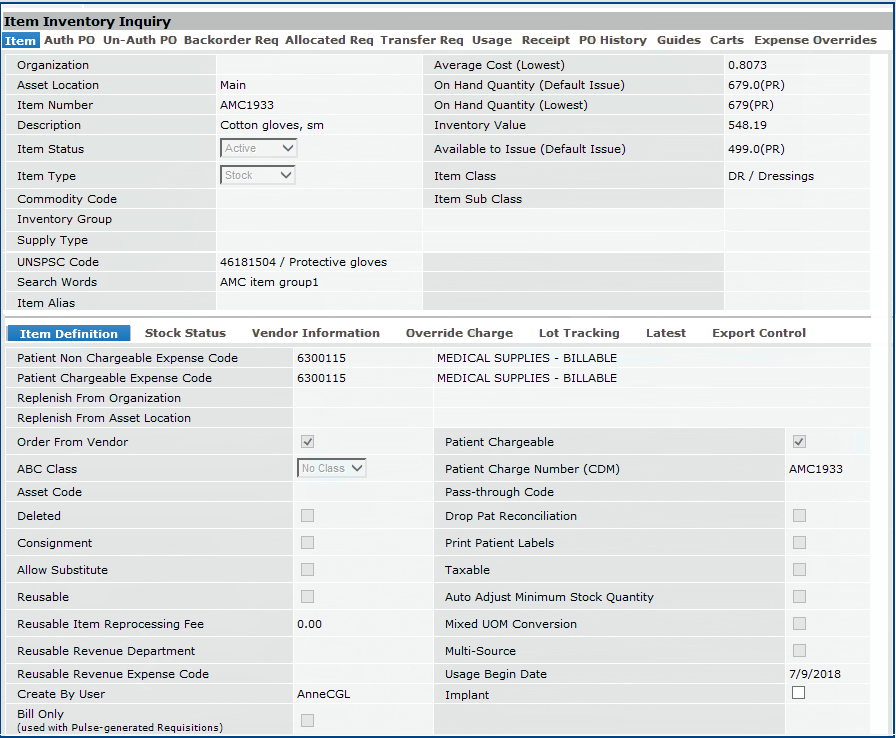
Figure 2 - Item Inventory Record, Inquiry View
Note: All patient identifier fields in this document's figures contain fictional values, and are not associated with any actual individual.
The edit panel contains the same bottom tabs, but only two of the top tabs (Figure 3).

Figure 3 - Item Inventory Record, Edit View
Note: All patient identifier fields in this document's figures contain fictional values, and are not associated with any actual individual.
Summary of Tabs Contents
On the Item Edit panel, clicking Help displays information about all the fields. (The Inquiry panel has no help button.)
Item Inventory Inquiry - Top Tabs
When you click the i next to a record, these tabs appear at the top:
- Item: Lists item and inventory information.
- Auth PO: Lists currently
authorized POs containing orders for the item.
- Un-Auth PO: Lists currently
unauthorized POs containing orders for the item.
- Backorder Req: Lists
current requisitions that backorder the item.
- Allocated Req: Lists
requisitions that have allocated the item. (You can also view the quantity
of the item issued using the Requisitions list.)
- Transfer Req: Shows
a list of requisitions that make up the Transfer In Qty from the Stock Status tab.
- Usage: Shows the total
quantity of the item used during an accounting year, and the total cost for
the item. You can also get a detailed breakdown by month from the Menu on this panel, and statistics by department and across organizations.
- Receipt: Shows any receipt summaries by year, and receipt details.
- PO History: Shows purchase
orders for the item.
- Guides: Shows order
guides containing the item.
- Carts: Shows par carts containing the item.
- Expense Overrides: Lists the expense codes for the Issued To organization that will override the existing default expense codes for patient billable and/or non-billable items in the issuing organization. This tab will only be visible if the Override Item Inventory Expense Codes flag has been enabled in System Values (Administration > Administration > System Values > Other tab).
Note: GL Account Validation must be turned on for the expense codes to be overridden on the requisition line and other affected transactions.
Item Inventory Edit - Top Tabs
When you click the edit pencil icon  next to a record, only these tabs appear at the top:
- Item: Lists item and inventory information.
- Expense Overrides: Lists the expense codes for the Issued To organization that will override the existing default expense codes for patient billable and/or non-billable items in the issuing organization. You may view, edit, or enter new Expense Code Overrides from this tab (See Figure 4.)
Note: The system will not let you enter organization expense code overrides when the item inventory record has an Override Charge Department value (on the lower panel's Override Charge tab). Similarly, you cannot enter a value for the Override Charge Department when an organization expense code override already value exists.
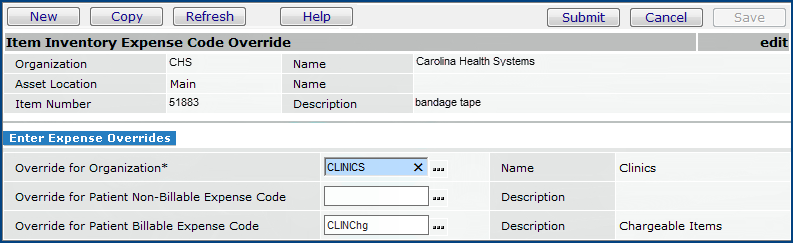
Figure 4 - Expense Overrides Tab
Item Inventory Inquiry and Edit - Bottom Tabs
When you click the edit pencil icon or the i next to a record, these tabs appear at the bottom; Item Definition, Stock Status, Vendor Information, Override Charge,
Lot Tracking, Latest, and Export Control. The paragraphs below provide information on several key fields. All the fields are explained in the Item Edit panel Help.
Item Definition: See Figure 3. Shows a subset
of the categories from the item catalog that characterize the item and are
relevant to inventory (e.g., Patient Chargeable and Non-Chargeable
Expense Codes, ABC Class, whether the item is a consignment item,
etc.)
- Patient Non Chargeable Expense Code - An expense code for expenses that are not directly billed to patients.
The expense code corresponds to the materials expense segment of an account code in your site's Chart of Accounts. When the item is requisitioned or purchased, the cost of the item is recorded in the account.
This field is filled in automatically. Enter any correction needed, or use the prompt to choose a new expense code.
An expense code must be
established in the expense code table before it is available for selection.
If your site has enabled General Ledger account validation:
See Using General Ledger Account Validation.
- Patient Chargeable Expense Code - An Expense Code for expenses that are directly billed to patients. This field is required if Patient Chargeable is checked.
- Replenish From Organization - The organization that orders or replenishes the item if Order From Vendor is not checked.
- Replenish From Asset Location - The asset location that orders or
replenishes the item if Order From Vendor is not
checked. The system defaults to the Replenish From
Organization and Asset Location specified in Current Settings.
- Order From Vendor - If the box is checked, the item is ordered from a
vendor. The PO for the item originates at the organization and asset
location in which the item is being created. If the box is not
checked, the item is replenished via system transfer from the
organization
and asset location specified in Replenish
From Organization and Replenish From
Asset Location.
- If a Preferred Order Factor and a Preferred Order UOM are defined for an item (click the Stock Status tab), how order quantities are determined depends on the setting for this field.
- When this field is checked for a stock item, and the Preferred Order Factor and a Preferred Order UOM are also entered, ordered quantities for purchase orders are adjusted upwards by the UOM and UOM factor.
- When this field is not checked, ordered quantities for transfer requisitions are adjusted upwards by the specified UOM and UOM factor.
- ABC Class - A classification for an item based on a percentage of
the annual expense for all items. Typical percentages are:
A
= 20% (the 20% of the items that carry 80% of the expense)
B
= 30%
C
= 100% - Class B% - Class A%
Sites can define ABC classes based on annual item expenses.
Any item can then be assigned the appropriate
letter class according the percentage of the expense that it carries.
- Asset Code - The asset code for the item (another categorization), if assigned. Reports can be run against various Asset Codes.
- Reusable - Durable items that can be used over and over are reusable. Departments to which you issue reusables do not get expensed for the purchase cost of the item.
- Patient Chargeable - When checked, the item is chargeable to a patient.
- Patient Charge Number - A number assigned by the hospital. Also called the CDM.
The Patient Charge Number passes over to the patient billing system for patient bills and/or insurance compliance.
Patient chargeable items issued to a department will print on the patient reconciliation report.
Note: All patient identifier fields in this document's figures contain fictional values, and are not associated with any actual individual.
- Pass-Thru Code - A code used for insurance billing purposes, such as a Medicare code.
- Drop Pat Reconciliation - If checked, the item should be dropped from the lost charge reconciliation report for every department. Patient charges are not reconciled with issues of the item.
- Auto Adjust Minimum Stock Quantity - If checked, the system
will recalculate the Minimum Stock Level as follows: If Days
Between Delivery is specified, then:
Minimum Stock Level = Days Between Delivery * Average
Daily Usage
otherwise:
Minimum Stock Level = Pipeline Days * Average Daily
Usage
If unchecked, the
system allows an authorized user to determine the Minimum Stock
Quantity. Use Auto Adjust Minimum Stock level for Stock items only.
- Multi-Source - When checked, the item is multi-sourced, and records cannot be shared across asset locations. The item has a different set of vendors, vendor units of measure, etc. for one or more asset locations.
- Usage Begin Date - The date when the system begins tracking usage for the item at the inventory location. The system normally calculates this date
based on the oldest regular purchase order receipt found for the item. This field lets you reset the date, if you wish. Click the calendar icon to select a date.
- Bill Only (Implant Application ("Pulse") Requisitioning only) - This field appears under Create By User only when implant system requisitioning is enabled (Figure 5).
It specifies whether bill only requisitions and POs order the item as "bill-only" or "bill-and-replace."
- If Bill Only is selected by a user, the requisition line for the item is bill-only.
- If Bill Only is unselected (the default), the requisition line for the item is bill-and-replace

Figure 5 - The Bill-Only Field Used for Implant System ("Pulse") Requisitioning
Stock Status: See Figure 6. Shows quantity descriptors
and values (Minimum Stock Quantity, Maximum Stock Quantity, Allocated Quantity, On-Order Authorized Quantity, Pipeline
Days), aisle/bin locations, physical inventory information, and more.
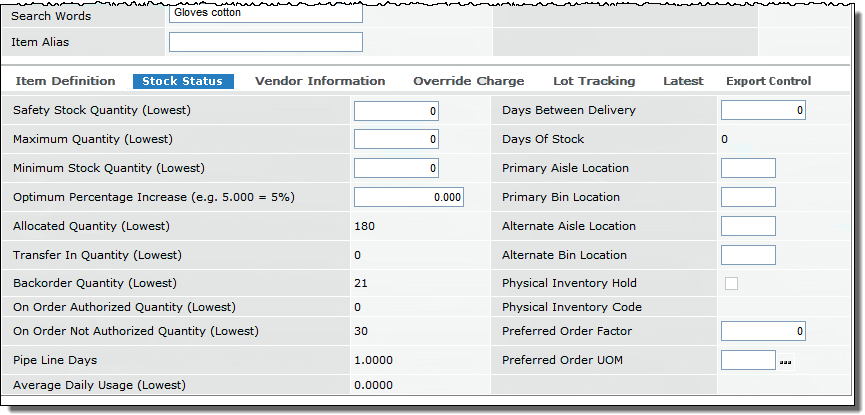
Figure 6 - Item Inventory Record Stock Status Tabbed Panel
- Safety Stock Quantity - the minimum acceptable stock quantity
for an item. The Safety Stock Quantity
is a value that a Materials manager specifies for an item.
- Maximum Quantity - The maximum quantity of
an item that can be ordered at any one time. This value is
tracked when a site has limited storage space. Backorders are
not included in the MSQ.
- Minimum Stock Quantity - A calculated value equal
to Days
Between Delivery * Average Daily Usage if Days
Between Delivery is greater than zero. Otherwise, it equals Pipeline
Days * Average Daily Usage. See
the discussion of the Suggested
Order List.
- Optimum Percentage Increase - A manually entered optimum stock level percentage used to
modify reorder quantity as additional safety stock. This field may
be entered for all items at the asset location level or specified
at the item inventory level. (If entered, the item inventory level
overrides the asset location level.)
- Allocated Quantity - The total quantity of the item that has either been released for picking, or has been put on a pick list, but not confirmed.
- Transfer In Quantity - The total quantity of the item on transfer requisitions, but not yet received.
- Backorder Quantity - The total quantity of the item on backorder to all departments, within the current Asset Location.
- On Order Authorized Quantity - The total quantity of the item on purchase orders that are authorized, but not yet received.
- On Order Not Authorized Quantity - The total quantity of the item on purchase orders that are not authorized.
- Pipe Line Days - The number of days between the created date on a PO for the item and the initial receipt date for a PO. If the calculation is zero, Pipe Line Days is set to one. When the item is first entered in the Item Catalog, Pipe Line Days is also set to one.
- Editing the Pipe Line Days Value:
- You can edit the Pipeline Days associated with a stock item inventory record.
- Authority to edit the number of pipeline days must be set on your User Profile Authorities tab.
To edit the Pipeline Days,
- From the Materials Management main Contents, select Item Inventory or Item Inventory All Locations.
- Locate the item of interest.
- Next to the item on the list, click Menu > Reset Stock Item Pipeline Days. A panel appears for resetting the pipeline days.
- Enter the new number of days in the field Pipeline Days.
- Click Submit.
The pipeline days are reset for the item.
Note: The menu option Reset Stock Item Pipeline Days for editing pipeline days is not available if:
- You do not have the authority to reset Pipeline Days.
- The item was created less than 45 days ago.
- The Pipeline Days for the item was reset less than 45 days ago.
- The item not a stock item type.
Reasons for Editing Pipeline Days:
The pipeline days associated with an item can be influenced by the amount of time that purchase orders for the item sit in the unauthorized state, awaiting approval. Similarly, when an item is on vendor backorder, the pipeline days can be affected. These situations can result in an unrealistic calculation from the response formula, which the system uses to project replenishment times and levels for stock items.
To compensate, edit the Pipeline Days associated with a stock item inventory record to correct skewed values resulting from delays.
When you reset pipeline days manually,
the system uses the reset value for the next 45 days from the reset date, then calculations for average pipeline days resume.
- Average Daily Usage - The average quantity of the item used per day.
- Days Between Delivery - Specifies the number of days between deliveries by the vendor for this item. If a value is entered in this field, and Auto Adjust Minimum Stock Quantity is checked, Days Between Delivery will be used in the calculation of Minimum Stock Quantity (Days Between Delivery * Average Daily Usage.)
- Days of Stock - The number of days the current level of stock would cover with no additional replenishment. If you have 100 on hand, none are currently allocated, and the average usage per day was 7 then the days of stock would (100 - 0) / 7 = 14 days of stock.
- Preferred Order Factor - The minimum divisor for an ordered quantity (Preferred Order UOM ). If either the Preferred Order Factor or Preferred Order UOM is entered, they must both be entered. When values exist in these fields, the ordered quantity must be evenly divisible by the preferred order factor. If not evenly divisible, the quantity is rounded upwards to the next evenly divisible quantity.
- This field is only valid for stock items.
- The Preferred Order UOM is a purchasing UOM for the item. (The Preferred Order UOM prompt only displays valid purchasing UOMs for the primary supplier of the item.)
- When the Order from Vendor field (Figure 2) is checked for a stock item, and the Preferred Order Factor and Preferred Order UOM are also entered, ordered quantities for purchase orders are adjusted upwards by the UOM and UOM factor.
- When the Order from Vendor field is not checked, ordered quantities for transfer requisitions are adjusted upwards by the specified UOM and UOM factor.
- Although quantity adjustment occurs immediately for purchase orders when a line is saved, ordered quantity for transfer requisitions is adjusted when the requisition is submitted for approval.
- If the Preferred Order Factor and Preferred Order UOM are not specified, purchase orders for the item still follow the regular best packaging logic, and transfer requisitions still apply the transfer quantity adjustments.
- Deleted UOMs: When a UOM designated as a Preferred Order UOM is deleted, the Preferred Order UOM and Preferred Order Factor are automatically removed.
- Changed UOMs: When an item's UOM conversion factor is changed (on the item vendor record), and the UOM is also designated as a Preferred Order Factor for the item, a warning message appears. The message says that the UOM is used as a Preferred Order UOM.
Example 1:
Item ABC has the Preferred Order Factor set to 5. Whenever a quantity is added to or removed from a purchase order for item ABC, if the quantity is not evenly divisible by 5, it must be rounded up to the next highest, evenly divisible factor of 5. Thus, a quantity of 4 becomes 5; a quantity of 7 becomes 10; a quantity of 15 stays at 15, etc. Rounding up is applied to the quantity instead of best-packaging.
Example 2:
An item has UOMs and conversion factors for ordering as follows: CA/24, BX/12, PK/6, EA/1.
The Preferred Order Factor is 2 and the Preferred Order UOM is PK. Whatever quantity is ordered on the line for the item, it must be in terms of (or divisible by) 2 PKs. Below are sample quantity adjustments.
| If ordering.... |
Adjusted to... |
| 4 EA |
2 PK (rounded to the next highest of 2 PK) |
| 7 EA |
2 PK (rounded to the next highest of 2 PK) |
| 1 PK |
2 PK (rounded to the next highest of 2 PK) |
| 10 EA |
2 PK (rounded to the next highest of 2 PK) |
| 12 EA |
2 PK (rounded to the next highest of 2 PK) |
| 13 EA |
4 PK (rounded to the next highest of 2 PK) |
| 3 BX |
6 PK (3 BX evenly goes to factor of 2 PK) |
| 3 PK |
4 PK (rounded to the next highest of 2 PK) |
| 3 CA |
12 PK (3 CA evenly goes to factor or 2 PK) |
| 37 EA |
8 PK (rounded to the next highest of 2 PK) |
- Preferred Order UOM - The unit of measure associated with the Preferred Order Factor. The UOM is a purchasing UOM. If either the Preferred Order Factor or Preferred Order UOM is entered, they must both be entered. See the discussion of Preferred Order Factor.
Vendor Information: (See Figure 7.) Shows the Primary
Vendor and Primary Manufacturer, Contract number
(if relevant), UOMs (lowest, order, issue) and conversion values for UOMs.
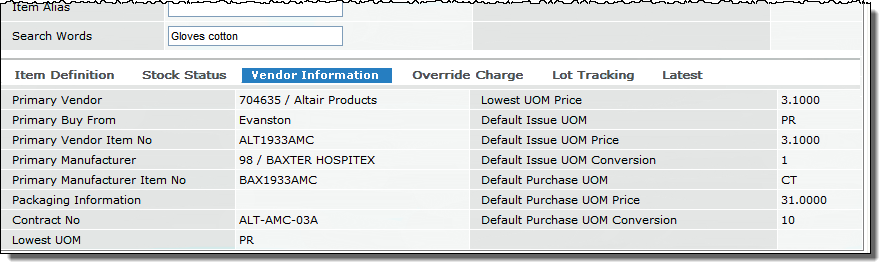
Figure 7 - Item Inventory Record Vendor Information Tabbed Panel
- Primary Vendor - The vendor name and vendor number of the primary supplier of the item.
- Primary Buy From - The primary vendor's buy-from location that the item is usually purchased from. This is the location where orders are sent.
- Primary Vendor Item No - The vendor's identifier for the item.
The system searches this field on lists of item records when you enter information in Search Words on a list's Search panel.
- Primary Manufacturer - The name of the manufacturer of the item. If there are multiple manufacturers, this field is the primary manufacturer.
- Contract No - The contract number, if the item is activated on a contract.
- Lowest UOM - The lowest unit of measure for the item. Often, this value is EA (each).
- Default Issue UOM - The default unit of measure in which the item is issued.
- Default Issue UOM Conversion - The conversion factor for the default issue unit of measure. (The conversion factor is the multiple of the smallest Unit of Measure contained in each larger Unit of Measure.)
- Default Purchase UOM - The default unit of measure in which the item is purchased.
Override Charge: Shows the department
(and organization) to which the item is charged as a override of the usual
charge department.
- Override Charge Organization - The organization charged for the item. This organization overrides the usual charge-to organization.
- Override Charge Department - The department charged for the item. This department overrides the
usual charge-to department. When a user specifies Charge Override for
a PO, item, order guide, or par cart, only those departments that have
been defined in the user's data profile are valid for selection.
If you place a department identifier in this field, no matter where
the item is issued, it will always be charged to that department. You can manually override the department you specify in this
field on order guides, par carts, requisitions, and quick
issues. A header Charge Department Override will not override an
Item Inventory Charge Department Override.
Lot Tracking: Shows lot tracking information,
if used for the item.
- Tracking Enabled - When selected, lot tracking is in effect for the item.
With lot tracking, the system tracks the lot number,
serial number, and/or expiration date for an item from the time the item enters a hospital's
inventory until the item is issued and used for a patient. You can associate patient, case, and physician information
with an item record, as well.
You can enable lot tracking for individual items as long as lot tracking is enabled for the items' asset location(s). The system maintains lot tracking
and patient data associated with an item permanently.
See Tracking Lot Information and Patient Information for Items.
- Lot Number Tracking - When selected, specifies that lot number tracking is in effect. You can select Lot Number Tracking alone, or in combination with either Serial Number Tracking or Expiration Date Tracking, or both.
- Expiration Date Tracking - When selected, specifies that expiration date tracking is in effect. You can select this field along with either Lot Number Tracking and Serial Number Tracking, or both.
- Serial Number Tracking - When selected, specifies that serial number tracking is in effect. You can select Serial Number Tracking alone, or in combination with either Expiration Date Tracking or Lot Number Tracking, or both.
Latest: Shows updated statistics such as Last Inventoried Date, Last Inventoried Quantity, Last Received Date, Last Invoice Date, quantities and costs.
Export Control: Export controls are used in selecting item records for export; for example, export to a supply dispensing unit such as Pyxis. Export controls are defined in the Materials Management tables. Once defined and assigned to item records, you can specify export controls on the Item Export Selection Parameters panel.
For details, see the discussion in exporting item records: Using Export Controls
- On the Item Inventory List (Figure 1), scroll to the far right to see any export controls defined for items (Figure 8). You can search for an export control using the Quick Filter at the top of the Import Control column.
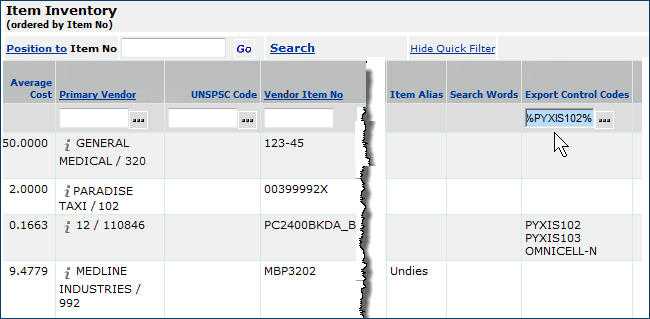
Figure 8 - Searching for Export Control Codes on the Item Inventory List
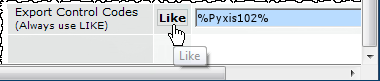
Important: To search for an Export Control Code value (either using the Quick Filter or the Search link), do this:
- Surround the search characters with %.
- With the Search link, click the comparison operator box (in front of the search box)
and scroll to select the operator Like; for example:
To
view inventory transactions for an item:
- From the Materials Management main Contents, click Inventory > Item
Inventory or click Inventory > Item Inventory - All Locations.
- The item inventory list appears.
- Enter
an item number (Item No) in the Position To box.
-
Click
Go.
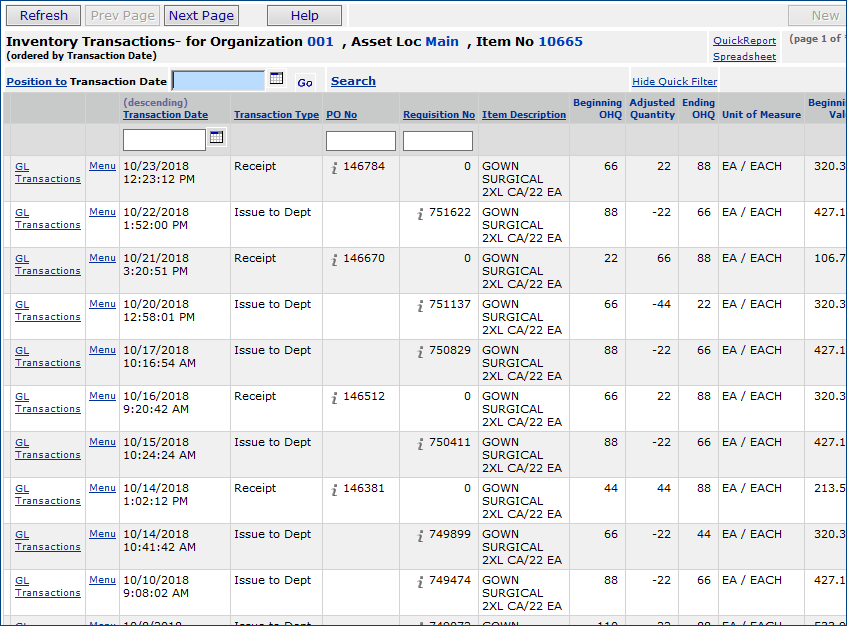
- Next to the item, select Menu > View Inventory Transactions.
- Inventory transaction information for the item
appears (Figure 9).
 .
.
Figure 9 - Inventory Transactions for an Item
Notes:
- If you click Search to find a particular inventory transaction, you can use the UNSPSC tab on the Search panel to locate items by their UNSPSC code, if assigned. See Using UNSPSC Codes.
- For each inventory transaction, you can click
GL Transactions to see the general ledger
entries. Also, you can select Menu > Pivot to for a vertical
view of the inventory transactions.
Transaction Types
In using some report objects, you can select the field "Transaction Type." This field is usually an integer value, rather than a description of the transaction. Here is a list of transaction types, and the matching number type.
| Transaction Type -- Description |
Transaction Type -- Number |
| Requisition |
1 |
| Issue to dept |
2 |
| Inventory adjustment |
3 |
| Dept return to inventory |
4 |
| PO credit |
5 |
| PO-unauthorized |
6 |
| PO-authorized |
7 |
| Receipt |
8 |
| Transfer - entry |
9 |
| Issue - transfer |
10 |
| Receipt - transfer |
11 |
| Receipt - direct delivery |
12 |
| Issue - direct delivery |
13 |
| Physical inventory |
14 |
| Cost adjustment |
15 |
| Return to vendor |
16 |
| Cancel -- issue to dept |
17 |
| Cancel -- receipt |
18 |
| PO credit adjustment |
19 |
| Dept to dept transfer out |
20 |
| Dept to dept transfer in |
21 |
To view file inventory transactions:
- From the Materials Management main Contents, click Inventory > File
Item Transactions.
- The Inventory Transactions list for file items appears.
- A small arrow next to an Item No takes you to a tabbed panel. From
the panel, you can view an item picture, an MSDS, or contract information
for the item;
- Click GL Transactions to view the transactions associated with the
item.
To view non-file inventory transactions:
- From the Materials Management main Contents, click Inventory
> Non-file Item Transactions.
The Non File Item Transactions list appears.
- If there is a small
arrow next to Vendor or Manufacturer, clicking it takes you
to the vendor's or manufacturer's web page.
- If you wish to search the list for particular items, click Search and enter your search values on the Search panel. Notice that you can search for an Item Description by entering text in the Item Desc field.
- Click GL Transactions to view the transactions associated
with the item.
Inventory Valuation
For each organization and asset location defined in the user's data profile, the Item Inventory Value list (Figure 10) shows the inventory value. The valuation data include:
- Inventory Value - the current total dollar value of the active items in the asset location.
- Inventory Group - the total value of all inventory groups.
- Patient Charges - the total of patient chargeable items for the inventory.
An inventory's value is updated when inventory transactions are created for any of its items. If an asset location had no inventory transactions, a message appears when you request the inventory valuation.
The Item Inventory Value list lets users drill down on each asset location to view inventory values for each Inventory Group and Item Class.
Note: The role object "Inventory Value" allows you to work with inventory valuations. The minimum setting is View. If this role object is set to None, the Inventory Value menu item is not visible on the main Materials Management contents.
To view inventory values:
- From the Materials Management main Contents, select Inventory > Inventory Value.
- The Item Inventory list appears (Figure 10).
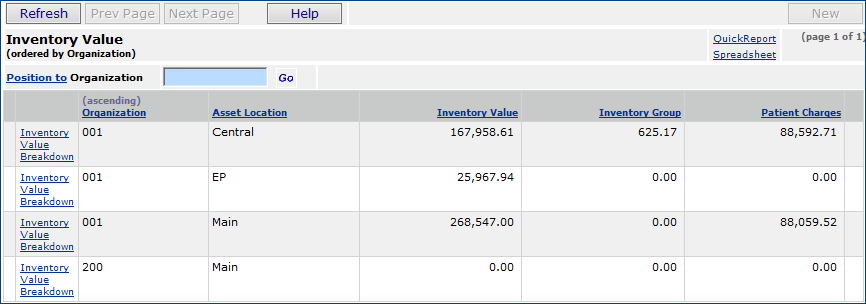
Figure 10 - Item Inventory Value List
To view a breakdown of inventory values from the Inventory Value List:
- Click Inventory Value Breakdown next to any organization/asset location in the list.
- The Inventory Value Breakdown panel appears (Figure 11).
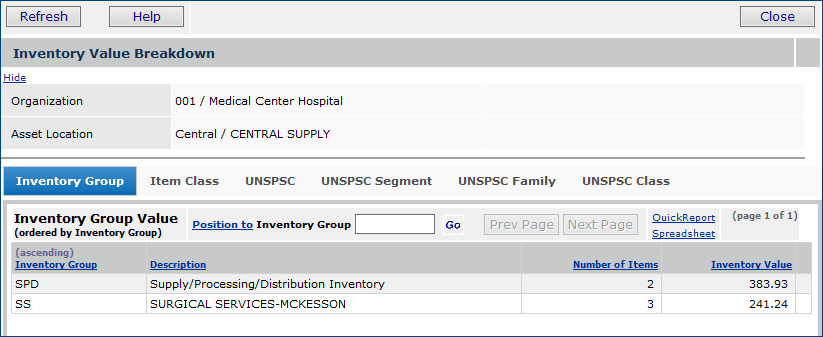
Figure 11 - Inventory Value Breakdown Panel
- The Inventory Group header (Figure 11) shows organization and asset location information, the period, and the accounting year from your financial calendar.
- Below the header (Figure 11), the Inventory Group tab shows inventory value by Inventory Group, if you have Inventory Groups defined.
- Click the Item Class tab to view inventory value by item class.
- Select the UNSPSC tab to view inventory value by UNSPSC code. The remaining tabs -- UNSPSC Segment, UNSPSC Family, and UNSPSC Class -- display inventory information by each 2-digit UNSPSC code portion: segment (the first two code integers); family (the second two code integers), and class (the last two integers). For details on UNSPSC codes, see Using UNSPSC Codes.
Accessing Inventory Values
Permission to run inventory values is provided by the "Inventory Value" role object (Figure 12), which must be included in the user's role, and set to All. (See Set Up and Maintain Users for details on role objects.)
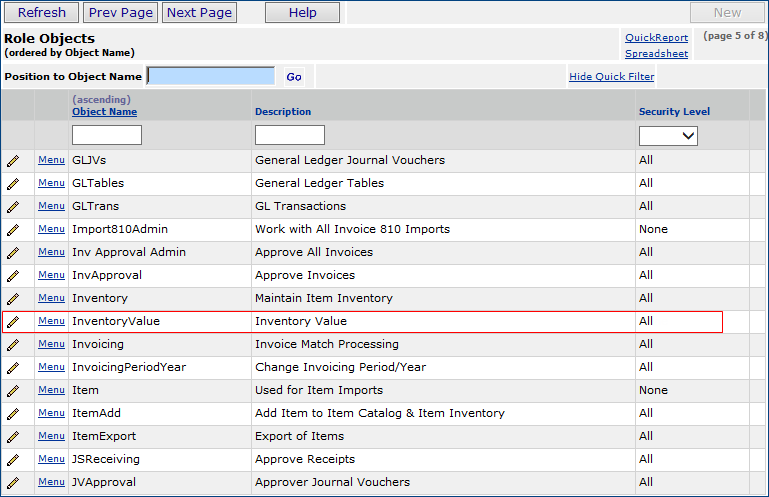
Figure 12 - Inventory Value Role Object
Copyright © 2023 by Premier Inc. All rights reserved.