This topic outlines how to set up and use check request processing. Accounts Payable must be activated at a site for check request processing to be available.
Check requests are user-initiated requests for invoice payment. These requests contain information that populates a manual invoice within Accounts Payable. Invoice Number, Invoice Date, Invoice Total, Vendor, and Pay To data can be entered on a check request, as well as check total and distribution detail amounts. When information on the check request is complete, and the check request is balanced and approved, AP staff can create an invoice from the check request and submit it for payment.
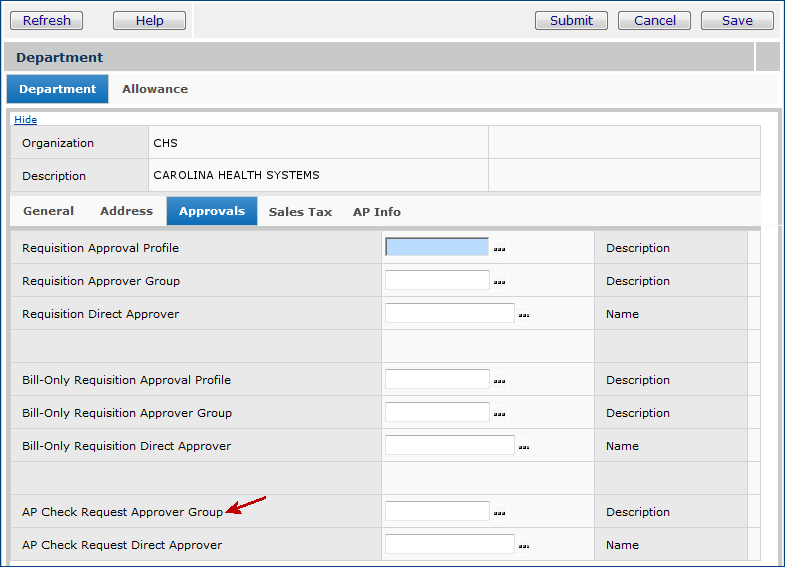
An approval workflow allows each check request to be reviewed by a single “direct” approver or routed to several approvers in an approver group. Every department that uses check request processing can identify a direct approver or approver group on its Accounts Payable department record.
Each approver has his/her own approval queue that contains check requests awaiting approval. An approver can select a check request from the queue for review. The approver can then approve the check request, reject it, or do nothing with it, pending further discussion or change.
Accounts Payable can send a notification to an approver when a check request is placed in the person's approval queue. When the request is approved or rejected, notification can also be sent to the user who originated the check request. You can also set up and use approval reminders to appear at specified intervals for check requests that have not been reviewed. Details are in the topic Approval reminders and redirected approvals.
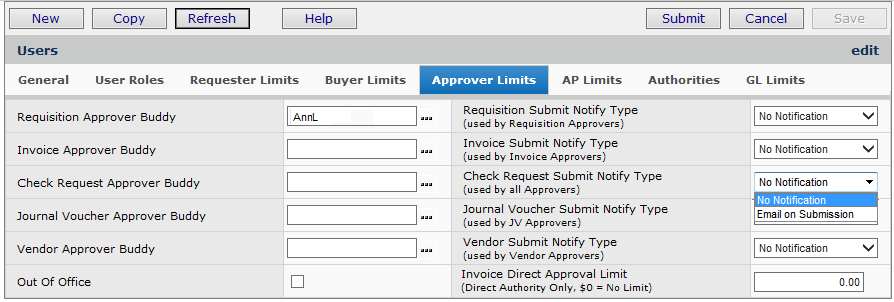
Check request approvers can designate an "approver buddy." The approver buddy backs up the primary approver when the primary approver is out of the office -- with his/her Out-of-Office status set. In this case, check requests originally destined for the primary approver are routed to the approver buddy's queue.
You can attach documents and emails to a check request, create emails while editing or viewing a check request, and view existing documents attached to the request.
Check requests can be printed.
Check request processing is not available for purchase-order-generated invoices. However, purchase order numbers can be associated with check requests as a reference, if desired.
You can use statistical distribution lines in check requests.
Several role objects control access to check request creation, approval, and setup, including access to to check request lists and approval queues. You may need to change the settings of role objects for users who create, review, and administer check requests.
The documentation topic Set Up and Maintain Users, Administration, and Security explains role objects in more detail.
Note: You must be a System Administrator to access and set role objects.
The role objects for check requests are:
| Role Object | Allows Users To: |
| CheckRequest | Create, maintain, and submit check requests. |
| ChkRqstApproval | - View, and approve or reject a check request routed to
the user's
queue My Check Request Approval Queue. |
| ChkRqstApprovalAdmin | Access All Check Request Approval Queues. |
| CheckRequestAdmin | Access lists of check requests, including viewing the Approved Check Requests list. |
The ability to create and view check requests is also subject to the user's data profile. See Set Up and Maintain Users, Administration, and Security for details.
The "Documents" role object controls access to check request documents. The setting Create (or All) allows users to create and copy documents. The default setting is Create. Only users with the setting All can delete documents.
Setup for check request processing involves the following:
Note: Setting up check request processing requires system administrator privileges and access to the Work in Administration menu.
To set notification options, open user profiles as follows:
Users who create check requests have the option of being notified when a check request has been approved or rejected by a check request approver.
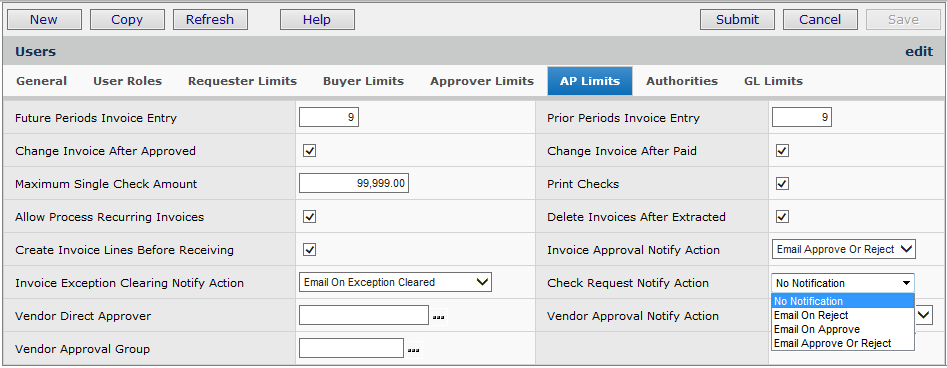
Users who approve check requests have the option to be notified when a check request has been added to their check request approval queue.
When a notification arrives that you have a check request to approve, a link within the email notification takes you directly to the transaction needing approval, and avoids your having to navigate manually through ERP after receiving an email message.
If you are not logged in to the application, clicking the link opens the login panel, and you can log in. The system displays the transaction needing approval. The application remains open for other work.
Of course, you can also access a check request that needs approval through your approval queue.
Note: The link from an email is only available for Microsoft Internet Explorer. Mobile browsers, Firefox, Chrome, and others are not supported.
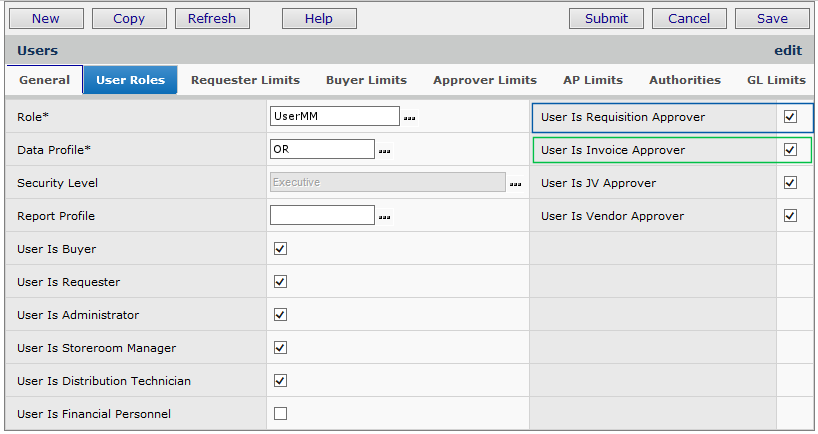
Check request approvers (including members of approver groups) must have either the User Is Invoice Approver or the User is Requisition Approver box checked. (Both can be checked.) These fields are located on the user profile.
Check requests and invoices generated from check requests flow through the approvals process. Check requests can be assigned either a requisition direct approver/approver group or an invoice direct approver/approver group.
Requisition approver groups: A requisition approver group contains multiple users who approve requisitions and check requests. The group members have different approval responsibilities for dollar amounts. Each member of an approver group can approve or reject requisitions -- and check requests -- up to his/her dollar limit. Requisitions/check requests are routed within an approver group based on the cost, and each group member's approval dollar limit until the requisition or check request is signed off. Instructions for setting up a requisition approver group are in the topic Set Up Requisition Approver Groups and Define Approver's Dollar Limits.
Invoice approver groups: An invoice approver group contains several users who approve invoices and check requests. Invoices/check requests are routed among members of the group. In the routing process, the Total is compared to each approver's Maximum Approval Limit to determine whether the approver needs to review the invoice or check request. Each member of an approver group can approve or reject invoices/check requests up to his/her dollar limit. Instructions for setting up an invoice approver group are in the topic Set Up Invoice Approver Groups.
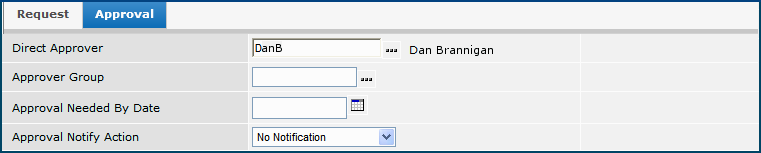
In his/her User Profile, the direct approver and each member of an approver group must be designated as either a requisition approver or an invoice approver (Figure 3).
Each department that uses check requests can specify either a direct approver or an approver group responsible for approving all its check requests. The direct approver/approver group assigned to the department is the default for the department's check requests. If no check request direct approver or approver group is specified on the department record, a user in that department making a check request must select a direct approver or approver group on the check request itself.
Approvals for check requests and requisitions can be automatically escalated up the approver group ladder if the requester is also an approver in the group.
When enabled, this feature prevents users who are members of an approver group from approving their own requests. Approval for requisitions and check requests automatically route to the next approver in the approval group ladder, regardless of the Max Dollar limit for the next approver. This enhancement applies only to members of approver groups, not to direct approvers.
See "Approver group members creating requisitions/check requests" for instructions on how to enable this feature.
Check request approvers can designate an approver buddy to handle their check requests that need approval when they are out of the office. Setting the Out-of-Office status triggers the routing of check requests to a primary approver's "approval buddy."

From
the main Contents, select Misc. Functions > Change My
Out-of-Office Status.
The system
displays the My Out-of-Office Status panel (Figure 7).
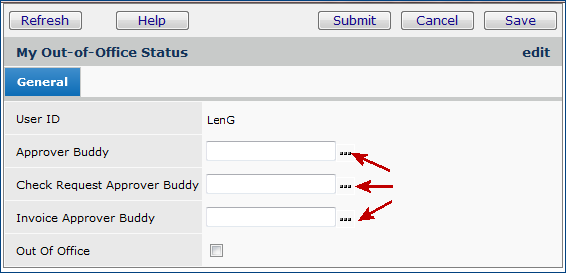
Select an approver buddy for each of your areas of responsibility, as applicable (Figure 7, red arrows).
For example, if you need to identify a check request approver buddy, click the prompt for the field Check Request Approver Buddy and select an approver buddy.
Click Submit. The system turns on your out-of-office status, and reroutes check requests that you normally approve to your approver buddy.
Reason Codes provide a shorthand method for communicating the reason for approval or rejection. They are required when an approver approves or rejects a check request. The approver selects a reason code from a list that the site's system administrator creates.
Refresh the reason codes list. The new code appears.
You can set up check request distribution reviews (and manual invoice distribution reviews) so that approvers can only see GL accounts that are relevant for distribution, and valid based on the users' Data Profiles.
This feature does the following:
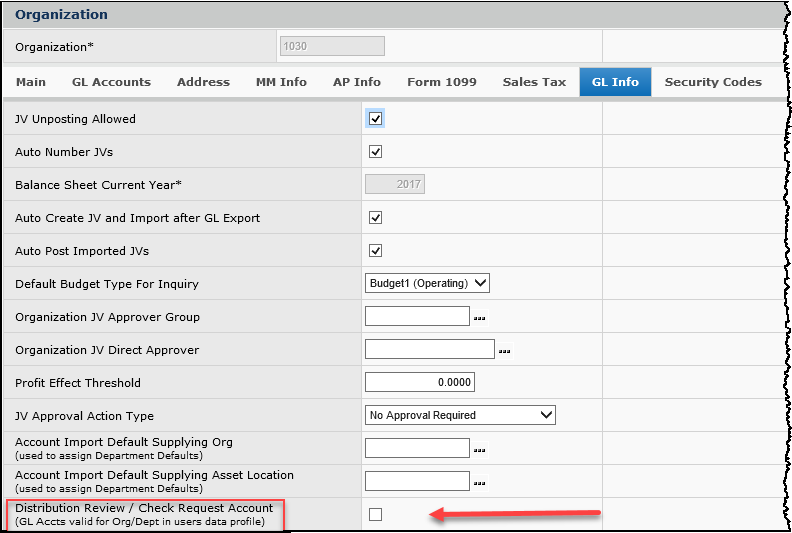
Materials Management or AP main Contents > Tables > Organizations > locate Organization > edit > GL Info tab
Note: If you set the Distribution Review / Check Request Account field for an organization, you must also specify the accounts that are distribution review accounts and vice versa.
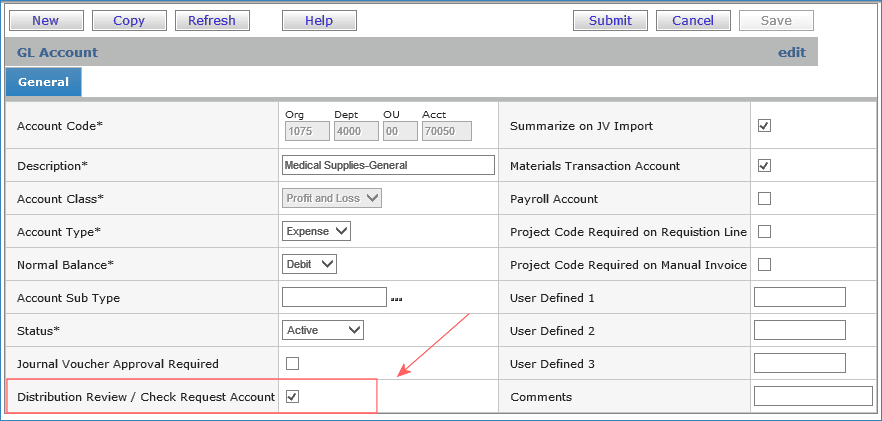
When the Distribution Review / Check Request Account field on the Organization record is checked and the appropriate accounts are designated as Distribution Review / Check Request accounts, this feature works as follows:
Check request reviewers: Clicking the GL Account prompt on the check request Distribution panel (Figure 10) displays only accounts that are valid for the organization(s) and department(s) in your Data Profile and that are designated as Distribution Review/Check Request Account.
Accounts Payable main Contents > Check Requests > My Check Requests > locate check request > edit
If you click the GL Account prompt to enter a distribution review account and your organization and/or department is invalid for the invoice or check request, the list of accounts will be blank. Similarly, if you key in an account number that is not designated as a Distribution Review/Check Request Account, an error message also appears.
Note: The Search for the GL accounts list contains a new option for finding distribution review accounts. The list of accounts contains the new quick filter Distribution Review/Check Request Account (Figure 11). The quick filter is only visible when the Distribution Review/Check Request Account field is set for the organization.

General Ledger main Contents > Account Management > GL Accounts >
Account mass maintenance users: For account mass maintenance, the new Distribution Review/Check Request Account field is also located on the Select Fields panel and available for sorting the accounts list. On the mass maintenance import, the field defaults to "blank" -- the flag is not set. When a new account is created, by default, the Distribution Review/Check Request Account field is not set.
You can create a check request from either Materials Management or Accounts Payable.
Note: You can also copy check requests. Copying a OneTime vendor does not, however, copy the vendor address, by design, since OneTime vendors are often not “vendors” in the strict sense, and have no AP location address. (Many sites use OneTime for patient refunds.)

The list displays your check requests. (Figure 12 has hidden the Quick Filter.)
The list is initially pre-filtered by user. Click Show All to display all check requests for departments that are valid in the user's data profile.

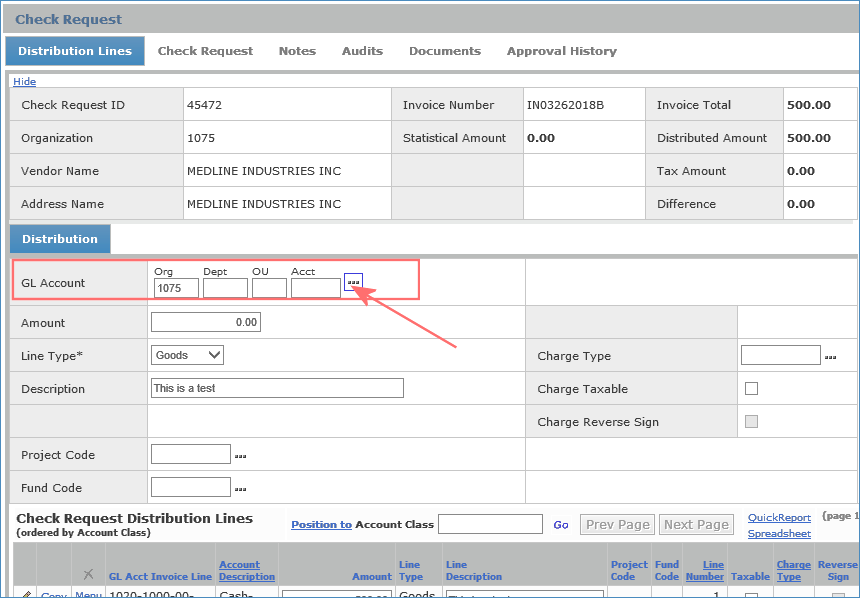
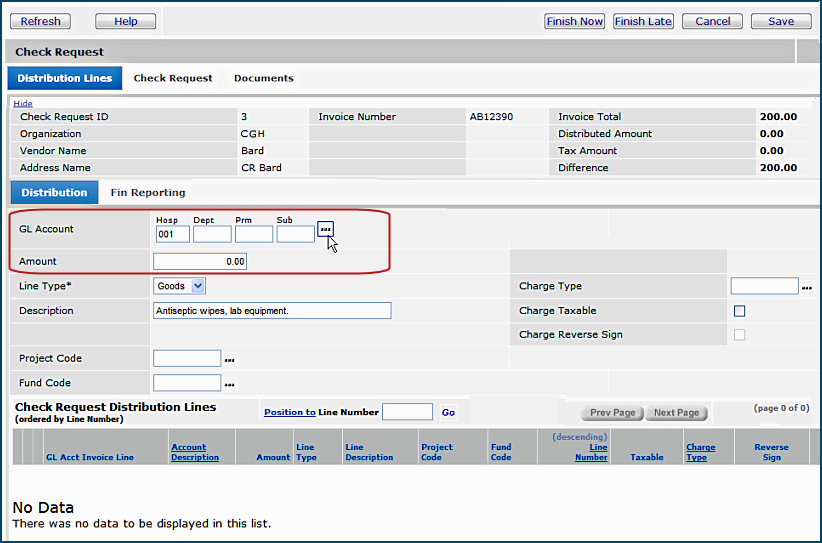
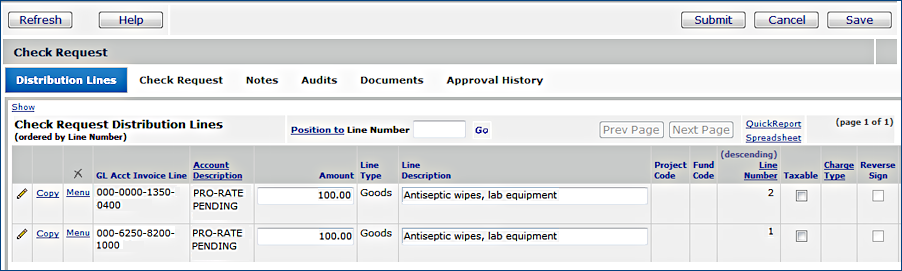
The system displays a panel for you to enter distribution detail amounts for the check request (Figure 15). The distribution lines must balance to the Invoice Total amount before the check request can be used to create an invoice.

If approved, the check request is displayed on the Approved Check Requests list. An invoice can be created from the check request.
If the check request is rejected, it returns to the user who created it. The user can edit the check request, and re-Submit it for approval.
You can enter statistical GL account information on a check request from the Distribution tab, just as you enter financial accounts for goods or charges.
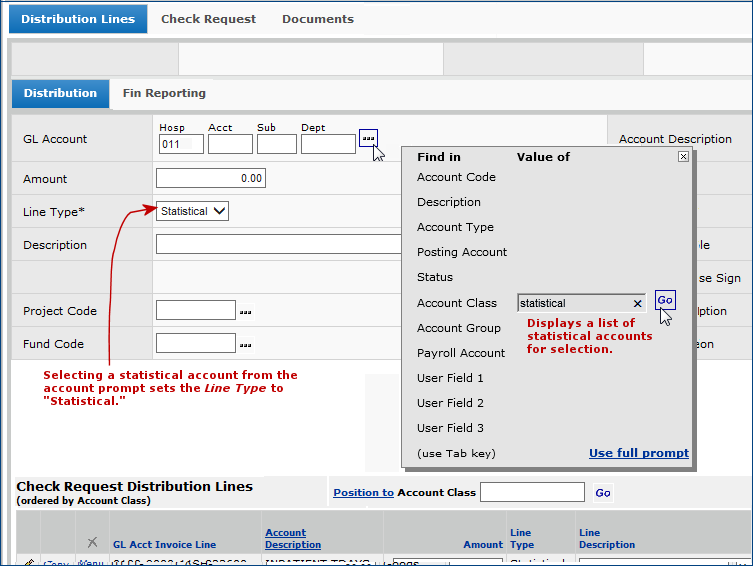
When you select a statistical account for a distribution line, the application sets the Line Type to Statistical. The application will not let you change the Line Type when the GL Account field contains a statistical account. If you key in statistical account segments manually, you will need to set the Line Type to Statistical manually.
Restriction for Statistical Account Lines: A check request cannot contain only statistical account lines. It must also contain lines for financial accounts.
Amounts for statistical account lines are not added to other distributed totals for a check request. When you balance a check request with lines for statistical accounts, the value(s) that you entered in the Amount fields for each statistical distribution line are accumulated in the Statistical Amount field on the invoice header (Figure 18).

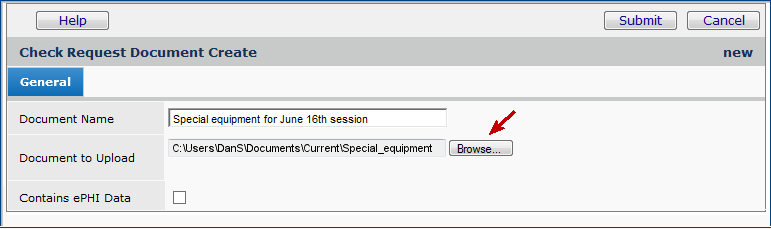
The Documents panel for a check request (Figure 19) is available when you edit or inquire on the check request. From the Documents panel, you can add documents to the check request, view the documents, and delete the documents.
On the Documents panel, if you do not have ePHI access, and the "Contains ePHI Data" checkbox is selected, you cannot view a document. When you click the arrow to open the document, the Insufficient Authority message appears. For more information, see Securing Electronic Protected Health Information (ePHI).
For Bill Only documents, if the checkbox has previously been selected for "Contains ePHI Data," then only the Administrator can change the status of the document and select or unselect the "Contains ePHI Data," checkbox. This checkbox remains locked for everyone else.
A list of documents attached to the check request is displayed, if any have been uploaded.

Note:
When a document has been copied from a check request to an invoice, Delete removes all references to the document being deleted. The document is removed from both the check request and the invoice.
You can access all the check requests for a department from the menu on the Departments list.
Note: To access a department's data, your data profile must include the department. Also, to view the departmental Check Requests list, you must have the role object "CheckRequestAdmin" set to View or higher.

The list (Figure 17) displays all check requests for the department. Check requests that have invoices already created appear on the list. Check requests cannot be rejected from the list, however.
Once you have balanced and submitted a check request by clicking Finish Now, the check request is routed either to a direct approver or to an approver group, as assigned either for your department, or on the check request Approval tab (Figure 14). Several tools let you monitor the progress of a check request through approvals.
The Status column displays one of these values for approvals purposes:
Open - the check request has been created, but not submitted for approval.
The person who created the check request can re-open it for editing and click Finish Now to send it to approval.
Pending Approval - the check request has been submitted for approval and is being reviewed.
Rejected - the check request was submitted for approval and rejected by an approver.
Note: If the last approver in an approver group approves an check request, the check request can still end up with the Status of Rejected. This situation occurs if the check request Total exceeds the last approver's Dollar Limit. The clue to this occurrence is in the invoice approval history: the audit shows that the last approver approved the check request, but the check request Status changed from Pending Approval to Rejected.
Approved - the check request was submitted for approval, and was approved. The check request appears on the list of approved check requests.
AP staff responsible for invoicing can click Create Invoice to create an invoice from the check request. Once an invoice is created, the check request is no longer displayed on the Approved Check Requests panel.
Approved, Missing Info - the check request was approved, but needs additional information before it can be turned into an invoice for payment.
Note: When a check request has the status Approved or Approved, Missing Info, you cannot delete it. The Menu > Delete option is grayed out.
Approvers access check requests waiting for approval through approval queues. For check request approvers, the Accounts Payable and Materials Management main Contents link to the approval queues. Each approver has a queue containing check requests awaiting review and approval/rejection.
- My Check Request Approval Queue displays check requests for regular approval. The list also contains check requests for approval when the user is an approver buddy and the regular approver is "out-of-office." The column -- Approving for User -- indicates that the user is approving as an approver buddy. (Otherwise, for regular approval, this column is blank.) The column -- Approver Group -- displays the approver group ID and group name if the user is part of an approver group.
- All Check Request Approval Queues shows check requests assigned to all check request approvers.
- Consolidated Approval Queue shows check requests awaiting approval, and any other transactions documents (such as invoices) that you are also authorized to approve.
Direct approvers are solely responsible for the approval or rejection of a submitted check request. When a direct approver approves a check request, the check request Review Status is Approved (or, Approved, Missing Info if more information is needed to create an invoice).
With approval groups, check requests are assigned to each member of the group sequentially according to the approver's dollar limit. The Review Status is Pending Approval until routing reaches an approver whose dollar limit is greater than the check request. After the final approver approves a check request, its Review Status is Approved.
Note: If no approver has a dollar limit higher than the check request, the check request is rejected. The person who created the check request will need to edit it, and resubmit it for approval.
If you are set up to receive email notifications when a check request is ready for review, you can link directly to the check request from the email. (See the Notifications Setup section above.) You can also access check requests for review/approval from your approval queue.
Not Reviewed - The approver has not looked at the check request.
Reviewed - The approver has looked at the check request but has not approved or rejected it.
Rejected - The approver has rejected the check request.
Approved - The approver has approved the check request.

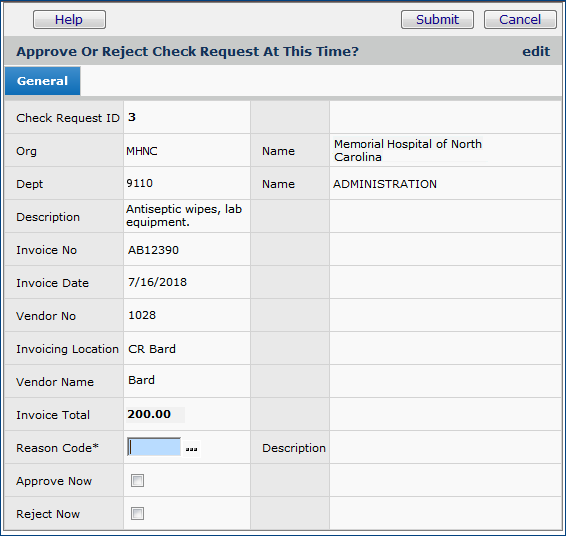
- Select Approve Now or Reject Now.
- Select a Reason Code
- Click Submit.
Based on the selected Approval Notify Action on the check request, the user who created the check request may be notified by an email when the check request is approved.
Note: When the Check Request Status is Pending Approval, the Finish Now button is disabled. A user who edits the check request cannot click Finish Now to process the check request. The check request must first be approved.
A situation may occur at a medical center where no one is available to approve a department's check requests -- both the normal approver and approver buddy are out of the office. In this case, check requests could sit in a user's approval queue for days...or longer. The all-approver queues are designed to handle this situation.
Note: The "ChkRqstApprovalAdmin" role object provides access to the all-approver queue.
The All Check Request Approval Queues list includes a column that indicates when the normal approver is "out-of-office." The approver buddy and his/her out-of-office status is also displayed in a different column.
The Approver Group column contains the approver group ID and group name when the check request is routed to an approver group.
This Consolidated Approval Queue consolidates all your check requests, invoices, journal vouchers, and requisitions needing approval in one place.
You can see all the transaction documents that you are authorized to review and approve or reject.
This panel is helpful for approvers who approve multiple types of transaction documents...such as check requests and invoices...so that they do not have to go multiple approval queues in the ERP application. Everything is in one queue.
From the Materials Management, Accounts Payable, or General Ledger main contents, select Consolidated Approval Queue (Figure 25).
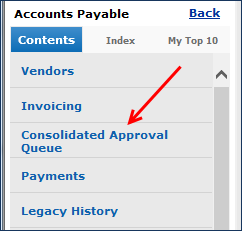
The list of transaction documents awaiting your approval appears. On the list are check requests awaiting approval, but also any other documents that you are authorized to approve.
The links and menu have the same capabilities as those on My Approval Queue or on All Approval Queues.
When a check request with the wrong cost center (department) is in approval, and the check request is rejected because the department is wrong, you can correct the department and send the check request back through approval routing.
-
Locate a rejected check request on My Check Requests list, and open it to edit the department.
Note: Selecting a new department (via the prompt) also may change the approver group or approval routing of the check request: the approval group/approver follows the approval rules of the new department selected.
When an approver's Out of Office status is set, check requests for the approver go to his/her Approver Buddy. If an approval group is assigned to the check request, both the original approver and the person's Approver Buddy can belong to the approval group.
In this situation:
The list of approved check requests is controlled by the role object ""CheckRequestAdmin." By default, this role object setting is None. The system administrator at each site (or other authorized staff) will need to change the setting for users who access this list. The Approved Check Requests menu option does not appear unless the user has the setting View or higher for the role object.
The Approved Check Requests list is pre-filtered to display check requests with the status Approved and Approved, Missing Info.
Invoice approvers who have Modify (or higher) authority for the role object "ChkRqstApproval" can reject approved check requests from the Approved Check Requests list.
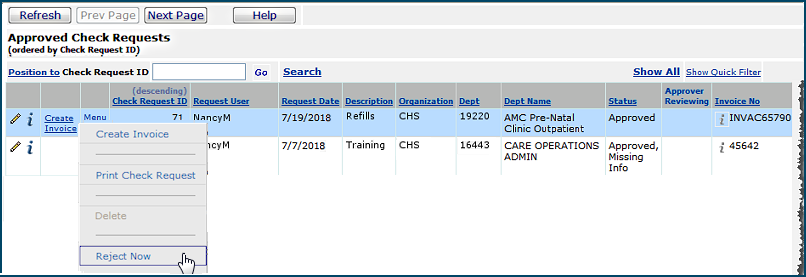
The check request is set to rejected and must be edited and resubmitted.
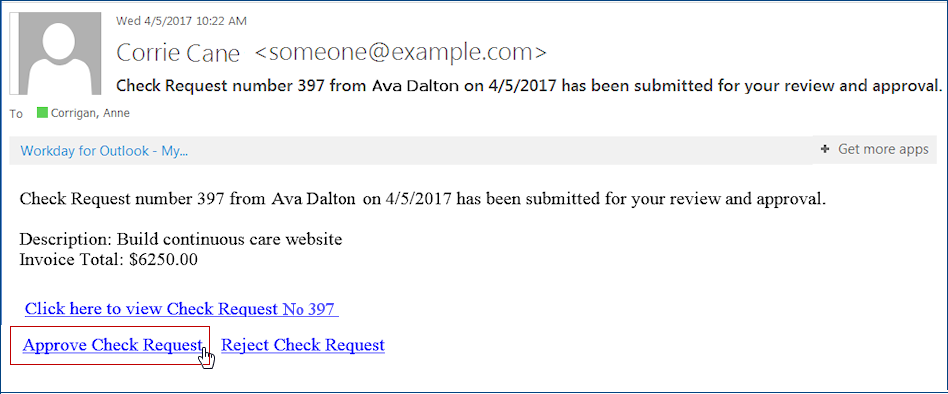
You can approve or reject check requests from a link on an email message. ERP can send an email to check request approvers that only requires clicking the approval or rejection link. Approvers can also add comments before sending the email back to the application. The check request is then approved or rejected, as specified in the email.
Note: Email approval/rejection is also available for requisitions and invoices.
Here are the setup steps:
When a departmental user creates a check request that must be approved, ERP marks the check request as Pending Approval (Figure 27) and sends an email message to the designated approver (Figure 28).

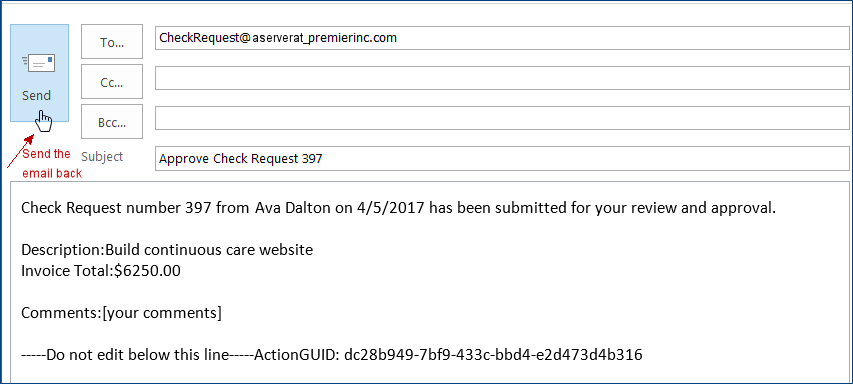
You will receive another email with the approval or rejection notification.
You can review the check request on the Check Requests List, with the approval Status as you specified in the email. In this example, the Status is Approved (Figure 30).

On the email message (Figure 28), you can also click the link “Click here to view Requisition No XXX” to open ERP and look at the check request in detail, to accept or reject it. If you are not logged in to the application, clicking the link opens the ERP Sign On panel and you can sign in. The system displays the transaction needing approval. The application remains open for other work.
When you open ERP from the "Click here..." link on an approval email, you can access the entire ERP features menu directly from the approval queue. Here is an example:

You can display the history of approvals for a check request from the check request inquiry.
The Approval History panel shows who has reviewed, approved, and/or rejected a check request. You can identify which approver currently has your check request in his/her queue. You can also see the length of time that each approver has/had the check request and other information.
The topic Approval Information on Inquiry Panels: Examples contains some sample Approval History panels. Approval history is only available from check request Inquiry.
You can print a check request from any of the check request lists available from the Check Requests main Contents.
For example, to print a check request from the list Approved Check Requests (Figure 26),
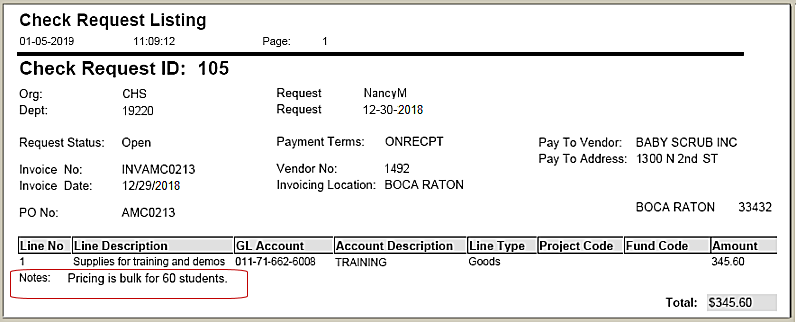
Note: If a user note has been written for any line on the check request, the note appears on the printout for the line.
Figure 32 is an example of a printed check request. Notice that the printout has a user note for a line.
Once approved, check requests can be used to create and populate invoices. Approved check requests have complete invoice, vendor, pay to, and balanced distribution detail information. Check requests that have the Review Status Approved, Missing Info have gone through the approval process successfully, but still require missing values to be provided before an invoice can be created.
Invoices can be created from the Approved Check Requests list or from the departmental list of check requests, for approved check requests. Once an approved check request has an invoice, it is no longer displayed on the list.
Note: Check request invoices go through the invoice approvals process, if required at your site. So for any check request, you may have two rounds of approvals: one for the check request itself, and another for the check request invoice.

A panel appears asking you to confirm that you wish to create an invoice (Figure 34).

The AP staff responsible for the invoice review it, and approve the invoice for payment, or reject it. If the invoice is rejected it is routed back to the requester.
The field Check Request ID (on the far right of the list) is populated for invoices that were generated from check requests (Figure 35). Clicking i opens the check request inquiry.

When you Search the Invoices list, a new option in the Invoice Created field -- From Check Request -- lets you locate invoices created from check requests (Figure 36).

The Invoice Inquiry panel displays the Check Request Audits and Check Request Approval History tabs when the invoice was generated from a check request (Figure 37).

Once you have an approved invoice for a check request, you can create the payment. As with other invoices, you have two options:
To create a payment run, from the Accounts Payable main Menu select Payments > Payment Runs. Detailed instructions are in the online topic "Payment Run Steps".
To create a quick, single payment for a check request, open the invoices list in Accounts Payable to the invoice for the check request. (Accounts Payable > Invoicing > Invoices). Next to the invoice, click Menu > Pay Invoice. Detailed instructions for quick payments are in the online topic "Making Quick Payments."
Copyright © 2023 by Premier Inc. All rights reserved.