Set Up Buyers, Approvers, and Approver Groups (Invoices, requisitions, check requests, journal vouchers only) Version
Materials Management users: This chapter covers setting up buyers who authorize purchase orders and approve requisitions, invoices, and check requests.
AP Users: For vendor and Check Name approvals, see Vendor Approval Processing.
General Ledger users: This chapter covers mass maintenance for journal vouchers. For the entire approval process, see Journal Voucher Approvals.
Contents
Overview
System administrators set up identities
and permissions for users, including users who approve requisitions, invoices, check requests, and journal vouchers.
Once users are identified to the system, they can be assigned to review and authorize purchase
orders from particular organizations, departments, asset locations, and vendors.
Buyers and other staff at a site may also research the cost of requested items and approve requisitions.
For any user who creates requisitions, the system administrator assigns an individual
approver (Direct Approver) or approver group that handles requisition approval.
Similarly, the system administrator can designate users who approve invoices, check requests, and journal vouchers, and assign the users to approver groups. For sites that delegate different dollar limits to approvers, approver groups provide automatic routing of requisitions, invoices, check requests, and journal vouchers. In this way, all approvers who need to approve a document have a chance to do so.
Security
Data
To access organization, department, or asset location data, the organization, department, or asset location must be included in your data profile. Additionally, for any asset location, you must have permission to maintain the asset location record. See "Restricting Users from Editing Asset Location Records."
Role Objects
- The role objects "InvApproval, JVApproval, VendorApproval, ChkRqstApproval," and "Approval (requisitions)" control maintenance of approver groups and access to their respective approval queue lists and approval features.
- For users who are approvers, these role object(s) must be set minimally to Modify.
- For users who create and edit approver groups, the role objects must be set minimally to Create. This setting activates the New button on the ... Approver Groups Edit page, for example.
-
For check requests, the "ChkRqstApproval" role object (set to Create) allows users to create and edit approver groups on the Invoice Approver Group Edit panel or on the Approver Groups panel for requisitions. You can assign either a requisition approver group or an invoice approver group to check request.
- For users who create and maintain invoice approver groups, the "...Approval" (e.g., "InvoiceApproval") role object setting All activates the approver groups Menu.
- The role objects "InvApprovalAdmin, JVApprovalAdmin, VendorApprovalAdmin, ChkRqstApprovalAdmin," and "ApprovalAdmin (requisitions)" control access to the lists .. .Approval Queue - All.
-
For users with access to the ... All queues, the "InvApproval, JVApproval, VendorApproval, ChkRqstApproval," and "Approval (requisitions)" role objects control the menu features.
User Profile Authorizations
As described subsequently, approvers must be designated as such on their User Profiles. Approvers are assigned approval limits (dollars). You can also set related approval characteristics, such as how the approver is notified when an element requiring approval is available. Each approver can be assigned an Approver Buddy who handles approvals when the normal approver is out of the office.
- Users who clear invoice exceptions, regardless of their job type, must be also designated as invoice approvers in their User Profiles.
Purchase Order Authorizations
Buyers and other users who authorize purchase orders
must have the appropriate permissions set in their user profiles. The dollar
limits on purchase orders that a person can authorize must also be established
for item cost, item extended cost, and PO total cost. Finally, an authorizing user can be designated in the system's records for each organization, department,
vendor, and asset location, and for each item type (stock and non-stock/non-file)
within an organization.
Requisition
Approvals
Depending on the structure of your hospital, you can set up different configurations for requisition
approvals. You can assign an approver to each user. You can also create approver groups, made up of several approvers. When you set up an approver group, you specify the order in which requisitions are routed among the group members.
You can assign each department an approver group or a single direct approver (but not both), and an approval profile. Approval profiles contain the dollar limits allowed for different item types (stock, non-stock, non-file) on requisitions.
You can assign one approval profile to a department for bill-only requisitions, and a different approval profile for all other requisition types.
Separate approval paths can be established for commodity items. Bill-only requisitions do not split for commodity approvals. (Typical requisitions that contain lines with commodity codes split those lines into one or more separate requisitions for approval routing. Bill-only requisitions do not do this.)
Requisition reviews proceed through these stages: costing, commodity code, and item type as follows:
- The user who enters requisition line(s) must include critical information that identifies any non-file items. Then, the costing
approver (Requisition Non-File Approver/Buyer) assigned to the user or user's department
reviews the non-file lines, and completes any missing purchasing information,
such as price. If no critical information is missing, or the requisition does not have non-file lines, the process skips this
step.
- The commodity code approver or approver group approves commodity-coded item lines.
- The Requisition Direct Approval User or Requisition Approver Group assigned to a user or department reviews and approves for item
cost, line cost, and total cost. A user can be required to get approval
for requisitions based on item type, dollar amount, or both. For example,
some staff may not need approval for stock items, but will
need all non-stock items approved. Other
staff may need approval for non-file items that cost more than a certain
amount. Still others may only need approval for requisitions above
a total amount.
If you use approval profiles for your departments, you can assign each department a separate approval profile for bill-only requisitions.
Requisition approvers are typically designated as buyers in their user profiles. User profiles also contain approvers' dollar limits.
Dollar limits and item type requirements are also specified in the user profiles of staff who are allowed to create requisitions. These staff are designated as requisitioners in their user profiles.
Requisition Approver Groups
A requisition approver group is a group of approvers who approve
requisitions. (A user who approves requisitions and purchase orders is typically designated as a buyer on his/her user profile.) Either an approver group or a single approver (Requisition Direct
Approval User) is assigned to each person who creates requisitions.
Depending on the structure of your Materials and AP organizations, you may have
multiple approver groups.
Each member
of an approver group can approve or reject requisitions up to his/her dollar
limit. (Two users in the same group cannot have the same dollar limit, however.)
Requisitions are routed within an approver group based on the cost of the requisition,
and each group member's approval dollar limit. Users
with Administrator privileges create and maintain approver groups.
Invoice Approvals
The Invoice Approvals process enables designated approvers to review and approve or reject invoices created in the system. Any PO invoice, manually-created invoice, or recurring invoice can be put into the approval process, except for invoices created from EDI 810 documents.
The Invoice Approval process, similar to requisition approval, contains an approval workflow that allows invoices to be reviewed by a single “direct” approver, or routed to several approvers in an invoice approver group. Each approver has an approval queue containing invoices awaiting approval.
Invoice Approver Groups
Invoice approver groups allow invoices to be routed to multiple approvers. Invoices are routed within a group based on the amount of the invoice,
and each group member's approval dollar limit. In the routing process, an invoice’s Total is compared to each Approvers Maximum Approval Limit to determine if the approver needs to review the invoice. Each member
of an approver group can approve or reject invoices up to his/her dollar
limit. (Two users in the same group cannot have the same dollar limit, however.)
Either an approver group or a single approver (Invoice Direct
Approval User) is assigned to each person who creates invoices. Users
with Administrator privileges create and maintain approver groups.
The invoice approval process and setting up invoice approval groups is described in a separate topic: Invoice Approval Processing.
Check Request Processing Approvers
Once created, check requests are routed for approval. The approvals process contains an approval workflow that allows each check request to be reviewed by a single “direct” approver or routed to several approvers in an approver group. Check requests can be assigned either a requisition approver group or an invoice approver group.
Direct approvers and approver groups for check requests can be identified on a departmental basis. Each department that uses check request processing selects approvers and/or approver groups which are then retained in the department record. If no check request approver or approver group is selected for a department, a user in that department making a check request must specify an approver or approver group on the check request itself.
 Direct approvers (individual users) for check requests must have either the User Is Invoice Approver or the User is Requisition Approver box checked on their user profiles. (Both can be checked.)
If a department assigns an approver group to its check requests, the approver group can be either an invoice approver group or a requisition approver group.
Groups of both types are included in the selection list for the AP Check Request Approver Group on the Department Record edit panel. If you set up one or more requisition approver groups or invoice approver groups, that is sufficient for check request processing.
Check request approvers can designate an approver buddy to handle their check requests that need approval when they are out of the office.
Creating and processing check requests -- and setup steps -- are described in a separate topic: Check Request Processing.
Set Up Buyers
Users who authorize purchase orders must be identified as buyers. Buyers authorize purchase orders, but also typically serve as approvers for requisitions and possibly check requests, invoices, and vendors.
Identifying
a User as a Buyer
To identify a user as a buyer, as with any other user, a system
administrator first enters basic information into the application to establish a user profile. User profiles include the user's name, ID, phone
number, etc., along with permissions for features and access to a hospital's
data records. When you create new user IDs for staff at your site, you assign
each user ID a role and a data profile.
A role specifies the application features
-- called role objects -- that users assigned to the role may work with. For
example, the Buyer role includes the Approval role object. Each
role object is set to a security level: None, View, Create,
Modify, and All.
A user profile also has a data profile
associated with it. A data profile specifies the organizations, departments,
and asset locations whose data the user can access. Review your data profiles
to determine which one contains the medical center units whose data the buyer
will work with, and assign that data profile to the buyer.
- To view data profiles, select: Work in Administration > Administration
> Data Profiles.
The discussion in the following sections
assumes that you already have some users set up at your site with basic information,
and need to assign them the Buyer role. If the Buyer role -- or a role
with a similar name -- does not exist, you can create it. See Set
Up and Maintain Users for details.)
- To view the list of roles established at your site, select: Work in Administration
> Administration > Roles.
You must be a system administrator to
view and access the Administration Contents.
To assign
a Buyer role and a data profile to a user:
- From the main contents, select Work in Administration > Administration
> Users.
The list of users at your site appears.
- Locate the user that you are interested in.
You can scroll the list, or use the Search panel. (Click Search.)
- Next to the User ID, select Menu > Edit or click the edit icon
(
 ).
).
A tabbed panel appears.
- Click the User Roles tab.
The User Roles panel appears (Figure 1).
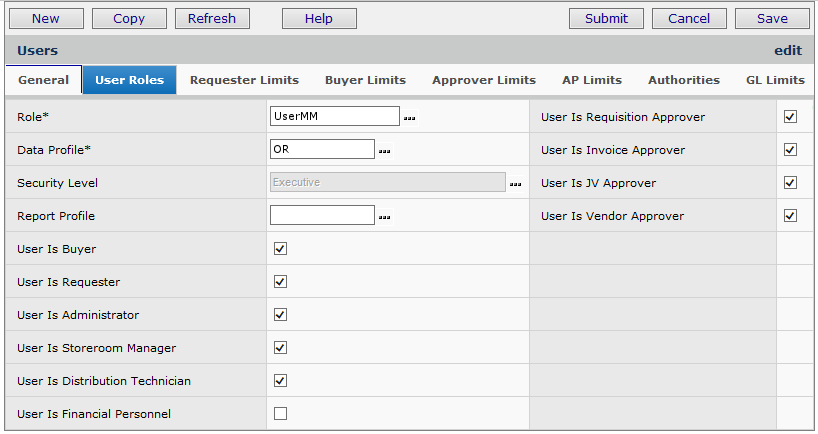
Figure 1 - User Role Panel for a Buyer
- In the Role field, select the role Buyer (or whatever
role your site has established for buyers -- it may be called something different).
- In the Data Profile field, select the data profile that will give
the user access to the correct data tables.
- Select the User is Buyer field.
- Select the User is Requisition Approver field, if the buyer approves requisitions, also.
- If the user approves invoices, select the User is Invoice Approver
field.
- Click Save.
You can move on to the Authorities panel, or click Submit to
return to the Users list.
De-Assigning Buyers as Approvers
Several restrictions exist on de-assigning users as approvers/authorizers.
For requisitions and check requests:
For invoices:
- A user cannot be de-assigned as an invoice approver if the user belongs to an invoice approval group or if the user is a vendor direct approver. (Vendor approvers are designated on the vendor record.) See Designate approvers for requisitions, invoices, check requests.
- Also, the user cannot be de-assigned if Not Reviewed or Reviewed entries exist in the user's approval queue(s). All queue entries must be Approved or Rejected before the user can be de-assigned.
You can remove a user's ability to approve requisitions, invoices, and/or check requests by clicking the checked box (Figure 2). The check disappears, and the user is de-assigned.

Figure 2 - Requisition Approver and Invoice Approver Assignment Fields for a User
To give a buyer permission to authorize
purchase orders:
- Follow steps 1 through 3 in To assign a Buyer
role and a data profile to a user.
- Click the Authorities tab.
The Authorities panel appears (Figure 3).
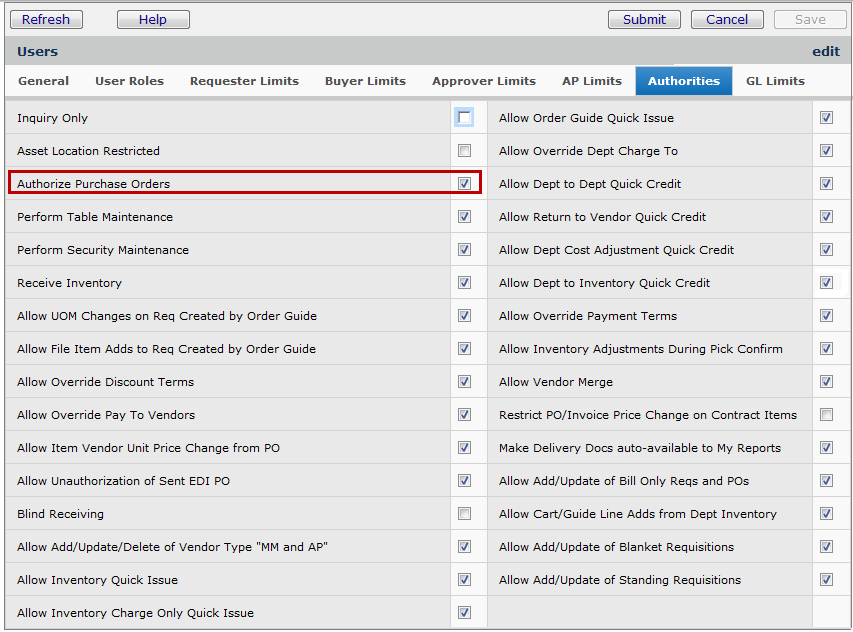
Figure 3 - Authorities Panel: Permit Buyer to Authorize Purchase Orders
- Select the Authorize Purchase Orders field.
- Click Save to save the panel.
You can move on to the Buyer Limits tab, or select Submit to
return to the Users list.
To specify a buyer's authorization dollar amount
limits:
The steps below assign dollar limits to a buyer for authorizing purchase orders. The buyer can authorize purchase
orders for items with an item cost up to the amount entered in the PO Item
Cost Limit field. The limit for the line cost that a user can authorize
is in the PO Line Extended Cost Limit. The total amount for a PO that
the user can authorize is specified in the PO Total Cost Limit.
- Follow steps 1 through 3 in To assign a Buyer
role and a data profile to a user.
- Click the Buyer Limits tab.
The Buyer Limits panel appears (Figure 4).
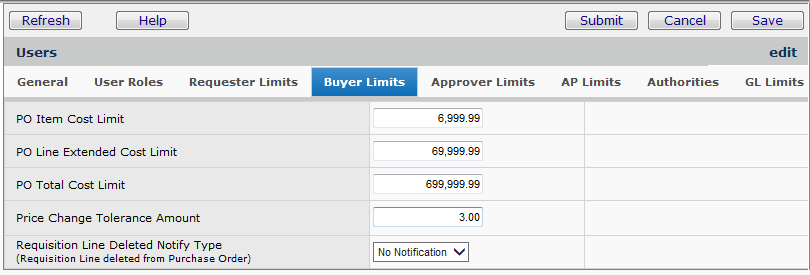
Figure 4 - Dollar Limits that a Buyer Can Approve
In Figure 4, the buyer can authorize POs containing items that cost
up to $6,999.00. The total dollar amount for a line on a PO that the buyer can
authorize is $69,999.00. The buyer can authorize purchase orders whose total is
less than $699,999.00. This buyer is allowed to approve price changes on items
up to $3.00.
- Enter new limits in the fields on the Buyer Limits panel.
- Click Save to save the dollar limits.
- You can move on to the Approver Limits tab, or select Submit
to return to the Users list.
No
Dollar Limit Authorization - If you wish to give a buyer
no dollar limit, enter a very large value (9,999,999.00) in the fields for PO
Item Cost Limit, PO Line Extended Cost Limit, and PO Total Cost
Limit.
To set up an approver buddy, out of office status, and notification:
For each of your approving users, you may wish to identify another user
as an "approver buddy." An approver buddy performs the work of a direct
approver and an approver group member if the normal approver is out of the office. Your approvers
can set their out-of-office status when they leave the office for a vacation
or trip, and their approver buddy will be routed their invoices, (or journal vouchers, or requisitions or check requests) for approval.
- Follow steps 1 through 3 in To assign a Buyer
role and a data profile to a user.
- Click the Approver Limits tab.
The Approver Limits panel appears (Figure 5).
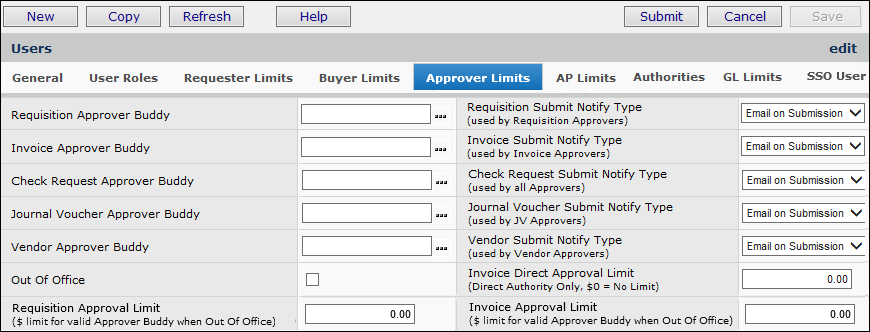
Figure 5 - Approver Limits Panel: Identifies Approver Buddy
- Click the prompt next to Requisition Approver Buddy and/or Check Request Approver Buddy to select approver buddies.
- Whenever the approver goes out of the office, he/she must set the out-of-office status flag to have approvals routed to an approver buddy.
Note: Users can set their own out-of-office status from the Misc.
Functions menu in the main Contents.
-
Select Misc Functions > Change My Out-of-Office
Status. (The My Out-of-Office Status panel appears.)
-
Select the Out Of Office field.
- If the approver wants to be notified when a requisition, invoice, or check request has been submitted
for approval, select email on Submission in the Requisition/Invoice/Check Request Submit Notify Type field(s).
- Click Save.
You can select another tab on the Users panel, or click Submit to return
to the Users list.
Using Dollar Limits for Approver Buddies
You can specify dollar limits on approvers so that an approver going out-of-office can select a buddy approver who has the same (or higher) approval limits. This feature requires setting a field in System Values, and assigning Requisition Approval Limits and/or Invoice Approval Limits to users who approve requisitions, invoices, and/or check requests, as appropriate. On the User Profile Approver Limits tab, these limits fields are at the bottom (Figure 5).
This feature applies to approvals for requisitions, check requests, and invoices. (Journal voucher approvals and vendor approvals are not included.)
A System Value "Restrict Approver Buddy by Approval Limits" enables this feature for requisition, check request, and invoice approver buddies. When the system value is enabled, approvals route to assigned approver buddies with the appropriate limits. When the system value is not enabled, approvals route without the restriction of approval limits defined for approver buddies. This system value field is audited.
To set the System Value,
- Open System Values: Work in Administration > Administration > System Values > Edit.
- Click the Other tab.
- Select the field Restrict Approver Buddy by Approval Limits (Figure 6).
- Click Save, Submit.
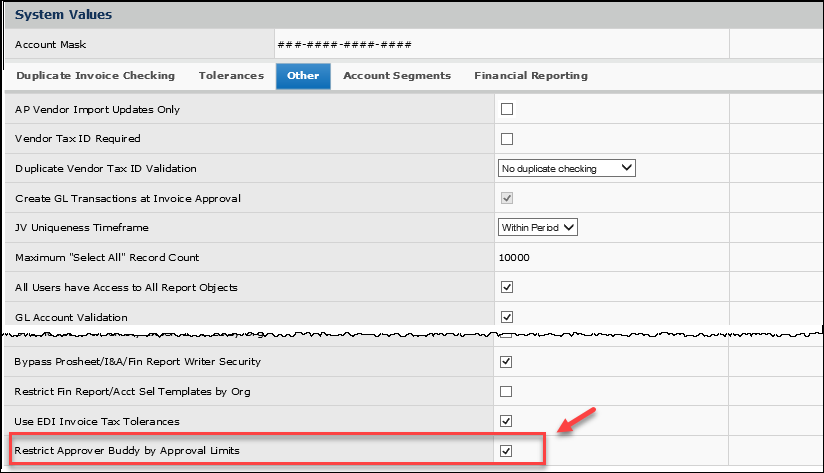
Figure 6 - Enabling the Approver Buddy Approval Limits Feature on System Values
To add approval limits to a User Profile
- From Work in Administration on the main Contents, select Administration > Users. The Users list appears.
- Locate the user of interest on the list.
- Edit the User Profile.
- On the User Profile record, click the Approval Limits tab. The fields you need are at the bottom (Figure 5).
- Enter a dollar amount for Requisition Approval Limit, if the user approves requisitions. Similarly, enter a dollar limit for Invoice Approval Limit for invoice/check request approvers.
- Click Save, Submit.
You can set an out-of-office approver buddy as described below. In the example, the current user "JamesB" has an approval limit of $2000.00 and he is going out-of-office. All potential approver buddies also have approval limits set on their User Profiles.
Imagine that the approver limits in Figure 5 are for user "NancyM." Next we will assign "NancyM" as a buddy approver.
To assign an approver buddy with approval limits
- On the main Contents, select Misc. Procedures > Change Out-of-Office Status.
The My Out-of-Office Status panel appears (Figure 7).
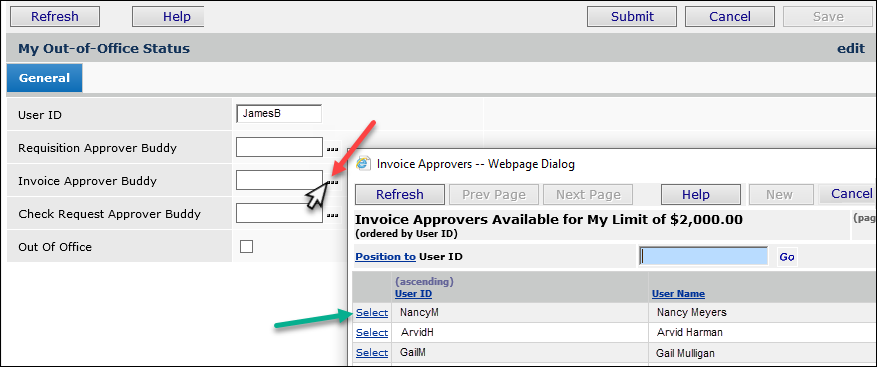
Figure 7 – Selecting an Approver Buddy for Invoices
- Click the prompt for the type of materials that the Approver Buddy should approve. In the example, the user wants to set an approver buddy for invoices.
The approver buddy select list appears. This list only contains users who have the same or higher approval limit ($2000.00) as the user who is going out-of-office (JamesB). The actual dollar approval limits for each user on the list are not displayed because that information remains confidential.
- Select an approver buddy. The list closes.
- On the My Out-of-Office Status panel, select Out-of-Office.
- Click Submit.
The user selected as an approver buddy will handle the approvals (in this case, invoice approvals) for JamesB until he returns to this panel and un-selects Out-of-Office.
Suppose instead of using the prompt to get a select list of approver buddies, you keyed a user into the Invoice, Requisition, or Check Request Approver Buddy field. The system checks that the user you selected is valid; that is, has an approval limit equal to or greater than yours. If not, an error message appears) and you must designate another user, or chose from the select list.
On the User Settings (All Columns) list, the Approval Limits are displayed in the last two columns on the right.
The User Maintenance template (Work in Administration > Administration > User Create Template) also includes the Approval Limits fields for importing when you create new users.
Assign Buyers to Organizational
Units and Vendors
Each organization at your site has a default buyer. If you need
separate purchase orders for stock and non-stock items, you can also assign
an organization a buyer for stock items and a buyer for non-stock/non-file items.
Purchase orders for each type of item are routed to the designated buyer. Each
vendor buy-from location may also have several buyers assigned to it, but one
buyer must be named as the primary buyer. Additionally, you may assign a buyer
to each department, and finally, to any asset location.
Thus, a purchase order can fall under the jurisdiction of several
different buyers. When this situation occurs, the system uses the following strategy
to locate the appropriate buyer, and to route the PO:
- The system first looks for a department buyer.
- If there is no department buyer, the system looks for a primary buyer
assigned to the vendor buy-from location.
- If no vendor buy-from location buyer exists, the system looks for a buyer
at the asset location.
- If there is no asset location buyer, the system uses the default buyer for the organization making the request.
- If the organization requires separation of purchase orders by item type,
then...
- For stock items, the default stock buyer is used instead of
the default asset location buyer.
- For non-stock and non-file items, the default non-stock/non-file
buyer is used, instead of the default asset location buyer.
Assign buyers to an organization
You must assign a Default Buyer to each organization when
you create the organization record. You can define and configure an organization
from the main Contents by selecting Tables
> Organizations. The Default Buyer field is located on
the Organization record Main tab, as shown in Figure 8. (Click the prompt to
select a buyer from the list.)
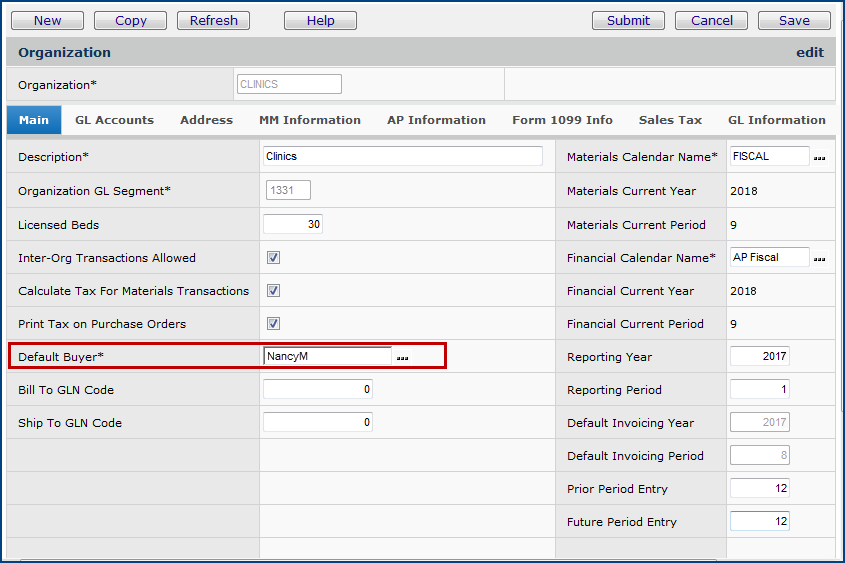
Figure 8 - An Organization Record's Main Panel
Assign an organization's
buyers to item types
In medical centers that keep materials inventories, some organizations
may need separate purchase orders for stock and
non-stock / non-file items. In this case, you assign a buyer to stock POs and
a buyer to non-stock / non-file POs. You can make the buyer assignments on the Organization > MM Information tab (Figure 9). Be sure to also select
the field Separate PO By Item Type.
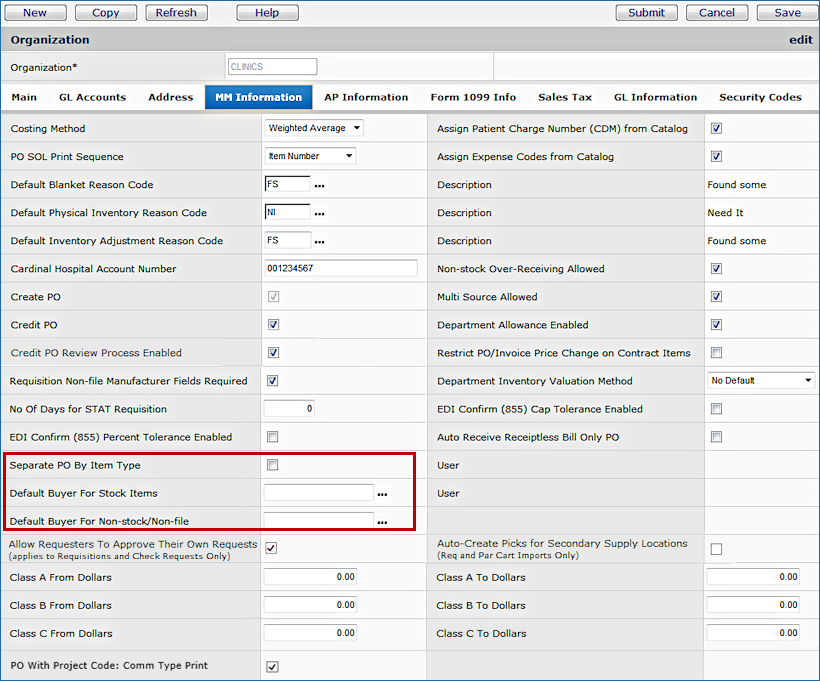
Figure 9 - The Organization MM Information Panel
Assign a buyer to a department
You may assign each department in your organization a buyer, if
you wish.
- From the Materials Management main Contents, select Requisitioning > Departments.
- Edit an existing department record or click New if you wish to create
a new department.
- If you are editing an existing department's record, use the Quick Click
menu to locate the department on the Departments list.
- Click the edit icon or Menu > Edit next to the department.
The Department edit panel appears (Figure 10).
- In the Buyer for Department field, click the prompt to
select a buyer from the Buyer list.
- Click Save.
- When you are finished editing the department record, click Submit.
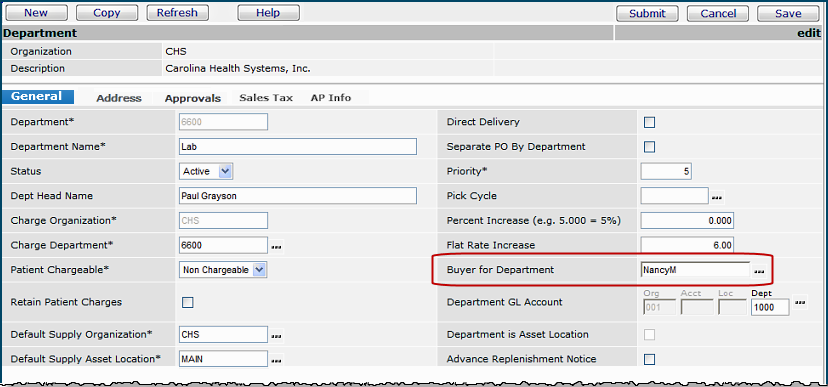
Figure 10 - The Department General Panel
Assigning a buyer to an asset
location
An asset location may be a storage area that maintains a physical inventory of supplies. An asset location may also be a "virtual" organization that contains only inventory records for items, and handles requests and order processing. Asset locations in the virtual sense are used by sites that follow a just-in-time supply strategy, with no physical inventory.
The asset location acquires and issues requested items to medical center departments.
You may assign a buyer to each asset location,
if you wish. You assign an asset location buyer on the Asset Location record
panel, located in the Materials tables.
- From the Materials Management main Contents, select Tables > Asset Location.
The Asset Locations list appears.
- Edit an existing asset location record by clicking the edit icon ,
or click New if you wish to create a new asset location.
The Asset Location panel appears (Figure 11).
- In the Assigned Buyer field, click the prompt to select a buyer from
the Buyer list.
- Click Save.
- When you are finished editing the asset location record, click Submit.
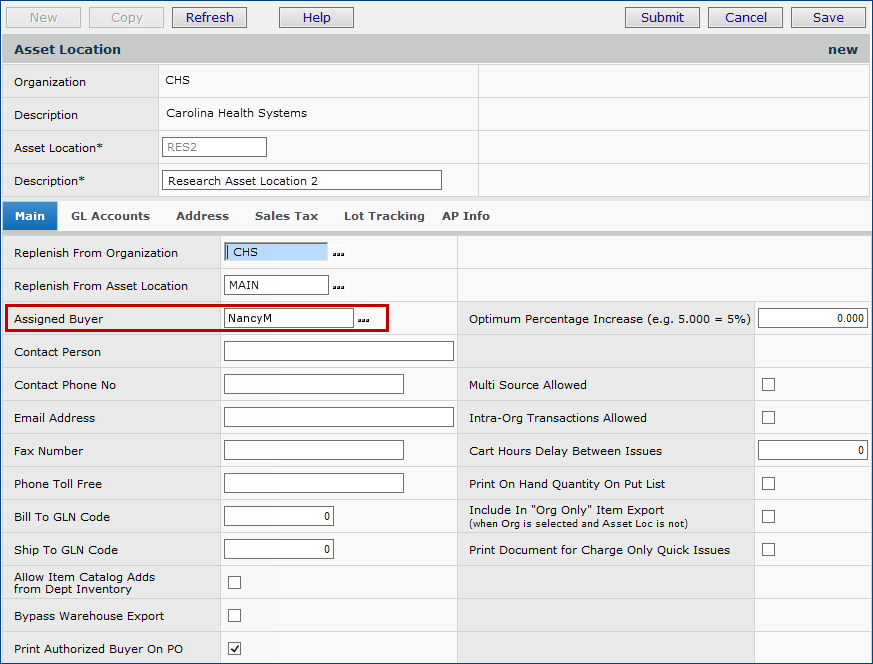
Figure 11 - Asset Location Panel
To assign a buyer to a vendor-buy
from location:
You can assign multiple buyers to a vendor buy-from location, but you can only
specify one as the primary buyer. (When the system searches for the buyer, it
finds the primary buyer.)
- From the Materials Management main Contents, select Vendors > Vendors.
The Quick Click menu appears.
- On the Quick Click menu, select Buy From Locations.
- Enter the Vendor Name, and click Go.
The Buy From Locations list appears.
- Next to the Buy From Location of interest, select Menu > Buyers.
If any buyers are currently assigned to the vendor buy-from location, the
list of buyers appears (Figure 12).
- Notice that Yes appears in the Primary Buyer column to indicate
the primary buyer.
- To identify a buyer as the primary buyer for the buy-from location, click Set Primary Buyer.
If no buyers are assigned, No Data appears.
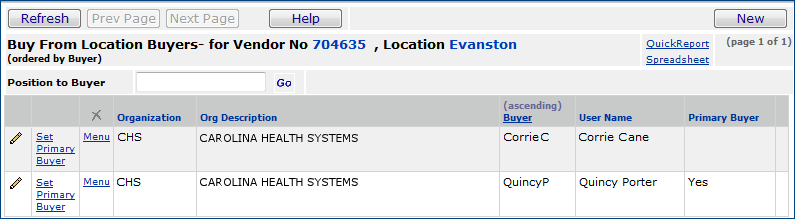
Figure 12 - Buyers Assigned to a Buy-From Location
- Click New to assign a new buyer.
The Buy From Location Buyers edit panel appears (Figure 13).
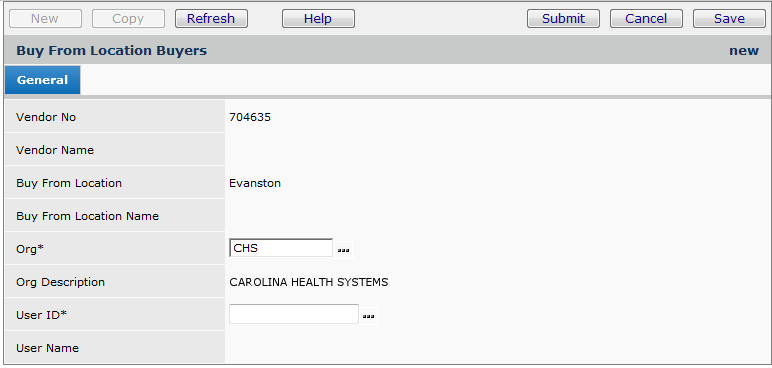
Figure 13 - Buyer Edit Panel for Buy-From Location
- Click the prompt next to User ID to select the user ID
of the buyer.
- Click Save.
- Click Submit.
The list of buyers is displayed.
Designate Approvers for Requisitions, Invoices, and Check Requests
Users who approve requisitions, invoices, and check requests must have the appropriate authorization in their user profile.
- For requisition approvers, the field User is Requisition Approver must be selected.
- For invoice approvers, the field User is Invoice Approver must be selected. This field must also be selected for any user who clears invoice exceptions.
- For check request approvers, either the User Is Invoice Approver or the User is Requisition Approver box must be selected. (Both can be selected.)
For details on setting up check request approvals, see Identify a Department's Check Request Approvers.
To set the User Is Invoice Approver/User is Requisition Approver field:
- On the user profile, click the User Roles tab to open the User Roles panel.
- Click the box next to User is Invoice Approver and/or click the box next to User is Requisition Approver (Figure 14).
- Click Save and Submit.
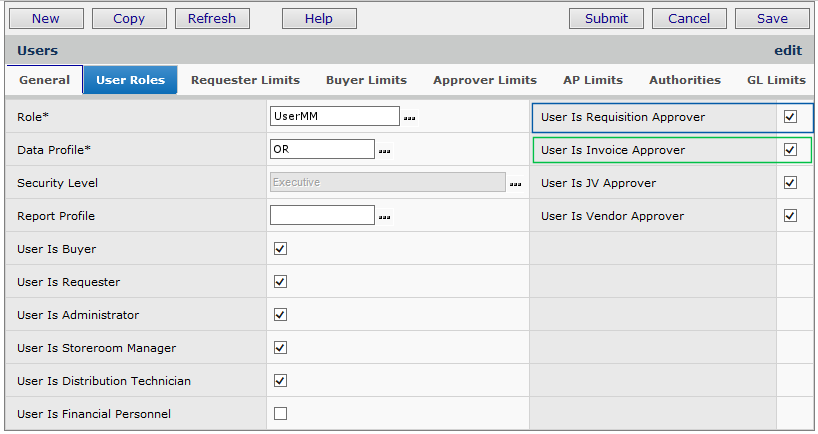
Figure 14 - Designating a User as an Approver
Set Notification Options
To set notification options, open user profiles as follows:
- From Work in Administration on the
main Contents, select Administration
> Users. The list of users appears.
- Locate the user of interest.
- Click the edit icon
 to edit the user profile.
Users who create requisitions, invoices, and check requests have the option of being notified when a requisition has been approved or rejected by an approver.
To set the notification option for users who create requisitions:
- On the user profile, click the Requester Limits tab to open the Requester Limits panel.
- For the field Requisition Approval Notify Action, click the down arrow and select the appropriate option from the list (Figure 15).
- Click Save and Submit.
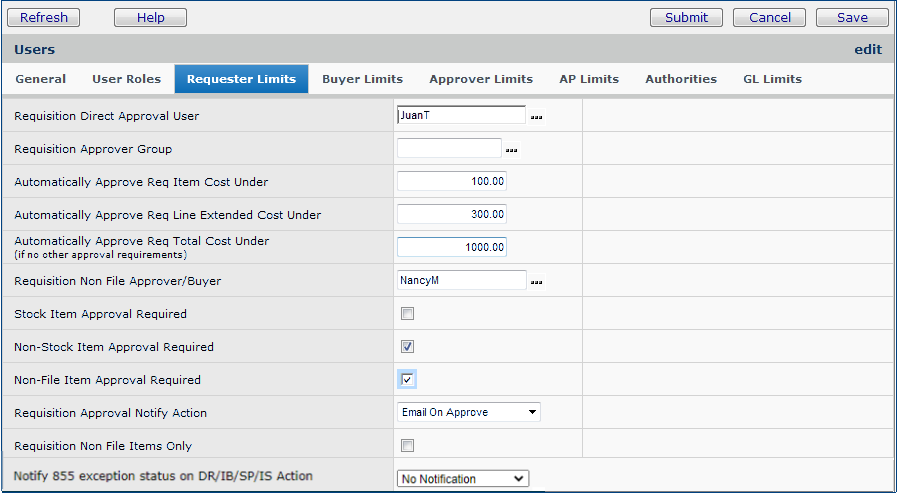
Figure 15 - Requisition Approval Limits for Requesters
To set the notification option for users who create invoices and check requests:
Similar fields for invoices and check requests are on the AP Limits panel (Figure 16).
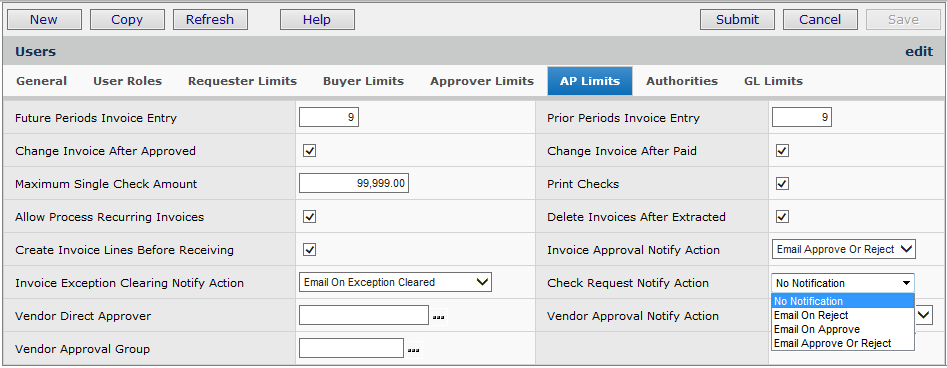
Figure 16 - Setting the Approval Notification for a Check Request or Invoice Creator
To set the notification option for users who approve requisitions, invoices, and/or check requests:
Users who approve requisitions, invoices, and/or check requests have the option to be notified when a transaction needing approval has been added to their approval queue.
- On the user profile, click the Approver Limits tab to open the Approver Limits panel.
- For the field Invoice Submit Notify Type, click the down arrow and select the appropriate option from the list (Figure 17).
- Click Save and Submit.
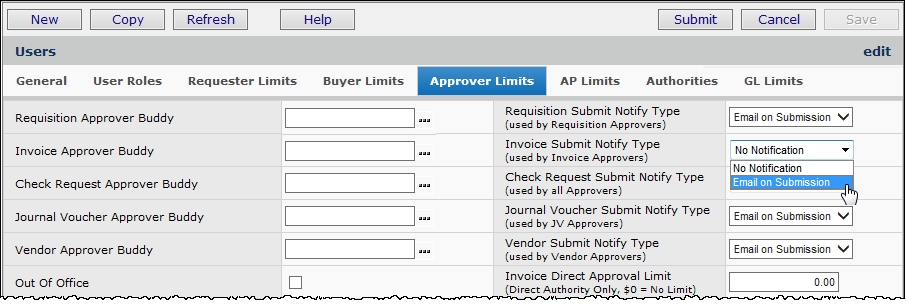
Figure 17 - Setting the Invoice Approval Notification for an Invoice Approver
Email Notifications Link to Requisitions for Approval
When a notification arrives that you have a requisition, invoice, or check request to approve, a link within the email notification takes you directly to the transaction needing approval, and avoids your having to navigate manually through ERP after receiving an email message. Figure 18 is an example of an email for requisition approval, with the link.
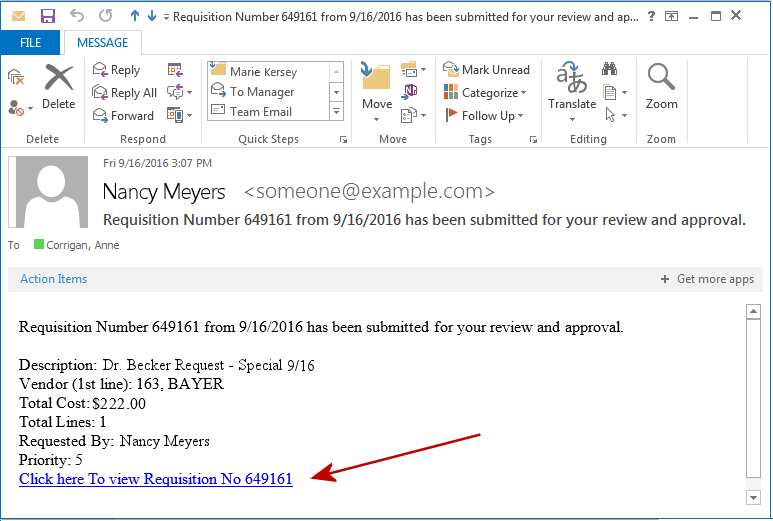
Figure 18 - An email Notification for a Requisition Needing Approval
If you are not logged in to the application, clicking the link opens the login panel, and you can log in. The system displays the transaction needing approval. The application remains open for other work.
Note: This feature is only available for Microsoft Internet Explorer. Mobile browsers, Firefox, Chrome, and others are not supported.
Set Up Requisition Approver Groups and
Define Approver's Dollar Limits
Requisition approver groups contain
users with different approval responsibilities for requisition dollar amounts.
Approver groups route a requisition through each member until the requisition
is signed off.
Approver groups are organization independent. Thus, users who approve requests do not
need to have identical data profiles or departments. For example, if a requisition
is created for Department 6200, and the first approver in the group does not
have 6200 as a valid department in his/her user profile, the requisition still
appears in the person's approval queue, and he/she can still approve or reject
it. The system administrator can add any
user defined as an approver to an approver group, and to multiple approver groups.
When an approver group is restricted by organization, Yes appears in the Restricted column on the Approver Groups List.
You can
copy and delete approver groups. Copying an approver group copies the group
and all its members. Deleting an approver group deletes the group and all its
members. However, if the approver group is assigned to a requester in User
Settings, the group cannot be deleted.
To define a requisition approver group:
- On
the Materials Management main Contents, click Requisitioning > Approver
Groups.
The Approver Groups list appears (Figure 19). (If no approver groups are defined,
No Data appears.)
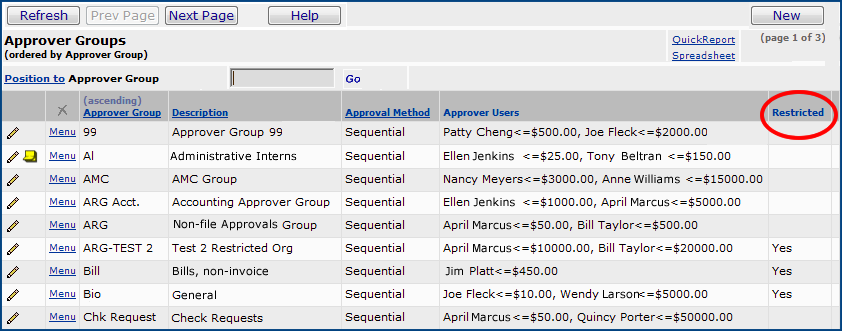
Figure 19 -Requisition Approver Groups
- Click
New. The New Approver Group panel appears (Figure 20). Use this panel to define
a new group.
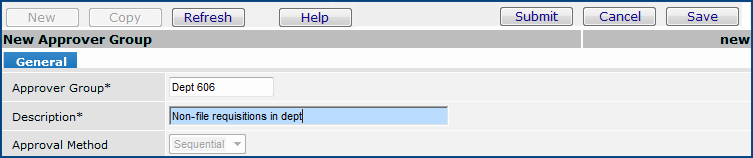
Figure 20 - New Requisition Approver Group
- Enter
a name for the group in the Approver Group field.
- Enter
a Description. You do not need to select an
Approval Method. Currently, the Approval Method is Sequential.
- Click Submit.
The Approver Group Edit panel appears (Figure 21).
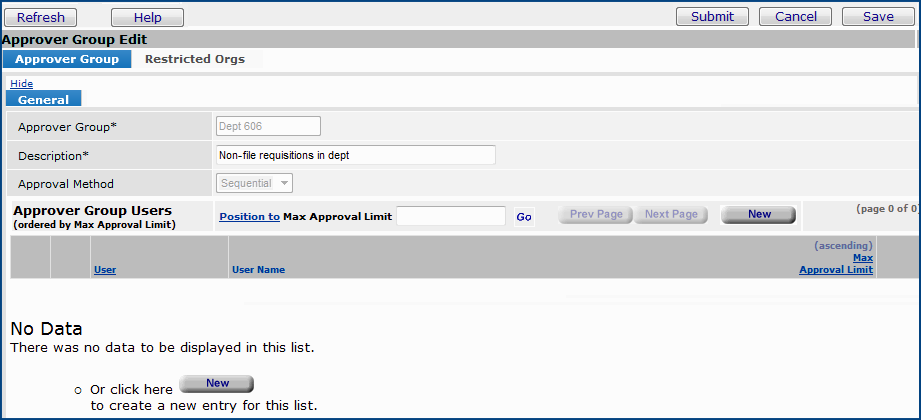
Figure 21 - Requisition Approver Group Edit
To
add a member to a requisition approver group:
- Follow Steps 1 through 5 in To
define a requisition approver group. You will then be working with the Approver Group
Edit panel.
- On the lower part of the Approver Group Edit panel, click New. The Approver User header panel appears (Figure 22).
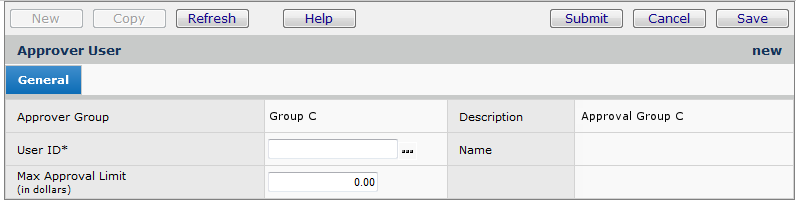
Figure 22 - Add Approver Group Member
-
In
the User ID field, select the User ID
of the approver whom you wish to add to the group.
Note: The user must be defined as an Approver on the User Roles panel (Figure 14).
- If
your organization uses approval limits, enter the dollar limit for the approver
in the Max Approval Limit field.
The designated buyer will be able to approve requisitions up to the dollar
limit that you enter.
- Click Save. The member is added. You can add more members, if you wish.
- Click
Refresh to see the member data on the Approver Group Users list.
- If you wish to restrict the approver group by organization, select the Restricted Orgs tab. (See Figure 23.)
By restricting approver groups by organization, you can limit user access to them based on data profile.
When an approver group has been restricted by organization, it will only appear in lists and prompts where the user has data profile organization access to at least one of the restricted organizations.
- On the Restricted Orgs tab, select from the list of organizations displayed.
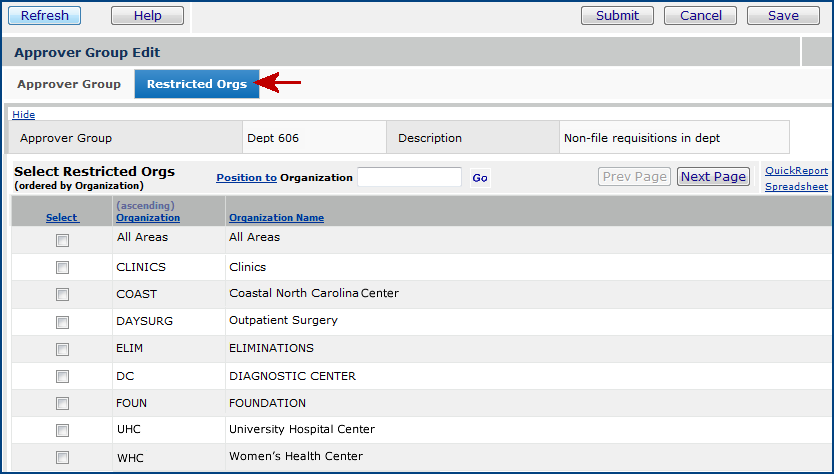
Figure 23 - Restrict Approver Group by Org(s)
- When
you are finished editing the approver group, click Submit. You
are returned to the Approver Groups list.
- Click
Refresh to see the new approver group on the list.
To edit or view requisition approval groups and their members:
- From
the main Contents, click Requisitioning > Approver Groups. The
Approver Groups list appears.
- Locate
the approval group and click the edit icon ( ),
or select Menu > Edit. The Approver Group Edit panel and the
Approver Group Users list appear.
- If
you are editing the approver group data, you can change the approval group
Description, and you can add and delete members, or edit member data.
- Select
New to add a member.
- Select
Menu > Edit (or click the edit icon next to the member's name)
to edit member data.
- When
you are finished editing, click Submit. The system makes the changes,
and returns to the Approver Groups list.
To assign approvers
to commodity codes:
- From the Materials Management main Contents, select Tables > Commodity Approvals.
The Commodity Approvals table appears, listing the different commodity codes
used at your site, and their associated approver group or direct approver.
(No Data appears if no approvers have been assigned.)
- Click New. The Commodity Approvers edit panel appears (Figure 24).
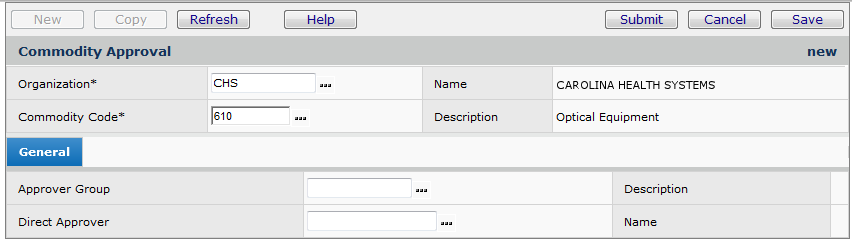
Figure 24 - Identify Commodity Code Approver(s)
- Verify that the organization code entered in the Organization
field is correct. If not, select a new organization code from the prompt (...).
- Click the prompt next to Commodity Code to select the commodity code
that you wish to assign to an approver or approval group. Figure 14 has the
commodity code "610" selected. (Each commodity code is associated
with a description of the commodity in the Commodity
Table.)
- Next to Approver Group, click the prompt and select an approver group
that will be responsible for approving items with the commodity code. Alternately,
click the prompt next to Direct Approver to select a user who will
approve items with the commodity code. Select either an Approver Group
or a Direct Approver, but not both.
- Click Save.
Approver group members creating requisitions/check requests
Approvals for check requests and requisitions can be automatically escalated up the approver group ladder if the requester is also an approver in the group.
When enabled, this feature prevents users who are members of an approver group from approving their own requests. Approval for requisitions and check requests automatically route to the next approver in the approval group ladder, regardless of the Max Dollar limit for the next approver. This enhancement applies only to members of approver groups, not to direct approvers.
Situation 1: User Abby who normally approves requisitions for a department opens a requisition for $99.50. Abby is part of an approver group configured as follows:
| User Name |
Approval Limit |
| Abby |
$100 |
| Baker |
$1000 |
| Charlie |
$10,000 |
Result: The requisition is automatically sent to Baker, even though Baker would not normally get requisitions for under $100.00. Those would be handled by Abby. But, since this requisition was made by Abby, Baker does get it for approval. The notification sent to Baker that a request needs approval includes the information that the approval has been escalated.
Situation 2: An approver -- Frank -- who is the highest level approver in an approval group makes a check request for $3,200.00. The approver group looks like this:
| User Name |
Approval Limit |
| Delta |
$100 |
| Erin |
$1000 |
| Frank |
$5000 |
Result: The request routes through approvals normally to Delta and then Erin until it gets to Frank. Frank initiated the request, but no user in the group exists for escalating the request since Frank is the top approver. In this case, the system automatically approves the request.
Situation 3: A requisitioner, Cindy, submits a requisition with a non-file line that requires both an item approval and a commodity code approval.
Commodity Approval Group
| User Name |
Approval Limit |
| Joe |
$2000 |
| Bill |
$3000 |
| Roberta |
$5000 |
Item Approval Group
| User Name |
Approval Limit |
| Cindy |
$1500 |
| Joe |
$2000 |
| Steve |
$5000 |
Result: Joe approves the requisition as a commodity code approver. Bill also approves. Roberta approves.
For item approval,
Cindy is skipped because she is the requester. Approval is flagged as escalated.
Joe is assigned to approve, but should not because he already reviewed the requisition. Steve is the next assigned approver as an escalated approver.
Enabling the approval escalation feature
This feature can be enabled on the organization MM Info tabbed panel by unselecting the field Allow Requesters To Approve Their Own Requests (Figure 25). (The field is selected by default.)
The path for the panel is: Materials Management (or Accounts Payable) main Contents > Tables > Organizations.
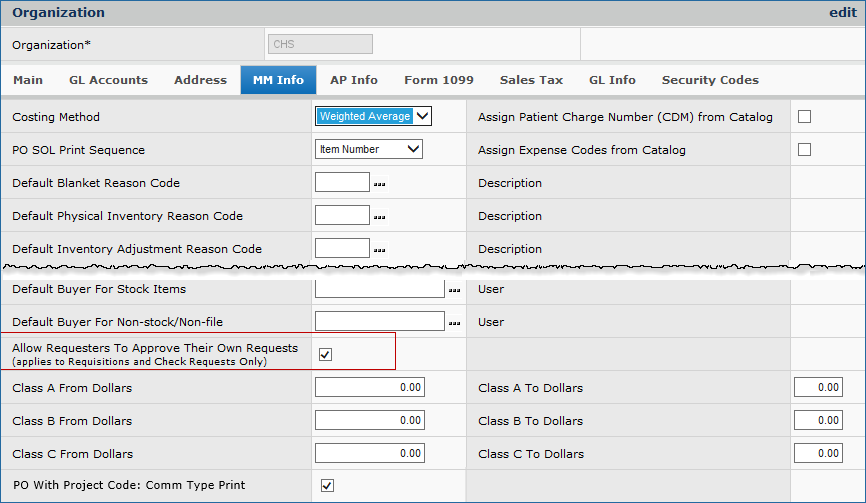
Figure 25 - The Organization Record MM Info Panel with the Approval Escalation Field
When the field Allow Requesters to Approve Their Own Requests on the organization panel is turned off (unchecked) to prevent approvers from approving their own requisitions/check requests, the following occur:
- Email notifications to approvers highlight that the needed approval is "escalated."
- The page for reviewing check requests and requisitions also displays "**ESCALATED**."
- The Escalated column on the All Approvers queues contains Yes to indicate that an approval was escalated up the approval group ladder.
Set Up Invoice Approver Groups
Invoice approver groups allow invoices to be routed to multiple approvers. In the routing process, an invoice’s Total is compared to each approver's Maximum Approval Limit to determine whether the approver needs to review the invoice. (How to specify the Maximum Approval Limit is explained in subsequent paragraphs. Also, see Figure 26.)
Members of invoice approver groups must have the authorization User is Invoice Approver selected on the User Roles tab of their user profile (Figure 12).
To create an invoice approver group:
- From the Materials Management or Accounts Payable main Contents, select Invoicing > Invoice approver groups.
The Invoice Approver Groups list appears (Figure 26). If no groups have been set up, No Data appears.
If an invoice approver group is restricted (as indicated by the value in the Restricted field) it can only be viewed by users whose data profile allows them access to at least one of the restricted organizations listed for that group.
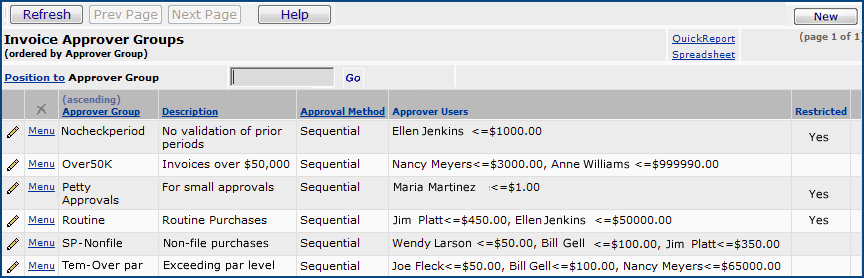
Figure 26 - Invoice Approver Groups List Panel
- Click New to create a new invoice approver group.
The Edit panel appears (Figure 27).
- Enter a name in Approver Group field and a description of the approver group in the Description field.
The available Approval Method is Sequential, which cannot currently be changed.
- Click Save and Submit.
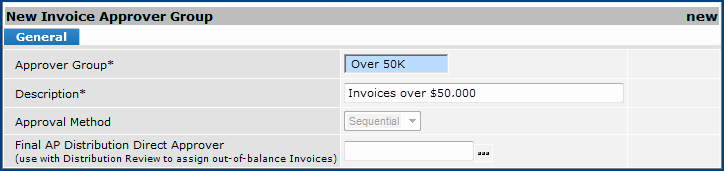
Figure 27 - Entering Descriptive Information for a New Approver Group
The Invoice Approver Group Edit panel appears (Figure 28). When you add users to the group, they are listed on this panel.
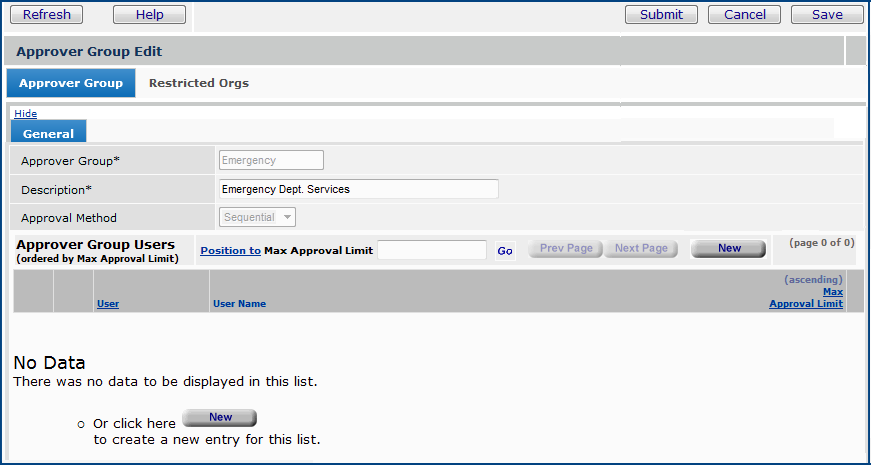
Figure 28 - Approver Group Users Panel: A New Group is Being Created
- Click New. A panel appears for entering a user name and dollar limit (Figure 29).

Figure 29 - Adding a User to an Approver Group
- Enter information for the approver in the fields on the panel.
The Max Approval Limit is the maximum amount of dollars for an invoice that the user can approve.
Click Help for more information about fields.
- Click Save and Submit.
You are returned to the Approver Group Users list.
Click Refresh to view the user that you just entered.
To enter more users, go back to Step 5 and follow the steps until your approver group is complete.
- If you wish to restrict the approver group by organization, select the Restricted Orgs tab. Click the selection box for the organization(s) desired. (Figure 17). An approver group that is restricted by organization may only be viewed by users whose data profile allows them access to at least one of the restricted organizations selected.
- Click Save and Submit on the Invoice Approver Group Edit panel.
Using Approval Queues
Requisition, invoice, and check request approvers each have their own queue containing documents awaiting approval.
- To access the requisition approvals queue, from the Materials Management main Contents, select Requisitioning > My Approval Queue.
- To access the invoice approvals queue, from either the Materials Management or Accounts Payable main Contents, select Invoicing > My Invoice Approval Queue.
- To access the check request approvals queue, from either the Materials Management or Accounts Payable main Contents, select Check Requests > My Check Request Approval Queue.
A situation may occur at a medical
center where the normal approver for a department's requisitions is out of the
office, and the person's approver buddy is also out of the office. In this case,
requisitions could sit in an approver's queue for days...or longer. Similarly, check requests or invoices could remain in a queue unattended for a period of time. The All Approver Queues are designed to handle this situation.
Requisitions
For requisitions, the system administrator can assign the role object "AdminApprover" to a user who will be able to view and approve/reject any requisition. This role might be assigned to the Purchasing Manager, for example.
In this way, requisitions that need approval will not linger without attention
in an approver's individual queue. Once this designation
has been set for a user, the user can approve any requisition in the queue: Requisitions > All Approval Queues.
Note: Two differences exist in security settings for the approval queues:
- All Approval Queues
The administrative approval queue (Requisitions > All Approval Queues.) is subject to a user's data profile. The user have permission to access data for the departments and organizations associated with requisitions in the queue. Requisitions for which the user does not have the appropriate data profile will not appear in the queue.
- My Approval Queue
The display of requisitions for approval in My Approval Queue is not governed by users' data profiles. See the previous discussion of Approver Groups.
Invoices
For check requests, the system administrator can assign the role object "Inv Approval Admin" to a user who will be able to view and approve/reject any invoice. When this role object is set, the use can access invoices in the queue: Invoices > All Invoice Approval Queues.
Check Requests
For check requests, the system administrator can assign the role object "ChkRqstApprovalAdmin" to a user who will be able to view and approve/reject any check request. Once the "ChkRqstApprovalAdmin" role object
has been set for a user, the user can approve any check request in the queue: Check Requests > All Check Request Approval Queues. See Check Request Processing for details on setup.
See Set Up and
Maintain Users for information on assigning role objects.
Approval Reminders and Redirected Approvals
This feature generates emailed approval reminders for requisitions (regular, bill-only, standing, and blanket), invoices, and check requests if review/approval/rejection has not occurred within a specified time interval. The scheduled job "Approver Reminder and Redirect," lets you specify the time period, the organization that uses the reminders, and the type of approvals affected: invoices, check requests, requisitions, or all three. For approval groups, you can specify the number of reminders that each group member receives before approval occurs automatically for that group member, and then moves to the next group member.
How Approval Reminders Work
When a document (invoice, check request, or requisition) appears in an approver's queue, the approver can review it, and then approve or reject it. If the approver does not act within the set time period, the system sends the approver a reminder message. A reminder is sent to both direct approvers and members of approver groups, whichever is applicable.
For approver groups, you can also define the number of reminders to be sent to each approver. After the set number of reminders, the document is marked "auto-approved" (if possible), and appears in the queue of the next approver. For the last approver in the group, reminders persist until the last reviewer reviews, approves, or rejects the document. When a document cannot be marked as auto-approved, it continues to be included in future reminder messages. For example, costing buyer approvals cannot be auto-approved. A costing buyer would receive repeated reminders until he/she acts with review, approval, or rejection.
When the out-of-office flag is set for an approver, the reminder is sent to the approver buddy. The reminder email is generated even for approvers who do not have an email address in their User Profiles.
Set Up the Scheduled Job for Approval Reminders
General instructions for creating scheduled jobs are in the topic "Set Up Schedules for Batch Jobs." Here is a summary for approval reminder scheduled jobs.
1. Open the list of scheduled jobs (Miscellaneous Functions > Scheduled Jobs).
2. Click New to create a new scheduled job.
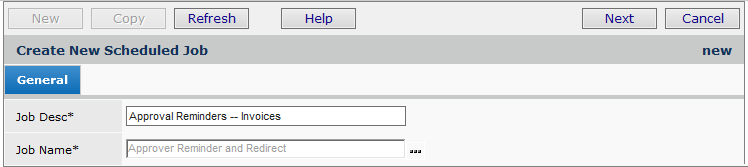
3. Enter header information (Figure 30) for the new approval reminder job.
- Enter a job description (Job Desc).
-
Select the Job Name Approver Reminder and Redirect.
Figure 30 - Scheduled Job Header Panel
- Click Next. The Scheduled Job panel appears (Figure 31). This panel contains the setup fields for approval reminders.
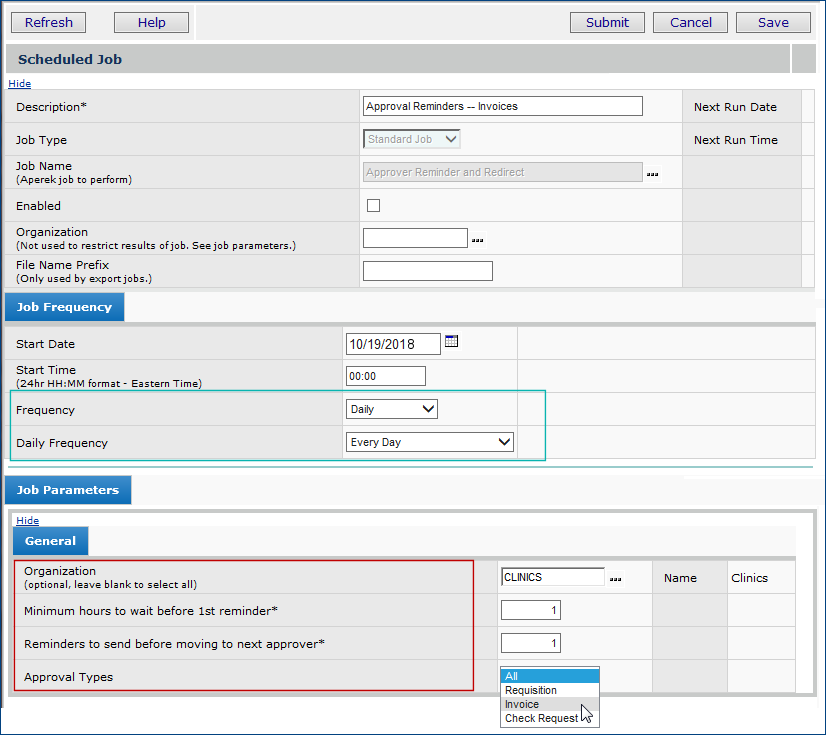
Figure 31 - Scheduled Job Panel with Job Parameters Fields
- In the Job Frequency panel (Figure 31 blue box), enter values for the Start Date and other fields. The frequency of reminders sent is equal to the job frequency of the scheduled job.
- In the Job Parameters, General tab (Figure 31, red box), set up the reminders.
Organization - You can create an approval reminder job for any organization: select the organization. If you wish to set up the job for all organizations, leave this field blank.
Minimum hours to wait before 1st reminder - The number of hours that can elapse between an approval being required, and the first reminder notice being sent. In other words, when a user creates a requisition (invoice, or check request) and sends it to approval, the document appears in an approver's queue. This field is the time interval (in hours) that must elapse before the approver gets a reminder message. Enter the number of hours.
Reminders to send before moving to next approver - An integer used with reminders in an approver group situation. This value is the number of reminder messages to be sent to a delinquent approver before redirecting to the next approver in the group. Enter an integer.
Approval Types - The types of documents for which the approval reminders are to be used. The options are: invoice, requisition, check request, or all types. Select an approval type.
Note: Be sure to enable the job. (Select the Enabled box.)
When an approver is delinquent in acting on approval queue entries, a formatted reminder message appears in his/her email. The message contains a count of each type of approval awaiting the user in the specified organization. The count includes entries that have been in the user's approval queue longer than the time frame defined in the scheduled job. The counts are broken down by approval type(s), as specified in the job. See Figure 30.
Tips in setting up reminders:
- When you enter the Minimum number of hours..., give approvers enough time to locate and review their approval queue entries. Reminders should not be set to occur too soon.
- The Reminders to send... field should not be set so high as to continually include the same queue entries before allowing the system to auto-approve for a delinquent approver group member.
- The scheduled Job Frequency (Figure 31, blue box) controls how often the system checks for unreviewed entries in approval queues. For this reason, setting a too-frequent schedule will cause more emails and potentially create over use of the auto-approval feature.
- The Approval Type field can be All, so that all reminders occur together. But a "one size fits all" job may not be what you want. You should consider setting approval reminders by organization, and/or for a single approval type. Multiple approval reminder jobs are possible.
- Be careful in creating multiple scheduled jobs. If the jobs overlap by organization and approval type, you will have more approval reminders, and more frequent emails and automatic approvals.
Approval Reminder Notifications
An example of an approval notification emailed to a user is in Figure 32.
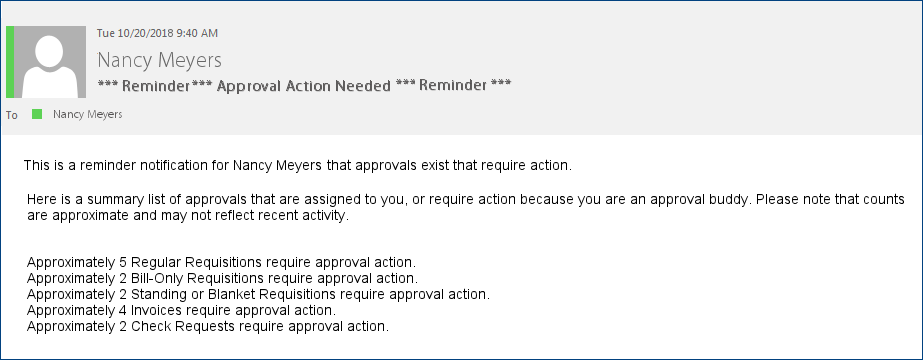
Figure 32 - Sample emailed Approval Reminder
Notice that the email message summarizes all available approvals for the approver. If the user is a member of an approver group, and one document -- for example, an invoice -- becomes auto-approved as a result, the count for that type of document is reduced by one.
Approval Information on Inquiry Panels: Examples
Several fields on the inquiry panels for invoices, requisitions, and check requests display the status of approvals. Below are several examples.
To display approver information on an invoice, check request, or requisition,
- Inquire on the invoice, check request, or requisition by clicking i next to its ID number.
- Select the Approval History tab.
Example 1 - Simple Approval with One Direct Approver

Figure 33 - Invoice Approval: One Direct Approver
In the Approval History panel for the invoice in Figure 33,
- The Review Occurrence column shows each instance when the invoice was submitted for approval.
- The approver
 JuanG is the single direct approver. This assignment is in the column Reason Approval Assigned
  .
.
- The approver reviewed the invoice, so the Review Status
 is Reviewed.
The invoice still needs to be approved or rejected, but is currently with this approver.
- Three Reminder emails
 were sent to the approver before he reviewed the invoice. The last reminder was sent on October 9.
Example 2 - Approval that Needs a Cost Buyer
The requisition in Figure 34 is for a non-file item, and requires review by a costing buyer. A costing buyer is the first person to review non-file requisitions, and he/she completes information for the requested item, such as the manufacturer or vendor (if not specified by the requester), the price, etc. Other approvers may follow the costing buyer's review, but the requisition cannot proceed further until the costing buyer approves it.

Figure 34 - Requisition Approval Routed to Costing Buyer
In the Approval History for the invoice in Figure 34,
- The Review Occurrence column shows each instance when the requisition was submitted for approval.
- The approver is the costing buyer. This assignment is in the column Reason Approval Assigned .
- The requisition has not yet been reviewed, so the Review Status is Not Reviewed.
- Seventeen Reminder Emails have been sent to the costing buyer, and he has not yet reviewed the requisition. The last reminder was sent on October 21.
- The costing buyer will continue to receive emails until the requisition is reviewed, or until someone with access to the costing buyer's approver queue reviews the requisition.
Example 3 - Approval Routed through an Approver Group with the First Approver Not Responding
The requisition in Figure 35 is assigned to an approver group with three approvers. The first approver (Mary) approved it. The second approver (Len) was out of the office, so approval bounced to his approval buddy (Nancy). The approver buddy was also out of the office, so after three reminders, the system auto-approved the requisition, and sent it to the third approver. The requisition is now with the third reviewer (Quincy), who needed nine reminders to review it, and who has now done so.
Because the person with nine reminders is the last approver, the system would not have been able to auto-approve the requisition, as it did for the first reviewer. It will stay in Quincy's approval queue until he approves or rejects it.
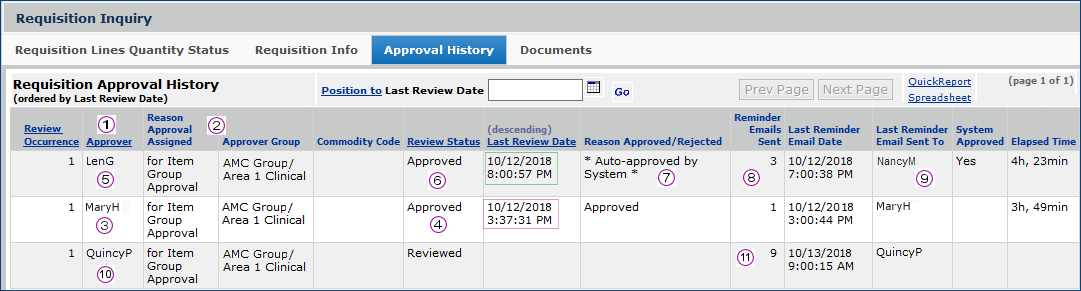
Figure 35 - Requisition Approval Assigned to Approver Group: Second Approver Does Not Respond
In Figure 33,
- The Review Occurrence column shows each instance when the requisition was submitted for approval.
- The three approvers: Len, Mary, and Quincy are assigned to an approver group "AMC Group/Area 1 Clinical."
The Reason Approval Assigned field specifies "group approval."
- The approver MaryH was the first approver. We know this from the timestamp at which she reviewed the requisition: October 12 at 3:37 PM (Figure 35, purple box). The other timestamps are later.
- Mary approved the requisition: its Review Status is Approved.
- The second reviewer LenG
 also seems to have reviewed and approved the requisition
  on October 12 at 8:00 PM (Figure 35, green box).
However, that is not actually the case.
- In the Reason Approved/Rejected field
 , we can see that the system -- not the reviewer -- actually auto-approved the requisition on October 12 at 8:00 PM.
- Three reminders were sent
 . The last was on October 12 at 7:00 PM.
- The reminder (on October 12 at 7:00) was sent to Len's approver buddy -- NancyM
 . Len apparently had out-of-office set. Nancy, however, was also not available.
- So, as specified in the scheduled job, after three tries, the system auto approved the requisition (System Approved is Yes) in place of the missing approvers.
- The last approver (Quincy) currently has the requisition
 .
.
- He has reviewed it (Review Status is Reviewed), but it took nine reminder emails
 .
.
Normally, the system would have stopped sending reminders after the third one; however, Quincy is the last reviewer, and would have continued to get reminders until he reviewed the requisition. The requisition will stay with Quincy until he either approves or rejects it.
Report Object for Approval Queues
A report object "Approval Queue Notify Activity" is available for reports on approval activity, such as the number of elapsed days between a document being placed on an approver's queue and the current day.
Importing Approvers for Approver Groups
This feature allows administrators to create and populate new requisition and invoice approver groups via mass import into ERP. The import avoids the need to go into the ERP application and create approver groups/assign approvers to each approver group manually. This feature lets administrators quickly incorporate approvers from newly acquired units and facilities into medical center operations.
The approver group import tool applies to invoices, requisitions (including bill-only requisitions and invoices), and check requests. You can create requisition and invoice approver groups and assign members on the same upload document. Once you have created and uploaded newly completed approver groups and direct approvers, you can link them to organizations and departments using another import.
Prerequisites
Note: If a check request approval route and limits are the same as the requisition approval route and limits, only one approver group is needed. Otherwise, if the check request approval route and limits need to have differing approver paths, users, or dollar levels, then a second approver group is needed.
- Users who will be designated as approvers must exist in the application, and have the appropriate roles ("approver"), approver settings, and authorizations in their User Profiles.
- Roles, role objects, organizations, departments, and data profiles must exist and be assigned to the users who will serve as approvers.
- If your site uses Approval Profiles, they must also be set up.
Note: This feature enables mass population of approver groups with members. Mass maintenance of approver groups is available in ERP.
-
To use mass maintenance, from the Materials Management main Contents, select Requisitioning > Mass Approver Change.
Security
This feature is controlled by a new role object: "Approver Group Import." This new role object controls access to the Approver Group Import Template and the import menu options. The initial setting is None. Settings All and Create allow administrators to create and import approver groups.
Populating New Approver Groups
To populate approver groups, an Excel template is available for entering fields that you then upload and import into ERP.
- From the Materials Management or Accounts Payable main Contents, select Imports/Exports & Financials > Approver Group Import Template.
Follow the instructions to open the template in Excel. Figure 36 is an example.

Figure 36 - Excel Template for Creating New Approver Groups
- On the template, enter the Approver Group name, and values for approver group fields in the appropriate columns.
- Fields highlighted in yellow are required.
- Click the worksheet tab Info for instructions on completing and saving the template.
- Enter information right over the text that says <required> and must be R or I. If you import the spreadsheet with the <required> word and other words still in a cell, the application will take it as an invalid value, and will send an error message.
- The last entry on the template must be <EOF>.
- When you finish entering values in the fields, save the spreadsheet as a .csv file on your local network.
- Upload and import the spreadsheet to ERP.
Importing New Approver Group Members to ERP
After you assign users to approver groups on the template, you import them back to ERP.
Important: The file you import must be in .csv (comma-separated values) format.
To display imported Approver Group files and upload a new one,
- From the Work in Administration main Contents, select Materials Management or Accounts Payable > Imports/Exports (& Financials) > Approver Group Imports.
The Approver Group Imports list appears (Figure 37). Uploads appear on the list, if there are any. Otherwise, No Data appears.
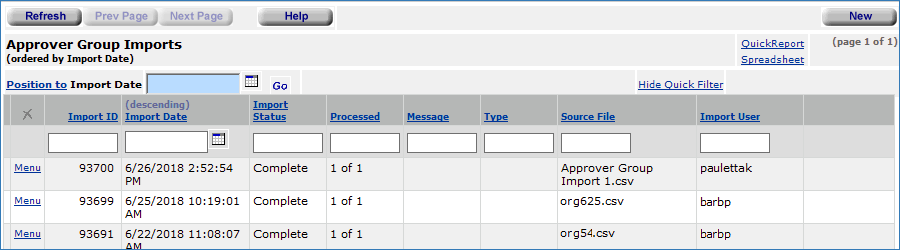
Figure 37 - The Approver Group Imports List
- On the list of imports, click New (upper right). An Import Panel appears (Figure 38).
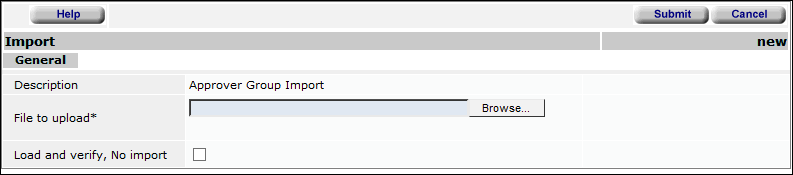
Figure 38 - The Approver Group Upload Panel
- Enter the .csv file that you wish to import in the File to Upload field.
- Click Browse (on Microsoft IE or Edge) or Choose File (on Chrome) to locate the file on your network, then click the file to select it.
- At this step, you have a choice. You can work through the import process in either one stage or two stages.
- If you have uploaded files to the application before, use the one-stage approach, as follows:
- Click Submit. The system attempts to upload your file and validate it. The appropriate imports list appears.
- Click Refresh to see your file listed.
- For users working with import files for the first time, we recommend the two-stage import approach. The two-stage approach first loads the file and validates it. Click Load and verify, no import. Once the file has successfully loaded, you can process it manually from the Imports panel Menu.
- Click Help on the Imports panel for details on the processing step.
- On the list of imports, each import has a Menu that
lets you Reprocess, View Details, Download or Delete an import file. Clicking Menu > View Details lets you display messages and edit the import record.
- Uploaded files that process completely with no errors have the Import Status of Complete.
Handling Import Errors
Valid rows on the spreadsheet will import into the application. If some rows are valid, and other are not, the invalid rows will not be imported. When the Import Status of the uploaded user record file is not Complete, the import encountered errors.
To work with errors, you need to review the import details, make corrections, and reprocess the data.
- Next to the import, click Menu > View Import Details to display any errors or warnings that may have occurred.
- On the Import Details panel, each imported record appears. The Messages column contains Yes if errors or warnings exist for any record.
- Click Menu > View Messages.
- Click Menu > Edit to edit any unprocessed data and correct it.
- After making corrections, from the import list, click Reprocess to rerun the process for any imports that do not have an Import Status of Complete.
Assigning Approvers and Approver Groups to Departments and Organizations
An import feature also lets you link an existing approver group or direct approver to an organization and department within your ERP application. The link is implemented via a download of a department's current approval setup parameters (approval profiles), followed by upload of approver groups and direct approvers. This capability supports acquisition of new units at a medical center, and quarterly audit compliance. The feature uses the standard import. See Importing Approvers and Approver Group Assignments for Departments.
Making Mass Approver Changes
The mass approver change feature lets you make mass changes to approvers in approver groups.
You can...
- Swap multiple approvers in and out of approver groups for invoice and requisition approvals
- Change the members of approver groups
- Remove approvers from groups
(The remove function also lets you remove an approver as the direct approver for other users.)
- Add new approvers to approver groups
- Change the maximum approval dollar limits for approvers in approver groups.
Similar to other "mass change" features in the system, for approver changes, you first create a job that specifies the approver changes. When the job runs, the changes take effect.
Accessing the Mass Maintenance Panels for Approvers
- Requisition approvers: From the Materials Management main Contents: Requisitioning > Mass Approver Changes.
- Vendor approvers: From the Materials Management or Accounts Payable main Contents: Invoicing > Mass Approver Changes.
- Invoice approvers: From the Accounts Payable main Contents: Invoicing > Mass Approver Changes.
- For journal voucher approvals, from the General Ledger main Contents: Journal Vouchers > Mass Approval Changes.
To create a mass approver reassignment job,
- Select Mass Approver Change from the appropriate menu (see above).
The list of reassignment jobs appears, if any have been created.
- Click New.
The Create Mass Approver Change panel appears (Figure 39).
Use this panel to create the job header.
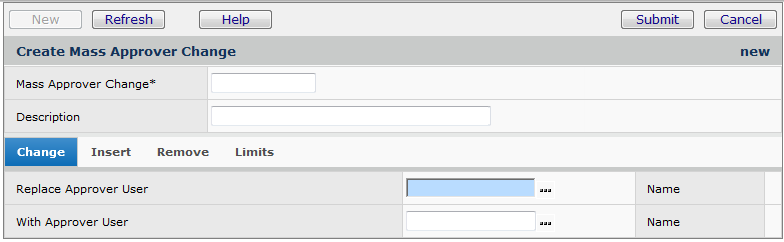
Figure 39 - The Header and Change Tab for a Mass Approver Reassignment Job
- Enter values in the fields at the top of the panel.
- In Mass Approver Change enter a name for the job.
- Enter a Description.
- Click the tab for the action that you wish to perform: Change, Insert, Remove, or Limits. You can only work with one reassignment type at a time per job.
- Change: replaces an approver referenced as a direct approver or an approver in an approver group with a different approver.
- Insert: adds an approver to an approver group. (Insert is only for approver groups.) See Figure 40.
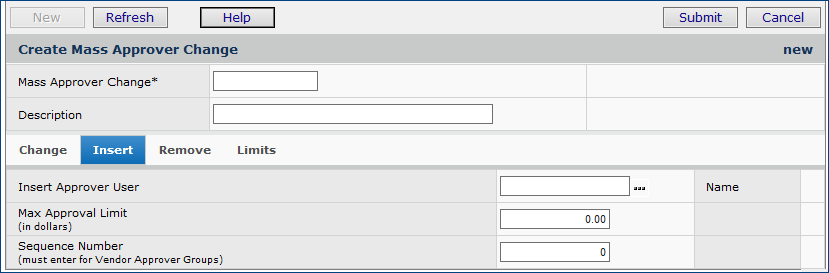
Figure 40 - The Insert Tab for a Mass Approver Change Job
For vendor approver groups, the Sequence Number on the Insert (Figure 41 tab is required.
The Sequence Number determines the order in which the person's approval is solicited.
- Remove: removes an approver referenced as a direct approver or an approver in an approver group.
- Limits: changes the approver's maximum dollar limit for approver groups to which the approver belongs. (See Figure 39.)

Figure 41 - The Limits Tab for a Mass Approver Change Job
- Click the prompt(s) to select the user(s) involved in the change. The field names differ depending on the type of change (replace, insert, remove, limits).
- Complete other fields on the panel. For example, when you add an approver to one or more approver groups, you must specify the approver's dollar limit. When you change the dollar limit for an approver, you must enter a new dollar value.
- Click Help for field details.
Figure 42 is an example of a reassignment in which an approver in an approver group is replaced with a different approver.
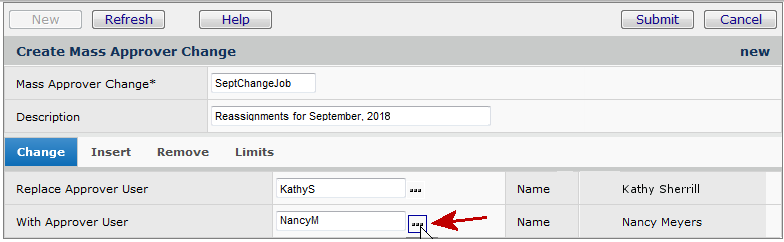
Figure 42 - Assigning a Replacement Approver
Figure 43 is an example of a change to an approver's maximum dollar limit.
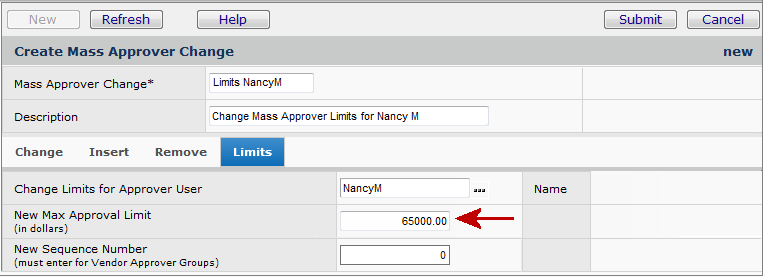
Figure 43 - Using the Limits Tab to Change a Maximum Dollar Limit
- Click Submit.
A new panel appears for locating and selecting approver groups, as described below for Change, Insert, Remove, and Limits.
Change: replacing an approver in an approver group.
The Mass Approver Change: Replace Approver User Panel lets you select approver groups in which one approver (Replace Approver User) is removed and another approver (With Approver User) is added (Figure 44).
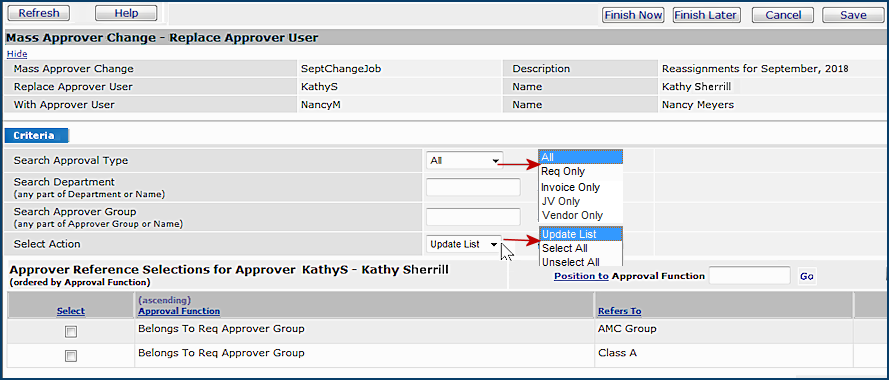
Figure 44 - Selections for Changing Approver Group Assignments
The Criteria fields (center) let you filter the bottom list (Approver Reference Selections...). The list is governed the by data profile setting of the person making the changes.
- Search Approval Type lets you select a filter for the bottom list. Options are: all types of approver groups, invoice approver groups only, requisition approver, or journal voucher groups only.
- Search Department (in removing and replacing approvers only) searches for characters that you enter from one or more department names. The list of Approver Reference Selections... on the bottom is filtered for the department(s) whose name(s) contain the characters.
- Search Approver Group searches for characters that you enter from one or more approver group names. The list of "Approver Reference Selections..." on the bottom is filtered for approver groups whose names contain the characters.
Select Action has these options:
- Update List - Activates the filter(s) that you specified.
- Select All - Selects all the list entries. When you have your filters set just right, you can choose this option.
- Unselect All - Deselects any list entries that you have chosen.
- Use the criteria to find the group(s) for which you wish to replace the approver with the new approver.
- Click Enter to activate the filter or execute the search.
- Click the Select box next to each group, or choose Select Action: Select All.
- Click Save.
Insert: adding an approver to an approver group.
The Mass Approver Change: Insert Approver User Panel lets you add an approver to a group that the approver does not currently belong to (Figure 45).
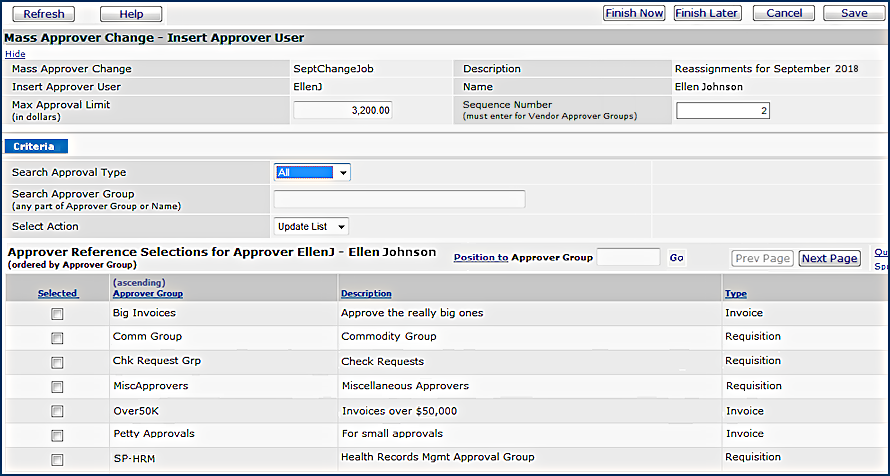
Figure 45 - Selections for Adding an Approver to an Approver Group
The Criteria panel works the same way as for Replace Approver User.
The Approver Reference Selections for Approver... panel, at the bottom, contains a list of approver groups to which the approver can be added. The approver does not currently belong to any of the groups.
- Use the criteria to find the group(s) to which you are adding the approver.
- Click Enter to activate the filter or execute the search.
- Click the Select box next to each group, or choose Select Action: Select All.
- Click Save.
Delete: removing an approver from an approver group.
The Mass Approver Change: Remove Approver User Panel removes an approver either from an approver group, or from assignment as the direct approver of another user (Figure 46).
- The Criteria panel works the same way as for replacing or adding an approver user.
- The Approver Reference Selections for Approver... panel, at the bottom, contains a list of approver groups (in the Refers To column) from which the approver can be removed. The list to also contains users for whom the approver is a direct approver.
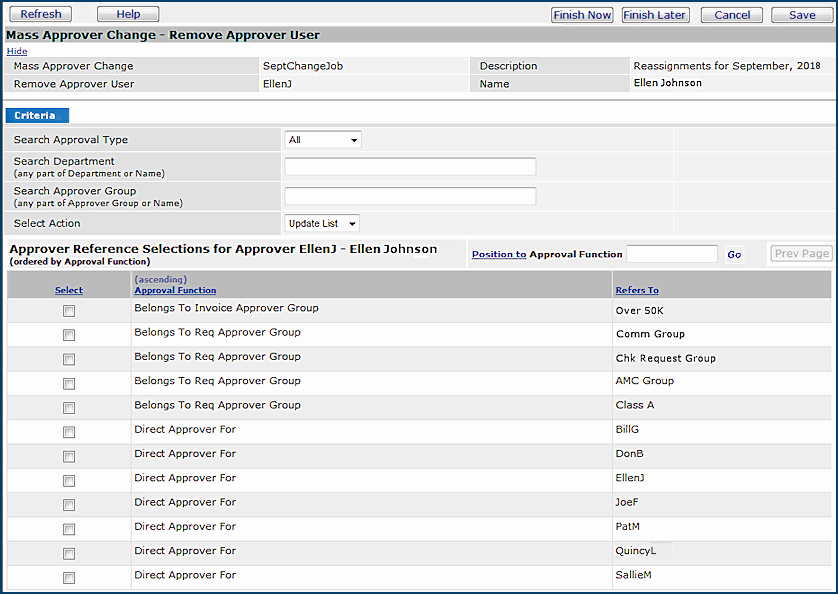
Figure 46 - Selections for Removing an Approver's Assignments
- Use the criteria to find the group(s)/user(s) for which you are de-assigning the approver.
- Click Enter to activate the filter or execute the search.
- Select the group(s) and/or users.
- Click Save.
Limits: Changing the approver's maximum dollar limits.
The Mass Approver Change: Remove Approver User Change Max Limits (Figure 47) lets you change the maximum dollar approval limit for an approver. You can select the approver groups where you wish to change the user's dollar limits, or you can change the user's dollar limits for all the groups that include the user.
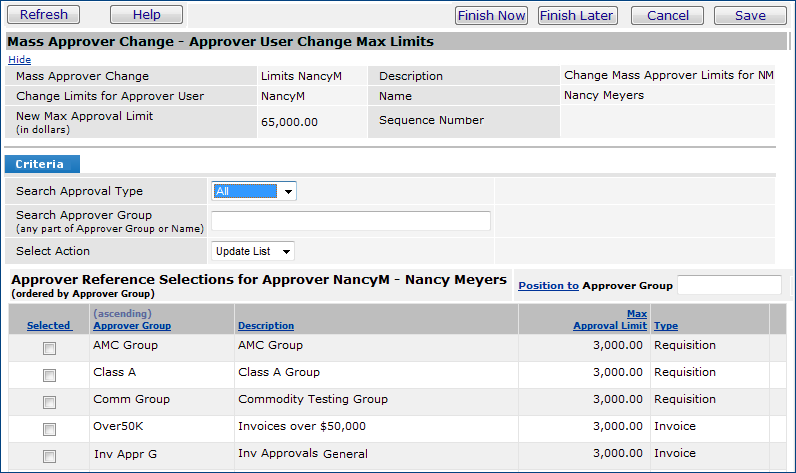
Figure 47 - Selections for Changing an Approver's Maximum Dollar Limits
The Criteria fields (center) let you filter the bottom list (Approver Reference Selections...). The list is governed the by data profile setting of the person making the changes.
- Search Approval Type filters the bottom list for all types of approver groups, invoice approver groups only, or requisition approver groups only. All is the default.
-
Click the down arrow to select the Type, or accept the default.
- Search Approver Group searches for characters that you enter from one or more approver group names. The list of "Approver Reference Selections..." (bottom panel on the Mass Approver Change edit page) is filtered for approver groups whose names contain the characters.
Select Action has these options:
- Update List - Activates the filter(s) that you specified.
- Select All - Selects all the list entries. When you have your filters set just right, you can choose this option. (For Select All, the system marks each approver group's checkbox.)
- Unselect All - Deselects any list entries that you have chosen.
- Use the criteria to find the group(s) of interest.
- Click Enter to activate the filter or execute the search.
- Select the groups where you wish to change the user's maximum approval limit. Or, choose "Select All" in the Select Action field to select all the groups. (The system marks each group's checkbox.)
- Click Save.
The last step is clicking either Finish Now or Finish Later. When you are changing maximum dollar limits, clicking Finish Now updates the approver groups that you selected for the user with the new dollar limit.
For all the mass approver change types:
- When you finish making assignment selections -- Change, Insert, Remove, Limits -- click Finish Now.
(Or, to come back later and finish, click Finish Later. The mass assignment job has a status of Open and is available for editing.)
The list of mass reassignment jobs is displayed.
- Click Refresh to view the job that you submitted.
The Status (on the list of reassignment jobs) of the mass assignment job changes to In Progress.
When the job runs, the Status changes from In Progress to Complete, and a System Note is written that describes the changes made.
Copyright © 2023 by Premier Inc. All rights reserved.