Using Vendor Punchout to Order Departmental Supplies Version
Contents
Overview
Vendor Punchout lets each medical center department place supply orders through a vendor's Internet portal without leaving Supply Chain. Items ordered this way generate regular requisitions, which go through the approval process, if used. When approved, a requisition flows to a purchase order that can be authorized and sent using the vendor's normal communication method (EDI, email, FAX, or print). The purchase order provides a starting point for creating receipts, and for matching invoices from the vendor.
Setup is required for this feature.
Security
Requisitioning and approvals: To be able to order from punchout vendors, authorization to create requisitions is needed. A site's system administrator can assign the proper role and data profile to users who work with punchout orders.
- The "Requisitions" role object controls access to requisition creation, display, copying, and editing.
- The minimum setting is Create for users to create a requisition, copy a requisition, or submit a requisition for approval.
- To edit a requisition, the setting must be Modify or higher.
- Approvals are governed by the role object "Approval." The minimum setting to approve or reject a requisition is Modify. (A setting of View lets you review, but not approve a requisition.)
- Requisitioners' and approvers' user profiles contain other approval settings.
- For the user's role, the role object "Punchout" must be set to a value other than "None" for the Punch-out Catalogs option to appear in the Materials Management Table of Contents.
- User profiles also specify the type of access a user has for vendor ordering sites, including Full Access (can order items), Public Site Only (can view, but not order items), and No Access.
Setup: Setting up vendor punchout requires Administrator privileges, including permission to edit tables.
Currently Supported Punchout Vendors
The vendors below are currently (as of Release 7.15) available for punchout orders. Sites that need additional vendors not on this list must contact the Help Desk, as setup steps are needed, in addition to approval and review by Premier.
Punchout Vendors |
| AmerisourceBergen |
| Cardinal Health |
| CDW |
| Dell |
| Fisher |
| GE Healthcare |
| Grainger |
| Henry Schein |
| INSIGHTS |
| KST Data Inc |
| McKesson Extended Care |
| McKesson Medical Surgical |
| Medline |
| Office Depot |
| OfficeMax |
| Officewise |
| PartSource |
| Staples |
| Zones |
Summary: Departmental "Punchout" Orders
Ordering supplies:
- Open the punchout feature from Materials Management.
The path is: Materials Management > Requisitioning > Punch-out Catalogs.
- Click the link for the vendor of choice to open the vendor's portal for ordering.
Login is automatic.
- Use the normal tools on the vendor page to order items and check out. A requisition in Materials Management is automatically created.
Displaying and approving punchout vendor requisitions:
Requisitions needing approval appear in the approver's queue, as usual. For non-file item lines, because vendors code manufacturer identities differently, the system may not be able to match the vendor's manufacturer ID (MfrID) with a value from its tables. In this case, the manufacturer must be identified: the reviewer/approver can enter a value for the MfrID from a select list of options. Details on this process are in a subsequent section.
- Review the requisition.
- Resolve the manufacturer ID on a requisition line where it is needed. The system remembers the manufacturer ID, and applies it to other requisition lines for the same manufacturer and vendor.
- Approve or reject the requisition. Approval generates a purchase order which can be authorized and sent.
The Details: How to Order Supplies for Your Department from a Punchout Vendor
- From the Materials Management main Contents, select Requisitioning > Punch-out Catalogs (Figure 1).
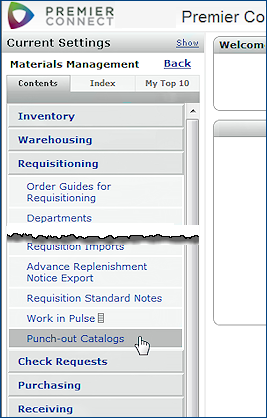
Figure 1 - Opening the Punchout Feature
A list of available vendor sites appears (Figure 2). This example uses Office Depot.

Figure 2 - Available Punchout Vendors at a Medical Center
- Click the logo for the vendor of interest; for example, Office Depot.
The vendor's ordering portal appears (Figure 3). You are automatically logged in.

Figure 3 - A Vendor's Ordering Site Home Page
- Use the tools on the vendor's pages to locate items, place an order, and check out.
You can order file items (items that exist in your site's item catalog) or non-file items.
When you check out,
- The system displays the Materials Management requisition. The Requisition Lines panel contains all the items successfully ordered in the vendor punchout session.

Figure 4 - A Requisition Generated from a Vendor Punchout Order
- You can also display and edit requisitions from the Requisitions list. This list contains all your requisitions -- punchout orders and other requests.
The path is Materials Management > Requisitioning > Requisitions - Current Department.
- On the Requisitions list, the Punchout column (far right) contains "Yes" if the requisition was created using vendor punchout.
- If the requisition needs approval, it appears on the queue of the designated approver.
- If a problem exists with your order when you check out, the system displays the line number, requisition number, the item information, and the problem.
For example, the user in Figure 5 has ordered computer monitor cleaning wipes. The system cannot create the requisition line because the UOM (TU = tub) is unknown. The line is not added to the requisition.
- Click Continue to Requisition to view the generated requisition with lines for any other items that you have ordered in the same punchout session.
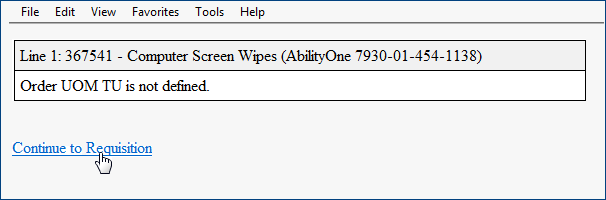
Figure 5 - An Error Message on a Vendor Punchout Order
When a requisition is approved (or released, if approval is not needed), the system generates a purchase order. The PO appears on the Purchase Orders list (Figure 6). You can display, edit, and/or authorize the PO and the system will transmit it to the vendor (for EDI, FAX, and email vendors) or make it available to print. See Working
with Purchase Orders for details.

Figure 6 - The Purchase Orders List with a Purchase Order Generated from a Punchout Requisition
Punchout Requisitions Approval Routing
Non-file item requisitions typically route to a costing buyer who fills in the manufacturer ID, manufacturer item number, price, and any missing information on the requisition. The requisition may also route for approvals, if set up at your site, depending on the item commodity code, cost, and other factors. "Requisition Approval Processing by Cost, Commodity Code and Item Type" outlines approvals in detail.
Cross-Referencing Vendor Manufacturers
Manufacturer IDs used by punchout vendors may differ from the Mfr IDs stored in the Supply Chain manufacturer tables. To make sure that the manufacturer values match, the system uses cross references between the vendor's manufacturer ID and the manufacturer ID in Supply Chain.
When the manufacturer name from the vendor needs to be cross-referenced with the Supply Chain manufacturer, the value in the Mfr Name column on the requisition line is a link, and the Mfr ID column is blank (Figure 7).
To cross reference a vendor's Manufacturer ID with a Supply Chain manufacturer,
- On the requisition line, click the underlined Mfr Name value (Figure 7).
Note: You must click the Mfr Name link for the system to create the cross reference. The cross reference is important because it is used automatically to resolve the manufacturer ID in other requisition lines with the same manufacturer and vendor. Editing the requisition line and entering a Mfr ID will not generate a cross reference.
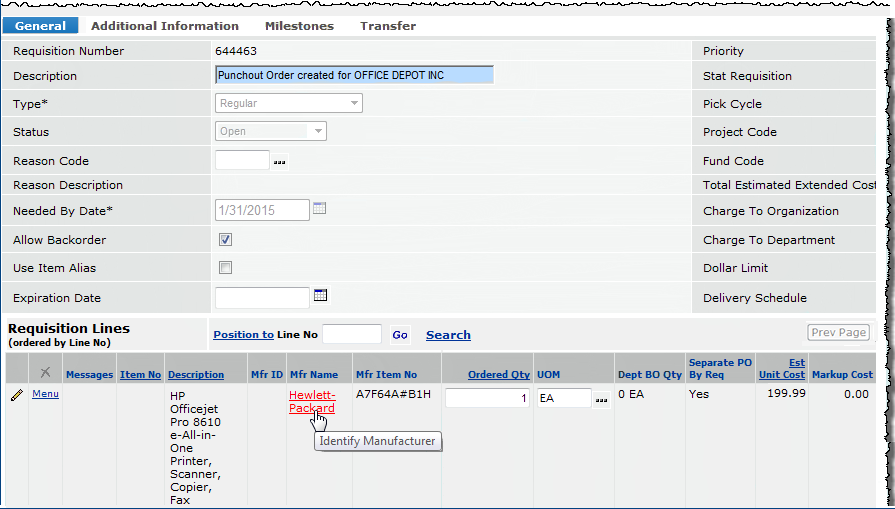
Figure 7 - A Punchout Requisition Line that Needs a Mfr ID
A panel pops up for you to locate the manufacturer ID stored in the system.
- Click the prompt (...). The standard Materials Management List Search panel appears (Figure 8).
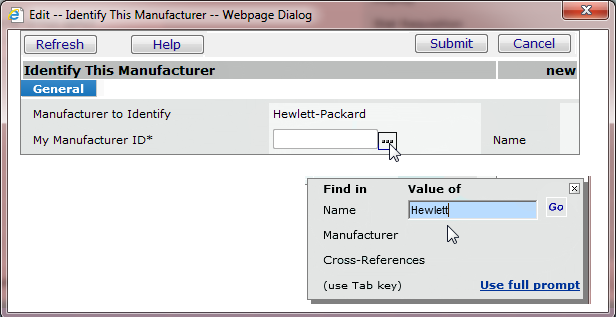
Figure 8 - Searching for a Manufacturer to Cross Reference
- Enter the vendor's manufacturer name in the search box, and click Go.
-
Or, click Use full prompt to get a searchable, scannable list of all manufacturers.
If the system finds any candidate manufacturers, they appear in a select list (Figure 9). For example, in Figure 9, as a potential match for the vendor's value "Hewlett-Packard" (with a hyphen), the system found "HEWLETT PACKARD" (no hyphen).
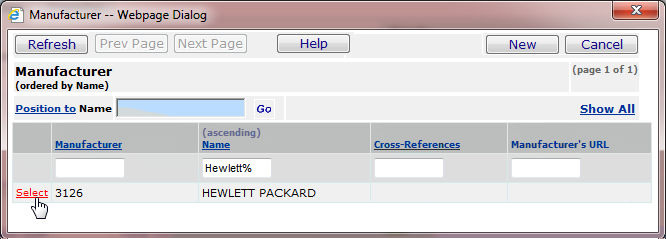
Figure 9 - Select List for Making a Manufacturer Cross Reference
- Click Select to select the matching manufacturer Name. The selected manufacturer's ID appears on the requisition line in the Mfr ID column (Figure 10).
- For a requisition with multiple lines for the manufacturer, click Refresh.
- All requisition lines with the same Mfr Name that are missing the Mfr ID are updated, and a system note is written.
- The system creates the manufacturer cross reference. (Users with appropriate authorization can view and edit the cross-reference table.)
- The next time the manufacturer appears on a punchout requisition for the vendor, the system will use the cross reference to automatically populate the Mfr ID field.
- Click Submit when you are finished editing the requisition.

Figure 10 - Mfr ID on a Requisition Line Populated by the Cross Reference Process
To view manufacturer cross references,
If you need to display all the cross references for a manufacturer, and edit or add to them, the system makes the data available.
Note: This activity requires administrator privileges.
- From the Materials Management main Contents, select Tables > Manufacturers.
- Locate the manufacturer of interest.
- Next to the manufacturer, select Menu > Cross References.
Cross references for the manufacturer appear, if any have been created by the system.
You can maintain the list as needed:
- Clicking New lets you create a new cross reference, should one be needed.
- Clicking the edit icon or Menu > Edit lets you change a cross reference.
To add a manufacturer that is missing from Supply Chain
On a punchout requisition line that needs a Mfr ID, if the manufacturer does not exist, you can create a system record for the manufacturer as a new manufacturer.
Note: You need system administrator privileges to create new manufacturers.
- Click the Mfr Name link (Figure 11).

Figure 11 - Another Requisition Line that Needs a Mfr ID - Manufacturer is not in the System
A panel pops up for you to locate the manufacturer ID (Figure 8).
- Click the prompt (...). The standard Materials Management List Search panel appears (Figure 8).
- Enter the vendor's manufacturer name in the search box, and click Go.
The Manufacturer list panel appears with No Data because the manufacturer does not exist in the system (Figure 12).
- Click New to create a manufacturer record (Figure 12).
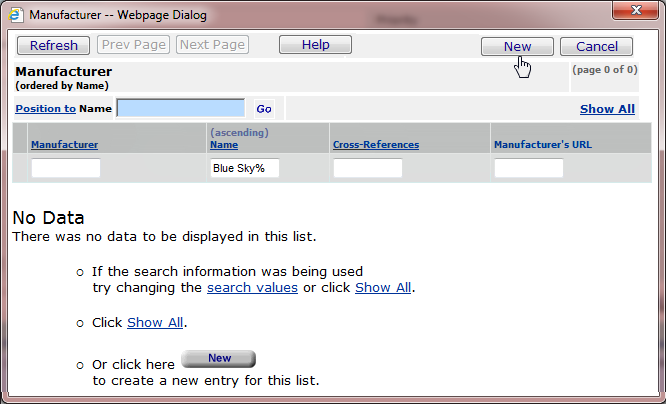
Figure 12 - Getting a Panel to Create a New Manufacturer Record
A blank manufacturer panel appears (Figure 13).
- Enter data for the manufacturer in the panel (Figure 13). Fields with an asterisk * are required.
- When you finish, click Submit.
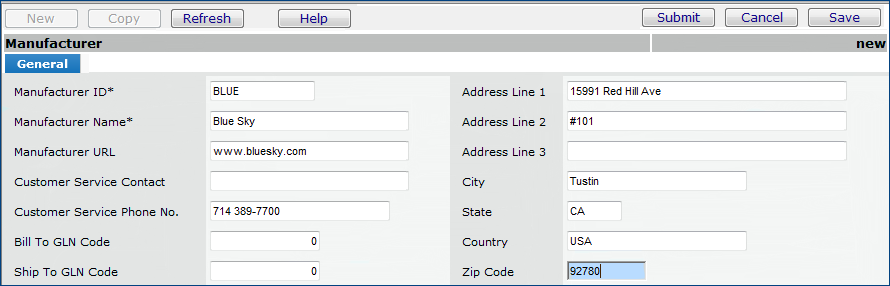
Figure 13 - Creating a New Manufacturer Record
The system returns you to the Manufacturer list panel (Figure 12).
- Click Refresh. The new manufacturer appears on the panel (Figure 14).

Figure 14 - Selecting the New Manufacturer
- Click Select. The system displays the Identify This Manufacturer panel with the ID for the new manufacturer.
- Click Submit.
For the same vendor, the system populates the Mfr ID for the requisition line, and any other missing Mfr IDs (Figure 15).

Figure 15 - The System Updates the Requisition Lines with the New Manufacturer
Register Punchout Vendors and Departments
When a new punchout vendor is available, Supply Chain builds the top-level punch-out definitions for the vendor and creates the link to the vendor ordering portal.
Each medical center must individually enter network IDs and credentials -- obtained from the vendor -- into the system. These values are unique for each site. They also depend on on how a medical center site is structured for the ordering activity, and on how the vendor's ordering process works with that structure.
Note: Registering vendors and departments requires Administrator privileges.
General Steps:
If you do not already have one, establish a business relationship with the vendor.
Obtain account numbers for any departments that will use punchout ordering, but do not have accounts.
Set up the vendor.
-
Contact the vendor to get a "boarding" or "configuration" document that contains the communications settings and credentials needed for Internet purchasing.
-
Then, register the vendor in Supply Chain using the settings provided in the boarding/configuration document. (Use the Punch-out Registration - Registration panel in Administration.)
Register the departments that will use vendor punchout and their vendor accounts. Users who create punchout orders must have these departments in their data profiles.
Create test orders and monitor results. Address any communications issues with the vendor. A log of punchout sessions is available to help with troubleshooting.
Set up the vendor
Network Settings from the Vendor
Obtain a "boarding" or configuration document from the vendor. This document specifies values for communication parameters and credentials needed for Internet ordering transactions. In general, these values are needed:
To Domain, From Domain, and Sender Domain: Either DUNS numbers, or network identifiers.
To Identity, From Identity, and Sender Identity: Alphanumeric or numeric values.
Sender Shared Secret: An alphanumeric value that functions as a permission for some transactions.
Ship to Account ID: A vendor account ID. Individual departments will want to place orders under their own account IDs, which are in the Punch-Out Department registration panel, Ship To Account ID Override field. You could enter a default account in this field so that departments' accounts will override it, or leave the field blank.
To register a new punchout vendor and enter network settings,
- From the Work in Administration main Contents, select Administration > Punch-out Registration.
- A list of punchout vendors that are already setup appears, if any exist. Otherwise, No Data appears.
- Click New. The system displays a blank registration panel (Figure 16).
The Punch-out Name field is for the vendor that you are setting up.
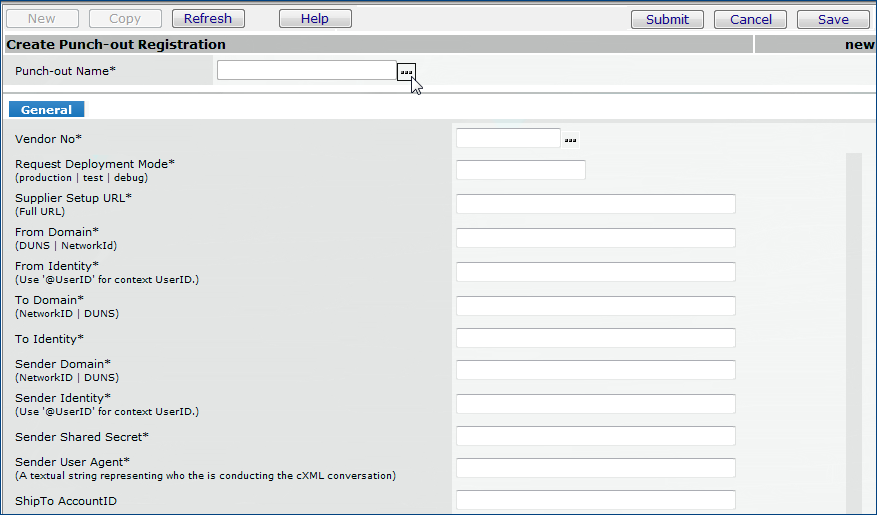
Figure 16 - Vendor Registration Panel
- For the Punch-out Name, click the prompt (...). The Punch-out Definitions panel appears (Figure 17). The panel contains vendors that are defined in Supply Chain for the punchout feature.
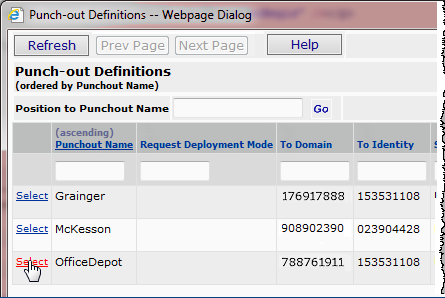
Figure 17 - Selecting a Defined Punchout Vendor
- Next to the vendor of interest, click Select.
On the Create Punch-out Registration panel, the system populates several of the fields on the General tab with values from the vendor definition.
- Review these values against your vendor boarding/configuration document.
- In consultation with the vendor, make changes if needed.
- For the remaining blank fields, enter the values you obtained from the vendor document.
- When you are finished entering registration information, click Save and Submit.
The system returns to the Punch-out Registrations list.
- Click Refresh to display the vendor that you registered.
Register Departments That Will Use Punchout
Punchout departments will each need a vendor account number, unless your site is structured so that all departments use the same account.
To register a department,
- From the Work in Administration main Contents, select Administration > Punch-out Registration.
One or more vendors that you have set up appears.
- Next to the vendor of interest, click Menu > Departments.
A list of departments appears, if any have been registered. If no departments are registered, the panel displays No Data.
- Click New.
The
Punch-out Department registration panel appears (Figure 18).

Figure 18 - Registering a Department for Punchout Orders
- Enter values in the panel's fields as follows:
- Click the prompt for the Org field and select the organization that the department belongs to.
- For the Dept field, select the department.
- Click the prompt to locate and select the department's Default Expense Code for supplies ordered through the punchout vendor.
An expense code is associated with a materials expense segment (or segment group). The system uses the materials expense segment
in constructing the complete GL account code that will be the final destination of an item line's cost.
Expense codes reside in the Expense Code table. The path is:
Materials Management > Tables > Expense Code.
- Enter the vendor account for the department in the ShipTo AccountID Override field. This account will be used instead of the account on the vendor registration panel's ShipTo AccountID.
- Click Save and Submit.
The
Punch-out Departments list appears.
Click Refresh to view the newly added department on the list.
Using the Log
If you are running test orders through a vendor portal, you may find several values on the Punch-out Log helpful in resolving problems.
- To access the log, from the Work in Administration main Contents, select Administration > Punch-out Log.
The log appears. Figure 19 is an example. (Identifiers in the figure are fictional.)

Figure 19 - Sample Punchout Message Log
For example (Figure 19, green box), the Buyer Cookie is a string that Supply Chain sends on the order.
The vendor sends it back on all responses. It links all the transactions together. The vendor may use it when trying to debug a problem.
The column cXML Message is the actual text of the message exchanged between the system and the vendor's portal. Elements in the cXML code, such as the <Response> (red box) can help isolate problems with orders not getting communicated. You can also check <From> (and <To>) credentials and network IDs (blue box) for correctness. Basically, the text of the message should help you and the vendor identify where problems are occurring.
Definitions
Punchout - The ability to access a vendor's ordering portal from within a supply chain system, and place orders that enter the system.
Cross-reference - For manufacturers in vendor punchout orders, Supply Chain uses a cross-reference value to identify a manufacturer on a requisition line when the vendor's manufacturer ID does not match any manufacturer ID in the system.
When the unmatched manufacturer (from the vendor) first appears on a requisition line, the user can activate a link to select the matching manufacturer (in Supply Chain). The system then creates the cross reference, which it uses to automatically match the manufacturer again, if missing, on other requisitions for the same vendor.
Copyright © 2023 by Premier Inc. All rights reserved.
requsition requistion reqisition requstion