
This section outlines how to set up a requisition approval process based on the types of items (e.g., commodity-coded items) requested and their costs. The information below will be of primary interest to system administrators. However, buyers and anyone who approves requisitions should find parts of the discussion useful.
A companion documentation topic covers the process of creating an approver group and identifying approvers. See Set up buyers, approvers, and approval groups.
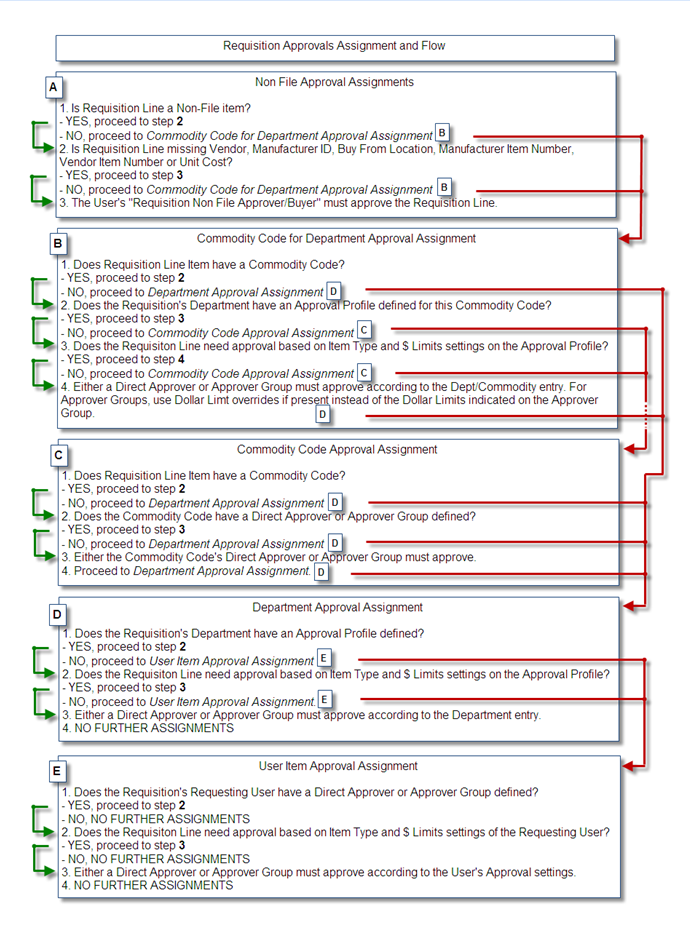
In Materials Management, several categories of approvals exist for processing requisitions: costing, commodity code, item type.
Costing approval allows buyers to review and enter missing information on non-file requisition lines before the lines go to a purchase order. Missing information may include item cost, manufacturer ID, manufacturer item number, vendor number, vendor buy-from location, vendor item number, and so on. A single buyer who performs costing review is specified in the user settings of each person who is allowed to create requisitions. After the costing buyer reviews a requisition line, the system evaluates whether further approval is needed. The evaluation is based on commodity code, item type, or the requisition originator's approval dollar limits, as outlined in the Processing Rules section. The requisition then goes to the next step in the approval process, if needed. If no further approval is necessary, the requisition is approved when it leaves the costing buyer.
Commodity code approval assigns a direct approver or approver group to one or more commodity categories. Direct approvers or approver groups approve or reject requisitions containing stock, non-stock, or non-file items that have the assigned commodity codes.
Item type approval (stock, non-stock, and non-file items) specifies the kinds of items that must be approved for any person creating requisitions. Approval of requests with requisition cost, item cost, or item line cost below a specified dollar limit can be waived. Dollar limits can be assigned to individual users. You can also create an approval profile, and assign it to all users in a department.
Requisitions flow through approval steps in this order:
costing (non-file items) > commodity type > item type (stock, non-stock, or non-file)
When a requisition is approved at any point in the process, the requisition advances to the next approver, or the next approval step. When no more approvers exist in the chain of approvals and all have approved, the entire requisition is approved. If a requisition is rejected for any step, the entire requisition is rejected.
For example, Figure 1 outlines the approval process for a requisitioned file item that subject to commodity code approval.
Rejected requisitions must be reviewed and edited before they can re-enter the approval process. A rejected requisition re-enters the approval process at the beginning, and follows the same path as it did originally. New lines cannot be added to a requisition once it enters the approval process.
Approvals in Materials Management are configured so that requisitions are not routed to the same approver multiple times at different points in the process flow. For example, the costing buyer assigned to a particular requisitioner and the direct approver for non-file items may be the same person. If non-file items for the requisitioner need approval, then the assigned costing buyer both reviews and approves those requisitions.
A requisition approver group contains multiple buyers who approve requisitions. The buyers have different approval responsibilities for requisition dollar amounts. Each member of an approver group can approve or reject requisitions up to his/her dollar limit. Requisitions are routed within an approver group based on the requisition cost and each group member's approval dollar limit until the requisition is signed off. A hospital may have one or multiple approver groups. Setup details are located in Set up buyers, approvers, and approval groups.
When an approver's Out of Office status is set, requisitions for the approver go to his/her Approver Buddy. If an approver group is assigned to the requisition, both the original approver and the person's Approver Buddy can belong to the approver group.
In this situation:
Approvals for check requests and requisitions can be automatically escalated up the approver group ladder if the requester is also an approver in the group.
When enabled, this feature prevents users who are members of an approver group from approving their own requests. Approval for requisitions and check requests for the users automatically route to the next level in the approval group hierarchy. The next highest approver's Max Dollar Amount limit is ignored so that requests for any amount are escalated. This feature applies only to members of approver groups, not to direct approvers.
See "Approver group members creating requisitions/check requests" for instructions on how to enable this feature.
An approver's maximum dollar limit can be changed simultaneously for any approver groups that the user belongs to.
You can make mass changes from the Materials Management Requisitioning or Invoicing menus, or from the Accounts Payable Invoicing menu. The mass change feature is similar to other utilities in the system for making mass changes: first, select the appropriate changes; then, instruct the system to execute the changes.
For detailed instructions on how to change approver limits, see the discussion of mass changes to approvers in the approver setup topic.
The application checks these parameters on requisitions submitted for approval:
If the asset location for the department is not correct or the approver does not have the asset location in his/her data profile, the requisition approval process stops. The requisition cannot be approved, and the user receives an error message. The approver then has the option of updating the supplying asset location for the department or changing allowable asset locations in his/her data profile, as applicable.
These validations prevent the application from dropping requisition lines that cannot be approved and cannot be added to a purchase order.
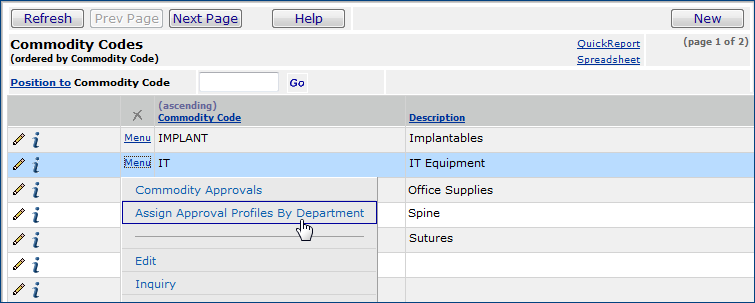
For hospitals that use commodity-coded items, an approver or approver group is assigned to each commodity code. The approver or group approves requisitions for items that carry the commodity code. Approver assignments are found in the Commodity Approvals table.
You can define a separate routing and approval pattern for each department/commodity code combination (e.g., code 123, department 500; code 567, department 500; code 123, department 600; code 567, department 600; etc.) This approach is helpful when different departments require unique approval qualifications or routing rules for the same commodity code. With this departmental approach, dollar limits specified for an approver group can be overridden.
An overall chart of the progress of a requisition — from the time it is opened to the complete issuing of items — may help you visualize the approvals process (Chart 1).
To view the full Requisition Approval Process chart on a separate page, here is a link.
Approval settings can be created for individual users and/or for all the users in a department.
Each requesters user settings specify item type approval limits. Item types are: stock, non-stock, and non-file. When a dollar limit is set for an item type, approval is waived for requisition costs below the dollar limit. For requisitions that need approval, approvers are also assigned in the user settings.
A requesters user settings contain:
Item type limits can be set to provide several options:
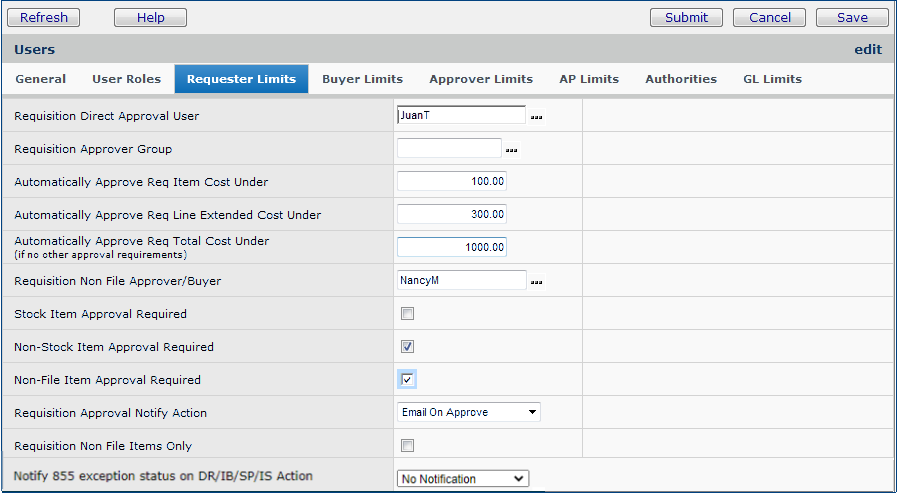
The Requester Limits panel in Figure 2 shows the approval settings for a person at a site who has a Requester role. This person opens and submits requisitions for items.
The Requisition Direct Approval User field is the normal approver for this requester ("JuanT"). A Requisition Approver Group could have been entered instead of the requisition direct approval user. (You can enter a Requisition Direct Approval User or a Requisition Approver Group, but not both.) The requisition direct approver or the requisition approver group approves this person's requests for the item types identified in the check boxes (in the lower fields on this panel).
The next three Cost fields set dollar limits. These dollar limits apply to requisitions for any item type (stock, non-stock, non-file) that is flagged in the check boxes as "requiring approval."
The Requisition Non-File Approver/Buyer identifies the person ("NancyM") who reviews non-file requisitions to fill in cost data.
The following fields work with the three Cost fields on this panel to identify the types of items that need approval:
Note: Requesters can enter different types of items on a single requisition, but if your site's approval process requires reviewers for each item type, the system splits your original requisition according to approver and item to create new requisitions. The new requisitions are tied to the original requisition. (See Requisition Splitting.)
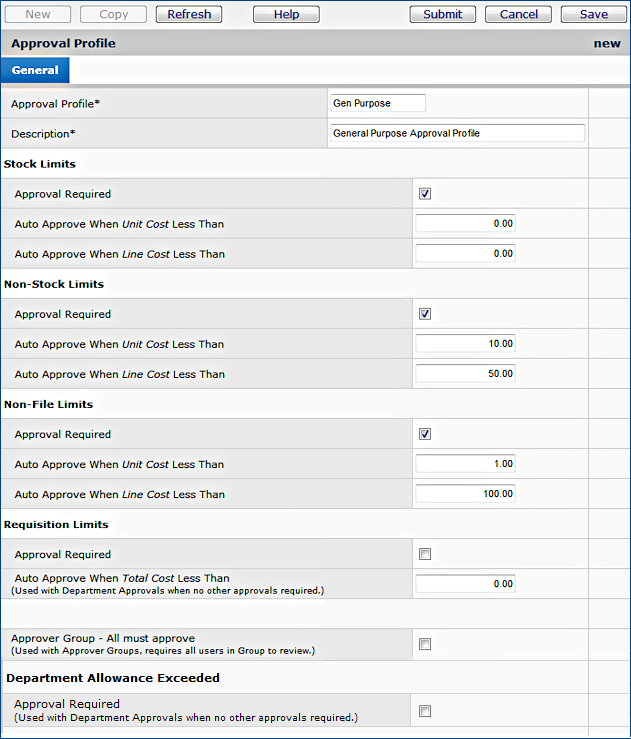
Approval profiles let you define how requisition lines qualify for approvals on a departmental basis, independently of individual users' settings. Approval profiles contain the item types (stock, non-stock, non-file) and dollar limits for requisitions. Once created, an approval profile can be assigned to an entire department for the department's requesters. Direct approvers or approver groups can also be assigned to departments. In this way, you can avoid maintaining approval data for multiple individual requesters who all have the same approval requirements because they belong to the same department.
An import feature lets you link an existing approver group or direct approver to an organization and department within your ERP application. The link is implemented via a download of a department's current approval setup parameters (approval profiles), followed by upload of approver groups and direct approvers. This capability supports acquisition of new units at a medical center, and quarterly audit compliance. The feature uses the standard import. See Importing Approvers and Approver Group Assignments for Departments.
Notes:
If a user belongs to a department that has an approval profile assigned, the approval profile takes precedence over the individual user's settings.
You must be a system administrator to access requester
limits information.
If a department uses expense code allowances, you can require approval for any requisition whose total exceeds the allowance. The Approval Required field on the approval profile (Figure 4, bottom) triggers this action. See the discussion of departmental allowances for details.
From
the Materials Management main Contents, click Requisitioning > Approval Profiles.
The Approval Profiles list appears (Figure 3), if any have been created. Otherwise, No Data appears.

You can now assign the approval profile to a department.
By (optionally) restricting approval profiles by organization, you can limit user access to them based on users' data profiles.
When an approval profile has been restricted by organization, it will only appear in lists where the user has data profile access to at least one of the restricted organizations.
The Approval Profile Edit panel (Figure 4) displays a tab that allows you to restrict the approval profile by organization.
When an approval profile is restricted by organization, Yes appears in the Restricted column on the Approval Profiles List (Figure 3).
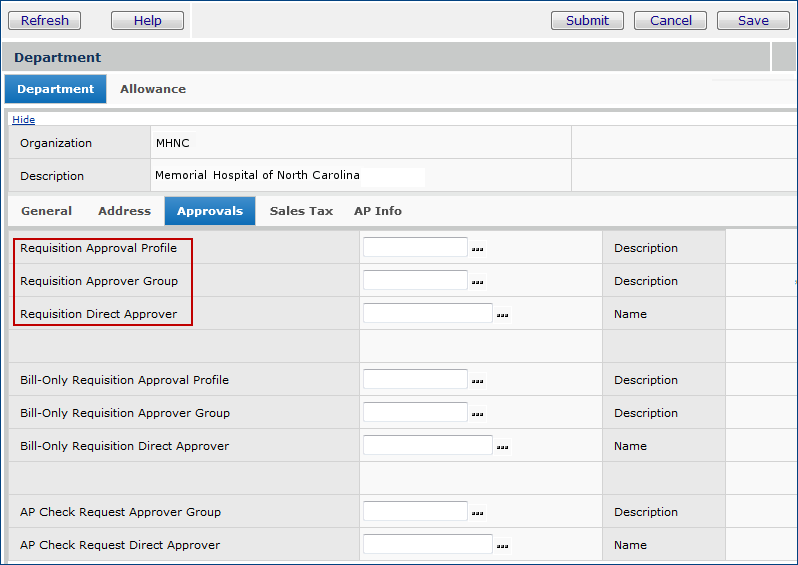
You can assign an approval profile to a department from the Approval Profiles list (Figure 3) or from the Department edit Approvals tab (as described subsequently). On the Approvals panel, you can also designate a direct approver or an approver group for all the requesters in a department.
On the department's Approval Profile panel (Figure 4), for the heading Requisition Limits, the fields Approval Required and Auto Approve When Total Cost Less Than determine if a requisition needs approval when no other approvals (such as commodity code approvals) are required.
When a requisition is submitted, The system looks for a departmental approval profile. If the department has an approval profile, the system determines if the Approval Required field is selected. If so, the system looks at the field Auto Approve When Total Cost Less Than (Figure 4).
- If the total cost is greater than the amount in the field Auto Approve When Total Cost Less Than (Figure 4), the requisition is assigned to the approver group or direct approver specified on the department record.
- If the requisition total cost does not exceed the amount, The system checks the user profile.
User approval settings are on the User Profile - Requester Limits panel (Figure 2).
When the user profile field Automatically Approve Req Total Cost Under field (Figure 2) has a value, and the total cost for the requisition is greater than the value, the requisition is routed to the approver group or direct approver specified on the user profile.
Direct Approvers are solely responsible for the approval or rejection of a submitted requisition. When they approve an requisition, the requisition Status is Approved.
Approver Groups share responsibility for the approval or rejection of a submitted requisition. When a member of an Approver Group approves a requisition, the requisition Status remains at Pending Approval until all eligible approvers in the group have reviewed the requisition. When the last eligible approver approves the requisition, the requisition Status is set to Approved.
When an approver user sets his/her "Out of Office" status, approvals for the user are routed to the users Approver Buddy.
Approvers access requisitions waiting for approval through approval queues.
- My Requisition Approval Queue is unique for each approver and shows requisitions assigned to the approver.
If you are an requisition approver, this queue contains requisitions assigned to you.
- All Invoice Approval Queues shows requisitions assigned to all invoice approvers.
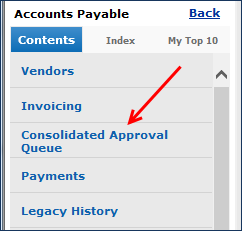
- Consolidated Approval Queue shows requisitions awaiting approval, and any other transactions documents (such as invoices) that you are also authorized to approve.
Based on a requisition approver's user profile settings, the approver may be notified by an email when a new requisition is placed in his/her approval queue. If you are set up to receive email notifications when a requisition is ready for review, you can link directly to the requisition from the email.
The Materials Management main Contents contains menu links to the approval queues.
- Select Approve Now or Reject Now.
- Select a Reason Code.
- If you select Reject Now, you must enter Rejection Comments.
Rejection comments can provide the requisition originator useful information.
The system creates a User Note containing the rejection comment's text.
- Click Submit.
This Consolidated Approval Queue consolidates all your requisitions, invoices, journal vouchers, and check requests needing approval in one place.
You can see all the transaction documents that you are authorized to review and approve or reject.
This panel is helpful for approvers who approve multiple types of transaction documents...such as requisitions and invoices...so that they do not have to go multiple approval queues in the ERP application. Everything is in one queue.
From the Materials Management, Accounts Payable, or General Ledger main contents, select Consolidated Approval Queue (Figure 6).
The list of transaction documents awaiting your approval appears. On the list are requisitions awaiting approval, but also any other documents that you are authorized to approve.
The links and menu have the same capabilities as those on My Approval Queue or on All Approval Queues.
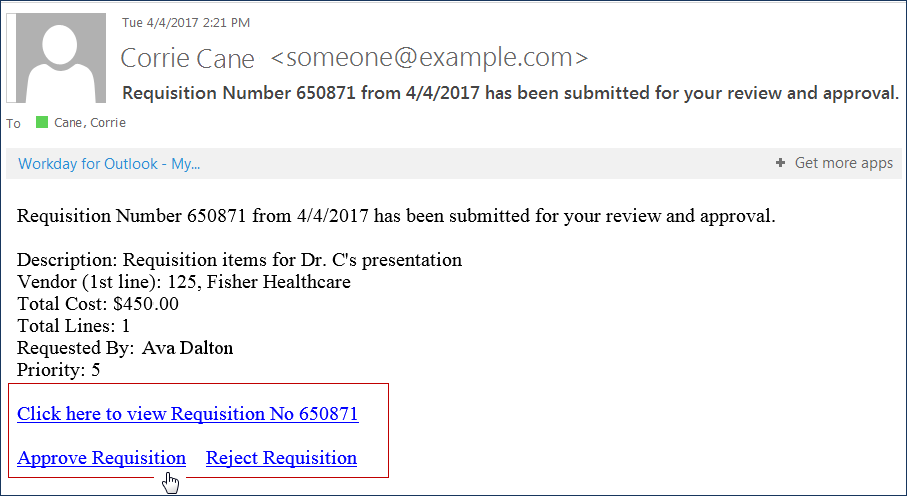
You can approve or reject requisitions from a link on an email message. ERP can send an email to requisition approvers that only requires clicking the approval or rejection link. Approvers can also add comments before sending the email back to the application. The requisition is then approved or rejected, as specified in the email.
Note: Email approval/rejection is also available for check requests and invoices.
Here are the setup steps:
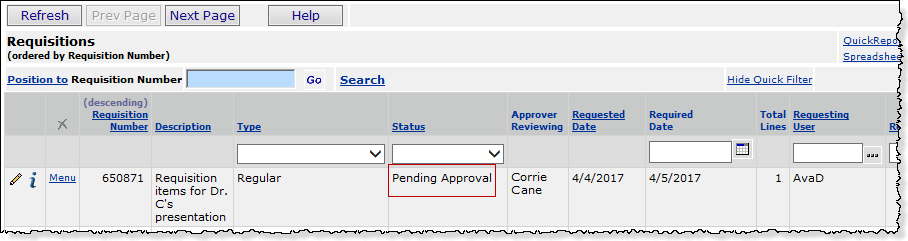
When a departmental requester creates a requisition that must be approved, Materials Management marks the requisition as Pending Approval (Figure 7) and sends an email message to the designated approver (Figure 8).
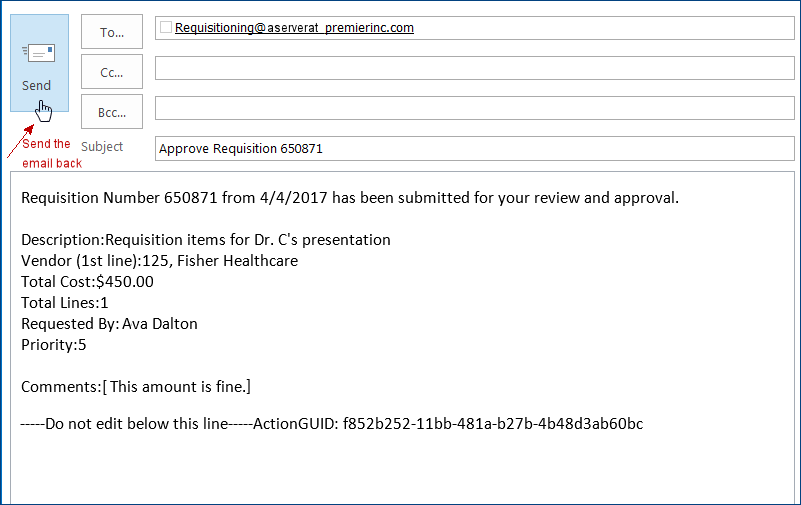
You will receive another email with the approval or rejection notification.
You can review the requisition on the Requisitions List, with the approval Status as you specified in the email. In this example, the Status is Approved (Figure 10).

On the email message (Figure 8), you can also click the link “Click here to view Requisition No XXX” to open ERP and look at the requisition in detail, to accept or reject it (Figure 8). If you are not logged in to the application, clicking the link opens the ERP Sign On panel and you can sign in. The system displays the transaction needing approval. The application remains open for other work.
When you open ERP from the "Click here..." link on an approval email, you can access the entire ERP features menu directly from the approval queue. Here is an example:

For sites who use commodity codes to drive approval routing, the need to change incorrect commodity codes on non-file requisition lines is addressed by this feature.
Important: Setup is needed to use this feature. The flag ("Allow Change to Req Line Commodity Code") controls access. This field is in your site's administration records, and can be set for you by the HelpDesk. Contact the HelpDesk if you wish to use this feature.
Corrections/changes to the commodity code on a requisition are audited.
When a requisition containing a non-file line is rejected by an approver because of an incorrect commodity code, you can either correct the commodity code directly on the rejected requisition, or copy the requisition, and make corrections. Which action you can take depends on whether the requisition contains both file and non-file items, and whether the incorrect commodity codes are the same for the file and non-file items. See below: "You can edit the rejected requisition if..." and "You must copy the rejected requisition and making corrections on the copy, if...".
The requisition has either no file lines, or file lines with commodity codes different from those in the non-file lines. The non-file lines contain incorrect commodity codes and the requisition is rejected by approvers. You can edit the rejected requisition to correct the commodity codes on the non-file lines, and resubmit it for approval. When you resubmit the requisition, a message (Figure 12) tells you that the first commodity code that you change will be changed for all non-file lines, and asks you to confirm.
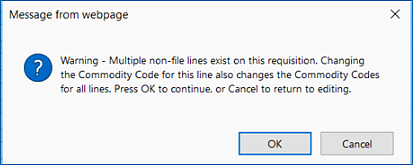

When you change a commodity code for one non-file item on a requisition, ERP makes the change for all the non-file items on the requisition. The message is in Figure 12.
The rejected requisition contains file and non-file lines, with the same incorrect commodity codes. The rejected requisition cannot be edited, but must be copied, and corrections made on the copy. When you attempt to edit the incorrect requisition, an error message tells you that you must copy the rejected requisition and change commodity codes on the copy. Here is the message (Figure 14):

The Copy Requisition panel provides a check box that lets you automatically "complete" the original requisition so that no one can mistakenly use it again. The box is checked by default (Figure 15). This field only appears for rejected requisitions being copied; not for any copied requisition. You can unselect this field if you do not wish to complete the rejected requisition.
On the original rejected requisition being copied, the quantities on the lines are killed and a system note is written to the requisition header. The Status of the original requisition is set to Complete.

Note: Be sure to select the Copy All Notes field on the General tab if you wish to copy any notes associated with the requisition.
Click Submit. The system copies your requisition and sends a message that tells you the number of lines copied and the new Requisition Number.
Requisition originators and approvers can display the budgeted and current amounts for each project/fund, and determine if each requisition can be approved based on the remaining project or fund balance.
Note: A Project Code entered on a requisition's General tab does not carry down to the requisition line or over to the PO Header. Only a em>Project Code entered on a requisition line will carry over to the PO line.
If you are a requisition approver in charge of certain projects, you can inquire on the project codes from requisition lines before or during the approval process. Similarly, users responsible for funds can inquire on fund codes.
For example, Figure 16 is a requisition in which the Project Code and Fund Code have been entered for lines.

The approver can check the project and/or fund code amounts as follows:
When a requisition line has a Project Code, the department's cost (item's extended cost + markup + tax) is added to the project's current amount when the inventory transaction is created. These are the relevant inventory transactions:
2 - Issue to Dept
4 - Dept Return to Inventory
15 - Cost Adjustment
16 - Return to Vendor
17 - Cancel - Issue to Dept
20, 21 - Dept to Dept Transfer
25 - Department Cost Adjustment
Note: A Project Code can require any requisition line or purchase order line that specifies the Project Code to contain only a Commodity-Coded item.
In creating a requisition, if you enter an item that does not contain a Commodity Code in this case, the application displays an error. You must go to the Item Catalog record and enter a Commodity Code for the item.
See Using Project Codes with GL Accounts.
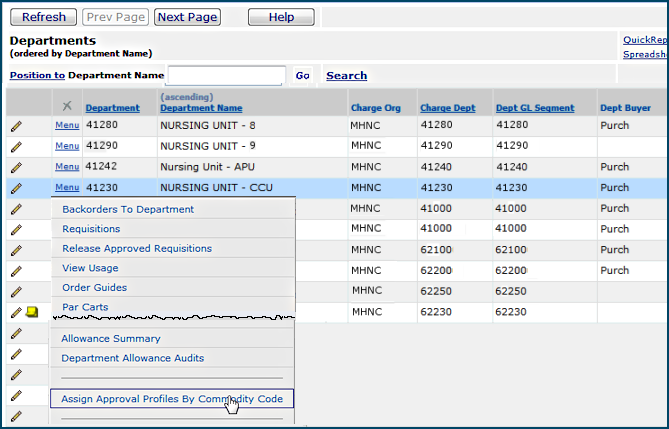
Staff at your site who review and approve requisitions may be assigned to handle particular commodity codes.
- Requisition approval responsibility is set on the User Profile panel User Roles tab (see "Specify the User Role").
- Notifications for reviewers are set on the Approver Limits tab (see "Setting Approver Limits").
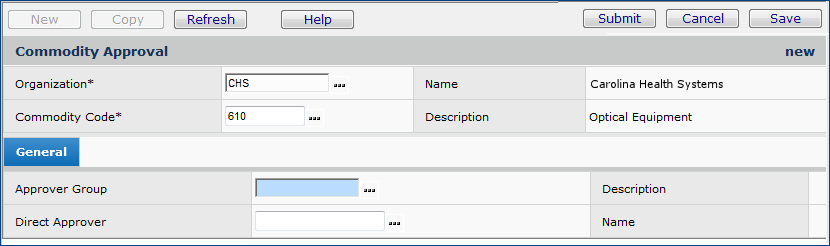
- Approvers' commodity code assignments are made in the Commodity Approvals table in Materials Management.
When a commodity-coded item assigned to an approver appears on a requisition, the requisition is always subject to approval. Although a requester can enter items that have different commodity codes on a single requisition, if your site's approval process requires different reviewers for different commodity codes, the system splits your original requisition according to approver and commodity code, and creates new requisitions. The new requisitions are tied to the original requisition.
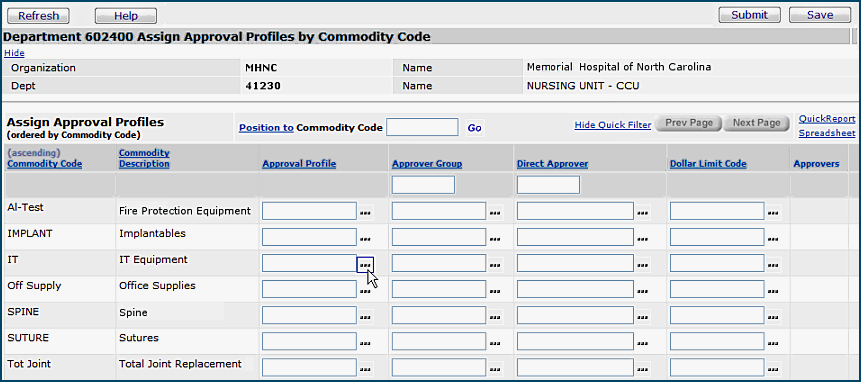
You can set up commodity approvals by department. This approach allows different departments to have different approval qualification and routing rules for the same commodity code. For example, suppose a surgical department and operating room department both use items that are defined with the commodity code IMPLANT. However, the items sharing this commodity code are vastly different in type and cost, and require a different approval approach. Commodity approvals by department provides the means to fulfill this need.
Notes:
You can set up and use approval reminders for regular requisitions. Details are in the topic Approval reminders and redirected approvals.
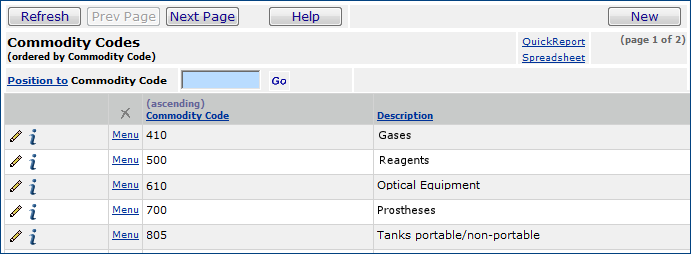
From the Materials Management main Contents, click Tables > Commodity Codes. The Commodity Codes table appears (Figure 18). (No Data appears if no commodity codes are defined.)
From the main Contents, select Inventory > Item Catalog. The Item Catalog list appears.

Approvers for items with different commodity codes are assigned on the Commodity Approvals table.
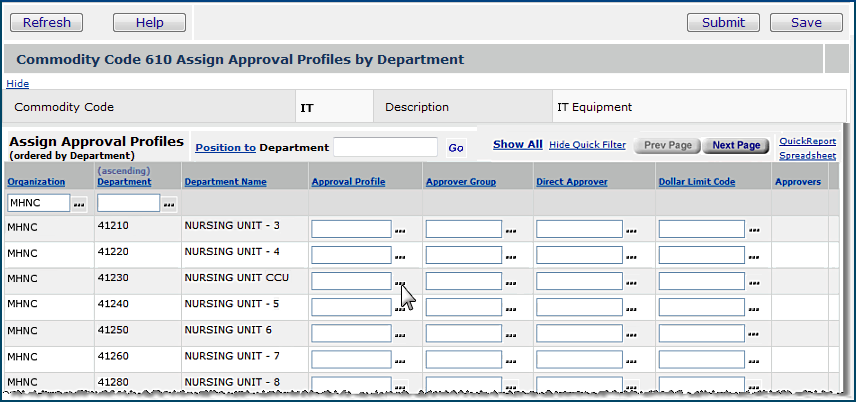
To establish commodity approvals by department, assign an approval profile and either an approver group or direct approver to a "commodity/department" relationship. The approval profile determines what requisition lines should be approved when the defined commodity code is present for a department. The approver group or direct approver identifies the user(s) responsible for approving the commodity requisition.
The system provides a list of commodities and associated departments for selection.
With commodity code approvals for departments, you can optionally override dollar limits specified for an approver group. To override dollar limits, you create one or more independent sets of new dollar limits that replace the maximum approval limits for an approver group. Figure 21 is an example of an approver group and a set of override dollar limits.
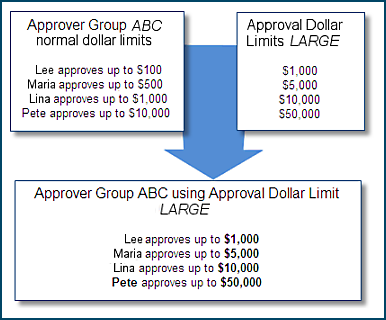
Override dollar limits can be assigned across organizations. In this way, you can reuse approver groups when the approvers in the group are correct, but their maximum approval limits must be different for a commodity in different departments.
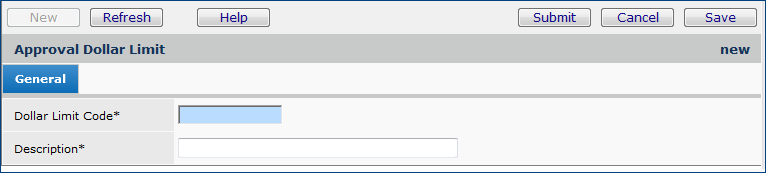
A dollar limit code is associated with each set of override dollar limits. When you assign an approver group to a department/commodity combination, you specify the dollar limit code for the set of dollar limits that override the approver group's existing dollar limits. The overriding dollar limits then control which approver(s) review the requisition.


In Figure 25, the organization MHNC has seven commodity codes: FIRE, IMPLANT, IT, Off Supply, SPINE, SUTURE, and Tot Joint. The department (Figure 25, yellow shading) is 001000, and is combined with all seven. The next department (Figure 25, purple shading) is 110000 and is also combined with each code (finished on the next page). Subsequent pages show other departments combined with each commodity code. In this example, the user would likely be looking for a nursing department/commodity code combination, since the approval profile is For Nursing.
Notice that the list is prefiltered to the Organization in Current Settings, but does show every possible department/commodity code combination that exists. You will want to further filter the list by department, commodity code, or any of the other available filter fields found on the Search panel to make the list manageable.
![]() Open the Commodity Code list and assign a commodity code to the department.
Open the Commodity Code list and assign a commodity code to the department.
A list of departments appears (Figure 27).
The list is initially filtered for the Organization in your Current Settings.
![]() Open the Departments list and assign an approval profile and commodity code to the department.
Open the Departments list and assign an approval profile and commodity code to the department.
The list of commodity codes appears (Figure 29).
Item lines on a single requisition may require different approval paths depending on each item's type, cost, and whether the item has an associated commodity code with a designated approver. For this reason, when you submit a requisition, the system analyzes the requisition's lines to determine how to route them for approval. The system takes the lines that need approvals from the original requisition and puts them on new requisitions. This process splits the original requisition into multiple requisitions, based on review and approval requirements for item type, commodity codes, and non-file costing. If no approvals are required, the requisition is not split, and its status is Approved.
A requisition is split - if needed - when you submit it. The separate requisitions created from the split remain associated as a requisition group. Once a split has occurred, each requisition in the group proceeds on its appropriate approval path. Note that splitting can also occur with imported requisitions based on their lines' approval requirements. You can view the requisition group and the approval history for your requisition. (See To view requisitions that have been split out from the original.)
Here is an example of how approvals and requisition splitting work.
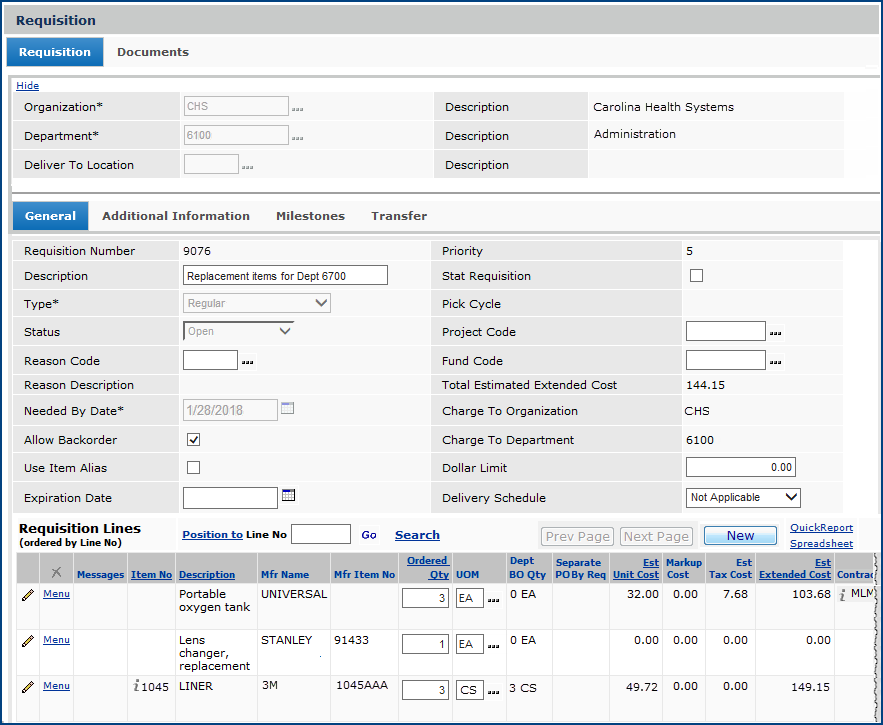
A user makes a request for a stock item and two non-file items. Both of the non-file items have associated commodity codes, and approvers are assigned to the codes. The requester does not need approval for stock items or for non-file items. Here is the original requisition (Figure 30), with Requisition No. 9076:
When the user submits the requisition, the system splits it into three requisitions, as shown in Figure 31.

Requisition 9076 (the original requisition number) contains the stock item. Since this requester does not need approval for stock items, this requisition is automatically approved.
Requisition 9077 (one of two requisitions that were created) contains one of the non-file commodity-coded items. This requisition is first routed to the Requisition Non-File Approver/Buyer ("NancyM") assigned to the requester. The buyer completes cost and other information.
Requisition 9078 (the other of two requisitions that were created) contains the second non-file commodity-coded item. This requisition is also routed first to the Requisition Non-File Approver/Buyer assigned to the requester.
Figure 32 shows the requisition non-file approver/buyer's approval queue.
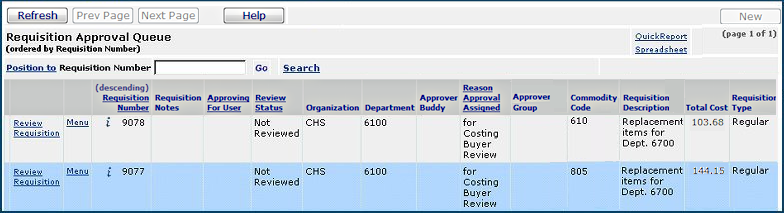
The Requisition Non-File Approver/Buyer completes cost and other information and submits the requisitions again. Because both requisitions contain items with commodity codes that must be approved, approval processing continues, and the requisitions go to the next approver in order -- the approver for the respective commodity codes. Figure 33 shows the approval queue for the commodity code approver who reviews items with the codes "610" and "IMPLANT." Requisition Number 9078 appears on this queue.

Since this requester does not need approvals for non-file items, once the commodity-code reviewers approve the item requests, the entire original requisition and all the split requisitions are Approved. (If the user did need non-file item approvals, at this point the requisitions would go to the requesters requisition direct approval user or requisition approver group. See Figure 2.) Materials Management enters the non-file items on purchase orders, and the stock item request is filled from the appropriate asset location.
The Approval History panel displays information about the approval routing and approval status for your requisition. You can identify approvers, and if several, note which approver currently has your requisition in his/her queue. You can also see the length of time that each approver has/had the requisition and other information.
The topic Approval Information on Inquiry Panels: Examples contains some sample Approval History panels.
A situation may occur at a medical center where the normal approver for a department's requisitions is out of the office, and the person's approver buddy is also out of the office. In this case, requisitions could sit in an approver's queue for days...or longer. To handle this situation, your system administrator can set the role object "AdminApprover" equal to All for the person responsible for approving or rejecting any requisition. The role that contains the "AdminApprover" role object might be assigned to the Purchasing Manager, for example. In this way, requisitions that need approval will not linger without attention in a buyer's queue. See Set Up and Maintain Users for information on assigning role objects.
Once the AdminApprover designation has been set for a user, the user can approve any requisition in the Materials Management list: Requisitions > All Approval Queues. Note: The All Approval Queues list is subject to users' data profiles. A user can only approve requisitions for the departments whose data he/she can access.
Two report objects for requisition aging are available: "Requisition Aging" and "Requisition Approval Aging." Use these report objects to create requisition aging reports.
This report object displays elapsed time between two status events in the requisition process, along with other requisition information. Sixteen different events are available; for example: Created to Backordered, Created to Pending, Created to Approved, Creation to Complete, Backordered to Complete, and more. The Sequence field can be used to show events in the order in which they occur. The content is controlled by the user's data profile department access.
Available fields are:
Requisition
Organization
Department
Sequence
Requesting User
Requested Date
Requisition Status Event and Event Description
Requisition Status and Status Description
Elapsed Text
Elapsed Hours
Elapsed Days
Completed Date
This report object displays the amount of time that has passed between a requisition's being entered on an approval queue and the time when the requisition was either approved or rejected Other requisition and approval information is included. The content is controlled by the user's data profile department access.
Available fields are:
Action Date
Approval Type
Approval Type Desc
Approver
Approver Group
Approver Group Desc
Approver Name
Assigned Date
Dept
Elapsed Hours
Elapsed Text
Elapsed Days
Org
Req Status
Req Status Desc
Requested Date
Requesting User
Requisition No
Review Status
Review Status Desc
Copyright © 2023 by Premier Inc. All rights reserved.
requisition reqsition reqistion requstion requestion spliting