This topic explains the Product Index Layer (PIL), and outlines activities that you can perform with the Product Index Layer.
The Product Index Layer reconciles item data from different sources. It is a cross-reference index of item records by manufacturer, manufacturer item number, vendor, and vendor item number that allows contract and hospital items to be matched without intensive data cleansing. Processing associates contractable item catalog records and contract item lines with the corresponding PIL entries.
The PIL currently contains several hundred thousand item records.
Development of the PIL is ongoing, to increase the size, and to implement additional planned user interface features. Maintenance is done on a regular basis to modify the PIL as new items become available, as new manufacturer/vendor corporations are formed, and as existing manufacturers or vendors consolidate.
Item manufacturer and vendor information from a GPO or distributor can be different from the data in a hospital’s records for a given item. Different versions of the manufacturer name can occur.
Multiple vendors/distributors may exist for the item, manufacturer and vendor item numbers can differ, and other inconsistencies can exist.
When contracts are imported, significant data cleanup is often needed before contract items and hospital item records can be matched accurately. The PIL eliminates most cleanup. Hospitals can activate contract items immediately so that they can purchase the items on-contract. Non-file items purchased on-contract can be identified, and spend for those items added to the pool of data for study and analysis.
Several panels provide user access to maintenance and other activities in the PIL, as outlined below. Continued development of both the PIL features and the PIL database is planned for future service packs.
The Product Index Layer uses the concept of "entities" to reconcile item record differences and to make spend data available for analysis.
An "entity" is a corporate name for a manufacturer or vendor, such as Johnson & Johnson or Owens & Minor.
For example, with two manufacturer item records, if the manufacturer names (although different) represent the same overall company, the items belong to the same manufacturer entity. The situation is parallel for vendors; when two vendors are part of the same company, even if the vendors' names are different, the vendors can be associated with the same PIL vendor entity.
Services vendors (who provide services, rather than items) may also be associated with entities in the Product Index Layer. For example, the entity GE Healthcare could be associated with services vendors such as GE Healthcare Financial Services.
Definition: Registering a vendor or manufacturer means associating that vendor or manufacturer with a Product Index Layer entity.
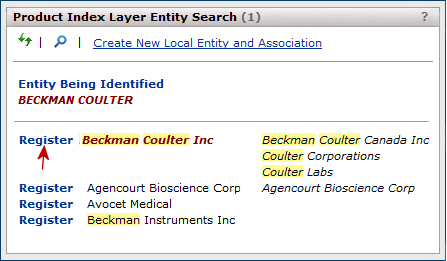
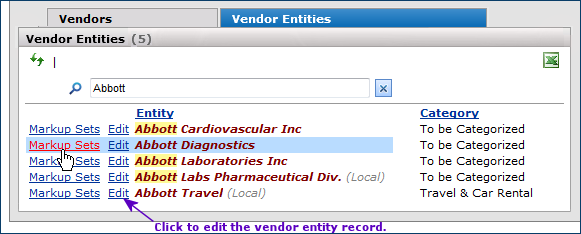
An entity may be simple with only one name associated to one manufacturer or vendor. If the same manufacturer, or vendor, uses different names or has subsidiaries, the entity may include the multiple names as aliases. Figure 1 is a list of entities with aliases. Notice that each of the four Abbott... entities is assigned one or more aliases (red arrows on the right side).
An entity can be a "parent" or "child" of another entity. This situation is common.
In Figure 1, the entities "Abbott Medical Optics Inc.," "Abbott Molecular Inc.," and "Abbott Vascular Inc." (on the left side) are actually "child" entities of the parent "Abbott Laboratories Inc." The hierarchical structure is illustrated in Figure 2. This kind of entity structure is a "family."

The hierarchical structure of entities lets the Product Index Layer handle items whose manufacturer (or vendor) has been acquired by a new owner, either outright, or as a subsidiary of an existing enterprise, in addition to the more common situation where manufacturer/vendor names have different forms, either because of spelling or brand designation.
![]() Manufacturers -- such as "Guidant," for example -- are registered in the PIL to manufacturer entities, such as "Abbott Laboratories, Inc." (Figure 1).
Manufacturers -- such as "Guidant," for example -- are registered in the PIL to manufacturer entities, such as "Abbott Laboratories, Inc." (Figure 1).
![]() Vendors -- such as "Fisher Scientific," for example -- are registered in the PIL to vendor entities, such as "Thermo Fisher Scientific, Inc."
Vendors -- such as "Fisher Scientific," for example -- are registered in the PIL to vendor entities, such as "Thermo Fisher Scientific, Inc."
Registration associates or cross-references manufacturers and manufacturer entities; vendors and vendor entities.
Tip: When registering a vendor, register based on the vendor name, rather than on the vendor location name.
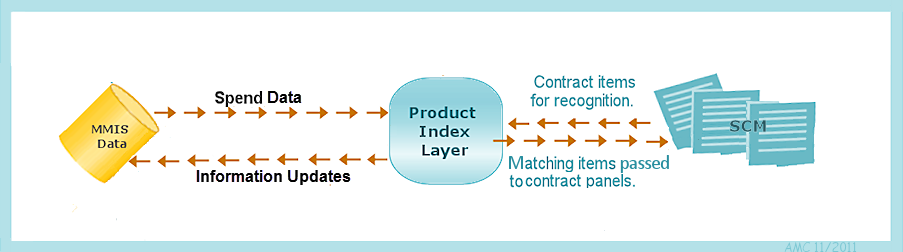
Figure 3 illustrates how the PIL works with Sourcing and Contract Management to match contract items.
In matching contract items (and in spend analysis), the Product Index Layer uses the vendor item number (VIN) to determine whether an item on a contract detail line is the same as a PIL item. Figure 4 is an illustration of the process.
After processing with the PIL, if a contract item cannot be matched but the item manufacturer is registered, Sourcing and Contract Management uses the site's original data to match the item. The item catalog MIN and manufacturer are compared with those in the contract. The MIN is compared in "noiseless" mode; i.e., with non-alphanumeric characters removed.
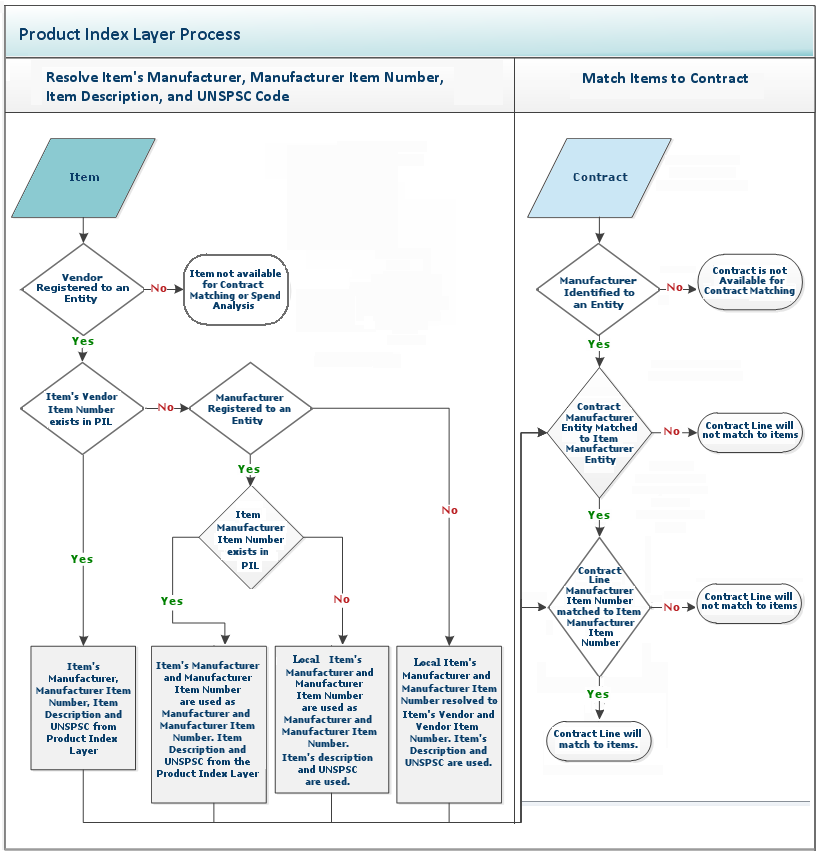
Here are some examples of how the Product Index Layer might match items in a contract.
-
In the discussion below, MIN is "manufacturer item number;" VIN is "vendor item number."
Case 1:
-
The manufacturer is registered and the MIN is found in the PIL.
- The PIL finds the item's vendor and VIN.
The PIL returns the manufacturer, MIN, item description, and UNSPSC code for use in contract matching and in analysis.
![]() In Case 1, the MIN, manufacturer identity, item description, and UNSPSC code come from the PIL.
In Case 1, the MIN, manufacturer identity, item description, and UNSPSC code come from the PIL.
Case 2:
-
The manufacturer is registered, but the MIN is not found in the PIL.
- The PIL does not find the item's vendor or VIN.
The system uses the site's local item data (MIN, manufacturer, item description, and UNSPSC code) in contract matching and in analysis.
![]() In Case 2, the MIN, manufacturer identity, item description, and UNSPSC code come from the site's local item data, not from the PIL.
In Case 2, the MIN, manufacturer identity, item description, and UNSPSC code come from the site's local item data, not from the PIL.
Case 3:
-
The manufacturer is not registered.
- The PIL does not find the item's VIN or vendor.
The system uses the site's local item VIN as the MIN and the vendor as the manufacturer in contract matching and in analysis.
![]() In Case 3, the VIN, vendor, item description, and UNSPSC code come from the site's local item data, not from the PIL.
In Case 3, the VIN, vendor, item description, and UNSPSC code come from the site's local item data, not from the PIL.
Case 4:
-
The manufacturer is registered and the MIN is found in the PIL.
- The PIL does not find the item's VIN or vendor.
The system uses the site's local manufacturer and MIN, and the PIL's item description and UNSPSC code.
![]() In Case 4, values from both the PIL and the site's local item data are used in contract matching and in analysis:
In Case 4, values from both the PIL and the site's local item data are used in contract matching and in analysis:
The MIN and manufacturer come from the site's local item data, and the item description and UNSPSC code come from the PIL.
Using the local item's VIN to match to contracts (Case 3, above) can occur when a manufacturer has not been associated with an entity.
You will want to look at the list of manufacturers and make any needed manufacturer–entity registrations.
For Contract Matching:
When neither the manufacturer nor the vendor is registered, the system cannot match contract items.
When you accept a contract, if "no item matches are found" you may need to check the registration status of the vendor and manufacturer.
For the Analysis Workbench and Projects:
Imagine that you have used a keyword to create an analysis group in the Analysis Workbench, and then created a project from the group.
The project that you created may contain more items than the analysis group had.
The reason is that the project pulls spend for all MINs that are the same as the analysis group MINs. In addition, project items include items from the item catalog/item file that match the analysis group MINs, but have no spend. Items with the same MIN may have different item descriptions. The objective is to get the complete set of items relevant to the segment
of spend under analysis so that you can solicit bids. You can review and eliminate any items that you do not want to include in the project, of course.
Another detailed example of this situation is in the chapter on Analysis Projects, under "Spend Values in Projects Created from Analysis Groups."
The version of the item description used in Projects and in the Analysis Workbench can be set for your site. The options are: use either the item description from local item records or the item description from the PIL.
Search is available from the page menu and from the Sourcing and Contract Management main Contents (Figure 5) for contracts.
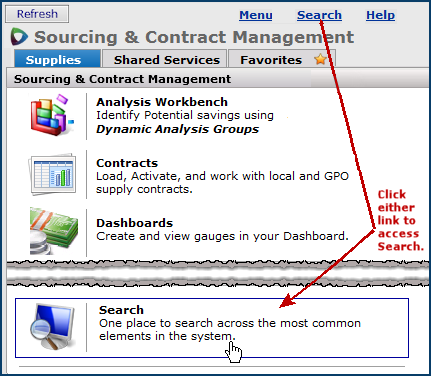
The Search panel contains tabbed areas where you can run different kinds of searches. A tab appears for Product Index Layer item searches (Figure 6).
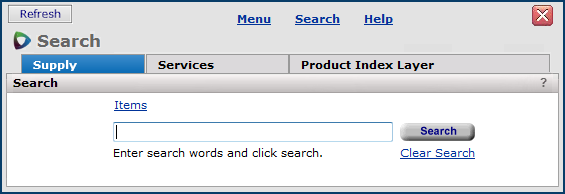
Clicking the Product Index Layer search tab lets you search for an item in the PIL. You can enter characters from the MIN (manufacturer item number), VIN (vendor item number), item description, manufacturer, vendor, UNSPSC, or UNSPSC description. Mouse over the Items link to display a list of elements that are searched.
Important: For the Product Index Layer search, and for other links in the application that let you search for an entity, use a search value longer than three characters. The search routine does not work effectively for three or fewer characters. For example, instead of "MAS" enter "Medical Automation Systems."
Figure 7 is an example of a PIL item search. The user has entered characters from the VIN.

Note: Call the Help Desk to turn on the Search feature.
When you first open the search for a supply contract, manufacturer, item, or vendor search, for a services contract search, or for a PIL item search, the list of My Last Viewed Contracts appears. My Last Viewed Contracts contains the last ten contracts that you opened.
The link Open Full View appears at the bottom of the contracts list if you have worked with more than ten contracts. Click Open Full View to display more contracts.
Spend for a vendor's locations is "rolled up" to the vendor entity level. Multiple vendor locations are registered to a single vendor entity.
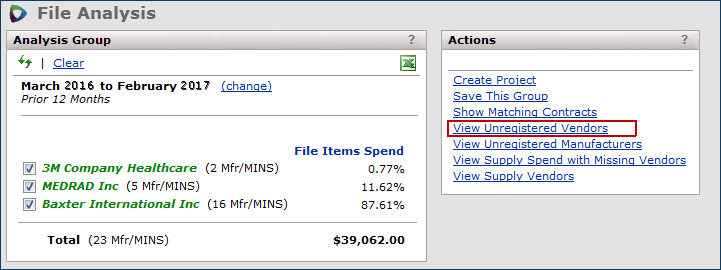
When you are analyzing vendor spend, you can identify any unregistered vendors, and then register the vendors.
The panels for registration contain sorting tools that rank vendors by spend amount so that you can register those whose spend you consider significant.
Registration of vendors is outlined in a subsequent section.
A single vendor entity can have -- and usually does have -- multiple vendors locations registered to it. Some of the vendor locations registered to a single entity can provide supplies and others can provide services. Some vendor locations may provide both.
For example, consider a hypothetical vendor "American Electronics Inc." This vendor provides imaging equipment and accessories, equipment maintenance, film, and portable storage media for X-rays and other imaging devices. Imagine that you have services contracts with this vendor for maintenance, and supply contracts for film and equipment accessories.
Since American Electronics is used to purchase both items and services, how would you describe its spend? Is the spend "supply" spend or "services spend?" It depends on how you wish to work with the spend.
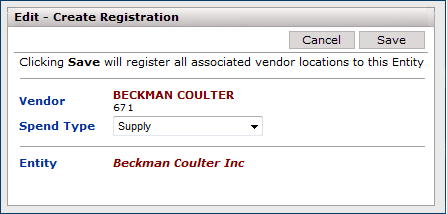
In registering a vendor, you specify the vendor's Spend Type. The spend type options are Supply or Services.
The spend type does not necessarily reflect what you purchase from the vendor, but rather, how you want to access the vendor's spend for analysis.
![]() You specify a vendor's Spend Type as the location of the vendor's spend for analysis purposes.
You specify a vendor's Spend Type as the location of the vendor's spend for analysis purposes.
![]() Spend dollars labeled "supply" are from purchase order invoices.
Spend dollars labeled "supply" are from purchase order invoices.
![]() Spend dollars labeled "services" are from all invoices (which includes PO invoices).
Spend dollars labeled "services" are from all invoices (which includes PO invoices).
Here are a couple of approaches you might take in deciding how to assign a vendor's spend.
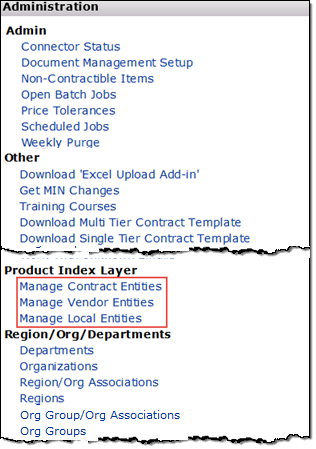
To access the panel in Figure 8, from the Administration contents, click Product Index Layer > Manage Vendor Entities.
An example of two vendors registered to the same entity with different spend types is in Appendix 1.
Vendors must be registered ("cross-referenced") to vendor entities so that the Product Index Layer can provide correct item information for contract matching and spend analysis. The sections below explain how to register vendors, and how to specify that a vendor's spend is services spend or supply spend.
When you register a vendor, its spend is available for analysis the next day. The registration process completes overnight.
Note: Manufacturers are also registered to Product Index Layer entities. However, the need for a site to register a manufacturer seldom occurs. The need to register vendors, especially local vendors, is more common.
Most hospitals purchase supplies from large, nationally known vendor/distributors such as Abbott Laboratories, Inc. and Cardinal Health; and from national manufacturers such as Johnson & Johnson, Ethicon, and others. Services vendors may also include national companies such as Hertz, ADP, ARA, and others. The Product Index Layer (PIL) includes parent and child entities for these "universal" suppliers that you can register to the specific subsidiary (e.g., Abbott Diagnostics, Allegiance Inc.) that your hospital uses.
In addition to national and regional suppliers, many hospitals use smaller, local vendors and manufacturers. Local vendors and manufacturers may provide supplies. Local services vendors may provide services such as housekeeping, landscaping, valet service, water treatment, etc. Entities for these local vendors may not exist, and will need to be created.
When created and registered, local vendor and manufacturer entities and cross-references become part of a site's own data tables.
Note: To create/register entities, the "CARegistration" role object in your user role must be set to Modify, minimally.
You must decide if an unregistered vendor (or manufacturer) is local, or should be associated with one of the universal entities in the Product Index Layer.
Links are available for registering a vendor from these application panels:
- The "Supply Analysis Workbench" page Actions panel (Figure 9). This link opens the "Vendors and Entities" page. Figure 12 is an example.
- The main Contents Administration > Product Index Layer > Manage Contract Vendors link (Figure 10). This link also opens the "Vendors and Entities" page. Figure 12 is an example.
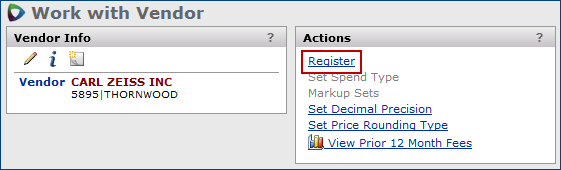
- The "Work with Vendor" page Actions panel (Figure 11) lets you register a single vendor. You can access the Work with Vendor page through the Search application; Search > Vendors > Select a vendor.
|
Figure 9 - Register a Vendor from the Supply Analysis Workbench Actions Panel. |
|
Figure 10 - Register a Vendor from the Administration Contents |
|
Figure 11 - Register a Vendor from the "Work with Vendor" Actions Panel |

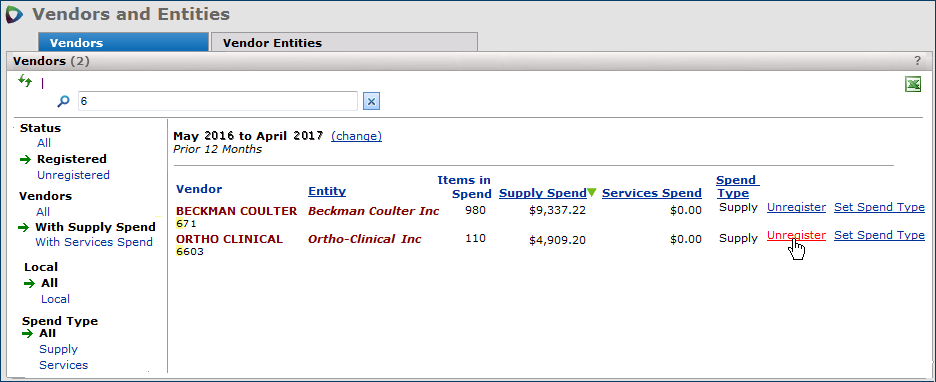
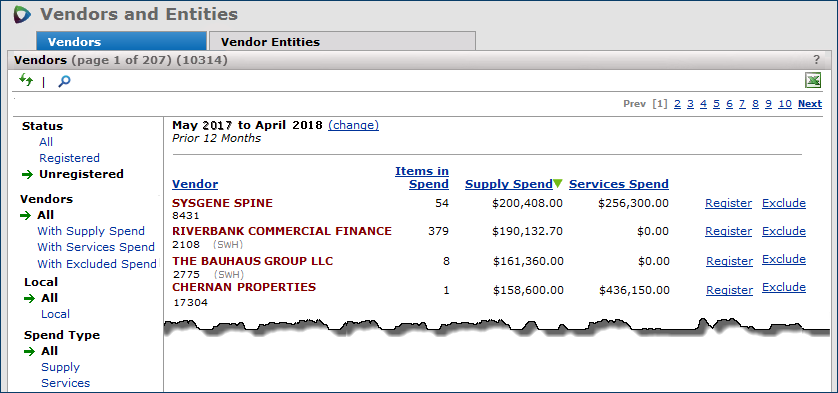
The Vendors list (Figure 12) shows vendor locations, items in spend for each vendor, if any, spend amounts, and more, depending on how the list is filtered. You can use the filters on the left to display registered and unregistered vendors, or all vendors. Other filter options are on the left as well. The default date range is Prior 12 Months, but this can be changed by clicking the change link.
You may have a vendor that cannot be registered as either a supply or services vendor; in such a case, you can exclude a vendor from the Unregistered Vendors list by clicking the Exclude link.
An "undo" feature -- the Include link -- is available for any vendor that you exclude.
Using the Vendors PanelStatus filter: On the Status filter, you can select All, Registered, or Unregistered vendors. Figure 12 displays unregistered vendors;
Figure 13 - List of Registered VendorsVendors filter: You can display All vendors, vendors With Supply Spend, or With Services Spend for each Status. Spend Type filter: You can also filter the list for vendors with Supply spend,
Services spend, or All types (services and supply). Clicking a value in the column Items In Spend opens a list of vendor's items for all vendor locations.
Figure 14 - Vendor Items for an Unregistered Vendor |
The entity candidates listed include "universal" entities -- vendors of national or regional scope -- and "local" entities designated by (Local).
Is the vendor "universal" -- in other words, a national or regional company?
Determine if there is an existing entity on the list to register to the vendor.
If none of the entities match, and the vendor has national stature, you can request the Help Desk to create a new universal entity
Or...Is the vendor "local?"
Determine if there is an existing local entity to register to the vendor.
(If none of the local entities match, you can create one.)
Fields on the panel are in Table 1:
Vendor |
The name of the vendor that you are registering to the entity. |
Spend Type |
Select the spend type (See the discussion below). - Services: The vendor's spend appears on the Services Analysis Workbench. Also, when you check this box, You can have both supply and services vendors registered to the same entity. |
Entity |
The entity name that the vendor is being registered to. |
Register All Locations for this Vendor? |
Clicking this checkbox causes all of the vendor's locations to be registered to the entity when you click Save. |
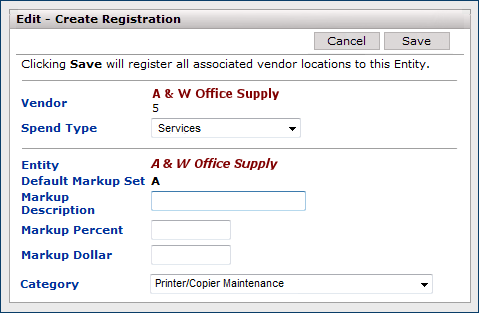
Default Markup Set |
The letter identifier for the default markup values used by the vendor. Once the vendor is registered, you can edit the vendor registration record and add other markup sets, if you wish. The initial markup set is designated "A." Other markup sets that you create are assigned successive letters. Unless at least the initial "A" markup set has been defined for a vendor entity, you cannot activate item prices |
Markup Description |
A description of the markup set. |
Markup Percent |
The percent markup to be applied to manufacturer prices for the vendor. You can enter only this value, or a markup dollar amount also. If no markup applies to the vendor, enter zero. |
Markup Dollar |
The dollar amount of markup to be applied to manufacturer prices. You can enter only this value, or a markup percent. You can also enter both a percent and a dollar amount. (You can enter zero in this field.) |
Category |
This field appears when you select the Spend Type "services." Categories are descriptors assigned to vendor entities, A table of Categories is created for your site. Click the down arrow to select the appropriate Category. Some entities may have both supply and services vendors registered. Note: If you change the Category of a services vendor (by editing the vendor entity record), |
Do you want to work with the vendor's spend as services spend?
If so, do Step 6. If you are working with a supply vendor (the default Spend Type setting), go to Step 7.
Notes:
Vendor locations are "rolled up" to the vendor level. This means that when you register a vendor to an entity, all of the vendor locations are registered as well. When you unregister a vendor, all of its locations are unregistered. If you set the Spend Type for a vendor to Services, all its vendor locations set their Spend Type to Services.
When you register a vendor location to an entity, Sourcing and Contract Management looks for other vendor locations for the same vendor, and automatically registers them to the entity. Once you have a vendor entity (either local, or universal) with vendors registered to it, should any new vendors need to be registered to the entity, you can do so following the process outlined previously.
Normally when you first register a vendor to an existing entity, or when you select a vendor entity that already has at least one vendor cross-referenced to it (Figure 19A), the Create Registration panel for the new vendor looks like Figure 19B.
Figure 19A - Select an Entity with Registered Vendors |
Figure 19B - Register an Additional Vendor to the Entity |
As mentioned earlier, your site may use local vendors that are not associated with a national or regional universal entity. (See Universal and Local Suppliers.) These local vendors are registered as Local Entities (steps are outlined above) and are stored separately in the site’s own database, not in the PIL with other vendor entities. For this reason, there are separate menus for managing local entities and “non-local” entities.
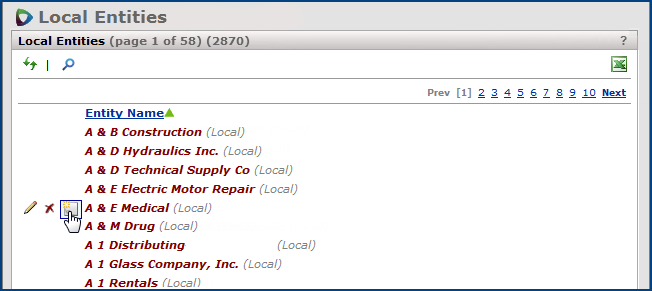
To edit or delete a Local Entity, open the Administration menu on the main Table of Contents. Under the PIL subheading, select Manage Local Entities. (See Figure 20.)

On the Local Entities panel, you may edit  , delete
  , or add a note
  to a Local Entity. (See Figure 21.)
Once a vendor entity has been created and cross-referenced to vendors, you can create or change markup sets for the entity.
You can change the category of a vendor entity by editing the vendor entity record.
You can change the Spend Type of a vendor, if desired. Doing so will change the spend type of all vendor locations for that vendor.

Manufacturers must be registered (or "cross-referenced") to manufacturer entities so that the Product Index Layer can provide correct item information for contract matching and spend analysis. Most manufacturers that you work with will already be registered as part of Product Index Layer implementation, but you may encounter some -- particularly if you use local manufacturers -- that do need registration. The Actions panel on the Supply Analysis Workbench (Figure 26) page lets you open the panels for registering manufacturers.
Note: When you register a manufacturer, spend for the manufacturer is available for analysis the next day. The registration process completes overnight.
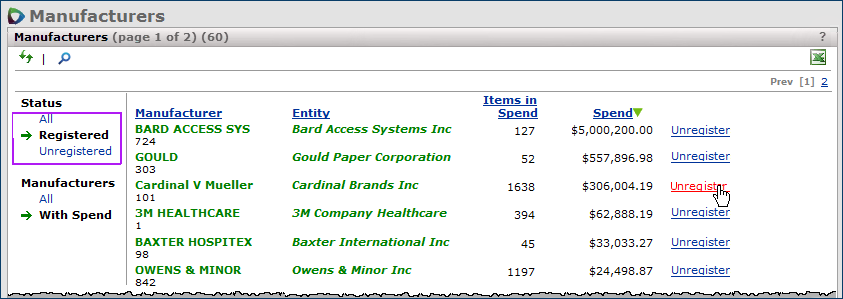
A list of manufacturers appears (Figure 27).
-
By default, the Status is set to Unregistered, so the list displays unregistered manufacturers. You could also view Registered manufacturers, or All manufacturers.
- Notice that the Manufacturers view is set to With Spend. Clicking All displays manufacturers with and without spend.


You may have registered a manufacturer or a vendor to an entity, and later realized that the cross-reference is wrong. You can remove the registration for the vendor or manufacturer, if you wish.
For a vendor,
- Click View Unregistered Vendors.(Figure 26, green arrow).
The unregistered vendors list appears.
- On the list, in the Status view, click Registered.
A list of registered vendor appears, similar to Figure 13.
Typically you will only need to request a new entity when you are working with spend for a "universal" supplier -- a vendor (or manufacturer) of national or regional stature whose items should be available in the PIL. If you are working with a "local" vendor, you can create a local vendor entity yourself. The local vendor's data will then be available in your site's tables.
Note: To request a new universal entity, call the Help Desk.
It will be most helpful if you can provide the following information when you call:
Entity Name – as close to the true legal name as possible.
Address
Phone Number
URL address for the vendor's website
Tax ID
Provide as much information as you have for the vendor.
The timeframe for getting a new universal entity into the PIL is seven to ten working days.
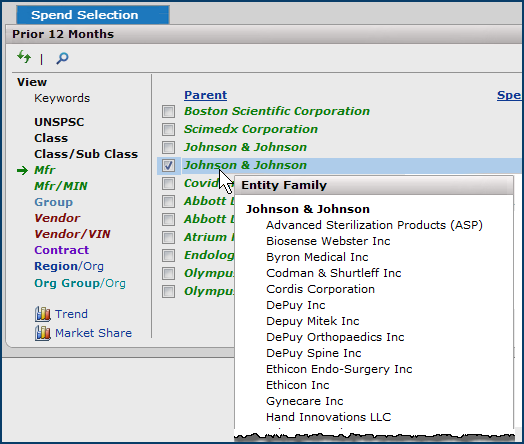
In Projects, Analysis, and Savings, you can click a manufacturer parent entity to display family members (children).
For example, in Analysis, the Spend Selection panel lists manufacturer parent names. In Figure 31, clicking the manufacturer entity Johnson & Johnson displays members of the family for Johnson & Johnson in a pop-up window.
When a contract is imported, Sourcing and Contract Management picks out the field that it maps as the manufacturer, and looks for an entity associated with the manufacturer. The mapped field depends on where the contract originated, and whose contract it is. For example, the system maps the Business Partner Entity ID in a contract as the manufacturer.
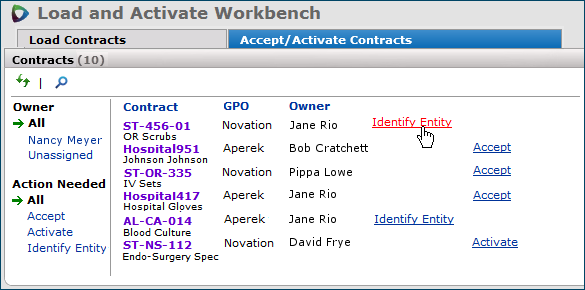
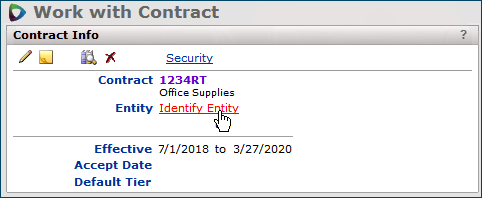
In Sourcing and Contract Management, when Identify Entity appears with a contract name, the manufacturer on the contract cannot be found among the PIL entities.
Before you can activate the contract item prices, you need to associate the contract manufacturer with a PIL entity (Figure 32).
|
|
For example, a manufacturer code “JJ” on a contract needs to be associated with a PIL entity, probably “Johnson & Johnson.” The user searches for an entity using the characters “Johnson.”
A list of entities appears. Figure 34 is an example.
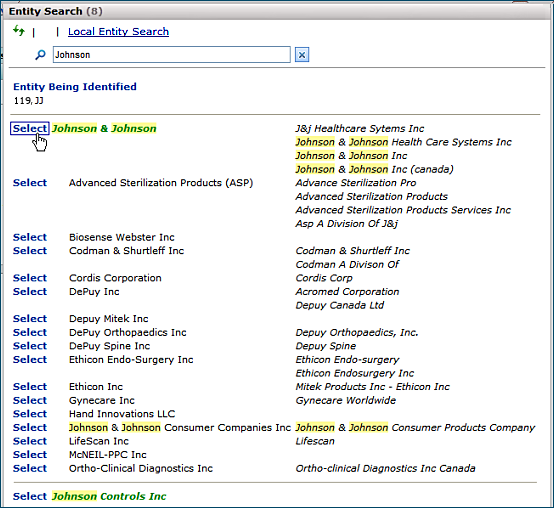
The entity search looks for "universal" entities in the Product Index Layer.

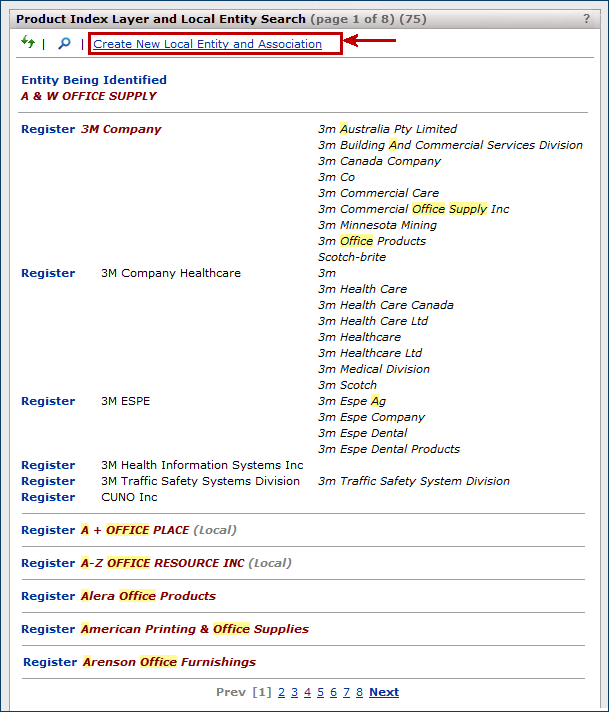
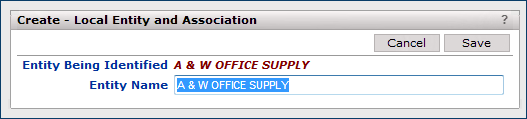
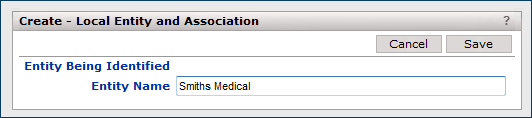
A panel appears for creating a new local entity and associating the manufacturer with the entity (Figure 36).

Note: You can also identify entities from the Contract Info panel (Figure 37).
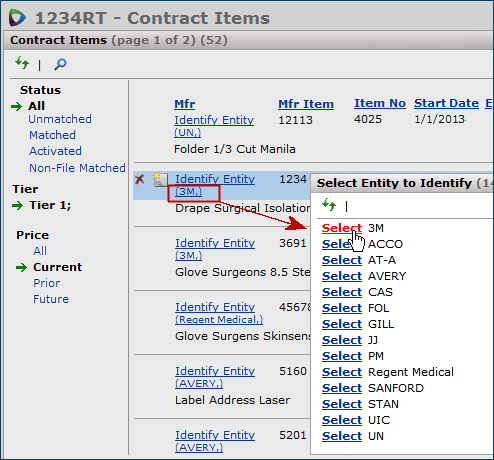
In some situations, a contract may have multiple manufacturers, each of which needs to be associated with an entity.
Selecting the correct entities may be difficult without viewing the manufacturers on the contract. In this case, it is easier to go to the Contract Items panel and work with each item manufacturer until you have covered all the manufacturers.
If you made an error in assigning a contract manufacturer to an entity, you can remove the assignment, as long as any contracts that use the the manufacturer are not activated.
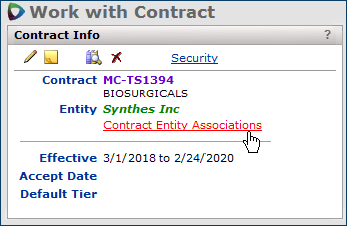
When you associate a manufacturer with an entity for a contract, the Entity field is populated with the manufacturer name.
Beneath the manufacturer name is a new link -- Contract Entity Associations -- that lets you remove the cross reference (Figure 39).
The Contract Business Partner Entity Associations panel appears (Figure 40).
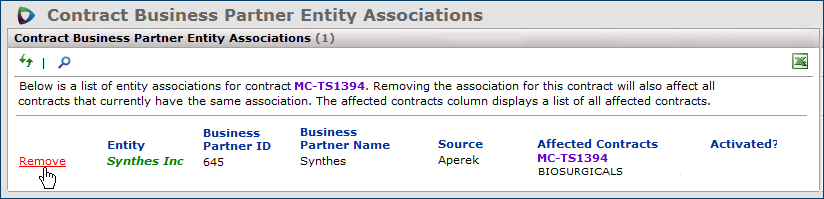
The panel contains these columns:
- Entity: the name of the PIL entity that is associated with the contract manufacturer.
- Business Partner ID: the contract's ID for the business partner name.
- Business Partner Name: the contract manufacturer's name.
- Source: the source of the Business Partner Name and ID; e.g., a GPO.The Affected Contracts column lists the current contract and any other contracts that use the entity-manufacturer association.
Multiple contracts may be listed on the panel. (If the list is long, page number links are available at the bottom.)The Activated? column contains Yes when the contract is activated.
If a contract on the panel has been activated, you cannot remove the entity-manufacturer association. The Remove link is grayed out.
When you hover over the grayed-out Remove link, the message "Activated contracts exist with this entity association, therefore, it cannot be removed."
You can view a list of all contract entity - manufacturer associations from the Administration menu.
From the Administration menu, under the heading Product Index Layer (Figure 10), click Manage Contract Entities.
You can use the Sourcing and Contract Management overall Search to locate and display vendor and manufacturer information.
To search for a vendor,
Sourcing and Contract Management returns a list of vendors where the search characters you entered are matched (Figure 41). The results panel contains vendors whose names, IDs, or vendor sets contain the search characters. You can filter the list of vendors in the search results for either services or supply Spend Type, or display both.
If no matches for the search characters exist, a message appears.
The panel columns can be sorted.
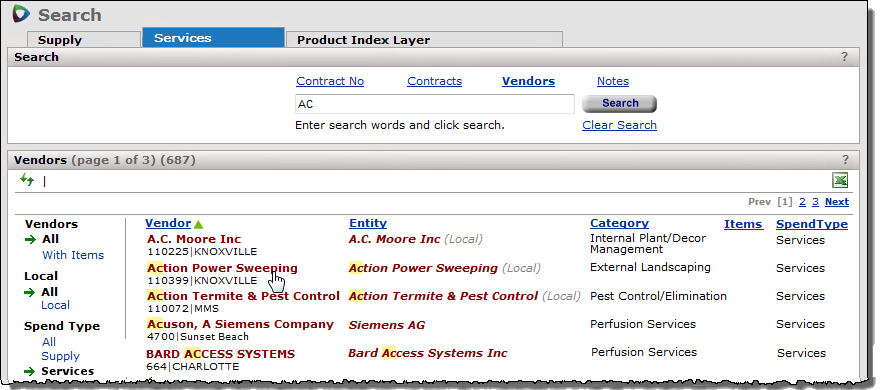
Vendors: lets you display all vendors (services and supply) or only vendors with spend.
Local: displays all vendors, or only vendors that are local.
Spend Type: lets you display vendors with both spend types (services and supply); supply vendors only, or services vendors only (as in Figure 39).
- Filter the results list for supply vendors by clicking Spend Type: Supply.
- Display both services and supply vendors by clicking Spend Type: All.
Table 2 shows the column name and the definition, from Figure 41.
Vendor |
The vendor location name.
|
Entity |
The entity to which each vendor is registered. If the entity is a local entity, the "Local"
appears in parentheses, grayed out.
|
Category |
The category assigned to a vendor entity. The Category helps you locate spend in the Services Analysis Workbench.
|
Items |
The number of items for each vendor, if any. (Services vendors may have no items.)
|
Spend Type |
The type of spend represented by the vendor's contracts. |
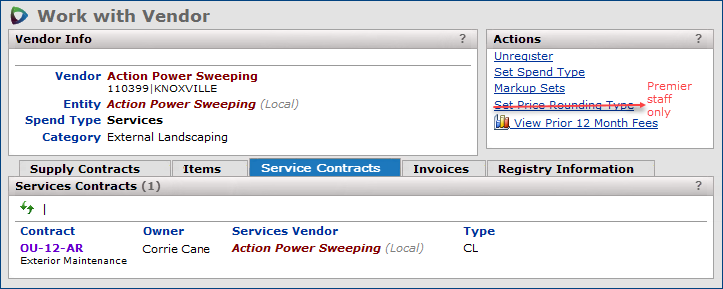
Services contracts vendors (Figure 42) display the Vendor Info panel and Actions panel. In the Vendor Info panel, note the Category definition "External Landscaping" assigned to the vendor entity. Vendors used for services contracts display the Services Contracts tab, Invoices tab (grayed out, if no invoices exist), and Registry Information tab.
If the vendor is not registered, the Entity, Category, and Spend Type fields in the Vendor Info panel do not appear,
and a note is on the Registry Information panel.
In this case, you may wish to register the vendor. You can do so by clicking Register on the Actions panel.
Supply contracts vendors (Figure 43) display the Supply Contracts tab, Items tab, and Registry Information tab. If the vendor is not registered, the Entity and Spend Type fields in the Vendor Info panel do not appear, and a note is on the Registry Information panel. In this case, you may wish to register the vendor. You can do so by clicking Register on the Actions panel.
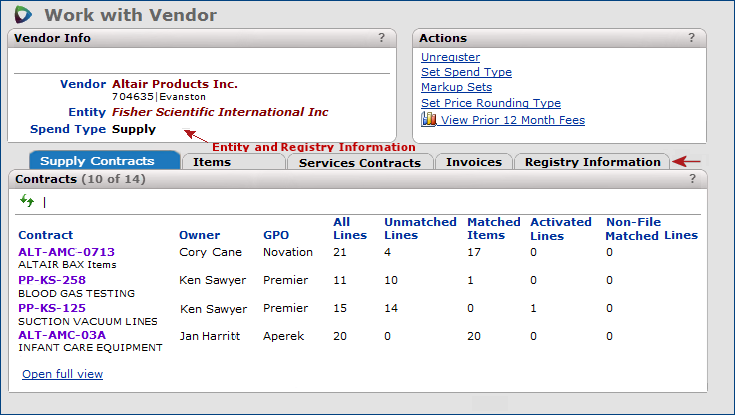
Vendor Info lists the vendor name and vendor entity. If a vendor is not registered, the entity field is missing.
Supply Contracts or Services Contracts lists the contracts for the vendor. Clicking any contract number opens the contract.
Items lists the vendor's items for vendors of supply contracts.
Invoices lists invoices for vendors of services contracts.
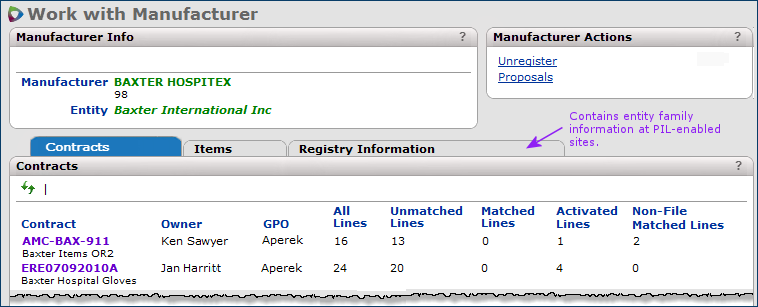
Registry Information displays the entity family -- the parent entity and its child entities and aliases -- to which the vendor belongs. If the vendor is not registered to an entity, a message appears on the panel. In this case, you may wish to register the vendor.
Actions contains activities that you can perform with the vendor.
You can use the Search panel to locate a manufacturer. On the manufacturer search results, click the manufacturer name. Figure 44 is an example of the information available
Manufacturer Info lists the manufacturer name and, when the manufacturer is registered, the entity.
Contracts lists the contracts for the manufacturer. Clicking any contract number opens the contract.
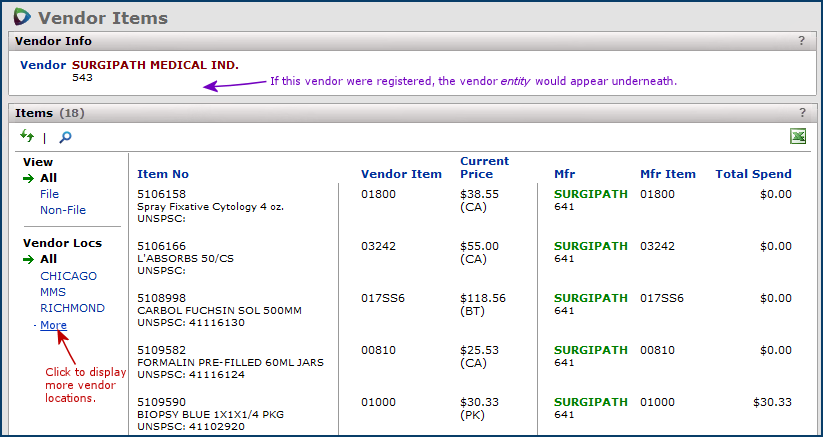
Items lists the manufacturer's items. Click any Item No to display item information (Table 3).
Item No |
The item number used in your item file. The item description is underneath the item number. |
UNSPSC |
The UNSPSC code for the item, if assigned, from your item file. This field may be absent on some versions of the panel. |
Vendor |
The vendor for the item. (Appears for lists of manufacturer items.) |
Vendor Item |
The vendor item number (VIN). This value is the vendor's identifier for the item. |
Current Price |
The current price of the item from your item records. |
Mfr Item |
The manufacturer item number (MIN). |
Total Spend |
The dollar amount of spend for the item. The spend includes file and non-file items. |
Entity |
The entity that the item's manufacturer is registered to. |
Item |
The PIL item description and UNSPSC code for the item. |
Registry Information displays the entity family -- the parent entity and its child entities and aliases -- to which the manufacturer belongs. If the manufacturer is not registered to an entity, a message appears on the panel. In this case, you may wish to register the manufacturer.
Actions links to activities such as displaying manufacturer proposals.
This feature is only available for sites with Sourcing and Contract Management and with the Materials Management and/or Accounts Payable applications.
Normally, spend dollars for analysis in Sourcing and Contract Management are drawn from the set of vendors labeled "MM and AP." These vendors produce both purchase order invoices and non-purchase order invoices.
Vendors labeled "AP-only" are not automatically included in the Sourcing and Contract Management spend pool because hospitals tend to have many such vendors that are small- volume suppliers or services providers, one-time vendors, or are set up as "AP-only" to handle refunds. However, you may have AP-only vendors with significant amounts of spend -- services vendors -- that you wish to analyze in Sourcing and Contract Management.
To include spend from AP-only vendors in Sourcing and Contract Management, you set a flag on the vendor record in Materials Management or Accounts Payable. The Vendor Edit panel.
Instructions are in the advanced vendors setup chapter -- Work with Vendor Information: Advanced - "Set Up an AP-Only Vendor" -- for Materials Management and Accounts Payable.
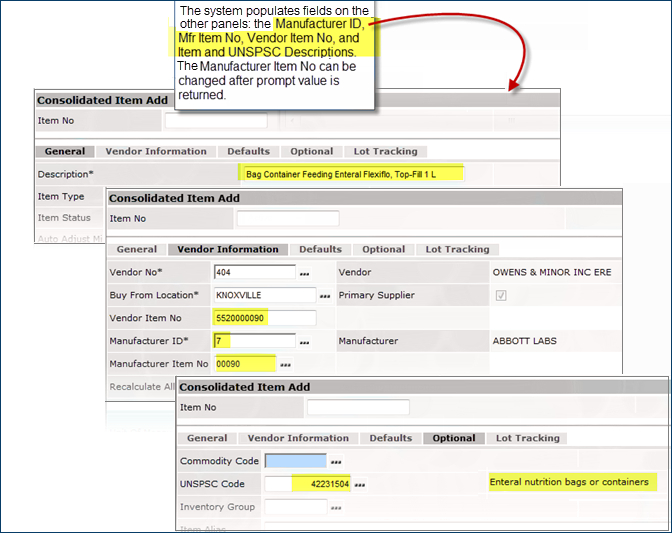
When adding an item to the Item Catalog, you can now use the PIL to find and select the item. On the Consolidated Item Add panel's Vendor Information tab, the Manufacturer Item No (MIN) field lets you select an item from the Product Index Layer. When you select the manufacturer item, the system populates several fields on other panels with PIL data for the item.
Also, if you wish, you can override the MIN by keying in a different value in the Manufacturer Item No field.
This feature is only available for Sourcing and Contract Management sites that also have the ERP - Materials Management application.
Note: If you wish to use this feature, contact the Help desk. A system flag must be set for PIL access with Consolidated Item Add.

A report object "Product Index Layer Item Extract" allows you to export Product Index Layer information to update your site's materials management system, for systems other than 's.
These fields are on the report object:
| Vendor Loc Name | PIL Item Desc | |
| Vendor Loc | PIL Item Create Date | |
| Vendor Item No | PIL Entity Zipcode | |
| UNSPSC Code | PIL Entity URL | |
| Record Count | PIL Entity Tax ID | |
| Mfr Name | PIL Entity State | |
| Mfr Item No | PIL Entity Name | |
| Mfr ID | PIL Entity DUNS No | |
| Item Sub Class | PIL Entity Create Date | |
| Item No | PIL Entity Country | |
| Item Desc | PIL Entity City | |
| Item Class | PIL Entity Address Line 3 | |
| Vendor Set | PIL Entity Address Line 2 | |
| Vendor Entity Name | PIL Entity Address Line 1 | |
| PILUNSPSC Code | PIL Created | |
| PIL Updated | Orig Mfr Item No | |
| PIL Source Description | Noiseless Vendor Item No | |
| PIL Source | Noiseless Mfr Item No | |
| PIL Parent Entity Zipcode | MIN VIN ID | |
| PIL Parent Entity URL | Manufacturer Catalog | |
| PIL Parent Entity Tax ID | Local Registered YNB | |
| PIL Parent Entity State | Local Registered YN Desc | |
| PIL Parent Entity Name | Item Vendor ID | |
| PIL Parent Entity Create Date | Item Sub Class Desc | |
| PIL Parent Entity Country | Item Class Desc | |
| PIL Parent Entity City | Item Catalog ID | |
| PIL Parent Entity Address Line 3 | Different UNSPSC Code YNB | |
| PIL Parent Entity Address Line 2 | Different UNSPSC Code Desc | |
| PIL Parent Entity Address Line 1 | Different Min YNB | |
| PIL Item No | Different Min Desc | |
| PIL Item Description | Catalog |
Several Product Index Layer features are available from the Sourcing and Contract Management Administration menu. For example, you can view a log of contract activations.
The Contract Price Activations Log is a single, searchable list of price activations for all contracts.
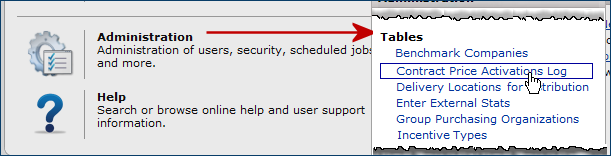
Other features on the Admin menu include (Table 4):
Connector Status |
Clicking this link displays recent activity for connectors. A connector is an element of the application used to pass data between stand-alone MMIS systems, such as Lawson, and Sourcing and Contract Management. Only sites with an MMIS other than ERP - Materials Management have connectors. See View a Connector's Status for details. |
Open Batch Jobs |
Displays batch jobs that have been opened. Batch jobs run in asynchronous mode. |
Price Tolerance - Activation |
Sets a system tolerance for price changes. See Setting Price Change Tolerances for details. |
Non-Contractible Items |
Click to view a list of items that are never purchased on contracts. |
| Scheduled Jobs | Displays a list of scheduled jobs. You can create, edit, or delete a scheduled job. See Set Up Schedules for Batch Jobs. |
| Weekly Purge | Allows administrators to purge obsolete records, such as old archived reports. |

Copyright © 2023 by Premier Inc. All rights reserved.