Analysis Projects
Version
Contents
Overview
The Projects feature lets you segment and study spend, create and send RFPs (requests for proposals) for better pricing, and upload returned bids. You can review and compare returned bids, benchmark prices, and current prices. (Price comparison is available on several levels, including total dollars and item dollars.) You can award contracts to bids, then track savings on project items purchased on the contracts.
The Projects feature enables you to...
- Identify and examine segments of spend in terms of manufacturer, manufacturer/MIN, vendor, vendor/VIN, contract, item keywords, UNSPSC codes, and others. The Region/Org filter lets you work with spend for affiliate organizations.
- Compare prices for the same items from various sources: current prices, prices from returned RFPs, prices on contracts, and benchmark prices.
- Review monthly spend by supplier market share percentage, quantity, and amount.
- Review spend by organization, including graphs of spend dollars by organization and region.
- Automatically generate requests for proposals (RFPs) for a project's spend segment, and send the RFPs to suppliers.
- Automatically generate requests for benchmark prices from registered benchmark companies.
- Email or upload returned proposals and benchmarks to a project.
- Award contracts.
- Review your progress toward goals using graphs and charts provided on the Project Status tab.
- Use the Savings feature to monitor project savings and savings opportunities.
Sourcing and Contract Management generates requests for proposals (RFPs) and benchmark price requests in Microsoft Excel format. You can email an Excel RFP or benchmark worksheet to a supplier or benchmarking company directly from a project. When you receive return email with the completed worksheet, you can forward the worksheet to Sourcing and Contract Management using email, or you can upload the worksheet from Excel. The returned worksheet with the proposal or benchmark data is automatically associated with the correct project, and available in the project for further review. You can then compare the prices to current prices and to other proposals and contracts.
To import returned proposal/benchmark worksheets into Sourcing and Contract Management, you will need the Excel Upload Add-In. The add-in is available as a download from the Administration menu. After downloading the Excel add-in, install and enable it. Be sure to perform the install before you start working with proposals and benchmarks, and creating contracts. Instructions are below.
You can create new projects using the Excel Project Template spreadsheet. The Excel spreadsheet originates in the Analysis Workbench. Once you have identified an analysis group for the project, you download the data from the analysis group to Excel, add non-spend items to the spreadsheet, and then upload the spreadsheet to create a project. You can add multiple items to an existing project at any time with the spreadsheet template.
Note: In this topic, "bid" and "proposal" are used interchangeably.
Suggestion: Read the discussion on spend and savings definitions and keep it open for reference as you go through this topic.
Security
The role object "CAProjects" controls access to this feature. To view "Projects," the minimum setting must be View. To edit bid and benchmark lines, the minimum setting is Modify.
For details about the settings required for the activities within this menu, see Role objects associated with Sourcing and Contract Management.
Workflow
- Use the Analysis Workbench to examine and save a segment of spend as an analysis group.
- Create a project containing the saved analysis group.
- Add additional items to the project, if desired.
- Create and send RFP(s).
- Upload received bid(s) into the project.
- Create and send Benchmark request(s).
- Upload benchmark prices to the project.
- View existing contract(s) containing project items.
- Add existing contract(s) to the project for comparison.
- Compare all pricing information in the project.
- Negotiate with manufacturers as needed on the basis of price comparison.
- Award contract(s).
- Track savings.
Setup
You must Enable the Excel Add-in to send and receive RFPs and Benchmark requests in Projects.
- Select the Excel Upload Add-in from the Administration menu.
- Download and run the setup file.
- Enable the Add-in in Excel.
If you are using benchmarking, you must establish a relationship with a benchmarking company (e.g., ESRI) and create a link to the company (as described below) from the Sourcing and Contract Management Administration menus. The link lets you send benchmark requests and upload returned data.
- Set up benchmarking companies.
Setup: Download and Enable the Excel Upload Add-In
The add-in imports bids, proposals, benchmarks, and contracts from an Excel file. The Excel project template imports new projects or adds items to existing projects. To work with the Excel imports (proposals, benchmarks, project items) you need to download and enable the Excel Upload Add-In.
If you are installing a new Excel add-in from a new Sourcing and Contract Management Service Pack, disable (by unselecting) the old add-in that you are currently using. The instructions below explain how to install, enable, and disable an Excel add-in.
- Add-ins have the .xlam file extension.
- Templates with embedded macros now have the file extension .xlsm.
To download and install the Excel upload add-in on your local system:
- From the Administration > Other menu, select Download 'Excel Upload Add-in' (Figure 1).
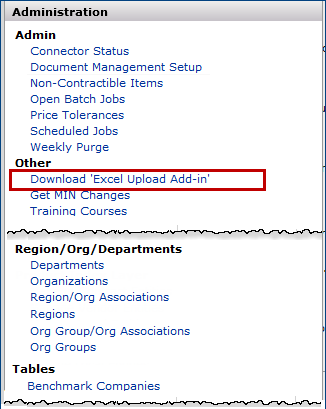
Figure 1 - Downloading an Excel Add-In for Uploading Bids
The panel for downloading the add-in appears (Figure 2).
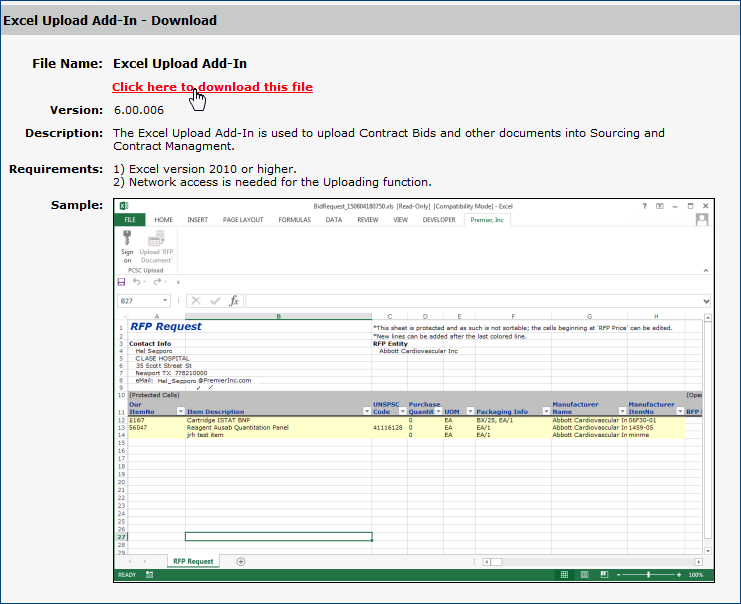
Figure 2 - The Add-In Download Panel
- Click "Click here to download this file".
The Microsoft Windows File Download panel appears.
- Click Run.
Depending on your Internet Explorer Security Settings, a verification panel may appear.
- If the verification panel appears, click Run.
The installation wizard panel appears (Figure 3). Follow instructions on the install Wizard.
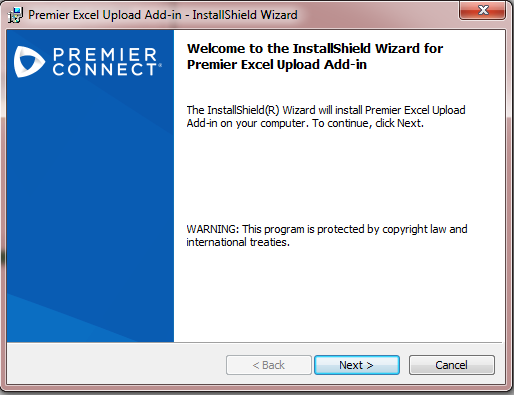
Figure 3 - The Installation Wizard's Initial Panel
- Click Next.
The next installation wizard panel appears and displays the destination for the downloaded add-in file (Figure 4).
On the Destination Location panel the Destination Folder specifies
where the add-in will be installed. If you wish to install the add-in
at another location, click Browse and specify the location.
Caution: The download process overwrites any existing spreadsheet
add-in with the same name. If you have an existing spreadsheet with the same
name, you may wish to rename the existing spreadsheet so that its data are preserved.
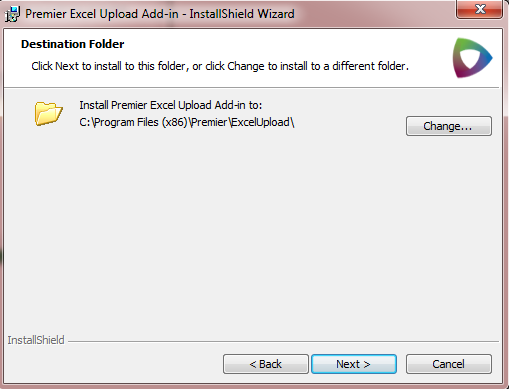
Figure 4 - Destination Location for Installed Excel Add-In
- Click Next.
The install wizard offers you the chance to review settings for the add-in (Figure 5). Click Back to review the settings, or click Install to proceed.
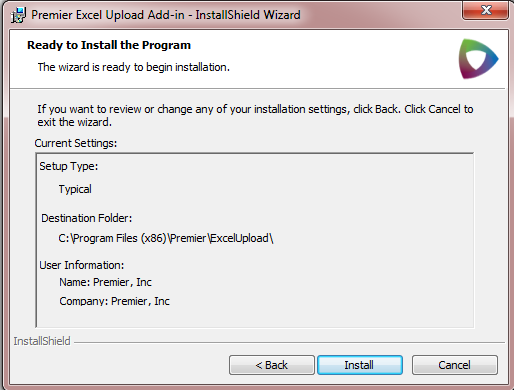
Figure 5 - Reviewing the Settings for the Excel Add-In Install
The application installs the add-in to the location specified and sends you a message when installation is complete (Figure 6).
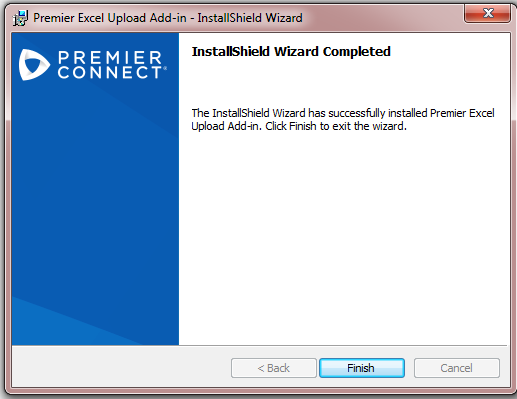
Figure 6 - Finish Template Installation Panel
- Click Finish.
The add-in template is installed and available on your local system in the default location, or in the location you specified.
Next, you need to enable the add-in.
Enabling/Disabling Excel Add-Ins
The steps for enabling an Excel add-in (once you have installed it) are the same as the steps to disable an existing Excel add-in (before you install a new version). The difference is that to enable the add-in, you select the box next to the add-in in the steps below. To disable the add-in, you unselect the box.
Note: You only need to perform the enable step once.
Users with Excel 2003 (or any versions earlier than 2010)
To enable/disable an add-in:
- Open Microsoft Excel.
- From the Excel Tools menu, select Add Ins.
The Add-Ins panel appears.
- Review the add-ins on the panel. The name of the add-in is Excel Upload Add-In.
 To disable an old add-in before installing a new one, click the selected box on the left to unselect the add-in (Figure 7).
- Click OK.
To enable a new add in after you have installed it, select the box.
- Click OK.
Note: If the add-in is not displayed, it was not downloaded to the default folder.
On the installation wizard panel for the destination, if you clicked Browse and selected a destination other than the default, you need to specify the destination folder.
If the add-in that you wish to enable is not listed on the Add-Ins panel:
- On the Add-Ins panel (Figure 7), click Browse and go to the folder where you saved the add-in file when you downloaded it.
The file name is ExcelUploadAddIn.xlam.
- Select the add-in.
The add-in name appears on the Add-Ins panel.
- Click the box on the left to select it (Figure 7).
- Click OK.
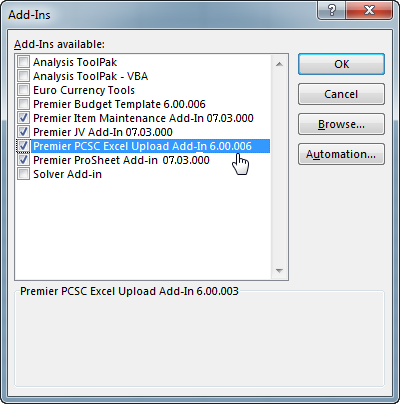
Figure 7 - The Microsoft Excel Tools Add-Ins Panel
Users with Excel 2010 and Excel 2013
To enable or disable an add-in:
For Excel 2010:
- Add-ins are available from the Add-Ins tab above the main ribbon.
- Click the Add-In tab.
- To browse for the location of an add-in:
- Click the File tab.
- Click Options.
- Select Add-Ins from the options menu on the left.
- Click Go at the bottom of the Excel Options panel in the “Manage Add Ins” field.
- The Add-Ins panel appears. The file name is ExcelUploadAddIn.xlam.
- If the add-in is not on the panel, click the Browse button to locate the add-in within the folder that it was downloaded to.
- To enable the add-in, click the select box so that a check appears.
Click OK.
- To disable the add-in, click the select box to remove the check.
Click OK.
For Excel 2013:
- Add-ins are available from the Options window.
- Open the File tab.
- On the left-hand menu, click Options.
The Options window appears.
- Click the Add-Ins link towards the bottom of the Options window.
The Excel Options panel appears with a list of add-ins.
- To browse for the location of an add-in:
- Click Go at the bottom of the Excel Options panel in the Manage field.
- The Add-Ins panel appears. The file name is ExcelUploadAddIn.xlam.
- If the add-in is not on the panel, click the Browse button to locate the add-in within the folder that it was downloaded to.
- To enable the add-in, click the select box so that a check appears.
Click OK.
- To disable the add-in, click the select box to remove the check.
Click OK.
After you disable an existing add-in, you can install the new one. (Don't forget to enable it once you have installed a new version.)
Note: If you are removing an add-in completely (perhaps to replace it), you must not only delete/uninstall it from the appropriate folder, but also delete it from the add-ins list (Figure 7).
If you have enabled a new add-in, it is now ready for use.
Setup: Create a Benchmark Company
A company must be defined in Administration to be available for benchmarking.
To define a company:
- From the main Contents, go to Administration > Tables > Benchmark Companies.
- In the Benchmark Companies panel, click Create Benchmark Company (Figure 8).
A panel appears to identify the benchmark company.
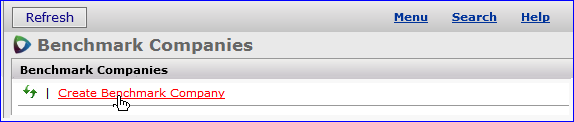
Figure 8 - Create a Benchmark Company
- On the Create Benchmarks popup panel, fill in the blank fields and click Save (Figure 9).
It is important to complete these fields because the contact information is copied to the Excel spreadsheet that you send to the benchmarking company. Be sure to include http:// in the URL.
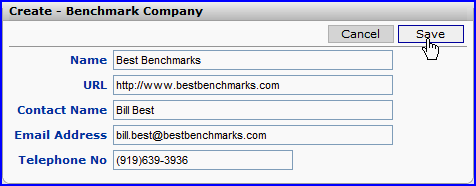
Figure 9 - New Benchmark Company Information
Review the Projects List
The list of projects in progress at your site is available from the Projects list. You can also create a new project from this panel.
To view the list of projects, on the main Contents, click Projects.
The Projects list appears. (If no projects have been created, the Projects panel is empty.)
By default, the list displays Recently Viewed projects.
Click All under Owner (left side) to view all projects (Figure 10).
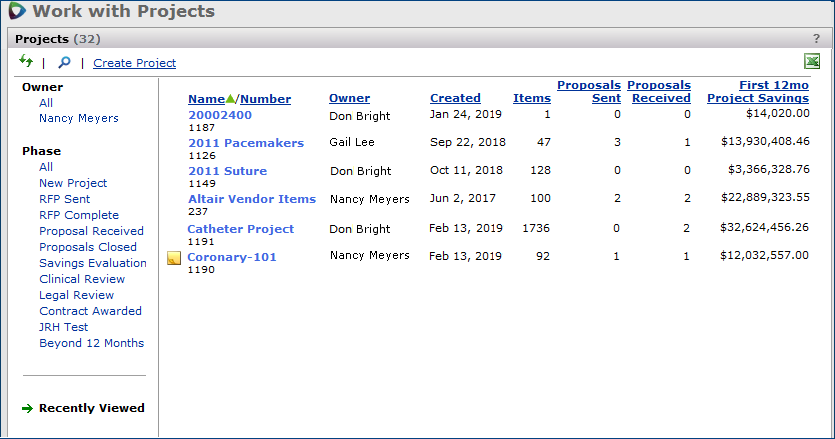
Figure 10 - The List of Projects on the "Work with Projects" Page, Projects Panel
If your site uses phasing, the list includes projects in all phases by default.
You can filter the project list for projects that have reached a particular phase:
- Click the desired phase on the left side under Phase.
- Click Recently Viewed to filter the list for projects that have been most recently opened.
Create an Analysis Project
You can create a project using the Project panels. This method is the most common and recommended.
You can also use the spreadsheet upload method to create a project. For example, if you are working with an analysis group whose items you wish to edit for inclusion in a project, you can download the analysis group data to an Excel spreadsheet, edit it, and then upload it to create a project. This method is described in the subsequent section: Work with Projects Created from the Project Template Spreadsheet. You should also review the discussion on downloading the analysis group spreadsheet in the spend analysis chapter.
The instructions below explain how to create a project using the Project panels.
To create an analysis project:
- Click Projects on the Sourcing and Contract Management main Contents or on the page menu.
The Projects panel displays a list of analysis projects, if any have been created (Figure 11).
Figure 11 - Link on the Projects Panel for Creating a New Project
- At the top left of the Projects panel, click Create Project (Figure 11).
The Create New Analysis Project panel appears (Figure 12).
Figure 12 - Creating an Analysis Project
- Enter a description or name for the project.
- If you wish to add values in any user fields set up for projects, click User Fields.
- The user fields appear, if any have been defined.
- Enter data in the user fields as needed, and save it.
- Click Save to save the project.
- The system assigns the name to the saved project and generates a project number. The project name is listed on the Projects panel the next time you open Projects. (You can also refresh the panel to view the project name.)
- The "Work with Project" page appears with the project header information on top and tabbed panels at the bottom (Figure 13).
At the bottom, the Project Contents tabbed panel appears. The Mfr/MIN data is the default display.
Note: Initially, the Project Contents panel is empty unless you previously created the project from a saved analysis group (in the Analysis Workbench). In that case, items appear for the analysis group that you built.
The next step is identifying spend for the project.
Identify Project Item Spend
After you create a project header, you should identify spend for the project. You can create one or more analysis groups from within a project, or call in an analysis group that you created and saved previously. You can then review spend data, generate one or more requests for proposal (RFPs) for the items, and compare prices on bids, benchmarks, and contracts for different suppliers.
Analysis projects are based on a static date range and do not include rolling monthly spend data. As months progress, the data included in the project remains static so that you only analyze bids for a predefined period.
When you add items from the Analysis Workbench to an existing project, the spend for those items is based off of the project’s date range. For example, if the date range of a project is July 2016 through June 2017, then the spend for items added to the project is only considered from that specific range — July 2016 through June 2017. Spend is not calculated based on a rolling 12 month period. By default, the date range is set to Prior 12 Months for new projects, but you can go back as far as 24 months prior spend.
When you include a segment of spend, you can also change your mind and exclude the spend from the project. You can view both included and excluded project spend by class, class and subclass together, manufacturer, manufacturer and MIN together, vendor, vendor and VIN, UNSPSC code, item, contract, and category (for -managed contracts). From the Analysis Groups view, you can exclude an analysis group from the project.
You can also work with spend by organization. This strategy enables analysts to generate projects that involve affiliate organizations only, including RFPs and awarded contracts. See Work with Affiliate Spend.
Important: You may wish to review the spend definition types, summarized in the Spend Definitions topic.
To add item spend to a project:
- From the "Work with Project" page Actions panel, click Add Items (Figure 13, right side).
The Add Items box appears.
- Select Off Contract, File Items, Non File Items, or All Items (Figure 13).
Figure 13 - Adding Items to a Project
The Contract Detail Items and Manually Add Items options let you work with items whose spend is not currently visible in Analysis. For example, if you are adding items to a project for an affiliate organization and wish to include items that are not represented in the organization's spend, you can pull the items in manually.
- Items from a contract:
Click Contract Detail Items. A search panel appears. Use the panel to locate and select the contract.
Once you have selected the contract, the system displays a message while the contract items are loading into the analysis group. The items are added to the project as an analysis group. Once the load process is finished, you can add more items or proceed with analyses. See the detailed discussion of this option in the next section.
- Items, manually:
Click Manually Add Items. A search panel appears. Use the panel to locate and select the item's manufacturer.
Once you select the manufacturer, a panel opens for you to identify the item. Enter the Mfr Item No, item Description, and UOM. You can optionally enter the Conversion Factor and/or Price. The system displays a message while it loads the item. The items are added to the project as an analysis group. See the detailed discussion of this option in the next section.
- The Add More Items panel appears in the middle of the page (Figure 14).
Spend appears at the bottom of the page in the Prior 12 Months panel. The list is organized by Keywords, but you can select any other category (e.g., Class) to organize spend differently.
Figure 14 - Including Items in a Project
- In the Prior 12 Months panel on the left side (bottom), use the Keywords, other View descriptors, and the search (click
 ) to locate and select the segment of spend that you wish to include in the project.
- Click the View that you wish to use for selecting spend.
- Click the selection box for each element that you wish to include.
-
For Keywords, mouse over each keyword to display its selection box.
- For Org/Group, if you have defined organization groups, you can select spend for those groups only. This tactic is useful in projects for affiliates. See Work with Affiliate Spend for details.
On the Add More Items panel (Figure 14), the system displays spend dollars for your selected keywords, UNSPSC codes, classes, and other elements.
In Figure 14, Add More Items contains the keyword Sterile, which the user had selected from the keywords list. (You can uncheck the selection box for any element on the Add More Items panel, if you wish.)
- On the Actions panel, click Add These Items to include the spend for the items in the project (Figure 14, right side).
- If you decide not to add the items, click Cancel Adding Items (Figure 14, yellow arrow) on the Actions panel.
- Mouse over the refresh message, if the message appears.
The "Work with Project" page refreshes, and the Project Contents tabbed panel appears. The Project Contents panel returns to the default view (Mfr/MIN).
You can add and remove spend from the project up to the point where you award a contract.
- Once a contract is awarded, the items selected for the project are final: you cannot include or exclude any more items from the project, or add contracts (on the Proposals panel). If you use phases, the phase is "Contract Awarded."
Spend Values in Projects Created from Analysis Groups
When you create a project from an analysis group using the Analysis Workbench, you may see higher spend values and more items in the project, compared to the original analysis group.
Imagine you use a keyword to create an analysis group in the Analysis Workbench, and then create a project. When you create a project from the analysis group, you may see more items than in the analysis group, and with proportionally higher spend values. The reason is that the project pulls spend for all MINs that are the same as the analysis group MINs. In addition, project items include items from the item catalog/item file that match the analysis group MINs, but that have no spend.
The objective is to get the complete set of items relevant to the segment of spend under analysis so that you can solicit bids.
You can always review and eliminate any items that you do not want to include in the project.
Examples
Example 1. In the Analysis Workbench, you select item MIN 112233A from manufacturer entity Bonner Supply. Another item with the same MIN exists for entity Bonner Supply Northwest. Bonner Supply and Bonner Supply Northwest are both child entities of Bonner Supply International, Inc.
- In the Analysis Workbench group, only the first item from Bonner Supply is included.
- The project created from the analysis group includes both the item from Bonner Supply, and the item from Bonner Supply Northwest, and any other items with the same MIN. All items with the designated MIN are included in the project, whether or not the items have spend, so that you can solicit bids on items that you are not currently purchasing.
Example 2. In the Analysis Workbench, you create an analysis group selecting items with the keyword "pins." Items with "pins" in the item description are included in the group. Your item records also contain an item with the same MIN as one of the included items, except that the item description has a misspelling — e.g., "pens."
- The Analysis Workbench group only includes the "pins" items.
- The project also includes the "pens" item and its spend, if any.
Modify the Spend Date Range
You can manually change the static spend date range (Figure 15, red box) on an existing project as long as no RFPs or benchmark documents have been created. Once RFPs or benchmarks exist for a project, you must delete all of them before the date range can be unlocked and edited again.
You can modify this date range from the Project Summary panel on the "Work with Project" page using one of two options:
- Define Prior Months of Spend (select from a range of 1 to 24 months)
- Set a User Specified range (select specific From and To dates)
When modifying the date range, you can only change it to months prior to the current date. For example, if the current date is 06/14/2017, you can set the From and To dates to anything between 06/2015 and 05/2017 (24 month range).
Note: When awarding a contract, the spend date range that was defined in the project at the creation of the first RFP is used. Once a contract is awarded, you can no longer edit the range. You must delete all RFPs and benchmark documents in order to enable the ability to modify the date range again.
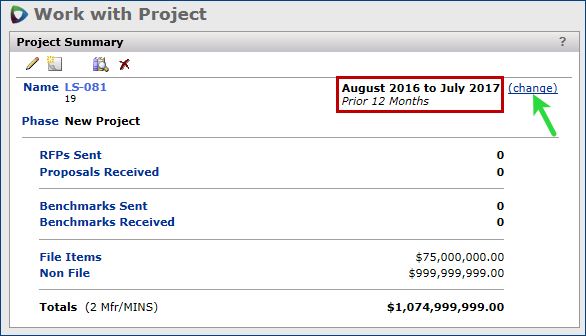
Figure 15 - Changing the Spend Date Range for an Analysis Project
To modify the spend date range for an existing analysis project when no RFPs or benchmark documents exist:
- On the "Work with Project" page, click the (change) link (Figure 15, green arrow) next to the spend date range in the Project Summary panel.
- Select one of the Month Range options (Figure 16) in the Edit - Change Date Range panel:
- Prior Months of Spend – Use the drop-down box that appears to select the number of prior months to include in the project spend; 12 months is the default option, but you can select anywhere from 1 to 24 months.
- User Specified – Select specific month/year dates for the From and To ranges.
- Click Save.
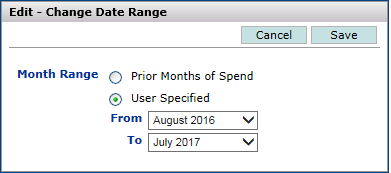
Figure 16 - Options for Changing the Spend Date Range for an Analysis Project
To modify the spend date range for an existing analysis project when at least one RFP or benchmark document exists:
- On the "Work with Project" page, click the Unlock Date Range link (Figure 17, green box) above the spend date range in the Project Summary panel.
Hover over the grayed-out (change) option to view the tooltip explaining why this option is currently unavailable.
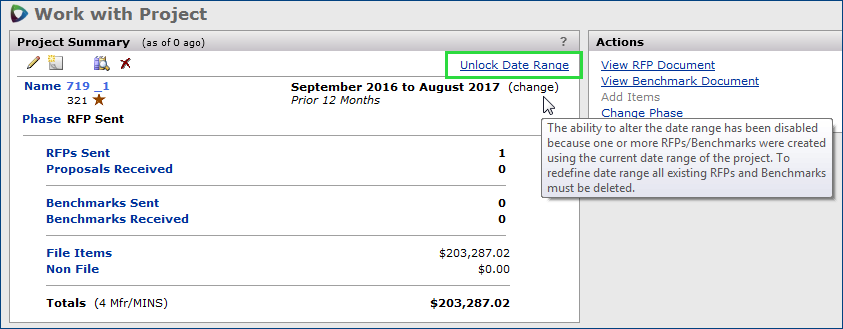
Figure 17 - Unlock Date Range Link for Project with Existing RFPs
- In the Unlock Date Range panel, click Submit to delete all RFP and benchmark documents from the project.
- Click the (change) link (Figure 15, green arrow) next to the spend date range.
- Select one of the Month Range options (Figure 16) in the Edit - Change Date Range panel:
- Prior Months of Spend – Use the drop-down box that appears to select the number of prior months to include in the project spend; 12 months is the default option, but you can select anywhere from 1 to 24 months.
- User Specified – Select specific month/year dates for the From and To ranges.
- Click Save.
The spend columns on the Contents tab of the "Work with Project" page reflect any changes you make to the spend date range in these steps.
Views and Links on the Project Contents Panel
Once you have identified one or more analysis groups for a project, the next time you open the project, the Project Contents panel displays the Mfr/MIN view by default. This view organizes spend by manufacturer and manufacturer item number You can look at the project spend in different ways by using the view descriptors and the other controls on the left of the panel.
View descriptors for selection
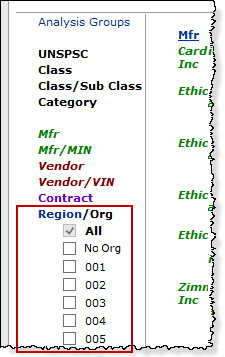
You can display project spend by UNSPSC code, item Class and associated subclasses, manufacturer (Mfr), manufacturer item number (Mfr/MIN), vendor, vendor item number (Vendor/VIN), Category, Contract or by Region/Org. These filters are on the left (Figure 17).
When you are working with multiple organizations, you can filter spend by organization, if you wish. You can select particular organizations whose spend you wish to review, include spend associated with no organization, or use all organizations. When you filter spend by organization, the other descriptors — UNSPSC, Class, Class/Sub Class, Category, Mfr, Mfr/MIN, Vendor, Vendor/VIN and Contract — only apply to the selected organization(s). For organizations with spend in the project, you can display summary graphs and details.
- Click the descriptor of interest on the left.
- Figure 17 is an example of spend organized by UNSPSC. UNSPSC is selected.
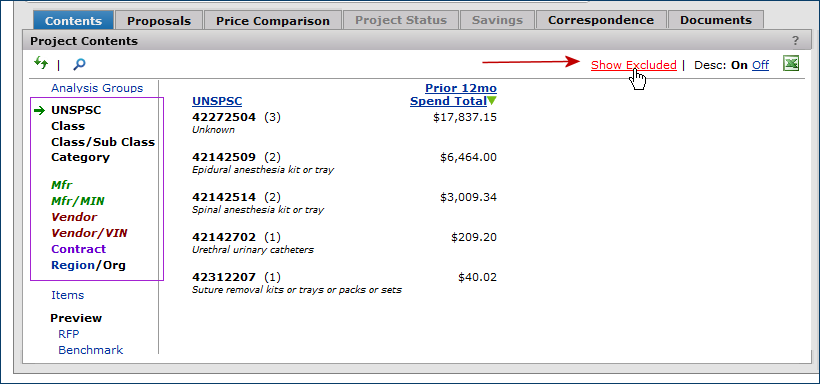
Figure 17 - Project Spend Organized by UNSPSC Code
Another example, Figure 18, displays spend by Class/Sub Class. You can sort the spend by any underlined column header.
In a project, when you organize spend by class/subclass, you can filter out spend by item for a particular item class and subclass. For example, in Figure 18 (top image) the Item Class Suture 12 contains spend for 365 items.
- To display spend by item in an item class and associated subclass, click the integer next to the class. (This value is the number of items in the class/subclass.)
Figure 18 (bottom image) displays item spend for Class 12, Sub Class 99.
- Click [Clear] (green box on the lower image, next to Filters) to clear spend for items in the class, and return to all classes.
Similarly, when you have the list organized by UNSPSC code, Mfr, or Contract, clicking the number of items in parentheses next to each UNSPSC code, manufacturer, or contract filters the list and displays items for that particular element.
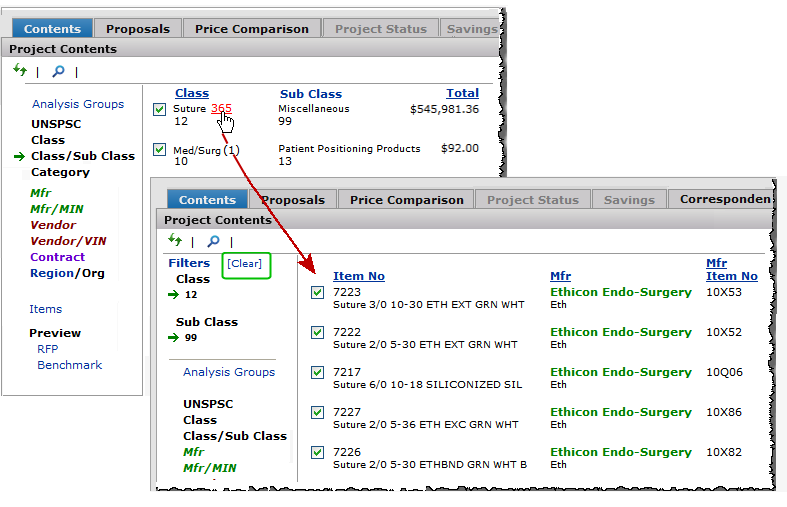
Figure 18 - Using the Item Class Category to Examine Spend in a Project
Use the Analysis Groups View
The Analysis Groups view lists the analysis groups in the project (Figure 19). A project may contain one, or several analysis groups.
Click Analysis Groups to see a project's analysis group(s) (Figure 19).
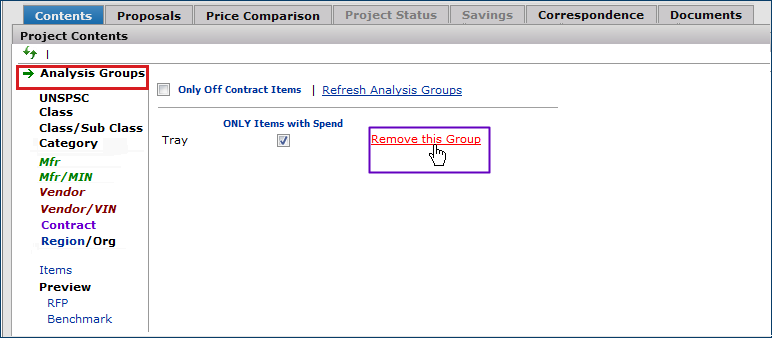
Figure 19 - Project Items: Analysis Group View
In Figure 19, the project contains an analysis group named "Tray."
- To remove an analysis group: Click Remove this Group (Figure 19, right side, purple box). A panel appears for you to verify removing the group, or canceling.
- To include only items with spend in the analysis group: Select ONLY Items with Spend (Figure 19, center of the Project Contents panel).
Displaying project spend only for items that are not on any contract
For any project, regardless of the type of items originally specified (file, non-file, off-contract, or all), you can switch to viewing off contract spend only, if you wish. Figure 20 is an example.
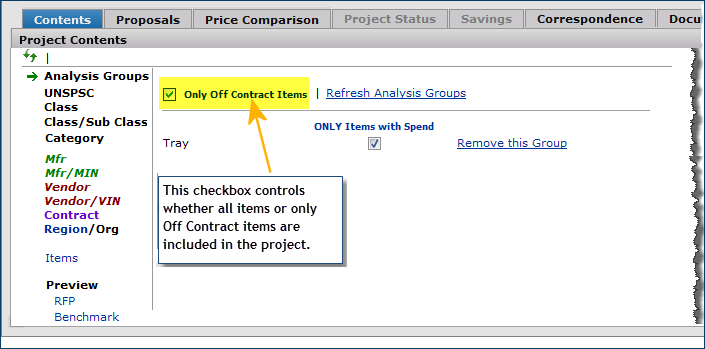
Figure 20 - Items Analysis Groups View: Off Contract Items Only
When the Analysis Groups view is selected (left), the check box Only Off Contract Items appears. The check box controls whether the project includes any item or only items that are off contract.
When you create a project from the beginning based on off-contract spend, the Only Off Contract Items checkbox is checked, by default. You can uncheck or recheck the box at any time to display spend for any item, or spend only for off-contract items.
Clicking the link Refresh Analysis Groups (see Figure 20) reevaluates all analysis groups. Any new items, created since the project was started, are added to the project. This link is available until items are finalized for the project.
Display Spend Charts and Graphs for Organizations
You can review spend by organization from the pie charts and the bar graph available from the Project Contents panel Region/Org link (Figure 21).
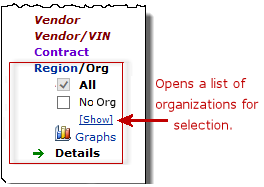
Figure 21 - The Region/Org Link
To use the Region/Org filter:
- Click Region/Org.
Several options appear for selecting organizational spend.
The default setting is All (to display spend for all organizations).
Selecting No Org displays spend not associated with any organization.
- Click [Show]. A list of organizations appears.
- Select one or more organizations whose spend you wish to display in the Graphs or Details.
- Once the list of organizations is displayed for selection, you can click [Hide] to close the list.
Note: The list of organizations for selection is controlled by your Data Profile. If you are not allowed to work with an organization's data, based on your Data Profile settings, that organization does not appear.
The Graphs and Details views display only data for any selected organizations, all organizations, or spend that is not associated with any organization (No Org).
Figure 22 is an example of the Graphs.
- In the pie charts, mouse over a portion of a graph to display the percentage for the graph segment.
- In the bar graphs, mouse over a portion of a graph to display the spend dollars for the graph segment.
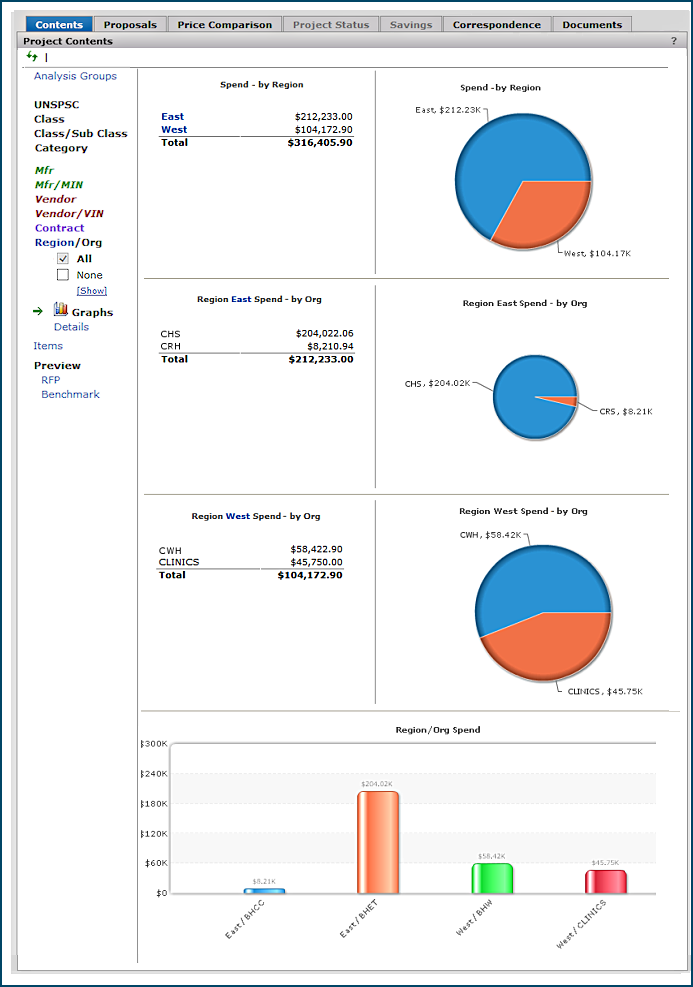
Figure 22 - Spend Dollars in a Project by Organization and Region
Use the Items View
The Items view displays spend by item.
Figure 23 is an example of the Items view. Figure 23 contains details such as the catalog Item No, the manufacturer (Mfr) and manufacturer item number (Mfr Item), spend for the item over the previous months, the quantity of the item represented by the spend (Qty), the UOM for the quantity, prices, and others. Help for the panel includes the columns and their meanings. (Click ? in the upper right for help.)
Figure 23 - Project Items: All Items View
The Items view (Figure 23) displays spend in these subviews:
- All Items – Spend for all items that meet the analysis group selection criteria.
- Unmatched – Spend that does not match a contract line. Unmatched spend can be either file or non-file spend.
- Activated – Spend for items in activated contract lines. Activated spend is always file item spend.
- Matched –Spend for items that match unactivated contract lines. Matched spend can be either file or non-file spend.
- File Item Exists – Non-file spend that matches a file item (Mfr/MIN/Vendor/VIN) for the same organization. The MMIS catalog is used to determine that the file item exists for the same organization as the non-file spend.
You may wish to review spend definitions.
To display item details in the Items view:
- Mouse over the Org number or the Item No (if there is no Org) and click the "+". See Figure 23.
The Item Details panel appears (Figure 24).
Figure 24 displays item details for a project that has not yet had a contract awarded. The item is not on any existing contract, so the Contract Price is n/a. The Purchase Price is the price at the last purchase.
Figure 25 displays an item from a different project with a contract already awarded.
- Under Pricing (Figure 25), the yellow highlight on the MMIS Price and the Contract Price indicates a difference between the prices. Since the item in Figure 25 is only matched on a contract and not activated, we might expect the MMIS price and contract price to be different.
- Under Contract Savings in Figure 25, the Savings value is zero. Even though on this project a contract has been awarded and savings are being calculated, this particular item has no savings.
- The Figure 25 item has had no purchases in the past 12 months: No value is associated with Comparable Spend, which is the total spend dollars for the item over the timeframe for this particular project.
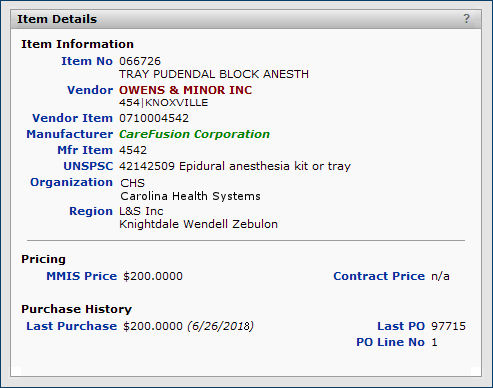
Figure 24 - Project Item Details: No Awarded Contract |
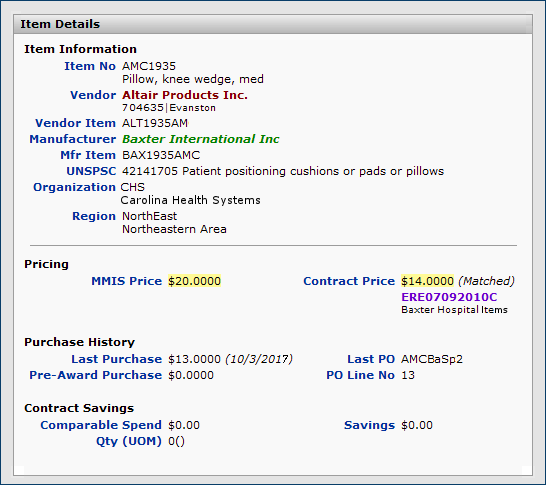
Figure 25 - Project Item Details: Awarded Contract |
To display item descriptions:
- In the Items view, to turn item descriptions, manufacturer IDs, and contract names on or off, click the link next to Desc: (Figure 23, upper right). The default is On.
To display item catalog information:
- In the Items view, mouse over the Item Number. (See Figure 23.) Click to display Item Catalog Information. (See Figure 26.)
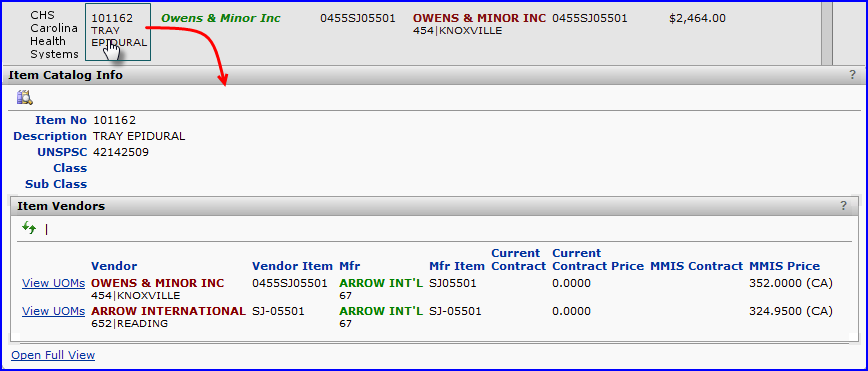
Figure 26 - Item Catalog Information
To sort by a column:
- To sort the panel by a column (e.g., sort by Mfr): Click the column header. The sort toggles between ascending and descending. A small green arrow shows the direction of the sort.
You can exclude spend for manufacturers from a project. Excluding spend is only allowed before you award a contract. When a contract is awarded, project spend freezes.
To exclude spend, work with the Mfr and Mfr/MIN views. From the Mfr view, you can open a display of spend dollars and a count of project items for both a parent manufacturer family and individual "child" manufacturers. You can also exclude an entire manufacturer family, or exclude only individual "child" members in the family.
In the Mfr view, the initial Project Contents panel contains the Parent entity spend (Figure 27), sorted descending by amount.
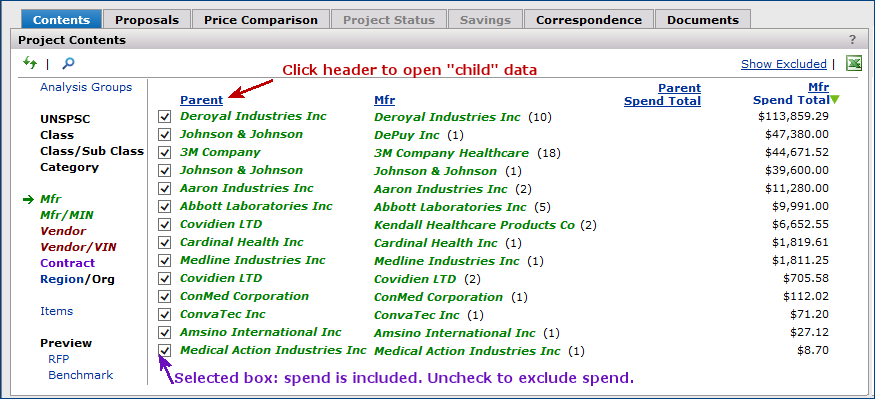
Figure 27 - The Project Contents Panel with Manufacturer Data
Click the Parent column header to sort by Parent family and to open the Mfr "child" data (Figure 28).
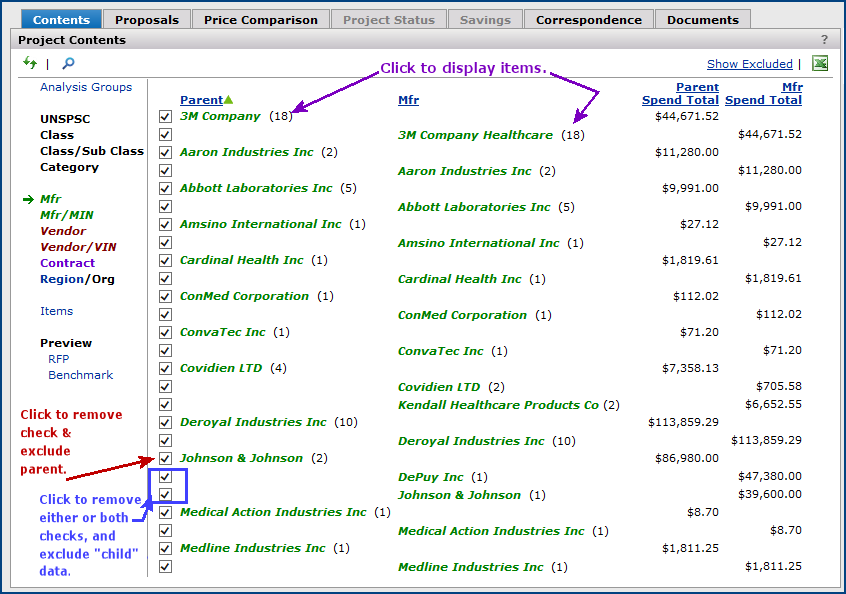
Figure 28 - The Project Contents Panel with Parent and Child Manufacturer Data
On the Project Contents panel in the Mfr view:
- To sort by Parent family and to view the Mfr "child" data, click the Parent column header.
- To display items in the spend, click the item count (in parentheses). The View shifts to the Mfr/MIN display, and is filtered for the manufacturer.
To exclude spend from a project:
- Select the view for Mfr (or for Mfr/MIN).
- In the Mfr view, select the box for the manufacturer family or manufacturer "child" of interest.
- To exclude all spend for a manufacturer family, click the box next to the parent manufacturer.
- To exclude spend just for the child manufacturer, click the Parent column heading to open child manufacturers.
Then, click the box that aligns with a child manufacturer.
- In the Mfr/MIN view, select the box for the item of interest.
The check in the box disappears and the spend element is grayed out.
- Click Refresh.
The element disappears from the list.
- To display excluded elements, click Show Excluded (Figure 29, top right).
The excluded list appears.
- To restore an excluded spend element, re-select it on the excluded list, and click Show Included.
- The element reappears on the included list.
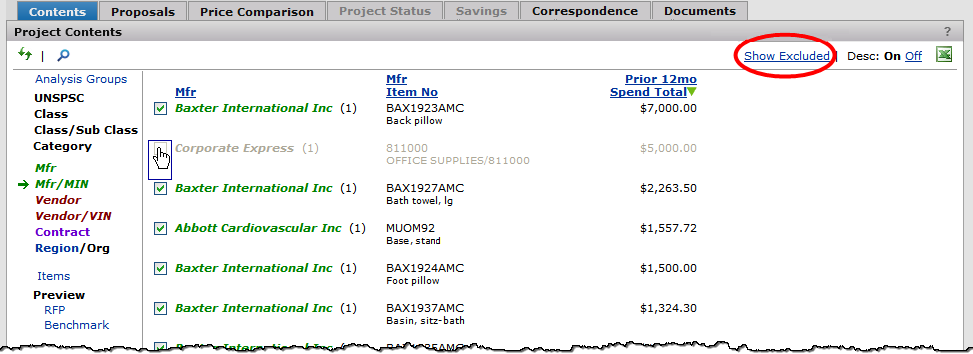
Figure 29 - Exclude Items from a Project
When you exclude a manufacturer item or a manufacturer's spend, you also exclude spend for the associated vendor and the vendor item number. In the Vendor or Vendor/VIN view, click Show Excluded to display the excluded vendor and VIN spend. You can only re-include the vendor item and vendor by re-including the manufacturer.
Previewing RFP or Benchmark Items
The project panels offer a preview of any RFP (request for proposal) or Benchmark that you might create to send to a supplier or benchmarking company.
- To preview a request for proposal for the project: Under Preview, click RFP (Figure 23, bottom left, green box). A panel like Figure 30 appears.
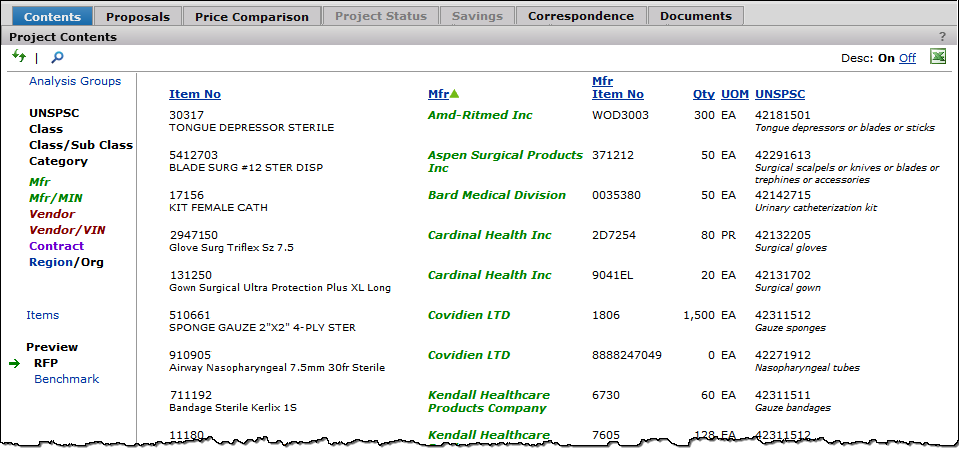
Figure 30 - Preview RFP
- To preview a benchmark, click Benchmark under Preview. A panel like the one in Figure 31 is displayed.
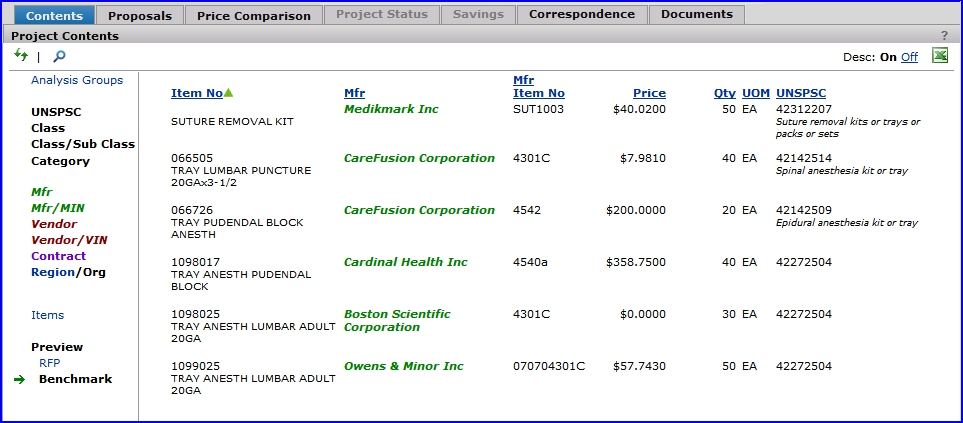
Figure 31 - Preview Benchmark
Adding Items Manually or From a Contract
When you add item spend to a project, you normally select spend from the Prior X Months panel. You may also wish to add items to a project that are not normally visible to analysis. For example, an item from a contract for which you plan to solicit another manufacturer's bid, or an item with no spend that you wish to compare with benchmark prices. In the latter case, for the item with no spend, you can enter the item price and an estimate of the item quantity that you would use over 12 months. The system will calculate a comparative spend value.
You may also be working with affiliate spend, and may wish to add items that are not represented in the affiliate organization's spend. The items can be added manually.
To add items from a contract,
- From the "Work with Project" page Actions panel (Figure 15), click Add Items > Other Items > Contract Detail Items.
A panel appears for you to search for the contract.
- Enter characters from the contract name or number in the search box.
- Click Enter. If contracts with the characters exist, they are displayed in a selection list (Figure 32).
Note: Only contracts with a manufacturer that is known to Sourcing and Contract Management are available from the selection list.
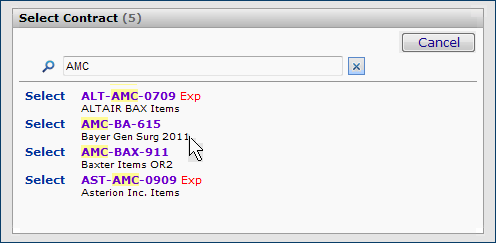
Figure 32 - Adding Contract Items to a Project
- Click Select next to the contract of interest.
The contract's items are added to the project as an analysis group.
Click the Analysis Groups view to see the contract whose items were added (Figure 35).
To manually add manufacturer items to a project,
- From the "Work with Project" page Actions panel (Figure 15), click Add Items > Other Items > Manually Add Items.
A panel appears for you to select the manufacturer entity for the items.
- Enter characters from the manufacturer's entity's name in the search box.
- Click Enter. If manufacturers with the characters exist, they are displayed in a selection list (Figure 33).
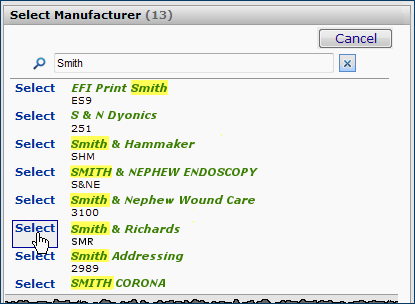
Figure 33 - Adding Manufacturer Items to a Project
- Click Select next to the manufacturer of interest.
A panel appears for you to enter the item that you wish to add (Figure 34).
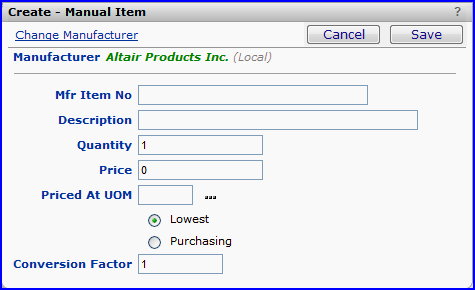
Figure 34 - Identifying a Manufacturer Item to Add to a Project
- Complete the fields on the panel. The Mfr Item No, Quantity, Price, Priced At UOM and Conversion Factor are required fields. Completing these fields lets you provide an estimate of spend for comparison in bids and benchmarking data.
- Description - Enter a description of the item, if you have one. This field is not required.
-
Quantity - Enter an estimate of the quantity you would use in a twelve month period, as though you had spend for the previous 12 months.
- Price - The unit of measure associated with the value in the Price column. This is the UOM that the item price represents.
- Priced At UOM -
The unit of measure associated with the value in the Price column. This is the UOM that the item price represents. Enter a UOM value.
- Underneath, select Purchasing or Lowest UOM.
If you select Purchasing, another field appears for you to enter the lowest UOM.
- UOM Conversion Factor - The numeric factor that converts the Lowest UOM to the Priced At UOM.
- If the Priced At UOM is the same as the Lowest UOM, the value in this column should be 1.
- if the Priced At UOM (BX) is different from the Lowest UOM (EA), the value in this column must be greater than 1 (for example: 10)
- Click Save.
The manufacturer's item is added to the project as a separate analysis group.
You will see the following confirmation message: "[Item#] was successfully added to the project. Add another item or select cancel if you are done."
Click the Analysis Groups view to see the manufacturer whose item was added (Figure 35).
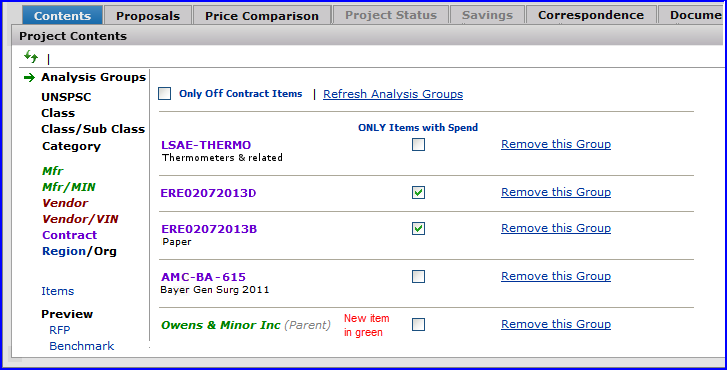
Figure 35 - Analysis Groups View with Groups for Items Added Manually and As a Contract
- In the Analysis Group view (Figure 35), items added using the Add Items links are collected into a group and given a name.
- The View filter Items > Manual Items displays only the items that you added manually.
Items displayed in this filter can be deleted, or you can edit the items' price, estimated quantity, and UOM data.
Work with Requests for Proposals (RFPs)
Several processes let you create requests for proposals (RFPs) and analyze returned bids. The subsequent sections explain how to...
- Create a request for proposal and email it to a supplier
- Receive a returned proposal via email
- Upload a proposal to Sourcing and Contract Management
- View an uploaded proposal
- Add a contract to the project
- Compare current prices, prices from returned proposals, and prices from contracts
You can...
- Award a contract to a manufacturer bid
- Create an export file for any unmatched items on an awarded contract
- Upload the vendor contract to Sourcing and Contract Management
Be sure to download and install the Excel add-in for contract templates. Instructions are in another section.
Create and Send a Request for Proposal
The Projects feature can generate RFPs for suppliers' items and send the RFPs. If you are working with spend for specific organizations selected on the Project Contents panel, spend from those organizations is used as the basis for item information in a proposal.
From the Proposals panel, the link Send RFP via Email opens a Microsoft Outlook email message with a generated request for proposal (RFP) already attached and ready to send. Remember: RFPs can only be created for manufacturers.
To create, send, download, open and/or save an RFP
-
From the Work with Contracts page, click the Proposals tab (Figure 36).
- Click Create RFP.
- The Available Manufacturers panel appears (Figure 36). The manufacturers listed on the panel supply items identified in the project.
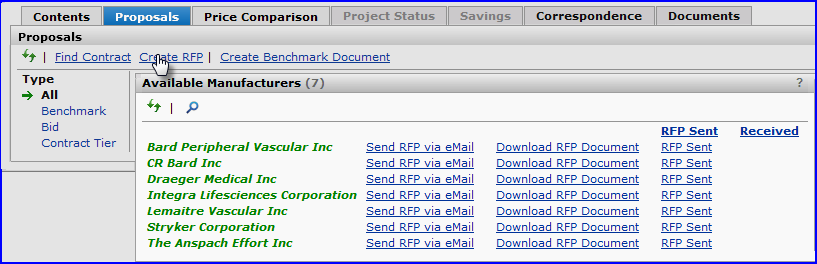
Figure 36 - Project Manufacturers Available for Creating RFPs
If your site uses Microsoft Outlook or another Microsoft-compatible email program, you may now send an RFP to the selected manufacturer using by clicking Send RFP via Email.
Alternately, you may download the document and save it by clicking Download RFP Document. You may then save it and attach it to an email via any email server.
- To have the system automatically send the RFP, next to the manufacturer of interest, click Send RFP via Email.
The Microsoft Windows File Download panel appears (Figure 37).
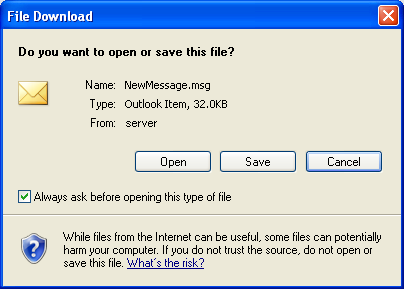
Figure 37 - Microsoft Windows File Download Panel
- Click Open. You can also click Save, as described subsequently.
An email message appears with the RFP attached (Figure 38).
If you wish, you can add additional documents to the email as attachments.
You can also add a message.
Important: Insert any email message above the dashed line and the project number. You can add more space above the dashed line if needed.
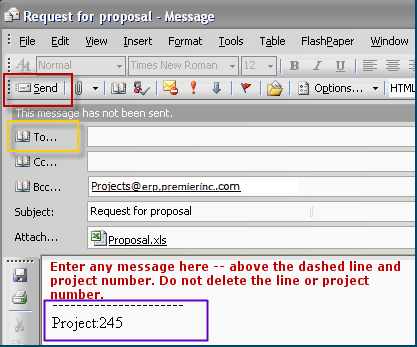
Figure 38 - Email Containing RFP as an Attachment
- Leave the Bcc... line containing the server information as it is. Sourcing and Contract Management uses this information to associate your RFP and any other documents with the project. (Note: the Bcc line in the figure is a made-up address; your email will display the correct application address.)
- To display the RFP, click the link on the Attach... line.
For example, on the Attach... line in Figure 38, clicking " Proposal.xls" would display the RFP, similar to Figure 39. The spreadsheet is sorted by manufacturer MIN. The sort is first by manufacturer, followed by the MINs for the manufacturer.
- Enter the email address of the supplier on the To... line.
- Click Send to send the email.
- When you send an RFP using the link Send RFP via Email, the application populates the column RFP Sent with the date, or, for the same day, the elapsed time.
- The attached blank proposal that you sent is written to the Documents panel. Benchmark requests also appear on the Documents panel when sent.
- Also, a system note is written to the Correspondence panel. A system note is also written when you send a benchmark request.
Notes:
- If you do not wish to email the RFP immediately, on the File Download panel (Figure 37), you can click Save and save the email message (with the attached RFP) to a network location.
- If you do not wish to have your email system automatically create and send the document, you can click Download RFP Document (Figure 36) to download the document, and send it as an attachment on an email that you create manually.
Units of measure for item quantities on RFP spreadsheets
On project RFPs, several factors influence which unit of measure Sourcing and Contract Management uses for item quantities. The UOM used for item quantity is determined as follows:
When transactions exist for an item in the past 12 months, and the transactions contain a UOM,
- The lowest UOM is used if both the transaction UOM and the lowest UOM are defined on the item vendor record.
- The transaction UOM is used if either the lowest UOM or the transaction UOM is defined on the item vendor record.
When transactions do not exist for an item in the past 12 months, or the transaction UOM is blank,
- The lowest UOM from the item vendor record is used.
- If a lowest UOM is not defined on the item vendor record, the UOM field on the spreadsheet is blank.
Important:
- On the RFP document, notice the two columns RFP Price and RFP UOM (arrows in Figure 39).
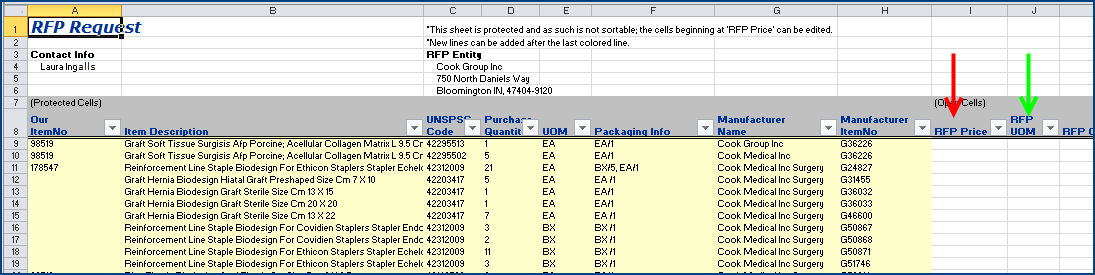
Figure 39 - Excel RFP Document
- The manufacturer to whom you are sending the RFP must complete the RFP Price and RFP UOM columns for each item and price.
- Also, the conversion factor should be entered in the field RFP ConvFactor.
- The RFP manufacturer may use different item numbers than the item numbers in the Manufacturer ItemNo column.
- In this case, the manufacturer should complete the RFP Manufacturer ItemNo and RFP Item Description if either is different from the entries on the spreadsheet.
- Ask the manufacturer to send the bid back as an email attachment.
- In other words, the Excel worksheet containing the bid response should not be sent in the email Message area, but rather sent as an attachment to the email.
- The bid Excel spreadsheet contains column filters. Click the down arrow on a spreadsheet column to open and use the column's filter.
- In addition, fields whose values are highlighted in yellow are locked: Our Item Number, Item Description, UNSPSC Code, Purchase Quantity, UOM, Manufacturer Name, and Manufacturer Item No.
- Locked fields are password protected. If you attempt to enter and save data in a locked field, a message appears, similar to Figure 40:

Figure 40 - Excel Protected Cell Message
User-Defined Fields for Bid Lines
Two user fields are available on the bid spreadsheet. Values can be entered in the fields by a supplier, or by the application user — you — after the bid is uploaded. When the bid is uploaded, the system attaches the fields to bid lines. You can display the fields and edit their values from the Proposal Detail panel.
- To open the Proposal Detail panel, on the "Work with Project" page, Proposals tab, click View Source next to any uploaded bid.
- To display user fields (and edit them), mouse over an item line, and click the edit icon
 . The edit panel appears with field names at the bottom.
The field names and descriptions can also be edited. See the online documentation topic "Work with User Defined Fields."
Edit Proposal Details from the Price Comparison Tab
The Edit - Proposal Detail panel for each source company is also accessible on the Price Comparison tab under the Detail view.
To edit the proposal details for a source company from within a project:
- On the "Work with Project" page, click the Price Comparison tab.
- Under View, click Detail (red box, Figure 41).
Note: Under the Cost filter, Unit Price must be selected to enable editing of proposal details.
This option is only available applicable to bids.
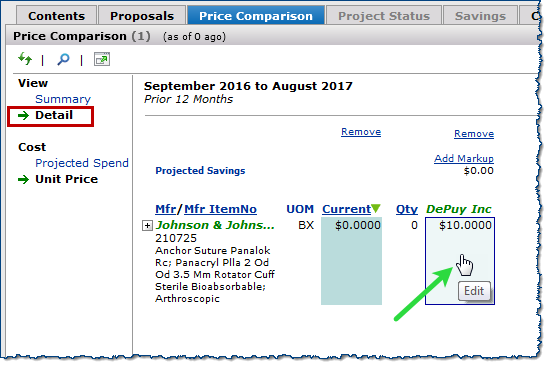
Figure 41 - Accessing Proposal Details from the Price Comparison Tab
- Hover over a bid amount for a source company until it is highlighted, and click within the highlight (green arrow, Figure 41).
- Make any necessary changes in the Edit - Proposal Detail panel (Figure 42).
- Click Save.
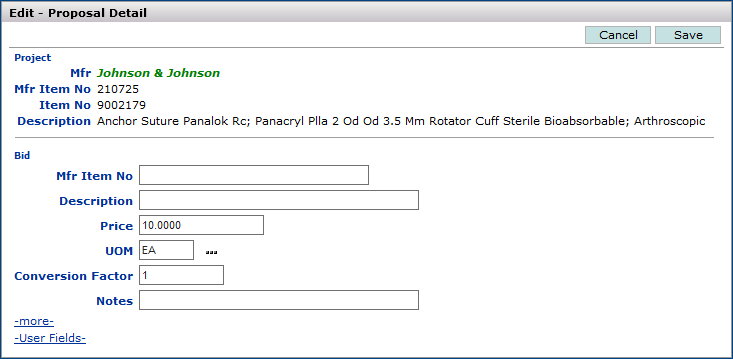
Figure 42 - The Edit - Proposal Detail Panel from Price Comparison Tab
Note: You cannot edit proposal details after a contract has been awarded.
How to Get a Returned Proposal Back to a Project
When a manufacturer emails you a proposal, you can either forward the email to the application server, or upload it manually.
- In your email application (e.g., Microsoft Outlook), locate the message with the attached proposal from the supplier.
- Forward the email with the proposal to Sourcing and Contract Management, as described below.
When you forward a proposal to SCM via email, the system attaches the proposal to the project (provided that the project information is in the email message). The proposal is available from the Proposals tab and also from the Documents tab for further review.
- If you wish to review the proposal before you send it to a project, you can open the proposal (attached to the supplier's email message), and upload it manually from the Excel spreadsheet.
Manual uploads do require that you have the Contract Template Add-In installed on your system. See the instructions.
Notes:
- Once a contract is awarded, the items selected for the project are automatically finalized by the system. After a contract is awarded, you cannot include or exclude any more items from the project, or add contracts (on the Proposals panel). If you use phases, the phase is "Contract Awarded."
- For contracts that are created from projects (i.e., by awarding a contract to a project bid): You cannot specify an Activate Date prior to the first day of the current month.
To forward an emailed proposal from your email inbox to a project,
- Working on your email viewer (for example, Microsoft Windows Outlook), locate the email message that contains the attached proposal.
- Click Forward.
The email message opens.
- Make sure that the dashed line with the project number is on the message portion of the email, and that it is the last part of the message. (See Figure 38, purple box.)
- In the To field, enter the application server and projects address: Projects@erp.premierinc.com
- Click Send.
When the proposal arrives, Sourcing and Contract Management attaches it to your project, and populates the Received column on the Proposals panel.
The section View a returned proposal has details.
Upload a Proposal from an Excel Spreadsheet
Before you can upload a proposal from Excel, the Excel Upload Add-In must be installed on Excel.
To upload a proposal to Sourcing and Contract Management,
- From your email application (e.g., Microsoft Windows Outlook), open the email containing the returned Proposal.
- Open the email Excel attachment containing the Proposal.
- On Excel 2003 or Excel 2007, a Sign-on button appears in a toolbar at the top of Excel (Figure 43).
- With Excel 2010, click the Add-Ins menu to access the Sign-on button. (The Upload Items, Download Items, and Create Template buttons are also available from the Add-Ins menu. The Add-Ins menu is on the upper right.)
- With Excel 2013, click the Inc. tab (last tab, top right) to display the Sign-on icon.
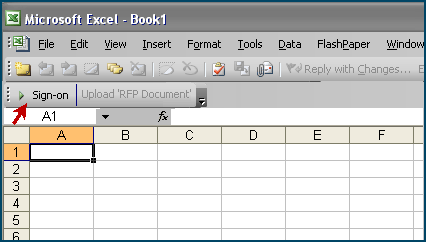
Figure 43 - The Sign-on Button
- Click the Sign-on button or icon (Excel 2013). The Sign-On panel appears (Figure 44). You must sign on to Sourcing and Contract Management from Excel to upload a Proposal.
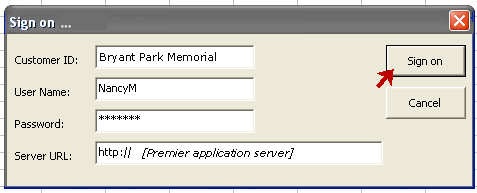
Figure 44 - Signing On to Excel for Proposal Upload
- Enter your normal Customer ID, User ID, Password, and Server URL in the Sign-On panel.
- Click Sign on.
If the sign on information you entered is correct, the Sign-On panel disappears, and you are signed on.
The Upload 'RFP Document' is activated (Figure 45).
Otherwise, if you did not sign in correctly, error messages appear.
-
Correct any problems with your sign-on credentials, and try again.
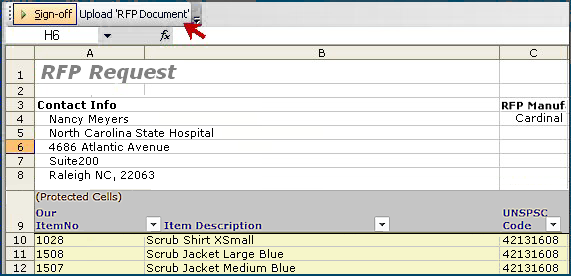
Figure 45 - The Upload RFP Button
- Click Upload 'RFP Document'.
Messages appear about the status of the upload.
-
If the upload is successful, you can compare prices and create a contract, if you wish, from the Proposal. The uploaded Proposal is automatically associated with the Project for which you created the original RFP.
-
If the upload is not successful, you may wish to check the Proposal document for format or other errors.
Project Bids and Contracts
The Proposals panel provides several tools for working with project proposals/bids. You can...
- Search for contracts to add to a project. When you add a contract to the project, it appears on the list and can be selected for comparison.
- Add notes to contracts/proposals in the list.
- Award a contract to a bidder.
- Create a contract from a proposal.
You can view bids returned from manufacturers from the Projects Proposals panel, or from the "Work with Manufacturer" page.
View a Returned Proposal from the "Work With Manufacturer" Page
Sourcing and Contract Management automatically associates an uploaded bid/proposal with both a manufacturer and a project. You can access uploaded bids from either the manufacturer record or from the Projects area.
To view an uploaded proposal from the Manufacturer Info panel,
- Use the Search panel to locate the manufacturer for the returned proposal (Figure 46).
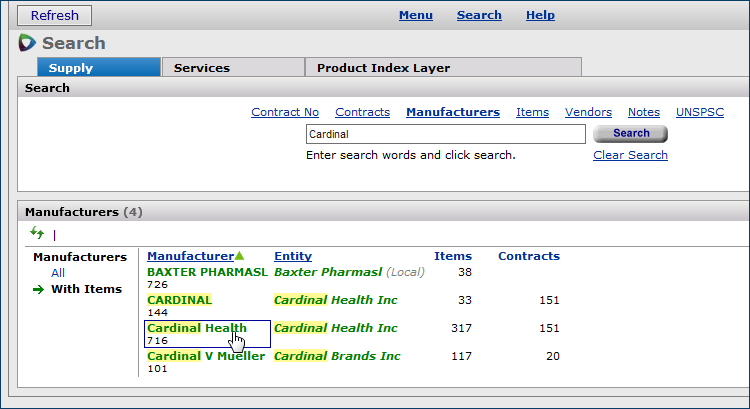
Figure 46 - Search Results for "Cardinal"
- Click the manufacturer.
The "Work with Manufacturer" page appears.
- On the "Work with Manufacturer" page Actions panel, click Proposals.
The Proposals panel opens (Figure 47).
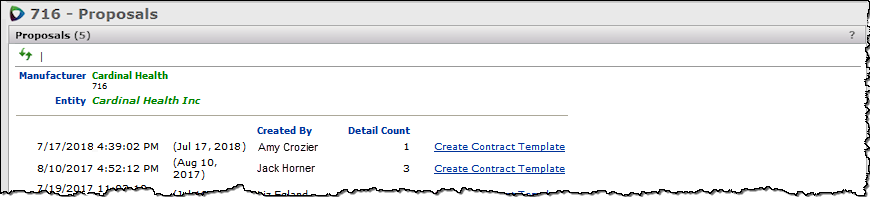
Figure 47 - Proposals Selection Panel
- Click the date for the proposal of interest.
The Proposal Detail panel appears with a list of items on the proposal, item numbers, bid prices, UOMs, and more.
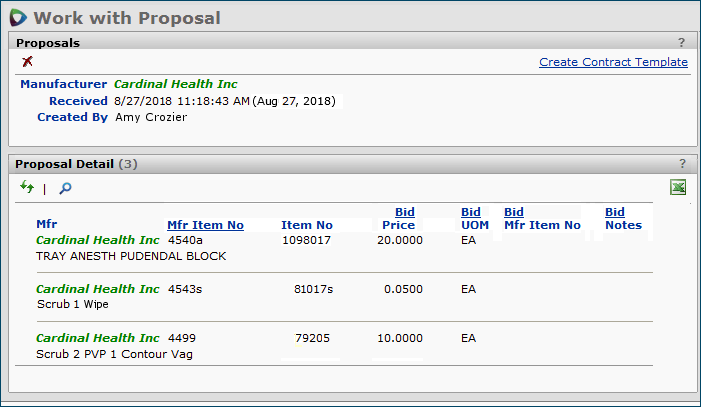
- At the bottom of the Proposal Detail panel, click Open Full View. The "Work with Proposal" page appears
 (Figure 48).
Figure 48 - The "Work with Proposal" Page
Work with Bids, Benchmarks, and Contracts on the Project Proposals Panel
The project Proposals panel (Figure 49) has three parts: a section for benchmarks you request, and that are returned; bids that you send, and that are returned; and a section for contracts that you add to the project, including contracts that you award or create. Figure 49 is a project with three bids that have been sent and received. Figure 50 has several contracts added, in addition to a returned bid.
Notice on the far left side (Figure 49), that you can use the Type filter to display only benchmarks, bids, or contract tiers, or all.
Clicking
View Source lets you inspect individual items in the bid, benchmark data, or proposal.
Tip: Contract tiers are useful to compare because you can see your progress (in terms of spend) towards the next higher tier.
- On the "Work with Project" page, click the Proposals tab.
The Received column displays the elapsed time since the returned bid was uploaded (if less than a day), or the received date (Figure 49).
- Click View Source to view the returned bid details (i.e., proposed prices for items), or prices in a proposal or benchmark document.
- Click the down arrow to open the selection box found in the Use Price field. Choose whether you want to use the High, Low, or Average benchmark price for the price comparison.
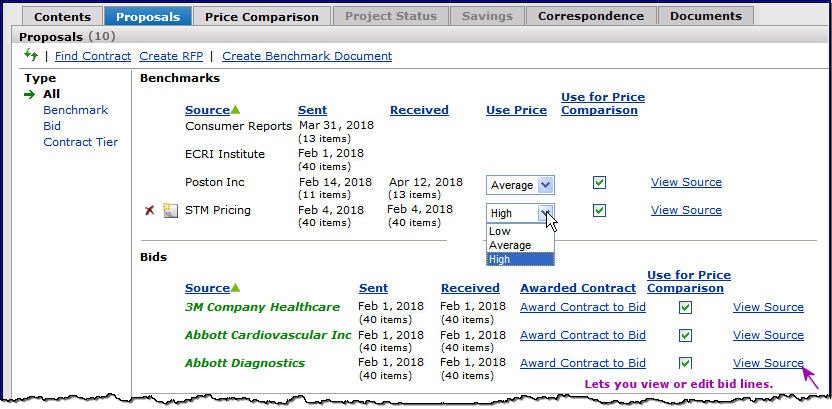
Figure 49 - Proposals Panel with Returned Benchmarks and Bids
To select/unselect contracts and bids for price comparison:
- Open the project and click the Proposals tab.
The Proposals panel appears.
- Locate the benchmark(s), contract(s) and proposal(s) that you wish to use for comparison.
- For each benchmark, contract or proposal, mouse over the box Use for Price Comparison (Figure 50). A check appears in the box.
- Click the box.
When you open the Comparisons panel, the data from the selected contract or proposal appears in a comparison column.
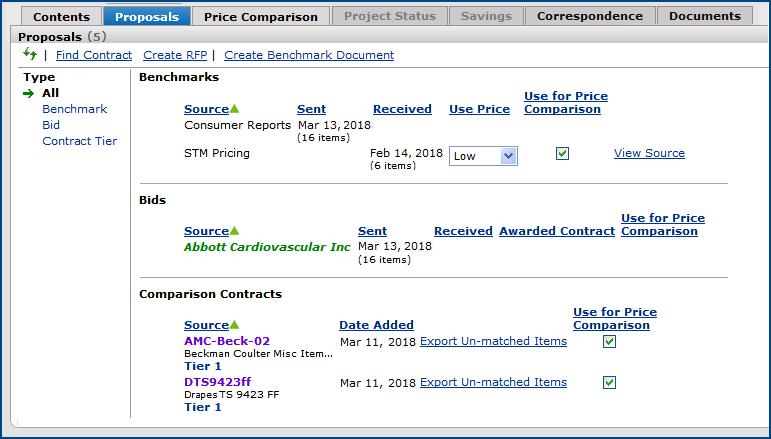
Figure 50 - Including Benchmark, Proposal, or Contract Data in Price Comparison
Editing a Proposal Line
From time to time, you may receive proposals that have incorrect information on one or more lines. A classic example is a proposal with the wrong UOM for a unit price; e.g., a price for a case but a UOM of each. You can edit bid lines to correct information such as this, except when a contract has been awarded or when there is no manufacturer item number. In those situations, you cannot edit a project bid.
Note: The edit capability is also available for benchmark lines. See the discussion in a subsequent section.
To edit a bid line:
- Open the Proposal Detail panel. Two methods are available:
- On the Proposal Detail panel, on the line that you wish to edit, mouse over the item number. The edit icon appears (Figure 51).
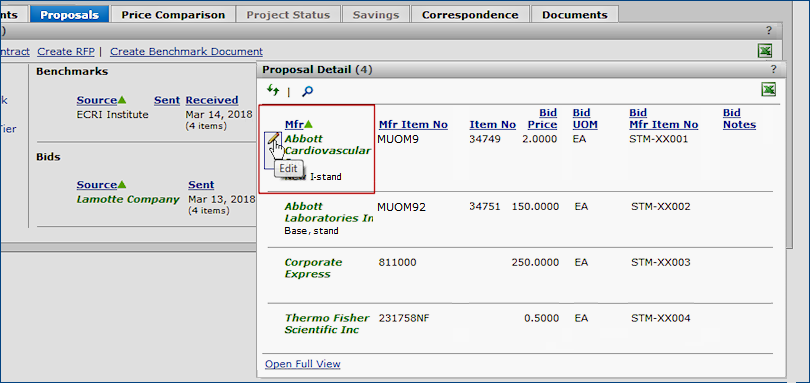
Figure 51 - Displaying Proposal Lines for Editing
- Click the edit icon . The Edit Proposal Detail panel appears for the proposal line (Figure 52).
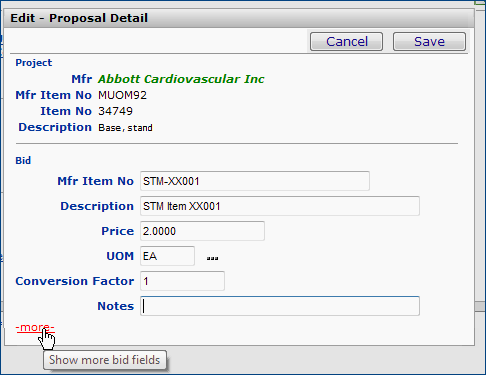
Figure 52 - Editing a Proposal Line
- Make changes as needed in the item fields.
On the panel, you can correct the Mfr Item No, Description, Price, UOM, and Conversion Factor for the UOM. You can also add notes.
- To change a UOM, click the prompt (...) and select a new UOM.
- The Price and Conversion factor must be numeric values.
Clicking - more - opens fields for adding two to five additional UOMs and conversion factors, if needed.
- Click Save when you are finished. The new information appears on the Proposal Detail panel's line for the item.
Add an Existing Contract to the Proposals List
Adding an existing contract is useful if you wish to compare prices on any returned bid to those on the existing contract. You can also use the contract to create an RFP.
To add an existing contract to a project:
- On the Proposals panel (Figure 53), click Find Contract.
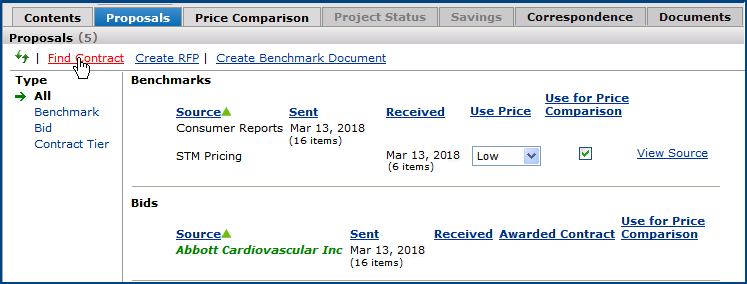
Figure 53 - Search for a Contract to Add to a Project
- The system looks for contracts with items that match the proposal's items. If one or more contracts are found, they appear in a select list (Figure 54).
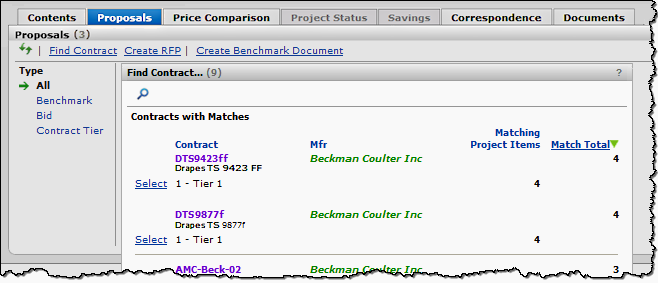
Figure 54 - Selecting a Contract to Add to a Project
- If no matching contracts exist, a panel appears with a message (Figure 55). You can search for a contract to add, if you wish, by clicking the Search icon and entering search characters in the box.
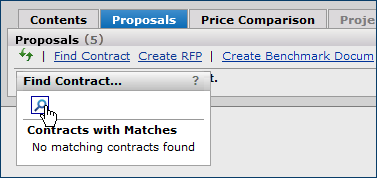
Figure 55 - The Contract Search Box
- Select the contract that you wish to add to the project.
The contract appears on the Proposals panel list under Contracts (Figure 56).
Note: If the contract has unactivated items, the Load and Activate Contract panel appears first, before the contract is written to the Proposals panel. You can activate any items that are matched.
- When you select a contract to add to a project, it appears on the Proposals panel with the Use For Price Comparison box selected.
- If one or more contracts have been awarded, the Award Date is the date of the first awarded contract. If no awarded contracts exist, the Awarded Date is just the date when you added the existing contract.
In Figure 56, no contracts have been awarded to the project, so the Award Date for each contract is the date when the contract was added to the project.
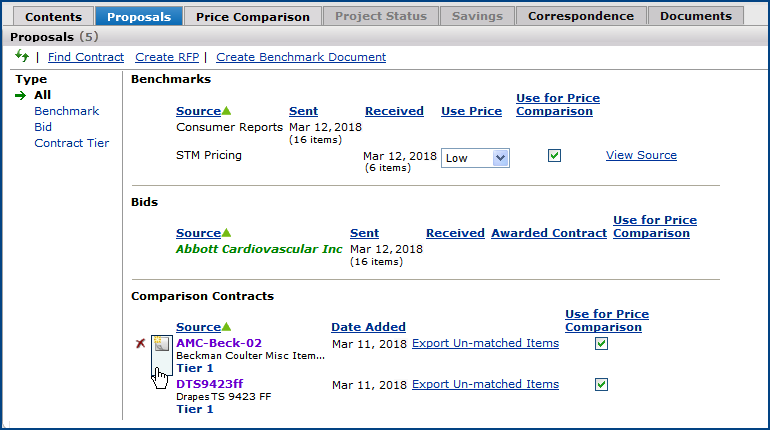
Figure 56 - Proposals Panel with Contracts Added
To remove a contract or a bid from a project:
To remove a contract or a bid from the Proposals panel, mouse over the contract or bid name. Icons appear. Click the Delete icon  (Figure 56).
To add notes to a bid/contract:
- Mouse over the contract or bid name. Icons appear.
- Click the Add User Note icon
 (Figure 56, bottom).
The User Notes Edit panel appears.
- Enter the note and click Submit.
- Click Refresh.
The user note icon  appears next to the contract/proposal.
You can edit or delete the note, or add additional notes. See User Notes.
Add Benchmark Prices to a Project
Clicking Create Benchmark enables you to send a request for benchmark prices to a registered benchmark company. Once the request is returned to the project, the prices can be used for comparison with returned bids and/or existing contracts. You must have already completed the steps under Create a benchmark company to perform these functions.
To create and send a benchmark request:
- On the Proposals panel, click Create Benchmark Document (Figure 57).
If you have not set up a benchmark company, when you click the link, a message appears.
See Create a benchmark company for instructions on setting up a benchmark company.
- Make a selection from the list of Available Benchmark Companies. Click Send Benchmark via Email.
Alternately, you can click Download Benchmark Document to download the document, and send it to the project as an attachment on an email that you create manually.
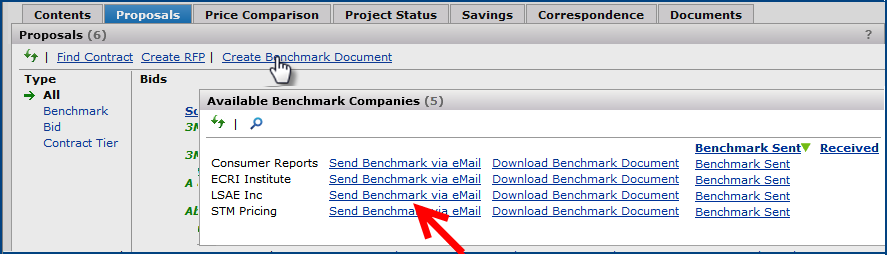
Figure 57 - Create Benchmark Request
- Click Open to view the email window with the project items listed as an Excel attachment (Figure 58).
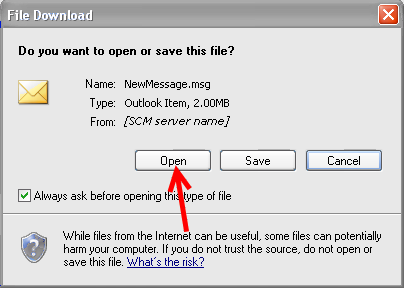
Figure 58 - Complete and Send Email Benchmark Request
- Complete the email header information as follows: (Figure 59)
- Enter the email address of the recipient.
- Leave the Bcc field as populated by Sourcing and Contract Management.
- Type your message in the message area.
- Click Send.

Figure 59 - Complete and Send Benchmark Email
When the benchmark company receives the request, they can enter pricing information into the editable fields on the Excel spreadsheet. When they return the pricing information to you via email, you can upload the spreadsheet into the project.
Item Notes
The benchmark Excel spreadsheet that you send to the benchmark company, and upload when it is returned, contains a Notes column. If notes are entered for a benchmark item, the notes are accessible from the Price Comparison panel Details view. Click the notes icon  next to the item to display the notes.
To upload benchmark pricing information to the project:
- Open the email and click on the attachment.
- Sign on to Sourcing and Contract Management.
- For Excel 2013, click the Inc.. tab. Then click the key-shaped Sign on icon.
- For versions of Excel earlier than 2013, click Sign-on in the upper left-hand corner of the spreadsheet (Figure 60).
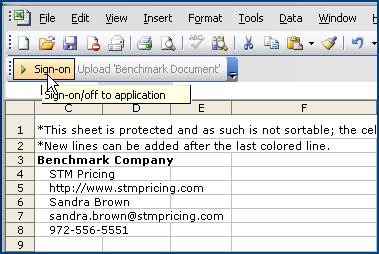
Figure 60 - Sign-on and Upload
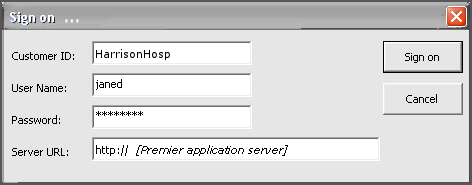
Figure 61 - Complete Sign-on
- Enter your password (Figure 61).
- Click Upload 'Benchmark Document' (Figure 60).
Return to the Proposals panel (Figure 62) to see that the Benchmark has been added. (Refresh if necessary.)
- To choose which price to use for the price comparison, select High, Low, or Average in the Use Price field.
- To view or edit the benchmark details, click View Source.
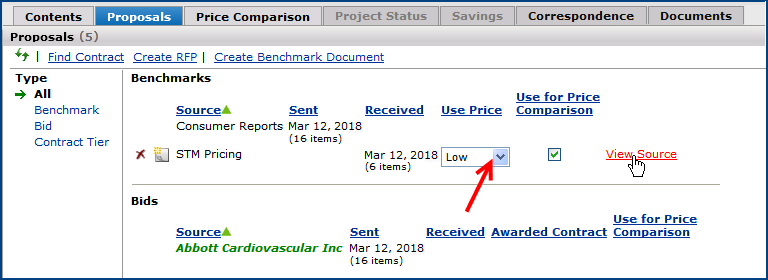
Figure 62 - View Benchmark Details
Editing Benchmark Details
You may receive a set of benchmarks that you need to edit because of incorrect data in an item's fields. A classic example is the wrong UOM for a unit price. You can edit benchmark lines to correct information such as this, except when the manufacturer item number is missing. In that situation, you cannot edit benchmark item data.
Note: The edit capability is also available for bid lines. See the discussion in a previous section.
To edit a benchmark line:
- On the project's Proposals panel, click View Source next to the benchmark (Figure 62).
The "Work with Benchmark" page appears (Figure 63.)
The top panel is contact information for the benchmarking company.
The bottom panel are Benchmark Detail lines.
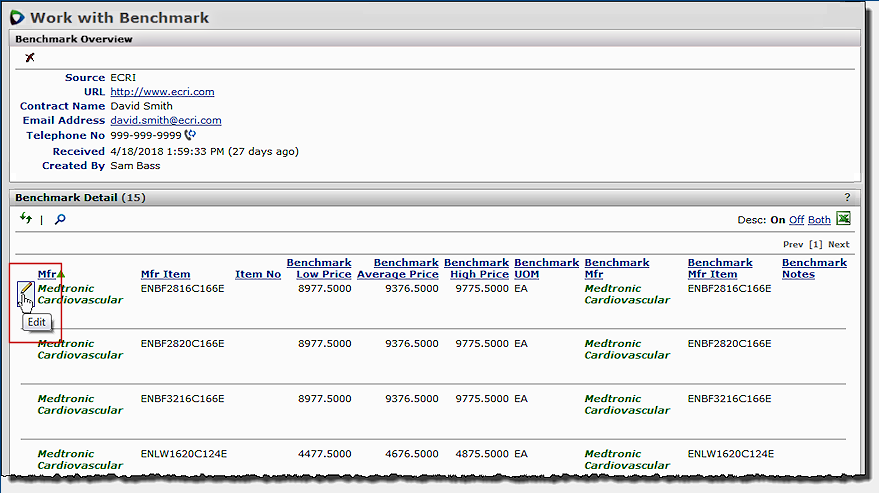
Figure 63 - The "Work with Benchmark" Page
- On the Benchmark Detail panel, on the line that you wish to edit, mouse over the item number. The edit icon appears (Figure 63).
- Click the edit icon . The Edit Benchmark Detail panel appears for the line (Figure 64).
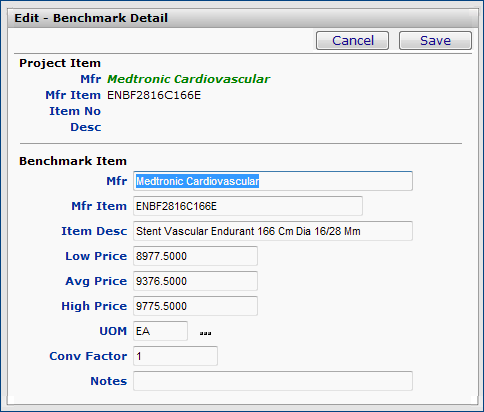
Figure 64 - Editing a Benchmark Line
- Make changes as needed in the item fields.
On the panel, you can correct the Mfr, Mfr Item, Item Description, Low, Average, and High Price, UOM, and Conversion Factor for the UOM. You can also add notes.
- To change a UOM, click the prompt (...) and select a new UOM.
- The prices and conversion factor must be numeric values.
- Click Save when you are finished. The new information appears on the Benchmark Detail panel's line for the item.
Compare Prices
The price comparison feature provides comparative item unit prices, projected spend, and projected savings among contracts, contract tiers, proposals, and current costs. The comparison can include: proposals, different contracts, and/or different tiers of the same contract.
- You can switch between a display of item unit prices and a display of projected costs (item price times the quantity purchased over the previous 12 months).
Note: You need to first identify the contracts and proposals on the Proposals panel.
- Click the Proposals tab and select the box "Use for Price Comparison" next to the bid, benchmark, or contract of interest (Figure 56).
Calculation of Unit Price
The unit price is not based on the item record price, but on a calculated value. The Unit Price is calculated as the straight average of the last prices for organizations using the same Mfr/MIN.
To compare prices:
- Open the analysis project.
- Click the Proposals tab to open the Proposals panel.
- Locate the benchmarks, proposals and/or contracts that you wish to compare to current prices.
- Next to each benchmark, proposal, or contract that you wish to use for comparison, click Use for Price Comparison (Figure 56 or Figure 62).
- Click the Price Comparison tab to view the comparison data. The left of the Price Comparison panel lets you switch between a View of Summary and Detail. On both the Summary and Detail views, you will see the following:
- The date range for the project spend is displayed.
- Before a contract is awarded on the project, the date range is the prior 12 months.
- After a contract is awarded, the date range is locked at the 12 months before the first contract award.
- The title on the panel displays the award date; e.g., "Price Comparison as of "2/21/2013."
- The Markup Percent field is visible only on All, Bid, or Contract Tier views.
- The Use Price field displays High, Low, or Average, indicating which benchmark price has been selected for comparison.
- The default view — Summary (Figure 65) — displays the sources you may choose to compare. All sources are selected for comparison unless you remove them by clicking Remove next to the source.
- To restore a removed source, open the Proposals panel and select the Use for Price Comparison field next to the source.
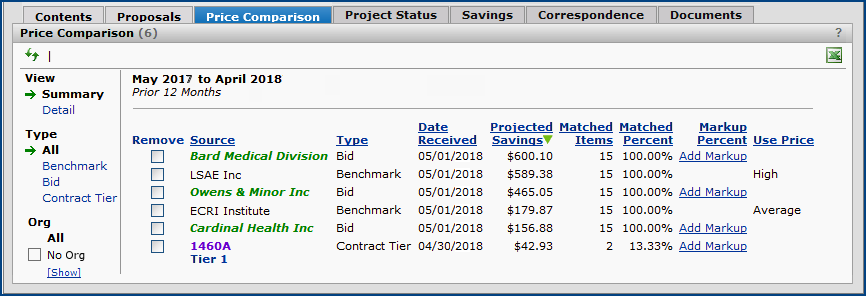
Figure 65 - Price Comparison Panel, Summary View
- Clicking Detail allows you to view items compared by Projected Spend or by Unit Price. Figure 65 displays cost by Unit Price.
- The Unit Price is defined as the "average of all last purchase prices across organizations."
- Projected Savings is at the top of each price column, in small print.
Green numbers indicate positive savings.
Red indicates negative savings.
Black with a blue background (see the Bard Medi... column in Figure 66, red arrow) indicates highest positive savings.
Black with no background means no savings.
The projected savings value is the total difference between prices in a bid, benchmark, or contract column and the prices in the current column.
In other words, for a bid, for example, Projected Savings is not a sum of values in the bid column, but a sum of the differences between each bid value, and the corresponding current price value. If you subtracted each item's current price and its corresponding bid price
and then summed the results for all prices, you would have the projected savings for that bid.
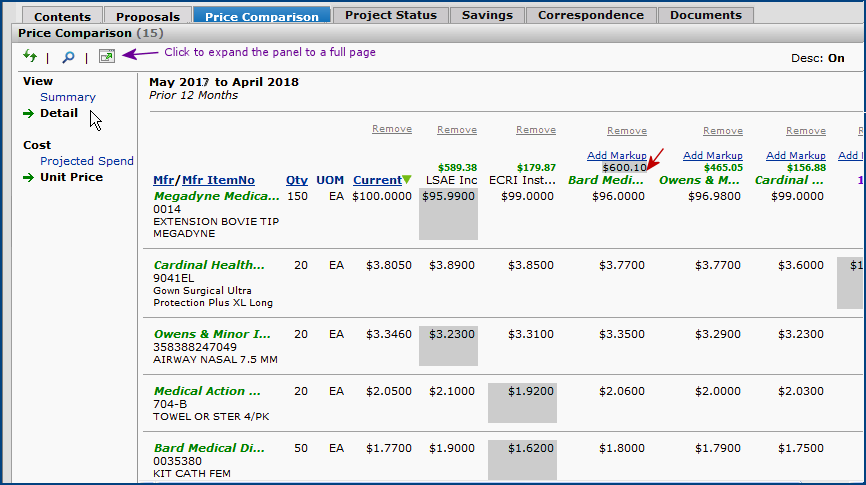
Figure 66 - Price Comparison Panel, Detail View: Unit Price (default)
- Clicking Projected Spend displays Unit Price*Qty for each proposal. (See Figure 66.)
- The Projected Spend in the column for each proposal is calculated as: Unit Price * Qty.

Figure 67 - Price Comparison panel, Detail view: Projected Spend
Notes on the Detail Views:
- Clicking the expand icon
 expands the panel to a full page.
- Horizontal scroll bars allow an unlimited number of columns, which means you can select as many pricing sources as desired.
- Field headings remain visible when the panel scrolls vertically.
- To sort the amounts in ascending order, click the column heading Current.
- To view vendor information, mouse over the manufacturer name and click the "+" link that appears.
- The default list of items does not show item descriptions. You can turn descriptions on (and off again) using the Desc: On Off switch in the upper right corner of the Comparisons panel (e.g., Figures 66, Figure 67).
- The dollar amounts highlighted in blue are the lowest for each item.
- Hovering over the benchmark heading brings up a tool tip displaying the full name of the benchmarking company and the price (high, low, or average) being used for comparison.
- You can scroll vertically and not lose the column headings, and horizontally and not lose the row headings that are being used for comparison.
Removing and restoring a comparison column
- To remove a comparison column, click Remove at the top of the column.
- To restore a removed comparison column, open the Proposals panel and select the Use for Price Comparison field next to the source.
Award a Contract
An action link on the Proposals panel lets you award a manufacturer contract to a returned bid. Figure 67 contains an example.
Note: The system creates an awarded contract using the application's Generic format.
To award a contract to a bid:
- Open the project.
- Select the Proposals panel.
- Locate the proposal of interest.
- Next to the proposal, click Award Contract to Bid.
The Bid to Contract edit panel appears for entering contract information (Figure 68).
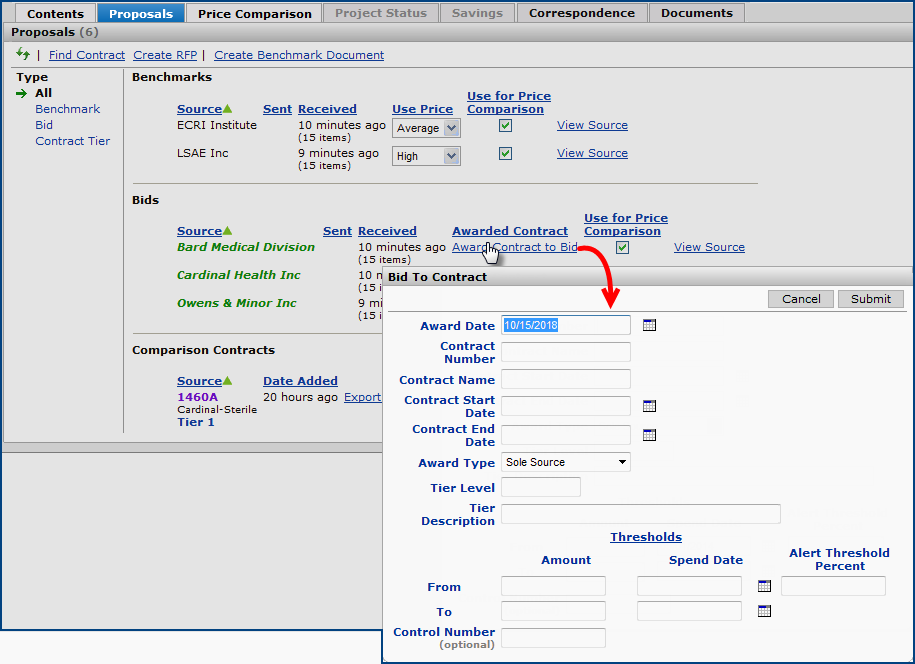
Figure 68 - Awarding a Contract to a Bid
- Enter information in the panel fields. The Thresholds fields are optional.
- The From Amount and To Amount values define the dollar amounts for the lower and upper tier boundaries.
- The Alert Threshold Percent is the point at which you wish to be alerted about spend on the contract tier. For example, if the upper tier limit To Amount is $100,000.00, and you want to know when you are at $90,000 (or 90 percent of the way to the tier boundary), set an Alert Threshold Percent of 90.
- The Spend From Date and the Spend To Date define the time period within which you want to monitor spend on the tier, and receive an alert if you reach the Alert Threshold Percent.
Note: You need to set an alert separately. See Use tier boundary spend alerts.
- If you enter a Control Number, the application keeps a copy of the contract file with the contract's documents.
The Control Number is associated with the contract document file. See Using Control Numbers for details.
- Click Submit.
The system
creates the contract and adds the newly created contract to the Proposals panel list. (See Figure 69.)
- The project Savings tab and the Project Status tab become active.
- The Project Summary panel on the "Work with Project" page displays the award date.
- The system begins to track savings on project items.
Detailed savings information over time is available by clicking the Savings tab.
- To view the "Work with Contract" page, click the contract number (Figure 69).
Note: On the "Work with Contract" page for the contract, the Actions panel contains a link to the project.

Figure 69 - Awarded Contract is Created in Sourcing and Contract Management
Unmatched Items on Contracts
For contracts in your project, you can create an Excel spreadsheet of unmatched items for export.
To create a spreadsheet of unmatched items:
- On the Proposals panel, next to the contract number, click the link Export Un-matched Items (Figure 69).
An import panel opens (Figure 70).
- Accept the default tier level, or click the down arrow to select a new tier.

Figure 70 - The Export Unmatched Items Panel
- Click Save.
The system prompts you to either open or save the Excel file.
Save the Excel file to a local network location from which you can import it to your materials system.
Work with Affiliate Organizational Spend
In analysis projects for medical center affiliates, you can identify and work with spend segments that belong to affiliate organization(s) of interest.
- You can build analysis groups in the Analysis Workbench that contain spend only for one or more affiliate organizations (or organization groups). Analysis projects can then call in the organizations' spend. (See the discussion of organization groups in the topic "Examining Supply Contract Spend.")
- Alternately, or additionally, you can create analysis projects that initially include item spend for multiple organizations or for all organizations, and then segment the spend by organization for future work.
In either case, you can review the spend for the affiliates; create RFPs and benchmarks based only on the affiliate spend; compare prices using affiliate spend; and track savings on awarded contracts for the affiliate(s).
Display Project Contents Spend for Selected Organizations
The Project Contents panel contains options for selecting organizations of interest. You can select one, several, or all organizations. You can also work with spend that is not associated with any organization. For example, you may have included items manually in the project — for comparison, or other purposes — that do not have spend in any of your selected organizations.
To select organizational spend:
- On the Project Contents panel, left side, click Region/Org (Figure 71).
Several options appear: All, No Org, [Show], Graphs, and Details. (The default is All organizations.)
Figure 71 - The Region/Org Selector on the Project Contents Panel
- Click [Show] to display a list of organizations.
- Select one or more organizations by checking the box(es).
Or, click No Org to view spend associated with no organization.
- [Hide] closes the list.
On the Project Contents panel, when you identify one or more organization(s), the view descriptors (Keywords, UNSPSC, Class/Subclass, Category, Mfr, Mfr/MIN, Vendor, etc.) display data associated only with those organizations' spend. Figure 72 is an example of the Project Contents display before the user has selected any specific organizations. Figure 73 is the result when one organization (004) is selected, and displays Mfr/MIN spend.
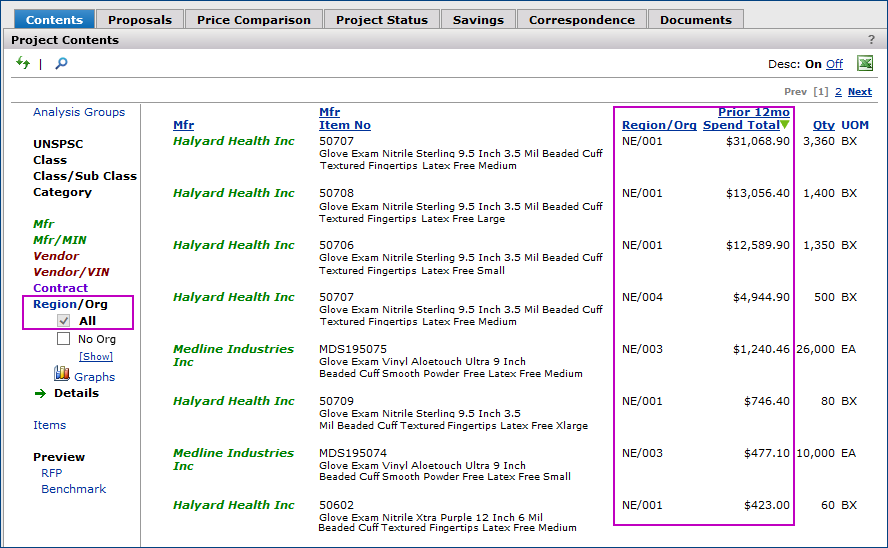
Figure 72 - Project Contents Panel with Mfr/MIN Spend for All Organizations
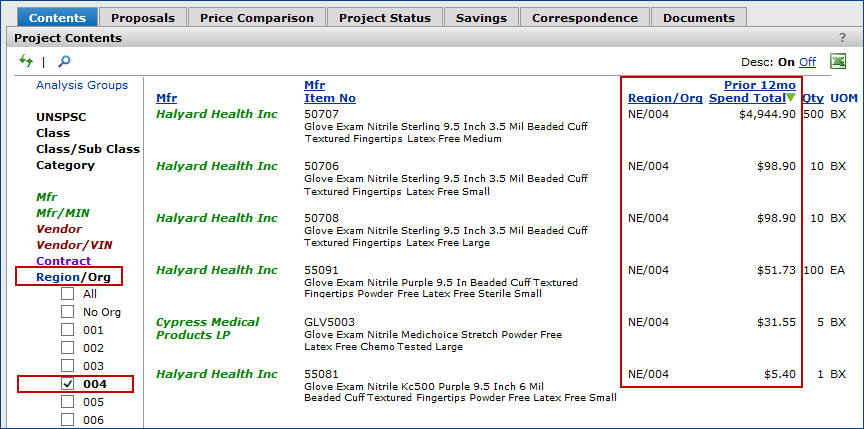
Figure 73 - Project Contents Panel with Mfr/MIN Spend for One Organization
Graphs and Details also display data associated only with the selected organizations' spend. Figure 74 is an example of pie charts for all organizations in a project. In Figure 75, spend for one organization has been segmented out.
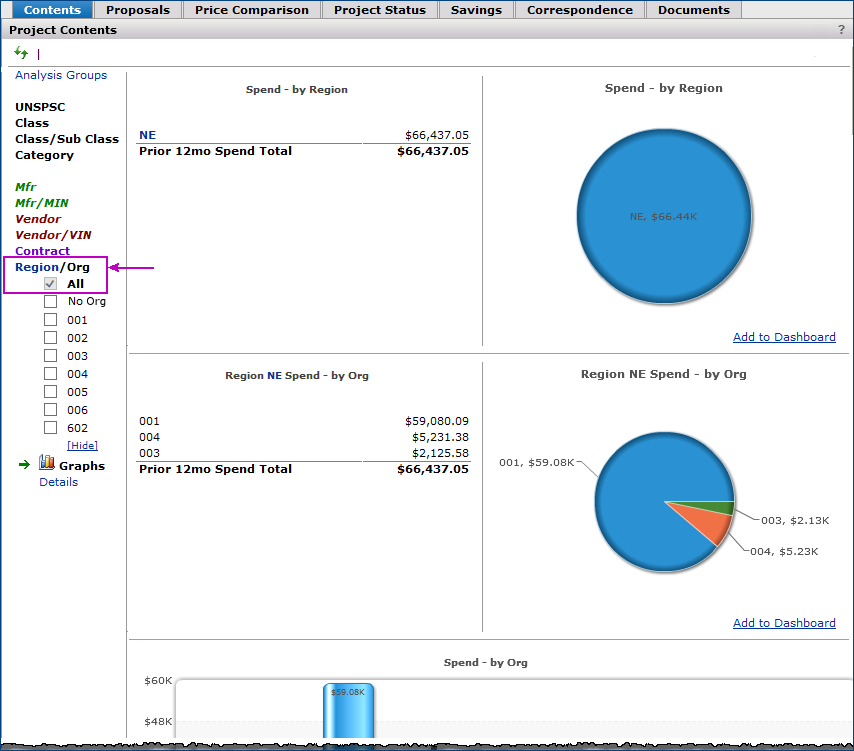
Figure 74 - Project Contents Panel with Spend Pie Charts for All Organizations
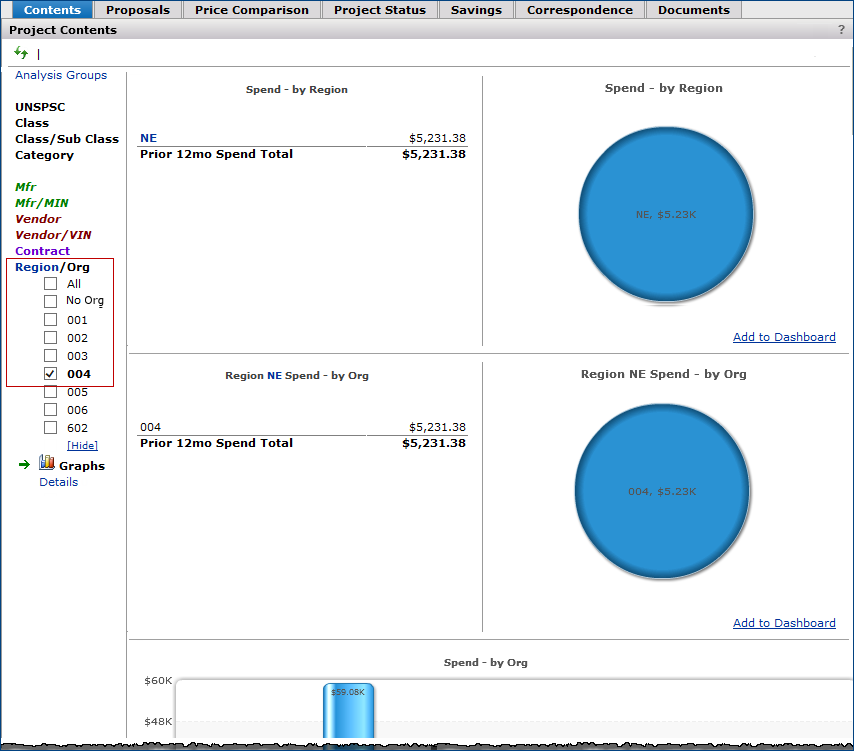
Figure 75 - Project Contents Panel with Spend Pie Charts for One Organization
Benchmarks and RFPs Using Affiliate Spend
Your selection of organizations on the Project Contents panel persists on the Proposals panel. This strategy lets you create an RFP for selected affiliates. You can generate and send an RFP and/or call in a benchmark document based only on the organizational spend that you selected on the Project Contents panel.
Your selected organizations also persist on the Comparisons panel; however, on the Comparisons panel, you can select different organizations.
View Price Comparisons for Selected Organizations
The analysis project Price Comparison panel lets you evaluate the benefits of a project from the perspective of different sources and different organizations. You can compare line item prices from different manufacturers, and look for your best projected opportunities.
In the Summary view, you can compare organizations’ Projected Savings for each Source and Type (e.g., a manufacturer bid). Initially, rows are collapsed (Figure 76).
Figure 76 - The Project Price Comparison Panel with Two Bids Returned
Mouse over a row and click “+” to view individual organization data (Figure 77). When you select organizations, the application adds an Org column to the panel to identify each organization.
Figure 77 - Displaying Organization Summary Data on the Project Price Comparison Panel
Clicking "-" rolls the data up again, removing individual organizations (Figure 78).
Figure 78 - The Organization Selector on the Project Price Comparison Summary Panel
Organization settings on the Project Contents panel are replicated on the Price Comparison panel, but you can change the settings in the Summary view using the use the Org filter. See Figure 78. Selecting No Org displays spend not associated with any organization, if part of the project spend.
The projected savings are based on the individual organization(s) line item prices/cost and not from an average price/cost of all organizations within the project. The last price that the organization paid for the item is used in the projected savings calculation.
Calculation Example When Organizations are Selected
For three organizations, purchase prices for an item are as follows:
Org 1: Last purchase unit price $6.50 for item 123 (Quantity Purchased 100)
Org 2: Last purchase unit price $7.00 for item 123 (Quantity Purchased 30)
Org 3: Last purchase unit price $6.75 for item 123 (Quantity Purchased 76)
A manufacturer (Zed, Inc.) bids item 123 at $6.00 EA.
Here are calculations for Projected Savings for the individual organizations:
Org 1:
Previous Spend = $6.50 * 100 = $650.00
Projected Spend = $6.00 * 100 = $600.00
Projected Savings = $650.00 [Previous Spend] - $600.00 [Projected Spend] = $50.00
Org 2:
Previous Spend = $7.00 * 30 = $210.00
Projected Spend = $6.00 * 30 = $180.00
Projected Savings = $210.00 [Previous Spend] - $180.00 [Projected Spend] = $30.00
Org 3:
Previous Spend = $6.75 * 76 = $513.00
Projected Spend = $6.00 * 76 = $456.00
Projected Savings = $513.00 [Previous Spend] - $456.00 [Projected Spend] = $57.00
Calculation of Current Price is as follows:
Total Previous Spend = Previous Spend for Org 1 + Previous Spend for Org 2 + Previous Spend for Org 3
Total Previous Spend = $650.00 + $210.00 + $513.00
Total Previous Spend = $1,373.00
Total Previous Quantity Purchased = Quantity Purchased by Org 1 + Quantity Purchased by Org 2 + Quantity Purchased by Org 3
Total Previous Quantity Purchased = 100 + 30 + 76
Total Previous Quantity Purchased = 206
Current Price = Total Previous Spend/ Total Previous Quantity Purchased
Current Price = $1,373.00/206
Current Price = $6.6650
Total Projected Savings are:
Total Projected Savings = Projected Savings for Org 1 + Projected Savings for Org 2 + Projected Savings for Org 3
Total Projected Savings = $50.00 + $30.00 + $57.00
Total Projected Savings = $137.00
Tracking Project Savings on Awarded Contracts by Organization
Using the Region/Org filter on the Savings panel, you can review savings on awarded contracts for individual organization, all organizations, or no organization. No Org (no organization) displays savings associated with spend for items that are not associated with any organization in the project.
The organizations available for selection may not include all organizations; rather, only organizations with contract savings are available for selection.
Figure 79 is an example of the Savings panel with savings on awarded contracts for all organizations with project spend. Figure 80 is the same display, except that savings for only one selected organization appears.
Figure 79 - Savings for All Organizations in a Project with an Awarded Contract
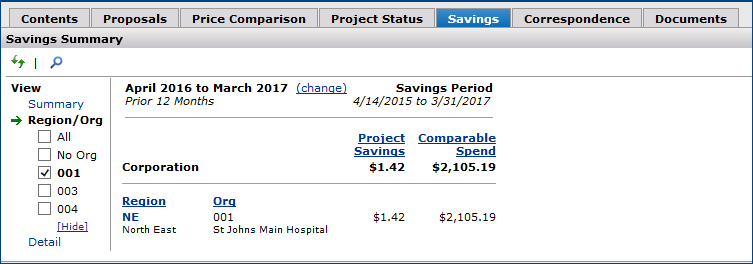
Figure 80 - Savings Filtered for a Single Organization in a Project with an Awarded Contract
Note: The organizations available for selection may not include all organizations; rather, only organizations with contract savings are available for selection.
Create a Contract Document from a Proposal
You may wish to create a formatted Excel contract from a manufacturer's proposal, for discussion or perhaps to add items, and then upload the contract later. You can use the Contract Template to generate a single- or multi-tier contract from a link on the manufacturer Proposals panel.
To use the manufacturer Proposal panel to create a contract:
- Search for the manufacturer who has returned the proposal.
- Enter characters from the manufacturer name in the Search box (Figure 81, top part).
- Click Manufacturers.
- On the results panel for manufacturers, click the Manufacturer Name (Figure 81, lower part).
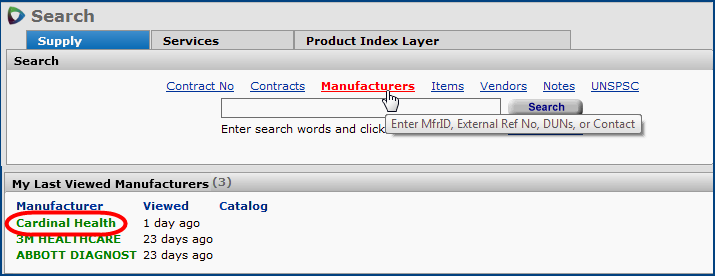
Figure 81 - Opening Information for a Manufacturer Located Using Search
The "Work with Manufacturer" page appears (Figure 82).
- On the Manufacturer Actions panel, click Proposals. (If the Proposals link is grayed out, no bids exist for the manufacturer.)
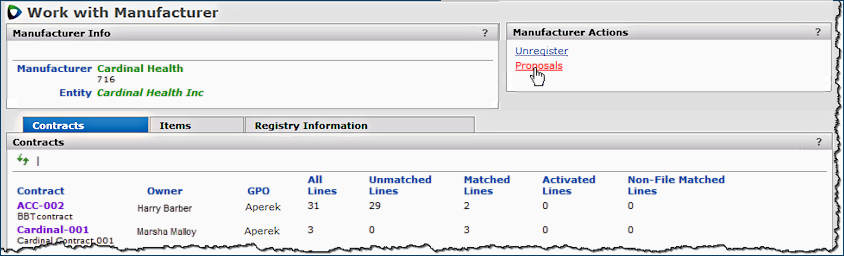
Figure 82 - View a List of Manufacturer Proposals
A list of proposals for the manufacturer appears (Figure 83).
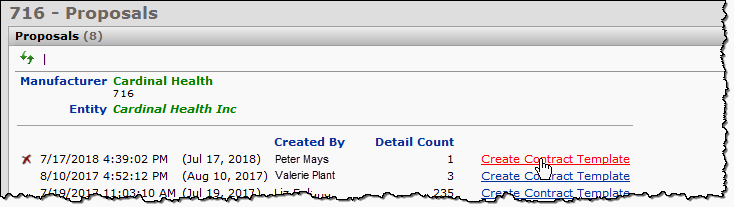
Figure 83 - List of Manufacturer Bids for Selection
- Click Create Contract Template next to the proposal of interest (Figure 83). A panel, similar to Figure 68, appears for you to enter contract fields, if you wish. Entering information in the fields is optional, because when you click Submit, you will get a full-size Excel contract and can enter information there.
- Follow the previous instructions to complete the fields.
-
Notice that you can enter boundaries for any contract tiers: From and To percents, amounts, and quantities, if desired.
- Also, you can enter a tier threshold. When you enter a tier threshold, the application tracks tier threshold spend on the contract for you. You can also set a threshold alert.
- The Control Number field does not appear; you cannot enter a control number for a contract created this way.
- Click Submit. The Multi-Tier Contract Template appears. You can use this document to create one, or many tiers.
Important: Detailed instructions for entering data on the contract template are in the section Using the Contract Template. You should look at this information if you have not used the multi-tier contract template before.
Upload a Contract from the Contract Template
You can import a contract created with the Contract Template either from within the Excel worksheet or using the GPO portals.
To import a contract template from within the Excel worksheet:
- Make sure you have downloaded and installed the latest version of the Contract Template Add-In.
- Detailed instructions for the download and install are in the topic "Download and Install the Contract Template Excel Add-In."
- Use Excel (with the add-in installed) to open the saved contract that you created in Sourcing and Contract Management.
- Click Sign-On (Figure 84).
- For Excel 2013 users, click the Inc tab (top, last tab on right). The key-shaped Sign-on icon appears.
- If you are using Excel 2010, click the Add-Ins tab. The Sign-on link appears on the top left (Figure 85).
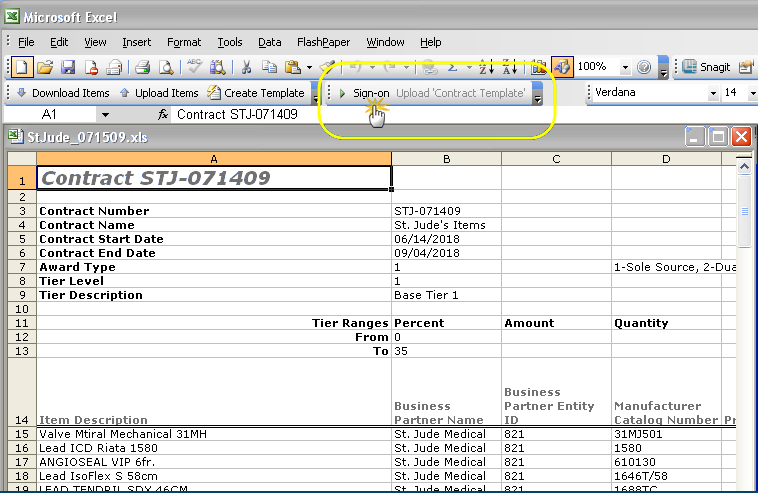
Figure 84 - Opening the Sign On for Excel Versions Lower Than 2010
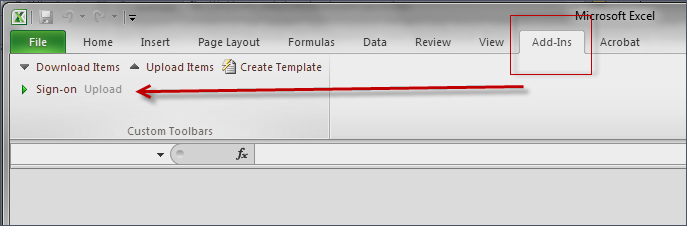
Figure 85 - Opening the Sign On - Excel 2010
A panel opens for you to sign on to the system (Figure 84).
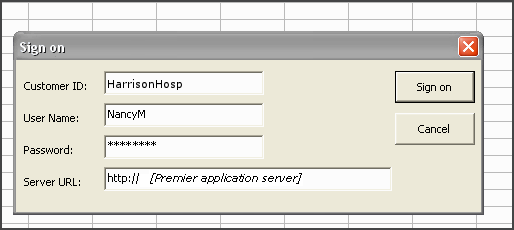
Figure 86 - Signing On from an Excel Spreadsheet
- Enter your normal Customer ID, User ID, Password, and Server URL in the Sign on panel.
- Click Sign on.
- If the sign on information you entered is correct, the Sign on panel disappears, and you are signed on. Otherwise, error messages appear.
-
Correct any problems with your sign on data, and try again.
- The Sign-On button changes to Sign-Off.
- Next to Sign-Off, a button Upload 'Contract Template' appears.
- Click Upload 'Contract Template'.
Sourcing and Contract Management uploads the contract. When the contract upload finishes, a message appears.
When the upload is successful, the contract is listed on the "Load and Activate Workbench" Contracts panel (Figure 87).
(Click the Activate Contracts tab to view the contract.)
If you created the contract from a project bid, click Find Contract on the project's Proposals panel to locate the contract and add it to the project.
- Close the message window.
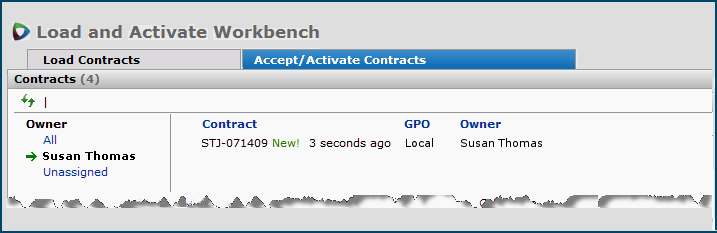
Figure 87 - The "Work With New Contracts" Upload Status and Contracts Panels
- If the import was not successful, error messages appear on the "Load and Activate Workbench" Upload Status panel.
- Click the Load Contracts tab.
- Review the error messages, and make corrections to the Excel worksheet. Then, repeat Step 6.
Important: A problem occurs if the contract template is not the first worksheet (i.e., the far left worksheet on the tabs) in the Excel file you are uploading.
-
The first worksheet must be the Contract worksheet; otherwise, you will not be able to import the Contract Template back into Sourcing and Contract Management.
- If you copy worksheets from other sources into the Contract Template, be sure to put them behind the template.
-
Hidden worksheets have to be behind the Sourcing and Contract Management template as well.
The safest way to avoid an import problem is to delete any extra worksheets before you import the template.
To import a contract template using the GPO Portals,
The import steps are the same as for any contract, except, on the GPO Portals panel, select the application's format as the GPO. Below is a summary of the import steps.
See Import Supply Contracts for details.
- From the page menu, select Supplies > Contracts > Load and Activate Workbench.
The "Load and Activate Workbench" page containing the Upload Status panel appears.
- On the Upload Status panel, click Upload New Contract.
The GPO Portals panel appears.
- Click Upload Generic Contract.
The Contract Import panel appears.
- Enter the contract file that you wish to import in the File to Upload field.
- Click Browse to locate the file.
- Select the file.
- Click Open.
The system fills in the field with the file path and file name.
- Click Submit.
The system sends you a message that it has uploaded the contract file, and that you should close the window.
- Click Close Window.
The "Work with New Contracts" page appears. The application immediately processes
the file.
Work with the Project Status Analyses
The Project Status tab displays a dashboard of analysis information for a project.
To access the Analysis Dashboard:
- Open the analysis project.
- Click the Project Status tab.
Note: Click Open Full View in any dashboard box to open the box as a full page view.
Figure 88 is an example of Project Status data. Savings are displayed on the Savings tabbed panel using the Release 5.0 Savings Feature for a project.

Figure 88 - The Project Status/Analysis Panel
Note: If data is not available, the graphs on the panel are blank.
Click ? for help on the Analysis panel, including details and calculations.
Project Status Graphs
The Conversion bar graphs display your progress in purchasing preferred vs. non-preferred items for 12 months. "Conversion" is used in the sense that over a period of time, you are converting your purchases from a set of "non-preferred" items and prices to a set of "preferred" items and prices.
The Conversion bar graphs display spend beginning with the earliest activation date among the awarded contracts. The preferred spend includes replacement items from the project and all project items that do not have designated "preferred" replacements. A purple line labeled Act Date appears on the graphs.
The Conversion - Preferred vs. Non-Preferred graph shows the percent preferred contract spend (green) compared to the percent non-preferred contract spend (gray) for the period of time.
- Mouse over a green or gray portion of any bar to view the spend percentage.
The Conversion - Preferred w/Qtys graph presents data similar to the Conversion - Preferred vs. Non-Preferred graph; however it graphs the full spend amounts, rather than the relative percentages. The preferred quantity is overlaid on the amounts.
- Mouse over a green or red portion of any bar to view the spend percentage.
- Mouse over any month node of the graph to display the quantity for the month.
The Manufacturer Market Share graph displays each manufacturer's percent market share. On the graph, the Y axis is the Percentage of Spend. The X axis is Time, by month. Spend percentages are calculated at the end of each month.
- Mouse over any month node of the graph to display the percentage for the month.
Project Savings
Once the first contract is awarded on a project, savings begin to accrue. The Savings feature tracks project savings for all project items once a contract has been awarded on the project. You can work with savings for all projects or any project from the Savings feature.
- From any project that you are working in, click the Savings tab on the "Work with Contract" page (Figure 89). The Project Savings panel appears (Figure 90).
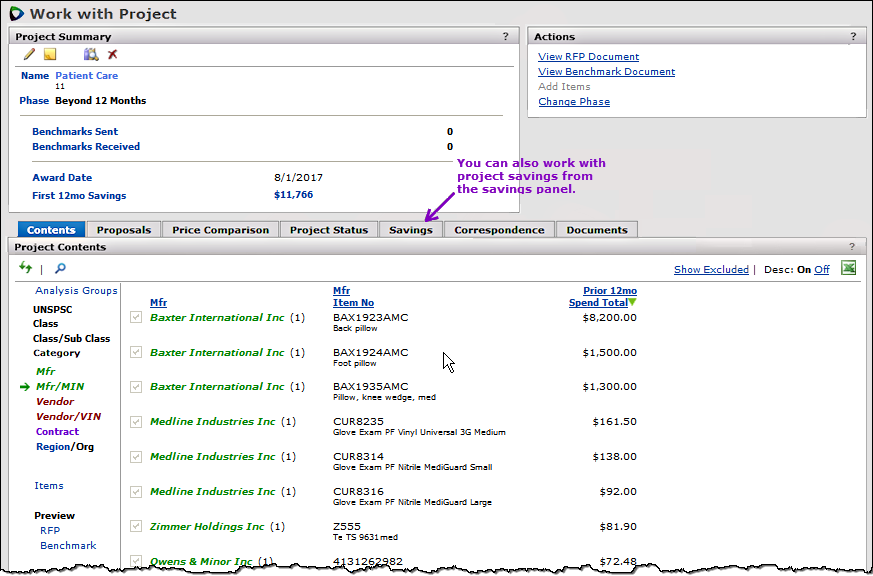
Figure 89 - The "Work With Project" Page
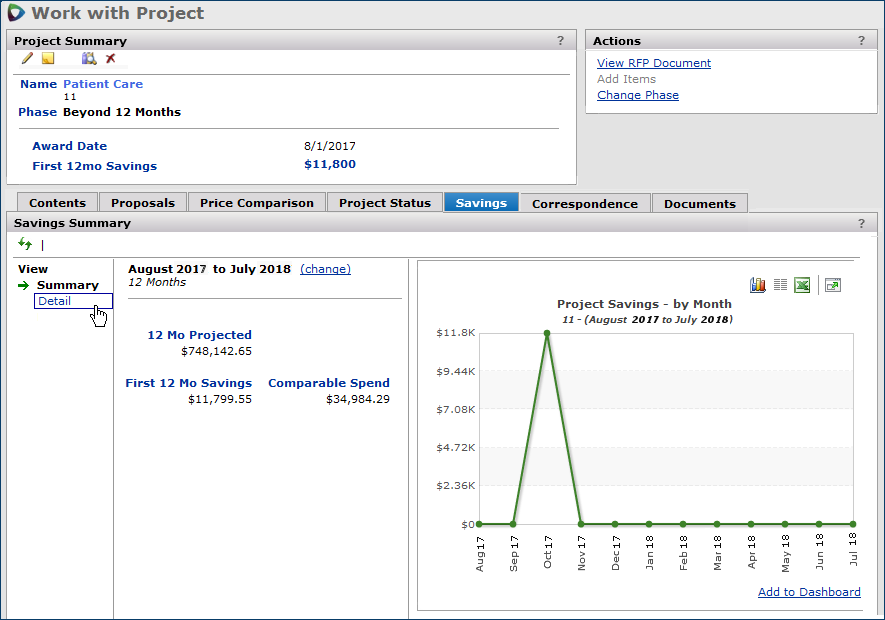
Figure 90 - Project Savings from the "Work with Project" Page
Details on using the Project Savings Feature are included in the Savings chapter; the topic is Project Savings.
In brief:
- You can display project savings at the summary level (Figure 90).
- Clicking Details displays savings on the contract for each item.
The Savings feature, including Project Savings is available from the main Contents (Figure 91).
Figure 91 - Savings Menu
Set Up and Use Project Phases
You can use project phases to track the progress of a project. Sourcing and Contract Management can automatically assign a phase to a project when a trigger event occurs.
Figure 92 is an example for a site with several phases defined. Notice that the phases are sequential in integer order with increments of ten.

Figure 92 - Sample List of Phases for a Site
To use phases with a project, you must define the phases. If you do not wish to use phases, you can ignore the setup step, and not define any phases. The process of defining phases is discussed below, under "Set Up Phases."
How Phases Work
Two types of phases are available: standard phases and user-defined phases.
- The standard group of phases is provided by Sourcing and Contract Management. When a project reaches a trigger event, such as when the first RFP is sent, the system assigns the phase associated with the event to the project. Trigger events for standard phases are listed in the following table. To use the standard phases, you only need to create a record that associates the phase and its trigger.
Table 1 - Standard Phases and Triggers
Phase |
Trigger Event |
| New Project |
The user creates a new project. |
| RFP Sent |
The user sends the first RFP to a supplier by clicking Send RFP via Email
Or, the user clicks RFP Sent. |
| Proposal Received |
The system receives the first returned RFP for the project. |
| Contract Awarded |
The user awards the first contract for the project |
| Beyond 12 Months |
The award date is farther back than 12 months.
Sourcing and Contract Management
runs a nightly process that evaluates
award dates for projects. |
- With user-defined phases, you set a project to the phases manually. An event does not automatically trigger a phase change. You can enable user-defined phases and use them instead of — or alongside of — system standard phases.
Note: You can also manually assign a system standard phase to a project.
Setup for project phases is in the Administration contents. You need administrator security settings in your User Profile to define project phases.
Set Up Phases
To create and define phases:
- From the main Contents, select Administration > Tables > Project Phases (Figure 93).

Figure 93 - Menu Element for Project Phases
The list of phases appears (Figure 94). Initially, the list is empty.

Figure 94 - Project Phases Panel
- Click Create Project Phase.
The Phase Setup panel appears (Figure 95).
Figure 95 - The Create Project Phase Panel
The Seq field is populated by the system in increments of ten. When you create the first phase definition, the Seq value is 10. You can change the value if you wish (Figure 95).
- Click the down arrow in the Triggered by field to select a trigger event (Figure 96).
Figure 96 - Selecting a Trigger Event for a Phase
- For a system standard phase, select one of the five events: Project Created, RFP Sent, Proposal Received, Contract Awarded, or 12 Months Past.
The Description field is populated automatically for system standard phases.
- Or, for a user-defined phase, select User Defined.
If you are creating a user-defined phase, enter a Description.
- Optionally, enter a Comment.
- Click Save.
The system displays the Project Phases panel.
- Click Refresh to view the new phase.
This phase is now defined and enabled.
-
A standard phase will be assigned to projects when the trigger even occurs.
-
A user-defined phase is available for you to assign manually.
You can create other phases as needed.
- Once a standard system phase is defined for a project, you can only stop using the phase by deleting it.
To delete/edit a phase:
You can delete a phase as long as it is not the current phase on any project. You can also edit the phase information.
- Mouse over the phase on the Project Phases panel. Icons appear (Figure 97).
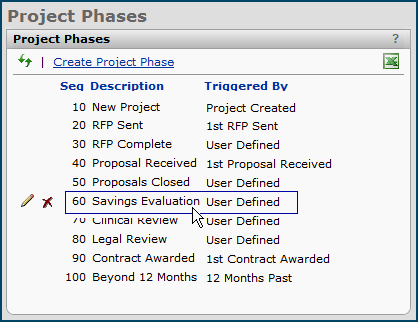
Figure 97 - Edit/Delete a Project Phase
- Click the delete icon .
- You can edit a phase definition by clicking the edit icon .
Use Phases
When phasing is used, the Project Summary panel displays the project phase (directly under the Project Name).
To change a phase manually:
- Open the project.
- On the Actions panel, click Change Phase (Figure 98).
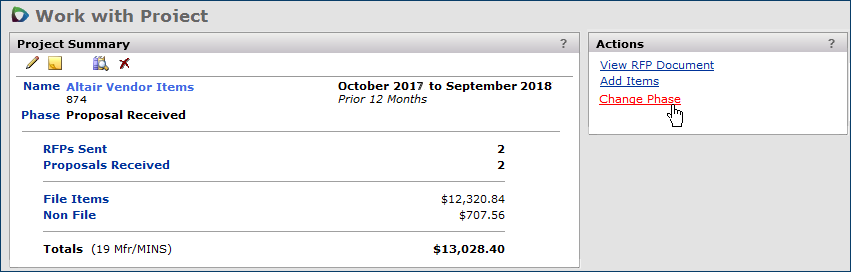
Figure 98 - Changing a Project Phase
A list of phases defined for your projects appears.
- Select the new phase.
To filter the list of projects by phase:
The Projects panel contains a filter for phases so that you can display all projects or only projects that have reached a particular phase (Figure 10).
- Click the phase that you wish to use as a filter.
Add Correspondence to a Project
From the "Work with Project" page, you can send email from the project, and save email and attachments.
When an RFP is sent to a supplier, a System Note is created. The System Note is displayed on this panel.
You can also create and save user notes for the project. When a note links to other information, Open Link
appears in the same row as the note.
Note: Users with the role object "AnalysisProject" set to View or None cannot access a project's email, nor send email to a project. Emails are rejected with the message that the user does not have authority to add documents.
To send email:
- Open the analysis project.
- Click the Correspondence tab to open the Correspondence panel.
- Click the email icon (Figure 99) to compose and send email to the project.
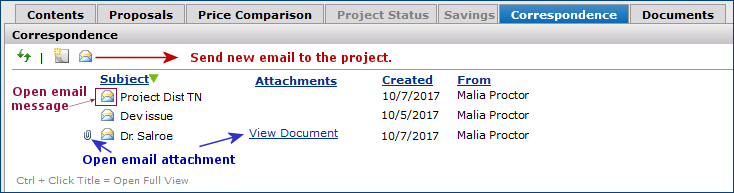
Figure 99 - Creating Email for a Project
- Write the email message.
- If desired, attach a document to the email.
- Send the email.
Correspondence containing Excel documents
Analysts can send Excel files that are not bids or benchmarks to an analysis Project to be attached as documents.
The system automatically associates the email message with the project. A link to the message appears in the Correspondence panel. A link to any attachment is in the Attachment column.
-
Automatic document attachment is subject to the standard rules for emailing project documents: the email must be sent to the project at Projects@erp.premierinc.com and the project number must be located in the body of the email.
-
Files emailed in a non-bid/non proposal or non-benchmark format are not displayed under the Proposals panel within a project. If your file is not in one of these formats, you will receive notification via email as confirmation.
Project Documents
Use the Documents panel to upload documents to a project, and to work with documents that you have attached to a project. The following discussion explains the basic process of uploading and opening documents. You will notice that the panels for uploading and displaying documents have several options. These are addressed in the Document Management topic. This section just describes the basics of getting a document associated with a project.
You may wish to explore the other capabilities of the Documents feature. For example, you can use a full-text search to find information in a project's documents. You can create groups for documents and sort documents by the groups to which they are assigned. You can assign a Status value to documents. You can attach a document from the project to a contract. See the discussion in the Documents topic.
For the first document that you upload, the Documents panel is empty. Newly uploaded documents are flagged as New. You can display, edit, or delete uploaded documents. You can also upload revisions to documents.
Searching a Project's Documents
The "Work with Project" Documents panel has a full text search of listed documents for the project.
- To find any document that contains specific characters, click the search icon, and enter the characters in the search box.
- Click Enter.
Documents containing the characters appear in the list (if any exist).
Display and Upload Project Documents
For projects, the Documents panel is located on the "Work with Project" page (Figure 100).
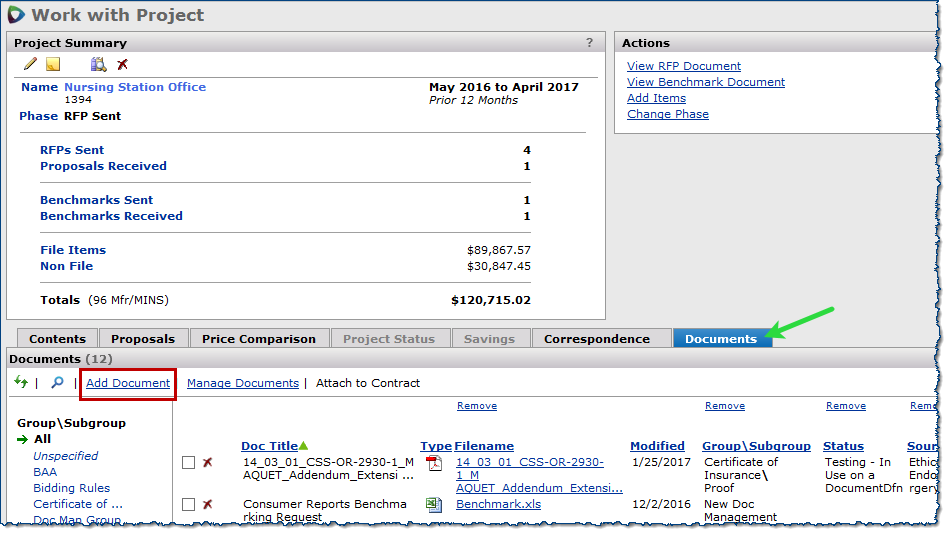
Figure 100 - Adding a Document to a Project
The following document types are supported:
Microsoft Word (.doc, .docx)
Microsoft Excel (.xls, .xlsx)
Adobe Acrobat (.pdf)
image documents (.jpg, .png)
Power Point (.ppt, .pptx)
plain text documents (.txt)
HTML documents (.htm/.html)
Add a Document to a Project
Use the Documents panel to upload documents to a project. For the first document that you upload, the Documents panel is empty. Newly uploaded documents are flagged as New. You can display, edit, or delete uploaded documents. You can also upload revisions to documents.
To add a document to a project:
- On the Documents panel, click Add Document (Figure 100, red box).
The Add Document panel appears (Figure 101).
- Enter a name in the Title field.
- The name will be displayed on the Documents panel when the document is uploaded.
- You can also optionally assign a Group and Subgroup (Unspecified is the default), a Status, and a Source. (These values can also be assigned after you upload the document.)
- Click Browse.
Figure 101 - Identify the Document to be Added
The Microsoft Windows Choose File panel appears (Figure 100).
- Locate and select the file for the document that you wish to upload and add to the project.
When you select the file, Windows populates the File name: field (Figure 102).
Note: Figure 102 may look different on your computer, depending on the version of Microsoft Windows that you are using. Regardless, you will see a list of documents to choose from.
- Click Open.
Figure 102 - Select the Document to be Added
The document path and file name appear in the Filename field on the Add Document panel (Figure 103).
- Click Submit.

Figure 103 - Complete the Addition of a Document
A message tells you that the document is uploaded.
- Click outside of the message area to close the message.
- Click the Refresh icon
 on the Documents panel.
The document appears on the Documents panel for the project.
You can upload another document by clicking Add Document, and following the steps above. Alternately, for new documents, you can create a placeholder name for a document, and upload the content later. Also, using the same process, you can upload revisions to documents that already exist.
To create a document placeholder name and upload content later:
- In Step 2 (above), enter only a document Title. Leave the Filename path field blank.
- Click Submit (instead of clicking Browse).
A message appears that your document was created, but no upload was performed.
- Click in an area outside the message and the message disappears.
- Click the refresh icon on the Documents panel.
The document title appears on the Documents panel. An Upload link is in the Filename column.
To upload new content for a document placeholder name:
- Locate the name of the document on the Documents panel.
- Click Upload.
The Upload Document panel (Figure 104) appears. The Check In As line sets the version of the document to 1.0.
Figure 104 - Uploading Version 1.0 of a Document
- Click Browse to locate and select the file on your local drive that you wish to upload.
- Click Submit.
- Click the refresh icon on the Documents panel. The document appears with the completed type and filename information.
Check In/Check Out
To check a document out for editing:
- Click the document Title.
The system displays the Document Information panel (Figure 105).
Figure 105 - The Document Info Panel
- On the Document Information panel, click Check Out Document.
The Microsoft Windows Download panel appears.
If you change your mind and do not wish to check out the document, click Cancel. The panel disappears.
- Click Open.
The document appears.
- Change the document as needed.
- When you are finished editing the document, click File > Save As to save the document back to the local system file. When you check the document back in, you identify the location of the saved document, and the changes are uploaded to Sourcing and Contract Management.
Important note about saving checked out documents
When you edit a document, and wish to save your changes, you must select Save As and save the document back to your local network.
- You must use Save As.
Using Save alone will not save the changes.
To check a changed document back in:
- On the Documents panel, click the document Title.
The system displays the Document Information panel (Figure 105). However, for checking in a document, Check In Document is active; Check Out Document is grayed out.
- Click Check In Document.
The Check In panel appears.
On the Check In panel:
- At the right of the Document field, click Browse to locate and select the path and file name of the document.
- Assign a version number to the document from the Check In As field.
You can assign one of the following:
- The current version number.
- The next highest minor version number. A minor version number is the decimal portion of the number; e.g., 1.2, 1.3, etc.
- The next highest major version number. For example, if the current version is 1.4, you can assign 2.0 to the document.
- Click Submit.
To check an unchanged document back in:
- On the Documents panel, click the document Title.
The system displays the Document Information panel (Figure 105).
- Click Undo Checkout Document.
You can check documents out of a project for review or for editing. When you check out a document, it is locked so that no one else can simultaneously change it. Checking the document back in makes it available again for others to edit.
Notes about Internet Explorer option settings for downloading files
- You must have the Internet Explorer option "File download" set to Enable if you wish to upload and download documents in Supply Chain, applications, including Sourcing and Contract Management . This setting for this option is required.
- Another option "Automatic prompting for file downloads" has settings that determine how you do uploads and downloads. If your site requires this option set to Disable, you get a message on the Information Bar that Internet Explorer has not downloaded a file because of security.
In this case, to proceed with downloading a Documents file:
-
Click the Information Bar message, and OK the download.
-
Then, on the Documents panel, click the filename again.
This time, the standard Windows panel appears, and you can proceed to download the file.
You can set the Internet Explorer option "Automatic prompting for file downloads" to Enable — if this setting is consistent with your site's security policy — to avoid getting the Information Bar message. You may wish to consult your IT staff about Internet Explorer security settings.
Document Versions
You can view revisions to a document that you or others have made. On the "Work with Documents" page, the Revisions panel (Figure 109) lists each version of the document, if any revisions have been made. If no revisions have been made, version 1.0 of the document — the original upload — appears.
To open and view the content of any document version:
- On the Documents panel, click the document Title.
The Document Information panel appears (Figure 105).
- Click Open Full View in the lower left of the Document Information panel.
The "Work with Document" page appears.
- To open and view the content of any document version, in the Revisions panel (Figure 106), click the document Filename next to the Version number.
The File Download panel appears.
- Click Open to open the file.
- To view the latest version, on the Actions panel, click View Latest Version.
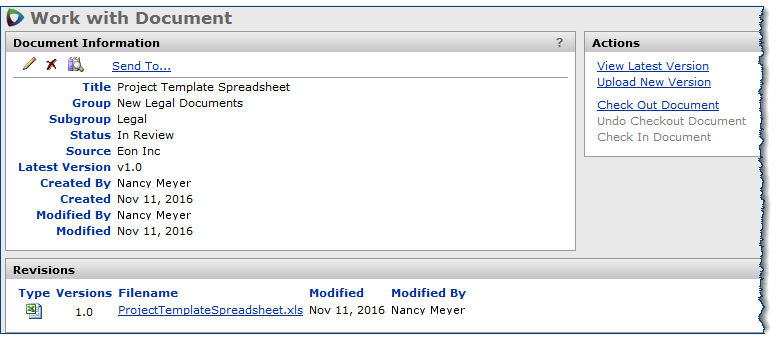
Figure 106 - Document Revisions Panel
Work with Projects Created from the Project Template Spreadsheet
Create a Project by Uploading an Analysis Group Spreadsheet
You can create a new project using the Excel Project Template spreadsheet. The Excel spreadsheet originates in the Analysis Workbench. Once you have identified an analysis group for the project, you download the data from the analysis group to Excel, add non-spend items to the spreadsheet, and then upload the spreadsheet to create a project.
Note: You can add multiple items to an existing project at any time using a Project Template.
Setup: Make sure that you have the Add-In for Excel spreadsheet uploading installed. Instructions are in the Setup section.
About Item Descriptions on the Project Template
Item Description values uploaded to Projects from the Project Template can differ from those in the site’s Item Master. To provide the most useful item descriptions in projects, an enhancement lets your site use either the uploaded project template item descriptions, or those from the site’s Item Master.
Note: This option must be set by the Help Desk.
When the option is set, Projects overrides Item Master or Product Index Layer (PIL) item descriptions with those uploaded in the Project Template.
- If you enter an Item Description in the Excel template, Projects uses that item description.
- If you do not enter an Item Description in the Excel template, or if you delete the item description, Projects uses the item description loaded into SCM from your Item Master.
Otherwise, if the option is not set, projects’ item descriptions are those in the Item Master.
To download analysis group items to a Project Template spreadsheet:
 On the analysis workbench, create the analysis group for the project (Figure 107).
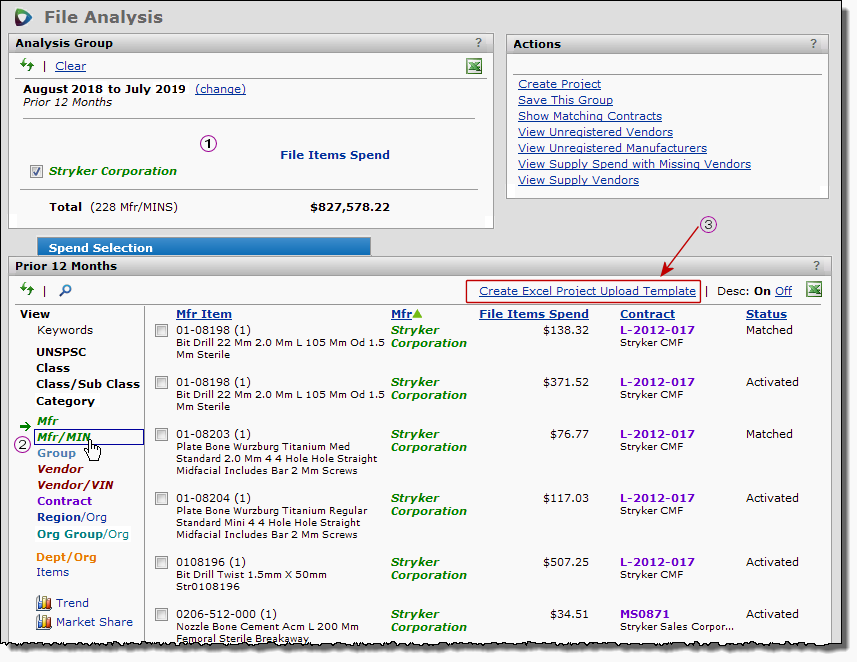
Figure 107 - An Analysis Group Ready for Download to the Project Template
 Set the View to Mfr/MIN. (The download link in the upper right only appears in this view.)
 Click the Create Excel Project Upload Template link in the upper right corner of the panel.
The Microsoft Windows File Download panel appears.
- Click Save to save the Excel document to a local network file.
The Save as panel appears.
- Select a folder and a file name.
- Click Save.
You can now open the file containing the spreadsheet to add items and project information.
Work with the Project Template Spreadsheet
To work with the Project Template spreadsheet:
- Navigate to the folder on your network or local drive where you saved the downloaded spreadsheet.
- Click the file name to open the spreadsheet.
Figure 108 is an example of a Project Template spreadsheet.
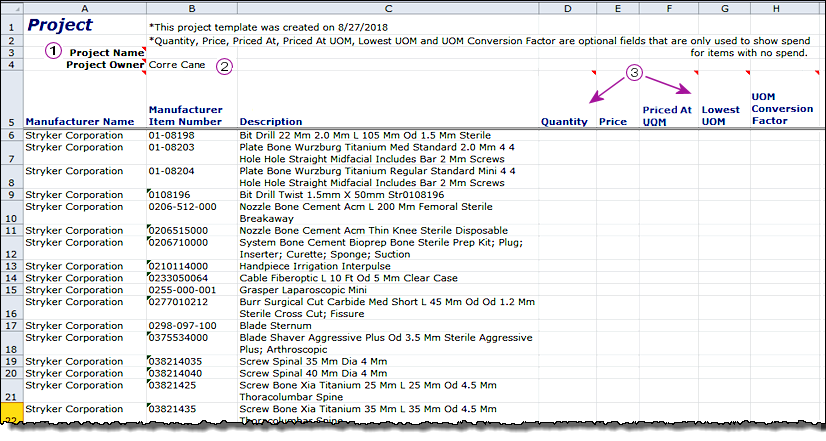
Figure 108 - Project Template
Editing the Project Template Spreadsheet
Enter a name for the new project. The name must be unique; i.e., it cannot be the name of an already existing project.
The Project Owner defaults to the user who created the downloaded spreadsheet. You can edit the project owner and enter a different name, but if you leave the field blank, the default owner is used. During the upload, this field is checked and an error occurs if the owner you entered is invalid.
The fields Quantity, Price, Priced at UOM, Lowest UOM, and UOM Conversion Factor are for items that do not currently have spend, but that you wish to add to the project. For example, the non-spend items could be included in bids and benchmark documents, and later used for price comparison. Enter data in these fields as needed. Table 2 contains an explanation of each field.
Table 2 - Fields for the Project Template
| Spreadsheet Field |
Meaning |
| Project Name |
The name of the project to be created when you upload the spreadsheet.
The name cannot belong to any existing project. |
| Project Owner |
The user who owns or is responsible for the project.
If left blank, this field value defaults to the current user. |
| Manufacturer |
The manufacturer of an item in the project. If you add non-spend items,
you can enter a value in this field.
Important: The manufacturer must be a valid PIL entity or local entity.
The name that you enter must match the entity name character for character
(otherwise, the system will not recognize the name, the spreadsheet will not upload,
and you will get an error message). |
| Manufacturer Item Number |
The manufacturer's identifier for the item. |
| Description |
The item description. |
| Quantity |
The 12 months estimated quantity of the item that you wish to use for calculating spend. |
| Price |
The item's price per unit of measure: either the purchasing price or the price
at the lowest unit of measure. |
| Priced At UOM |
The unit of measure associated with the value in the Price column.
This is the UOM that the item price represents. |
| Lowest UOM |
The lowest unit of measure for the item.
You can leave this field blank if the Priced At UOM value is also the lowest UOM for the item.
- Otherwise, if the Priced At UOM is different from the lowest UOM, enter a value in this field.
For example, if the Price column contains the box price,
the Priced At UOM is BX, and the lowest UOM is each (EA), enter EA. |
| UOM Conversion Factor |
The numeric factor that converts the Lowest UOM to the Priced At UOM.
- If the Priced At UOM is the same as the Lowest UOM, the value in this column should be 1.
- if the Priced At UOM (BX) is different from the Lowest UOM (EA),
the value in this column must be greater than 1 (for example: 10) |
The fields Project Name, Project Owner, Manufacturer Name, Price, Priced At UOM, Lowest UOM, and UOM Conversion Factor have content hints that you can access by mousing over the red arrow (Figure 109).
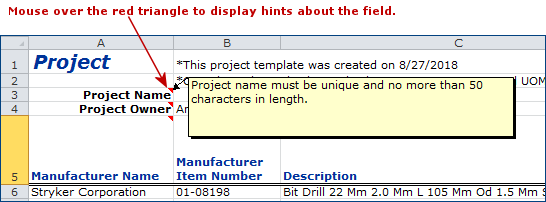
Figure 109 - Using the Field Hints on a Project Template Spreadsheet
Figure 110 is an example of the previous spreadsheet with non-spend items added. The non-spend items added by the user are highlighted in yellow.
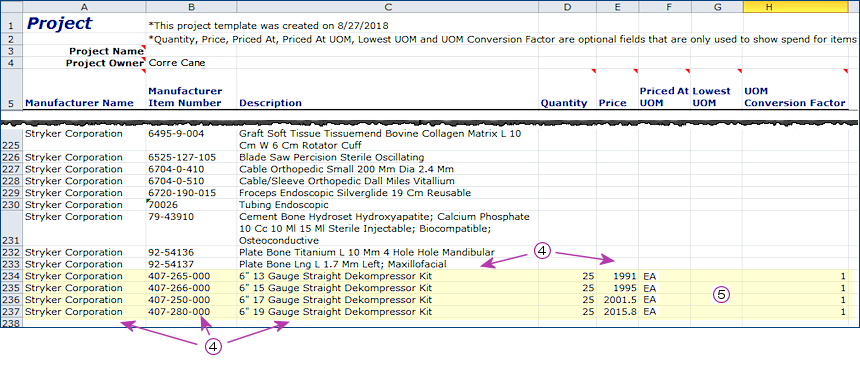
Figure 110 - Project Template with Non-Spend Items Added
 Notice on Figure 110, that for the non-spend items, the user has completed the optional fields — Manufacturer Name, Manufacturer Item Number, Description, and Quantity through UOM Conversion Factor — for each item (except for Lowest UOM).
- If you add data for one non-spend item in any of the fields (Quantity through UOM Conversion Factor), you must complete all of the fields. There is one exception: you can leave the Lowest UOM field blank if the Priced At UOM value is also the lowest UOM for the item.
- For any non-spend item, the Manufacturer Name entered must be a valid Product Index Layer entity or local entity.
 In the example, the user has not needed to enter a Lowest UOM since the Priced At UOM is the lowest UOM for all the items.
When you create the project, any non-spend project items that you have included on the spreadsheet and uploaded will also be available for editing or deletion on the Projects panels.
Upload the Project Template Spreadsheet
Two preliminary activities are needed before you can upload project data from a spreadsheet,
- Before you can upload a project template, the Excel Upload Add-In must be installed on Excel.
Note: If you have not installed the add-in, do so before proceeding. See Download and Install an Excel Add-In.
- For sites that access SCM through , you must set the Internet Explorer option Miscellaneous > Access Data Sources Across Domains as shown in Figure 111. This setting allows you to sign on to SCM from within the Excel project template. For details on setting IE options, see Internet Explorer Option Settings for instructions on how to access the IE options.
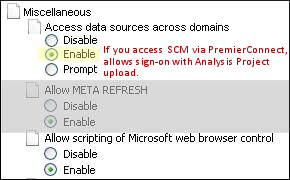
Figure 111 - IE "Access Data..." Option for Project Upload: Users
Uploading a project template spreadsheet is identical to the process of uploading a proposal, except that the upload link is "Upload Project Template."
- Each upload of a new project template creates a new project.
- The uploaded project template is saved and accessible in the Documents tab for the new project.
- Duplicate items within the spreadsheet are ignored.
To upload a project template:
- Open the project template in Excel.
- You must sign on to Sourcing and Contract Management from within Excel before you can upload a project template:
- Excel 2013: Click the Inc. tab (top, last tab on right). On this tab, click the key-shaped Sign on icon.
- Excel 2010: Click the Add-Ins menu to access the Sign-on button. The Sign-on button appears on the top left (Figure 112).
- Excel 2007: A Sign-on button appears in a toolbar at the top of Excel (similar to Figure 43).
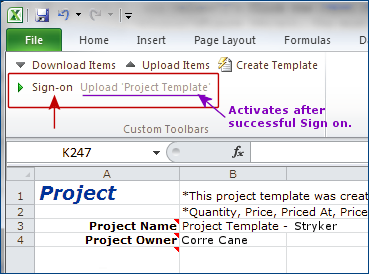
Figure 112 - The Sign-on Button
- Click the Sign-on button. The Sign-On panel appears.
- Enter your normal Customer ID, User ID, Password, and Server URL in the Sign-On panel.
- Click Sign on.
If the sign on information you entered is correct, the Sign-On panel disappears and you are signed on.
The Upload 'Project Template' link (Figure 112) next to the Sign-On/Off button is activated.
If you receive error messages, correct any problems with your sign-on credentials and try again.
- Click Upload 'Project Template'.
- If the upload is successful, your contract is created.
- If any errors exist in the values of fields that you entered, the project template will not upload. Correct the errors and try the upload again.
Note: The system stops the upload process at the first error that it encounters. You may have multiple errors to correct before the upload is successful.
Add Items to an Existing Project Using the Project Template
You can add items to an existing project by uploading a modified Project Template that contains the item information you need to include. This method eliminates the need to manually enter items when there are too many to input by hand. Once the updated spreadsheet is uploaded, you can display spend for all items in the project—original items plus any additional items you added via the Project Template upload.
Note: This method works even if the project was not created using a Project Template. However, you can only add items to eligible non-contract awarded projects. If a contract has been awarded, you will receive an error when attempting to add new items.
To add items to an existing project using the Project Template spreadsheet:
- On the "Work with Projects" page, click the Name/Number of the project to which you are adding items.
The "Work with Project" page opens.
- Click the Documents tab and verify that the panel contains a copy of the Project Template Excel spreadsheet (the list of original project items).
Note: An application-generated Project Template spreadsheet with correct header information must exist before you can add items via this process.
- If you do not have a copy of the Project Template spreadsheet on a local or network drive for editing purposes, download the file now:
- On the Documents panel, click the appropriate spreadsheet Filename.
- Click Save or Save as to save the file to your specified drive location.
- Open the Project Template spreadsheet from your drive and add any additional items.
Note the following:
- The Project Name field on the spreadsheet must be identical to the version that was originally uploaded to create the project.
This will not overwrite the original spreadsheet, but will merge the new and original items within your project. Duplicate items will be ignored.
- For details on entering item information, see Editing the Project Template Spreadsheet.
- Upload the Project Template to your project.
- Verify the upload was successful:
- Click the Documents tab. Your newly uploaded spreadsheet will appear in the list of documents on the Documents panel.
Click Refresh if it is not visible.
- Click the Contents tab. All new items will appear in the list of Project Contents.
Click Refresh if they are not visible.
Work with the Panels for an Uploaded Project
When you create a project from a spreadsheet, you can work with the project just as if it had been created using the project panels. Figure 113 is an example of the project created from the uploaded project template in Figure 108.

Figure 113 - Project Panels for a Project Created from an Uploaded Spreadsheet
In the Project Contents panel Items > All Items view, the items downloaded to the spreadsheet from the original analysis group panels appear with their spend data.
Non-spend items that were added to the spreadsheet and uploaded also appear. Spend for these items is calculated from data that the user entered in the spreadsheet's Price, Quantity, Priced At UOM, and UOM Conversion Factor fields.
In some cases, additional items may appear in the project as a result of the process that the system uses to get all matching spend items. When a project is created from a spreadsheet, the filters Spreadsheet (and possibly Non Spreadsheet) are available in the Items view. You can filter the list of items for only items that were included on the spreadsheet upload (Spreadsheet), or only items that were included by the system (Non Spreadsheet).
Figure 114 is the Analysis Groups view of the project.
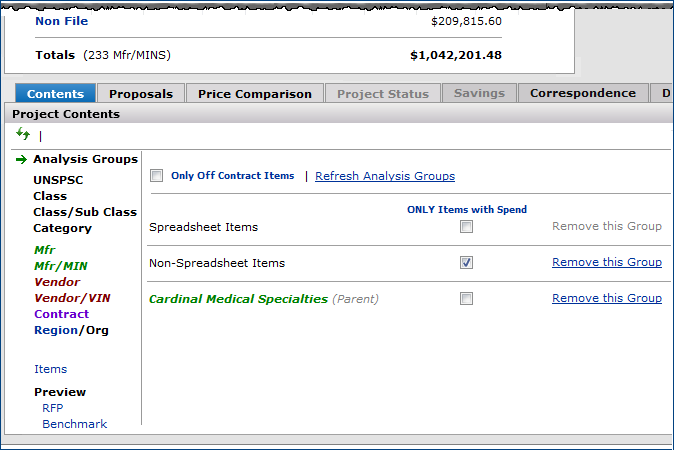
Figure 114 - Project Contents: Analysis Groups View for an Uploaded Project
- A new group with the title Spreadsheet Items is generated for the items uploaded in the spreadsheet. (You cannot remove this group from the project.)
- Any Mfr/MIN combinations included by the system that differ from the items in the spreadsheet are associated with the Non-Spreadsheet Items. Grouping these items separately provides the flexibility to remove all items not listed in the spreadsheet.
Edit or Delete Items Added to the Project on the Spreadsheet
Figure 115 is another example of the Items view.
Items on the project from the original analysis group that were downloaded on the spreadsheet cannot be deleted or edited.
Mousing over an item number for these items displays a plus sign "+".
Click the "+" to display item information. Details are in a previous section.
Note: If you wish to remove a downloaded item from the project, you must exclude it using the link in the Mfr/MIN view. (See Excluding Items for details.)
You can edit or delete (non-spend) items that you added to the spreadsheet and then uploaded.
(These items are easy to spot because they have no value in the Org column.)

Figure 115 - The Project Contents Items View: Mousing Over Item Data
To edit an item that you added on the spreadsheet:
- Mouse over the item.
An edit icon appears.
- Click the edit icon.
- The Edit Spreadsheet panel appears (Figure 116).
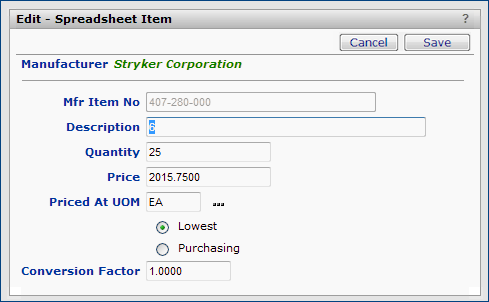
Figure 116 - Edit Panel for an Item Added on a Project Spreadsheet
- Enter or change item information in the panel as needed.
A summary of the fields (which are the same as those in the spreadsheet) is in Table 2.
Note: You cannot change the Manufacturer or the Mfr. Item No.
- Click Save to save your editing changes.
To delete an item that you added on the spreadsheet:
The process is the same as deleting items that you added manually via the Actions panel link (Add Items > Manual Add Items).
- Mouse over the item.
A delete icon appears (Figure 117).
- Click the delete icon.
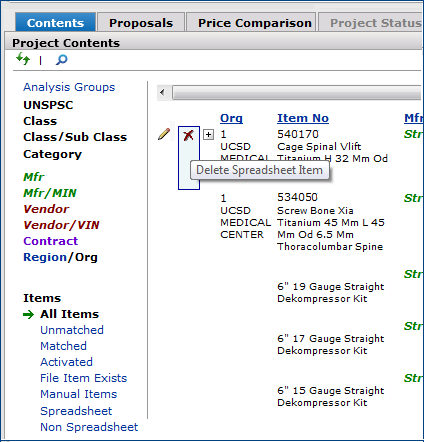
Figure 117 - Deleting a Project Spreadsheet Item
- The Delete confirmation panel appears.
- Click Delete (Figure 118).
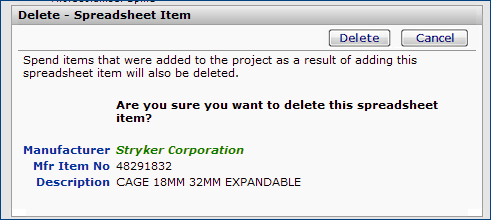
Figure 118 - Confirming Item Deletion
Create a Custom Project Using the Custom Export
An existing project's item data can be modified by the Custom Export feature to create a custom project, allowing you to define the exact item data to be included within a project. To use the Custom Export, create a project as normal and use the Excel add-in to export item details to an Excel spreadsheet. You can modify the data in specific fields for each item in the project — Quantity, Price, UOM Conversion Factor, etc. — and upload the new information back into the project via the Excel add-in. The item information on the newly uploaded spreadsheet completely replaces the items that existed in the original project, thus creating a custom project.
Custom projects are noted with a star icon  on the "Work with Projects" and "Work with Project" pages to visually distinguish them from standard projects.
Note: You must have the Excel add-in installed before using this feature. See "Download and Enable the Excel Add-In" for more information.
To create a custom project using the Custom Export feature:
- Create a project as normal.
- On the Contents tab of the "Work with Project" page, click the Custom Export filter (red box, Figure 119).
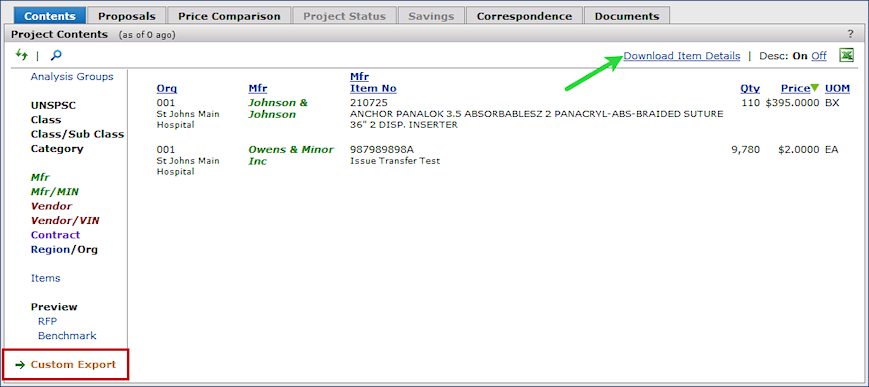
Figure 119 - The Custom Export Filter for Adding Custom Project Data
- Click the Download Item Details link (green arrow, Figure 119).
- Save the XLS file to your hard drive or network location.
- Open the file and modify any information in the data fields.
You can add new items or change the values for existing items, but you cannot modify the information in the header or column headings.
- Once your changes are complete, save your changes to the file.
- Upload the XLS file using the Upload 'Project Custom Export' button on the add-in tab in Excel (green arrow, Figure 120).
You must sign with your credentials before using this feature.

Figure 120 - The Upload 'Project Custom Export' Feature in the Excel Add-in
- Result: The custom project icon is now displayed in the Project Summary panel and the project contents reflect all changes made in the uploaded Excel file.
Edit Current Price and Quantity Within a Custom Export
Custom projects created using the new Custom Export feature display the current price of items for each Org in the Current (Current Price) column under the Detail view on the Price Comparison tab. You can edit the Current Price and Quantity fields for each item on this tab, and your changes are reflected on the Contents tab.
You can edit the Current Price and Quantity fields for each item in the following way:
- Create a custom project using the new Custom Export feature.
- On the "Work with Project" page, click the Price Comparison tab.
- Under View, click Detail.
- Hover to the right of the Current column header and click the plus sign to expand price and quantity information for the item (Figure 121).
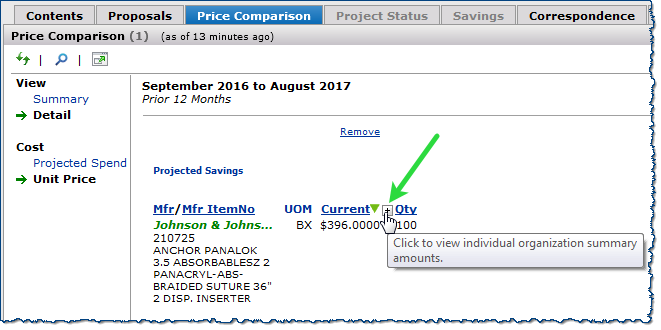
Figure 121 - Expanding Current Price and Quantity Information at Org Level
- Hover to the left of the expanded information (Figure 122) and click the edit icon .
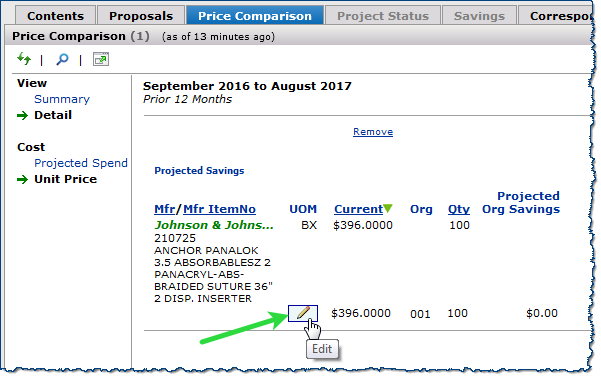
Figure 122 - Opening the Edit - Custom Export Item Panel
- Make any changes to Quantity, Price, etc. in the Edit - Custom Export Item panel.
- Click Save.
Restore Contents of a Custom Export
A project with item data that has been modified using the Custom Export feature can be restored to its original list of items using the Restore Contents link. The project items are returned to the starting point based on the original Analysis Groups that were used to initially create the project.
To restore a custom project to its original state:
- Open a custom project, notated with the custom icon , to its "Work with Project" page.
- Click the Contents tab.
- In the left column, click Analysis Groups.
- Click Restore Contents (red box, Figure 123).
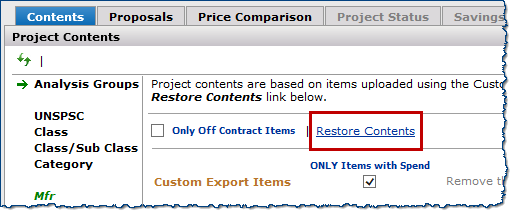
Figure 123 - Restore the Contents of a Custom Project
- Click Submit in the confirmation box to restore the project.
Once restored, the custom project icon is removed from the project and no longer appears next to the project title in any search.
Delete a Project
From time to time, you may need to delete projects that you have created. You can delete a project either from the projects list (Figure 10) or from the Project Summary panel when you open the project (Figure 125).
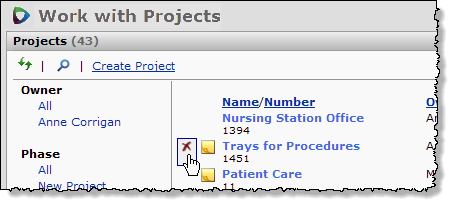
Figure 124 - Deleting a Project from the Projects List
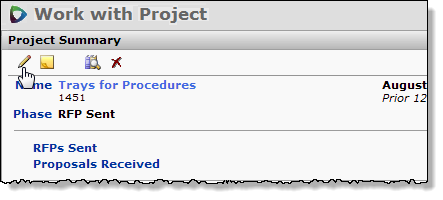
Figure 125 - Deleting an Open Project
- Clicking the delete icon displays a confirmation panel.
- Click Delete to finish the project deletion.
When you delete a project, all of the project documents (on the Documents tab) are also deleted, as well as any attachments to documents (on the Correspondence tab), user-defined field values, and benchmark documents associated with the project.
Copyright © 2023 by Premier Inc. All rights reserved.