The following sections discuss administration and user security for Sourcing and Contract Management. This document is for System Administrators.
The Administration menu in the main Contents contains the tools for system administration at your site. In particular, the User/Security Settings panels let you define new users and give them access to the areas in which they will work.
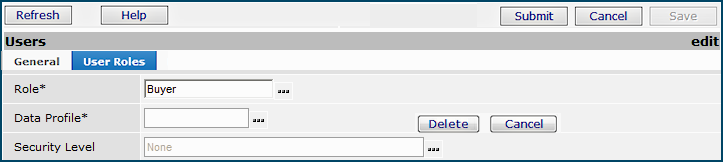
To set up a user at your site, you need to enter identifying information and system feature authorizations for the user into the system. A user profile is the repository for user identity information, and for the security settings and permissions that give the user access to system capabilities and organizational/department data. A user profile includes the user's name, ID, password, email address, etc. When you create a new user profile for a staff member, you assign the user a role and a data profile.
A role specifies application areas and features — called role objects — that users assigned to the role may work with. For example, the Contract Manager role includes the ScheduleJobs role object, which lets the contract manager schedule the running of batch jobs as needed. Roles determine the features and functions that a user can access, and the level of access. Several roles are provided for your use when during implementation, but you can edit these, copy them, and create others.
Each user profile also has a data profile associated with it. A data profile specifies the regions, organizations, and departments whose data the user can work with.
Independently of role and data profile settings, you can allow a user access to patient data, or deny access. This topic is covered in detail in Securing Electronic Protected Health Information (ePHI).
To display roles, data profiles, and user settings, you must have the "Administration" role object set minimally to View. Higher settings are required to create or edit user authorizations and security settings.
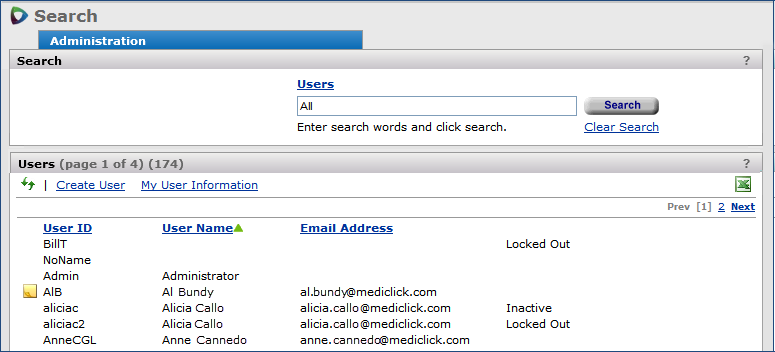
You can view a list of users, edit current user information, and add new users.
The contents of user lists is restricted by data profile and default organization. Table 1 displays user lists that are subject to data profile organizations and departments.
| List | Path |
| Users List | Main Contents > Administration > User/Security Settings > All Users |
| Users by Data Profile | Main Contents > Administration > User/Security Settings > Data Profiles > select data profile > Valid Users |
| Users by Role (Inquiry) | Main Contents > Administration > User/Security Settings > Roles > select role > i > Users tab |
| Sign-on History | Main Contents > Administration > User/Security Settings > Signon History |
| Security Log | Main Contents > Administration > User/Security Settings > Security Log |
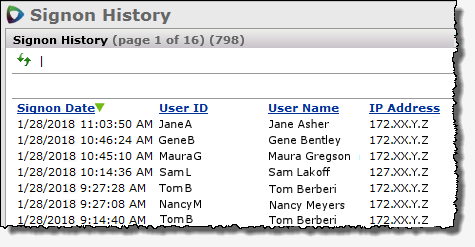
The Signon History list allows you to monitor invalid sign-on attempts.
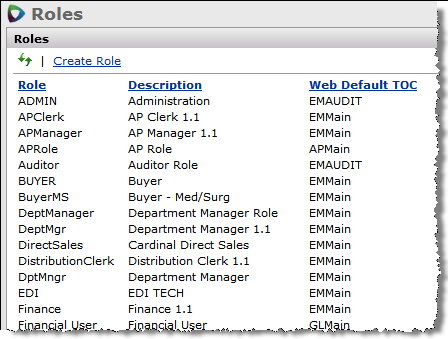
When your system was implemented, several user roles were defined. You can assign these roles to users at your site, as needed, and you can create new roles as well. For quick setup of users, copy a role. Then, edit the copy to tailor the role to your own needs.


Users in different roles may have different levels of access set for the same role object, depending on their jobs. The Administrator assigns a security level to the various role objects in a user's role. The Security Level column in Figure 4 displays the settings. Security levels from greatest to least scope are:
All - Users can delete, create, modify, or view data.
Create - Users can view, modify, or create data.
Modify - Users can change data.
View - Users in the role can view data, but not change it in any way.
None - Users have no access to the data or function.
When the role object is set to None for a feature (such as Dashboards), the feature does not appear on the main Contents for the user.

The following security role objects are used in Sourcing and Contract Management:
| Role Object | Controls access to: |
| Contract | The Supply Contract Workbench. Permits users to work with the key features of Sourcing and Contract Management. The setting must be View (at the minimum) to allow users to see the menu options. To import contracts, the setting must be Modify or higher. - The View setting allows users to search for a contract, and then drill down on the Items Found On count or the Matched Items Found On count. Also, users can view contract item details. |
| CATables | Tables containing contracts components: region, organization, vendor, manufacturer, and others. (Applies to both supply contracts and services contracts.) This role object must be set to Modify, at a minimum, for a user to be able to change table data; for example, to create a region/organization association. |
| CAAnalysis | The Analysis Workbench and analysis tools |
| CAProjects | Work with analysis projects. |
| ServicesContract | Work with services contracts. |
| SharedSvcsAnalysis | Analysis workbench for shared services contracts. |
| ContractSecurity | The contract Security feature. The contract Security feature lets you identify the organizations/regions whose users are allowed to view the contract. |
| CAAlerts | Set up and edit alerts for other users. |
| PriceActivation | Vendor price activation for supply contracts. |
| Dashboard | Lets users view and (depending on the setting) configure dashboards. |
| CARegistration | Lets user create entities and register them to manufacturers and vendors. Users who register local vendors or manufacturers will need this role object set to "Modify" or "All." (The default setting is "View.") |
| CADept | Allows the user to edit supply department names in the Departments table. (The default setting is "None.") |
| Contract Merge | Used (mostly during implementation) to merge old and new contracts. |
| ContractDocuments | Work with documents attached to a supply contract (controls the Documents tab on the "Work with Contract" page). Also allows users to work with emails and notes on the Correspondence tab. |
| ServicesDocuments | Work with documents attached to a services contract (controls the Documents tab on the "Work with Services Contract" page). Also allows users to work with emails and notes on the Correspondence tab. |
| AnalysisProjectDocs | Work with documents attached to an analysis project (controls the Documents tab on the "Work with Project" page). Also allows users to work with emails and notes on the Correspondence tab. |
| CAFees | Incentive setup and monitoring. |
Contracts - The View setting on the "Contracts" role object allows inquiry only on a contract for users who can access the contract based on their data profiles and the contract's security level. Figure 8 is the information that View users can display.
When the "Contracts" role object is set to View, users can not perform the following activities:
- Delete a contract with no activated prices.
- Import a contract.
- Add an alternate unit of measure for a contract item.
- Edit a GPO location on the GPO on the "Load and Activate Workbench" page GPO Portals panel.
- Add a manufacturer group.
- Add a markup set.
- Select/deselect items prices for activation after the contract activation header is created.
CAAnalysis - Users must have a minimum setting of View to work with the Analysis Workbench.
CAProjects - Users must have a minimum setting of View to open the Projects feature. To create an analysis project, the minimum setting is Create. To add or remove an analysis group (spend for a group of items), the minimal setting is Modify. On the Group By and All Items views, to include or exclude items from an analysis group, the setting must also be Modify. To work with the Proposals tab, the minimum setting is View.
Minimal settings for the Proposals tab:
- Find a Proposal - Modify
- Find a Contract - Modify
- Create
Contract Template - None
- Remove - Modify
- Use For Price Comparison - Modify
- Show Savings - Modify
- Add a Note - None
CARegistration - Allows users to register vendors and manufacturers.
The initial setting for this role object is View.
To perform these actions, the minimum setting for this role object is Modify:
CAAlerts - Allows you to set up and edit alerts for other users. For the Users with Alerts (setup) panel, the required settings are:
Add User – Create
Edit – Modify
Delete – All
ServicesContract - To open the Services Contracts Workbench and display contract information, users must have a minimum setting of View for this role object.
-
To create a services contract, the setting must be Create or All.
- To delete a services contract, the setting must be All.
ContractSecurity (supply contracts) - The Contract Security feature lets you identify the organizations/regions whose users are allowed to view the contract. The list of organizations/regions is displayed when you click the Contract Info panel's Security link (Figure 8). Details about the contract security feature are in the subsequent section Restrict user access to a contract.
PriceActivation (supply contracts) - The security settings All or Modify allow the user to create vendor price activation headers for supply contracts. (Users with the role object Contracts set to View can activate items, once a header has been created.) At the setting Modify, users can also do these tasks:
Contract Lines panel: delete a contract line from item details.
Exceptions panel: accept or reject items and enter a rejection Reason.
Activate Vendors panel: deactivate items; deactivate all vendors, manually activate items.
Search Results panel for items: delete item details.
Important: Activating prices on a supply contract is not secured by the user's data profile. Price activation activates all selected items in a contract, regardless of the user's data profile settings.
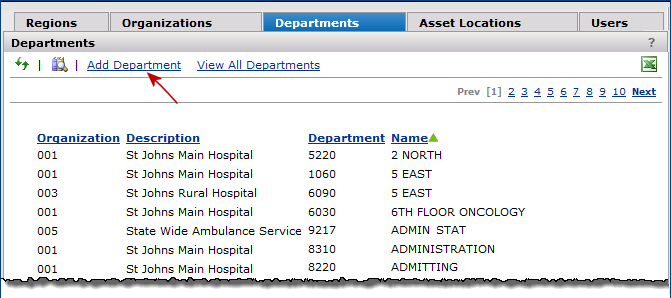
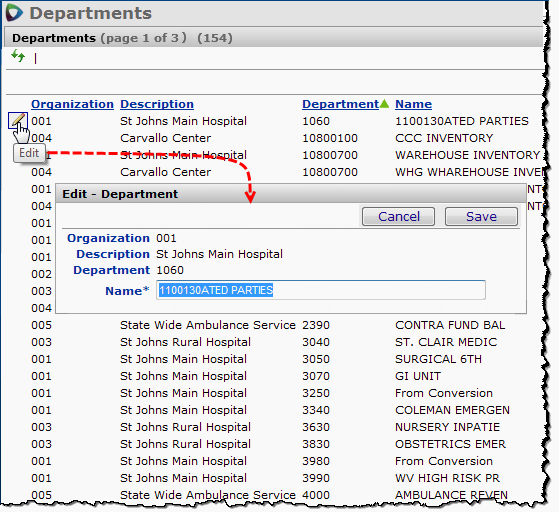
CADept - Permits users to change department names in the supply Departments list (Administration > Region/Org/Department > Departments). Also, note that users can only display and work with departments permitted by their data profiles.
ContractDocuments - Requires a minimum setting of View to allow a user to see the Documents tab (SCM main Contents > Supplies > Contracts > Contract Workbench > open a contract > Documents tab). A setting of All is required to delete documents, emails, and other attachments. The actions available on the Correspondence tab are also controlled by this role object.
ServicesDocuments - Requires a minimum setting of View to allow a user to see the Documents tab (SCM main Contents > Shared Services > Contract Workbench > open a contract > Documents tab). A setting of All is required to delete documents, emails, and other attachments. The actions available on the Correspondence tab are also controlled by this role object.
AnalysisProjectDocs - Requires a minimum setting of View to allow a user to see the Documents tab (SCM main Contents > Supplies > Projects > open a project > Documents tab). A setting of All is required to delete documents, emails, and other attachments. The actions available on the Correspondence tab are also controlled by this role object.
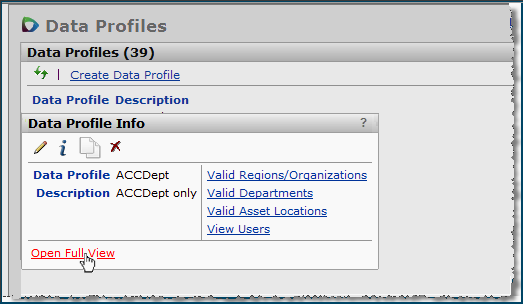
Data profiles specify the department, region, and organization data that a user may access. A data profile is assigned to each user. For example, a buyer's data profile identifies which organizations the buyer can make purchases for. Many other features are sensitive to data profiles; for example, the Department table (Administration > Region/Org/Departments > Departments) only displays departments permitted by the user's data profile.
To create a data profile, you first define the data profile in a header and then add organizations and regions to the profile.
To create the profile header:

Click Create Data Profile. The Data Profile header panel appears.

Regions
Organizations
The Select or Omit Organizations panel appears.
Departments
The Select or Omit Departments panel appears.
Asset Locations
The Asset Locations panel (click the Asset Locations tab, Figure 11) is similar to Organizations and Departments. You can add asset locations to the user profile by clicking the Add Asset Location link, and following the same steps as for departments or organizations. The Asset Location panel only applies to sites that have the ERP Materials Management system.
Users
The Users panel (click the Users tab, Figure 11) displays a list of all users to whom the data profile is assigned.
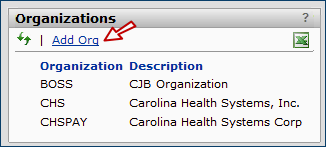
Your site's operational structure may include several organizations, each with multiple departments. One or more organizations can be assigned to a Region. You can view, edit, and create organizations, regions, and services departments from the Administration menu. You can also display and edit the names of supply departments.
Authority: To modify region, organization, or department tables, the user's "CATables" role object must be set to Modify, at a minimum.
Also, to edit a supply department's Name, the role object "CADepts" must be set to Modify or higher.
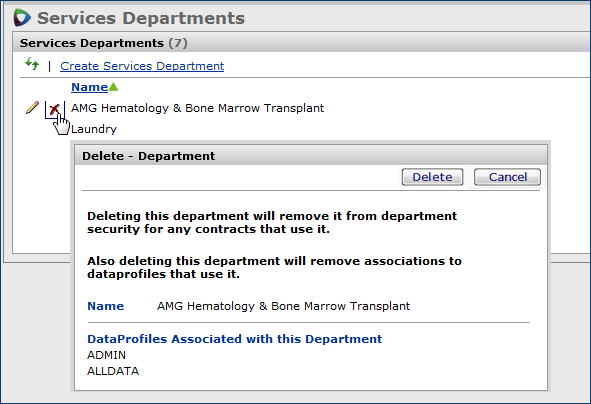
Two department tables are available: a table for services departments and a table for supply departments. Both tables are sensitive to the departments permitted by the user's data profile.
A list of departments appears.
For sites with the ERP - Materials Management, spend is automatically generated from charge-to department transactions. The system enters departments used to generate the spend in the supply Department list. You can edit department names.
For sites with a materials management system from another vendor, Sourcing and Contract Management generates spend from the site's data upload. However, when the department name cannot be determined, the supply department list contains the entry "From department issue spend" for the department name. Users should edit the department and enter the correct department name.
Note: Services departments created from within Sourcing and Contract Management are not tied to an organization or department identifier. Essentially, creating a department this way only creates a department name, which you can use with the services contract Security feature.
Your site may include several organizations, defined in its SCM tables. You can define groups for organizations and assign organizations to those groups. For example, you may have an organization group called "Clinics" to which you have assigned all the clinics at your medical center. Or, you may have a group of physical therapy centers for your medical center grouped under "PT."

Note: You cannot delete an Org Group once it has been created.
You can assign organizations to groups from two different locations: the Org Groups/Org Associations page and the Org Groups page.
To assign an organization to a group using the Org Groups/Org Associations page:
To assign an organization to a group using the Org Groups page:
Note: When assigning organizations to Org Groups, the following information applies:
If user-defined fields are set up for your organization groups, you can enter values in the fields for each group.

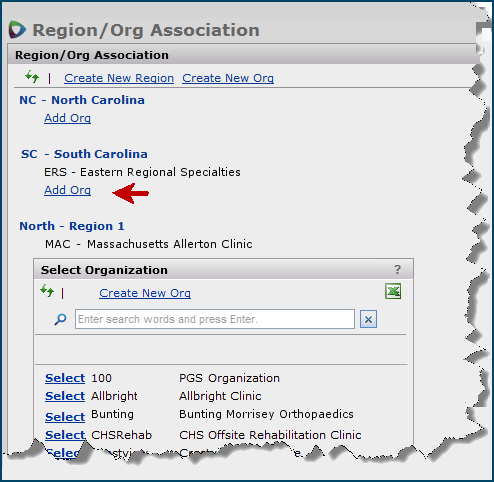
Large health care systems may contain regions to which hospitals and other organizations belong. You can create and display regions for your health care system, and assign organizations to each region.
The Signon History list and the Security Log let you see who is signing on to Sourcing and Contract Management, and monitor invalid or unsuccessful sign-on attempts.
To access the Signon History list and the Security Log,
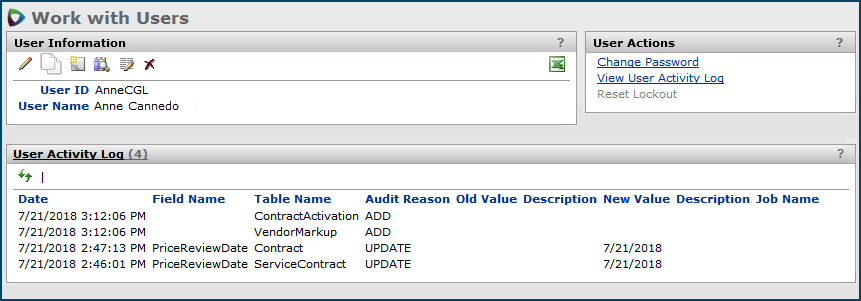
Figure 20 is an example of the Signon History panel.
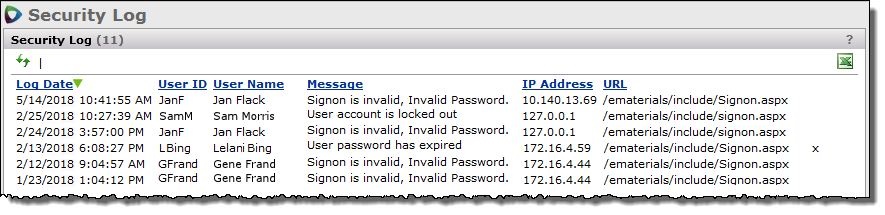
The Security Log lists invalid sign-on attempts and the reason the sign-ons are invalid; for example: "Invalid password," "User account is not active," "User password has expired," etc. The information also includes the user ID, user name, IP address, and sign-on URL.
Figure 21 is an example:
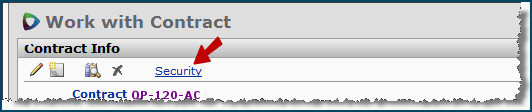
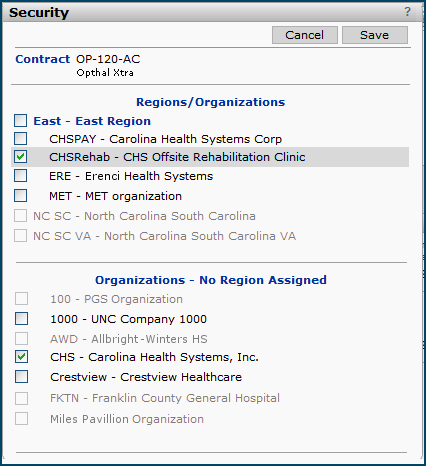
The contract security feature lets you specify the organizations/regions whose users are permitted to access the contract. The Security link on the Contract Info panel displays the organizations/regions for selection.
Note: Services contracts also display departments, in addition to organizations and regions. You can restrict a user's access to a services contract by department. See the section Shared Services Contract Security.
Selecting an organization/region (or a services contract department) limits access to the contract only to users with those organizations/regions (or departments) in their data profiles. If no organizations/regions (/departments) are selected with the Security link, all users can access the contract.
To allow user access to a supply contract based on an organization/region:
Note: For services contracts, you can also change the Security Level from this panel. See Raising a services contract's security level setting.
Also, in services contracts, you can set security for users in a department as well as in organizations/regions. See Allow User Access to a Contract Based on Organization/Region/Department.
System alerts displayed on the My Alerts panel take into account the organization/region/department security limitation: Users do not receive alerts for contracts that they are not able to view.

Access to the Security link on the Contract Info panel requires the setting Modify for the "Contract Security" Role Object, at minimum. If the role object setting is View or None, the security link is grayed out. A discussion of this role object is in the previous section Role objects.
A report object - "Supply Contract Security" - lets you identify supply contracts that have been secured, and those that have not.
Fields are:
| ContractBeginDate |
| ContractEndDate |
| ContractEntity |
| ContractName |
| ContractNo |
| Org |
| OrgDesc |
| Region |
| RegionDesc |
When contracts contain corrections or changes to MIN (Manufacturer Item Number) values, you can write the changed MIN values for all contracts to an Excel worksheet. You can then export the worksheet to merge the changes into your item file.
A prompt appears for opening or saving the Excel worksheet of MIN changes.

- Click File > Save As on the Excel toolbar to save the worksheet to your local network for import to your item file.
Alternately,
For sites that have Sourcing and Contract Management as a stand-alone application,
Your site probably has a key group of users who work with Sourcing and Contract Management all the time. You may also need to grant access to users with computers that have IP addresses outside of the key group. For example, you may have users in another building, or in a remote location. Or, you may wish to give some users access from their home computers.
You may also wish to restrict access to an IP address that would normally belong to the main group. For example, you may have a special purpose computer that you do not want to be used for work with Sourcing and Contract Management or Materials Management.
You can control access based on a computer's IP address. The setup process for IP permissions has these components:
* Represents any value.
, (comma)
Separates individual values.
For example, 245.120,124.333.17 means 245.120.333.17 and 245.124.333.17.
: Indicates the beginning and end of a range.
For example, 245.120:124.333.17 means all the values between (and including) 120 and 124 in the second octet:
245.120.333.17, 245.121.333.17, 245.122.333.17, 245.123.333.17, 245.124.333.17? Positional wild card. Matches only as many elements as there are question marks.
For example, ? matches 0 to 9, but not 10 because 10 is two places. ?? matches 10 to 99.[ ] Optionally groups numbers and operators together, as needed, for clarity.
For example, 245.122.199,20?.[17,20:24].
Connectors are database-specific routines that extract purchasing data from other manufacturers' supply chain products, and make the data available to Sourcing and Contract Management. When the application finishes working with the purchasing data, it sends updates back to the database via a connector.
The Connector Status panel provides information on the entire connector gateway, and on each running connector. Connector errors are displayed so that they can be worked.
Notes on specific systems:
Lawson - The Lawson connector sets the vendor agreement effective date to the "contract start date" when creating or updating a vendor agreement.
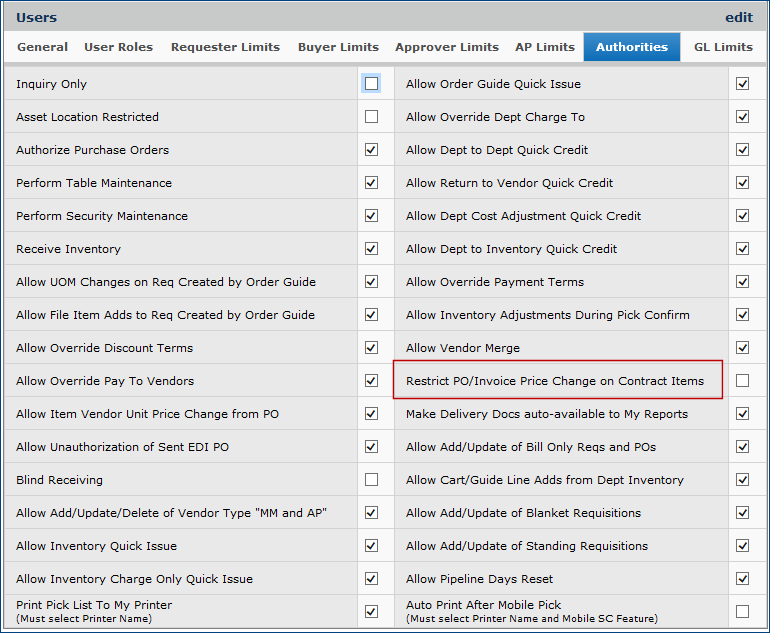
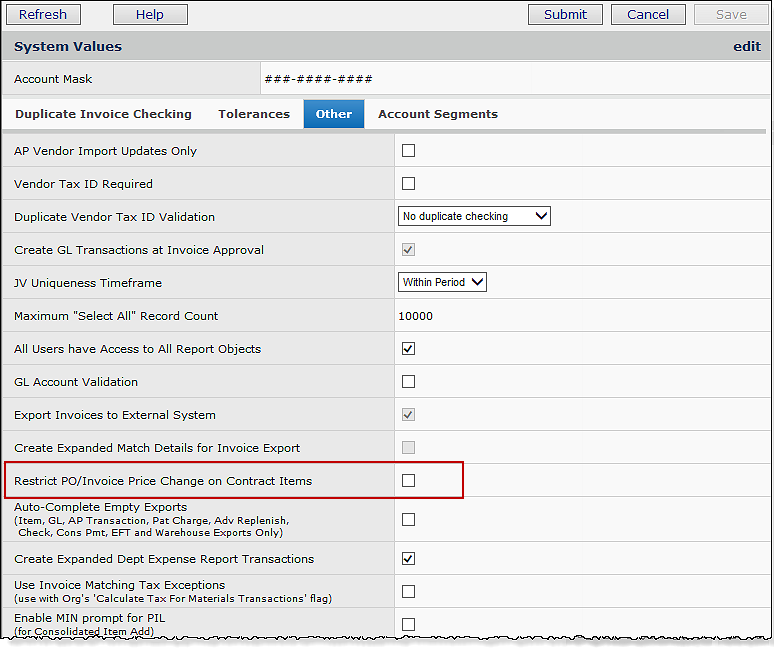
For hospitals with Materials Management, price changes to contract items on a purchase order, or during invoice matching -- clearing a price exception -- can be restricted for individual users, organizations, and entire hospitals. The restriction forces payment of an invoice at the PO price.
The field Restrict PO/Invoice Price Change on Contract Items restricts contract item price changes.
Figure 26 displays the restriction field on the User Profile Authorities tab. Figure 27 shows the field on the Organization MM Information tab. Figure 28 displays the field on the System Values Other tab. When the field is selected (as in Figure 26), the restriction is in effect for the particular level (user, organization, or site-wide). When the field is not selected, price changes for contract items are allowed.

User:
- If the restriction is not selected in a User Profile, the user can change cost/exception prices, as long as the restriction is not set at either the Organization or System Values level. Also, the user can select the Invoice Correct field when clearing price exceptions for contracted items.
- If the restriction field is selected, the user cannot change prices.
Organization:
- If the restriction is not selected, users in the organization -- who are not restricted individually -- can change contract item prices in purchase orders and invoices.
- If the restriction field is selected for the organization, no user in the organization can change prices.
System:
- If the field is not selected, price changes can be changed at the organization level and/or the user level.
- If the restriction field is selected in System Values, no one at the site can change a PO price for a contracted item.
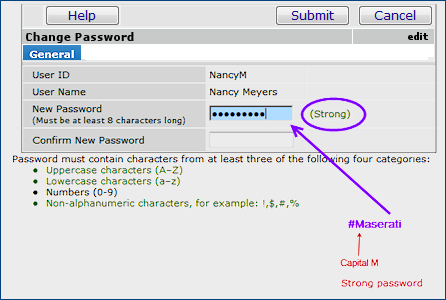
A user can change his/her own password.
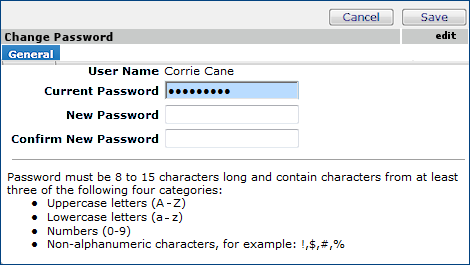
Figure 29 and Figure 30 show a user in the process of changing her password to "#maserati".
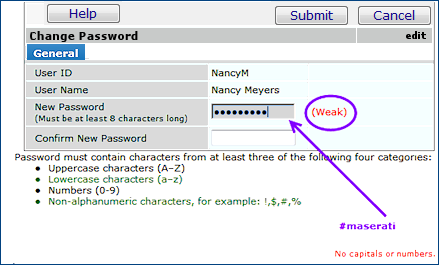
In Figure 29, the user has included only two of the four criteria: the password is long enough, and has a special character "#". Notice that the system provides feedback that the password is weak. This information appears as she is typing.
In Figure 30, the user has capitalized "M." This password is strong, and the system will accept it. The user could also have entered: "#8Maserati," which would be even stronger.
Passwords must be changed periodically. The Customer Record for a site contains a field that determines how often passwords must be changed. This field is set at implementation following discussion with the site.
Similarly, a field for password aging is also on the customer record. This field sets the quantity of previous, different passwords remembered by the system for a user. The default is 20 passwords. A password cannot be reused if it is one of the passwords in the system's memory.
Note: If you need a default value higher than 20, contact the Help Desk.
You can change your own password from the Administration contents: User/Security Settings > Change My Password. Also, you can change your password from the User Information panel.
Similarly, administrators and others authorized to change user data can change a user's password by opening the User Information panel from the All Users list.
- To view your own user information and change your own password, click My User Information.
The User Information panel appears.
- Click Change Password.
- To view another user's information and change his/her password, click the User ID for the person on the list.
The User Information panel appears.
- Click Change Password.
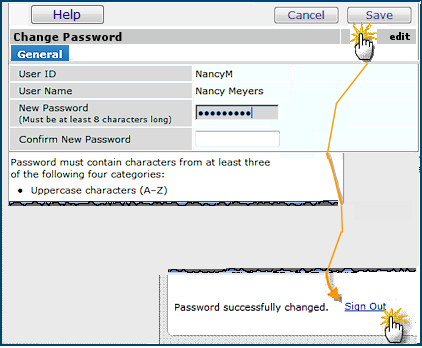
The Change My Password panel appears (Figure 31).
When you log in with an expired password, the password needs to be changed. In this case, the Change My Password panel appears, instead of the normal table of contents (Figure 32). The process is the same as if you were changing your password voluntarily. Except, the Current Password field does not appear.
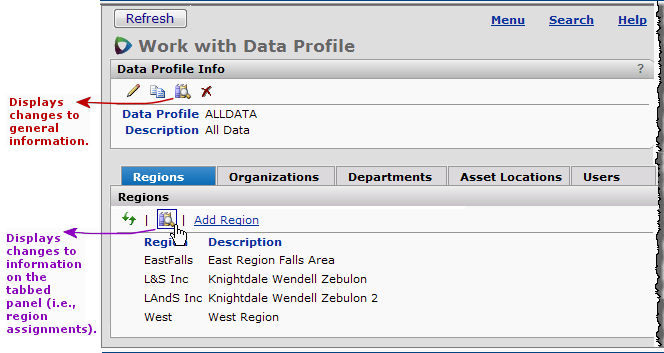
An audit facility is available on the Data Profiles lists and the Roles and Role Objects lists.
Links to audited fields for a data profile are located on the "Work with Data Profile" page, Figure 33.
Links to audited fields for roles are located on the "Work with Role" page, Figure 34.
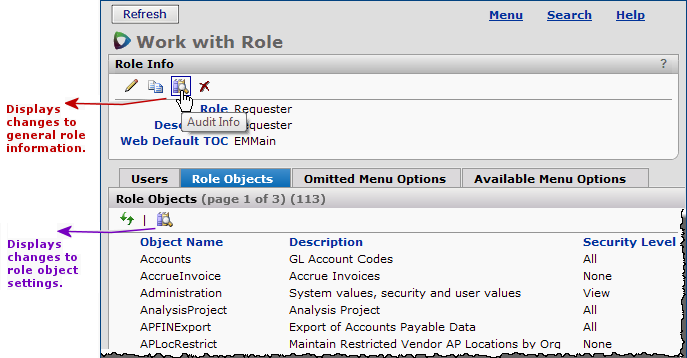
- Click the audit icon ![]() on the Role Objects tabbed panel (Figure 34, purple arrow).
on the Role Objects tabbed panel (Figure 34, purple arrow).
The system provides a grace period for inactivity so that users who do not sign on to the system every day are not deactivated. The grace period is determined by each site, and set at implementation or by the Help Desk.
A process in the nightly maintenance procedure sets active users to inactive if they fall outside the inactive grace period determined by their site.
The process checks whether any user ID's NoActivityLockoutPeriod has expired. If the period has expired, then
the Active YN flag is set to 0.
An audit record is created:
AuditSource = 'Routine Maintenance' and AuditReason = 'No activity lockout period exceeded.'
System administrators can also view the sign-on history and security activity for their site. (See Displaying the Signon History List and the Security Log.)
The following fields are audited on the user record:
Active YN
Role
Data Profile
Hide Financial Data YN
Hide Medical Data YN
IP Restriction YN
Password
Lock Out Counter
Lock Out Date
Last Used User
Report Security Profile
Email Address
User Security Level
You can access several features (listed in the table below) from the main Administration contents. For example, you can view a log of contract activations by clicking on an Administration contents link.
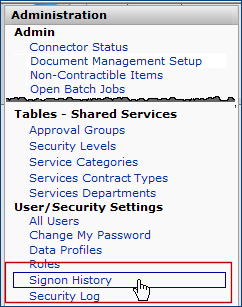
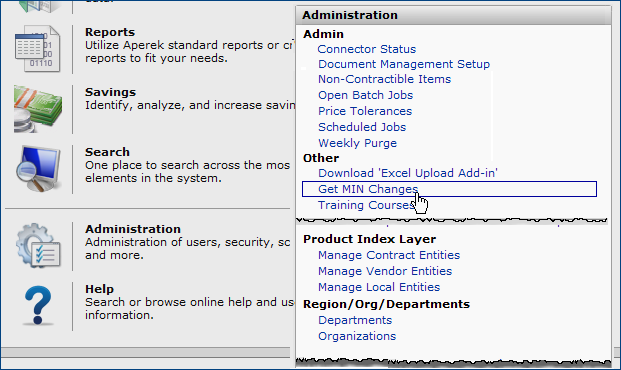
The Administration Admin menu appears in Figure 35. Scroll down for the Tables menu.

Several areas in the Administration contents are documented with the relevant features. For example, Tables - Shared Services topics (e.g., Approval Groups and Service Levels) are outlined in the Services Contracts chapter.
Below are administrative topics that are not discussed elsewhere.
| Connector Status | Location: Administration contents > Admin menu Clicking this link displays recent activity for connectors. A connector is an element of the application used to pass data between Sourcing and Contract Management and stand-alone MMIS systems, such as Lawson. Only sites with an MMIS from a vendor other than have connectors. See View a Connector's Status for details. |
| Document Management Setup | Location: Administration contents > Admin menu Clicking this link displays the Document Management Setup panel. You can create a new document group, and add new sub-groups within the same group. You can also define Status values to assign to documents. When you add documents to Supply Contracts, Supply Projects, and Shared Services Contracts, you can add them to a document group and sub-group. This makes it easier to drill down and view documents within a specific contract or project, and by a certain group and sub-group. See Manage Supply Contracts, Analysis Projects, and Work with Shared Services Contracts for details. |
| Non-Contractible Items | Location: Administration contents > Admin menu Lists items that your site has designated as "non-contractible." |
| Open Batch Jobs | Location: Administration contents > Admin menu Displays batch jobs that have been opened. Batch jobs run in asynchronous mode. |
| Price Tolerances | Location: Administration contents > Admin menu Sets a system tolerance for price changes. See Setting Price Change Tolerances. |
| Scheduled Jobs | Location: |
| Weekly Purge | Location: Administration contents > Admin menu Allows administrators to purge obsolete records, such as old archived reports. If you are also using ERP, you may be interested in the retention times table in Periodic Maintenance Tasks - Purging Obsolete Information. |
| Benchmark Companies | Location: Administration contents > Tables menu Lists benchmarking companies that you use to compare item prices against benchmark prices in analysis Projects. See Analysis Projects. |
| Contract Price Activations Log | Location: Administration contents > Tables menu - The Contract Price Activations Log is a single, searchable list of price activations for all contracts. - For individual contracts, on the "Work with Contract" page Actions panel, click View Contract Price Activations Log to display activated/deactivated items, dates, and prices for the contract. |
| Delivery Locations for Distribution | Location: Administration contents > Tables menu Delivery locations for distribution are used with incentives that have the header field Include spend for... set to: All Spend from Internal Distribution Center. See Set Up and Work With Incentives. |
| Enter External Stats | Location: Administration contents > Tables menu This table is a convenience for sites who wish to have quick information |
| Group Purchasing Organizations | Location:
Administration contents > Tables menu Lists GPOs. You can edit GPO records from the list. |
| Incentive Types | Location: Administration contents > Tables menu Contains the types of incentives that your site has defined for use with contracts. |
| IP Permissions | Location: Administrative contents > Tables menu Sets up and lists IP addresses for remote/special users. See the previous discussion. |
| Payment Terms | Location: Administration contents > Tables menu Payment terms are a payment schedule -- an agreement between a paying organization and a vendor. Your site may have several sets of payment terms for different vendors and organizations. Once you define a set of payment terms in this table, you can associate the terms with any vendor who offers them. - To define new payment terms, click Create Payment Terms. - To delete or edit existing payment terms, click a name in the Payment Terms column. A panel appears with icons for editing, copying, and deleting the payment terms. |
| Project Phases | Location: Administrative contents > Tables menu Lists and lets you define phases for your analysis projects. You can assign a phase to a project as you move through the project activities. |
| Units of Measure | Location: Administration contents > Tables menu Lists the units of measure established for your site. - To define a new unit of measure, click Create Unit of Measure. - To delete or edit existing units of measure, click the unit of measure name. A panel appears with icons for editing, copying, and deleting the UOM. From the panel, you can also establish an alias for the unit of measure. |
| UNSPSC Codes | Location: Administration contents > Tables menu Lists UNSPSC codes. |
| User-Defined Fields | Location: Administration contents > Tables menu Lets you define and use custom fields in various application elements, such as contracts, projects, and others. See Work with User Defined Fields. |
| Signon History | Location: Administration contents > User/Security Settings Menu Lists. |
| Security Log | Location: Administration contents > User/Security Settings Menu Lists invalid sign-on attempts. |
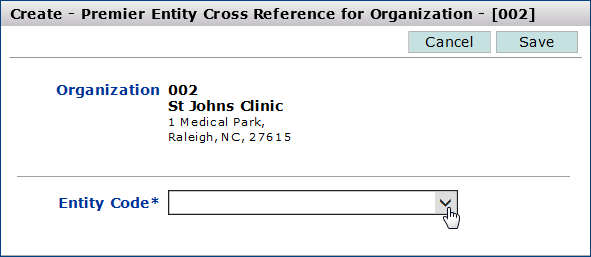
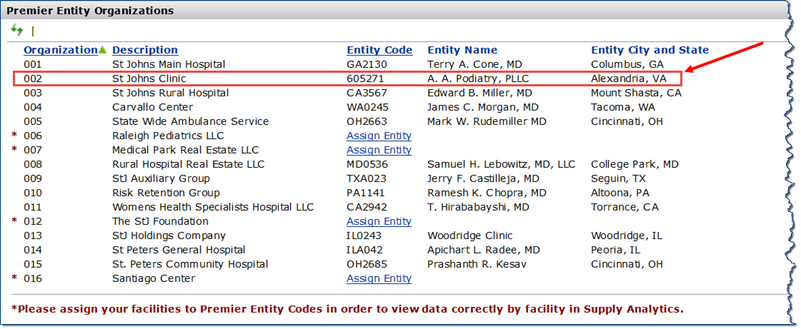
Spend for a Sourcing and Contract Management organization propagates to Supply Analytics when the SCM organization and the matching Supply Analytics entity are associated. You can use this panel to create an association between an SCM organization and a entity. You can also change and delete an association that you set up.
Note: This feature applies only to sites with the Product Item Master (PIM) enabled.


The Entity Organizations panel appears, with the added entity information (Figure 39).

The Create - Entity Cross Reference for Organization panel appears (Figure 38).
Copyright © 2023 by Premier Inc. All rights reserved.