Sourcing and Contract Management (SCM) lets you work with new contracts imported into SCM or awarded as a result of a Project in SCM. You will want to accept local (non-Premier) contracts and activate prices for the matched items. Matched items are contract items with matching records in your item master, based on manufacturer item numbers (MINs), as returned through the Product Index Layer (PIL).
Accepting a local (non-) contract makes spend data for its items available for analysis in SCM.
Activating contract prices writes the prices to a site's materials management item master file. The items are then available for purchase, at the contract price, on the date that the price is effective. You can activate both local and -managed contracts.
Spend Note:
For any contract, when an item is activated, the spend for the item is included in the contract spend. If an item is not activated, but only accepted, and is available on multiple accepted contracts, the application uses the following tie-breaking logic to determine which contract to assign the item's spend to.
- The application assigns the item spend to the contract with the most future Contract Accept Date. If a tie, then:
- The application assigns the item spend to the contract with the most future Contract Begin Date. If another tie, then:
- The most future Contract Create Date is used. If still no resolution, then:
- The application assigns the spend to the contract with the most future Price Start Date for the item.
-managed contracts originate in Supply Chain Advisor (SCA) and are brought into SCM via a nightly synchronization process.
The following sections outline contract price activation in Sourcing and Contract Management.
If you are using the Integrated SCM/SCA Platform, you should also review the topic "Integrated SCM/SCA Contract Management."
Note: The SCA/SCM will be available on a site-by-site basis, since configuration and some conversion is needed.
For sites set up for the SCM/SCA :
The role object "Contract" controls access to contract acceptance and activation in SCM. To view the "Load and Activate Workbench," the minimum setting must be View. For details about the settings required for the activities within this menu, see Role objects associated with Sourcing and Contract Management.
- Important: Price Activation activates items in a contract, regardless of the user's data profile settings.
All security settings are listed in the section Role objects associated with Sourcing and Contract Management.
Here are the steps in making prices available for purchasing on local contracts.
Sourcing and Contract Management provides a link next to the contract number for you to identify the manufacturer.
- Optionally open and review the contract.
- Vendors can be registered from the Supplies Administration menu under Product Index Layer > Manage Vendor Entities.
- You can also register a vendor/manufacturer from the "Analysis Workbench" page Actions panel.
When you activate items, you need to include any vendor markup on the contract prices. (Vendor markup can be zero.) If vendor markup has not been set, you need to enter it.
When a contract is imported, Sourcing and Contract Management picks out the field that it maps as the manufacturer and looks for the manufacturer in its records. If the manufacturer cannot be found, the application lets you identify the manufacturer (via a link that it provides). See Identifying Manufacturers with Invalid IDs.
You need to complete the process of identifying the manufacturer before activating prices on the contract. Typically, this is only an issue for local contracts.
With the Only: For local contracts, you may wish to review and/or edit the Primary Contract Entity, which appears on the Contract Info panel when you open a local contract. See Integrated SCM/SCA Contract Management for details.
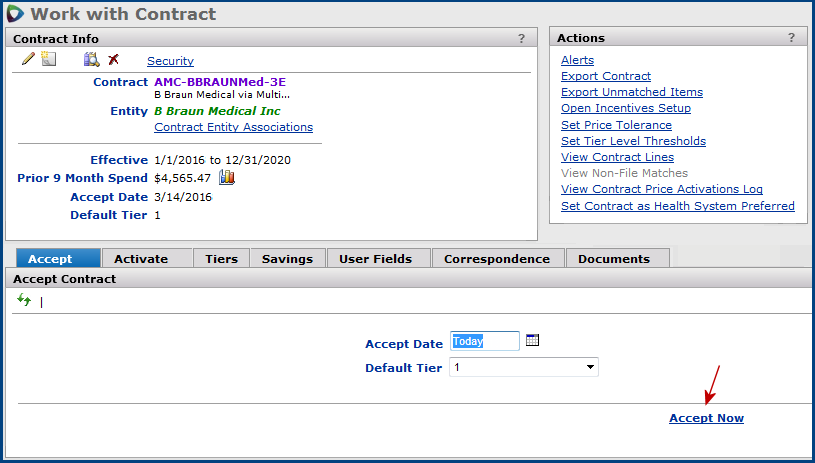
In accepting a local contract, you select the tier whose prices you are using. Acceptance makes contract data available to Analytics, Savings, and Projects.
- If you need auto activation, contact the Help Desk. This feature must be enabled for your site.
- With auto activation, a contract is activated when you accept it, whether or not it has matched items. You do not need to do anything further.
Notes: You can activate prices on contracts that have expired, if you need to.
One of the advantages that the brings is that when you accept a local contract, you can control contract eligibility; that is, the organizations (facilities) allowed to use -- or even view -- the contract. The application provides a default set of organizations (the core facility group) assigned as eligible, but you can change the default as necessary. If you change the default, however, you must do so before accepting a new contract. See the discussion of Eligibility in the overview.
Local contract acceptance also writes the contract data to the Catalog on the .
Note: -managed contracts created in SCA and brought into SCM by the nightly sync process will not need to be manually accepted in SCM. Only local (i.e., non-) contracts imported directly into SCM will need acceptance. See Integrated SCM/SCA Contract Management.
You can activate an entire contract and all vendors simultaneously: activation in this case is at the vendor entity level.
A local contract may contain exception items that do not match the item file records in every respect or that have prices above/below limits (tolerances) that you set. You should review and resolve any exception items to activate those items' prices.
Note: Exceptions in -managed contracts must be worked in SCA.
Sourcing and Contract Management supports several types of exceptions:
Table 1 contains definitions of matched, activated, and unmatched items. Note that matched, activated, and unmatched item definitions are mutually exclusive.
See Spend and Savings Definitions for Sourcing and Contract Management for more definitions
| Matched | A file item that matches a contract line, but whose price has not been activated. Or, a non-file item that matches a contract line. “Match a contract” line means matching all of these: the manufacturer item number, UOM, and price. |
| Unmatched | A file or non-file item that does not match any contract line. |
| Activated | A file item whose price has been activated on a contract. (Non-file items cannot be activated on contracts because they are not accessible from the item catalog/file.) |
Activating a contract involves selecting individual vendors (or all vendors) whose prices you wish to use. Typically, you must also include vendor markup percents or amounts when selecting vendors to activate.
Vendors (and manufacturers) are associated with entity families in the Product Index Layer. Associating a vendor with an entity family "registers" the vendor. Registering a vendor lets the PIL recognize the vendor's items that match a contract so that you can activate the prices. For example (Figure 1), the vendor DePuy Inc. belongs to the Johnson & Johnson family. DePuy is registered to the entity Johnson & Johnson. Ethicon also belongs to the Johnson and Johnson family.
With the Product Index Layer, each vendor buy-from location, for contract activation purposes, is "rolled up" to the vendor level. For example, if you have multiple Ethicon buy-from locations, all of the locations are under the Ethicon vendor umbrella. Activation occurs for the vendor entity. When you activate a contract, you will see that the vendor entity associated with Ethicon -- Johnson & Johnson -- appears.
You specify a default markup percent or amount for a vendor entity from the Vendor Registration panels. Activating item prices applies the default markup (which can be zero, of course). Working with the Product Index Layer contains instructions on how to set vendor entity markups.
If you open a contract and see that items are not matched when you expect them to be, it's possible that the vendor (or the manufacturer) is not registered in the PIL. You can register the vendor following the instructions Working with the Product Index Layer.
When you register a vendor to an entity, the system searches for any other vendors with the same Vendor No and registers them to the same entity.
When you import a new local contract, the contract is initially available -- before you accept or activate it -- on the "Load and Activate Workbench" Contracts list. -managed contracts are available after the nightly synchronization. See the details below about when a contract appears on this list.
The contract is also available on the "Supply Contract Workbench" Contracts list, along with your other contracts.
Clicking the contract number opens the "Work with Contract" page.
Panels on the page let you accept a local contract to make its spend available for savings analysis. (-managed contracts are already accepted when they arrive in SCM.)
You then activate contracts, including -managed contracts, to make the prices available for purchases.
The Savings portal (accessible from the main Contents, Supplies tab) lets you view savings for the contract as purchases on the contract occur.
Accepting a local contract makes contract data and spend information available for analysis, including savings. As mentioned previously, -managed contracts that are created in SCA and brought into SCM via the nightly synchronization process are already accepted. You only need to manually accept local contracts.
Important: You must accept a contract before you can activate contract prices in SCM.
These topics outline how to accept a contract and change eligibility for users of the .
Accepting a Local Contract
Changing Contract Eligibility
Editing the Primary Contract Entity.
The "Load and Activate Workbench" page appears.
A list of contracts for acceptance and/or activation appears (Figure 2).
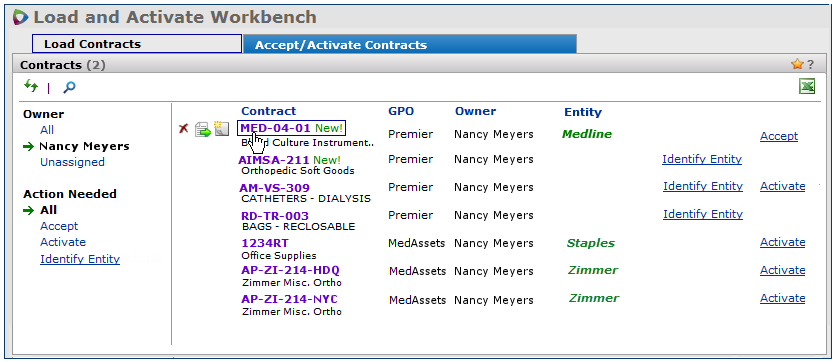
You can filter the list by Owner for your contracts only, all contracts, or unassigned contracts.
Clicking the filters under Action Needed displays all contracts, contracts that are unaccepted, that need price activation, or that need manufacturers/entities identified.
A search is provided. Click the search icon.![]()
Note: When a contract is uploaded and all of its prices are expired, the contract no longer appears for activation on the Accept/Activate Contracts panel. When all prices on a contract are expired, on the Accept/Activate Contracts panel you can only accept the contract, or identify a missing entity. The Activate link does not appear. You cannot activate expired contract items.
If some prices are available (not expired), the contract can be activated
The "Work with Contract" page appears (Figure 3). A detailed discussion of the "Work with Contract" page is below.
A message may appear at the bottom of the Contract Info panel that the accept process is running and to click Refresh.
Note: If you change your mind about accepting a contract, you can undo the acceptance by clicking Unaccept Contract.

When you are ready to activate contract items, click the tab for the Activate panel.
The listed contracts on the "Load and Activate Workbench" page include new contracts and contracts that are not new, but which have unactivated items. The system uses these criteria to determine that a contract should be displayed on the Accept/Activate Contracts panel:
Newly imported or re-imported contracts with no items to activate do not appear on this panel, but instead on the “Supply Contract Workbench” page Contracts tabbed panel.
Once a contract is accepted (a), and the contract is not marked Complete, then either (b) or (c) must also apply for the contract to remain on the list. When all of the items on the contract are activated, the contract drops off the list. When the contract is marked Complete, it also disappears from the list.
If the system cannot identify a contract's manufacturer entity, a link appears next to the contract name: Identify Entity. Click the link to locate and designate the manufacturer entity.
On the "Work with Contract" page, several panels provide activities for a contract. Click the ? Help icon on any panel (upper right corner) for details.
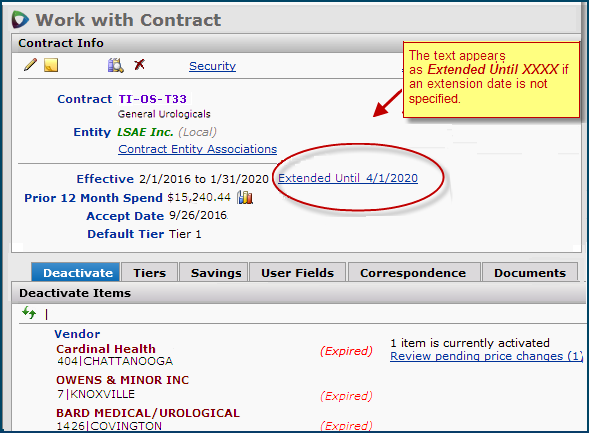
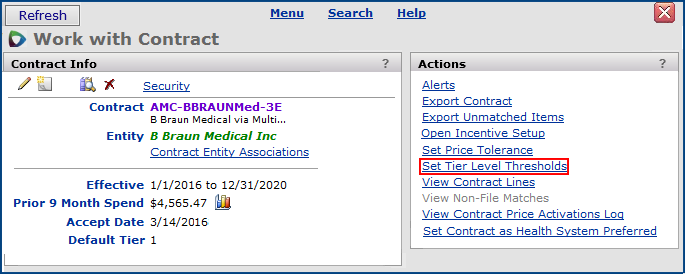
Displays key information about the contract, such as the contract name and number. Clicking icons (on the top left margin) lets you edit the contract header, create and view user notes, view audit information, view and enter values in any user defined fields, and delete the contract. The panel also displays the effective dates for the contract; the activated (or accepted, if not activated) default tier, and, for expiring or expired contracts, any extension to the end date (if applicable). The panel displays spend, if any, for the prior 12 months. Otherwise, the spend is $0.00.
If the contract is expired, and a replacement contract exists, the contract number appears in the field Replaced By Contract.
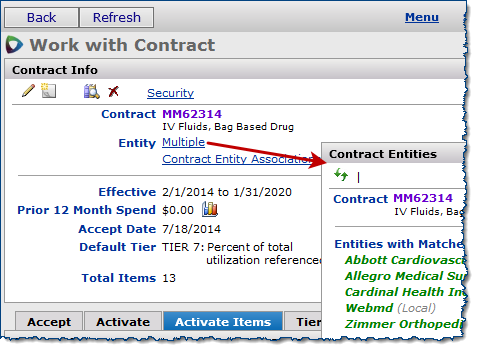
Entity field: If the contract has more than one manufacturer entity, the link Multiple appears. Click Multiple to display the manufacturer entities (Figure 3A).
Users: If you are using the SCM/SCA , underneath the Entity, you will also see the field Primary Contract Entity for local contracts. The Primary Contract Entity is the manufacturer entity that is associated with the contract on the SCM/SCA . Generally, the Primary Contract Entity is the same as the Entity that appears on the Contract Info panel in SCM. The Primary Contract Entity can be edited as long as the contract has not been accepted. See Local Contracts: Primary Contract Entity.
Security link: Lets you limit access to a contract to one or more regions/organizations.
Lets you accept a contract Figure 3. You must accept the contract before you activate prices (unless you are using auto activation). Until a contract is accepted, you can only view documents for the contract.
Users: If you are working on the SCM/SCA , see the discussion of activities you must perform before accepting a contract, if you wish: Changing Contract Eligibility and Editing the Primary Contract Entity.
Activates prices on the contract at the vendor entity level (Figure 4).

Provides links to activities that you can perform with the contract (Figure 3, upper right). Grayed-out links are unavailable actions. Below is a summary of some of the actions.
You can select the format: either a multi-tiered contract format, or a simple, single tiered format.
You can also select filters for the contract lines based on Status (All, Unmatched, Matched, Activated, or Non-File Matched) or Price (All, Current, Prior, or Future).
When you define tier boundaries, the contract is included in the Contract Tier Thresholds dashboard.
You can also set an alert to notify you when spend reaches a specified percent of the upper tier limit's dollars.Note: The Contract Template also provides space for entering tier information when you import a contract or when you award a contract to a bid in an analysis project.
Appears when you select View Contract Lines on the Actions panel.

*The current calendar month was January, 2016.
Note: For long contracts with many tiers, setting the Tiers view to All may not be the most efficient way to view items, since tier levels for each item will be displayed.
- If no current price exists, you may see the last expired price for the item.
- Exp appears next to the Price End Date only once the date is past.
Columns with underlined headers are sortable.
To delete a contract item, hover to the left of the Mfr name and click the red X that appears. You will see a warning message. Click Delete to complete the deletion.
For sites that have organizations with differing MMIS item master files, a user cannot see contract item details unless the user's data profile includes the relevant organization. Item master security affects the filtered data on the Contract Lines panel as follows:
All filter – shows all contract item lines. However, if the item is not in the user’s permitted catalog(s), the item catalog number does not appear.
Unmatched filter – shows item lines for items not matched in the user’s permitted catalog(s).
Matched filter – shows item lines for items matched in the user’s permitted catalog(s).
Activated filter – shows item lines for activated items in the user’s permitted catalog(s).
Non-file matched filter – displays non-file items that are matched on the contract (within the prior 12 months).
Note: If a contract item is matched with a file item for a catalog that is not permitted for the user, or activated in a non-permitted catalog, the contract line is not displayed.
Figure 6 displays the Activate panel.

The Markup column on the Activate panel initially contains the default markup for each vendor entity.
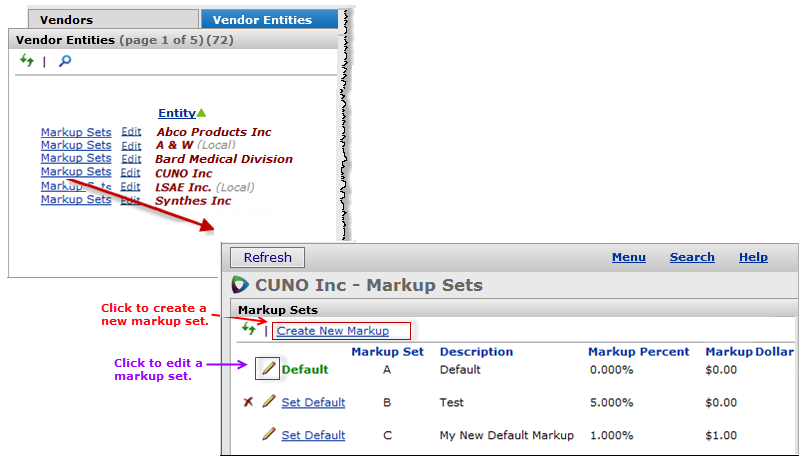
If a vendor entity has no markup definitions, the Create Markup link appears in the Markup column (Figure 7). You must define markup values for any vendor that has no markup before you can activate the contract.
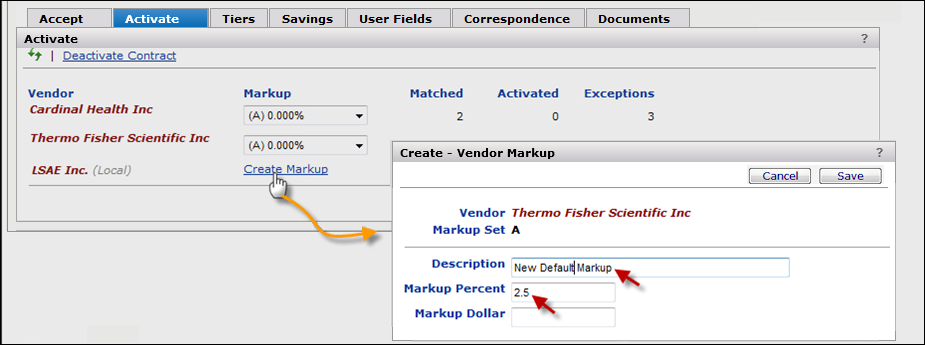
The Create Vendor Markup panel appears (Figure 7).
This panel lets you create a markup set that can include a markup percent, a markup dollar amount, or both.
The initial markup set for a vendor entity is "A." So, if the vendor has no current markup sets, you will be creating set "A".
The markup values that you entered appear with the letter "A" in the markup column as the default set for the vendor.
You can only use one markup set per contract, per vendor. (Multiple markups for a vendor on a single contract are not supported.)
You can create other markup sets for a vendor entity and designate which of the sets is the default. See More about markup sets.
With contract activation at the vendor entity level, the value in the Matched column (Figure 7) bears some explanation.
The Matched column contains the count of vendor items that are matched, totaled at the vendor entity level. You may have several vendor locations assigned to a vendor entity. If each location has matching items, then this column reflects the total number of matched items for the entity.
For example:
Vendor entity American Supply has three vendor locations assigned to it: New York, Chicago, and Los Angeles. Each vendor location has 2 matching items, and the items are the same.
- The value in this column for Matched items is 6.
- When activation runs, the number of activated items will be 6.
When all your vendor default markups are set, the contract is ready for activation in SCM. (You cannot activate the contract if any vendor does not have a default markup value.)
Contract prices for items activated on the contract are landed prices, taking into account tier designation and default vendor mark-ups.
The item prices are activated...
... for all the vendor entities on the Activate panel
... at the tier selected when you accepted the contract,
... at each default markup, or at another selected markup.
Any exceptions are collected for your review and resolution.
Note: You cannot delete a contract with activated items.
If you need to delete a contract, you must first deactivate any activated prices.
Deleting a contract will delete all price history, all overpayments, and all recoverable savings associated with the deleted contract. For this reason, you cannot delete a contract if recoverable savings are pending.
You may have a contract with all items activated and you wish to activate any new items that become available when the contract is updated and re-imported. When you first activate the contract and click Activate, the application is instructed to also activate any items that become matched later. So, new items on any updated, re-imported version of the contract are automatically activated. If a newly matched item cannot be activated because of an exception, the item appears in the count on the Exceptions panel.
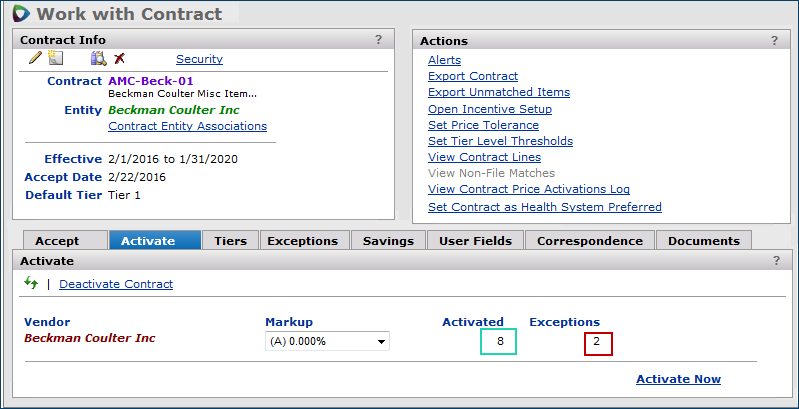
Figure 8 is an example of an activated contract. The contract has ten items: eight were activated and two have exceptions.
The next step in working this contract would be to review the exception items, resolve exceptions, and accept (or reject) the items.
You may wish to import contracts with no matching items, but for which you expect matching items to be available later. Auto activation lets you set a contract to automatically activate new, matching items, even if the contract currently has none. Auto activation takes effect when you accept the contract. All current matching items are activated, and any future, new matching items activate without your intervention. When a matching item becomes available, if the item is supplied by multiple vendors on the contract, the item is activated for all those vendors.
Once Automatic Activation is enabled and you are ready to accept an imported contract, the Accept Contract panel displays the field Activate Matched Items Automatically (Figure 9).
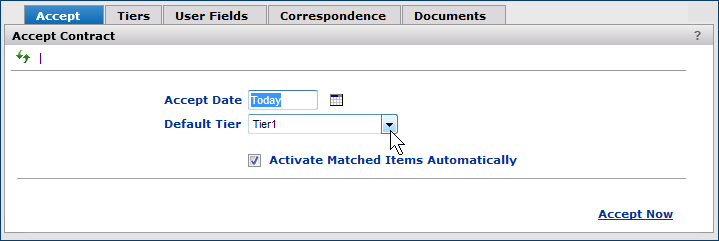
Make sure that you have contacted the Help Desk and are set up for auto activation.
Make sure that you have defined at least one markup set for the vendor entity.
When the accept process runs, the Activate tab appears. If the contract has any matched items, they are activated. When items on the contract become matched (in the future), they will be activated.
When you activate items, you select an Activate Date for the entire contract, or use the default of Today. You may encounter the situation where a contract has items with different price start dates. Figure 10 is an example.
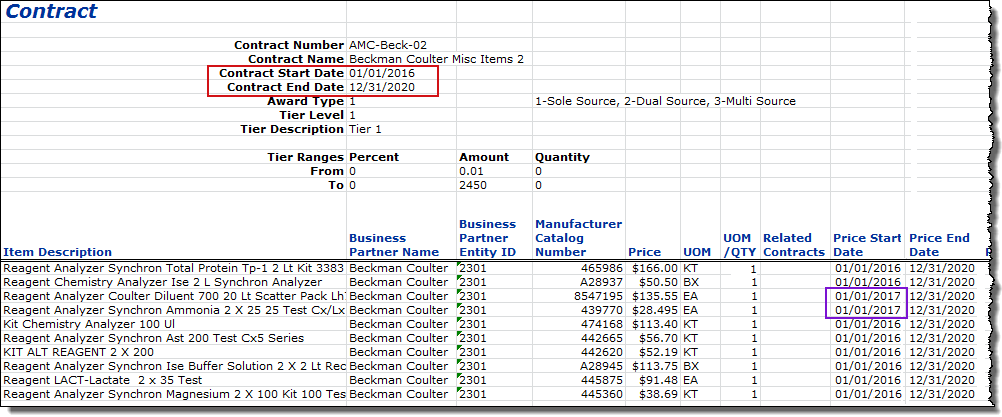
*The current calendar month was January, 2016.
You do not need to worry about coming back to the contract to activate items whose prices are effective at a later date. These items are considered to be "activated" but their prices do not go into effect until they are available.
You can see the future dates for activation on the Contract Lines panel with the Status filter set to Matched and the Price filter set to Future (Figure 11).

*The current calendar month was January, 2016.
Tier Start/End dates and Item Price Start/End dates must be aligned with Effective Start/End dates for local contracts. This logic applies to both the local single-tier and multi-tier contract template uploads. -managed contracts are not affected.
Uploading new local contracts or accepting existing local contracts that violate any of the logic rules will result in error messages that prompt you to correct specific issues with dates. To avoid errors, Tier Start/End dates and Item Price Start/End dates must adhere to several conventions, as outlined in the topic "Date Alignment Conventions" in the documentation for the .
Situations may arise when you need to deactivate a contract. As with activation, deactivating a contract applies to all the items on the contract for all the vendor entities. Additionally, deactivating a contract "unaccepts" the contract.
When you deactivate a contract, any items that you may have rejected are "unrejected," and are re-evaluated when you re-activate the contract. Also, when you re-activate the contract, unresolved items in exception will be in exception again.
These steps deactivate the contract in Figure 8.

When you deactivate items, the item Activate panel disappears, and the Accept panel reappears. If you wish to re-activate the contract, you must re-accept it first.
If a contract has expired, and you reinstate the contract with a new End Date, you must re-activate its items. (Expiration automatically deactivates all contract items.)
Also, when an item MIN (manufacturer item number) changes through a manual or other process, the item is deactivated. You must re-activate it.
Security: To access the Deactivate All Items link, a user must have a minimum value of Modify set on the "Contract" role object.
-Managed Contracts originate in Supply Chain Advisor (SCA) and are synchronized with SCM by an automatic nightly process.
This section notes how ending tier activation in Supply Chain Analysis (SCA) affects contracts in Sourcing and Contract Management (SCM).
Date changes to historical price activations do not need to result in de-activating products. That is, if an existing SCA price activation is changed in SCA, the item/product dates that fall within the new price activation date window stay active. Tier start/end dates for -managed contracts can only be changed in SCA.
Tier Prices Are Deactivated for a -Managed Contract in these circumstances:
If items with exceptions exist for a -managed contract where the Default Tier is expired, those items do not appear on any of the exceptions panels for the contract: Price Exceptions, Existing Contract Exceptions, and Rejected Items. (It does not matter whether the expiration occurred because of normal time lapse on the tier, a user manually changing the End Date, or a user activating a new tier on the contract.)
You cannot activate via the Activate Items tab or manually via the Select Items for Activation panel on an inactive tier. You also cannot activate vendors (via the Activate tab) on an inactive tier. If all contract tiers are expired, the contract cannot be activated, of course. The Deactivate panel displays the inactive tiers.
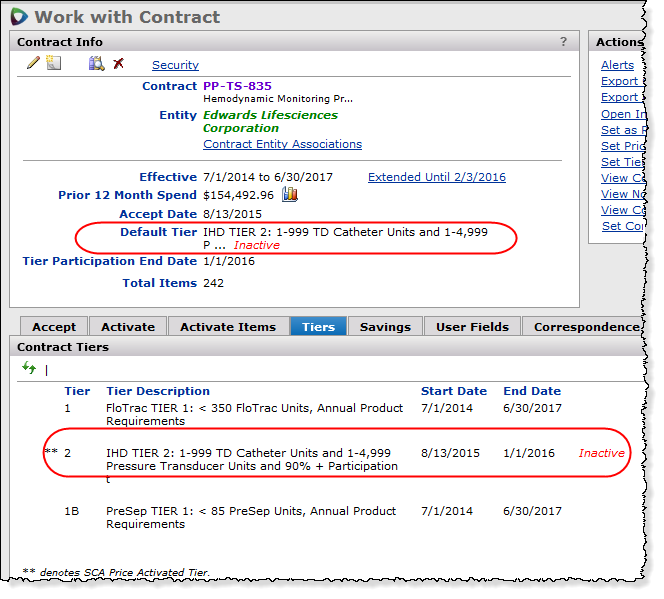
When the current Default Tier expires, SCM continues to display the tier until a new tier activation message comes over from SCA. Inactive appears next to the tier on the the Tiers panel and on the Contract Info header panel next to the Default Tier (Figure 13).
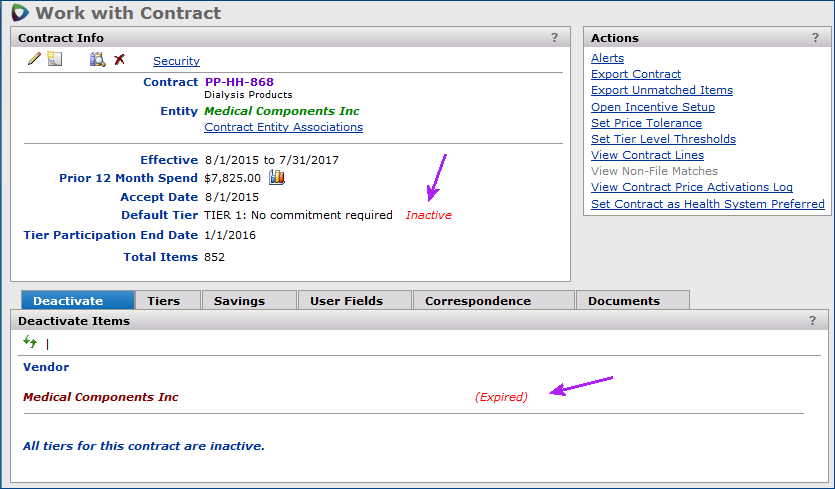
When all the tiers on a -managed contract expire, the contract cannot be activated from SCM. (No activate tabs are available.) The Deactivate panel displays the message that all tiers for the contract are expired (Figure 14).
Facilities Are Added/Removed from a Contract in SCA
Exception items cannot be activated because of problems with the item information. Think of exceptions as unactivated "leftovers" with issues that you need to review, and resolve. Once the exceptions are resolved, the items can be activated.
For a contract, exceptions include:
Other types of price changes and issues that require resolution include:
When resolved, items with vendor exceptions and user-initiated price changes automatically activate their prices.
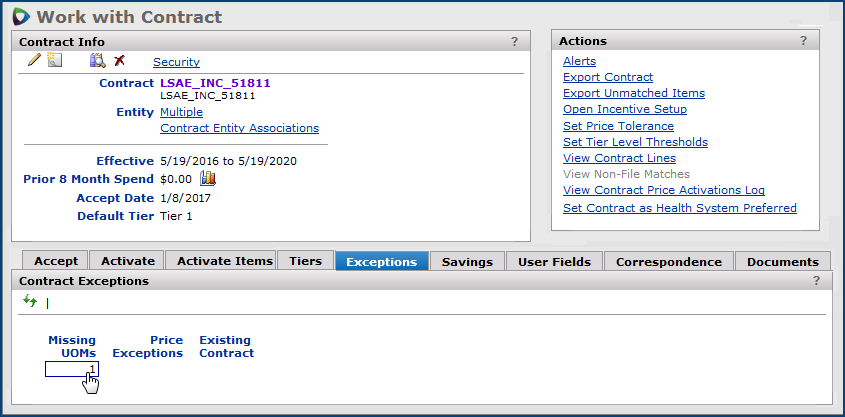
When a contract has exceptions, the Exceptions panel (Figure 15) is available on the "Work with Contract" page. The contract in Figure 15 has two Price Exceptions.
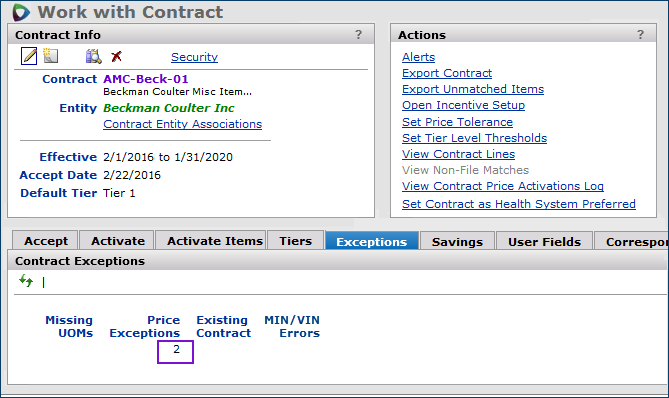
- The panel shows the number of exceptions of each type.
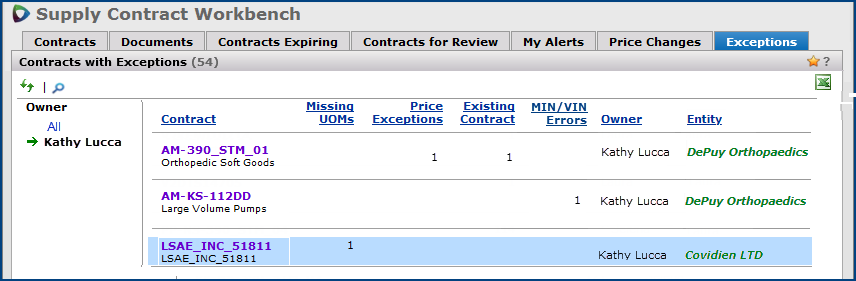
Exception items can also be reviewed and resolved from the links on the Contracts with Exceptions list (Figure 16).
This list is available on the "Supply Contract Workbench" page. For each contract, the count of exceptions is displayed for each exception type.
In Figure 16, one contract has a Missing UOM. One contract has a Price Exception and an item on an Existing Contract. Another contract has a MIN/VIN Error. (MIN/VIN errors are uncommon, but can still occur.)
When you click an exception count on either the Contracts with Exceptions list ("Supply Contract Workbench" page) or the Exceptions panel ("Work with Contract") page, panels and actions appear for resolving vendor exceptions.
The Contracts with Exceptions list provides several other controls:
| To do this: | Action: |
| Filter the list by owner | Click the Owner value (on the left side) that you wish to filter by. Options are All and your name. |
| Search for a contract | |
| Sort by a column | Click the underlined column header. |
Common sorting and filtering options make it possible to sort and filter items by the Total Spend column on the following four panels:
The Total Spend column on each panel contains total spend per item (includes 12 months of prior spend starting with the last full calendar month). Clicking the column header (green box, Figure 17) sorts the item data in either ascending or descending order according to spend, denoted by the green arrow next to it
To filter item data, click on one of the three filters (red box, Figure 17):
- All: Displays all items, regardless of spend.
- Without Spend: Displays only those items with $0.00 spend.
- With Spend: Displays items with spend that is not equal to $0.00.

You must resolve any missing UOMs on contract items before you can activate the items' prices.
To resolve a missing UOM, on the row for the contract in the Contracts with Exceptions panel (Figure 16), click a number in the Missing UOMs column. A panel appears for making corrections.
Figure 18 - The Exceptions Panel for Another Individual Contract
The Items with UOM Errors panel appears (Figure 19).
The fields in Figure 19 set the Contract UOM CA equal to 960 "each;" EA is the lowest UOM for the item in the item vendor record.

When you resolve a UOM error for an item, Sourcing and Contract Management makes the designated correction for any item with the same MIN for the same vendor entity on other contracts.
Additional details on resolving UOM errors are in a subsequent section.
Note: You must resolve any missing UOMs on contract items before you can activate the items' prices.
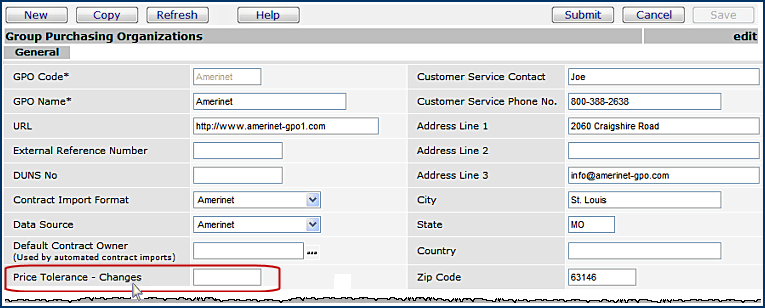
A price exception occurs when an unactivated item has a new contract price that is outside of a tolerance that you have set. You can set tolerances at the system or contract level. The application flags those prices that are above or below the set tolerance.
Price tolerances are explained in detail in Using price tolerances.
This exception means that the contract contains items that have already been activated on another, different contract. You can view these items, and decide whether to leave them on the other contract, or activate them on the current contract.
Note: When an item is on an existing contract, and also has a price exception, the existing contract problem is resolved first.
Details are in the section Review and resolve items on another contract.
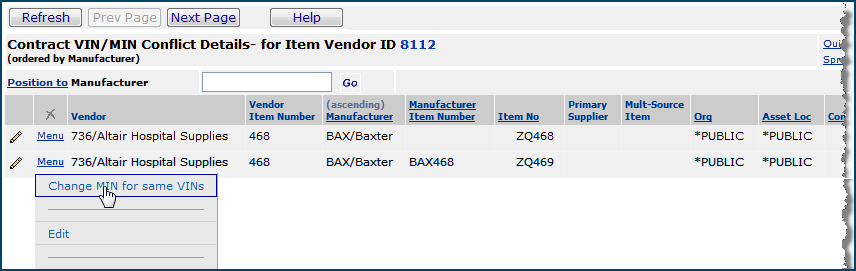
This exception occurs when item records have multiple Manufacturer Item Numbers (MINs) for a single Vendor Item Number (VIN). The Contract MIN/VIN Data Cleanup panel lets you resolve MIN/VIN errors.
This exception can only occur when both 's Materials Management and Sourcing and Contract Management are in use. This exception is not common because the Product Index Layer prevents most errors of this type from happening.
Detailed instructions are Correct MIN/VIN errors.
Price changes -- which are different from price exceptions -- occur when...
An activated item price has been manually changed by a user in the item vendor record, and no longer matches the contract price.
When a user changes an activated item's vendor record price -- either directly by editing the item vendor record; from working with a purchase order, EDI 855 document, or EDI 832 Vendor catalog; or while clearing an invoice exception. The system displays a message and logs the change, but does not immediately make the change.
Sourcing and Contract Management requires separate review and authorization of any price change for an activated item. Figure 20 is an example of the panel that displays the price change, and lets you accept or reject it.
Note: The Price Changes tab does not appear if the contract has no price changes.

How to resolve user-initiated (and GPO) price changes is in a subsequent section "Price Changes." Detailed information is in the chapter "User-Initiated and GPO Price Changes."
This problem occurs when an item was matched on the current contract, but is no longer matched. For some reason, the Manufacturer Item Number (MIN) has changed. Sourcing and Contract Management de-activates unmatched items that were previously matched and activated.
Note: The process that deactivates unmatched items runs at 3:00 AM. So, you may not see the deactivation immediately.
For this problem, you will need to identify what caused the mismatch.
These exception types are automatically activated when resolved:
When these exceptions/problems are resolved, you must activate the contract.
Keep in mind that an item may have multiple types of exceptions. For example, an item may have a UOM error and be activated on a different contract. When you resolve one exception -- such as the UOM error -- you will still need to resolve the other before the item can be activated. If you resolve an exception, and the Activate panel Exceptions column count does not change, you may be working with an item that has multiple exceptions.
Depending on the type of exception, rejecting an exception item can have various results. The effect of rejection is outlined in subsequent sections for each exception type.
A markup set is the vendor/distributor percentage or amount (or both) added to the contract item price. Markup percentages can be positive, negative, or zero. Negative markup percents are displayed in parentheses.
The markup set "A" -- zero dollars and zero percent -- is the initial default markup set. If you create a new markup set, you can designate the new set as Default.
The Default markup set is displayed on the Activate panel if the vendor items have never been activated. Whichever markup you select at the time of activation, that markup persists for that contract for that vendor entity.
New vendor entities added to Sourcing and Contract Management may have no markup set defined. In this situation, when you activate a contract for the vendor entity for the first time, you must define a markup set. A link on the Activate panel lets you do so, as outlined in the Activation section.
Markup can also be created for a vendor at the time when the vendor is registered to an entity. The Product Index Layer chapter outlines how to register vendors and include a markup set.
You can create additional markup sets for a vendor entity, and maintain existing markup sets.
The Default Tier is the highest activated tier in the local contract. If the contract prices have not been activated, then the Default Tier is the highest accepted tier. You accept a contract at a particular tier. When you activate prices in SCM, activation occurs for the tier that you accepted.
Imagine a contract vendor with some items priced at both tier 1 and tier 2, and other items priced only at tier 1. If you accept the contract at tier two and then activate items at tier two, what happens to the Tier 1 items? The system uses the following rules to determine which prices to activate.
Table 3 is an example of several tier activation scenarios.
| Vendor: | Price Tier: | Contract activated at: | |||||||
| Prices at: | Prices at: | Prices at: | Prices at: | Tier 4 | Tier 3 | Tier 2 | Tier 1 | ||
| Result: | |||||||||
| Ven A | Tier 1 | Tier 2 | Tier 2 prices activated | Tier 2 activated | Tier 2 activated | Tier 1 activated | |||
| Ven B | Tier 2 | Tier 3 | Tier 3 prices activated | Tier 3 activated | Tier 2 activated | No tier activated | |||
| Ven C | Tier 1 | Tier 2 | Tier 3 | Tier 3 prices activated | Tier 3 activated | Tier 2 activated | Tier 1 activated | ||
| Ven D | Tier 1 | Tier 4 | Tier 4 prices activated | Tier 1 activated | Tier 1 activated | Tier 1 activated | |||
You can change the activated tier for a contract as follows:
All activated items are then deactivated on the old tier, and reactivated on the new tier. If any item prices are out-of-tolerance on the new tier, price exceptions are available for review and acceptance/rejection.
You can set an alert to notify you when spend on a contract tier reaches a particular threshold, as the spend approaches the tier's upper limit. For example, you may wish to know when spend on the tier is 75% of the way to the upper tier boundary. You first specify the alert threshold as a percent of spend on the tier, and then configure the alert itself for your preferred communication method.
Note: You must define the threshold and set the alert.

The Contract - Tier Levels panel appears (Figure 24).
For the tier of interest, you can leave the values as they are or change them.
The Edit - Tier Level panel appears.
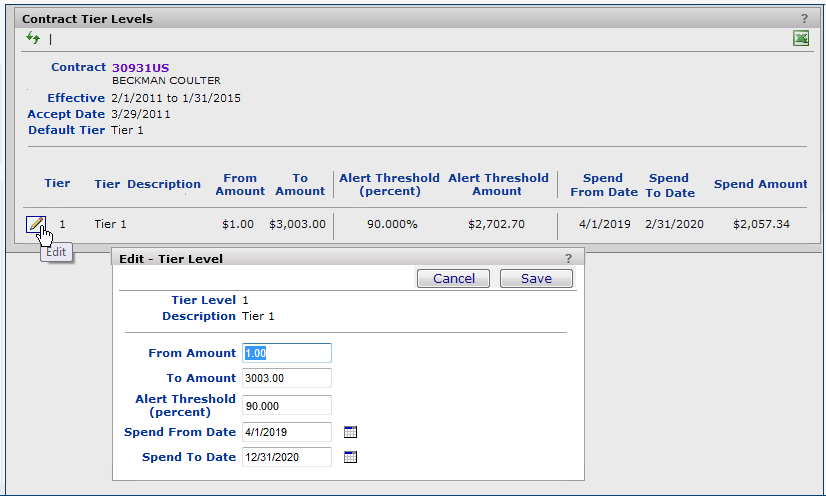
When spend reaches the specified threshold percent of the To Amount limit, the alert/email that you set appears.
Sourcing and Contract Management maintains a table of Business Partner IDs/Names from contracts.
Figure 25 is an example of the table. In this figure, the Business Partner IDs and Business Partner Names are manufacturers that were found in contracts. The row for each Business Partner ID/Name contains its associated manufacturer entity. When a contract is imported, the system looks up the contract manufacturer in the Business Partner ID/Name columns to find the matching manufacturer entity.
You can access this table from the main Contents: Go to Supplies > Administration > Product Index Layer, and click Manage Contract Entities.
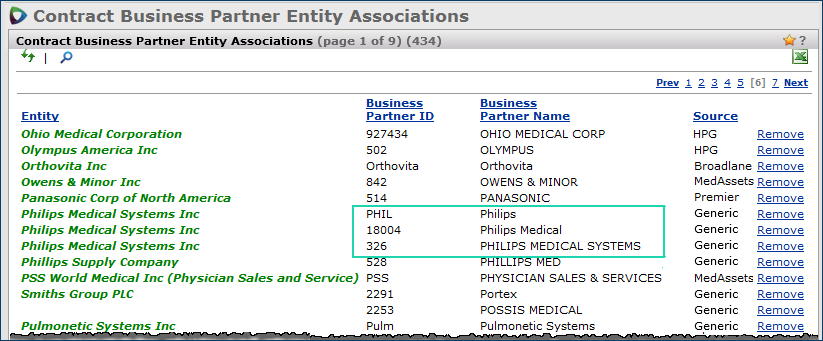
Notice in Figure 25 that there are several Business Partner IDs and Names associated with the entity Phillips Medical Systems Inc.
If the system cannot identify a contract's manufacturer, the link Identify Entity appears on on the "Load and Activate" page Contracts panel next to the contract. The link also appears on the "Work with Contract" page (Figure 26). You must click the link and find the entity to associate with the manufacturer.

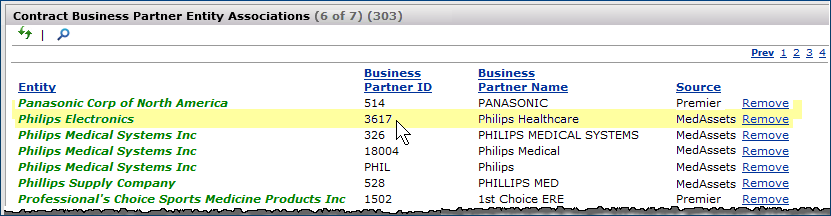
If you were to open the table of Business Partner IDs and Associated Entities, you would see the manufacturer from the contract in Figure 26 added to the Figure 25 list, and associated with the entity that you selected (Figure 27).
You must resolve any missing UOM problem with a contract item before the item price can be activated. You also have the option to reject the item, and not activate its price.
On the Exceptions panel for a contract, click the number under Missing UOMs. The Items With UOM Errors panel appears (Figure 28 is an example).

The error in Figure 28 is an item that has a contract unit of measure BT, which either does not exist in the item record; or exists, but cannot be used for ordering. On the right, the field Existing UOMs (Figure 28, red arrow) contains the UOMs from the item record -- EA and BX.
Use the UOM Errors panel to define the equivalence between the lowest UOM in the item record (EA), and the contract UOM (BT).
The left side of the panel is the Contract UOM being added; in the example, BT.
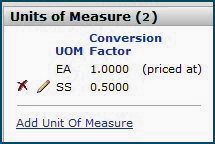
On the right, "= Qty" must contain the conversion factor for the contract UOM, expressed in terms of the lowest item record UOM. The placeholder value "10" is the system's "best guess." This value can be changed, if need be; however, in this case, it is correct.
You can add a contract UOM whose conversion factor is lower than the lowest UOM on the right. For example, suppose you are adding the UOM SS (split). The fields look like Figure 29:

You may encounter the situation where an item has a UOM error when you import a contract, but you are not able to add the contract UOM. This situation occurs when no UOM exists in the item record that can be expressed in terms of the contract UOM. Figure 31 is an example of this situation.

The Units of Measure panel contains no UOMs for the item. In this case, you must go to the item record, review its UOM value(s), and make any needed changes.
You can reject an item price on the UOM Errors panel (Figure 31, purple box.)
When you reject an item price with a UOM error, the following results:
The item remains unactivated on the contract for the vendor entity.
The item is placed on the Items with Rejected Prices panel.
The Accept box is disabled but the Reject box is enabled
Unchecking the Reject checkbox will remove the item from the Items with Rejected Prices panel and place the item back onto the Items with UOM Errors panel.
When a contract contains items that are activated on another, different contract, you will need to review the items and decide which contract you want to use for purchasing the items.
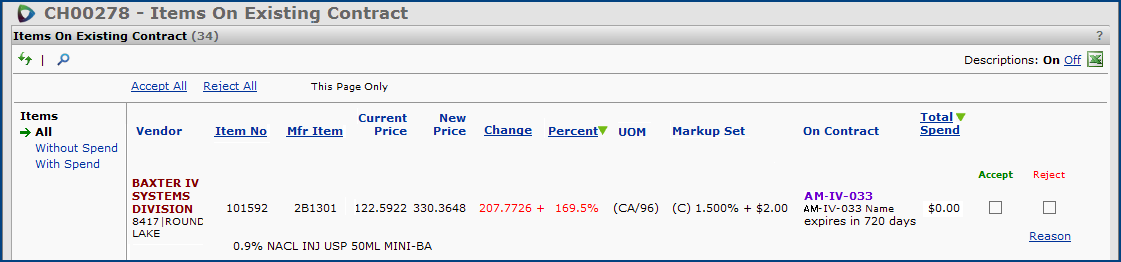
When you reject an item on an existing contract, the following results:
The item remains unactivated on the new contract where the exception appears.
The item is placed on the Items with Rejected Prices panel.
- To display the list of items with rejected prices, on the "Work with Contract" page Actions panel, click View Rejected Items.Both the Accept and Reject checkbox are active.
- Clicking Accept will deactivate the item from the existing contract for the vendor and activate the item on the new contract for the vendor. The item is removed from the Items with Rejected Prices panel.
- Unchecking the Reject box removes the item from the Items with Rejected Prices panel and places the item back into the Items on Existing Contract panel (Figure 32).
Imagine the situation where an item on one contract (A) is also on another contract (B). You accept the new price on contract A, the Price Exception clears, and the item is activated. When the second contract (B) is imported and accepted, only the Existing Contract exception appears. Figure 33 is an example.
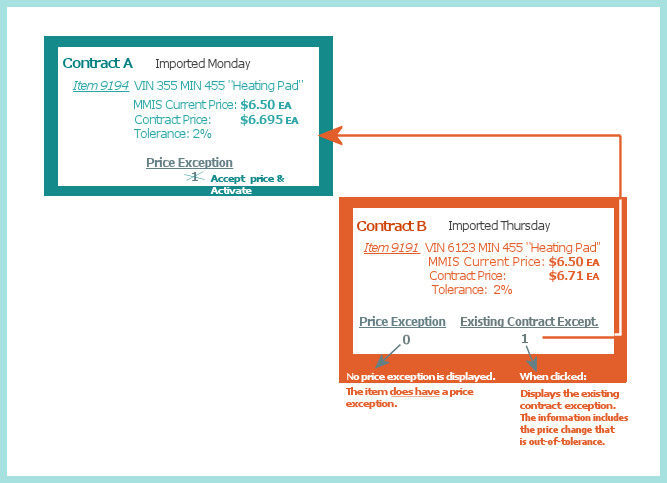
The Price Exception does not appear on contract B; only the Existing Contract exception appears. The reason is to avoid bouncing the item back and forth between the contracts without ever resolving the Existing Contract exception.
If a contract contains a Price Exception and an Existing Contract exception for the same item, the system expects to resolve the Existing Contract exception first. In accepting (or rejecting) the Existing Contract exception, you also accept (or reject) the Price Exception.
Imagine that a contract is imported, and that some of the items on the newly imported contract are activated on an existing contract. How does Sourcing and Contract Management decide if this situation is an update of the existing contract, or a truly different contract from the existing contract?
Rule: Existing contract exceptions do not include contracts whose price activation date will occur after an existing contract's expiration date.
The activation date for the newly imported contract is determined by the most future of these dates:
The expiration date of the existing contract is determined by the most future of these dates:
In a different situation, suppose that some items are activated on a contract. The contract is changed, and imported again, but the items have a different UOM and conversion factor for the activated prices on the old contract.
Sourcing and Contract Management de-activates the items on the old contract, and re-activates them with the UOM and conversion factor from the newly imported contract.
If a contract contains MIN/VIN Errors, some items have multiple Manufacturer Item Numbers (MINs) for a single Vendor Item Number (VIN). This situation is not common, but can occur.


Materials Management users:
The corrections to MIN values are copied to the Item Catalog record. You can also edit the Item Catalog record for any item that has a MIN/VIN problem.
Users of other supply chain/materials applications:
The corrections are available on an Excel worksheet for you to upload to your system. Instructions are below.
This feature is available to users who do not have Materials Management.
If you need assistance, contact the Help Desk.
Note: If you change the Manufacturer Item Number on any item that is currently activated, Sourcing and Contract Management immediately de-activates the item.
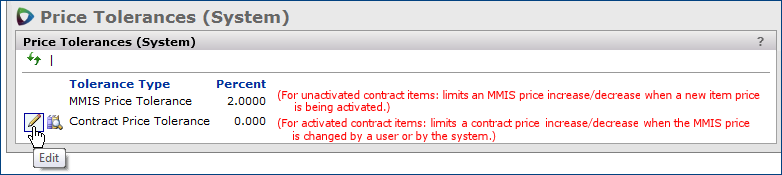
Tolerances let you set limits that define price exceptions and GPO price changes. When you import a contract, the system flags those items with price changes or price exceptions that are outside of the set tolerance. Items with out-of-tolerance prices are available for separate review. You can accept or reject each price.
You can set tolerances of these types:
You can set tolerances at these levels:
Sourcing and Contract Management applies tolerances in this sequence: system, contract.
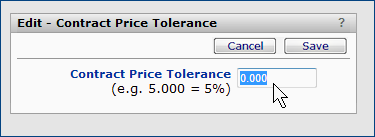
A tolerance is set as a percent value.
Note: Setting a tolerance to 0.0% does not mean "no tolerance." A tolerance of 0.0% flags any change in price as "out of tolerance."
For "no tolerance," just leave the tolerance percent field blank.
A panel appears for selecting the type of tolerance (Figure 39).


When you reject an item with a price exception, the following results:
Tolerances set for a GPO apply to price changes between an existing contract price for an item and a new contract price from an updated GPO contract. Thus, if you are activating a contract for the first time, GPO price changes do not apply. When you import a contract with GPO price changes, the system flags those items whose price changes are outside of a tolerance that you set. A tolerance is set as a percent value. Items with out-of-tolerance prices are available for separate review. You can accept or reject each price. When accepted, items with GPO price changes automatically activate their prices.
GPO out-of-tolerance price changes on a contract are generated for each vendor with a matching item. You will be able to accept or reject the price change for each item vendor. An example is in the topic GPO Price Changes for Items with Multiple Vendors.
GPO tolerances are different from system and contract tolerances in these ways:
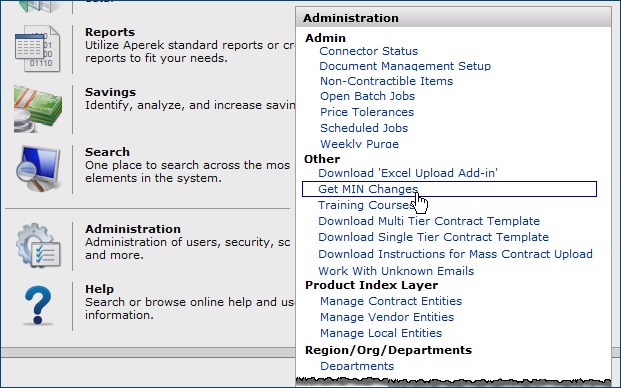
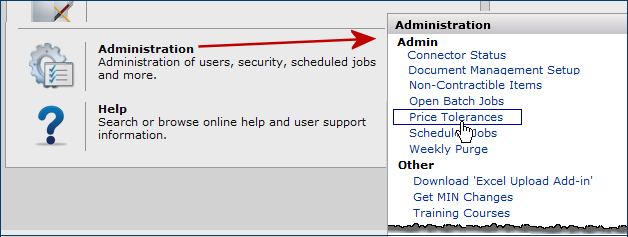
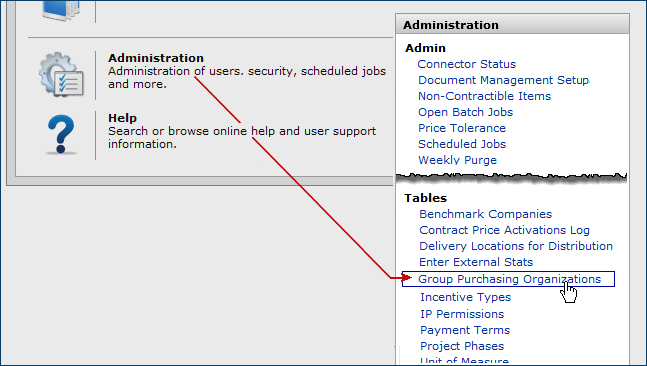
You can set GPO tolerances either from the "Load and Activate Workbench"page, or from the Administration menu (Admin > Price Tolerance Activation).

The Price Changes panel lets you review and resolve GPO price changes (Figure 46).
On the Price view (Figure 46), the Source column displays the source of each proposed price change.
For GPO price changes, you can only Accept Leave or Reject a price change. The check box under Accept Remove is grayed out.

Alternately, to review price changes, you can access the Price Changes panel from the "Supply Contract Workbench" page:
| To accept a proposed price for an item... ...and leave the item on the contract. ...and remove the item from the contract (user-initiated changes only) |
- Click the box in the Accept Leave column. Update Now appears. Or: - For user-initiated price changes, click the box in the Accept Remove column. Update Now appears. Note: The check box for the option Accept/Remove on the panel is grayed out for GPO price changes. You cannot select this option. - Click Update Now. |
| To reject a proposed price for an item
Note: If the item is activated on the contract, rejecting the price de-activates the item. |
- Click the box in the Reject column. Update Now appears. - Click Update Now. |
When you reject GPO price changes, the following results:
Once a GPO price change has been rejected for an item, the GPO tolerance is no longer a factor. So, if you later uncheck the Reject box, the system and/or contract tolerance is used to determine if the item should be activated or if the item is a price exception.
User-initiated price changes appear on the Price Changes panel.
Alternately, you can access the Price Changes panel from the "Supply Contract Workbench" page as follows:

On the Price view, the Source column displays the source of each proposed price change.
Figure 48 displays a price change whose Source is 'Item Vendor": a change was made to the item vendor record by a user.
"Item Vendor" is a user-initiated price change. Another type of user-initiated price change contains the Source value "Inv invoice_number." This price change results from clearing an invoice exception whose invoice number is invoice_number.
A GPO price change contains the Source value "GPO."

When you reject a user-initiated price change, the following results:
If you have tolerances set, and you deactivate items and then re-activate the items at a different tier, new exceptions could be generated if the prices on the different tier are outside of any tolerance value that you have set.
What is the difference between a system, contract and GPO price tolerance, and where do you go to modify each type?
Answer:
Sourcing and Contract Management uses a system tolerance to compare the current price of an unactivated item to the contract price for that item.
This tolerance is system-wide, meaning that the same tolerance is used when comparing prices for items on all contracts that come into the system. If the new price is out of tolerance, a price exception is flagged on the Items with Price Exceptions panel.
Sourcing and Contract Management uses a contract tolerance to compare the current price of an unactivated item to the contract price for that item. A contract tolerance is contract-specific, so this tolerance is only used for the current contract. If a new price is out of tolerance, a price exception is flagged on the Items with Price Exceptions panel.
Sourcing and Contract Management uses a GPO Tolerance to compare the current price of activated items to re-imported GPO contract prices for those items. If the new price is out of tolerance, a price change is flagged on the Price Changes panel.
When I reject a contract line that is out of tolerance or has a price change, am I rejecting the item or rejecting the price?
Answer:
Rejecting User Initiated Price Changes
You are rejecting the price for the item for a particular vendor. You are not rejecting the item (since the item is already activated)
Rejecting GPO Price Changes
You are rejecting the price for the item for a particular vendor. But since rejecting a GPO price change deactivates the item, you are rejecting the item as well.
Rejecting Price Exceptions
You are rejecting the item for a particular vendor. But since rejecting an item prevents the item from ever being activated, you are rejecting the price as well.
Rejecting Existing Contract Exceptions (i.e., items activated on another contract)
You are rejecting the item for a particular vendor for the contract you are currently working with. This prevents the item from ever activating on this contract, so you are rejecting the price as well. However, the item does remain activated on the existing contract that caused the exception.
Rejecting UOM Errors
You are rejecting the item for a vendor for the contract you are currently working with. This will prevent the item from ever activating on this contract. You are not rejecting a price in this case because the price can’t be calculated properly due to the UOM error.
My contracts exist in both SCM and SCA which means that they are synchronized using the standard nightly process. One of our staff made a price correction on an item vendor record in Materials Management. The item is on one of the contracts, and I cannot accept the price change in SCM for the contract. Is that right?
Answer:Yes. For a -managed contract , you cannot Accept/Leave or Accept/Remove price changes that originate in the ERP system (Materials Management or General Ledger). The Reject option is available, however.
While we are on the subject, you can Accept/Leave or Accept/Remove price changes for other GPO contracts, but not reject them. The Reject option is grayed out.
Users need to be able to correct incorrect item matches and match non-matched Items.
This feature is controlled by a new role object "ManualItemMatch." The minimum setting is Modify.
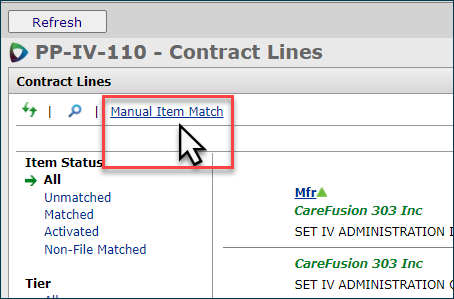
The Manual Item Match for a contract can be accessed through any of these paths:
| Work with Contract > | View Contract Lines > | Manual Item Match > | Maintain Matches |
| Activate tab > | Manual Item Match > | Maintain Matches | |
| Activate Items Tab > | Manual Item Match > | Maintain Matches | |
| View Rejected Items > | Manual Item Match > | Maintain Matches | |
| Exceptions tab > | Price Exceptions > | Manual Item Match > | Maintain Matches |
| Missing UOMs > | Manual Item Match > | Maintain Matches | |
| Price Exceptions > | Manual Item Match > | Maintain Matches | |
| Existing Contract > | Manual Item Match > | Maintain Matches |
This example uses the first navigation path above: Work with Contract > View Contract LInes > Manual Item Match (Figure 49).

If the item does not exist in your Item Catalog, the message No items match the search criteria appears.
Otherwise, a list of items for the manufacturer and vendor appear. These are items that exist in your item catalog.
- If the item is matched, it appears at the top of the list with the link Unmatch.
- For other items, the link Match appears.
The Item Status filter lets you display matched, unmatched and all items for the contract item you identified.
You can sort by any column that is underlined.
- Clicking the item number provides item catalog information.
For items on contract, clicking the item number opens that contract.
Other elements of the panel, such as the Search, export to Excel, etc. function as is standard for SCM.
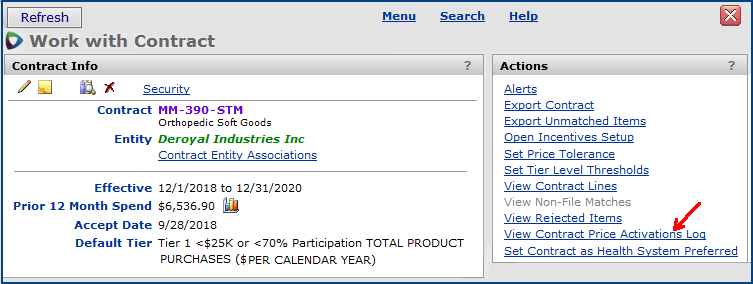
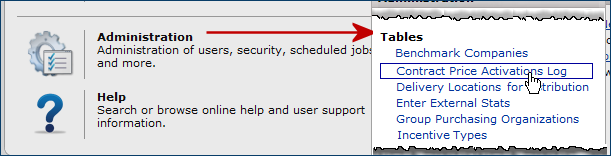
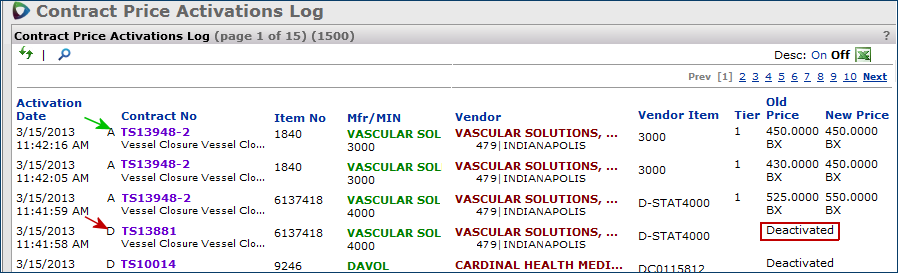
The Contract Price Activations Log is a single, searchable list of price activations for all contracts. The Contract Price Activations Log panel is available from the actions panel of the Work With Contract page, and also through the Administration menu.
Security: The ability to work with the Contract Price Activations Log is controlled by the role object "CATables."
You can access the Price Activations Log two ways:
The Contract Price Activations Log appears. The view that you see will differ depending on whether you have accessed the Price Activations Log via the Work with Contract panel (see Figure 51) or via the Administration menu (see Figure 52).
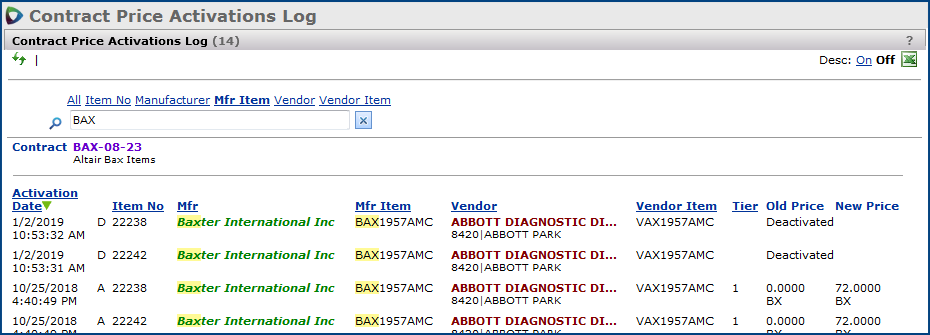
Notice that the descriptions are turned off, by default (Figure 54, red arrow). Click On to turn on item descriptions and to display the source of the activation/deactivation.
When a site uses catalogs and vendor sets to further distinguish items, those values are displayed in parentheses, as in Figure 55.

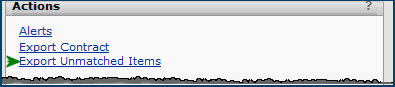
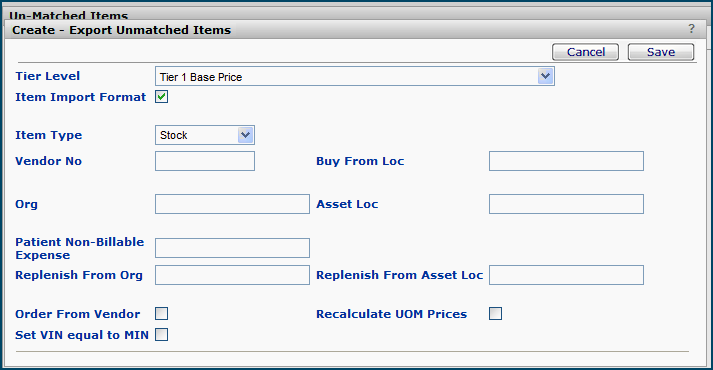
You can manage unmatched items on a single contract and for all contracts. On a single contract, in addition to managing items for individual vendors, you can simply export all unmatched items to Materials Management or to a network location. You can also add vendors to a contract to handle the problem of unmatched items.
For details on item management and adding vendors, see the topic Handling Unmatched Contract Items and Adding Vendors to Contracts.
An import panel opens.

You can display a list of expired contracts from the contracts search results panel when you search for a contract.
When a contract has expired, the designation Exp appears next to the contract number. Contracts which are still active, but which are about to expire are listed on the Contracts Expiring panel in various time-frame categories.
When a contract expires, an automated process deactivates all its items; except: any items with pending price changes do remain activated. You can set an alert (Expired - All items deactivated) to notify you that a contract expired. For supply contracts, the alert also flags any problems in deactivating items. The section below describes the error messages you may receive.
Figure 60 - The "Work with Contract Page" for an Expiring Contract
When an expired contract has pending, user-initiated item vendor price changes, the link Review pending price changes appears next to the relevant contract vendor (Figure 61). Clicking the link opens the Price Changes tab.
Figure 61 - An Expired Contract That Has User- Initiated Price Changes
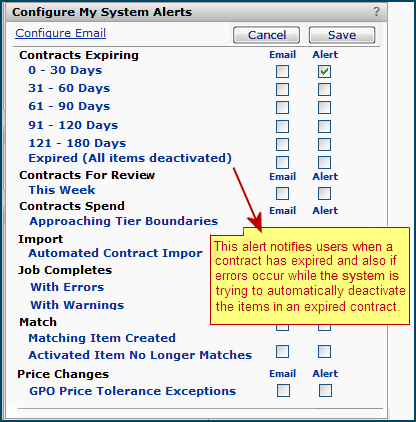
The system alert Expired (All items deactivated) can be set to notify users that the contract expired (Figure 62). For supply contracts, the notice also flags any problems in deactivating items. (Deactivation does not occur with services contracts.) Changes cannot be made to items on an expired contract. (See Alerts and notifications for details on setting alerts.)
Figure 62 - Setting a System Alert for Item Deactivation in Expired Contracts
Expiring Contracts: Deactivation Error Messages
If you receive an error message such as those below, the solution is to go back to the contract and look at the deactivation error messages.
- The problem could be that a change on a contracted item is pending. Check for pending user-initiated price changes and review/approve/reject as appropriate.
- The problem could be a temporary network situation. The de-activation will run again in its next nightly iteration when the network is working.
Error Message Examples for Expired Contracts
Errors occurred while trying to deactivate all items on expired Contract [CONTRACT, OWNER] with Entity [Entity Name]
Review the contract for any deactivation error messages.
-This message occurs when the manufacturer (sometimes labeled "Business Partner") on the contract does not match to the SCM manufacturer entity displayed in [Entity Name] Errors occurred while trying to deactivate all items on expired Contract [CONTRACT, OWNER] with Unidentified Entity.
Review the contract for any deactivation error messages.
- This message occurs when the manufacturer (sometimes labeled "Business Partner") on the contract does not match to any manufacturer entity in SCM.
Errors occurred while trying to deactivate all items on expired Contract [CONTRACT, OWNER] with Multiple Entities.
Review the contract for any deactivation error messages.
- This message appears when the expired contract has multiple manufacturer entities not associated with any registered manufacturer in SCM.Identifying Non-Contractible Items - Materials Management Users
This section applies to sites with 's Materials Management.
You may have items that cannot be purchased on a contract. To prevent purchases of these items from being included in off-contract spend when you are working with the analysis tools, you can now designate such items as "non-contract."
Security: The ability to designate items as non-contractible is controlled by the role object "CATables."
To designate an item as non-contractible,
- On the Search panel, enter the item number from your item catalog/item file in the Search box. (Figure 63).
- Click Item Search.
When the Search locates the item record, you can display the Item Catalog panel (Figure 63).
Figure 63 - Designating an Item as "Non-Contractible"
- Click the Item No (Figure 63, red arrow).
The Item Catalog Info panel appears.- Click Open Full View (green arrow).
The "Work with Item Catalog" page appears.- On the "Work with Item Catalog" Actions panel, click Set Non-Contractible.
The item is designated as a "non-contract" item.View a List of Non-Contractible Items - Materials Management Users
You can view a list of non-contractible items from the Administration > Admin menu (Figure 64).
Security: For you to display the list, role object "CATables" must be set minimally to View.
- Click Non-Contractible Items.
Figure 64 - Linking to a List of Non-Contractible Items
Items in the Item Catalog that are "Inactive"- Materials Management Users
This section applies to sites that use 's Materials Management and Sourcing and Contract Management together.
In the Item Catalog, it is possible to mark an item as "inactive." Sourcing and Contract Management handles inactive items as follows:
- Spend for any item marked "inactive" in the item catalog is included in any analysis group that contains the item, and in Total spend for All Items on the Analysis Workbench.
- If an item's price is activated on a contract, and the item catalog record is subsequently set to "inactive," the item remains activated on the contract.
- When a contract is imported and has matches and items with ready-to-activate prices, and the items are subsequently set to "inactive" in the item catalog, the items are removed from matches, and ready-to-activate counts.
- When an imported contract contains an "inactive" item, the item is not included in matches or ready-to-activate counts.
Copyright © 2023 by Premier Inc. All rights reserved.