Work with User-Defined Fields
Version
Contents
Overview
Sourcing and Contract Management lets you
create new fields that are specific to your needs.
Such fields are user-defined
fields.
User-defined fields can be associated with organizations, regions, contracts, users, analysis projects, incentives, and GPOs. Here are some ways you can use these fields:
- Filters or searches to provide customized access points to your data.
- Flags to indicate status or attention needed.
- Containers for information not available in other fields.
- Cues for an action related to your operations; e.g., “Review Needed – yes/no.”
Examples of use:
User-defined fields can filter the Supply Contracts and Services Contracts lists.
On departmental contracts, the Tags field can contain the department name to use in searches.
User-defined fields are set up in the Administration tables by a site administrator or other authorized person. Any user with the appropriate access (to the contract, project, etc.) can select or enter values for the field(s).
You can create the following kinds of user-defined fields:
Text fields - An input box for users to key in an alphanumeric or numeric value.
Calendar fields - A calendar icon for users to select a date. The selected date then appears in the input box.
Selection fields - A list of selectable values for the field. (Click a down arrow.) The values are pre-defined by the person who set up the user-defined field. The system automatically adds All as a selection.
Tags field - Keywords used in Searches to locate a contract, project, user, or other element.
Fields can be defined as "required."
Security
To create user-defined fields, the "CATables" role object must be set in your user role as Create.
To
create a user defined field:
- From the Sourcing and Contract Management main Contents, select Administration > Tables > User Defined Fields. The system displays a list of areas ("Tables") for which you can create user-defined fields. Figure 1 is an example of part of the list.
- To select a particular feature, click the appropriate link under Table. All is the default.
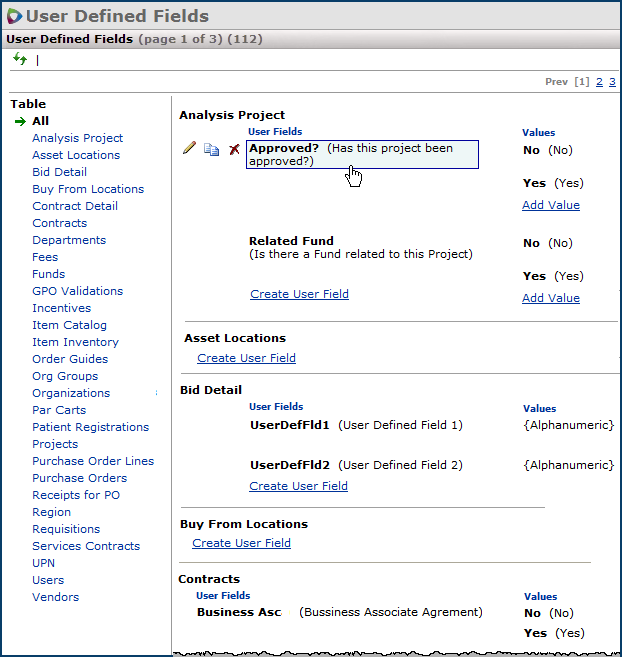
Figure 1 - Sourcing and Contract Management Tables that Support User-Defined Fields
-
Click
Create User Field under the element for which you want to create fields.
Note: You can edit  , copy
  , or delete
  an existing defined user-defined field.
- Hover the cursor over the field. Icons appear.
- Click the relevant icon.
-
The create/edit panel appears (Figure 2).
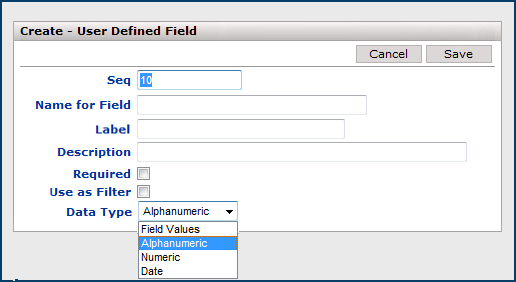
Figure 2 - User-Defined Fields Edit Panel
- Change the value of the Seq field, if needed. See the discussion below.
- Enter
the name for the field in the Name for Field box. The field name
can contain up to 30 alphanumeric characters.
- Enter a Label that the report writer uses for the field on output for report definitions written using the "Contract Header User Fields" report object. Figure 2A (red box) is an example. If no Label is entered, the system uses "UserDefFld1," "UserDefFld2," etc.
- When you create a services or supply contract header report definition, you can select each user-defined field individually from the Select Report Fields panel. Only fields that have been labeled are available for selection individually on the report.

Figure 2A - Sample Excel Output for a Report with User-Defined Fields in Contract Headers
- Enter
a description for the field in the Description box. The maximum length of the Description field (on the Create/Edit - User Defined Field panel) is 50 characters.
Other options — Required, Use for Analysis, and Data Type — may also appear on the panel if the data Table element allows different types of fields.
- If the field is required, select Required. The designation (required) will appear next to the field.
- Select the Data Type for the field (if Data Type is available). When you create a new field, the Data Type defaults to Alphanumeric. (You can select a different Data Type.) Options are:
Field Values - Users click an arrow next to the field's input box and select a value from a list. With this data type, you must specify selection values.
See Specifying Field Values.
Alphanumeric - Users key an alphanumeric value into an input box.
Numeric - Users key a numeric value into an input box.
Calendar - Users click the calendar icon and select a date from the pop-up calendar. The date appears in the input field.
- Click Submit. The system returns you to the User Defined Fields panel.
- Repeat Steps 3 through 10 until you have created all the fields that you need.
Specifying the Position of a User-Defined Field: Seq
Seq specifies the user field's placement in relation to the other user fields. When you create the first user field for an area of Sourcing and Contract Management , the system populates the Seq field with 10. The Seq field is automatically incremented by 10 each time you create a new user field for the same area. So, after the first user field, the second field that you create has 20 in the Seq field. Changing the value of Seq reorders the user fields.
For example, Figure 3 contains user fields for the Projects area: Related Fund and Approved?. Figure 4 displays the way the fields appear when Related Fund has the Seq value 10 and Approved? has the Seq value of 20.
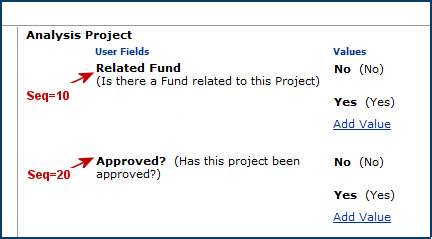
Figure 3 - User Fields with Seq Values 10 and 20 |
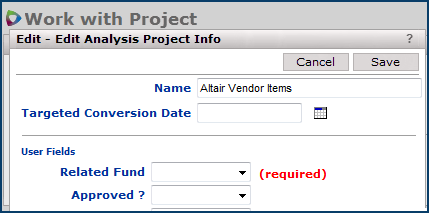
Figure 4 - Ordered User Fields
|
Suppose we edit Related Fund and change the Seq value to 30 (Figure 5). The result is in Figure 6: because 30 is higher than 20, Related Fund appears second, below Approved? You can change the value of the Seq field to create similar results with user fields that you have defined or are creating. Values for the Seq field that you enter do not need to be in increments of ten. You can use increments of five, or of some other number, depending on the results that you want.
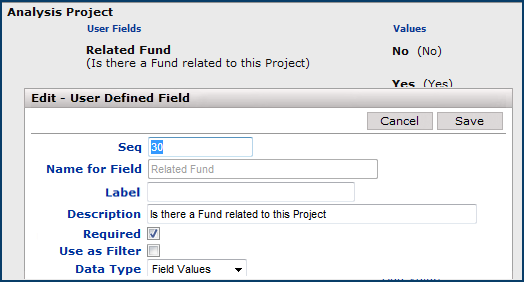
Figure 5 - Related Fund Seq Value Changed to 30 |

Figure 6 - User Fields Order is Different |
Specifying Field Values
When you create a new user-defined field in the Field Value data type, you must specify a list of selectable values for the field.
To create values for the field:
- From the User Defined Fields panel, click Add Value (Figure 7)
The Create - User Defined Field Value panel appears.

Figure 7 - Opening the Field Values Panel
- Enter the Field Value and Description on the Create - User Defined Field Value panel (Figure 8).
The Field Value can contain up to 60 alphanumeric characters.
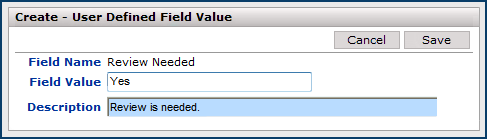
Figure 8 - Entering Field Values
- Click Save and Submit.
The system returns to the User Defined Fields list.
- Click Refresh.
- Repeat Steps 1 through 5 until you have entered all the selectable values that you need (Figure 9).

Figure 9 - List of Selectable Values for a User-Defined Field
The new field and its values are now available for use.
Set up user fields for services and supply contracts
For supply and services contracts, you cannot create new user-defined fields; however, 100 pre-defined user fields are available for you to customize as needed. These fields are initially called Field 1 to Field 100. You can do the following to customize these pre-defined fields:
- Edit the Label.
- Add a Description.
- Set the field's Sequence.
- Make the field Required.
- Change the Data Type.
- Make the field a Filter.
The original Data Type for the pre-defined fields is Alphanumeric. You would need to change this value if, for example, the user field is to be a filter. Filters must have the Data Type "Field Value."
The discussion below applies only to services and supply contracts’ user fields.
- For a contract user field that you are setting up for the first time, customize the Data Type, Label, and other parameters as needed. The path is: Administration > Tables > User-Defined Fields > Contracts or Services Contracts > select field > edit.
- For contracts' user fields already customized with a Label, you can change the Data Type, provided that the user field has not been assigned data values in any contracts.
To change the user field Label and Data Type:
- Open the user field’s parameters for editing. (See Figure 2.)
The path is: Administration > Tables > User-Defined Fields > Contracts or Services Contracts > locate field > edit.
- Edit the user field to reset the Label field back to its original: Field number. If you do not remember the original number, you can set number equal to any number between 1 and 100 that is not used in another Field number label.
- Save the user-defined field.
- Reopen the user field parameters Edit panel, enter a new Data Type and Label, and click Save.
Note: If the user field has data values assigned in any contract, an error message appears, and you cannot change the Data Type.
Designating a user field as a filter for services and supply contracts
You can designate user fields as filters for the Services Contracts or Supply Contracts list. The fields must be of the data type Field Value.
On the Services Contracts list Figure 10 and the Supply Contract list, the values of user fields that you have set up as filters appear on the left under User Fields. Figure 10 is an example for services contracts that contains three user fields as filters: Auto Renew, Status, and Quick Delivery?.
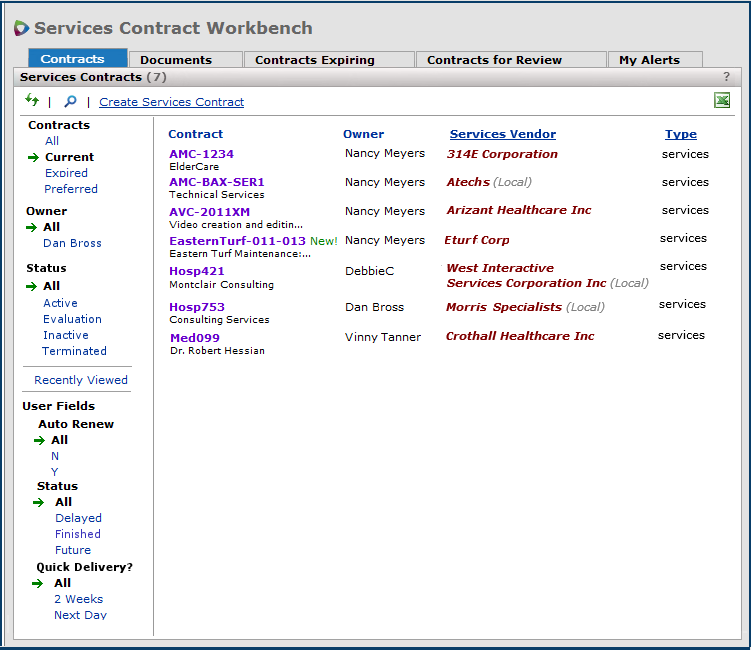
Figure 10 - Work with Services Contracts Page
Field values are listed under the field's name (Figure 10). If more field values exist than the space can accommodate, the link More appears.
- Click a user-defined field value to filter the contracts list by that value.
- If More appears, click it to display additional field values that you can select. (Click Less to shrink the list of values.)
The user-defined filter works with the other filters on the Services Contract or Supply Contracts list (except for Recently Viewed). For example, in Figure 10,
clicking Contracts: Current and User Fields: Auto Renew: Y would display current contracts with the Auto Renew field set to "Y".
Note: This feature is currently available only with the user-defined data type Field Values.
(Other data types will be supported in future releases.)
To designate a user-defined field value as a filter
- Open the user-defined fields list: Administration > Tables > User Defined Fields. The list of application areas and fields appears.
- Scroll to the Services Contract data area fields (Figure 11) or to the Supply Contract fields.
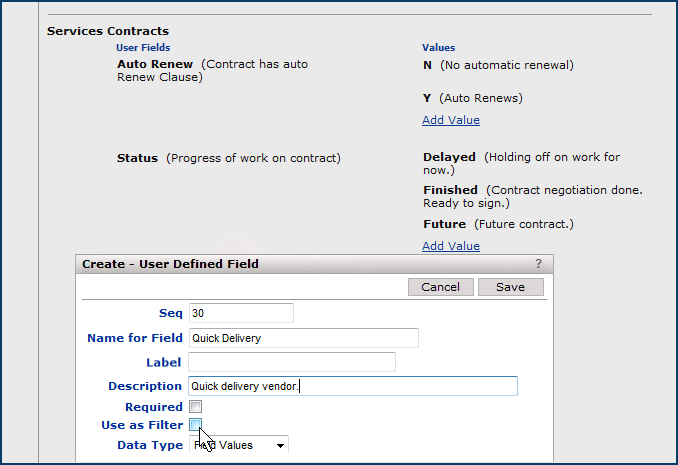
Figure 11 - Designating a User-Defined Field as a Filter
- Edit an existing field or select a new, pre-defined field to customize.
Note: For contracts’ user fields already customized with a Label, you can change the Data Type, provided that the user field has not been assigned data values in any contracts.
- For an a new pre-defined field, mouse over the field name. Icons appear.
- Click the edit icon .
The Edit or Create -- User Defined Field panel appears (Figure 11).
- Select the Use As Filter field.
- Click Save.
Accessing a User-Defined Field
In Sourcing and Contract Management, user-defined fields can be associated with supply contracts, services contracts, regions, projects, organizations, or user information.
Supply Contracts
- To access user-defined fields for a supply contract, from the Contract Info panel, click the User Fields tab.
The User Fields panel with the list of available fields appears (Figure 12).
Figure 12 displays the tabbed panel for a supply contract. Services contracts also contain the User Fields panel and tab.
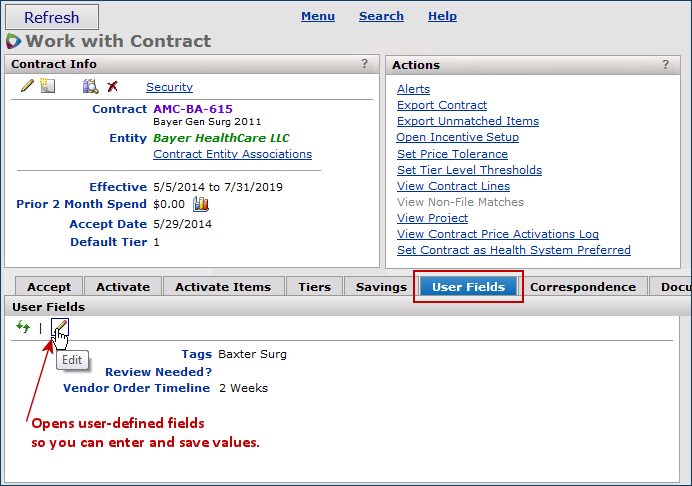
Figure 12 - Accessing User Fields from the Contract Info Panel
Hovering the cursor over the label for any field (such as Vendor Order Timeline, Figure 12) displays the Desc link.
- Click the Desc link to display the description of the field on the panel.
-
To remove the description, click the Desc link again.
- Click the edit icon to enter or edit values for user defined fields.
Services Contracts
The User Fields panel for a services contract appears on the "Work with Services Contract" page.
Any fields that you have designated as filters for the Services Contracts list appear to the left of the list under User Fields. The fields are links. Clicking a field sorts the list for services contracts with the field name.
Analysis Projects
The User Fields panel for an analysis project is available from the project edit (Figure 13).
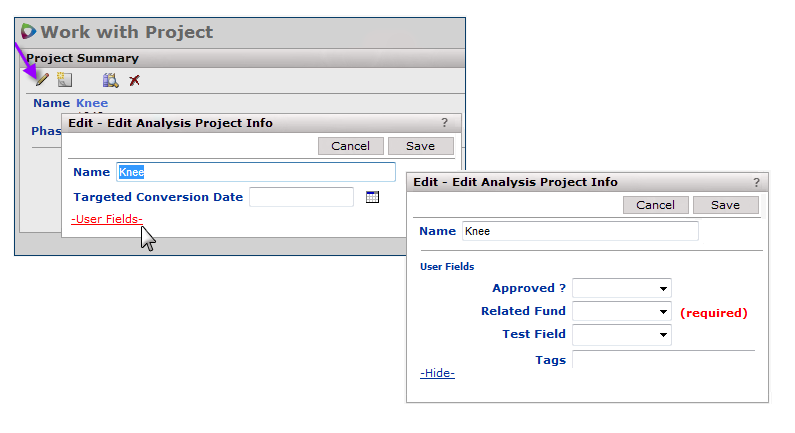
Figure 13 - Accessing User Fields for an Analysis Project
User Information
- To access user-defined fields for a user, from the User Information panel, click the User Fields icon
 (Figure 14).
The User Fields panel appears, as in Figure 14.
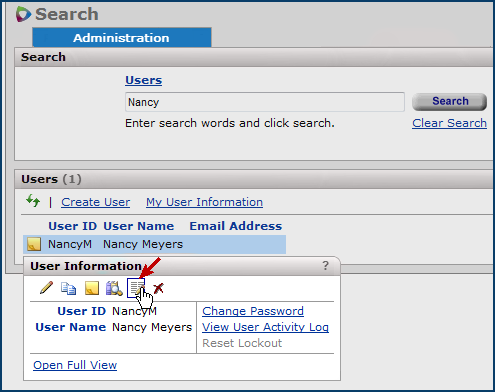
Figure 14 - User Information Panel: Click the User Fields Icon
Using a Tags Field
A Tags field is a special type of free-form user-defined field that allows you to assign one or more keywords to a contract, user, organization, project, or other application element. Tag values are searchable.
A Tags field is an alphanumeric type.
- For supply or services contracts, click the User Fields tab on the "Work with Contract" page to view the Tags field and other fields on the User Fields panel. Figure 15 is an example for a supply contract.
- To associate tags with a contract, enter tags in the Tags field for the contract (Figure 15).
Tags can only contain alphanumeric characters.
Figure 15 - Entering a value for Tags in the User-Defined Fields for a Supply Contract
Search for Tags
- You can use the Search panel to search for supply contracts, services contracts, or users (Administration > Users) for which you have defined Tags values.
Example: Use a Tags value to find a contract
- On the "Search" page, enter one or more of the Tags values in the search box (Figure 16). (For details about search, see Using Search.)
- Select Contracts or Users, as appropriate.
- Click Search.
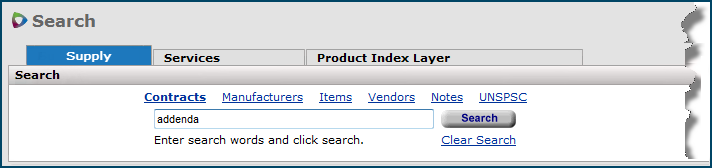
Figure 16 - Searching for the Contract with the Tags Value "addenda"
The system searches for the contract(s) or user record(s) that you assigned the Tags values to (Figure 17).
- In Figure 17, the first contract (MS50380) shows the search word found in several item records. You are looking for the search characters found in a contract's Tags field. This contract is probably not the one that you wanted.
- The second contract (PP–AM–1110) is more likely the contract of interest. Clicking the contract number displays contract information. When the contract is open, you can review the Tags value in the user fields to make sure that it is the correct contract.
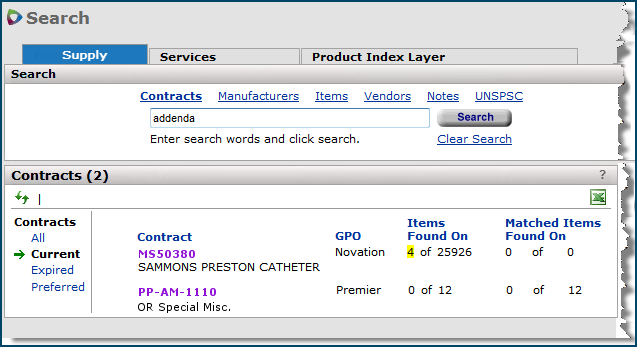
Figure 17 - Search Results for the Tags "addenda" Associated with a Contract
Search for an Organization/Region with Tags
- On the Savings panels, you can search for an organization or region by its Tags value(s).
- On the Project Contents panel, when you wish to display spend for an organization/region, you can use the organization's or region's Tags value to display the spend.
- When you wish to find an organization to associate with a region, as described below, you can search for the organization by its Tags value.
Example: Use a Tags value to find an organization to associate with a region
On the main Contents, click Administration > Region/Org/Departments > Region/Org Association.
- Click Add Org under one of the organizations listed.
The Select Organization panel appears.
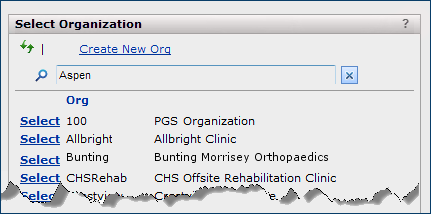
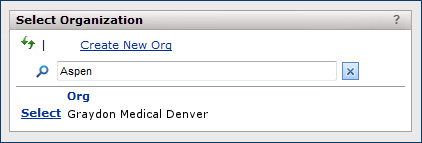
- Click the search icon
 to open the search box. (Figure 18). Enter the Tags value.
- Click Enter. The organization with the Tags value assigned appears, if found.
Figure 18 - Searching for an Organization Using Its Tags Value
- Enter tags characters in the Search box.
- Click Enter.
Copyright © 2023 by Premier Inc. All rights reserved.