Work with Shared Services Contracts
Version
Contents
Overview
The Shared Services Contract Workbench handles the creation and maintenance of services contracts. Typically, such services contracts contain multiple documents, and proceed through stages of construction, evaluation, and approval.
Similar to the Supply Contract Workbench, the Shared Services Contract Workbench lets you work with contracts.
- Contracts lists services contracts and lets you filter the list in various ways, including filtering by user-defined fields.
- Documents displays the results of a full text documents search
- Contracts Expiring lists services contracts expiring within specific time periods and provides a link to each services contract. A colored bar represents the size of the contract in dollars based on the estimated annual spend. Clicking the Excel icon
 in the upper right copies the list to a spreadsheet. The spreadsheet displays each contract and the associated time interval to expiration.
- Contracts for Review lists services contracts with review dates within specific time periods, and provides a link to each services contract.
- My Alerts displays alerts that have arrived.
Security
The role object "ServicesContract" controls access to this feature. To view the Shared Services Contract Workbench, minimum setting must be View. For details about the settings required for the activities within this menu, see Role objects associated with Sourcing and Contract Management .
Shared Services Contract Features
-
Analyzing services contract spend. (Details are in Shared services contracts spend analysis.)
-
Creating and editing of services contract headers and contract notes.
- Services contracts are assigned a type: physician, maintenance, consulting, lease, services, etc.
- The type is linked to a security level assigned to users who may work with the contract.
- A status flag can be set for each services contract: evaluation, active, inactive, terminated.
-
Uploading documents and emailing to and from services contracts.
- A Document Information panel provides quick links for editing, deleting, and viewing contract documents.
Document actions include check-out, undo check-out, and check-in functions.
For each contract, a document can be designated as "primary."
- A Correspondence panel lists emails associated with the contract, and lets you send emails to the contract.
-
Setting up approver groups and assigning them to services contract types.
- You can also assign individual users to a contract as approvers.
-
Setting up incentives for services contracts, and tracking incentives earned and payments.
-
Setting alerts and notifications for each services contract.
-
Different users can create different notifications for a single services contract.
- Alerts include "contract ready for review," "contract expiring,"
and "new contract to approve."
-
Other notifications include: Create Documents, Change Documents, and Delete Documents that belong to the services contract.
- Methods are selectable for each notification type: email or alert message.
-
Searching services contracts, vendors, and notes.
- Document version tracking.
Document versions include:
- Version number,
- Document file name,
- The name of the user who created or revised each document,
- The time when the document was revised.
- Creating user-defined fields which can be associated with services contracts.
- You can specify the order of user-defined fields, and flag any that should be used to filter the Services Contracts list.
- Auditing of services contract record changes.
- Deleting of services contracts.
Setup
Shared services contracts use vendor entities, rather than vendor locations. Vendors for services contracts must be registered; that is, each vendor location must be cross referenced to a vendor entity in the Product Index Layer. When you select a vendor for a services contract, if the vendor is not registered, you can create the registration.
When you register a vendor, you also assign a services category to the vendor. A list of services categories is available from Administration > Tables - Shared Services. You can edit the Categories table to add new categories. Appendix A displays part of the Categories table.
Vendors for services contracts whose spend you wish to analyze on the Shared Services Workbench must have their spend type set to Services. You can set a spend type when you register a vendor.
Security levels and services contract types must be defined before you can create services contracts. Initially, these tasks are handled when your system is implemented. However, you can create and maintain security levels and contract types from links on the menu Administration > Tables - Shared Services.
- Instructions for defining security levels and services contract types are in a subsequent section.
If your services contracts need approvals, you can designate approvers and set up approver groups.
User Profiles: For sites with 's Materials Management application, the user profile of the person creating a services contract must have the setting "User is buyer." For sites with Sourcing and Contract Management stand-alone, this setting is not required.
Shared Services Vendors
As outlined in the setup paragraphs, shared services contracts are assigned to vendor entities which are cross referenced ("registered") in the Product Index Layer to your vendor locations. When you register a services vendor, you select a service category and a spend type.
- The spend type "Services" makes spend for the contract available in the Services Workbench for analysis.
- The category is used to segment and study various kinds of services spend. Examples of vendor categories for which you might have services contracts are: Ambulance Services, Benefits Administration, Billing Services, Dietary Services, Document Destruction, Housekeeping, Interior Design, Linen Services, and many more. Appendix A displays part of the list available from the Administration menu.
Incentives
You can apply incentives to services contracts when necessary. Adding incentives and tracking incentive revenues is outlined in the online chapter "Setting Up and Working with Incentives."
Use the Services Contract Panels
- To open the Shared Services Contract Workbench, from the main Contents, click the Shared Services tab, then select Contract Workbench.
- The Workbench tabbed panels appear (Figure 1). If any services contracts exist, they are listed on the Services Contracts panel. Otherwise, the panel is blank.
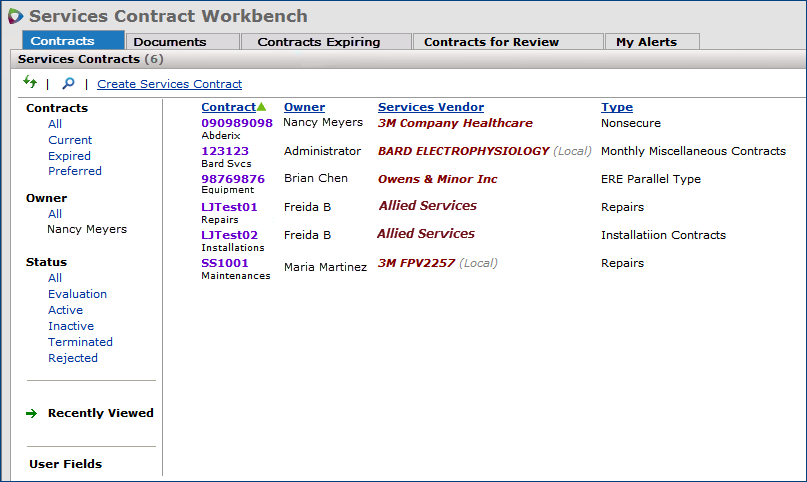
Figure 1 - Work with Services Contracts Page
The default open tab is the Contracts tab which displays Services Contracts list.
- Several links on the left side filter the list. You can click multiple links to refine list filtering (except for Recently Viewed).
- Contracts: All, Current, or Expired contracts.
- Owner: either your own contracts or All contracts.
- Status: the status of the contracts (Active, Evaluation, Inactive, or Terminated), Rejected, or All contracts.
- User Fields: user-defined field values that you have created. (See the subsequent discussion of this feature.)
- Recently Viewed: Lists contracts that you have looked at recently. (You cannot use other filters with Recently Viewed.)
- Panels:
- Documents opens the full-text document search. The document search must be enabled for a site. Contact the Help desk for details.
- Contracts Expiring lists services contracts expiring during different time periods.
- Contracts for Review displays services contracts that are due for review during different time periods.
- If a
services contract has a review date set, the contract is listed on this panel.
- My Alerts displays a list of alerts that have arrived. From this panel, you can set up system alerts for yourself, or for other users, and open and read detailed alert messages.
Searching the Services Contracts List Using the Search Icon 
You can use the search icon to locate contracts in the Services Contracts list.
- Click the search icon . The Search box opens.
- Enter characters in the Search box for the contract that you wish to locate.
- Click Enter.
The search routine looks in these fields to find the characters that you entered: Contract Number, Contract Name, Owner, Services Vendor, Type, and the Tags user-defined field.
If found, a list of contracts that contain the characters in the contract name, number, Owner, Services Vendor, Type, or tags field appears.
On a contract in the list, clicking the contract number opens the contract. Mousing over the contract name displays icons.
-
The new user note icon  lets you create a user note, if none exist.
-
The documents icon  lets you display all the documents created for a contract. Clicking the icon opens the list of documents.
- If the characters are not found, a message appears.
User Fields as Filters
For services contracts, you can create user defined fields and designate the fields as filters for the services contracts list. (Setup details are in Designating a User-Defined Field as Filter.)
On the Services Contracts list, the values of user-defined fields that you have set up as filters appear on the left under User Fields (Figure 1). Field values are listed under the field's name (Figure 1). If more field values exist than the space can accommodate, the link More appears.
- Click a user-defined field value to filter the contracts list by that value.
- If More appears, click it to display additional field values that you can select. Click Less to shrink the list of values.
Any user-defined filter works with the other filters on the Services Contract list, except for Recently Viewed. For example, in Figure 1,
clicking Contracts: Current and User Fields: Auto Renew: Y would display current contracts with the Auto Renew field set to "Y."
Note: This feature is currently available only for services contracts with the user-defined data type Field Values.
Other data types will be supported in future releases.
Create a Shared Services Contract
Either of two methods will get you started with creating services contracts.
Create a Services Contract Starting with an email Document
Sending an email to Shared Services is easy. The only prerequisite is that your own email address must be on your User Profile, so that the server recognizes it. See the discussion in User Profiles. The email address field is on the User Edit panel.
- Using your email utility -- for example, Microsoft Windows Outlook -- open a new email.
- Enter the address of the Services Contract Workbench in the To line (Figure 2).
- The address is: ServiceContracts@erp.premierinc.com.
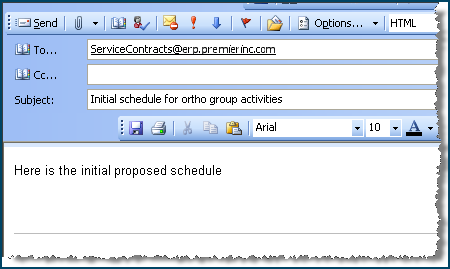
Figure 2 - Sending an Email to the Services Contract Workbench
- Enter a Subject line. This is important, so that you will recognize the email when it arrives.
- Enter the message. Include an attachment, if you wish.
- Send the email.
- The email arrives in the Shared Services application.
- Since the email does not yet have a contract associated with it -- you are going to create a contract -- the email appears on the Unknown Emails panel.
- On the Administration > Other menu, click Work with Unknown Emails (Figure 3).
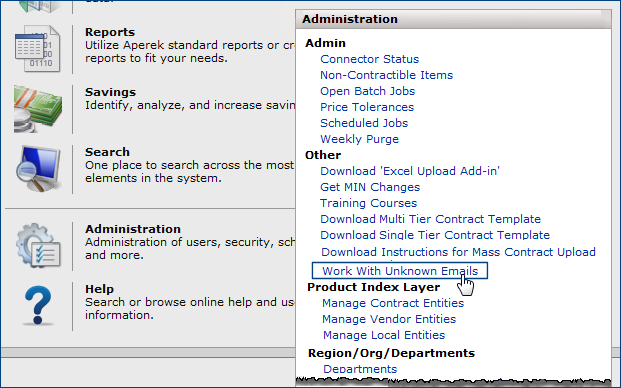
Figure 3 - Work With Unknown Emails
The list of Unknown Emails appears (Figure 4).
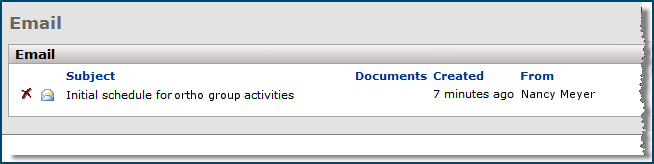
Figure 4 - The List of Unknown Emails
- Locate the email that you sent in the list.
- Click the email subject. An Actions panel appears with two options (Figure 5).
- Create Services Contract lets you create a new shared services contract. The email document is automatically included in the contract.
- Search the Service Contracts lets you identify an existing contract that the email should belong to.
- Click Create Services Contract (Figure 5).
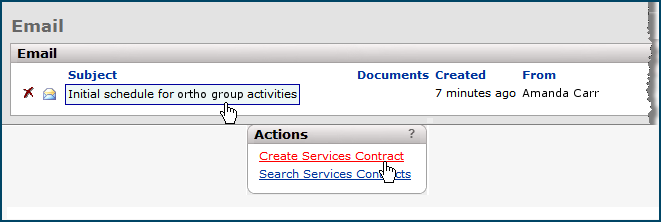
Figure 5 - Creating a Services Contract from an Email
The Select Contract Type panel appears.
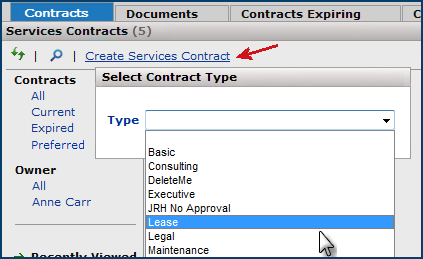
- Click the down arrow to select a services contract type (Figure 6). Types control security for services contracts and are set up in your administrative tables.
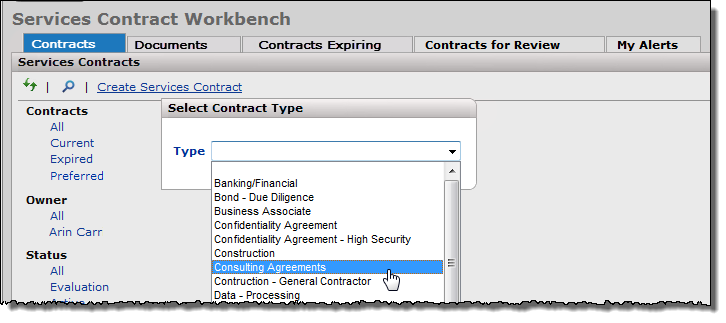
Figure 6 - Selecting a Type for a New Services Contract
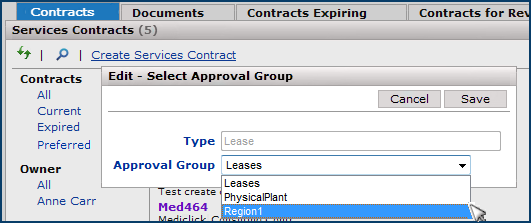
After you select a Type, if your site assigns approval groups to services contracts, the approval group panel appears (Figure 7).
You can accept the default approval group, if any appears, or select a different approval group.
If your site does not use approval groups (perhaps you assign approvers manually to services contracts), the panel does not appear.
- Select an approval group or accept the default.
- Click Save.
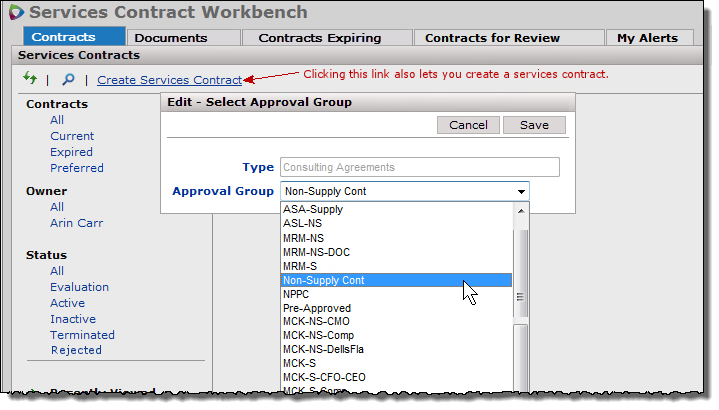
Figure 7 - The Select Approval Group Panel for a Services Contract
The Create Services Contract panel appears (Figure 8). A services contract header contains the contract name, number, services vendor entity, and other key information. The system populates the Type field with the values that you selected. You can change the Contract Owner field, but not the Type field.
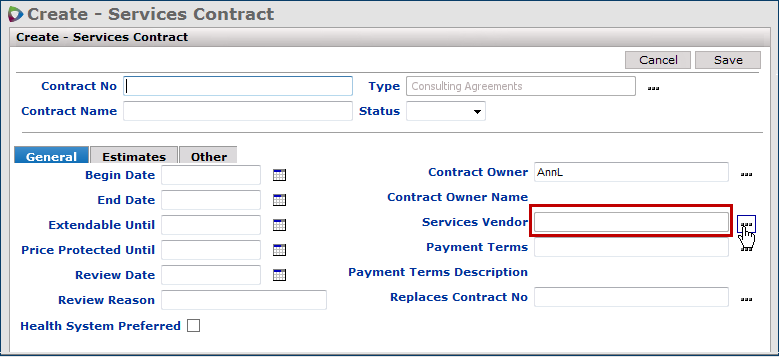
Figure 8 - Creating a Services Contract Header
- Next to the Services Vendor field, click the prompt to search for the vendor that you wish to assign to the contract.
- The Select Services Vendor panel (Figure 9) appears. The list may contain both registered and unregistered vendors.
- If the services vendor that you wish to assign to the contract does not appear, click the search icon (upper left) to look for the vendor, or page forward using the page numbers at the bottom to scan the vendors list.
Note: If you do not find the vendor, the vendor may not exist in your database at all -- registered or unregistered. In the Search, try a different combination of characters or a different name. You may need to confirm that the desired vendor actually exists if you are repeatedly unable to find the vendor.
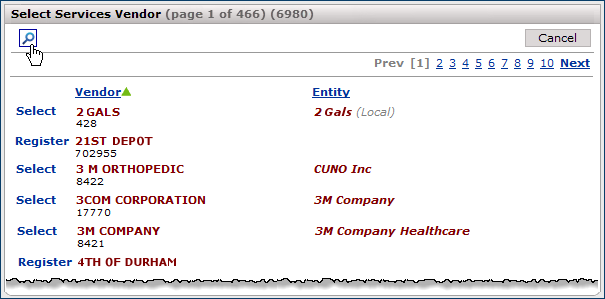
Figure 9 - The Services Vendor Select Panel
- If the vendor that you wish to assign is registered, the Select link appears next to the vendor. Click Select to select the vendor.
- If the vendor appears, but is unregistered, Register appears. Click Register to register and select the vendor.
- Follow the instructions below for registering the vendor. When you finish registering the vendor, the vendor is selected and the header panel Services Vendor field is populated with the vendor.
- Complete the other fields on the Services Contract header panel. Click the panel's Help button for field details.
Enter information in fields on the edit panel as needed.
- Fields marked with an asterisk (*) are required.
- The Contract Owner defaults to the current user. You can change the Contract Owner by clicking the ellipsis (...).
- Click Help if you need information about the contents of any field.
- Click Save periodically.
- When you are finished entering information, click Submit. The system creates the services contract and displays the Services Contract Workbench.
- Click Refresh.
- The contract information appears in the panel Services Contracts Last Viewed with the designation "New."
- When you initiate the creation of a services contract with an email, the email is automatically added to the contract.
- You can add more documents and emails to the contract.
Note: Service Contract Type vs. Services Vendor Category
- Services contract types are associated with security settings. For example, you may have some contract types that are only available to high-level executives.
- The services category is a description of the vendor service -- such as ambulance service, housekeeping, document destruction, etc. -- that is associated with the vendor entity, and used in analysis of spend. Appendix A lists some service categories. The administrator at your site can add, delete, and edit services categories as needed.
Create a Services Contract Starting with the Contract Header
You can create a services contract beginning with the header, as well as starting with an email. Once you create a services contract header, you can add email and documents to the contract.
To create a services contract starting with a header:
- From the Services Contract Workbench (Figure 7, red arrow, top) Services Contracts panel, select Create Services Contract.
- Follow the previous steps to select the services contract type, approval group, if used at your site).
To delete a services contract:
 Click the X on the Services Contract Info panel.
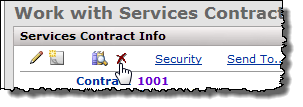
Note: To delete a services contract, you must have the role object Services Contract set to Delete.
Registering an Unregistered Services Contract Vendor
When you want to assign a vendor to a services contract, you can select and register a vendor that is currently unregistered.
- On the Select Services Vendor panel next to the vendor, click Register (Figure 10).
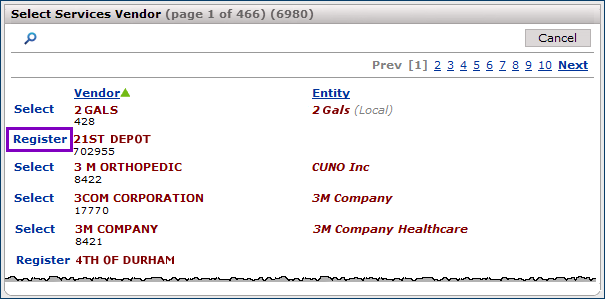
Figure 10 - Selecting an Unregistered Services Vendor
A panel displays entities from the Product Index Layer that may match the vendor (Figure 11). If none are found, the message "No entities found" appears.
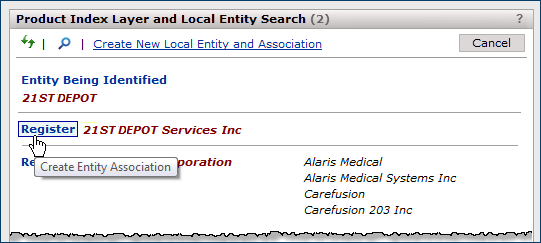
Figure 11 - Starting the Registration Process for an Unregistered Vendor
- Review the entities on the list. If none are a good match, you may need to click the search icon and search for a different part of the vendor name to find the correct matching entity, if one exists.
-
Keep in mind that the correct entity may name may be entirely different from the vendor.
- If your vendor is local, and no match exists on the list of entities, you can create the local entity yourself. See the instructions below.
- Click Register next to the entity that matches the vendor (Figure 11).
- A panel appears for you to fill in entity record information (Figure 12).
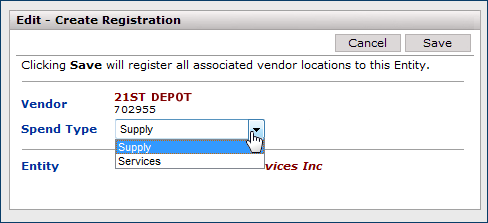
Figure 12 - Selecting the Vendor's Spend Type
- Select the Spend Type Services. When you select Services, the Category field appears (Figure 13).
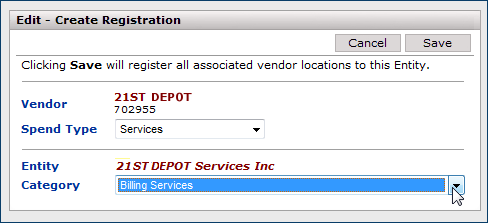
Figure 13 - Selecting a Category for a Services Vendor Entity
- Click the down arrow in the Category field and select a category. You must select a Category for a services vendor.
- Click Save. The vendor is registered and assigned to the services contract.
Registration for a Local Vendor and Local Entity
When your vendor is local, if there is no matching local entity, you can create one and register the vendor to it.
If there are no local entities listed
If none of the local entities listed on the Product Index Layer and Local Entity Search panel (Figure 14) match a local vendor, you can create a new local entity.
- Click Administration, and then Product Index Layer > Manage Vendor Entities.
- At the top of the page, click the Vendors panel.
- In the left navigation, under Status, click Unregistered.
- A list of unregistered vendors appears. Find the name of the vendor you wish to register.
- To the right of the record, click Register.
- The Product Index Layer and Local Entity Search panel appears.
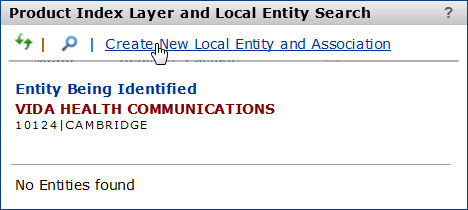
Figure 14 - The Product Index Layer and Local Entity Search Panel
- Click Create New Local Entity and Association (Figure 14).
- A suggested name appears in the Entity Name field. You can accept the name, or add another one.
- Click Save.
-
The Edit - Create Registration panel appears (Figure 15).
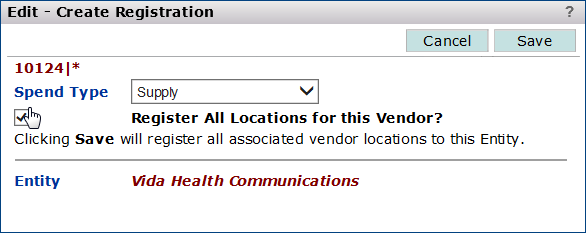
Figure 15 - The Edit - Create Registration Panel
- Select the correct Spend Type, and select the checkbox next to Register All Locations for this Vendor?
- Click Save.
- The
record is moved to the list of registered vendors. To check this, click Registered under Status. Then find your record.
If there are some local entities listed
If some of the local entities listed on the Product Index Layer and Local Entity Search panel (Figure 16) match a local vendor, you can register a local entity.
- Follow steps 1 - 4 from above.
-
The Product Index Layer and Local Entity Search panel appears.
- On the panel, look at the list of items under Entity Being Identified.
- Find the correct entity, and click Register.
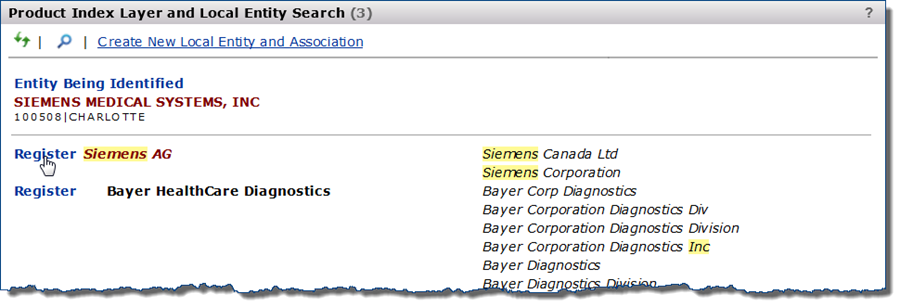
Figure 16 - The Product Index Layer and Local Entity Search Panel with Identified Entities
- The Edit - Create Registration panel appears. (Figure 17).
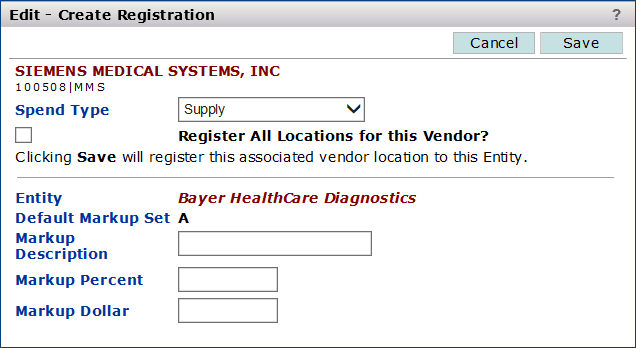
Figure 17 - Creating a Vendor Entity and Registering a Vendor
- Enter data in the fields on the panel as described below:
- In the Spend Type field, click the down arrow and select Services. (When you select Services, the Category field appears at the bottom of the panel.)
- You can enter a Markup Description or text such as "No Markup" or "N/A" if no markup applies.
- You can also enter a Markup Percent and/or a Markup Dollar amount. You can enter zeros if you wish.
Note: If you enter both a percent markup and a markup dollar amount, the system applies the percent markup first, then the dollar markup.
- Select a services Category.
- Table 1 shows the fields on the panel.
- Click Save.
- The vendor is registered to the local entity and appears on the services contract Services Vendor field.
Table 1 - Fields on the Vendor Create Registration Panel
| Vendor |
The name of the vendor that you are registering to the entity. |
| Spend Type |
Select the spend type.
- Supply: The vendor's spend appears on the supply Analysis Workbench. This value is the default.
- Services: The vendor's spend appears on the Services Analysis Workbench. Also, when you check this box,
the field Category appears at the bottom of the panel. |
| Entity |
The local entity that you wish to register the vendor to. |
| Default Markup Set |
The letter identifier for the default markup values used by the vendor.
A group of markup values -- a markup percent and/or dollar amount -- is a markup set.
Once the vendor is registered, you can edit the vendor registration record and add other markup sets.
The initial markup set is designated "A." Other markup sets that you create are assigned successive letters.
Unless at least the initial "A" markup set has been defined for a vendor entity,
you cannot activate item prices on contracts for the vendor. |
| Markup Description |
A description of the markup set. |
| Markup Percent |
The percent markup to be applied to manufacturer prices for the vendor.
You can enter only this value, or a markup dollar amount also. If no markup applies to the vendor, enter zero.
- Note: If the you enter both a percent markup and a markup dollar amount, the system applies the percent markup first,
then the dollar markup.
|
| Markup Dollar |
The dollar amount of markup to be applied to manufacturer prices.
- You can enter only this value, or a markup percent.
- You can also enter both a percent and a dollar amount.
- You can enter zero in this field.
|
| Category |
This field appears when you select the Spend Type "services." Categories are descriptors assigned to services vendors.
The Category can be used to focus on a particular kind of spend when you work with services spend analysis.
A table of services vendor Categories is created for your site. Click the down arrow to select the appropriate Category for the vendor.
- Note: If you change the Category of a services vendor (which you can do by editing the vendor registration record),
the change is processed in a nightly job, and not available until the next day.
|
Opening a Services Contract That You Have Created
- On the Services Contract Workbench, use the views and/or user fields to locate the contract on the Contracts list (Figure 1).
- Click the Contract Number.
The "Work with Services Contract" page appears. The page has several panels.
Figure 18 is the "Work with Services Contract" page for a newly created services contract, before any documents are uploaded.
- The Documents tabbed panel displays documents that belong to the services contract (once documents are added).
- The Correspondence tabbed panel displays email messages that have been sent to the contract, and lets you email new messages to the contract.
- The User Fields tabbed panel displays user fields established for Services Contracts.
- The Approval Users panel lets you assign approvers to the contract; or, if an approval group has been set up for the contract type, the approval group members
are listed.
- On the Correspondence panel, add an email and an attachment to the services contract, view and set alerts, and more.
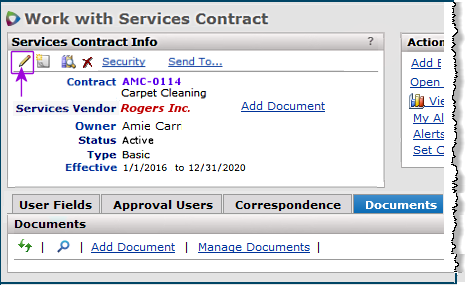
Figure 18 - The "Work with Services Contract" Page
To edit a services contract header,
Click the edit icon  in the Services Contract Info panel (Figure 18, purple arrow on top left). The Edit - Services Contract panel will display. (See Figure 19 below.)
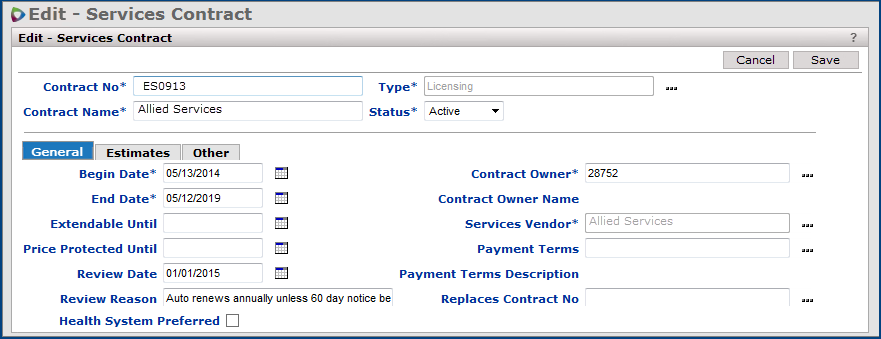
Figure 19 - Edit - Services Contract
If you are working with an expiring contract that is being replaced, you may go to the Other tab and enter the number of the contract that replaces the expiring contract. (See Figure 19A.)

Figure 19A - Replaced By Contract No
Completing this field will remove the contract from the Expiring Contracts list (main Contents > Shared Services tab > Contract Workbench > Contracts Expiring tab).
You can also remove a contract from the Expiring Contracts list by going directly to the list and clicking the contract number to activate the Work with Services Contract panel.
On the Actions panel, select the Set as Replaced link. (See Figure 19B below.) On the popup that appears, click Submit.
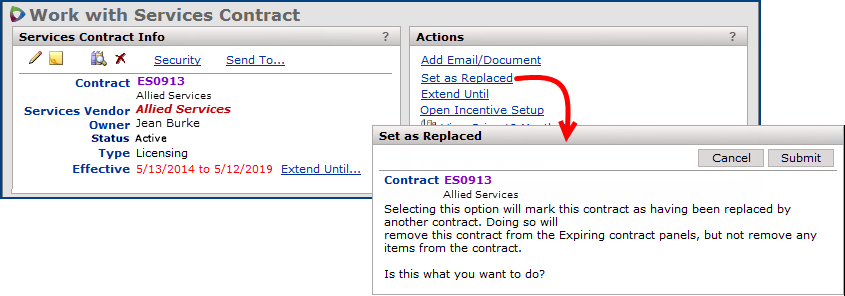
Figure 19B - Set as Replaced
View and Enter Data in User-Defined Fields
On the "Work with Services Contract" page,
- Click the User Fields tab to display the user-defined fields -- and their values -- that have been defined for Services Contracts (Figure 20).
- Click the edit icon at the top of the User Fields panel to enter/change/delete values in the user-defined fields.
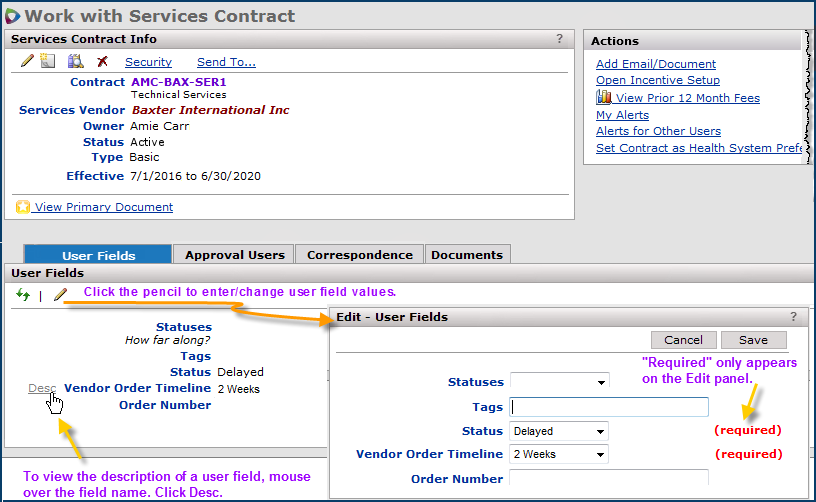
Figure 20 - "Work with Services Contract" Page
When you create user-defined fields, you can specify the order in which the fields appear. Also, for Services Contracts, you can flag user-defined fields as filters on the Services Contracts list (Figure 1). See Work with User-Defined Fields for details.
Add Documents and Emails to a Services Contract
The Documents tabbed panel lets you upload documents of different types. This panel lists documents associated with a services contract and makes them available for you to read, revise, and save/delete. Sourcing and Contract Management keeps a revision history and previous versions of documents. This feature works the same way for supply contracts, projects, and services contracts.
For a services contract, the Documents tabbed panel is located on the "Work with Services Contract" page.
To be able to work with documents attached to a services contract, the role object "ServicesDocuments" in your user role must have the appropriate setting. If the setting is None, you will not be able to use Documents. For details on user security, see Administration &
Security in Sourcing and Contract Management. Managing user security requires Administrator privileges.
The following document types can be added:
- Microsoft Word (DOC)
- Microsoft Excel (XLS)
- Microsoft Power Point (PPT)
- Adobe Acrobat (PDF)
- Image documents (JPG, PNG)
- HTML documents (HTM, HTML)
Add a Document to a Services Contract
Use the Documents panel to upload documents to a services contract, and to work with documents that you have attached to a services contract. The following discussion explains the basic process of uploading and opening documents. You will notice that the panels for uploading and displaying documents have several options...these are addressed in the Document Management topic. This section just describes the basics of getting a document associated with a contract.
You may wish to explore the other capabilities of the Documents feature. For example, you can use a full-text search to find information in a project's documents. You can create groups for documents and sort documents by the groups to which they are assigned. You can assign a Status value to documents. See the discussion in the Documents topic.
For the first document that you upload, the Documents panel is empty. Newly uploaded documents are flagged as New. You can display, edit, or delete uploaded documents. You can also upload revisions to documents.
Searching a Services Contract's Documents
The "Work with Services Contract" Documents panel has a full text search of listed documents for the services contract.
- To find any document that contains specific characters, click the search icon, and enter the characters in the search box.
- Click Enter.
Documents containing the characters appear in the list (if any exist).
To add a document to a services contract:
- On the "Work with Services Contract" page, in the Documents panel, click "Add Document." (Figure 21).
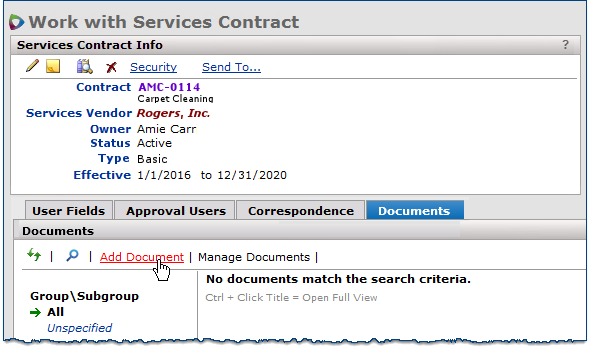
Figure 21 - Adding a Document to a Services Contract
The Add Documents panel appears (Figure 22).
- Enter a name in the Title field.
- The name will be displayed on the Documents list when the document is uploaded.
- You can also optionally assign a Group and SubGroup (Unspecified is the default), a Status, and a Source. (These values can also be assigned after you upload the document.)
- Click Browse.
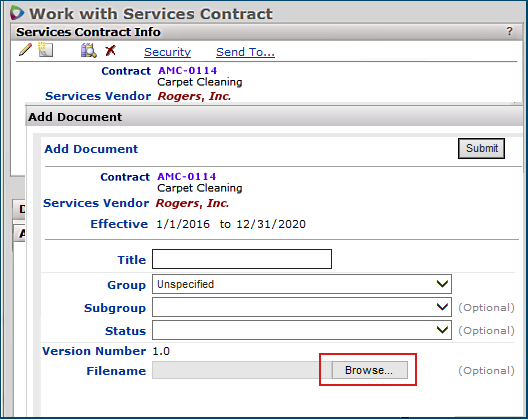
Figure 22 - Identify the Document to Be Added
The Microsoft Windows Choose File panel appears (Figure 23).
- Locate and select the file for the document that you wish to upload and add to the contract.
- When you select the file, Windows populates the File name: field.
- Click Open.
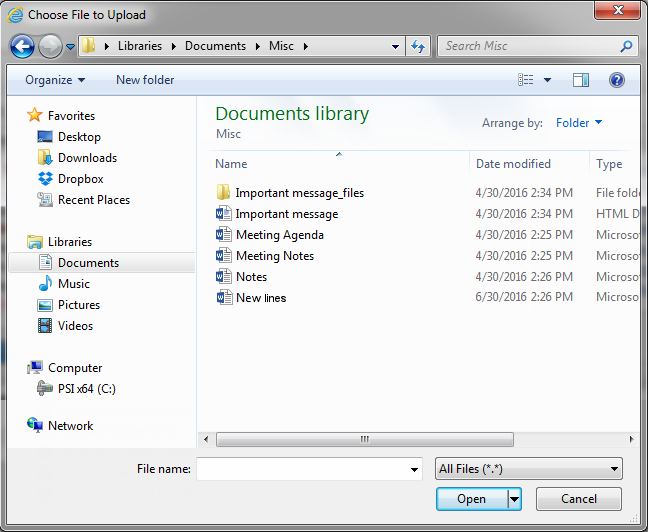
Figure 23 - Select the Document to Be Added
The document path and file name appear in the Filename field on the Add Document panel.
- Click Submit. .
A message tells you that the document is uploaded.
- Click outside of the message area to close the message.
- Click the refresh icon
 on the Documents panel.
- The document appears on the Documents panel for the contract (Figure 24).
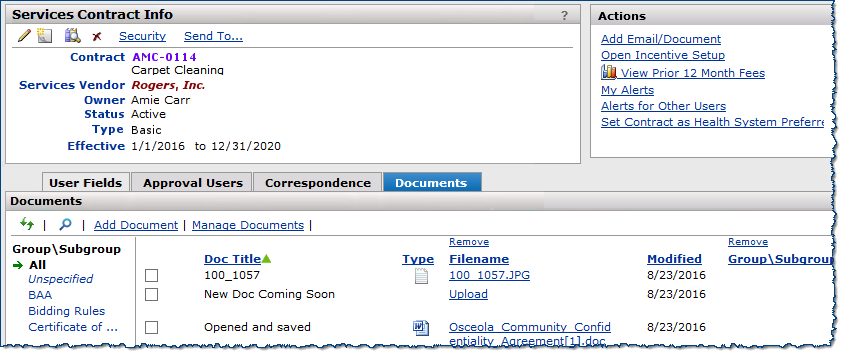
Figure 24 - Document Added to Contract
You can upload another document by clicking Add Document, and by following the steps above.
For new documents, you can alternately create a placeholder name for a document and upload the content later. Also, you can upload revisions to documents that already exist.
To create a document placeholder name and upload content later:
- In Step 2 above, enter only a document Title. Leave the Filename path field blank.
- Click Submit (instead of clicking Browse). See Figure 25.
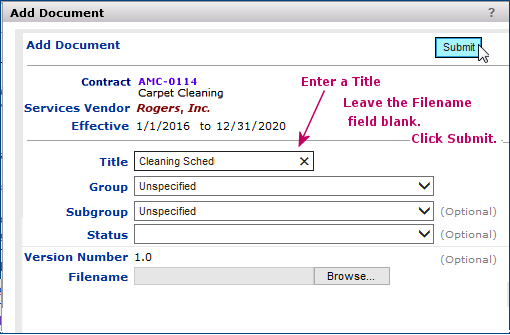
Figure 25 - Creating a Document for Later Upload
A message appears. Figure 26 is the message when the document placeholder was created successfully.
- Click in an area outside the message and the message disappears.
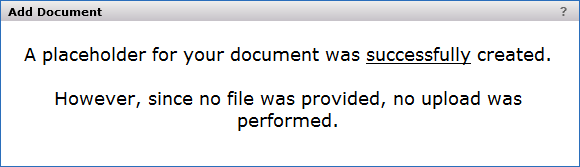
Figure 26 - Upload Message
- Click the refresh icon on the Documents panel.
- The document title appears on the Documents panel. An Upload link is in the Filename column.
To upload new content for a document placeholder name:
- Locate the name of the document on the Documents panel.
- Click Upload
- The Upload Document panel (Figure 22) appears.
- Click Browse to locate and select the file on your local drive that you wish to upload.
- Click Submit.
- Click the refresh icon on the Documents panel. The document appears with the completed type and filename information.
Email a Document to a Services Contract
You can send an email with or without attachments from within the "Work with Services Contract" page.
- On the "Work with Services Contract" Correspondence panel, click the email icon
 (Figure 27).
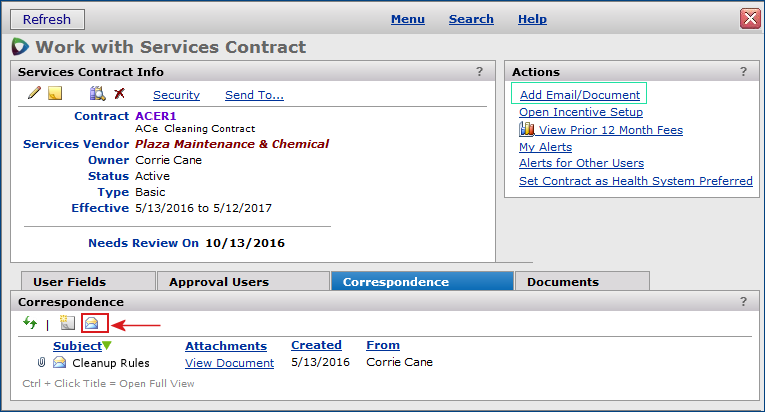
Figure 27 - Adding an Email to a Services Contract from the Contract's Actions Panel
A blank email message appears.
- Compose the message and add an attachment if you wish (Figure 28).
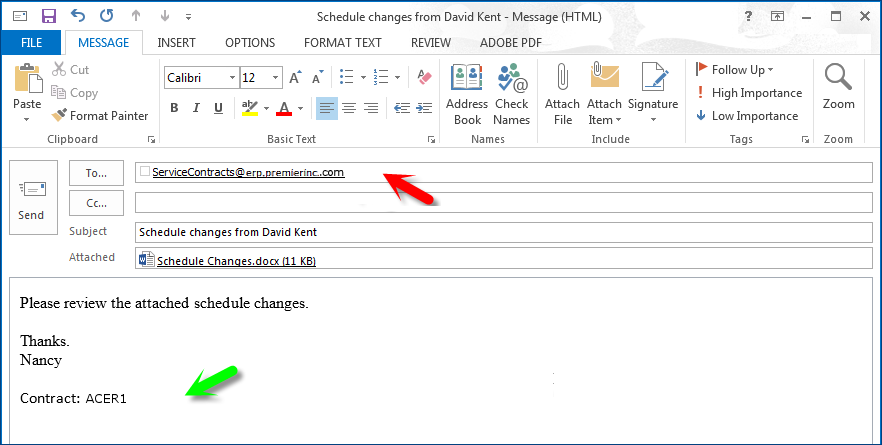
Figure 28 - An Email Message for a Services Contract
- The email To field (Figure 28, red arrow) contains the email address for your Sourcing and Contract Management Services Contract module. The services contract number appears in the body of the email message (Figure 28, green arrow).
Note: You can also add an email document from the link Add EMail/Document on the Actions panel (Figure 27, green box).
In the body of the email, enter the message that you wish to add to the services contract. Add information ahead of the contract number, so that "Contract: contract number" is the last element in the message space.
Note: If you send the email without a contract number in the message space, the email is routed to the Services Contract's Unknown Emails panel. From there, you can associate it with any contract.
- Send the email.
When the email arrives in Sourcing and Contract Management, it is listed on the Correspondence panel for the contract. Any attachments are also listed on the Documents panel. You can view the message and its attachment (if any).
- On the Documents panel, to view an attachment to an email, click the Filename. To view the email itself, click View Email.
- On the Correspondence panel, to view an attachment to an email, click View Document in the Attachments column. To view the email itself, click the text in the Subject column.
Sending an Email Summary to Users From a Services Contract
From within a Services Contract, you can send users an email summary of the contract header. The email contains the Contract Number, Contract Name, Services Vendor, and Effective Dates.
- On the Services Contract Info panel, click Send To...
The system displays a list of all users with email addresses (Figure 29). You can select one or several users to receive the email message, or you can send the email header to yourself.
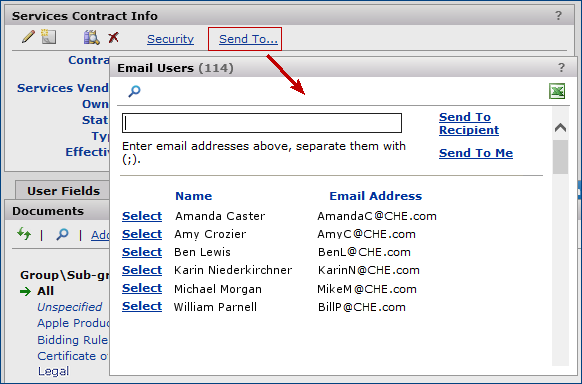
Figure 29 - Select an Email Recipient
- Click Select next to the user, or users that you wish to send the email to.
- This system displays the email recipients' addresses in the text box next to Send To Recipient.
- Click Send To Recipient.
- To send email to yourself, click Send to Me.
- The email header appears in the users email inbox. The user can forward the email back to the contract, including any message or attachment.
Note: Users with the role object "ServicesContract" set to View or None cannot access services contract email, nor send email to a services contract. Emails are rejected with the message that the user does not have authority to add documents. See User Security for details on role objects.
Work with Document Versions
You can check documents out of a Services Contract for review or for editing.
When you check out a document, it is locked so that no one else can simultaneously change it. Checking the document back in makes it available again for others to edit.
Internet Explorer option settings for downloading files
- You must have the Internet Explorer option "File download" set to Enable if you wish to upload and download documents. This setting for this option is required.
- Another option "Automatic prompting for file downloads" has settings that determine how you do uploads and downloads. If your site requires this option set to Disable, you get a message on the Information Bar that Internet Explorer has not downloaded a file because of security.
In this case, to proceed with downloading an Sourcing and Contract Management Documents file:
-
Click the Information Bar message, and OK the download.
-
Then, on the Documents panel, click the filename again.
This time, the standard Windows panel appears, and you can proceed to download the file.
You can set the Internet Explorer option "Automatic prompting for file downloads" to Enable -- if this setting is consistent with your site's security policy -- to avoid getting the Information Bar message. You may wish to consult your IT staff about Internet Explorer security settings.
Check In/Check Out
To check a document out for editing:
- Click the Title (Figure 24).
- The system displays the Document Information panel (Figure 30).
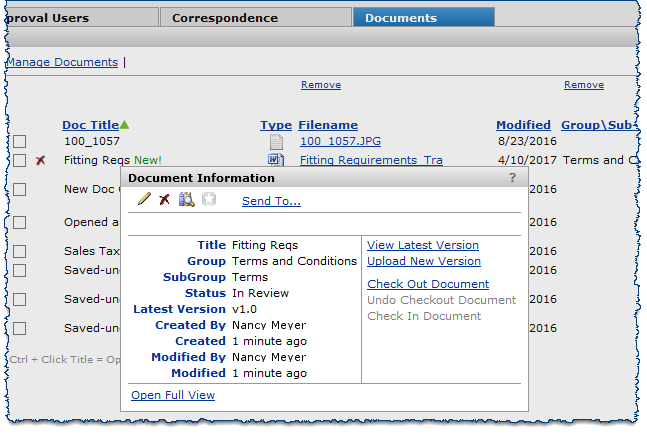
Figure 30 - The Document Info Panel
- On the Document Information panel, click Check Out Document.
- The Microsoft Windows Download panel appears.
- If you change your mind and do not wish to check out the document, click Cancel. The panel disappears.
- Click Open.
- The document appears.
- Change the document as needed.
- When you are finished editing the document, click File > Save As to save the document back to the local system file. When you check the document back in, you identify the location of the saved document, and the changes are uploaded to Sourcing and Contract Management.
Important Notes about saving checked out documents:
When you edit a document, and wish to save your changes, you must select Save As and save the document back to your local network.
- You must use Save As.
Using Save alone will not save the changes.
To check a changed document back in:
-
On the Documents panel, click the document Title.
- The system displays the Document Information panel (Figure 30). (However, for checking in a document, Check In Document is active; Check Out Document is grayed out.)
- Click Check In Document.
- The Check In panel appears.
On the Check In panel:
- At the right of the Document field, click Browse to locate and select the path and file name of the document.
- Assign a version number to the document from the Check In As field.
You can assign one of the following:
- The current version number.
- The next highest minor version number. A minor version number is the decimal portion of the number; e.g., 1.2, 1.3, etc.
- The next highest major version number. For example, if the current version is 1.4, you can assign 2.0 to the document.
- Click Submit.
To check an unchanged document back in:
- On the Documents panel, click the document Title.
- The system displays the Document Information panel (Figure 30).
- Click Undo Checkout Document.
View Document Versions
You can view revisions to a document that you or others have made.
- On the "Work with Documents" page,
the Revisions panel (Figure 31) lists each version of the document, if any revisions have been made.
- If no revisions have been made, version 1.0 of the document -- the original upload -- appears.
To open and view the content of any document version:
- On the Documents panel (Figure 24), click the document Doc Title.
- The Document Information panel appears (Figure 30).
- Click Open Full View in the lower left of the
Document Information panel.
- The "Work with Document" page appears.
- In the Revisions panel (Figure 31), click the document Filename next to the Version number.
- The File Download panel appears.
- Click Open to open the file.
- To view the latest version, on the Actions panel, click View Latest Version.
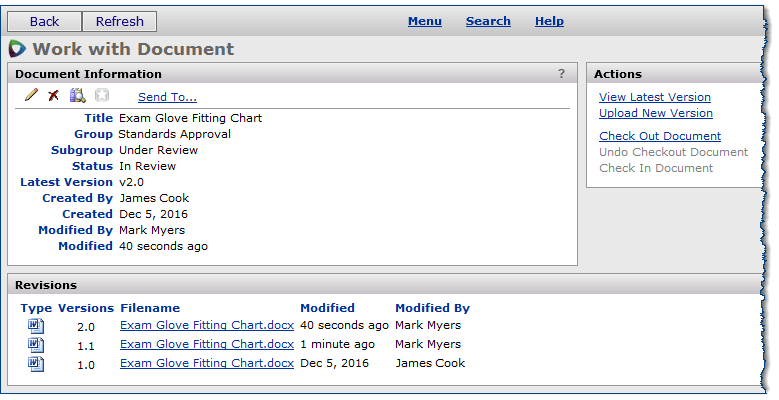
Figure 31 - Services Contract Revisions Panel for Document Versions
Full-Text Search of All Services Contracts Documents
Full text search finds documents that contain search characters that you enter.
- You can do a full-text search the documents associated with a single services contract on the "Work with Services Contract" page Documents tabbed panel.
- Click the Search icon .
- You can also perform a full text search through documents associated with all services contracts. The overall search finds documents' and also displays the documents' associate contracts.
- On the "Services Contract Workbench," click the search icon on the Documents panel.
The panel also displays the filter Recently Viewed. After you perform a search, clicking Recently Viewed returns to the list of documents that you looked at recently.
Figure 34 is an example of a full-text search and results for the characters "meeting."
Important: This feature must be enabled at your site for you to use it. Contact the Help desk for further information.
The full-text search applies to stored files in popular formats; e.g.,
- Microsoft Word (.doc)
- Excel (.xls)
- Powerpoint (.ppt)
- Web pages (.htm/.html)
- Adobe Acrobat (.pdf)
- Text files (.txt)
- Email messages (.msg)
- Other types of document formats
Note: Adobe Acrobat .pdf files must be OCR enabled for the full-text search to work with them. In other words, when a file is created, the optical character recognition (OCR) option must be set with Adobe Acrobat for the file. You can tell if a .pdf file is OCR enabled because the Acrobat Reader lets you search for text in the file, and you can highlight areas.
To use the full-text search of all services contracts' documents:
- From the "Services Contract Workbench" page, click the Documents tab.
- A blank search panel appears with a Search box at the top.
- Click the search icon .
- Enter characters in the Search box.
Note: If you enter two sets of characters with a space between, the search looks for documents that contain both the first set and the second set of characters.
-
For example, if you enter "cling wrap," the search returns documents that contain both "cling" and "wrap."
- Click Enter or click the search icon.
If the characters that you entered exist in any Services Contracts' documents, the search results panel appears with a list of the documents, their owners, the associated contracts, and so on (Figure 32).
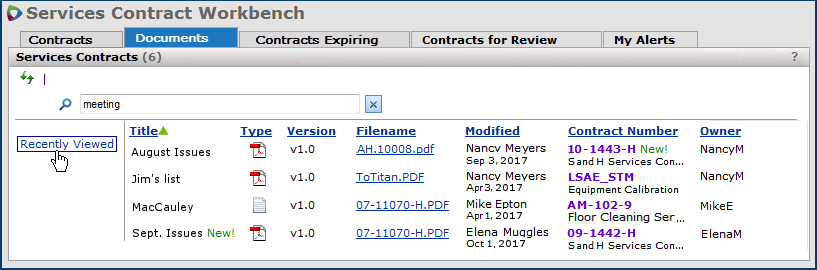
Figure 32 - Results of a Full-Text Search on Documents in Services Contracts
On the search results,
- To view document information, click the document Doc Title. The Document Info overview panel appears. From the panel, you can open the latest version of the document. You can also open a full view of the "Work with Document" page to display and read versions of the document.
- To open the document, click the Filename.
- To open the contract associated with the document, click the Contract number.
Note: If your site is not set up for this feature, the full-text search is not available. An error message appears when you enter a value in the search box and click Enter.
Services Contract Alerts and Notifications
Sourcing and Contract Management provides alerts and notifications of several types:
- You can set contract notifications for a contract for yourself. Click My Alerts on the "Work with Services Contract" Actions panel.
- You can set contract alerts for other users. Click Alerts for Other Users on the "Work with Services Contract" Actions panel.
- On the Services Contract Workbench My Alerts panel, you can set system alerts for yourself or other users.
- System alerts are associated with events that affect any contracts in Sourcing and Contract Management. For example, a system alert can let you know when a services contract needs approval.
-
You must have a valid email address to set up system alerts. If Sourcing and Contract Management does not have an email address recorded with your User ID, a prompt appears for you to enter your email address.
Security
Setting up alerts for other users is governed by the CAAlerts role object as follows:
Users with Alerts panel:
- Add User – CAAlerts/Create
- Edit Link – CAAlerts/Modify
- Delete Link – CAAlerts/All
Select User panel:
- Create User – Administration/Create (This selection adds new users to the database.)
To set up contract alerts for yourself:
- At the top of the screen, click the My Alerts panel.
- The alert configuration panel appears, and contains pre-defined events for which you can set alerts.
- For each event, select the type of notification that you would like when the event occurs.
- Select email for an email message.
- Select Alert for an alert to appear on the My Alerts panel.
- You can select both.
- The events include when a contract is expiring within a particular time period.
- Select the time period when the contract will expire. In...
0 - 30 days
31 - 60 days
61 - 90 days
91 - 120 days
121 - 180 days
- When contract or contract price is due for review during a particular week, an alert appears when the week arrives.
- Select:
This Week
- When a contract document is created, changed, or deleted.
- Select one of the following:
Any Document Changes
Any Document Created
Any Document Deleted
- Other events may also be available from time to time.
- Click Save.
To set up contract alerts for another user:
- Click a contract on the Service Contract Workbench.
- In the Actions panel on the right-hand side of the screen, click Alerts for Other Users.
- The Services Contracts - Users with Alerts panel appears (Figure 33).
- You can set up alerts for multiple users, but you must designate the users one at a time.
- Click Add User.
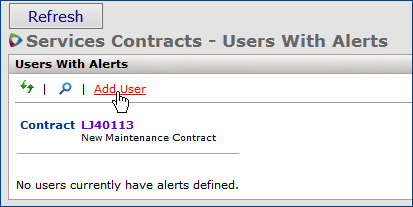
Figure 33 - Setting Up a Contract Alert for Another User
A panel appears for you to locate and select the user.
- In the Search box, enter characters from the user's name.
- Click Enter. A list of users appears for selection (Figure 34).
- Select the user.
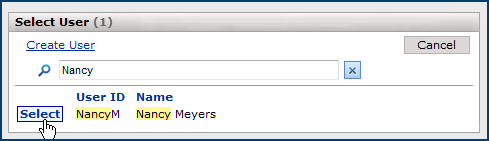
Figure 34 - Selecting a User for a Contract Alert
When you click Select, the standard alerts panel is displayed. Click ? on the panel for details.
- Select the alert(s) and alert type for the user. In Figure 35 Contracts for Review: This Week is being selected.
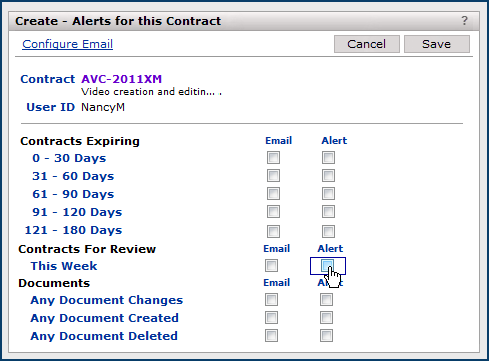
Figure 35 - Selecting an Alert and Alert Type
- Click Save. The alert has been created for the user.
- Click Refresh. The user appears on the Users with Alerts panel (Figure 36).
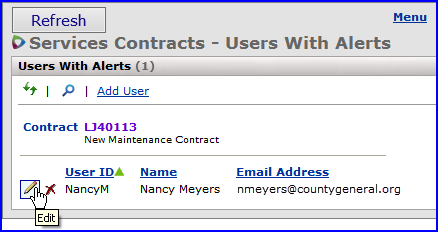
Figure 36 - Users with Alerts Set for A Contract
- You can add additional alerts for the user, or remove alerts. Mouse over the user's name and click the edit icon .
- To add alerts for another user, repeat steps 3 to 8.
To set up system alerts, on the My Alerts panel for yourself:
- Click Configure My System Alerts.
- The alert configuration panel appears, and contains pre-defined system events for which you can set alerts.
- Select the type of notification that you would like when an event in the list occurs.
- Select email for an email message.
- Select Alert for an alert to appear on the My Alerts panel.
- You can select both.
- Events include:
- Approvals
New Contract to Approve
Contract Expiring in
0 - 30 days
31 - 60 days
61 - 90 days
91 - 120 days
121-180 days
- Contracts for Review
This Week
- Click Save.
To set up system alerts for another user:
- From them main Contents, click the Shared Services tab > Contract Workbench.
- Click the My Alerts tab. A list of alerts appears if any have arrived.
- At the top of the list on the right, click Configure System Alerts for Other Users.
- Follow the previous instructions from step 3 for setting up an alert for another user.
Shared Services Contract Security
Services contract security has several components:
- The user's role, specified in the User Profile.
- The organizations, regions, departments, and asset locations whose data the user may access, specified in the user's data profile.
- The user's security level.
- A security level is identified in each user profile.
- The services contract Type.
A services contract is assigned an initial Type, which is associated with a user security level.
-
The security level for the Type is the minimum level for the contract. Users whose security levels are lower cannot work with the contract, or even see it on a list.
- The security level of the contract can be changed to raise the level above the minimum level. The user who makes the change must have a security level higher than the contract Type's security level.
- In addition to data profile settings, access to a contract can be further restricted by organizations, regions, and departments on the services contract itself. At this level of security, only users in a security-designated organization, region, or department can access the contract. Other users do not even see the contract in lists, and cannot drill-down to the contract from other areas, such as from a supplier.
User Security
The Administration table of contents provides the tools for user administration at your site.
In particular, the User Settings panels allow you to define new users and give them access to the areas in which they will work.
To set up a user at your site, you need to enter identifying information for the user into the system.
This information establishes a user profile and includes the user's name,
ID, password, email address, etc. When you create a new
user profile for a staff member, you assign the user a role, a data profile, and a security level.
Roles
A role specifies application areas
-- called role objects -- that users assigned to the role may work with.
For example, the Contract Manager role includes the CATables role object, which lets the contract manager add, change, and delete information from contracts tables such as the Services Vendor database table.
Roles determine the system features and functions that a user can access, and the level of access.
Each role object has a setting. The settings are:
- All - Users can exercise the feature to delete, create, modify, or view data.
- Create - Users can view, modify, or create data (but not delete data) in exercising the feature.
- Modify - Users can exercise the feature to change data.
- View - Users in the role can exercise the feature to view data, but not change the data in any way.
- None - Users have no access to feature or function.
Figure 37 displays a list of role objects relevant to Sourcing and Contract Management.
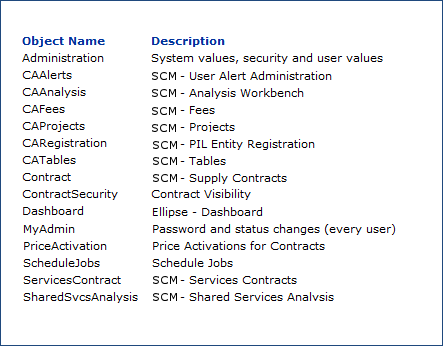
Figure 37 - Role Objects Relevant to Sourcing and Contract Management
Role objects that apply to Services Contracts, in particular, are:
- CATables - Allows access to tables containing contracts components: region, organization, vendor, and others. This role object must be set to Modify, at a minimum, for a user to be able to change table data; for example, to create a region/organization association.
- CAFees - Lets you associate incentives with services contracts and monitor incentive revenue.
- CAAlerts - Allows you to set up alerts for other users.
- CARegistration - Lets you register vendors, and assign each a category and a spend type.
- ContractSecurity - Allows contract owners to restrict access to a contract for other users based on organization, region, and/or department.
Data Profiles
Each user profile also has a data
profile associated with it. Data profiles identify the data that users can access. A data profile specifies the regions and organizations whose data the user can work with. For Materials Management users, data profiles also specify the asset locations and departments whose information each user can access.
User security is outlined in detail in the document Administration and Security Settings in Sourcing and Contract Management.
Security Levels and Contract Types
The Administration menu also provides access to security levels and services contract types. Initially, these values may be set up by your Sourcing and Contract Management implementation team. The following paragraphs illustrate the location of records for security levels and types.
Notes:
- The "CATables" role object controls permission to access and change Sourcing and Contract Management tables. This role object must be set minimally to Modify for you to access and edit Administration Tables.
- To maintain overall contract security (create security levels and contract types), you must have the role object "Administration" minimally set to Modify.
- To be able to change contract visibility for a set of users for a particular contract, you must have the "ContractSecurity" role object set minimally to Modify.
See the discussion of User Security.
Security Levels
Security levels are established for each site. Security levels are associated with each contract type that you define.
To access the Security Levels table:
The role objects "Administration" and "CATables" must be included in the role assigned to you and set to Modify or higher. Unless these role objects are set to at least View, you will not be able to see the Shared Services Tables menu.
- From the main Contents, on the Shared Services panel, click Administration.
- Click User/Security Settings > Security Levels (Figure 38, blue arrow).
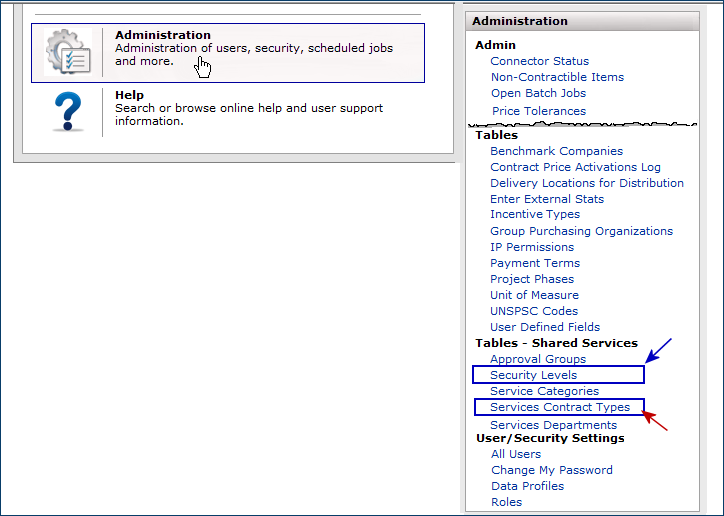
Figure 38 - Administration Tables for Shared Services Contracts
The Security Levels panel appears (Figure 39).
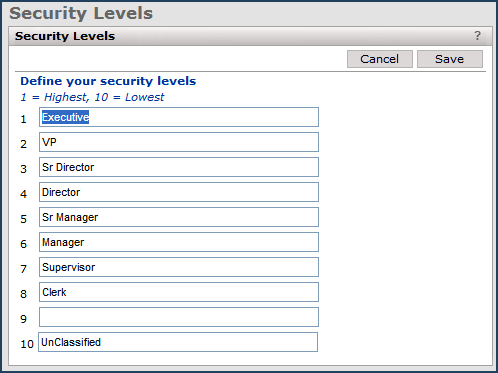
Figure 39 - Security Levels for Services Contracts
On the Security Levels panel, you can define, edit, and delete security levels. Fields on the panel can be left blank if your site needs less than ten levels.
- Click Back or close the window tab if you do not need to make changes.
- Otherwise, edit or enter security level descriptions, as needed.
- Click Save to save any changes.
Services Contract Types
Once your services contract security levels are established, you can create services contract types and associate each type with a security level. When a services contract is created, the contract owner selects the contract type. The type determines the minimal security level for the contract.
The role objects "Administration" and "CATables" must be included in the role assigned to you and set to Modify or higher. Unless these role objects are set to at least View, you will not be able to see the Shared Services Tables menu or work with services contract types.
To associate security levels with services contract types:
- From the contents on the Shared Services panel, click Administration.
- Click Tables - Shared Services > Services Contract Types (Figure 38, red arrow).
The Contract Types panel appears (Figure 40).
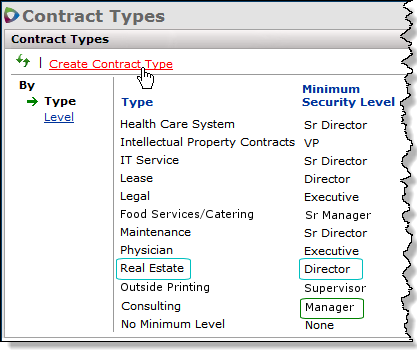
Figure 40 - Examples of Services Contract Types and Associated Security Levels
The Contract Types panel lists contract types defined for your site. Each type is associated with a security level.
For example, contracts with the type Real Estate (Figure 40) require the minimal security level Director.
When Real Estate is the specified type for a contract, not only the Director, but levels above Director -- Sr. Director, VP, and Executive -- can also access the contract.
Levels below Director cannot access the contract. (Refer back to Figure 39 to see the levels.) A user with the Manager security level could not view a
Real Estate contract because Manager is lower than the minimal level (Director) associated with the contract type (Figure 40).
Notice that you can filter the panel by type or by security level.
- If you need to create another contract type, click Create Contract Type (Figure 40).
- A panel appears for entering the name of the new contract type, and assigning it a security level.
- Enter the Minimum Security Level for the type, and the Type name.
- Click Save.
A contract Type may be edited as follows:
- Mouse over the Type, e.g., Basic. The icons appear.
- Click the edit icon .
If the Minimum Security Level for a contract type is changed, the new security level will automatically be applied to all contracts of that type that are set to a lower minimum security level. To change all contracts of that type, check the box for Override Contract Security Level that appears when you select a higher security level.
A warning message will appear, alerting you that the change will affect all contracts of that type, even those that were previously set to a higher level. (See Figure 41.)
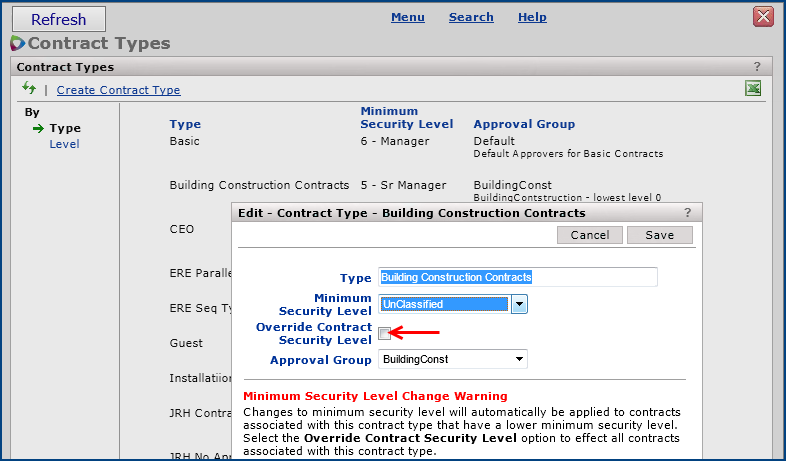
Figure 41 - Override Contract Security Level
User Profile Settings for Services Contract Security
A user's ability to perform various activities with the system is determined by the Role assigned to the user on the User Profile.
Access to organizational data is secured by a user's data profile. The use of roles and data profiles is outlined in detail in the document Administration and Security Settings in Sourcing and Contract Management.
For Services Contracts, a Security Level is also specified on each User Profile (Figure 42).
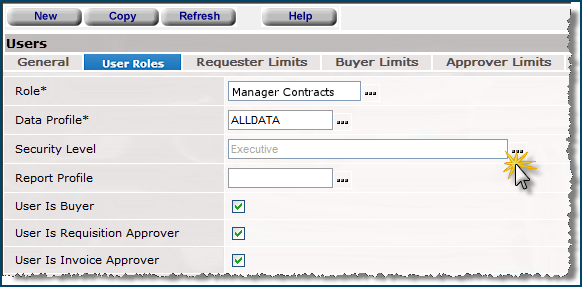
Figure 42 - User Roles Tab on the Users Edit Panel
- From the main Contents (Figure 38) Shared Services tab, click Administration > User/Security Settings > All Users.
- Locate the user of interest and click the User ID. The User Info panel appears.
- Click the edit icon to edit the User Profile.
- Click the User Roles tab to open it (Figure 42).
- To set a security level for a user, click the prompt in the Security Level field and select a level from the resulting select list.
- Save and Submit the change.
When a user creates a contract, she/he selects the contract type. The contract type is consistent with the minimum level of security that the contract needs.
Only users with the same security level as the contract type (and users with higher levels) can access the contract.
Users can restrict the security of a contract even more by changing the security level on the contract itself. This topic is outlined below.
Setting Security for a Services Contract
You can set security for individual services contracts by raising the contract's security level and/or limiting the organization/regions whose users can access the contract.
Raising a services contract's security level setting
When a contract type allows access to users with a lower security level than the owner's, the owner can raise the contract security level. The contract security level can be raised to any level between the owner's and the contract type's.
For example, suppose you are a Sr. Director (Figure 39), and have created a services contract with the type Consulting. Normally, the minimal security level associated with
Consulting (Figure 40) allows Managers access to the contract.
However, you may wish to limit access to the contract only to users at your level (Sr. Director) and above. You can change the contract security level to achieve this restriction.
- Open the services contract of interest (See To open a services contract, above).
- The "Work with Services Contract" page appears.
- On the Services Contract Info panel, click Security (Figure 43).
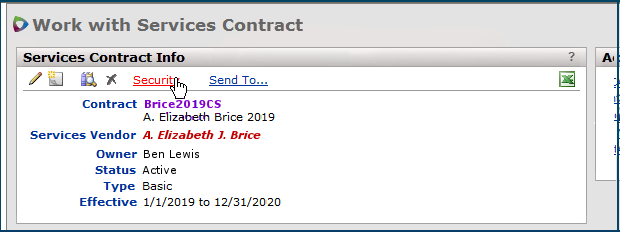
Figure 43 - Setting the Security Level for an Individual Contract
The Security panel appears (Figure 44).
- Click the Security Level arrow and select a security level for the contract.
- The user for Figure 44 has selected Sr. Director.
- Click Save at the bottom right.
- The security level for the contract is set. Users whose security level is below the one you selected cannot view the contract.

Figure 44 - Selecting a Security Level for a Contract
Access to the Security link on the Services Contract Info panel requires the setting Modify for the "ContractSecurity" Role Object, at minimum. If your role object setting is View or None, the security link is grayed out.
Allow User Access to a Contract Based on Organization/Region/Department
You can specify the organizations, regions, and departments whose users are permitted to access a services contract. The Security panel (Figure 45) displays the organizations, regions, and departments for selection. Selecting an organization, region, or department allows access to the contract only to users in the selected organization, region, and/or department.
Note: A list of departments for services contracts security settings is available from the Administration menu:
Tables - Shared Services > Services Departments. From the list, you can edit a department name, delete a department, or create a new department for use in setting contract security. Details are in the topic Using Tables for Regions, Organizations, and Departments.
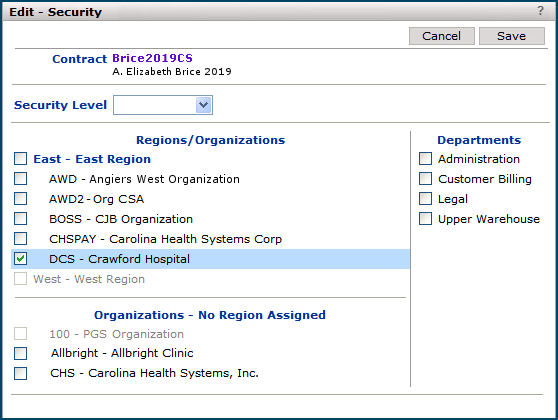
Figure 45 - Selecting Regions/Organizations for Access
You can limit other users' access to a contract to any organization, region, or department that is available to you, based on your User Profile. On the Security panel, organizations, regions, and departments that are grayed out are not in your profile.
If no organizations, regions, or departments are selected on the Security panel, any user (with the correct security level and data profile settings) can access the contract.
Note: Currently, limiting access to a contract by department is only available for services contracts.
To permit access to a contract by organization/region or department:
- Open the services contract of interest.
- The "Work with Services Contract" page appears.
- On the Services Contract Info panel, click
Security (Figure 43).
- The Security panel appears (Figure 45).
- Next to one or more organizations/regions or departments, click the select box to make the contract available only to users in the designated organizations/regions/departments.
- For example, the user for Figure 45 has selected DCS - Crawford Hospital. As a result, only users who can access that organization's data will be able to view and work with the contract. Users in other organizations will not even see the contract listed on any display panels.
- Click Save.
System alerts displayed in the My Alerts panel take into account the organization/region security limitation: Users do not receive alerts for contracts that they are not able to view.
Shared Services Contract Approvals
The owner of a services contract designates approvers for the contract. Services contracts can be approved by individual users assigned as "approvers" for any given contract, or by an approval group associated with the services contract type. Approval groups can be either sequential, in which approvers must approve the contract in a specified order, or parallel, in which the approval order does not matter.
For each logged-in user who is an approver, on the Services Contract Approval Users panel, Click to Approve appears next to the user's name when the contract is available for the user's approval.
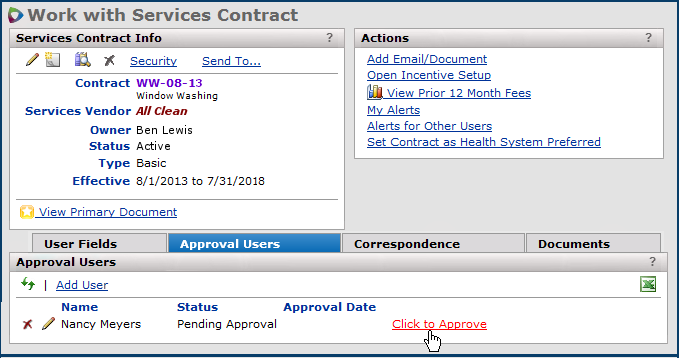
Figure 46 - A User Approving a Services Contract
A user can set a system alert to be notified when a contract needs review and approval (or rejection). The alert is New Contract To Approve. This alert is set on the "Services Contract Workbench" page My Alerts panel.
Normally, you work with a services contract to add documents based on your negotiations with the supplier before the contract is ready for approval. Approvers can be assigned to a contract when you first create the contract, but you will not want them to review it until you are ready.
During the working period, set the contract Status to either Inactive or Evaluation. When you are ready for approval routing, change the Status to Active. Once the contract is Active, any alerts or emails that you have set up for approvers will go out, and approvers will know that they need to review the contract.
- With sequential approval, a member of an approval group only gets a "New Contract to Approve" alert (if the member has set the alert) when all approvers with lower sequence numbers have approved the contract, and it is the member's turn to approve it.
The system validates security for both users and approval groups. Several rules apply to users who can be members of approval groups, and to approval groups that can be assigned to contract types. See "Security and Validation for Users and Approval Groups."
Assign Individual Approvers
If no approval group is associated with the Type of contract that you are creating, you must select individual approvers.
- To assign individual approvers to a services contract, click the link Add User on the Approval Users panel (Figure 47).
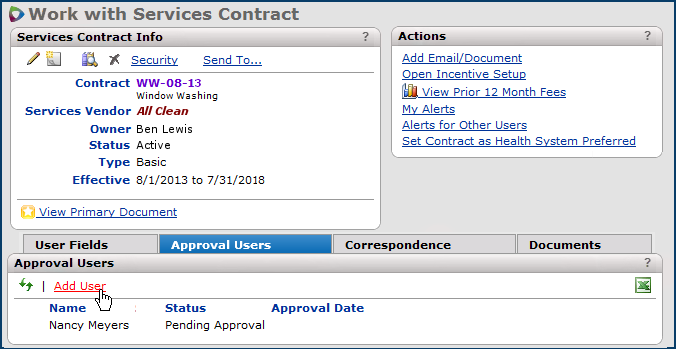
Figure 47 - Assigning a User as a Services Contract Approver
-
A panel appears for you to select the UserID. Select the UserID and click Save.
The user is added with the status Pending Approval.
Note: If an approval group is assigned to the contract type, the approval group members appear on the Approval Users panel. No action is needed from you; however, you cannot add additional approvers or remove approvers.
Create and Assign Approval Groups
Approval groups let you designate multiple contract approvers. Approval groups can be assigned to contract types. Approval groups are defined in the administration table Approval Groups.
- To view approval groups or set up a new group, from the main Contents, click the Shared Services tab.
- Select Administration > Tables - Shared Services > Approval Groups.
- The role objects "Administration" and "CATables" must be included in the role assigned to you and set to Modify or higher. Unless these role objects are set to at least View, you will not be able to see the Shared Services Tables menu or work with approval groups.
Figure 48 is an example of several approval groups.
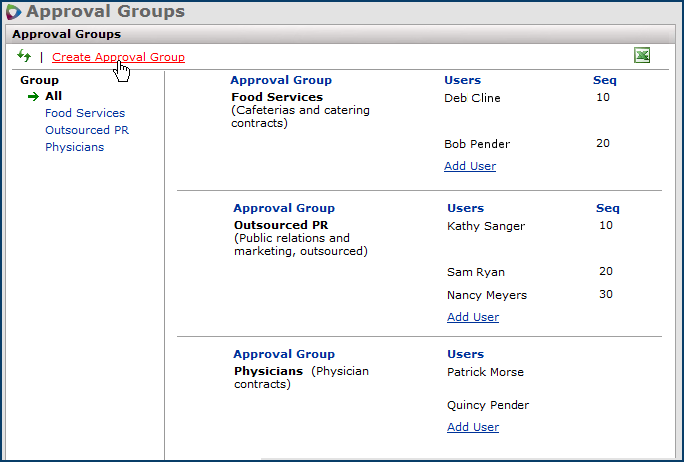
Figure 48 - List of Approval Groups
On the left side of the panel under Group,
- Click any group name to display the group.
- Click All to display all groups.
When an approval group is assigned to a contract type, then for any services contract of the given type, the approval group members are listed on the Services Contract Approval users panel. The status of approval (e.g., Pending Approval, Approved, etc.) is displayed next to a user's name and updated as the contract's approval moves forward.
Note: When a new contract is created, and its type has an approver group, the approver group is assigned to the new contract. The approver group is not assigned to existing contracts of the type.
Create an Approval Group
- From the main Contents Shared Services panel, click Administration > Tables - Shared Services > Approval Groups (Figure 49).
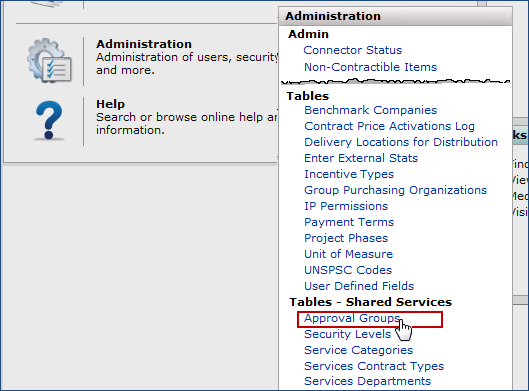
Figure 49 - Accessing the Approval Groups Display and Setup Panels
The list of approval groups appears, if any have been created.
- Click Create Approval Group on the top left of the Approval Groups list (Figure 49).
The Create - Approval Group panel appears (Figure 50).
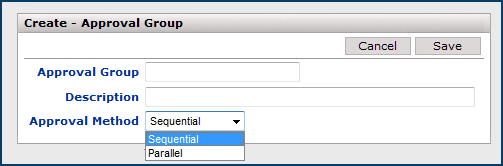
Figure 50 - Creating an Approval Group
- Enter a name in the Approval Group field and enter a Description.
- Select the Approval Method. Both the sequential and parallel approval methods are available.
Currently, the default is Sequential.
- With Sequential approvals, each approver is assigned a sequence number that determines the order in which the person's approval is solicited.
You assign each user a sequence number when you add the user to the approval group.
Each approver's sequence number is displayed on the approvals panels next to the approver's name.
Approvers with lower sequence numbers must approve a contract before users with higher sequence numbers can approve it.
- Parallel assumes that the order of approvers does not matter and all approvers will receive the contract at the same time. No sequence numbers appear on the contract's Approval Users panel.
- Click Save.
Add Users to an Approval Group
See Security and Validation for rules about users that you can add.
- On the Approval Groups list (Figure 48), locate the group of interest.
- Click Add User (Figure 51).
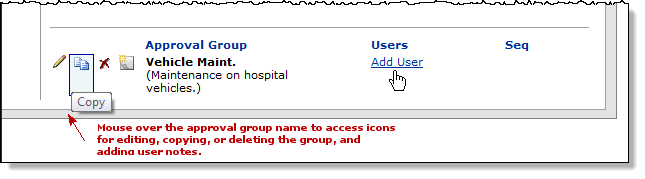
Figure 51 - Adding an Approver to an Approval Group
A panel appears for adding a user. The panel contains a list of users and UserIDs.
- Click Select next to the user that you wish to add to the group.
The panel closes.
- For parallel approval groups, the user is added to the group.
- For sequential approval groups, the Create - Approval Group User panel appears (Figure 52).
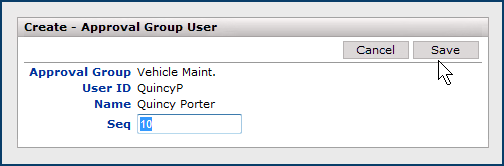
Figure 52 - Setting a Sequence Number and Confirming the New Approval Group Member
For Sequential approval, the Seq field displays the order assigned to the approver. The first sequence number defaults to ten. The sequence interval is also ten.
You can change the sequence number if needed. You can assign sequence numbers lower than ten. You can also assign sequence numbers that are not multiples of ten. This strategy is useful if you create an approval group, and later need to "insert" a new approver in order between two existing approvers.
- Accept or change the value in the Seq field, depending on where in the approval order you want the new approver.
- Click Save.
- Refresh the Approval Groups list to view the user associated with the group.
Associate an Approval Group with a Services Contract Type
- From the main Contents Shared Services panel, click Administration > Tables - Shared Services > Services Contracts Types.
- The list of services contracts types appears (Figure 53), if any have been created.
- To create a new services contract type and assign it an approval group, click Create Contract Type.
- To edit a contract type and assign it an approval group, click the contract type in the Type column.

Figure 53 - List of Services Contracts Types
The Edit - Contract Type panel appears Figure 54.
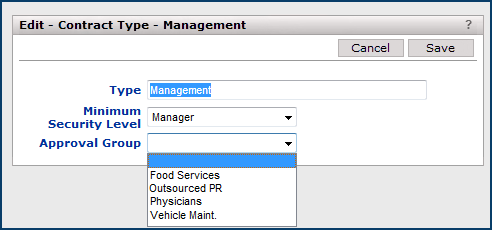
Figure 54 - Selecting an Approval Group to Assign to a Contract Type
- Click the down arrow in the Approval Group field.
- Select an approval group from the drop list.
- Click Save.
- Sourcing and Contract Management assigns the approval group to services contracts of the designated type.
Overriding the Approval Group Assigned to a Contract
Suppose that you a have contract in which you need to override the approval group normally associated with a contract type.
To override the approval group when you create the contract, select a different approval group.
The list of approval groups for selection includes other approval groups associated with the contract type, or an approval group that does not have a contract type associated.
Figure 55 is an example of a creating a contract whose type is Lease, and where the user wants to override the approval group (Leases) assigned to the contract type with the approval group Region1.
Figure 55 - Creating a Services Contract and Overriding the Approval Group Assignment
When are approver alerts triggered by the system?
- When you create a contract using a Contract Type that has an associated approval group, the users listed in the approval group are added to the contract when the contract is created. When the contract Status is changed to Active the users receive alerts. The alerts arrive depending on the sequence order defined in the approval group. (Sequential or Parallel).
- When creating a contract using a Contract Type which does not contain an approval group, but approvers are entered manually, for an alert to be triggered for an approver, the contract must be created as Active or set to Active before an approver is added.
Approving a Services Contract
Individual users named as approvers are listed on the the services contract Approval Users panel with the Status Pending Approval.
If an approval group is assigned to a contract type, then for new contracts of the designated type, the approval group members
are listed on the contract's Approval Users panel. You cannot remove approvers or add approvers to individual contracts that have approval groups.
You must change the composition of the approval group to add or remove users.
Ordering approvals with a sequential approval group
Sequential approval groups handle approvals in order, based on each group member's position in a numeric sequence.
-
Each approver is assigned a sequential number, with lower numbers approving first.
-
Approvers with higher sequential numbers cannot approve a contract until approvers with lower sequential numbers have approved the contract.
For example, George and Grace are approval group members for a contract. Grace's sequential number equals to 10 and George's equals to 20; Grace must approve the contract before George can. When Grace looks at the contract, the link Click to Approve is next to her name.
When George looks at the contract, the link does not appear next to his name until Grace has approved. Suppose that a new member is added to the approval group with the sequence number "5." In this case, the new member must approve the contract before either George or Grace can.
On the contract's Approval Users panel, the descriptor Next Required Approval appears next to the user who is due to approve the contract next in sequence (Figure 56).
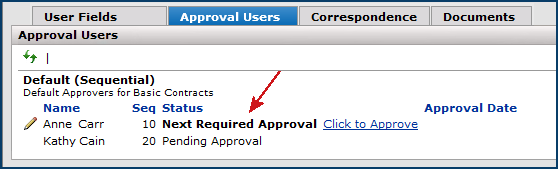
Figure 56 - The Approval Users Panel for a Services Contract
- When Click to Approve appears next to a user's name on the Approval Users panel, the user can approve the services contract by clicking the link.
-
To reject (not approve) a services contract,
- Mouse over your name on the Approval Users panel. Icons appear.
- Click the edit icon .
- Set the Approval Status field to Rejected.
- Click Save.
Note: The contract owner can also decline the contract by setting the Status of the contract to Rejected. A contract rejected in this way by the owner does not continue to route for approvals. All approvers are notified that the contract has been rejected. See the next section on Declining and Rejecting a Services Contract.
- To change your approval information,
- Click the edit icon
 next to your name.
- Change the Approval Date and/or Approval Status field.
- Click Save.
- Or, if you are the contract owner,
- Click edit next to the name of an approval user (not in an approval group).
- Change any or all of the fields: User ID, Approval Date, Approval Status.
- Click Save.
- To delete an approval user - not a member of an approval group (if you are the contract owner),
- Note: If an approval group is assigned to a contract type, you cannot remove approvers or add approvers to individual contracts of that type.
You must change the composition of the approval group to add or remove users, in this case.
- Mouse over the user's name. The icons appear.
- Click the delete icon
 .
.
Security and Validation for Users and Approval Groups
Here are rules governing services contract approval groups and users that can be members of a group.
- An approval group cannot be associated with a contract
type if the approval group has members who do not meet the minimum
security level for that contract type.
- A user cannot be added to an approval group
currently associated with a contract type if that user
does not have the required minimum security level.
- A user's security level can only be upgraded to a higher
level if that user is currently associated with an
approval group.
- The user's security level must be equal
to or higher than the minimum security level set by the
group's contract type.
- An approval group cannot be deleted if the group is currently
associated with a contract type.
- A user cannot be deleted if the user is currently a member of an
approval group.
Decline/Reject a Services Contract
The owner of a contract can skip or end the approval process, and decline -- or reject -- a shared services contract. To reject the contract, the owner must set the services contract Status to Rejected. Note that this type of rejection is different than rejections that come from the contract's approvers because it effectively ends the approval process. Once rejected, a contract can be "unrejected" by setting its Status to Active.
The Rejected Status option on the Services Contracts list let you filter the list for rejected contracts (Figure 57).
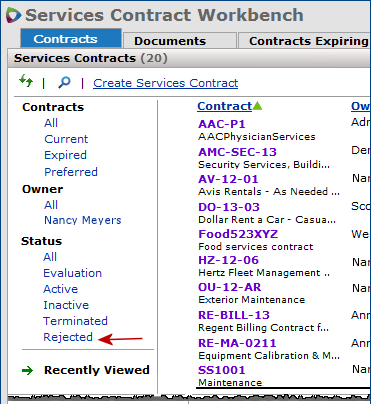
Figure 57 - The Rejected Filter on the Services Contracts List
Rejected contracts do not appear on the Contracts Expiring and Contracts for Review panels.
Note: This feature applies to Product Index Layer sites only.
To reject a contract,
- On the "Work with Services Contract" page, click the edit icon in the Services Contract Info panel (Figure 60).
- The services contract header appears for editing.
- From the Status drop down menu, select Rejected (Figure 58).
Note: Only the contract owner will be able to select and save this value. Other users will get an error message if they select Rejected and then try to save the contract edit.
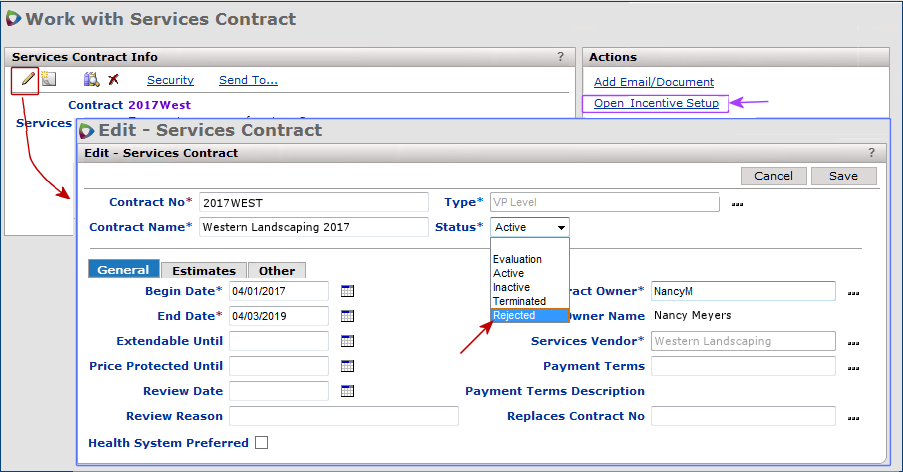
Figure 58 - Rejecting a Services Contract
- The Reason field appears (Figure 59).
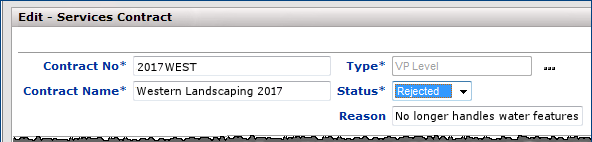
Figure 59 - Reason for Rejecting Services Contract Added by Owner
- Enter a reason for the rejection in the Reason field, if desired.
- Save the editing changes to the header.
- Click Submit to close the header edit, and return to the "Work with Services Contract" page.
To "unreject" a rejected services contract,
Edit the services contract header (Figure 58) and change the Status to Active.
Effects of Rejecting a Services Contract
- The rejection Reason is included on panels and reports: If the owner enters a rejection reason (not required), the reason appears on the Services Contract Info panel, on any reports that include the services contract, and on any rejection email notifications or alerts sent to approvers of the contract.
- Incentives cannot be added to the rejected contract, or modified: On the "Work with Services Contract" Actions panel (Figure 59, top right, purple arrow),
the link Open Incentives Setup is disabled (Figure 60) when a services contract's Status is Rejected. In the Incentives feature, you cannot modify any incentive associated with the rejected contract, or set a new incentive.
- Existing incentives are not recalculated: Any existing incentives that are set up for a services contract will not recalculate as long as the contract's status is Rejected.
Important: If you "unreject" a services contract and wish to display currently accurate incentive amounts, you must manually recalculate the incentives. See Recalculate incentives for all prior periods for instructions.
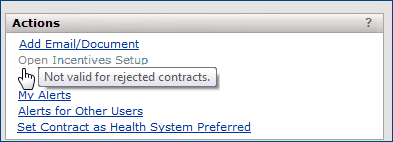
Figure 60 - Incentive Setup Disabled for Rejected Services Contracts
- The approval process stops: If approvals are in progress, setting the Status to Rejected stops the approval process. The Click to Approve link on the Approval Users panel for the contract is disabled. Editing of approval users is also disabled. No further emails or approval notifications are sent to approval users. Messages that the contract has been rejected are sent instead, as follows:
For
sequential approvals, a cancel approval email and/or alert notification is sent to the approval user whose approval is currently required, and to any users who have already approved the contract.
For parallel approvals, a cancel approval email and/or alert notification is sent to all approval users.
If the Status of a rejected contract is set back to Active, the approval process picks up where it left off. New approval notifications are sent.
Note: The cancel approval email and alert notification follow the same rules as the approval alert: only users who are set up for alerts receive the cancel approval message.
Documents searches are not affected: You can still search for the documents associated with a rejected contract on the Documents panel of the "Services Contract Workbench" page.
Search for Services Contracts, Notes, and Services Vendors
Searching from the "Search" page Services tab and from Supply tab works the same way. See the discussion of search values for valid characters that you can enter in the Search field. As with supply contracts searches, entering All in the Search box for services contracts directs the system to look for all records of the selected type: Contracts, Services Vendors, or Notes.
On the Services Contract Workbench, Search locates:
- Services contracts
- Services vendors
- Notes associated with a contract, or its supporting documents
Searching for an element in your contracts results in a list of contracts containing the search characters, if any are found.
You can also search for services contracts by opening the Search panel from either the main Contents, or from the page menu.
Detailed information and instructions on the application search are in the online documentation topic "Using the Search Page." Below is a summary of the basic steps.
To use the main Contents or page menu Search panel:
- Click Search on either the main Contents (Shared Services tab) or on the page menu to access the Search panel (Figure 61).
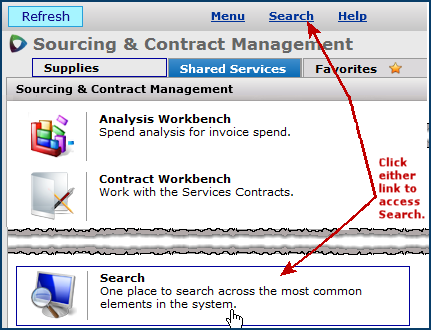
Figure 61 - Accessing the Search Panel
- On the Search panel, click the Services tab.
- To find a services contract, enter characters in the Search box (Figure 62).
- You can enter: characters contained in a Contract Number or Name; UserID, or all or part of the Owner's Name.
- To find a services vendor, enter characters from the vendor name.
- To find services contracts' notes, enter characters from the note of interest or from the UserID of the person who created the note.
- Entering All returns a list of all notes.
- Click Search.
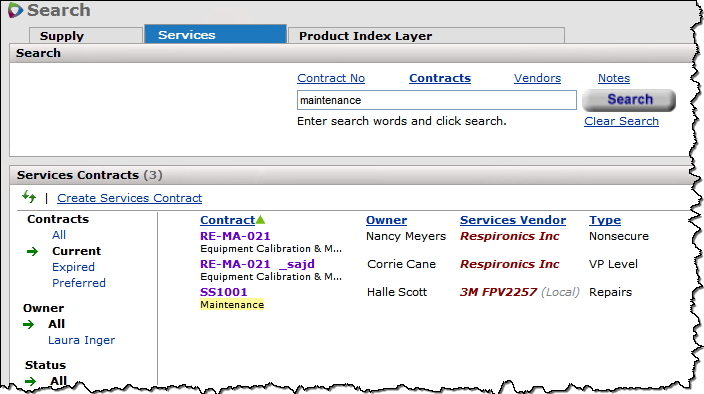
Figure 62 - Searching for a Services Contract
Designating a Services Contract as "Health System Preferred"
The Health System Preferred flag for contracts can now be enabled from the “Work with Services Contract” page using one of the following methods:
- Click the Edit icon in the Services Contract Info panel to open the Edit - Services Contract panel. Check the box next to Health System Preferred to add or remove the flag.
- In the Actions panel, click the Set Contract as Health System Preferred link. Click Yes to confirm. (The link text changes to Remove Health System Preferred Setting, which disables the flag when clicked.)
Contracts flagged as Health System Preferred are indicated by two red asterisks ** in the SCM panels and reports.
A visual indicator (**) identifies all "Health System Preferred" contracts in the SCM interface (see example in Figure 63). If a contract has the Health System Preferred flag enabled, the two red asterisks will appear next to it in searches, contract information panels, and all other interface locations where contract numbers are displayed.
A Preferred filter (Figure 63) is located on the Services Contract Workbench and other panels that list contracts. When this filter is selected, only contracts that have been flagged as Health System Preferred are displayed in the contract list.
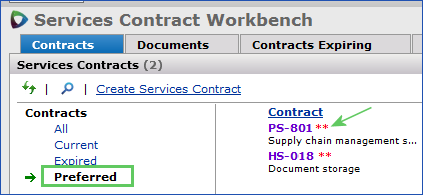
Figure 63 - Health System Preferred Contract Indicator
The Health System Preferred contract flag (**) appears next to the contract number on reports (Figure 64). Also, the field Health System Preferred YN is available on reports, and on the report export.
Figure 64 is an example of part of a report with the new flag ** and the new HealthSystemPreferredYN field.
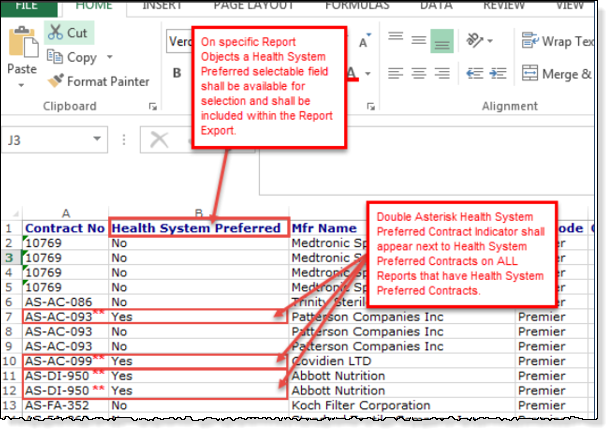
Figure 64 - Health System Preferred Filter on a Report (in Excel Format)
The ** flag appears and Health System Preferred YN is a selectable field on these report objects:
|
|
|
Contract |
CustDeptSpend |
ItemVendorUom |
ContractActivation |
DeptIssueSpend |
LotTrackInventoryTransactions |
ContractCaA |
DeptUsage |
Overpayments |
ContractDetail |
DeptUsageSummary |
POandReceipt |
ContractDetailAccepted |
InventoryTransactions |
POReuisitionAnalysis |
ContractDetailActivated |
InventoryTransactionsAll |
PriceChange |
ContractFeeInvoiceDetailPIL |
InvoiceMatchDetailPOLine |
PurchaseOrderDetails |
ContractHeaderDetail |
InvoiceMatchDetailPOLineView2 |
PurchaseOrderDetailsPlusInvoice |
ContractHeaderDetailCaA |
InvoicePO |
PurchaseOrderHeaders |
ContractHeaderDetailWithPrices |
ItemCatalog |
RecoverableSavings |
ContractPriceActivationLogLst |
ItemCatalogUserFields |
ServicesContract |
ContractPriceActivations |
ItemInventory |
ServicesContractApprovals |
ContractPriceChangeLog |
ItemInventoryAllVendors |
ServicesContractUserFields |
ContractSecurity |
ItemInventoryExtract |
ServicesContractUserFieldsAlt |
ContractStatistics |
ItemInventoryUsage |
SpendItemDetail |
ContractStatisticsSummary |
ItemInventoryUsageSummary |
SpendItemSummary |
ContractUserFields |
ItemInventoryUserFields |
VendorFees |
Report Objects for Services Contracts
These report objects are available for services contracts: "Services Contracts," "Services Contracts User Fields," and "Services Contracts User Fields - Consolidated."
- The report object "Services Contracts User Fields" includes any user-defined fields, and only returns data for services contracts that have user defined fields.
- The report object "Services Contracts" does not include user-defined fields.
- The report object "Services Contracts User Fields - Consolidated" contains a smaller set of contract fields than "Services Contracts User Fields."
The online documentation topic Creating Custom Reports outlines how to use report objects to create and run reports.
Appendix A - Part of the List of Services Categories for Vendors
The complete table is available from the main Contents. Click Administration > Tables - Services Tables > Service Categories.
Users at your site with administrative security privileges can create new service categories by clicking Create Service Category at the top of the list.
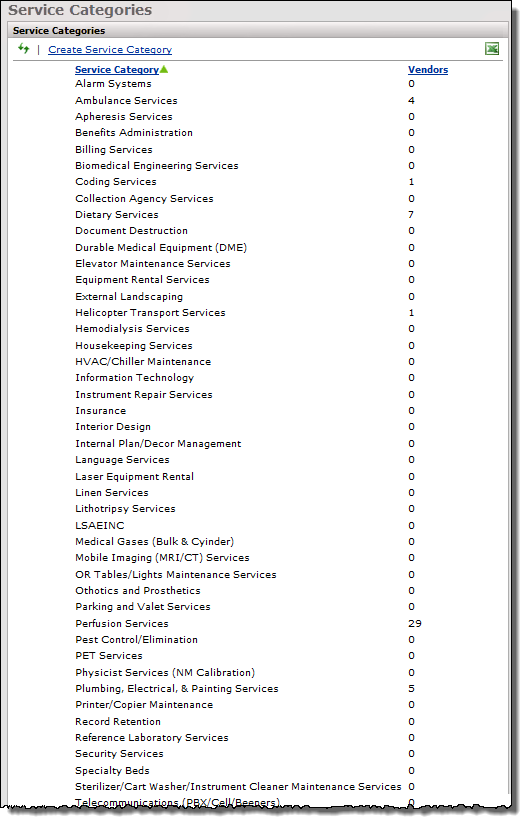
Copyright © 2023 by Premier Inc. All rights reserved.