Setting Up Tax Information for Accounts Payable Version
Contents
Overview
The Accounts Payable Tax feature handles taxes -- including
use taxes -- for invoices. A tax group contains multiple
tax rates and their associated GL accounts. For example, a tax group may contain
state, city, and local tax rates, all applicable to invoices from a particular
vendor. Supply Chain calculates taxes for invoice lines using a tax group. When
invoices are approved, taxes are posted to organizations' tax expense and liability
accounts
- On purchase order invoices, Supply Chain calculates tax, and
automatically assigns the amount to the tax account associated with the tax
rate for the organization.
- On manual invoices, you can distribute taxes among GL accounts.
The AP Tax feature must be enabled before the system can calculate taxes.
Some hospitals need to order items for locations that are in different cities, and different cities may have different tax rates. Because tax is determined based on where product ships to, not where it is ordered from, an invoice may be out of balance when it is created. To accommodate this need, you can set a AP tax rate for a department, and require tax to be calculated at the department rate in situations where the jurisdiction for the department is different from the organization, and tax is different. Similarly, you can set tax rates for asset locations, where the asset location may be in a different geographical area, compared to the organization. Tax can also be set up for vendor AP locations, if needed.
This topic describes the setup steps and summarizes how to use the tax feature
in Accounts Payable.
Security
To access organization, department, or asset location data, the organization, department, or asset location must be included in your data profile. Additionally, for any asset location, you must have permission to maintain the asset location record. See "Restricting Users from Editing Asset Location Records."
Your assigned role's "APTables" security object must be set to Modify, Create, or All for you to edit AP tables.
Setup Checklist
- Create your tax rates.
- Create one or more tax groups.
- Select tax rates to be included in each tax group.
- Associate tax rates with organizations' tax accounts, and with asset locations and departments, as needed.
- For "separate PO by department" invoices, select a Default Tax Group on the department record's AP Info tab,
if you wish to calculate tax for a department's location.
- Select a Default Tax Group on the organization's AP Information
tab, or asset location record, as needed.
- Enter the default tax type for each vendor AP location that has taxable
invoices, if you are using tax by vendor location.
- Enable Accounts Payable to calculate taxes for each organization, asset location, or department
that processes taxable invoices.
- Select the field AP Tax Enabled on the organization's AP Information
tab, or for the department or asset location.
Creating Tax Rates
You can create tax rates, and then assign the rates to tax groups, which you also create.
To create a tax rate record
- From the Materials Management or Accounts Payable main Contents, select Tables > Tax Rates.
The list of tax rates appears (Figure 1), or No Data if no tax
groups exist.

Figure 1 - List of Tax Rates
- Click New.
The new Tax Rate panel appears (Figure 2).
Use this panel to give the new tax rate an identifier -- enter a Tax Rate Code and Description -- and set the percentage in the Tax Rate field.
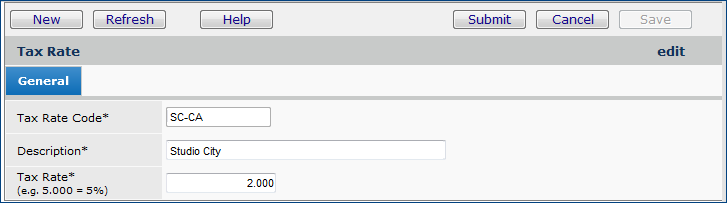
Figure 2 - Creating a New Tax Rate
- Click Save.
- Click Submit.
The tax rate is available to assign to a tax group, if you wish.
Creating Tax Groups
To set up tax group names
and distribution methods
- From the Materials Management or Accounts Payable main Contents, select
Tables > Tax Groups.
The list of tax groups appears (Figure 3), or No Data if no tax
groups exist.
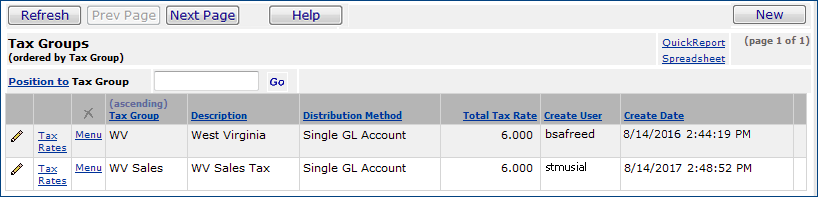
Figure 3- List of Tax Groups
- Click New.
The new Tax Group panel appears (Figure 4).
Use this panel to give the new tax group an identifier.
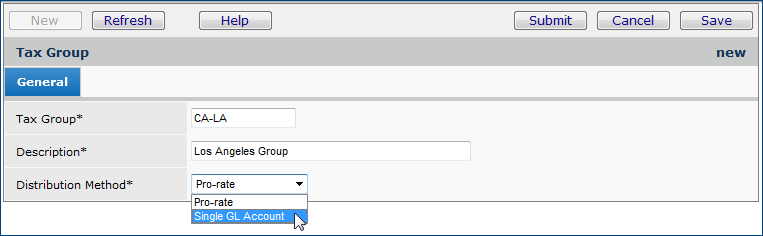
Figure 4 - Creating a New Tax Group
- Enter a Tax Group name and Description.
- Select a Distribution Method.
The Distribution Method field is applicable to manual invoices.
- Pro-rate allocates the tax expense
proportionally to accounts for goods lines and for taxable charge lines.
- Single GL Account allocates the entire tax expense
to one account.
- Click Save.
- Click Submit.
The Tax Group Rates panel appears (Figure 5).
To include tax rates in tax groups
- The Tax Group Rates panel provides several options.
-
You can create a new tax rate to add to the tax group.
In the middle of the panel (Figure 5), under Enter Tax Rate, enter
the code for the new tax rate (Tax Rate Code) that you wish to include in the tax group along with a description (Description),
and the tax rate percentage (Tax Rate) in the appropriate
fields.
Note: Tax rates that you create for a tax group are available
to include in other tax groups.
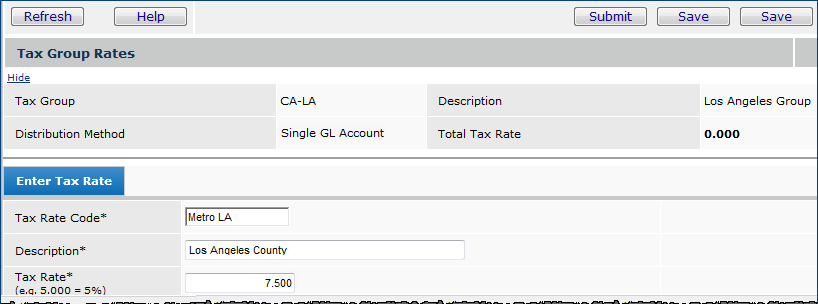
Figure 5 - Adding a New Tax Rate to a Tax Group
- When you click Save and Submit, the tax rate appears in the bottom of the panel under Tax Rates as selected (Figure 6).
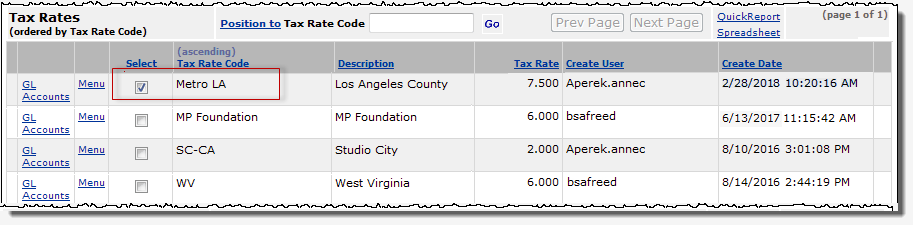
Figure 6 - New Tax Rate for a Group is Automatically Selected
-
You can select existing tax rates for the tax group.
Click the Select box for any tax rate that you wish to include in the tax group (Figure 7).
- You can add a new tax rate to the tax group and select an existing tax rate as well.
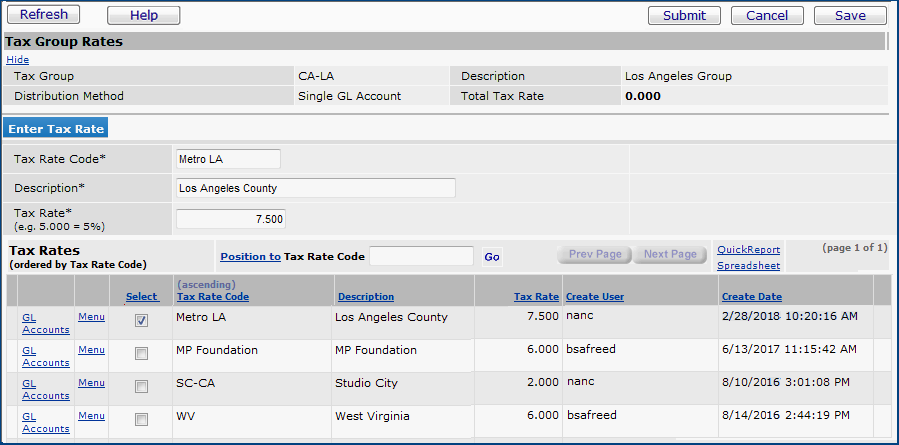
Figure 7 - Adding an Existing Tax Rate to a Tax Group
- Click Save and Submit.
The panel (Figure 7A) displays the total tax rate in the Total Tax Rate field. This value sums the tax rates for the tax group.
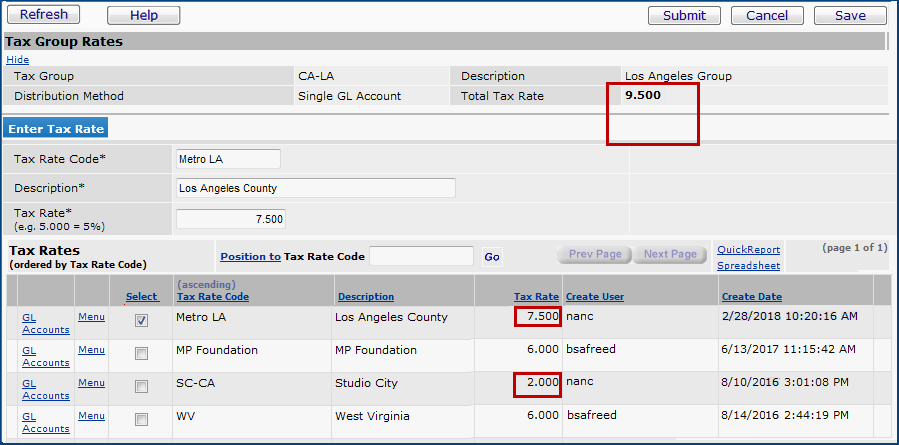
Figure7A - Tax Group Rates Totaled
To associate each tax rate with
an organization's GL accounts
Note: The tax accounts must exist in each organization's
Chart of Accounts before you can assign them to tax rates.
- From the Tax Rate list (Figure 1, Figure 6 or Figure 7), next to a tax rate, select GL Accounts.
No Data appears for a tax rate that is newly created. (Otherwise,
a list of GL accounts already assigned to the tax rate would appear.)
- Click New.
The Tax Rate GL Edit panel appears (Figure 8). This panel contains fields
for the GL expense and liability accounts associated with the tax rate.

Figure 8 - Associating a Tax Rate with a General Ledger Account
- Select the Organization.
- Click the prompt to select a GL account for the Sales and Use Tax
Expense.
- Similarly, select an account for Use Tax Liability.
- Click Save.
- Click Submit.
The system returns to the GL Accounts list.
- If you wish to associate the tax rate with another organization's tax accounts,
click New and complete the Tax Rate GL Accounts panel
again for the next organization.
- Click Refresh. The GL Accounts list appears
with the tax rate account included.
- Click X in the upper right corner to close the window.
The system returns to the Tax Rates list.
To enable AP taxes for an organization
- From the Accounts Payable main Contents, select Tables > Organizations.
A list of organizations appears.
- Locate the organization of interest on the list.
- Next to the organization, click the edit icon (
 ),
or select Menu > Edit.
),
or select Menu > Edit.
The Organization edit panel appears.
- Click the AP Information tab.
The AP Information panel appears (Figure 9).
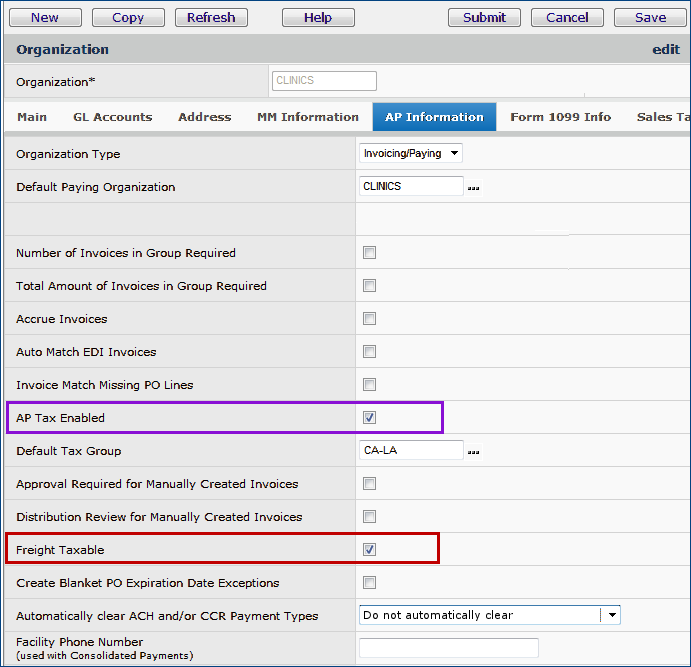
Figure 9 - Organization AP Information Panel
- Select the field AP Tax Enabled (Figure 9, purple box).
- If a tax group has been created to use as the organization's default, click
the prompt next to the box for Default Tax Group and select
the tax group.
- You can also select Freight Taxable if you are using Sales Tax Exception processing. See the subsequent discussion.
- Click Save.
- Click Submit.
The system displays the Organization list.
Set Up AP Tax for
a Vendor AP Location
-
From the Materials Management or Accounts Payable main Contents, select Vendors >
Vendors.
-
On the Quick Click menu, select AP Locations.
-
Enter the Vendor No in the box and click Go.
The AP locations for the vendor appear.
-
Next to the appropriate AP location, click the edit icon (),
or select Menu > Edit.
The AP Location Edit panel appears (Figure 10).
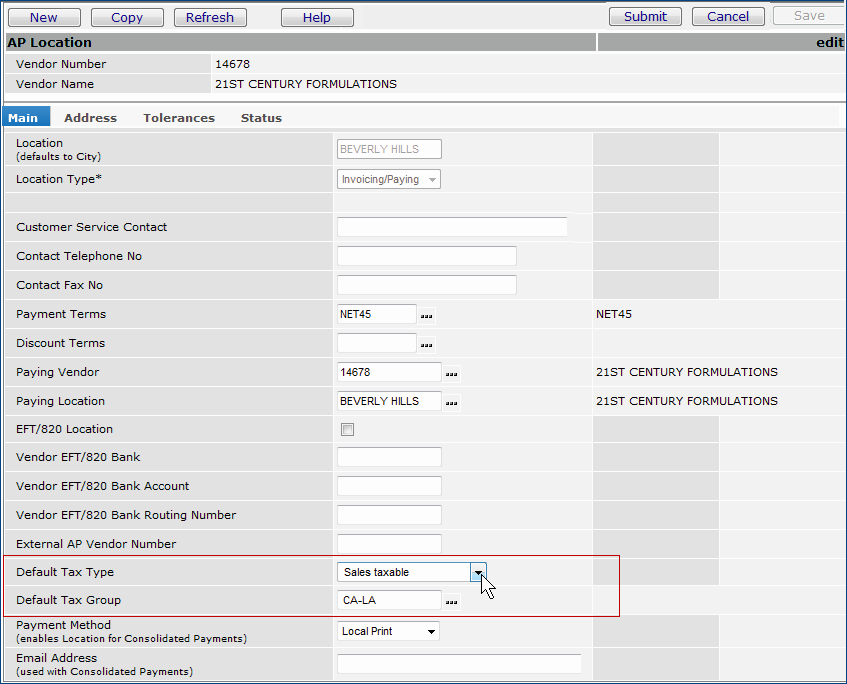
Figure 10 - Vendor AP Location Panel
- Select the Default Tax Type for the vendor AP
location. Options are: Sales taxable, Use
taxable, Non-taxable.
- Select a Default Tax Group for invoices from the vendor
AP location.
- When you have finished , click Save.
- Click Submit.
The system returns you to the list of the vendor AP locations.
Set Up AP Tax at the Department Level
The AP Info panel (Figure 11) on the department record "switches
on" a tax requirement and tax calculations for invoices associated with the department.
Note: Tax is calculated at the department level only when the Separate PO by Department field is enabled.
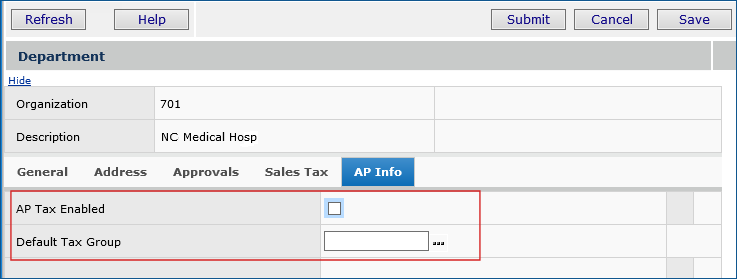
Figure 11 - Setting AP Tax at the Department Level
Since you can also specify AP tax to be calculated at the vendor, asset location, and organization level, ERP follows a hierarchy in determining which tax group to apply to an invoice. The way ERP decides what tax group to use is discussed below.
- Initially, for this release, the AP Tax Enabled field defaults to the same setting as the field for the department's organization.
- When new departments are created, the AP Tax Enabled field defaults to the same setting as the organization. You can update the AP Tax Enabled field if needed.
This feature is available for PO invoices including EDI 810 invoices.
Set up AP tax for an asset location.
The asset location's AP Info panel (Figure 12) "switches
on" a tax requirement and tax calculations for invoices associated with the asset location.
To enter AP tax data for an asset location:
- From the Materials Management main Contents, select Tables
> Asset Locations. A list of asset locations appears.
- Locate the asset location on the list. Click the edit icon,
or select Menu > Edit.
The Asset Location edit panel appears.
- Select the AP Info tab (new in this release).
- To require the calculation of tax on invoices for the asset location, select AP Tax Enabled.
- Select a Default Tax Group.
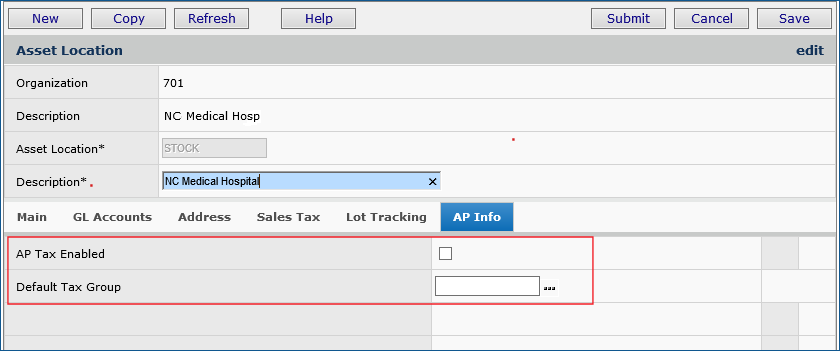
Figure 12 - Setting AP Tax at the Asset Location Level
Since you can also specify AP tax to be calculated at the vendor, department, and organization level, ERP follows a hierarchy in determining which tax group to apply to an invoice. The way ERP decides what tax group to use is discussed below.
- Initially, for this release, the AP Tax Enabled field defaults to the same setting as the field for the asset location's organization.
- When new asset locations are created, the AP Tax Enabled field defaults to the same setting as the organization. You can update the AP Tax Enabled field if needed.
This feature is available for PO invoices including EDI 810 invoices.
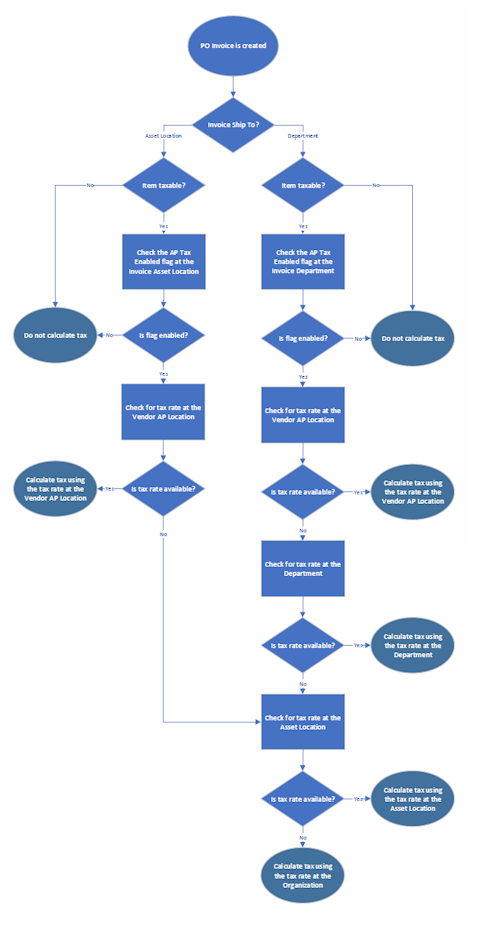
How ERP identifies the correct tax rate to use to calculate AP tax
When a department, asset location, organization, or vendor requires AP tax to be calculated, ERP checks whether a tax rate has been specified on the AP Info tab or on the vendor AP location Main tab. If so, the application uses it. If not, ERP checks other possible tax settings in hierarchical order until tax is found.
The order the application uses to search for a AP tax rate is the following:
Tax for Department:
The hierarchy is: Vendor AP Location > Department > Asset Location > Organization.
For invoices with a departmental Ship To location that are "separate PO by department" and "direct delivery," the Default Tax Group on the department's AP Info tab is used to calculate taxes unless the vendor AP location specifies a tax group.
If no tax data exists at the department level, ERP checks the asset location associated with the department for tax data. Finally, if no tax data exists for the asset location, ERP looks at the organization to determine if it has tax information.
When no tax information is available anywhere in the hierarchy, a message appears directing the user to enter tax information (a Default Tax Group).
Tax for Asset Location:
The hierarchy is: Vendor AP Location > Asset Location > Organization.
For invoices with the asset location as the Ship To location, if the vendor AP location contains tax data, ERP uses the vendor data to calculate taxes. Otherwise, ERP uses the tax specified for the asset location. Finally, if no tax data exists for the asset location, ERP looks at the organization to determine if it has tax information.
When no tax information is available anywhere in the hierarchy, a message appears directing the user to enter tax information (a Default Tax Group).
The attached images summarize the way AP tax settings will work when this feature is implemented.
Note: Non-PO Invoices use the hierarchy AP Location > Organization.
Automatic Calculation of Freight Tax
When an invoice is created, the system generates a distribution detail line for freight if a freight account is defined on either the asset location (for a PO invoice) or on the Organization record (for all types). The system first checks the asset location then the organization to determine if a freight account exists. When the freight account is present, a distribution detail line is automatically created for the account with a zero dollar line amount. It is up to the user to enter an amount if needed; otherwise, if the value is still zero when the invoice is submitted, the line is removed .
When you are using Sales Tax Exception processing, the new Freight Taxable field on the organization record, when selected, sets the Taxable flag on the freight distribution detail line. Tax is not calculated unless a line amount is provided.
To automatically calculate sales tax on freight charges, select the field Freight Taxable on the organization record's AP Information panel (Figure 9, red box).
The path to the organization record is: Materials main Contents > Tables > Organization > edit.
Notes
Invoices
- Purchase order invoices require entering the total
invoice amount and the total taxable amount.
- Manual invoices require entering
only the total invoice amount.
In calculating taxes for invoices, the system first looks at the vendor AP location
record for tax information.
- If the vendor AP location is taxable, the system determines
if a default tax group exists. If no tax group is set up for the vendor AP location,
the system goes to the organization record to determine if the organization is
tax-enabled.
- If the organization is tax enabled, the system uses the organization's default
tax group. Otherwise, if the organization is not tax enabled, the system treats
the invoice as "non-taxable;" however, tax information can still be
entered manually on the invoice.
Receipt exceptions
- For organizations that use receipt exceptions, if a receiving exception is
created for a PO line, the application calculates the actual tax liability only when
the receipt exception is cleared.
- Similarly, for invoice exceptions, the system
calculates the tax liability when invoice exceptions for a PO are cleared, and
adjustment receipts are processed.
Inter-organization
transfers
In
the case of inter-organization transfers, the system creates the General Ledger
transaction for the transfer of tax expense. This happens even if the GL accounts
for the two organizations are the same. This way, the GL entry can be tracked.
The tax liability is not transferred, however. If tax
processing is enabled for Materials Management, tax liability for an item
is recorded when the receipt for the item is processed. The tax liability, therefore,
remains in the original organization, since that organization pays the invoice
and records the tax liability offset.
Process Flow for Determining the Applicable AP Tax
Copyright © 2023 by Premier Inc. All rights reserved.