Setting Up Materials Tax Information in Materials Management Version
Contents
Overview
The Materials Management Tax feature allows you to apply estimated state, city, and county
taxes to requisitions and purchase orders. The Materials Management Tax feature
must be enabled before the system can calculate taxes.
Some hospitals need to order items for locations that are in different cities, and different cities may have different tax rates. Because tax is determined based on where product ships to, not where it is ordered from, an invoice may be out of balance when it is created. To accommodate this need, you can set a materials tax rate for a department, and require tax to be calculated at the department rate in situations where the jurisdiction for the department is different from the organization, and tax is different. Similarly, you can set tax rates for asset locations, where the asset location may be in a different geographical area, compared to the organization. Tax can also be set up for vendor AP locations, if needed.
When materials tax is calculated and an invoice is sales taxable, a debit entry
to the Tax Liability account is created when the invoice is approved. When materials
tax is calculated and an invoice is use taxable, no entries are created for
either the Tax Expense Account or Tax Liability Account. (Materials tax is calculated
when the field Calculate Tax For Materials Transactions on
the Organization record is selected.)
This topic describes the setup steps and summarizes how use the tax feature
in Materials Management.
Security
To work with any asset location, the asset location must be included in your data profile. Additionally, you must have permission to modify records for the asset location. See "Restricting Users from Editing Asset Location Records."
The ability for any user to view, change, and create values in tables is controlled by the role object "Tables." The security setting to create or copy an organization must be Create, or All. To edit an existing organization record, the setting must minimally be Modify.
The ability to create or edit asset locations is controlled by the role object "MMTables." To create or copy an asset location, the minimum setting is Create.
See Work with user roles for details on roles and role objects.
Requisitions and Purchase Orders
The system calculates estimated sales tax amounts when requisitions or purchase
orders are created. Tax amounts are calculated using the actual line amount,
and then summed for the entire requisition or PO.
- Non-file POs – You can specify
that a non-file purchase order line is taxable.
- Consignment POs – Tax calculations do not impact an
"initial consignment purchase order" which has a PO Match Type of Invoiceless. However, the "replacement consignment purchase
order" which has a PO Match Type of Invoice does have estimated
taxes calculated and displayed.
How the Current
Tax Rate is Retrieved
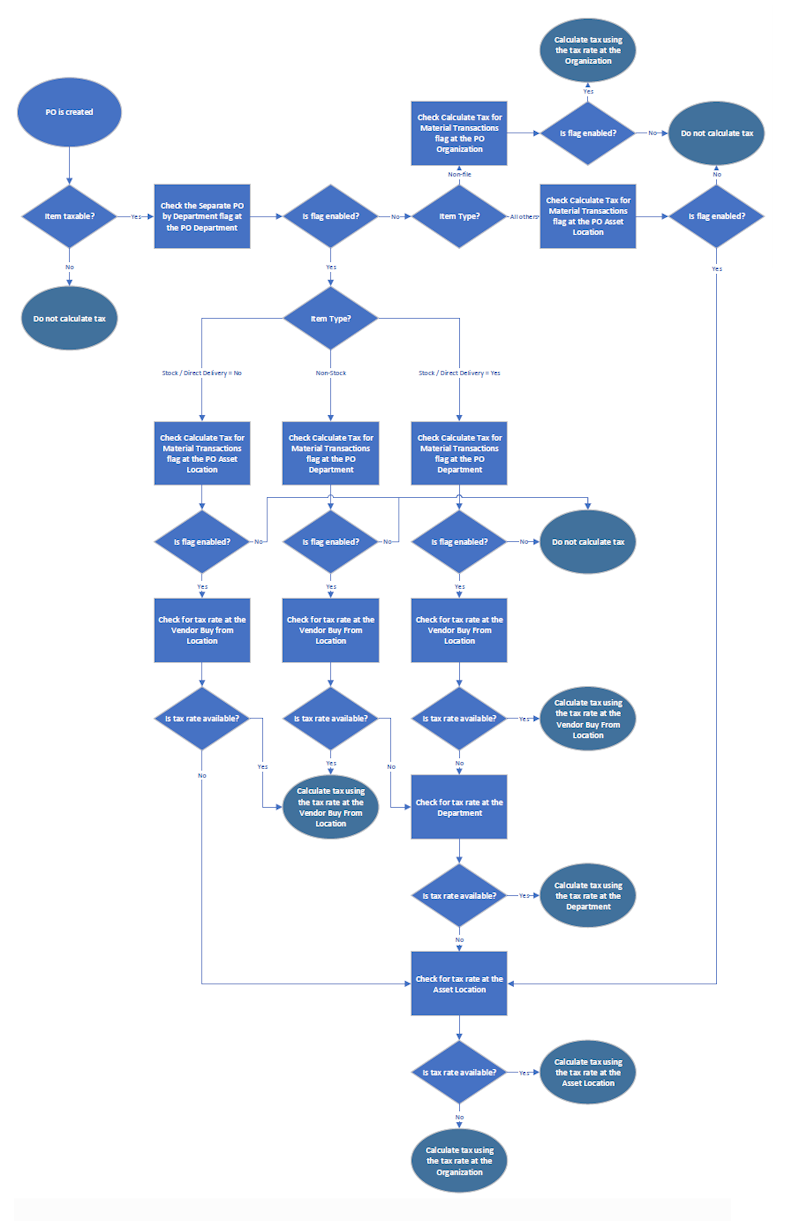
A general discussion of how ERP retrieves the correct tax rate is below. Here is a summary.
Requisitions
- For a stock item, the system checks the record for the vendor buy-from location, the requisition's supplying
asset location, then the record for the supplying organization to determine
if taxes apply.
Note: The supplying asset location and supplying organization on the requisition
may be different from the Department's default supplying asset location
and default supplying organization.
- For a non-stock item, the system checks the primary vendor
buy-from location, the department (for "separate PO by department" only), the asset location, then the organization.
- For a non-file or direct delivery item, the system checks the
PO's vendor buy-from location, then the department (for "separate PO by department" only), the asset location, then the organization.
Purchase Orders
- For a stock, non-stock, non-file, or direct delivery
item, the system checks the vendor buy-from location, the department (for "separate PO by department" only), the asset location,
then the organization.
Receipts
- The system retrieves the current tax rate for a taxable vendor buy-from location, department, asset location, or organization using the rules
described for requisitions and purchase orders. Tax amounts are calculated using
the actual line amount, and then summed for each receipt.
Issues
- The tax amount is combined with the cost of goods issued to the department.
The system accounts for issues that include a markup amount by calculating the
markup using the cost of goods and calculating the tax expense using the cost
of goods. The tax expense is not calculated using cost of goods plus markup.
- Transactions for the tax expense and liability accounts are created when
items are issued.
Setup Checklist and Summary of Steps
- Create tax rates and tax groups. See Creating
Tax Groups (in "Setting Up Tax Information for Accounts Payable").
- Associate tax rates with organizations' tax accounts. See Associating
tax rates with organizations' GL accounts
- For organizations
- Select the Calculate Tax For Materials Transactions field on the
Organization Main edit panel (Figure 1)
- Enter the tax rate(s) and accounts on the Sales Tax panel (Figure
3).
- For departments: You can set up tax for departments that use
separate POs by department.
-
Select the Calculate Tax For Materials Transactions field on the Department edit panel (Figure 4)
- Enter the tax rate(s) and accounts on the Sales Tax tabbed panel.
- For asset locations – Enter the tax rate(s) and accounts on the Sales
Tax tab of the Asset Location edit panel (similar to Figure 3).
- For vendor buy-from locations – Enter the tax rate(s) and accounts
on the Buy From Location Sales Tax edit panel (similar to Figure 3) .
- For items – Select the Taxable field on the Item Inventory edit panel (Figure 5).
– Estimated tax costs for
a taxable item are calculated when requisitions and purchase orders are created.
– The system keeps the taxable status of items for all asset locations within
a taxable organization synchronized. If you change the taxable status of an
item, the system sends a message warning that the change will affect all asset
locations.
– The tax expense for inventory adjustments is calculated when an
item is designated as taxable.
Set Up Materials Tax for an Organization:
- From the Materials Management main Contents, select
Tables > Organizations. A list of organizations appears.
- Locate the organization on the list. Click the edit icon
(
 ), or select Menu
> Edit.
), or select Menu
> Edit.
The Organization edit panel appears.
- On the Main tab, select the box labeled Calculate Tax For Materials
Transactions.
- If you want Materials Tax to print on purchase orders for taxable items, select Print Tax on Purchase Orders. (Figure 1).
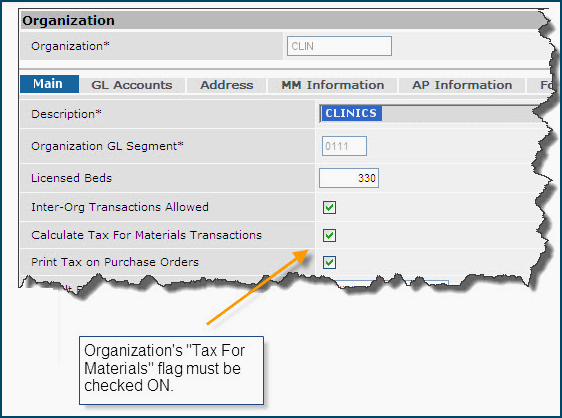
Figure 1 - Edit / Create an Organization Main Panel
- Notes:
On requisitions' and purchase orders' non-file lines, the Taxable flag is turned on by default if the organization record has Calculate Tax For Materials Transactions selected.
If tax is to be calculated at the department level (see Set Up Tax by Department), Taxable is selected by default for non-file items only when the department requires Separate PO by Department. Figure 2 is an example of a requisition non-file line with the Taxable flag set. You can uncheck the flag if the default is not appropriate.
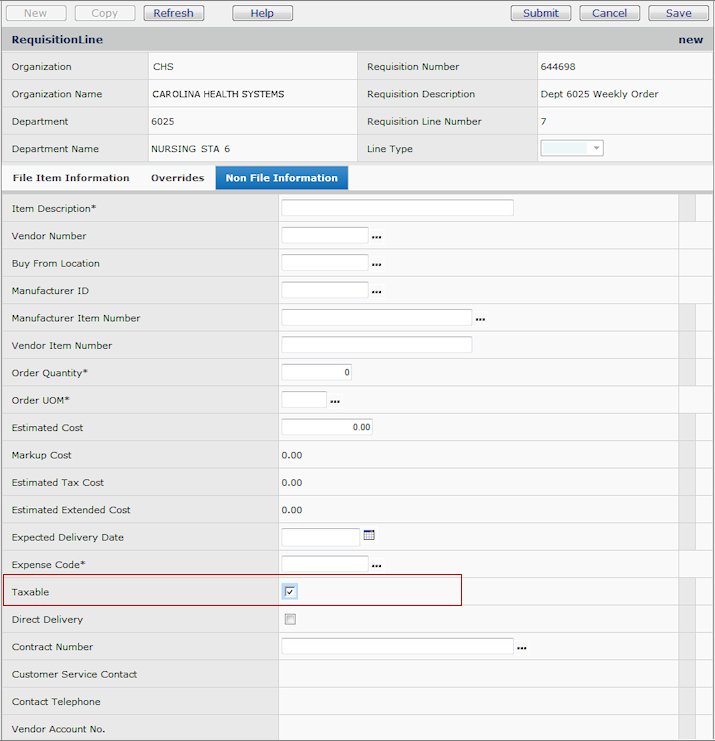
Figure 2 - The Taxable Flag Set by Default on a Requisition's Non-File Line
- Click the Sales Tax tab to display the Sales Tax panel (Figure 3).
The Sales Tax panel defines an organization's defaults.
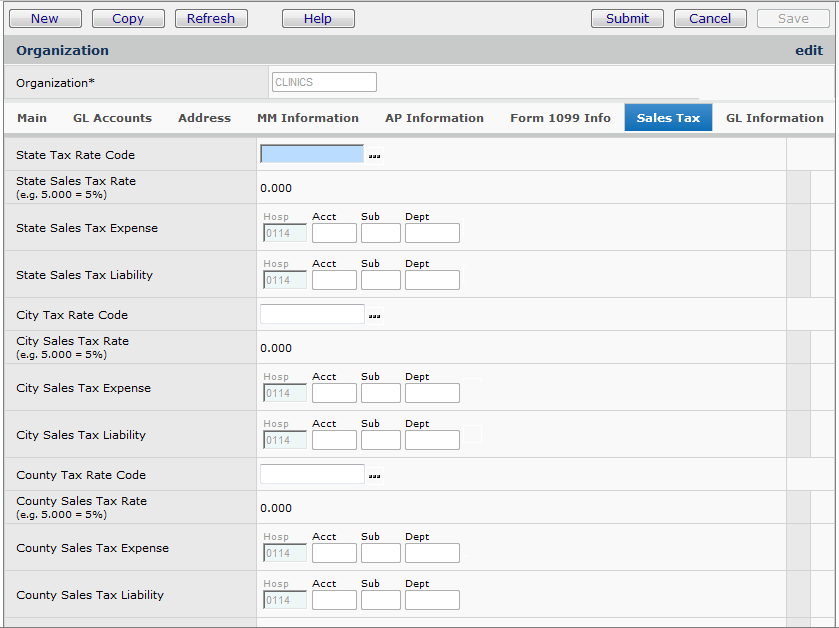
Figure 3 - Organization Sales Tax Panel
- Enter information in the fields on the Sales Tax panel as needed.
- The Tax Rate codes are the identifiers assigned to tax
rates.
- Click the prompts to select codes for the organization's default tax rates
for State, City, and County taxes, as applicable.
- If No Data appears when you click the prompts,
tax rates are not set up. Instructions for setting up tax rates are in Creating
Tax Groups.
Note: If the organization is taxable, you can change the State
Tax Rate Code, but you cannot remove it completely.
- You may enter any combination of State, City, or County
tax codes.
- If Expense and Liability accounts have been associated with each tax rate
for your organization, the accounts appear. Otherwise, No Data appears.
(See To associate a tax rate with an organization's
GL accounts.)
- If needed, you can click a prompt to select a different account for a tax
rate expense or liability.
- For details on the fields, click Help. Also, see the discussion
in the instructions for creating
and editing organizations.
Note: If you need to set up more than one tax rate
for an organization, you can specify more rates on the vendor
buy-from location panel.
-
When you have finished entering information, click Save.
-
Click Submit. You are returned to the Organizations list.
Set Up Materials Tax at the Departmental Level
Some hospitals need to order items for locations that are in different cities, and different cities may have different tax rates. Because tax is determined based on where product ships to, not where it is ordered from, the invoice may be out of balance when it is created. For example, a hospital in Sacramento orders supplies to be shipped directly to a department that is located in San Diego. The application calculates the tax at the organization level (Sacramento), but the vendor has calculated the tax at San Diego because that is where it it is sending the order.
You can set a tax rate for a department or an asset location, and require tax to be calculated at the department/asset location rate in situations where the jurisdiction for the department (or asset location) is different from the organization, and tax is different.
Department-level tax is only calculated for departments with the Separate PO field set to "yes." The Taxable field for non-file items defaults to "selected" when the department requires tax, and also requires Separate PO by Department.
To enter tax data for a department:
- From the Materials Management main Contents, select Requisitioning > Departments. A list of departments appears.
- Locate the department of interest on the list. Click the edit icon
(), or select Menu
> Edit.
The Department edit panel appears.
- On the General tab, select the box labeled Calculate Tax For Materials
Transactions. (Figure 4, red arrow).
Note: The initial setting of this field (for new departments, and at implementation) matches the setting of the same field on the Organization record.
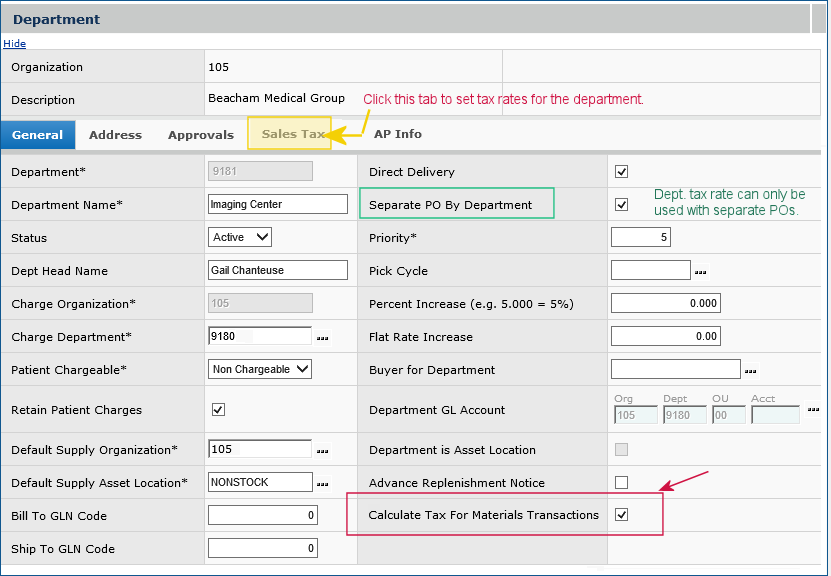
Figure 4 - Setting the Materials Tax Flag for a Department
- Select the Sales Tax tab to display the Sales Tax panel (similar to Figure
3).
- Enter information in the fields on the Sales Tax panel as
needed. You may enter State, City, or County tax
rates and accounts. The default value of these fields is "blank."
- When you have finished entering information, click Submit. You are returned
to the Departments list.
Set Up Materials Tax at the Asset Location Level
In situations where a medical center handles ordering in one jurisdiction for asset locations in different jurisdictions, you can define tax at the asset location level consistent with tax rates locally.
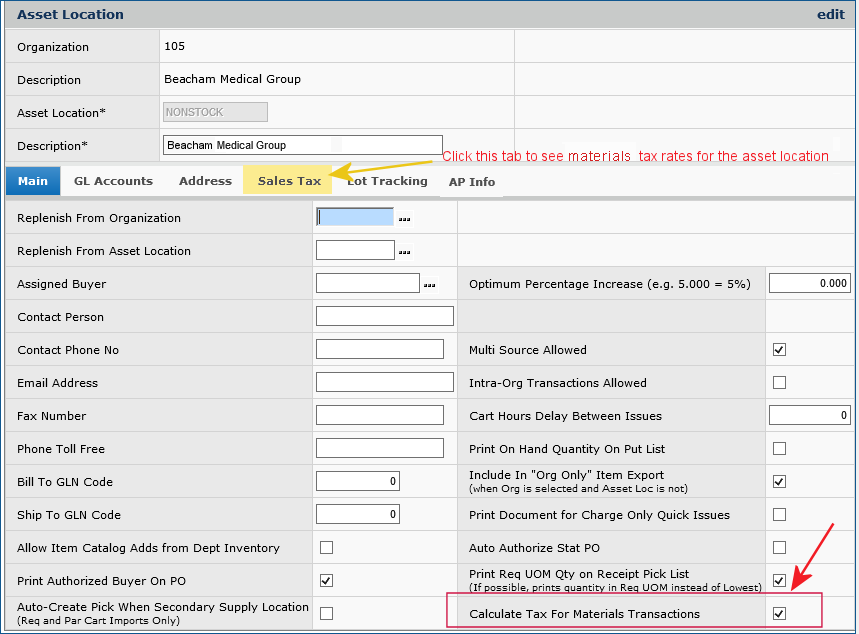
Figure 5 - Setting the Materials Tax Flag for an Asset Location
To display tax data for an
asset location:
Note: You cannot edit an asset location record unless your data profile contains the asset location. You must also have permission to maintain the asset location. See "Restricting Users from Editing Asset Location Records."
- From the Materials Management main Contents, select Tables
> Asset Locations. A list of asset locations appears.
- Locate the asset location on the list. Click the edit icon,
or select Menu > Edit.
The Asset Location edit panel appears.
- On the Main tab, select the box labeled Calculate Tax For Materials
Transactions. (Figure 5, red arrow).
Note: The initial setting of this field (for new asset locations, and at implementation) matches the setting of the same field on the Organization record.
- Select the Sales Tax tab to display the Sales Tax panel (similar to Figure
3).
- Enter information in the fields on the Sales Tax panel as
needed. You may enter State, City, or County tax
rates. Default accounts are populated by ERP.
- When you have finished entering information, click Submit.
- Click Submit. You are returned
to the Asset Locations list.
Set Up Tax for Vendor Buy-From Locations
A vendor buy-from location can also be assigned tax data.
To enter tax data
for a vendor buy-from location:
- From the Materials Management main Contents, select Vendors >
Vendors.
- On the Quick Click menu, select Buy From Locations.
- Enter the Vendor Name in the box and click Go.
The buy-from locations for the vendor appear.
- Next to the buy-from location of interest, select Menu > Sales Tax.
If tax information exists for Materials Management, the Sales Tax Rates list appears.
This list shows each organization for which tax data are established for
the vendor buy-from location.
- Click the edit icon or select Menu > Edit next to an organization
to edit sales tax data.
If no tax rates are established for any organization, No Data appears.
- Click New. The Buy From Location Sales Tax edit panel
appears, similar to Figure 3.
- Select the Organization from the prompt.
- Select the appropriate Tax Rate Code for State, City,
and/or County, as appropriate, from the prompts.
- GL accounts for the tax expense and tax liability appear in the fields following
the selected Tax Rate Code. You can select different accounts, if
you wish.
Note: Tax rates and their associated GL accounts must
be set up in advance. If No Data appears when you click a Tax
Rate Code prompt, tax rates have not been set up. Similarly, if no GL
accounts appear when you select a Tax Rate Code, none have been associated
with the tax rate for your organization. (See Creating
Tax Groups.)
- When you have finished entering information, click Save.
- Click Submit. You are returned to the Sales Tax Rates list.
- Click Refresh to see the organization and the rates listed.
Order of Processing Materials Tax
When a department, asset location, organization or vendor requires materials tax to be calculated, ERP checks whether a tax rate has been specified on the Sales Tax tab. If so, the application uses it. If not, ERP checks other possible MM tax settings in hierarchical order until tax is found.
The order the application uses to search for a materials tax rate is the following:
Purchase Orders - No direct delivery
- Separate PO by Department = Yes and Direct Delivery = No:
- Stock items: Vendor Buy-From Location > Asset Location > Org
- Non-stock and non-file items: Vendor Buy-From Location > Department > Asset Location > Org
If tax has not been specified at any level, an error appears to tell the user that tax should be set up at the department level.
- When Separate PO by Department = No, the order is Vendor Buy-From Location > Asset Location > Organization.
Purchase Orders - With direct delivery
How ERP decides if a non-file line on a PO is taxable
Tax is calculated at the department level only when the Separate PO by Department is specified for the department's PO.
Separate PO by Department = Yes, and...
- Calculate Tax for Materials Transactions for the department is Yes (checked): the Taxable field defaults to enabled for non-file purchase order lines. (Figure 6 displays the Taxable field on a non-file PO line edit panel.)
- Calculate Tax for Materials Transactions for the department is No (not checked): the Taxable flag defaults to disabled for non-file PO line edit panel.
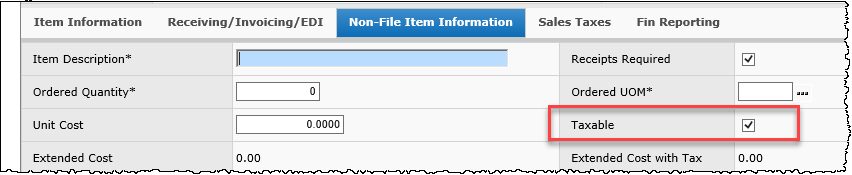
Figure 6 - The Non-File Edit Line on a Purchase Order
Requisitions
- Stock items: Requisition's supplying asset location > supplying organization
- Non-stock, non-file, or direct delivery items: Primary Vendor Buy From Location > Department > Asset Location > Org
How ERP decides if a non-file line on a requisition is taxable
- Tax is calculated at the department level only when Separate PO by Department is specified for the requisitioning department.
Separate PO by Department = Yes, and...
- Calculate Tax for Materials Transactions for the department is Yes (checked): the Taxable field defaults to enabled for non-file requisition lines.
(Figure 7 displays the Taxable field on a non-file line requisition edit panel.)
- Calculate Tax for Materials Transactions for the department is No (not checked): the Taxable flag defaults to disabled for non-file requisition lines.
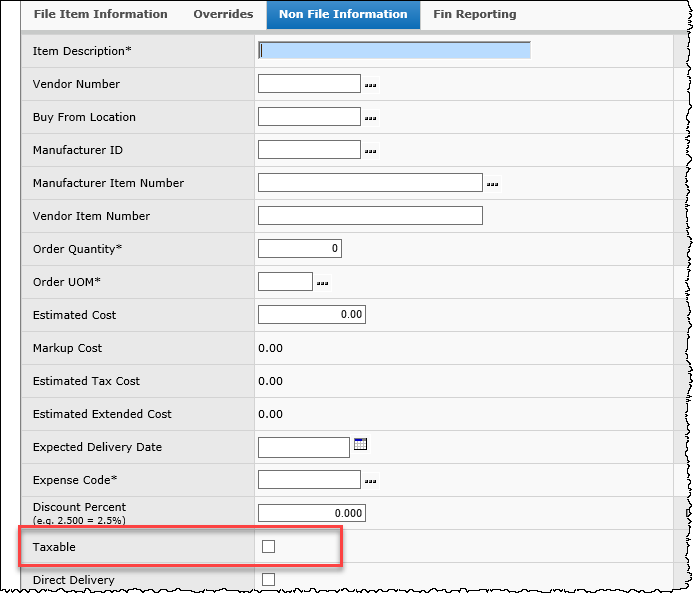
Figure 7 - The Non-File Edit Line on a Requisition
To specify that an item
is subject to tax:
- On the Current Settings, set the Asset Location field to the correct asset location.
- From the Materials Management main Contents, select Inventory > Item
Inventory.
- On the Quick Click menu under I would like to..., select Edit.
- Enter the item number in the Item No box and click Go.
The Item Inventory edit panel appears (Figure 8).
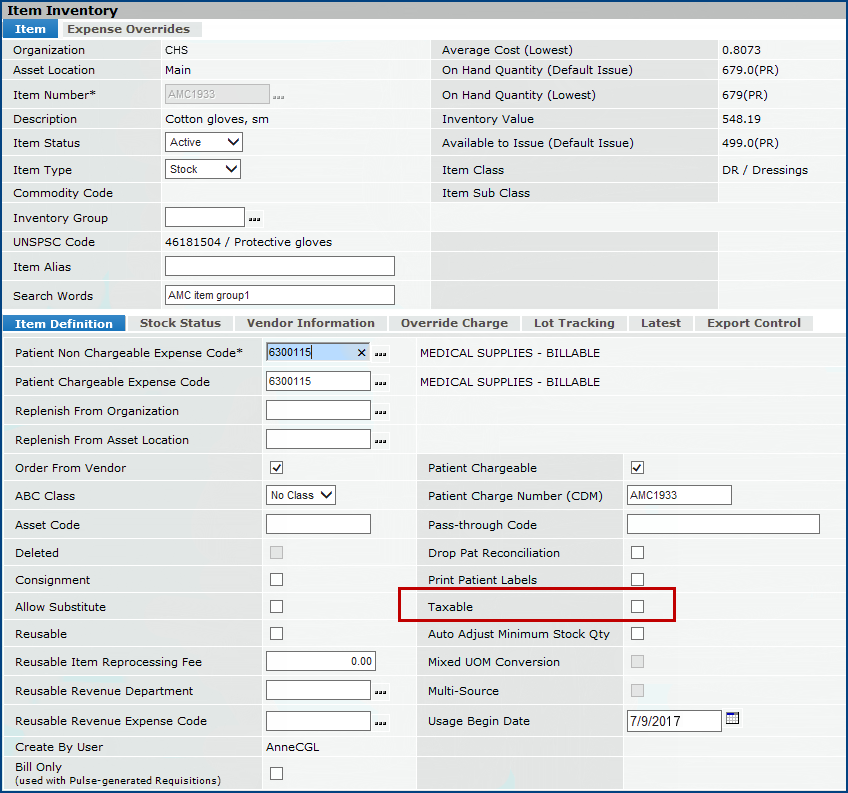
Figure 8 - Item Inventory Edit Panel
- On the Item Definition tab, in the right column, select the Taxable
box.
- Click Save or Submit. You get a message
such as:
Warning! Changing the
item's "Taxable" status also changes the taxable status for this item
in all Asset Locations for Organization [name of organization]. Press OK
to continue and change item(s), or CANCEL to return.
-
Click OK if you wish to continue. The taxable status of
the item is changed.
Notes
If an
item is designated as taxable, the system calculates the tax expense for...
- Inventory
adjustments
- Purchase orders
The tax liability for taxable items on a purchase order receipt equals the
inventory transaction's Adjusted Value times the current tax rate,
using the rules for determining
the tax rate. The system debits the Sales Tax Expense account(s) and credits
the Sales Tax Liability account(s). The actual tax liability for a purchase
order line can be different from the estimated tax liability if the tax rate,
or tax status of the item or organization has changed.
For organizations that use receipt exceptions, the system calculates the actual
tax liability only when a receipt exception is cleared.
Similarly,
for invoice exceptions, the system calculates the tax liability when invoice exceptions
for a PO are cleared, and adjustment receipts are processed.
In
the case of inter-organization transfers, the system creates the General Ledger
transaction for the transfer of tax expense, even if the GL accounts
for the two organizations are the same. This way, the GL entry can be tracked.
The
tax liability is not transferred, however. Tax liability for an item
is recorded when the receipt for the item is processed. The tax liability, therefore,
remains in the original organization, since that organization pays the invoice
and records the tax liability offset.
If the source and target asset locations have different tax rates, the system
uses the source asset location's tax rate(s).
For
credit purchase orders, the system determines if the organization and item are
taxable, and reverses the tax liability General Ledger accounts, as follows:
– The system calculates the estimated taxes, according
to the process outlined previously.
–
The system creates general ledger transactions for the reversal of the tax liability
by crediting Sales Tax Expense accounts and debiting Sales Tax Liability accounts.
Process Flow for Determining the Applicable Materials Tax
Copyright © 2023 by Premier Inc. All rights reserved.