Financial Report Writing - Advanced Topics Version
Contents
Overview
This topic is the sequel to Creating Financial Reports in General Ledger. Creating Financial Reports describes how to use the Financial Report Writer and ProSheet to build and run financial reports. The paragraphs below contain information about additional features and activities for the Financial Report Writer.
Prerequisites
For the advanced information in this topic, you need to be familiar with the material covered in Creating Financial Reports in General Ledger, including how to create a report and get output. You should also be familiar with your hospital's Chart of Accounts, and how to write account masks to access account information.
Security
Users of the Financial Report Writer must have the role object General Ledger Report Writer set to Create as a minimum. The setting must be All if a user is both creating and deleting reports. The users' data profiles must include the appropriate organizations and departments.
Data Profile Security for the Financial Report Writer and ProSheet
Data Profile settings for allowed organizations and departments control the account data that you can access using the application's account inquiry, the Financial Report Writer, and ProSheet’s account retrieval and downloading functions.
Important: This feature was deployed with Update 6.7.8. If you are using it for the first time since it was made available, note the following:
For ProSheet users, this security feature affects data and calculations for any version of ProSheet currently installed on your system, as well as on the new ProSheet version 06.08.007.
You need to be aware of the following:
The organizations/departments whose account data you retrieve using Account Inquiry, the Financial Report Writer, custom reports, or ProSheet must all be included in your Data Profile. If organizations/departments are not included in your Data Profile…
- The downloaded data will be different than downloaded data that included the missing organizations/departments.
- The results of any calculations will be different.
This security also applies to account masks, and to account selection templates called in to ProSheet, account inquiry, or used with the Financial Report Writer. Accounts identified by a mask are not available if the organizations/departments “wildcarded” in the mask are not in your Data Profile.
You can restrict financial reports to specific organizations. You can also restrict account selection templates (see Using Account Templates) to particular organizations. Restricted account selection templates cannot be used to create custom financial reports, account inquiries, row/column definitions, and ProSheet reports by users who are not authorized for the relevant organizations (in Data Profile settings).
Make sure that your Data Profile contains the organizations/departments whose data you need to work with. If you need to have organizations/departments added to your Data Profile, contact your site’s System Administrator. For questions or problems, the Solutions center is available at 877.633.4911.
Restrict a Financial Report by Organization
By (optionally) restricting financial reports by organization, you can limit access to them based on users' data profiles.
When financial reports or selection templates have been restricted by organization, reports can only be displayed/edited by users with data profile access to at least one of the restricted organizations. This feature helps you avoid having organizations inappropriately read and/or edit each other's financial reports.
Setup: Financial Report Restriction by Organization
Setup has these steps:
- In System Values, selecting the field Restrict Financial Reports/Selection Templates by Org.
- Identifying restricted organizations for one or more financial reports.
To set the System Values field:
- From
the main Contents, select Work in Administration > Administration
> System Values.
The System Values list appears.
- Select Menu > Edit. The options panel appears.
- Click the Other tab. The Restrict Financial Reports/Selection Templates by Org is at the bottom (Figure 1).
- Click the check box next to Restrict Financial Reports/Selection Templates by Org to select it.
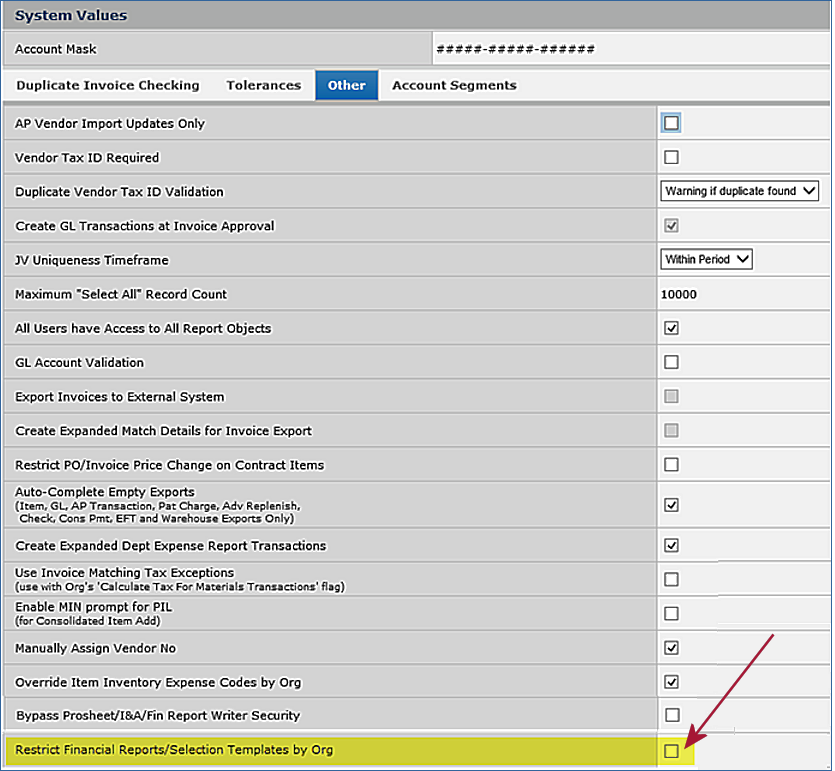
Figure 1 - The System Values "Other" Panel with the Restrict Financial Reports Options
The initial setting for the Restrict Financial Reports... field is "off" -- financial reports are not restricted. Once you enable the option, if a user tries to disable it, a warning message appears. The warning states that existing restrictions will not be enforced when the flag is disabled.
- Confirm the action by clicking either OK or Cancel to close the warning message.
Note: The ability to change the Restrict Financial Reports... field on the System Values Other tab is controlled by the role object "GLFINRptWtr." This role object must be set to All.
When the system value Restrict Financial Reports/Selection Templates by Org field is enabled, the menu option Restricted by Org is available on the list of Financial Report Definitions. Also, on the list of Financial Report Definitions, the sortable column Restricted by Org appears (Figure 2). This field is audited.
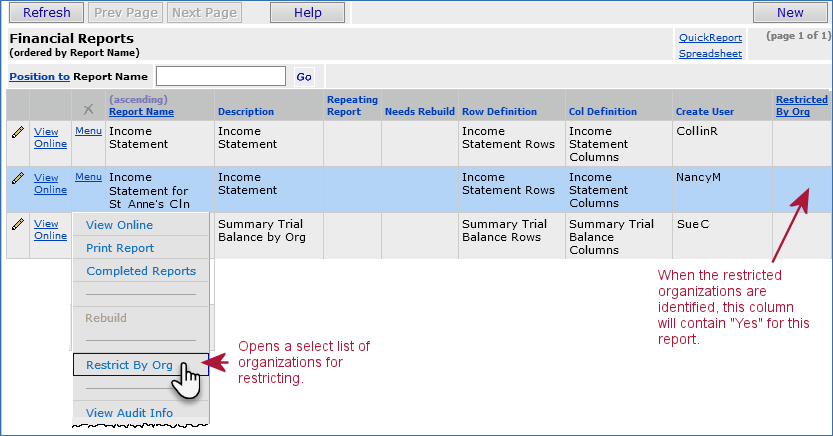
Figure 2 - List of Financial Reports
This menu option opens a list of organizations already available to the user based on his/her data profile. From the list, you can select organizations that will have access to the financial report. For example, in Figure 3, clicking the box next to 2162 - St. Anne's Clinics would only allow users with St. Anne's Clinics in their Data Profiles to access the report "Income Statement for St. Anne's Clinics." In contrast, a user logged in to ERP with the Current Settings Organization 2161 would not be able to access the report because the report does not include 2161 as one of the restricted organizations.
- When a user has a restricted organization in their data profile, the associated financial report is available to the user, even if they are not logged into that specific organization.
- If a report is not available to a user because the user does not have the restricted organization in his/her data profile, the user will not even see the report in the list of Financial Report Definitions.

Figure 3 - Organizations for Selection as Restricted
To identify the organization(s) for restriction,
- Open the list of financial reports (GL main Contents > Financial Report Writer > Financial Report Definitions) (Figure 2).
- Locate the report or reports of interest on the list.
- Click Menu > Restrict by Org next to the report of interest. A selection list of organizations appears (Figure 2).
- Click the box in the Select column next to the organization(s) that you wish to set restrictions for (Figure 3). To select all organizations,
click the down arrow next to Select Action and choose Select All.
- You can also go back and Unselect all of the organizations.
- Update List refreshes the list with your selections (deselections).
- Select Update List.
- Click Submit. The restrictions are in place for the report.
Important: If you add additional organizations to a data profile, you need to use this feature to restrict any of the added organizations, as needed, even if you used Select All in your initial set-up. In other words, Select All only marks the organizations that are currently in the target data profile when you use this feature. Adding new organizations to the Data Profile turns the restriction off.
Creating Stored Financial Report Writer Column/Row Definitions
When you build new row and column definitions for a financial report, the system saves them as a group and makes them available for subsequent use in other reports. Even if you are not going to use row or column definitions right away in a report, you can create the definitions and store them.
To create and store a set column/row definitions:
- From the General Ledger main Contents, select Financial Report Writer > Column Definitions or Financial Report Writer > Row Definitions.
The list of stored column definition or row definition sets appears. Figure 4 shows a list of column definition sets; the list of row definition sets is similar. (This procedure uses columns for the examples.)
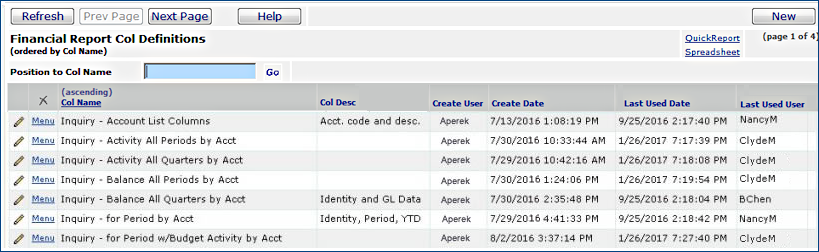
Figure 4 - List of Stored Column Definitions
- Click New to create a group of column definitions (or row definitions, if you are working with the rows list).
The Financial Report Col Definition panel appears (Figure 5). (A similar Financial Report Row Definition panel appears for rows.)
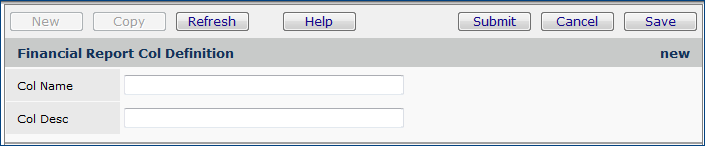
Figure 5 - Financial Report Column Definition Panel: Identify Column
- Enter a name for the set of column definitions, and if desired, a description. The name and description that you enter will appear on the list of available column definitions.
- Click Save.
- Click Submit.
The Report Column Definition panel (or, for rows, the Row Definition panel) appears (Figure 6). Initially, the panel shows No Data under Report Col Details. When you define each column (or row), the system will list it.
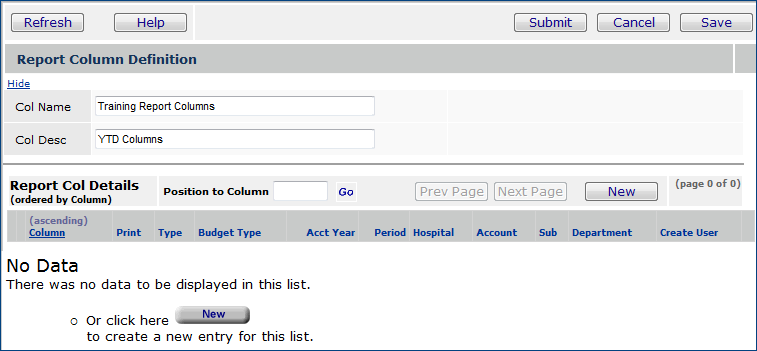
Figure 6 - Report Column Definition Panel
- Click New to enter the first column definition in the set.
The Report Col Detail panel appears (Figure 7). (For rows, the system displays the Report Row Detail panel. See Figure 8.)
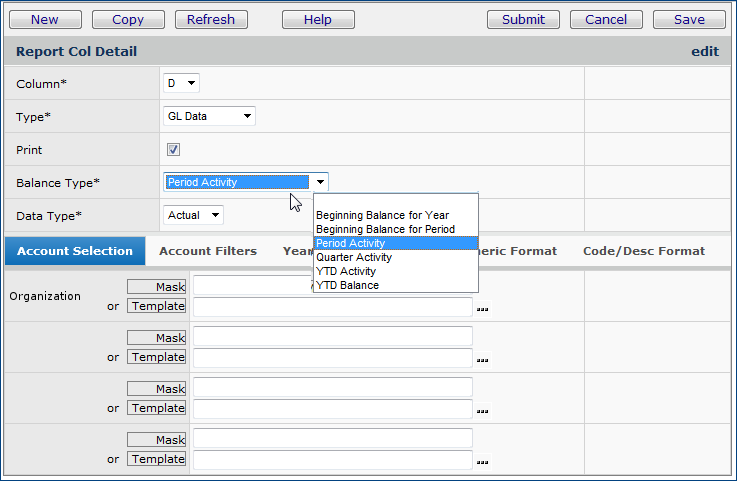
Figure 7 - Financial Report Column Detail Panel
- Complete the fields for column information.
The Column Detail panel is described in Creating Financial Reports (Also, see the instructions for the Row Detail panel.)
In summary, to complete the Report Col Detail panel:
- Select a letter to designate the Column.
- Select the Type of data for the column.
Figure 4 shows GL Data, but you can also create a column containing an account code, text, or a formula; or you can create a blank column.
- Check the Print box if you want the column to appear on the report.
- Select the Balance Type.
- Select the Actual or Budget Data Type.
If you need to complete any of the tabbed fields, see Advanced Notes on Columns.
For rows, the Report Row Detail panel is in Figure 8.
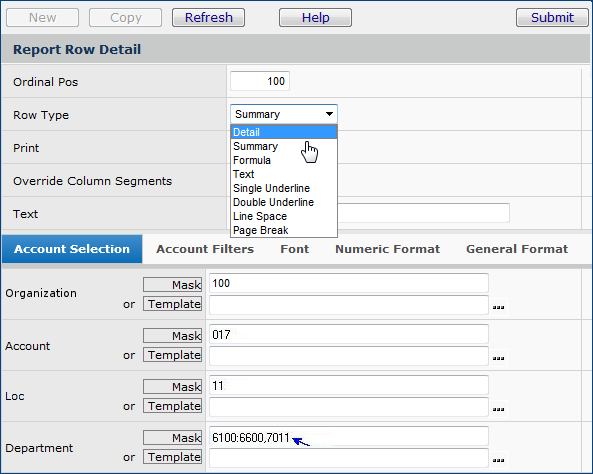
Figure 8 - Financial Report Row Detail Panel
In summary, to complete the Report Row Detail panel:
- Enter the row number for the row in the Ordinal POs field.
Hint: You may wish to number rows in increments of ten or 100 (or some other value).
- Select the Row Type from the drop box. Rows can contain data, formulas, text, or formatting (line, space, page break).
-
If the row will contain data, the options are:
Detail - A detail row shows information for one or more individual accounts. You can specify the account(s) using a template or a mask.
Summary - A summary row shows information for one or more summary accounts.
- A row can contain a formula. In this case, select Formula. See Use Formulas.
- For a row that will contain text or format information, select one of these options:
Text - The row contains text. (See the discussion about Text rows.)
Single Underline - The row contains only a single underline.
Double Underline - The row contains only a double underline.
Line Space - The row is blank, and used as a spacer.
Page Break - The row triggers a page break.
- Select the Print field if you want the row to print on the report. A report may contain rows that you do not wish to output on the report. In that case, do not select Print for those rows.
- In the report writer, you can override column account segments (if any -- columns do not usually contain GL account segments) with row segments. Check the Override Column Segments box if the account segment(s) for the row override the segment(s) specified for columns.
- Use the fields on the Account Selection tab to identify the account codes for reports' rows.
In specifying account codes, you can select an
account code template, or write a new mask to identify accounts.
The mask is a shorthand that tells the system
which account codes to include
in
the report. See Account Code Masks.
The other tabbed fields are described in Advanced Notes on Rows.
- As you fill out the details for each row or column, click Save, then Submit.
The system displays the Report Column Definition panel, Figure 6 (or the Report Row Definition panel, if you are working with rows).
- Click Refresh to view the column or row details that you entered.
- Click OK when you are finished. The system displays the Financial Report Column (or Row) Definitions list.
Using Account Templates
A hospital sets up templates to identify account codes when the same group of accounts is used often for various general ledger activities. Account templates contain masks.
Account templates can be used in financial reports to define rows and columns, and also to run an inquiry or analysis on accounts represented in the template,
To create and store templates:
- From the General Ledger main Contents, select Account Management > Account Selection Templates.
The Account Selection Templates list appears (Figure 9) or No Data if none exist.
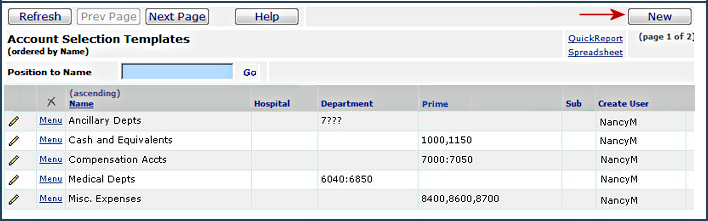
Figure 9 - List of General Ledger Account Selection Templates
-
Click New to create a new template.
The Account Selection Template edit panel appears (Figure 10).
Note:
You can edit an existing template by clicking the edit icon  or selecting Menu > Edit.
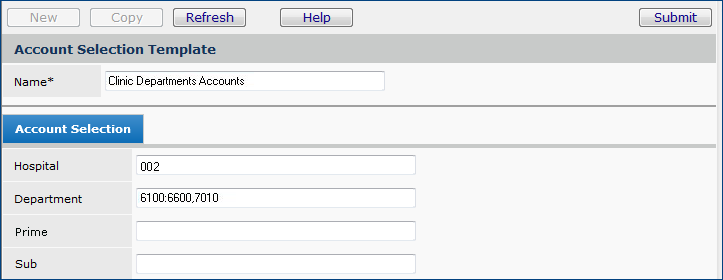
Figure 10 - Account Selection Template Edit Panel
- Enter the account segments for the accounts using a mask.
For example, the medical center for Figure 10 has two hospitals (or organizations): 001 and 002. The value 002 is entered for the Hospital segment to select the 002 hospital The Department segment mask specifies accounts for all departments between 6100 and 6600 inclusive, and department 7010. No Prime or Sub values are entered because the template is intended to include all accounts that contain the department segment values.
- Click Save, then click Submit.
You are returned to the Account Selection Templates list.
- Click Refresh to view your new template, which is available for use.
Restrict a stored account selection template by organization
This feature is similar to restricting financial reports by organization. In restricting account selection templates by organization, you can prevent unauthorized users from seeing the templates, and using the templates in custom financial reports, ProSheet reports, stored row/column definitions, and account inquiries. Any template restricted by organization(s) will not be available -- or visible on a select list -- to users who do not have Data Profile access to the organization(s).
This feature helps you avoid having affiliate organizations inappropriately read and/or edit each other's financial data.
Setup has these steps:
- In System Values, selecting the field Restrict Financial Reports/Selection Templates by Org.
- Identifying restricted organizations for one or more account selection templates.
Setting the System Values Restrict Financial Reports/Selection Templates by Org field
This process is outlined above and is the same for account selection templates as for financial reports.
The initial setting of the field is "unselected" (i.e., off). Account selection templates are not restricted.
When you create a new account selection template, the option also defaults to off. Once you enable the option, if a user tries to disable it, a warning message appears. The warning states that existing restrictions will not be enforced when the flag is disabled.
Note: The ability to change the Restrict Financial Reports... field on the System Values Other tab is controlled by the role object "GLFINRptWtr." This role object must be set to All.
When the system value Restrict Financial Reports/Selection Templates by Org field is enabled, the menu option Restrict by Org is available on the list of Account Selection Templates.
Also, on the Account Selection Templates list, the sortable column Restricted by Org appears. This column value (Yes, when the account template is restricted) is audited. The Account Selection Templates list menu is in Figure 11.

Figure 11 - List of Account Selection Templates
GL main Contents > Financial Report Writer > Account Selection Templates
The Restrict by Org menu option opens a list of organizations already available to the user based on his/her data profile. From the list, you can select organizations that will have access to the account selection template. For example, in Figure 12, clicking the box next to 2166 - Prescott Ventura Center would only allow users with Prescott Ventura Center in their Data Profiles to access the account template "Facilities, Construction, Grounds." In contrast, a user logged in to ERP with the Current Settings Organization 2161 would not be able to access the template because the account template does not include 2161 as one of the permitted organizations.
- When a user has a restricted organization in their data profile, the associated account selection template is available to the user, even if the user is not logged into that specific organization.
- If an account selection template is not available to a user because the user does not have the restricted organization in his/her data profile, the user will not even see the template in the list of Account Selection Templates.
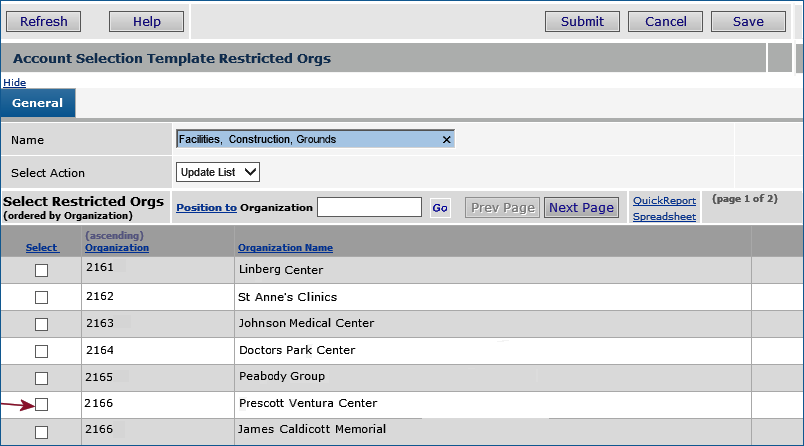
Figure 12 - Organizations for Selection as Restricted for an Account Template
GL main Contents > Financial Report Writer > Account Selection Templates > Menu > Restrict by Org
To identify the organization(s) for restriction,
- Open the list of account selection templates (GL main Contents > Financial Report Writer > Account Selection Templates) (Figure 11).
- Locate the account selection template or templates of interest on the list.
- Click Menu > Restrict by Org next to the template of interest. A selection list of organizations appears (Figure 12).
- Click the box in the Select column next to the organization(s) that you wish to set restrictions for (Figure 12). To select all organizations,
click the down arrow next to Select Action and choose Select All.
- You can also go back and Unselect all of the organizations.
- Update List refreshes the list with your selections (deselections).
- Select Update List.
- Click Submit. The restrictions are in place for the account template.
Important: If you add additional organizations to a data profile, you need to use this feature to restrict any of the added organizations, as needed, even if you used Select All in your initial set-up. In other words, Select All only marks the organizations that are currently in the target data profile when you use this feature. Adding new organizations to the Data Profile turns the restriction off.
Use Restricted Account Selection Templates in ProSheet
In ProSheet, you can pull in account data using an account selection template (Figure 13). If an account selection template is restricted to particular organizations, you can only access the template and use it in ProSheet if the organization is included in your Data Profile. The account selection template will not appear in the Formula Builder Selection Templates box.
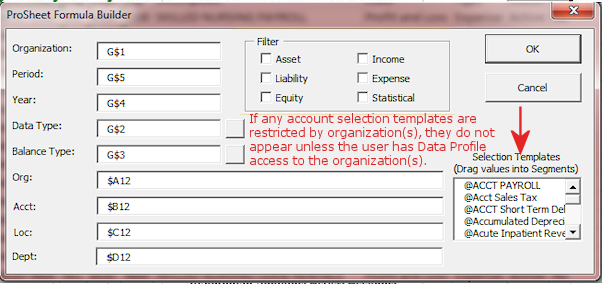
Figure 13 - The Formula Builder Panel with the Account Selection Templates Box
Copying a Financial Report Definition Created with the Report Writer
Copying and then editing an existing Financial Report Definition can be a handy shortcut to generating new reports. When you copy a Financial Report Definition...
Report titles are copied.
- All of the original report definition's
titles are copied to the new report.
Row and column definitions are not copied.
The system does not copy the row and column definitions used in the original
report, although those row and column definitions have been saved.
- If you wish to use the original row/column definitions in your copied report, do the following:
- Locate the original row and column definitions on the Report Column Definitions list (Figure 4) and/or Report Row Definitions.
- Make a duplicate of the
original row/column definitions. (Select Menu > Copy next to the definition to be copied.)
- Edit the copies, if you wish.
- On the GL Report Definition Panel (Figure 14), specify the copies in the Row Definition field and in the Column Definition field.
Because column titles are associated with the column definition, not with the report, financial
report column titles are portable. When sharing and reusing
column definitions across multiple financial reports, you do not need to
re-create the column titles.
All reports which use
the same column definitions will have the same column titles.
- If you need a different
column title in a report: copy the column definition, change the column title(s),
and use the copy in the new report.
For details on setting up rows and columns, see the discussion of the Row Definition panel and the Column Definition panel.
To copy an existing financial report:
- On the Financial Report Definitions list next to the report, select Menu > Copy.
The GL Report panel appears (Figure 14).
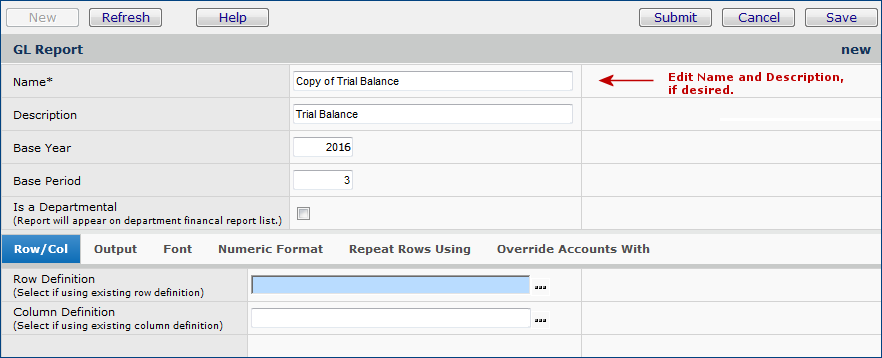
Figure 14 - GL Report Definition Panel
- Complete the information at the top of the report: edit the report's Name and Description, the Base Year and Base Period. Select the field Is a Departmental if you wish the report to appear on a list of reports available to departmental staff. For further information on the GL Report panel, see Creating a New Financial Report Definition.
- Use one of the following methods to enter row/column definitions:
- If you wish to re-use existing row/column definitions on the copied report,
click the prompt for the Row Definition or Column Definition field, and make a selection (Figure 14).
- Click Save, then click Submit.
The copied report is displayed.
- If you made a duplicate of the original row/column definitions that you
wish to use with some changes, select the duplicate Row Definition and/or Column Definition.
- Click Save then click Submit.
The report appears in the Financial Report Editor.
- On the report, click Edit All next to Rows or Columns to edit the definitions,
or click the row or column header.
- To create new row and column definitions for the
copied report, leave the Row Definition and Column
Definition fields blank.
- Click Save, then click Submit.
The report appears in the Financial Report Editor.
- On the report, click New next to Rows or Columns to create new definitions.
Creating Consolidated Financial Reports
Overview:
Consolidated Financial Reports are Departmental Financial Reports that users can run for multiple departments. Consolidated Financial Reports are defined by an Account Selection Template.
Consolidated Financial Reports are different from the financial reports available to departments (on the Departments list) which only allow departmental financial reports to be run for a single department.
 Users must be given explicit authority to the Account Selection Templates that they can use for Consolidated Financial Reports.
- For each Account Selection Template, your system administrator must identify users who are authorized to run Consolidated Financial Reports with the template.
- When running a Consolidated Financial Report, a user must select an Account Selection Template. Only the templates authorized for the user are available for selection.
The Consolidated Financial Report that is produced includes financial data from all the departments that fall within the department mask on the Account Selection Template. The Organization is always the one in Current Settings.
Consolidated Financial Reports are accessed from a menu in Materials Management and General Ledger.
- Select Reports > Consolidated Financial Reports.
Financial Report definitions are located in General Ledger.
- Select Financial Report Writer > Financial Report Definitions.
Security:
- When a user is added to an Account Selection Template as Consolidated Financial Report user, the system checks that the user has authority (based on the user's data profile) to data for all the departments defined by the department mask. A warning appears when the system finds departments that are not available to the user, but the template is authorized for the user nevertheless.
- When a Consolidated Financial Report is processed, the system checks again that the user has authority (based on the user's data profile) to all the departments encompassed by the department mask. An error occurs and processing stops if the system finds departments from the template that are not available to the user.
Two role objects control access to Consolidated Financial Reports.
- The Role Object "ConsFinRpts" lets users run reports. This role object must be set to All for a user to display the list of reports and run them.
- The Role Object "ConsFinRptUsers" allows you to assign users to Account Selection Templates for Consolidated Financial Reporting. The setting must be Create or higher.”
On the user profile GL Limits tab, a new authority -- Allow Access to All Account Selection Templates -- allows user to view all eligible templates available when running a Consolidated Financial Report. The user does not have to be assigned to each template separately.
Note: This option is intended for "super users" who have authority for all departments.
To run a Consolidated Financial Report:
- From General Ledger main Contents, select Financial Reports > Consolidated Financial Reports (Figure 15).
Note: You can also access consolidated financial reports from the Materials Management Reports menu.
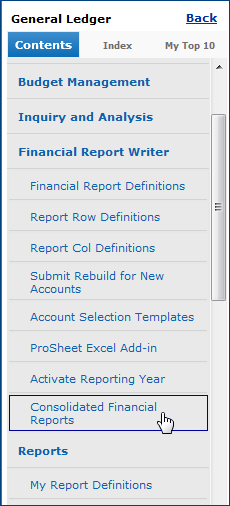
Figure 15 - The Consolidated Financial Reports Menu Element
A list of departmental reports appears.
- Locate the report of interest.
The method that you use to run a report depends on whether the report is for one department, or repeats for multiple departments.
- To run a single department's report, click View Online or Menu > View Online.
- To run a repeating report -- a report that has data for multiple departments -- select Menu > Print Report.
Repeating reports cannot be run using View Online.
The View Consolidated Financial Report panel appears (Figure 16).

Figure 16 - Running a Consolidated Financial Report, General Tab
- On the General Tab, enter values for the Base Year and Base Period for the report.
- Click the prompt in the Output Type field to select the type of output that you wish.
- Spreadsheet generates output as an Excel spreadsheet.
- PDF Document produces reports in the Adobe Acrobat .pdf format.
Note: For repeating reports, you must select either PDF Document or Spreadsheet.
- Click the Account Selection tab.
Account selection fields appear (Figure 17).
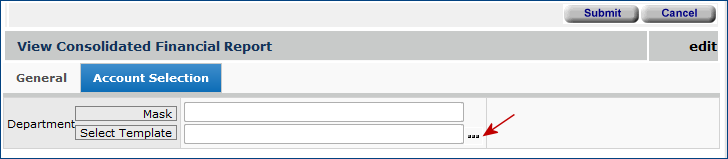
Figure 17 - Running a Consolidated Financial Report, Account Selection Tab
- Click the prompt in the Select Template field.
A list of templates appears. These are the templates that you are authorized to use.
- Select a template. (The system fills in the Mask field.)
Note: If the template displays several department ID numbers, it is a repeating report. If you used View Online to print the report, you will need to go back and select another print method. (Otherwise, when you click Submit, you get an error message.)
In this case:
- Click Cancel to close the View Consolidated Financial Report panel, and return to the Consolidated Financial Reports list.
- Next to the report of interest, click Menu > Print report.
- When the View Consolidated Financial Report panel appears again, select either the PDF Document or Spreadsheet Output Type.
- Click the Account Selection tab and choose the template.
- Click Submit.
The report runs, and output is sent to the designated location.
Consolidated Financial Report Output:
The output for Consolidated Financial Reports is the same as the output format for any other financial report, with this difference:
- The report variable @Dept on the report definition prints as blank on the report output.
- The report variable @Deptname prints the Account Selection Template name.
Figure 18 is an example.
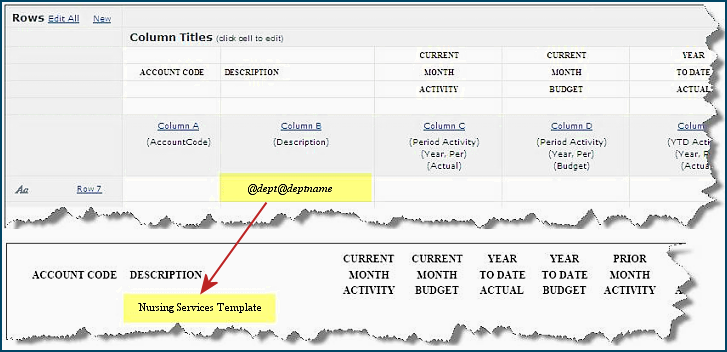
Figure 18 - Template Name Prints on Consolidated Financial Report
To authorize a user for an Account Selection Template to run Consolidated Financial Reports
- From the General Ledger main Contents, select Account Management > Account Selection Templates.
The list of account selection templates appears (Figure 9).
- Next to the template that you wish to assign, click Menu > Consolidated Financial Report Users.
A list of users who are currently assigned to the template appears (Figure 19). (No Data appears if no users are assigned.)
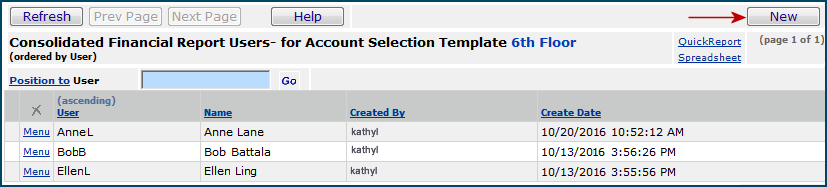
Figure 19 - List of Users Assigned to an Account Selection Template
- Click New.
The Consolidated Financial Report Users edit panel appears (Figure 20).
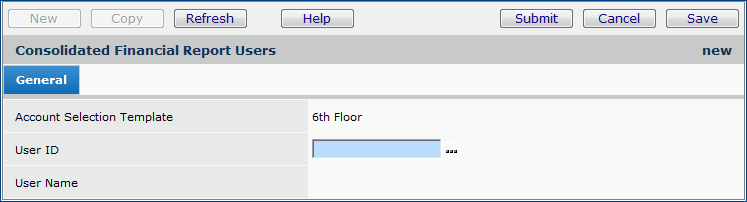
Figure 20 - Consolidated Financial Report Users Edit Panel
- Click the prompt in the User ID field and select a user.
- Click Submit.
The list of users assigned to the template reappears.
- Click Refresh. The newly assigned user is on the list.
Overriding Report Parameters
In the Editor: Overriding Column Definitions
When you are creating or editing a Financial Report, you can override column definitions. Column definitions take precedence over row definitions. The Row Definition panel lets you override a column definition with a row definition.
- On the Financial Report Row Detail panel, select the field Override Column Segments in the top part of the panel (see Figure 8).
At run time: Overriding Account Segments
Your financial report will be set up to collect data on accounts that you have defined. When you run the report, you can get data on the report for a different set of accounts by using the tab Override Accounts With on the View Report panel (Figure 21).
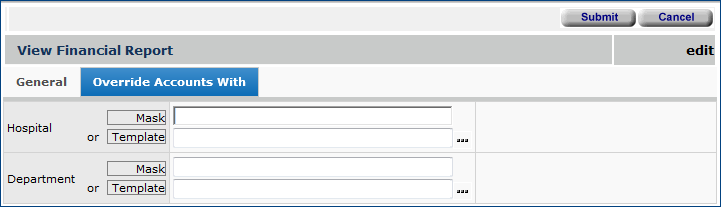
Figure 21 - Overriding Account Segments for a Report at Run-Time
On the panel, enter the segments of the accounts to use as overrides. You can enter a mask, or select a stored template. Click Submit to run the report.
Repeating a Report for Different Departments
On the GL Report Definition panel (Figure 14), you can use the tab Repeat Rows Using to run a report for different departments and/or organizations.
Typically, a report that contains values in Repeat Rows Using has a Row Definition with an unspecified account segment. For example, Figure 21 shows part of the Report Row Detail panel with information missing in the Organizations segment field (and for other fields also). The report user can enter the Organizations segment(s) in the Repeat Rows Using fields.
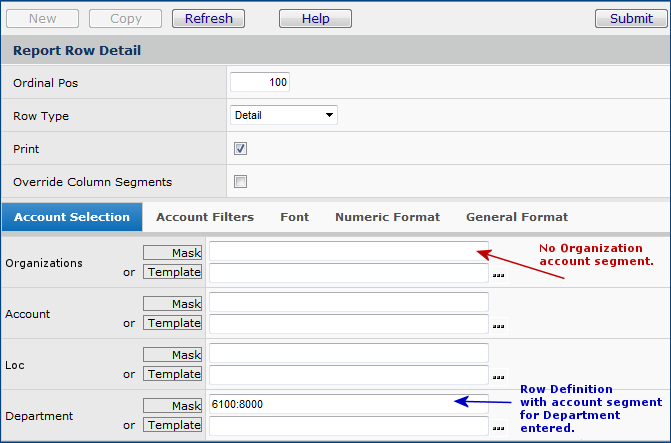
Figure 22 - Report Row Details Panel With Account Segment Information Missing
On the Repeat Rows Using tab (Figure 23), you enter a mask (or template) for the segment that fills the "blank" segment space in the row definition.
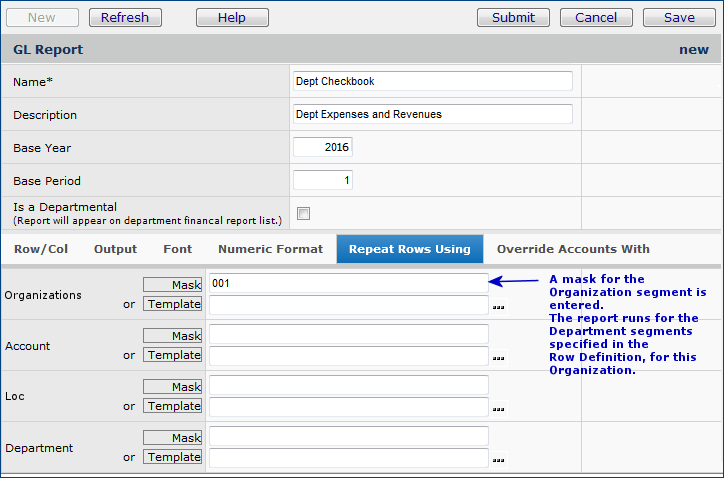
Figure 23 - Identifying an Account Segment at Run Time with the Repeat Rows Using Tab
Important: You must run a repeating report using the Print method (as described in the next steps). Repeating reports cannot be run using View Online unless you override the repeating account segment(s).
To run a repeating report from the Financial Reports list:
- Next to the report definition, click Menu > Print Report.
The View Financial Report Selection panel appears (similar to Figure 25).
- From the Output Type box, select the output type. For printed reports, the options are Spreadsheet or PDF Document.
- Click Submit.
The system runs the report and puts the output in My Archived Reports. You can view the output and print it.
Changing the Organization's Reporting Year/Period
At the beginning of a new fiscal/reporting year, account balances for the old year need to be moved forward into the new year. The Financial Reports panel Activate Reporting Year provides this utility.
- From the Financial Reports menu, select Activate Reporting Year.
The Activate Reporting Year panel appears (Figure 24).
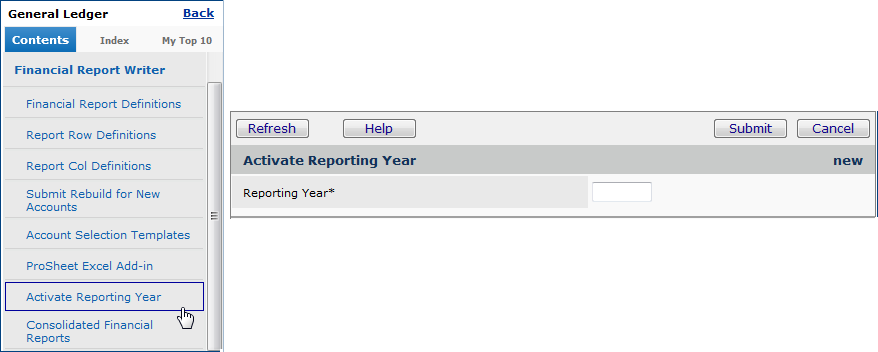
Figure 24 - Activating the New Reporting Year
- Enter the reporting year for the report.
- Click Submit.
The system enters the year end balances in Period 0 for the next accounting year
and updates the Balance Sheet Current Year field on the Organization record's General Ledger Tab.
Outputting a .pdf Report on Legal-Size Paper
Financial reports can use columns A through Z for data. To print 26-column financial reports from Adobe Acrobat .pdf files,
use legal size paper, and perform the steps below.
To output and print a .pdf report on legal size paper:
- In the list of Financial Report Definitions, click Menu > Edit next to the financial report.
The report definition appears in the Financial Report Editor.
- On the report definition, click Edit next to the financial report
name.
The GL Report panel appears. (See Edit a Report's General Characteristics in Creating Financial Reports if you are unfamiliar with this step.)
- Select the Output tab and set the Page Orientation field to Landscape. Set the Paper Size to Legal (Figure 25).
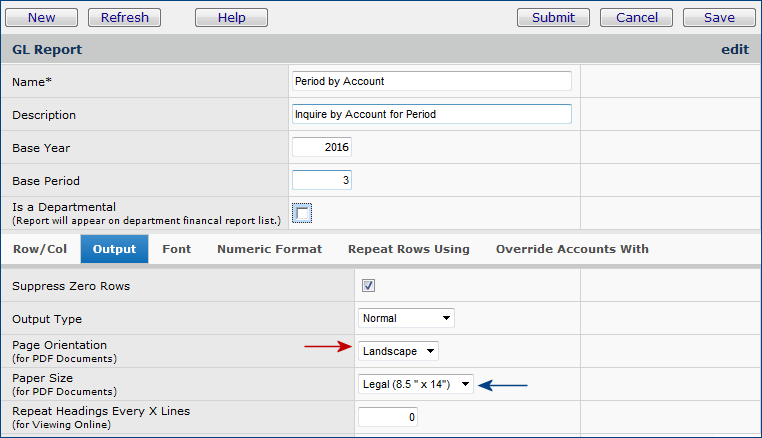
Figure 25 - GL Report Panel Output Tab
- Click Save and Submit.
- Exit the Editor.
The Financial Reports list is displayed.
- Run the report.
- To run the report, select Menu > Print next to the report definition. On the View Financial Report panel, make sure that the Output Type field is PDF Document.
- Click Submit.
Note: You can also run the report from inside the editor. See To run a report from within the editor.
- Open the report in Adobe Acrobat Reader.
-
To open the report, select Menu > Completed Reports next to the report definition. The Completed Reports list appears with the most recently run report at the top.
- Click View Report. The report appears in Adobe Acrobat Reader.
- From the Adobe Acrobat Reader toolbar, click File > Print.
On the Print panel, select the box next to Choose paper source by PDF
page size (Figure 26).
Note: the location of the field Choose paper source by PDF page size may be on a different part
of the panel, or even on a different panel, depending on your configuration.
You may have to look for this field.
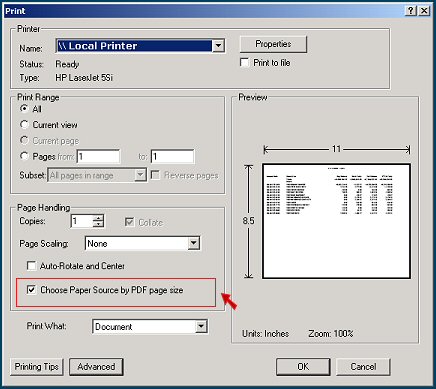
Figure 26 - Adobe Acrobat Reader Print Panel
- Click OK. The report is sent to the printer.
Copyright © 2023 by Premier Inc. All rights reserved.