
| This topic discusses: | Links to related topics: |
|
|
|
| Search Online Doc | |
| Current Release Notes | |
This topic explains how to set values that override vendor AP Location fields at the organization level.
To access organization, department, or asset location data, the organization, department, or asset location must be included in a user's data profile.
The "Vendors" role object controls access to this override feature.
See Work with user roles for details on roles and role objects.
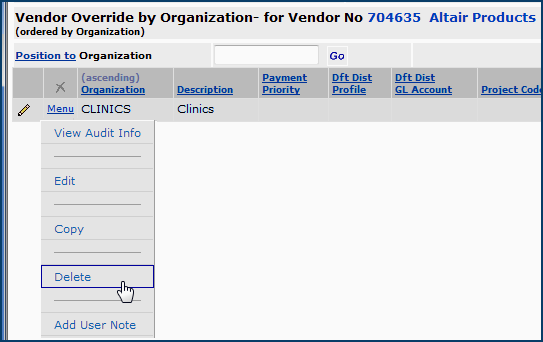
To set up this feature, locate the vendor whose AP location values you wish to override. A menu element opens a panel for entering override fields.
A list -- Vendor Override by Organization - for Vendor No -- appears. The list is initially empty (No Data). When you enter one or more organizational overrides, the organization appears on the list and links to the override information.
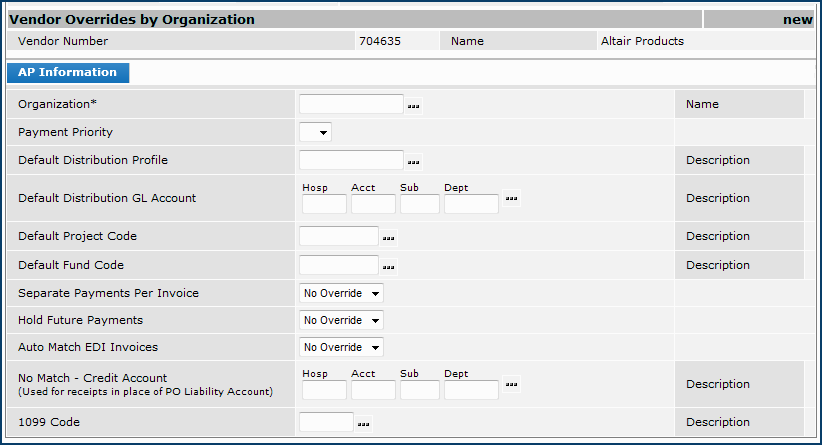
Fields are:
Payment Priority
Select the priority of payments to this vendor. Values are 1 through 9, or you can leave the field blank.
Defaults when creating invoices, recurring invoices, and invoices from check requests.
Payment priorities determine the order in which vendors are paid. If your site uses payment profiles (which are set up in the system's tables), a payment profile may contain a payment priority. For imported invoices, if the imported invoice's Payment Priority is zero, the system uses the vendor's default Payment Priority set in this field. Otherwise, if the Payment Priority is greater than zero, the system uses the payment priority on the import.Default Distribution Profile
Select the default Distribution Profile from the prompt, if applicable. Distribution profiles that you set up in the system specify how invoice charges (such as freight or sales tax) are allocated to different accounts. See Using Distribution Profiles.
The value in this field is used by default for the organization when creating invoices.
Note: When an organization override value is set for a distribution profile, the distribution profile cannot be deleted. Similarly, a GL account cannot be deleted when set as a Default Distribution Account or a No Match - Credit Account on an organization override.Default Distribution GL Account
A general ledger account used by default for distributing charges. A vendor may have a distribution profile, in addition to this default account.
The value in this field defaults when creating invoice distribution details, recurring invoice distribution details, and invoices from check requests.
If the Default Distribution GL Account requires a project code, any requisition lines that specify the account must also contain a value for the Project Code field.Default Project Code
A code for the project associated with charges from this vendor.
The value in this field defaults when creating invoices and invoices from check requests.Default Fund Code
A code for the fund associated with charges from this vendor.
The value in this field defaults when creating invoices and invoices from check requests.Separate Payments per Invoice
Select this field if the vendor requires a separate payment for each invoice. (You will not be able to include items from different invoices in a payment.)
The value in this field defaults when creating invoices, recurring invoices, and invoices from check requests. Used in payment validationHold Future Payments
Select this field to suspend future payments to this vendor.
Used in payment validation and in invoice selection for payment runs.Auto Match EDI Invoices
If the vendor uses EDI processing, select this field if you wish POs to be matched automatically with invoices.
Used when creating EDI 810 invoices.No Match Credit Account
The General Ledger credit account for No Match credit POs.
Used in creating GL transactions for "No Match" POs; it sets the PO Match Type to "No Match."1099 Code
Select a 1099 code from the 1099 codes available at your site. 1099 codes are required by the Internal Revenue Service
(IRS) to report vendor payments for tax purposes. 1099 codes are added to this list when new codes become available.When set, the value in this field defaults when creating invoices, and invoices from check requests.
The list displays the existing 1099 codes:
C - Royalties
E - Rents
F - Fishing boat proceeds
G - Federal income tax withheld
H - Other income
J - Crop Insurance Proceeds
M - Medical and health care payments
N - Non-employee income
Q - Excess golden parachute payments
T - Gross proceeds
Z - Substitute payments in lieu of dividends.Note: Code N - non-employee income is reported on the IRS 1099-NEC form.
You can edit a set of organizational override values that you have created to add, remove, or change individual values. You can also delete the entire set of overrides for one or more organizations.
Copyright © 2023 by Premier Inc. All rights reserved.