Work with Vendor Information - Advanced Version
Contents
Overview
Managing your vendors entails activities such as rotating among suppliers for particular items, setting mixed unit of measure flags, working with vendor statistics and account balances for departments and organizations, assigning a buyer to a vendor buy-from location, and setting up the system to handle commodity codes.
Security
To access organization, department, or asset location data: The organization, department, or asset location must be included in your data profile. Additionally, for any asset location, you must have permission to maintain the asset location record. See "Restricting Users from Editing Asset Location Records."
The role objects that control access to the required functions are "Vendors," "VendorsMM," "VendorsAP," and "Catalog," minimally set to View.
- To handle Commodity Codes, you will need to set the role object "MMTables" to View.
- To handle mixed UOMs, you will need to set the role object "Inventory" to Modify.
- To create a Vendor Last Activity Analysis, you will need to set the role object "VendorsAA" to All.
- To review a vendor's spend, you will need to set the role object "CAAnalysis" to View.
Rotating Among Vendors
More than
one vendor may be associated with any single item in your catalog, but only one vendor can be designated the Primary Supplier at any given time. If you wish to rotate among suppliers for the item, you change the Primary Supplier designation, assigning a different vendor as primary supplier. If you wish to
rotate vendors for an item in this way, you will also need to account for possible differences
in units of measure that each vendor uses to supply the item.
Note: Several mass maintenance features are available for working with multi-sourced vendors for items in several inventories (asset locations).
To change the Primary Supplier designation:
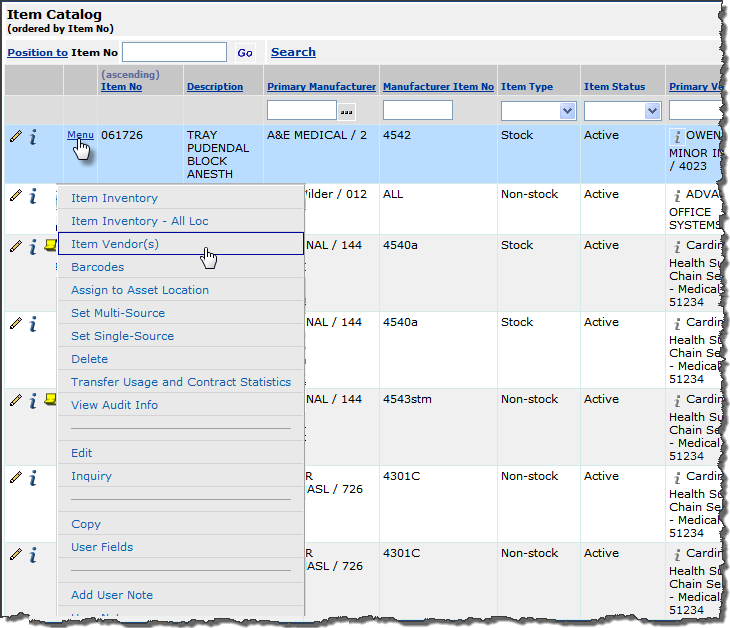
- From the main Materials Contents, select Inventory > Item Catalog.
- The list of items appears.
- Locate the item of interest. Click Menu and select Item Vendors.
- Vendor information appears (Figure 1).
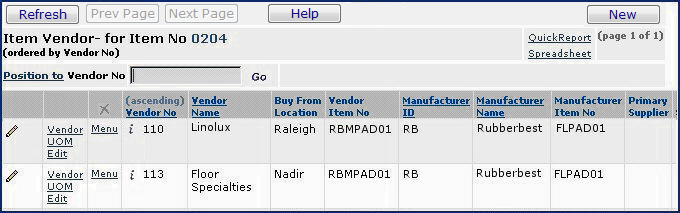
Figure 1 - Vendor Information for an Item
- Locate the vendor that you wish to designate as "Primary Supplier." Select Menu > Set Primary Supplier.
- The system asks if you are sure that you wish to set the Primary Supplier for the item.
- Click Submit.
- The system sets the field under Primary Supplier to Yes for the vendor.
- The system removes Yes from the Primary Supplier field for any other vendor.
Handling Mixed UOMs for an Item
Different vendors may package the same item using different UOMs (units of measure). In this case, when you rotate vendors for the item by changing the Primary
Supplier, you may get the following error message:
"Mixed UOM conversion factors have been detected for item (item no) in Organization (org), Asset Location (asset loc). Lowest UOM must be used until on-hand quantity
equals zero."
- When you rotate vendors with different UOMs or different conversion factors for an item, and when the On Hand Quantity of the item is greater than zero, the system turns on the Mixed UOM Conversion flag.
- The system turns off the Mixed UOM Conversion flag when the on-hand quantity of the item drops to zero.
- When an item has mixed units of measure, new requisitions must use the Lowest UOM for the item.
- If you create a requisition that specifies an item using any UOM except the lowest, you receive an error message:
"Order UOM [UOM name] must be Valid UOM."
- If you include the item on an Order Guide, you must also specify the Lowest UOM. If you use any other UOM for the item in the Order Guide, you receive an error message:
"Mixed UOM encountered in asset location. Requisition using the lowest UOM required."
- Note: Users with the correct authorization can reset the Mixed UOM Conversion flag manually. However, the inventory for the item must be depleted. Resetting the - - Mixed UOM flag manually should be done with caution.
- (Authorization to reset the Mixed UOM flag is established by a site's system administrator in a user profile.)
To view the mixed UOM conversion flag,
- From the main Materials Contents, select Inventory > Item Inventory.
- On the list of items, locate the item of interest.
- Click the edit icon
 or Menu > Edit next to the item. The Mixed UOM Conversion flag is a check box on the right towards the bottom of the Item Definition tab.
To reset the mixed UOM conversion flag manually,
Since the system automatically resets the Mixed UOM Conversion flag when the on-hand quantity of an item drops to zero, you should rarely need to perform this task manually.
Use caution in making the decision to perform a manual reset.
- From the main Materials Contents, select Inventory > Item Inventory.
- The list of items appears.
- Enter the Item No in the box next to Position To. Click Go.
- The item inventory information appears.
- Select Menu > Re-set Mixed UOM Conversion.
You receive a message asking if you are sure that you wish to reset the UOM conversion back to UOMs defined for the item.
- Click Submit if you wish to reset mixed UOM conversion, or Cancel if not.
Ordering Substitute/Replacement Items with Different Units of Measure
When you are ordering a substitute/replacement item, if the item replacing the regular item is not packaged the same as the regular item, use the process below with purchase orders to keep the On-Hand Quantity view correct.
- Create a new vendor buy-from location for the item, if needed.
- Change the Primary Supplier to the supplier for the substitute/trial/replacement item.
- Add the item to the purchase order.
- Authorize the purchase order.
- Change the Primary Supplier back to main vendor for the item, unless you wish to establish the item as a permanent replacement.
Vendor Statistics and Account Balances
The system lets you view data about your vendor purchases, such as the number of purchase orders sent to a buy-from location in a year or period, the dollar amount of items
ordered, and other values such as the dollar balance in each organization's account. In addition, you can view materials management statistics for receipts on items supplied by vendors, and accounts payable statistics on invoice and payment amounts. Vendor statistics on individual items are also available from the Item Catalog or Item Inventory Inquiry panel. Follow the procedures below to obtain this information.
To get vendor materials management receipt statistics,
Receipt statistics for vendors are available from the vendors Quick Click panel. The statistics contain summary data (by year) and detailed data (by month) on receipts for items supplied by the vendor.
- From Materials Management main Contents, select Vendors > Vendors.
- The Quick Click menu appears.
- Select Vendor MM Statistics.
- Enter the Vendor Name and click Go.
- The system displays summary statistics for each year that receipts exist for the vendor (Figure 2). The summary contains the total dollar amount of file and non-file item receipts for each year.
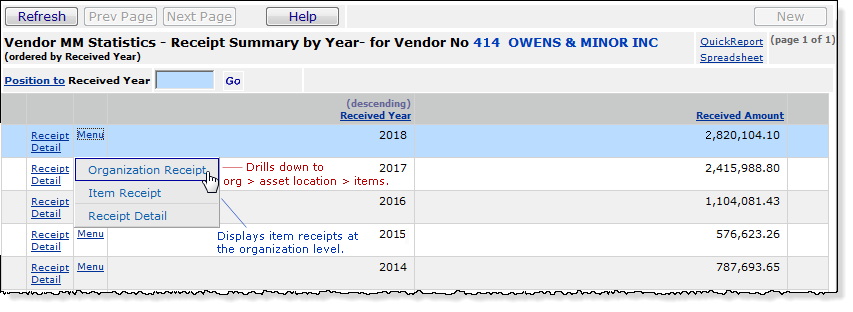
Figure 2 - Drilling Down for Receipt Statistics for a Vendor
From each yearly summary line for a vendor, you can drill down to more receipt statistics (both summary and detail), for each organization and for vendor items at the organization level. Similarly, you can view summary and detailed receipt statistics at each asset location, and for vendor item receipts within an asset location.
Item receipt statistics are available for both file and non-file items, and you can filter the list of items to view only file items, non-file items, or both. Figure 3 is an example.
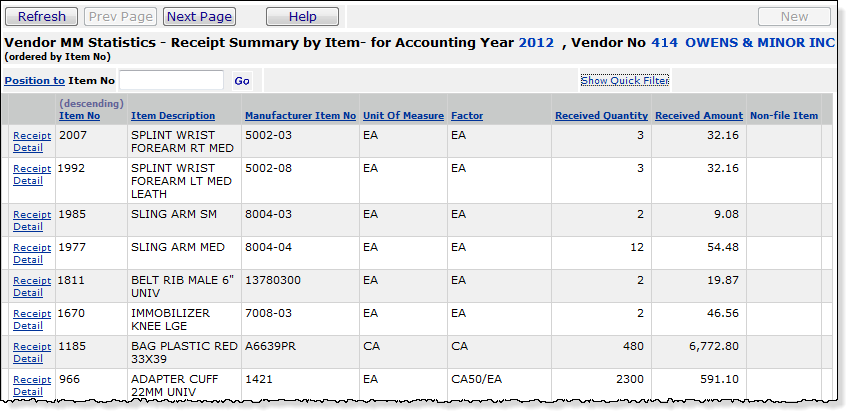
Figure 3 - Item Usage Statistics for a Vendor for a Year
For a specific item, vendor statistics are also available from the Item Catalog or Item Inventory.
- Locate the item of interest on the Item Catalog or Item Inventory list.
- Select Menu > Inquiry or click the i.
- Click the Receipt tab. Summary receipt data for the year for the item appears.
- Figure 4 shows the Item Inventory Inquiry panel. The Item Catalog Inquiry panel is similar.
- Select Menu > Vendor Receipt.
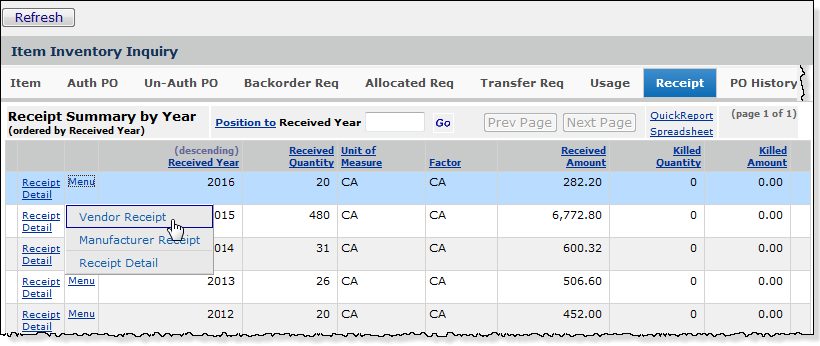
Figure 4 - Drilling Down to Vendor Receipts from the Item Inventory Inquiry Panel
Summary receipt statistics for the item appear by vendor. Clicking Receipt Detail displays data by month (Figure 5).

Figure 5 - Summary Statistics for an Item by Vendor: Item Inventory Inquiry "Receipts" Panel
To get vendor accounts payable statistics,
Accounts payable statistics for vendors are available from the vendor Quick Click panel.
- From the Materials Management main Contents, select Vendors > Vendors.
- The Quick Click menu appears.
- Select Vendor AP Statistics.
- Enter the Vendor Name and click Go.
- The system displays summary statistics for each year that data exists for the vendor (Figure 6).
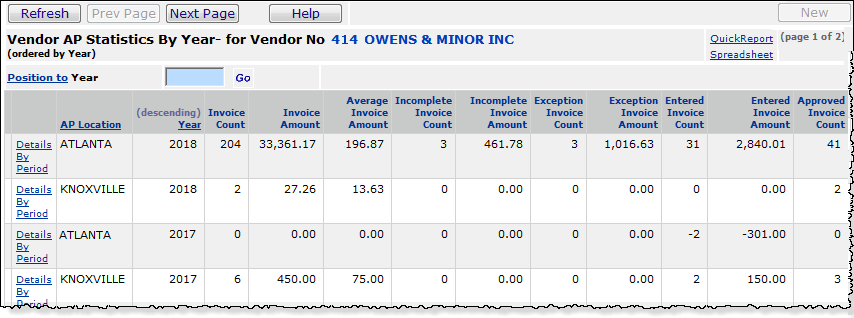
Figure 6 - Vendor AP Statistics for a Vendor During 2014, and 2015
Click Details by Period for any year to get statistics broken down by period.
To view buy-from location statistics,
- From the main Materials or AP Contents, select Vendors > Vendors.
- Locate the vendor that you need.
- On the Quick Click
menu, select "I would like to ... View the Vendors List."
Click Show All.
- The list of vendors appears.
- To view a particular vendor, on the Quick Click menu, enter the Vendor
Name under Starting With and click Go.
- The vendor list appears with the vendor you specified at the top.
- Select Menu > Buy From Locations.
- Locate the buy-from location of interest.
- Select Menu > View Statistics.
- The vendor statistics panel appears (Figure 7). Click Help to get field
descriptions. You can sort the list by Organization, Period, and Accounting Year.
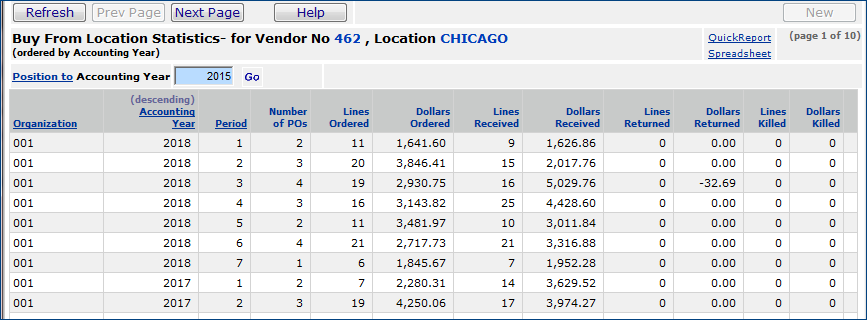
Figure 7 - Statistics for Vendor Buy-From Location
To view an organization's vendor account balances,
- From the main Materials or AP Contents, select Vendors > Vendors.
- Next to the vendor that you need, select Menu > Vendor Balances.
- A list of account balances appears by organization (Figure 8).

Figure 8 - Vendor Balances by Organization
- To get open invoices for the vendor and organization, click Open Invoices. The list of open invoices appears.
- Note: Open invoices are approved invoices that have an outstanding balance not equal to zero.
- To access a list of specific AP transactions for the organization, select Menu > AP Transactions. From the resulting AP Transactions list, you can similarly access General Ledger transactions.
Set the Primary Buyer for a Vendor's Buy-From Location
- From the main Materials or AP Contents, select Vendors > Vendors.
- Locate the vendor that you need.
- On the Quick Click menu, select "I would like to ... View the Vendors List." Click Show All.
- The list of vendors appears.
- To view a particular vendor, on the Quick Click menu, enter the Vendor Name under Starting With and click Go.
- The vendor list appears with the vendor you specified at the top.
- Select Menu > Buy From Locations.
- Locate the buy-from location of interest.
- Next to the buy-from location name, click Menu > Buyers.
- The list of buyers for the buy-from location appears (Figure 9).
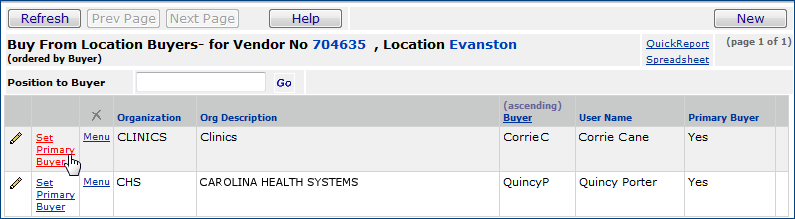
Figure 9 - Buyers Assigned to a Buy-From Location
- Click Set Primary Buyer at the beginning of the row that contains the User Name of the buyer that you wish to designate as "primary".
- The system asks you to confirm your choice.
- Click Submit. The system sets the primary buyer. When you click Refresh,
Yes appears next to the user's name in the Primary Buyer column.
Auto-Authorize EDI, email, or FAX POs by Buy-From Location
This feature automatically authorizes POs for buy-from locations that use either FAX, email, or EDI. To use this feature, you create one or more scheduled jobs that run the authorization. You can assign a Scheduled Job Group identifier to buy-from locations, and set up jobs to authorize only POs from those locations. You can create multiple Scheduled Job Groups and scheduled jobs.
If you wish, you can set a delay in the auto-authorization process. The delay lets you make any last minute changes to a PO before it is authorized -- such as a correction in a quantity or unit of measure. For example, in a job that runs hourly, a delay of thirty minutes would auto-authorize only those POs created more than a half hour before the next job run.
Automatic authorization works together with the Vendor Order Cycle established
for a vendor buy-from location. For each purchase order to be automatically
authorized, when the auto-authorization job runs, the system looks for a Vendor
Order Cycle for the PO's buy-from location.
- If no Vendor Order Cycle is established, the system assumes "today" and authorizes the PO, unless there is a delay established. If a delay is defined, the PO authorizes in the next cycle after the delay has passed.
- If a Vendor Order Cycle exists and is valid for the current day, the system
authorizes the purchase order; again, factoring in any specified delay.
- Otherwise, the system does nothing until the auto-authorize job runs again (factoring in any delay).
Then the PO is evaluated again, and compared with the Vendor Order Cycle value.
Hospitals that use auto-authorization often find it efficient to create a daily scheduled job to run the authorization (and include a delay) before the earliest vendor order cutoff time.
Security: To set up automatic authorization, you need permission established in your user profile for purchase order authorization and for scheduling jobs.
The scheduled job setup steps are:
- Create the Scheduled Job Group identifier.
- Edit buy-from location records whose POs you wish to auto-authorize.
- The PO Transmission Method must be FAX, Email, or EDI.
Important: If EDI, Email or FAX is not selected, the system
cannot auto- authorize POs for the buy-from location. In this situation, the system writes a System Note to the PO.
- Select the corresponding Auto Authorize ... field.
- On the buy-from locations' panels, assign a Scheduled Job Group identifier.
You can leave the field blank, but to pick up POs for the buy-from location(s), you must also leave the field blank on the job scheduler.
- Create the scheduled job.
- Assign the Scheduled Job Group identifier to the scheduled job. You can also add a Scheduled Job Group identifier to an existing job.
Vendors and Commodity Codes
A commodity code may be associated with various items in your site's item inventory.
The code is a high-level classification of items into different groups. This
code, which you can view from an item record in the Item Catalog, may be required
and specified by local regulations to track certain types of commodities; for
example, Radioactive Materials - 330. The Commodity Code table
contains any commodity codes needed by your site. (View the Commodity Code table
by selecting Tables > Commodity Codes from the Materials Management
or Accounts Payable main Contents.) You can create a list of commodity codes associated with
items that you buy from a particular vendor in the vendor record.
To associate commodity codes with a vendor:
- From the main Materials
or AP Contents, select Vendors > Vendors.
- Locate the vendor that
you need.
- On the Quick Click
menu, select "I would like to ... View the Vendors List."
Click Show All. The list of vendors appears.
- To view a particular vendor, on the Quick Click menu, enter the Vendor
Name under Starting With and click Go.
The vendor list appears with the vendor you specified at the top.
- Select Menu > Commodity Codes. The list of commodity codes used
by the vendor appears. (No Data appears if no commodity codes are
associated with the vendor.)
- Click New. The Vendor Commodity Codes edit panel appears.
- Complete information in the panel.
- Click Submit. The system adds the commodity code to the list of codes for the vendor.
Using Vendor Last Activity Analysis to Identify Unused Vendors
The Vendor Last Activity Analysis feature lets you create a batch job to identify vendors that are not being used, and delete them from your records, if you wish. In creating the batch job, you supply a date, and the system displays a list of vendors that have not had any activity since that date. The system then gives you the opportunity to delete the vendors from your list of active vendors.
Part of the list may include vendors that are not being used, but who have current, incomplete transactions such as open purchase orders, unmatched invoices, etc. You cannot delete these vendors until the transactions are completed.
Only one batch job can exist at a time.
- To create a new batch job, click New.
If a batch job is displayed on the panel, you must delete it before you can create a new batch job.
The Vendor Last Activity Analysis feature is available from either Accounts Payable or Materials Management.
To create a Vendor Last Activity Analysis job:
- From the Accounts Payable or Materials main Contents, select Vendors > Vendor Last Activity Analysis.
The list of Last Activity Analysis jobs appears, or No Data if none exist.
- Click New.
- The create job panel appears (Figure 10).
Note: If the Status of the last activity analysis job is Incomplete, the New button is disabled:
you cannot create a new analysis job until the last one is complete (or deleted).

Figure 10 - Setting Up a New Last Activity Analysis Job
- Select a Last Activity Date. This date is the "filter point" for vendor activity, such as invoices for the vendor, POs to the vendor, payments, etc. the system will look for vendors who have not had activity since the date that you enter.
- Enter a description or label for the Last Activity Analysis job.
- Click Submit.
The Old Vendor Deletes panel appears (Figure 11) with the Vendors That Can Be Deleted tab on top.
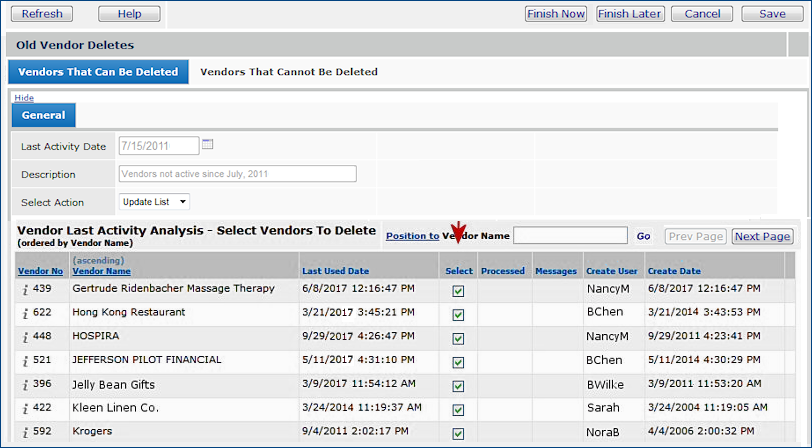
Figure 11 - Vendors That Can Be Deleted Tab
- In Figure 11, notice that all vendors listed are selected for deletion, by default (red arrow). If you wish to keep any of the listed vendors, click on the Select box to remove the check.
- When you click Finish Now, selected vendors are deleted from your records.
- Figure 12 displays the Vendors That Cannot Be Deleted tab. These vendors have incomplete purchase orders, invoices, or payments, and cannot be deleted until those activities are closed.
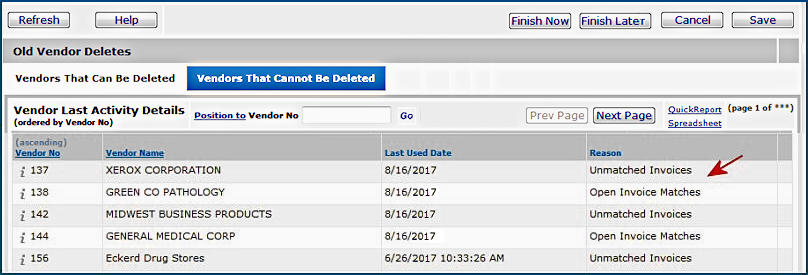
Figure 12 - Vendors That Cannot Be Deleted Tab
The Reason column (Figure 12) displays the reason why the vendor cannot be deleted.
- Click Finish Now to delete the selected vendors and complete the Last Activity Analysis job.
- The system returns to the list of jobs.
- Your job appears on the list. Messages ("job pending," "job running") may appear with the Status of In Progress.
- When the job runs successfully, its Status is Complete.
- Click Menu > View Deleted Vendors to see the vendors that were deleted.
Mass Maintenance Features for Multi-Sourced Items and Their Vendors
Several mass maintenance activities, as follows, are available for multi-sourced items and their associated vendors.
- Find asset locations where a particular vendor does not supply an item, and add the vendor for the item to the asset locations.
- Change the VIN (vendor item number) for an item in multiple asset locations.
- Flag an item vendor as the primary supplier in multiple asset locations.
- Change the Manufacturer ID as well as the MIN.
You can perform these activities for asset locations/organizations specified in your data profile, subject to rules outlined subsequently for each activity.
Add a Multi-Sourced Item/Vendor to Asset Locations
Imagine a multi-sourced item with two vendors in asset location Main. The item is also inventoried in two other asset locations -- OR and OR2 -- but only for one of the vendors. You wish to add the other vendor for the item to OR and OR2. Here is an example.
The two vendors who supply the item (Figure 13) are Altair and 3M Company. (The item is also manufactured by 3M, but manufacturer is not an issue for this activity).
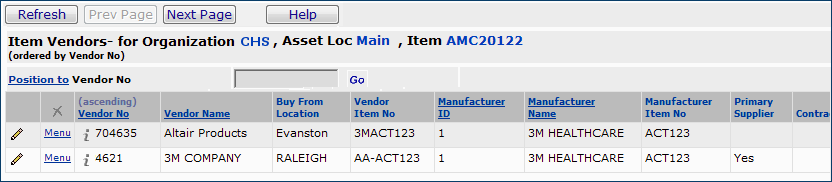
Figure 13 - Item Vendors for Item AMC20122, Asset Location Main
In asset locations OR (Figure 14) and OR2 , the item is supplied by only one vendor: Altair. You wish to add 3M.

Figure 14 - Item Vendors for Item AMC20122, Asset Location OR
You can direct the system to add the 3M vendor for the item to asset locations where it is missing, subject to some rules:
- The asset locations/organizations must be specified in your data profile.
- The asset locations for adding the item must allow multi-sourcing.
- The item must already exist in the asset locations where the new vendor is to be added.
- The existing item must be multi-sourced in the asset locations.
To add a multi-sourced item/vendor to asset locations:
- From the main Contents, click Item Inventory - All Locations.
- Search for the item. A line for the item appears at the top of the list. If the item is available in multiple asset locations, several lines appear -- one for each asset location.
- Locate the item line for the vendor that you wish to add (Figure 15).
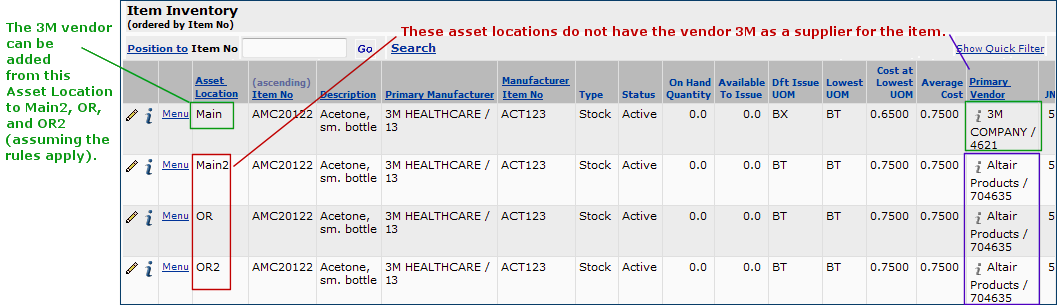
Figure 15 - Inventory Locations for Item AMC20122
- Click Menu > Item Vendors.
- The Item Vendors list appears (Figure 13).
- Next to the vendor that you wish to add, click Menu > Assign to My Inventories (Figure 16).
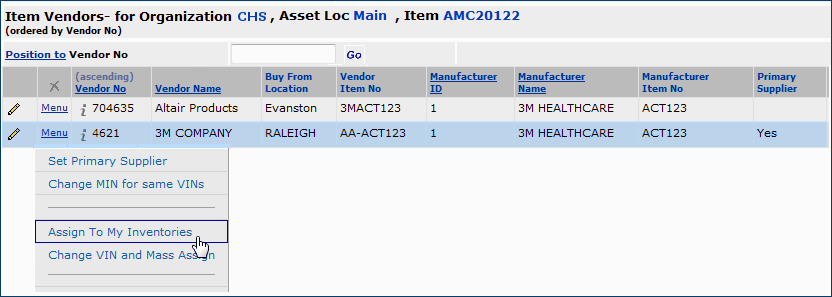
Figure 16 - Assigning an Item Vendor to Other Asset Locations
The panel Mass Assign Item Vendor to My Inventories appears (Figure 17).
- Select the asset locations where you wish to add the item vendor.
- Use the Select Action field to specify the action that the system should perform on the list in the lower part of the panel. Press Enter to apply the action.
Options for this field are:
Update List - Refreshes the list of asset locations.
Select All - Selects all asset locations in the list.
Unselect All - Removes the check from the selection box for any asset locations previously selected, or all.
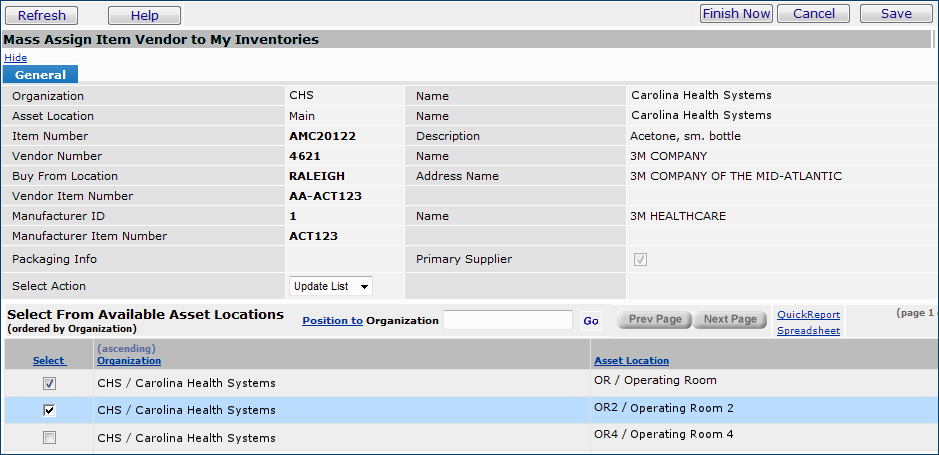
Figure 17 - Selecting Inventories for Adding a Multi-Sourced Item Vendor
- When you look at the list of organizations and asset locations that the system presents for adding an item, there may be fewer than your data profile contains.
In (Figure 17), for example, notice that the asset location Main2 does not appear in the list. Asset location OR4 does appear in the list, although the user has not selected it.
Missing asset locations are those that do not conform to one of the rules; for example, an asset location that does not allow multi-sourcing will not be on the "Select From..." list.
- Asset location OR4 follows all of the rules and is eligible to have the new item vendor added. The user could have selected OR4, if desired.
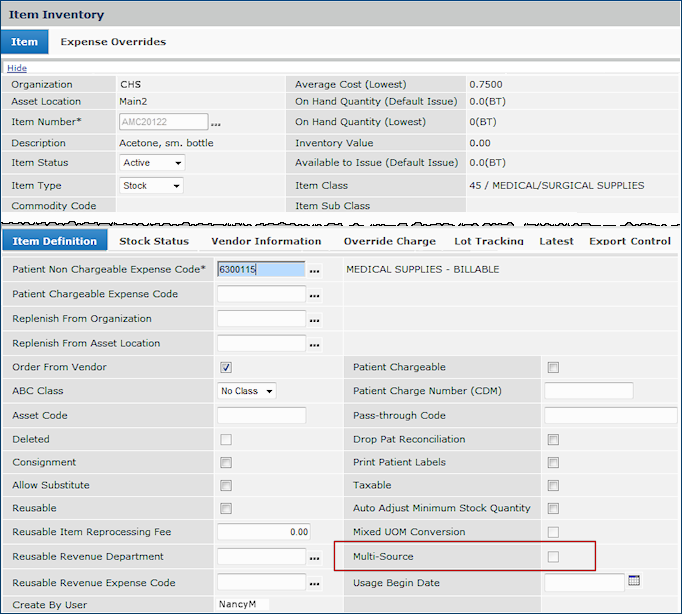
- In asset location Main2, for the existing vendor (Altair), the item is not multi-sourced. Figure 18 displays the item vendor record. Notice that the Multi-Source field is not checked. Main2 is therefore not eligible for selection.
 .
.
Figure 18 - Item Vendor Record in Asset Location Main2
- After selecting the asset locations for the new item vendor, click Finish Now.
- The item vendor is added to the asset locations.
- Restricted buy-from locations: If the buy-from location for the item vendor is restricted by organization, the system sets the buy-from location to the one allowed.
View the Item Vendor in an Asset Location
You can open one of the selected asset locations and verify the item/vendor addition, if you wish.
- On your Current Settings, click the prompt (...) next to the Asset Location field and select the asset location.
- (If the asset location is in a different organization, you can also select the Organization.)
- Click Inventory > Item Inventory.
- Use the filters, the Search, or the Position To box to locate the item (Figure 19).
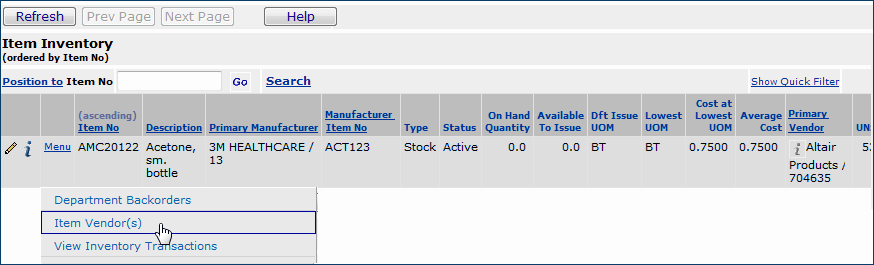
Figure 19 - Asset Location Containing Item
- Click Menu > Item Vendors. The list of vendors for the item appears (Figure 20).
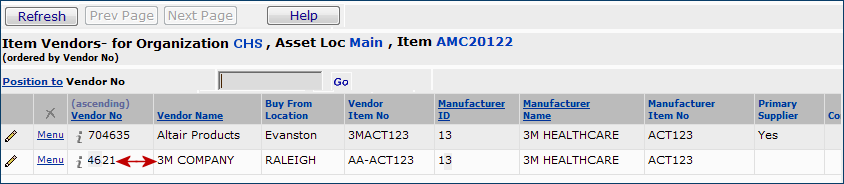
Figure 20 - Item Vendor Added to Asset Location
The added item vendor at the asset location is listed.
Designate a Multi-Sourced Item/Vendor as "Primary" in Several Asset Locations
In the example explaining how to add a multi-sourced item/vendor to asset locations, the vendor added (3M) was simply "another vendor." A primary supplier was already designated (Altair) at the asset locations, and adding a new vendor did not change the primary supplier.
If you wish, subject to several rules, you can designate an item vendor as the primary supplier at several asset locations simultaneously. The rules are:
- The asset locations/organizations must be specified in your data profile.
- The buy-from locations for the candidate primary supplier cannot be restricted by organization.
- The item must be multi-sourced in the asset locations for the candidate primary supplier.
- The item, the Vendor Number, and the Vendor Item Number (VIN) must exist and be identical in all the asset locations.
To set a multi-sourced item/vendor as "primary" for multiple asset locations:
- From the main Contents, click Item Inventory - All Locations.
- Search for the item. A line for the item appears at the top of the list. For items available in multiple asset locations, several lines appear -- one for each asset location.
- Click Menu > Item Vendors.
- The Item Vendors list appears (Figure 21).
- In Figure 21, the primary supplier for the item is currently Altair Products. The user wishes to set the primary supplier to 3M
Company.
- Next to the vendor that you wish to designate as primary supplier, click Menu > Set Primary Supplier (Figure 22).
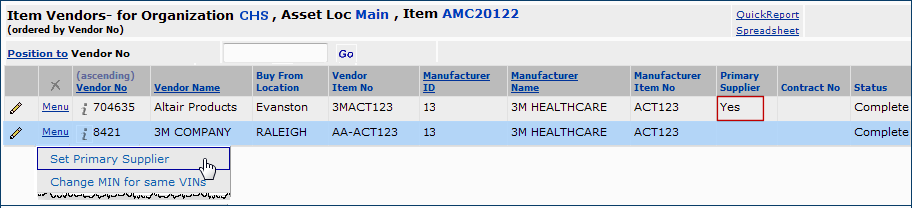
Figure 21 - Changing the Primary Supplier for an Item
A confirmation panel appears (Figure 22).
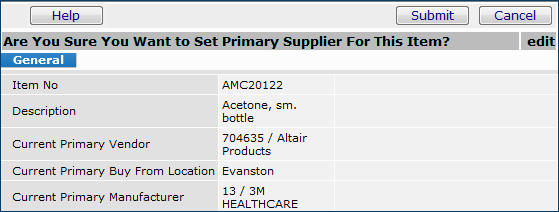
Figure 22 - Confirmation Panel for Changing Primary Supplier
- Click Submit.
The Set Other Vendors as Primary Supplier panel appears (Figure 23). This panel contains a list of the asset locations where the primary supplier for the item can also be changed. The listed asset locations probably do not include all of the asset locations available to you based on your data profile. Missing asset locations are those that do not conform to one of the rules; for example, an asset location that does not allow multi-sourcing will not be on the list.
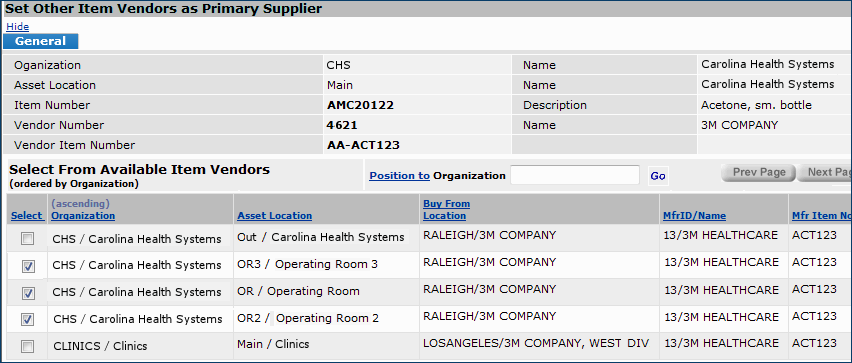
Figure 23 - The Set Other Vendors as Primary Supplier Panel
If the vendor is already set as the primary supplier for the item at an asset location, the asset location is not listed.
- Select the asset locations in which you wish to change the primary supplier. In Figure 23, the user has selected three asset locations.
- Click Finish Now.
- The primary vendor designation for the item is changed at the selected asset location.
If you wish, you can open one or more of the asset locations and view the changed primary supplier.
Change a Multi-Sourced Vendor Item Number (VIN) in Several Asset Locations
This feature lets you change the vendor item number for a multi-sourced item in one asset location, and optionally, in other asset locations where same item/vendor is inventoried. A few rules apply:
- The asset locations/organizations must be specified in your data profile.
- The original item, the Vendor Number, and the Vendor Item Number (VIN) must exist in the asset locations.
- The item must be multi-sourced in the asset locations.
To change the VIN for a multi-sourced item/vendor in several asset locations:
- From the main Contents, click Item Inventory - All Locations.
- Search for the item. A line for the item appears at the top of the list. For items available in multiple asset locations, several lines appear -- one for each asset location.
- Click Menu > Item Vendors.
- The Item Vendors list appears (Figure 24).
- Click Menu > Change VIN and Mass Assign (Figure 24).
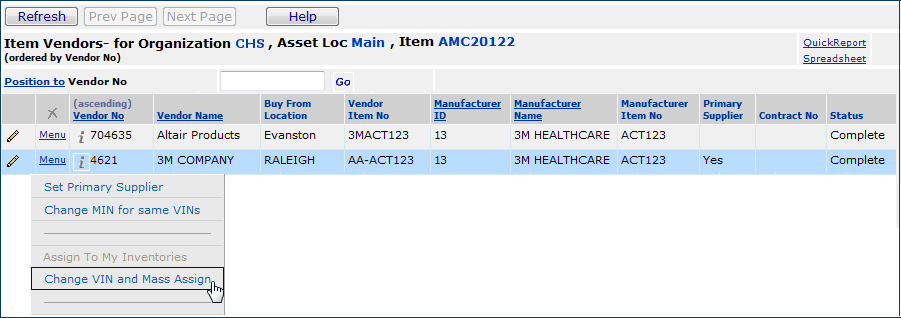
Figure 24 - Changing the Vendor Item Number (VIN) for an Item
The Change VIN and Mass Assign panel appears (Figure 25). This panel contains a list of the asset locations where the vendor item number (VIN) for the item can also be changed. The listed asset locations likely do not include all of the asset locations available to you based on your data profile. Missing asset locations are those that do not conform to one of the rules, for example, an asset location where the item/vendor does not exist.
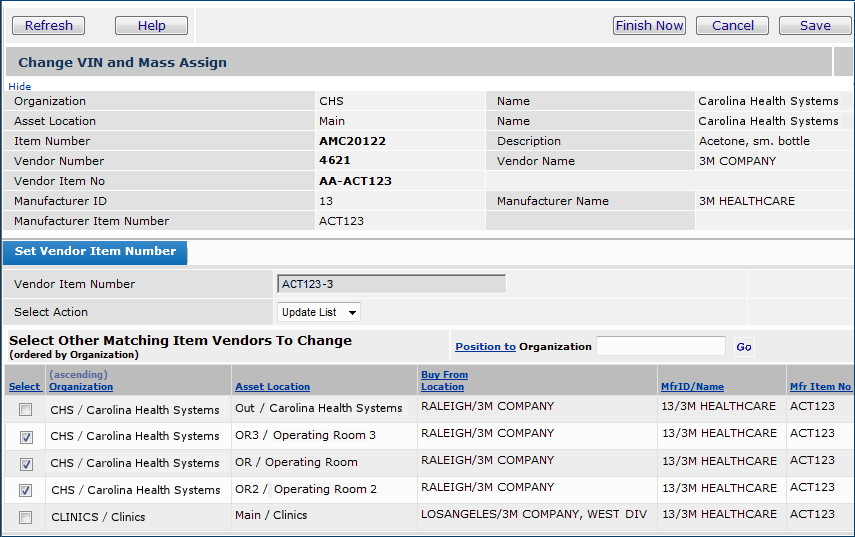
Figure 25 - The Change VIN and Mass Assign Panel
- In the Vendor Item Number field, enter the vendor item number that you wish to assign. In Figure 25, the user has changed the original vendor item number from AA-ACT123 to ACT123-3.
- Select the asset locations in which you wish to change the primary supplier. In Figure 25, the user has selected three asset locations.
- Use the Select Action field to specify the action that the system should perform on the list in the lower part of the panel. Press Enter to apply the action.
Options for this field are:
Update List – Refreshes the list of asset locations.
Select All – Selects all asset locations in the list.
Unselect All – Removes the check from the selection box for any asset locations previously selected, or all.
- Click Finish Now.
If you wish, you can open one or more of the asset locations and view the changed VIN for the vendor location.
Edit Primary Suppliers' Default UOMs
Designated users at a site may need to edit the item vendor record and change the primary supplier.
For items that are active, single sourced, and have multiple units of measure, a menu option Override Default UOMs for Primary Supplier is available. Any user who has the "Inventory" role object settings Modify, Create, or All can use the menu option to change the primary supplier's default issue or the default purchase UOM.
To change the default UOM for an item's primary supplier,
- Make sure that the role object "Inventory” in your user role is set to Modify, Create, or All. (Work in Administration > Roles > Role Objects > Edit)
- From the Materials Management main contents, select one of these paths:
- Inventory > Item Inventory or Item Inventory - All Locations.
- Inventory > Item Catalog > Menu > Item Inventory.
- Inventory > Item Catalog > Menu > Item Inventory - All Loc.
The Item Inventory list appears (Figure 26).
- Locate the single-sourced item of interest.
- On the "...All Locations" lists, locate the item and the asset location where you wish to make the change.
- Select Menu > Override Default UOMs for Primary Supplier (Figure 26).
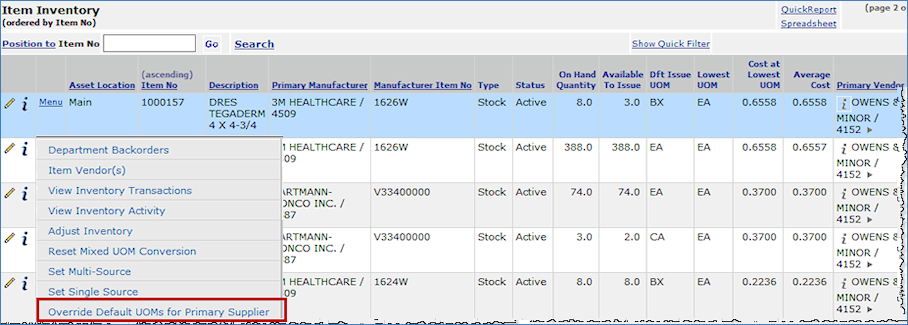
Figure 26 - Changing the Primary Supplier's Default UOM (Inventory List)
The panel Override Default UOMs for Primary Supplier appears (Figure 27). At the bottom of the panel are the units of measure for the supplier.
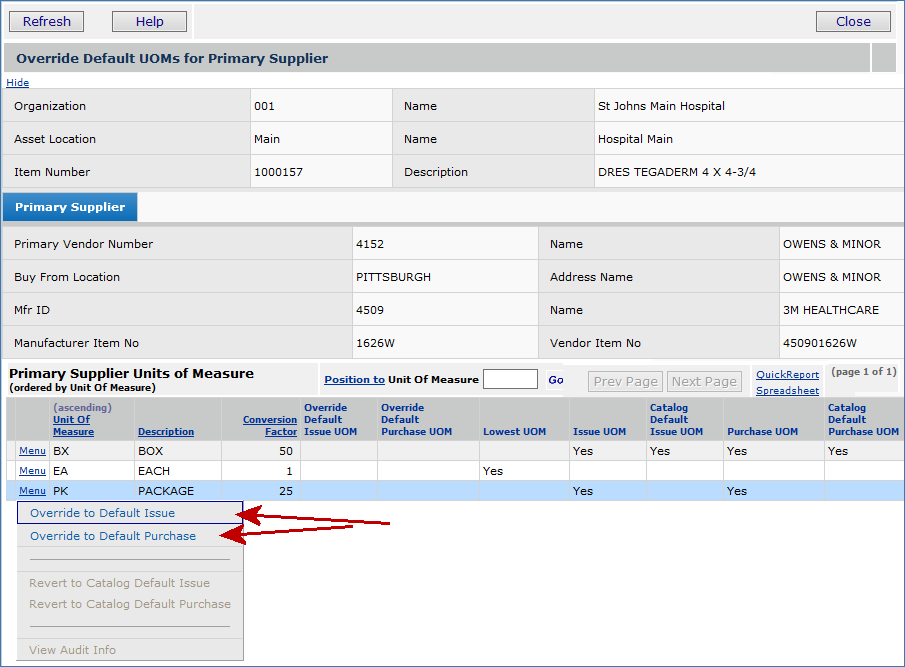
Figure 27 - Override Default UOMs for Primary Supplier Panel
To change a UOM to become the default, or to revert to the defaults in the item catalog,
- Click Menu next to the UOM of interest.
- Select the change that you wish to make. In Figure y, the user is setting the UOM "package" as the default issuing UOM for this item in this asset location from the primary supplier.
(Notice that you can also audit changes to the unit of measure status by selecting View Audit Info from the menu.)
A confirmation panel appears.
- Click Submit. The application makes the change and displays the Override Default UOMs for Primary Supplier panel with the overridden UOM.
Figure 28 is the bottom of the panel with the UOM change noted as "Overrides to PK," in this case.

Figure 28 - UOM Change Displayed for a Primary Supplier's Item
-
Click Close when you are finished.
If you open the Item Inventory record for the item, you will also see the change (Figure 29).
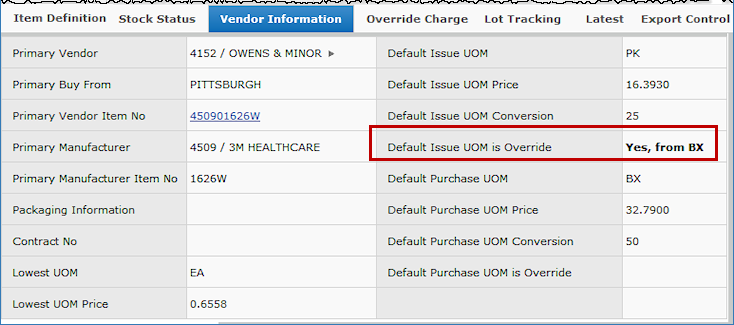
Figure 29 - Item Inventory Record, Vendor Information
The defaults in the item catalog record for the item will not be changed, nor will defaults in other asset locations. If you wish, you can revert to the item catalog values instead of the changed values using the same menu displayed in Figure 26.
Change the Manufacturer or MIN for the Same VINS
Work with the item in the Item Catalog.
- Select an active item from the item catalog.
- Click the blue Menu link in the far left column. (See Figure 30.)
- From the drop-down, select ItemVendor(s).
Figure 30 - Change MIN, Steps 1- 3
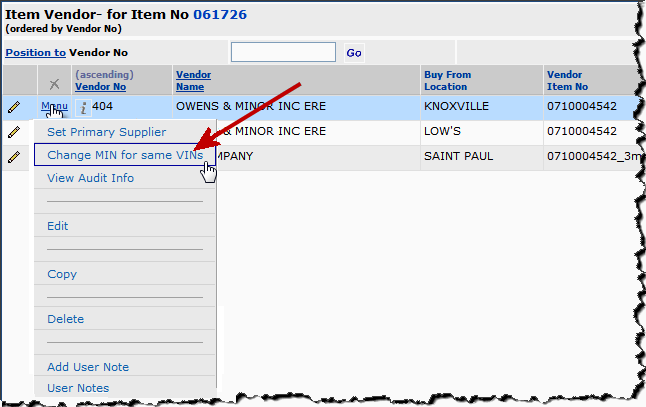
- From the Item Vendors list, pick the desired item vendor record.
- Click the blue Menu link, and select Change MINs for same VIN. (See Figure 31.)
Figure 31 - Change MIN, Step 5
- Change the information for Manufacturer and/or Mfr Item Number in the Set Manufacturer Values tabbed panel.
- Click the Submit button (Figure 32).
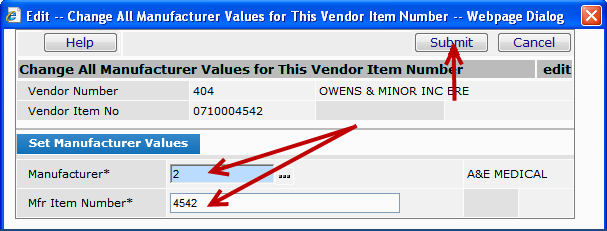
Figure 32 - Change MIN, Steps 6-7
When you change a Mfr Item Number or Manufacturer, these documents are updated by the system:
- All undeleted Purchase Order lines with the same Vendor/VIN
- Requisition lines with the same Vendor/VIN
- Receipt lines
- Invoice Match Detail lines
Set Up an AP-Only Vendor for Sourcing and Contract Management
This feature is only available for sites with Sourcing and Contract Management and with Materials Management and/or Accounts Payable.
Normally, spend dollars for analysis in Sourcing and Contract Management are drawn from the set of vendors labeled "MM and AP". These vendors produce both purchase order invoices and non-purchase order invoices.
Vendors labeled "AP-only" are not automatically included in the Sourcing and Contract Management spend pool because hospitals tend to have many such vendors that are small-volume suppliers or services providers, one-time vendors, or are set up as "AP-only" to handle refunds. However, you may have AP-only vendors with significant amounts of spend -- services vendors -- that you wish to analyze.
To include spend from AP-only vendors, you set a flag on the vendor record in Materials Management or Accounts Payable. The Vendor Edit panel (Figure 33) contains the flag.
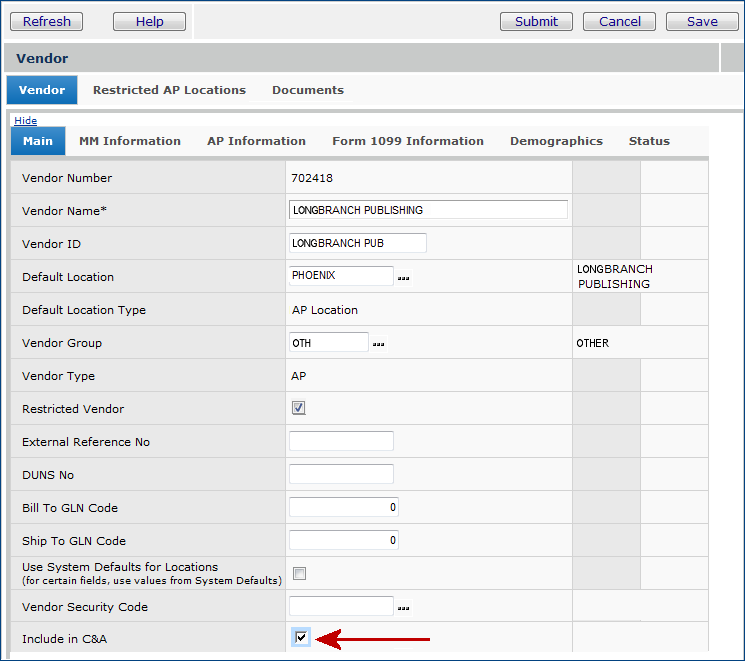
Figure 33 - Setting the "Include in Sourcing and Contract Management (C&A)" Flag for a Vendor
If the vendor is registered, its spend for the prior 12 months is available after the nightly job synchronizes the system for Sourcing and Contract Management with Materials/AP data.
If the vendor is not registered, you must first register the vendor for its spend to be available.
To edit a vendor record and set the flag:
- From
the main Materials or AP Contents, select Vendors > Vendors.
- The vendors list appears.
- Locate the vendor of interest.
- Click Menu > Edit or the edit icon . The Vendor Edit panel appears (Figure 33).
- Select the field Include in C&A.
- Click Save and Submit.
To review the vendor's spend:
- If the vendor is not registered, register the vendor. You can set the vendor's Spend Type to either Services or Supply depending on whether you want to work with spend for purchase orders invoices (supply) or all invoices (services). (Most likely, you will want the vendor's Spend Type to be Services.)
When you register the vendor, the registration job runs overnight, and the spend values (for up to 12 prior months) are available the next day.
- Open the shared services Analysis Workbench and select the Vendor filter.
Search for the vendor.
Note that you can click any header to sort the column. Figure 34 is sorted ascending by Spend.
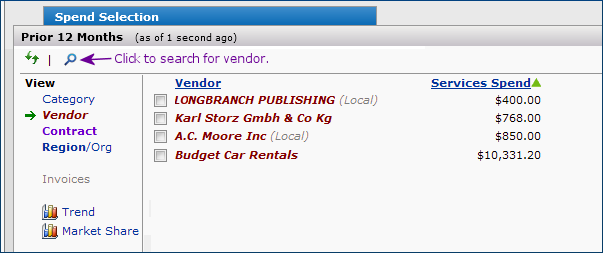
Figure 34 - Displaying Vendor Spend in the Services Analysis Workbench
Detailed information on using the tools for analyzing spend are in the following online chapters: Examining Supply Contract Spend and Examining Services Spend.
Copyright © 2023 by Premier Inc. All rights reserved.