Recording and Processing Patient Charges Version
Contents
Overview
Departments and item costs are designated as "patient chargeable"
if the items are typically charged to patients. You can record patient charges
against items that you requisition for patient use and
print barcode labels for items charged to patients. The
Patient Charge Reconciliation Report lets you view the quantities of items that
have been charged to patients, and the quantities not charged.
You can import patient charge information
into the system from your network, and you can export patient charges as well.
You can perform Imports and exports manually, as discussed in this topic, or
you can configure a Pulse to export patient charges
automatically. Exports
of patient charge data can also be scheduled as batch jobs. (See Set
Up Schedules for Batch Jobs.)
In addition
to importing and exporting patient charges, you can also import patient admissions,
discharge, and transfer data into the system. The import procedure is described
in Import Admission,
Discharge, and Transfer Patient Data. The export
procedure is the same as the export for patient charges, and is described in
this section.
Note: Patient charge expenses are always included in the Department Expense Report.
Security
ePHI Features
Features are built into the system to ensure the privacy of electronic protected health information (ePHI), in compliance with HIPAA requirements. One applicable area is patient charge entry and import/export.
On a User Profile, the Hide ePHI Data field determines whether a user can access patient data. When Hide ePHI Data is checked, a detailed series of restrictions apply to the user's access to ePHI records. Patient information in the patient charges feature is subject to restrictions governed by this user profile field.
In sum, if Hide ePHI Data is checked, the user cannot access or display patient-identifying information.
Patient information in printed documents or panels is either not displayed or not accessible (prompts for patient information and downloads that contain patient information are not available).
The list of restrictions and examples is outlined in the ePHI documentation.
Note: All patient identifier fields in this document's figures contain fictional values, and are not associated with any actual individual.
Role Objects and the Data Profile
Patient charging is controlled by the role object "PatChg."
- The View setting lets a user display the list of patient charge imports and exports.
- The Modify setting lets a user display patient charge entries, view details of patient charge imports, and reprocess patient charge imports.
- The setting Create is needed to enter patient charges (Materials > Imports/Exports & Financials > Patient Charge Entry > New).
- All is needed to download patient charge import details and to delete a patient charge import file.
Editing an item inventory record (as outlined in the setup section below) requires the role object "Inventory" set to Modify.
Editing a department record (described in the next section) is governed by the "DeptReq" role object. The setting is Modify.
To access organization, department, or asset location data, the organization, department, or asset location must be included in a user's data profile.
Setup
for patient charging
Departments
that charge items to patients must be identified as such in their department
records. Items that are chargeable must also be identified in their item inventory
records. You will need to edit the departments' records and the item records
to set up patient charging.
In
the Department record:
- From the Materials Management main Contents, select
Requisitioning > Departments.
The Quick Click menu appears.
- Use the Quick Click menu to locate the department that you need on the
Departments list.
- Next to the department, select Menu > Edit, or click the edit
icon (
 ).
).
- The Department edit panel appears (Figure 1).
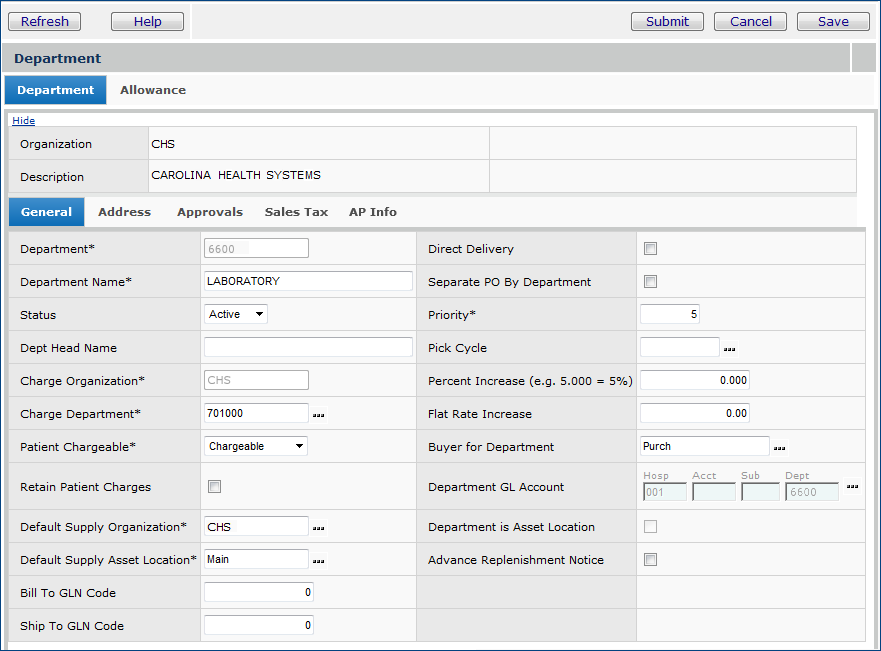
Figure 1 - Department Edit Panel
- Go to the Patient Chargeable
field and change the value from Non Chargeable (the default) to Chargeable.
- Click Save.
- Click Submit to return to the Departments list.
When you set the Patient Chargeable field
for a department to Chargeable, the Patient Chargeable Expense Code is
used for the General Ledger transaction when items are issued. In this way,
items which are used by many departments -- such as facial tissues -- can be
handled as patient chargeable items in some departments (e.g., Nursing), and
as non-chargeable supplies for other departments (e.g., Patient Accounting).
In
the Item Inventory Record:
- Review your Current Settings to verify that the Organization, Department,
and (particularly) the Asset Location are correct.
You will be editing the item inventory record in the asset location specified
in Current Settings.
 Change the value of the Current Settings
fields if needed.
Change the value of the Current Settings
fields if needed.
- From the Materials Management main Contents, select
Inventory > Item Inventory.
The Quick Click menu appears.
- Use the Quick Click menu to locate the item that you need on the Item Inventory list.
- Next to the item, select Menu > Edit, or click the edit icon (
).
- The Item Inventory edit panel appears (Figure 2).
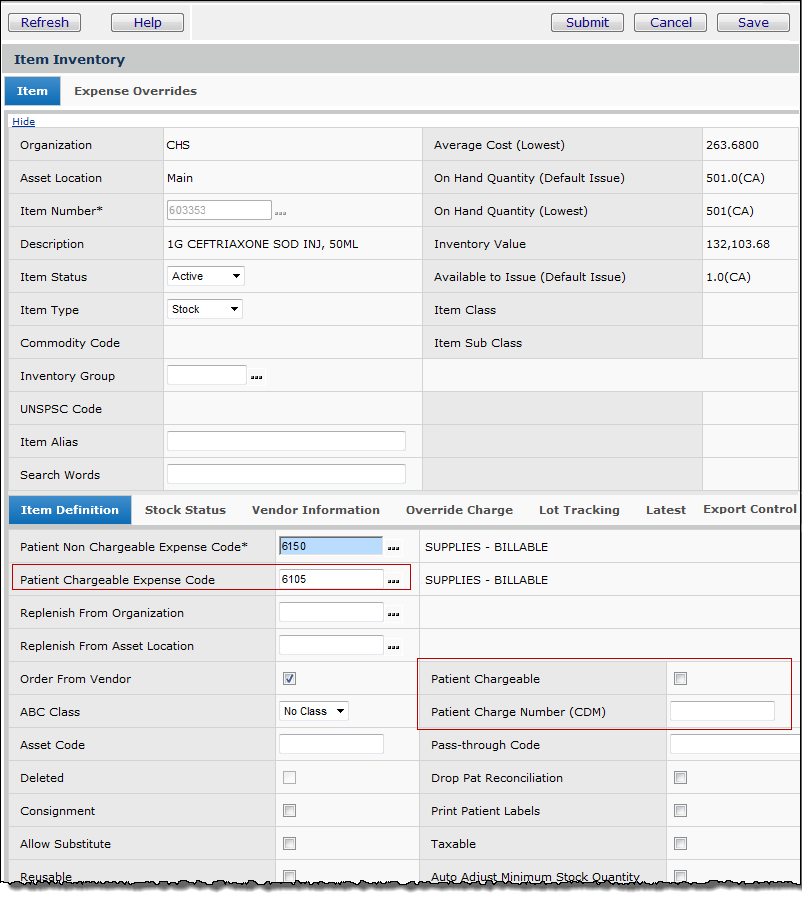
Figure 2 - Item Inventory Record
Note: All patient identifier fields in Figure 2 and in other figures contain fictional values. They are for demonstration purposes only, and are not associated with any actual individual(s).
- Select the Patient Chargeable
field for the item.
- Enter a value in the Patient Charge Number
(CDM) field.
- Click the prompt to select a Patient Chargeable
Expense Code field.
- Click Save.
- Click Submit to return to the Item Inventory list.
Printing Patient Labels
You can print patient charge labels on a sheet-fed or a roll-fed printer. For details, see Printing Labels.
Label paper
for patient charge labels must be specially ordered from your label
printing company. Obtain the label format layout from the Help Desk, and print the layout on a regular piece
of paper. This step is important in order to have the labels align correctly.
Then, you should send the custom label format layout to your label vendor to
use as a template for creating the label paper for your printer.
When you
print an item label, the bold number above the barcode is the system's item
number / manufacturer's item number coded in the barcode. The Patient Charge
Number (CDM) also prints on the label. Figure
3 is a sample patient charge label printed in the system.
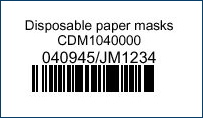
Figure 3 - Sample Patient Charge Label
Note: All patient identifier fields in figures contain fictional values and are not associated with any actual individual(s).
To
enter patient charges manually:
- From the
Materials Management main Contents, select Imports / Exports & Financials >
Patient Charge Entry. The list of patient charges already entered appears.
If no charges have been recorded, No Data appears.
- Select New.
The Patient Charge Entry panel appears (Figure 4).
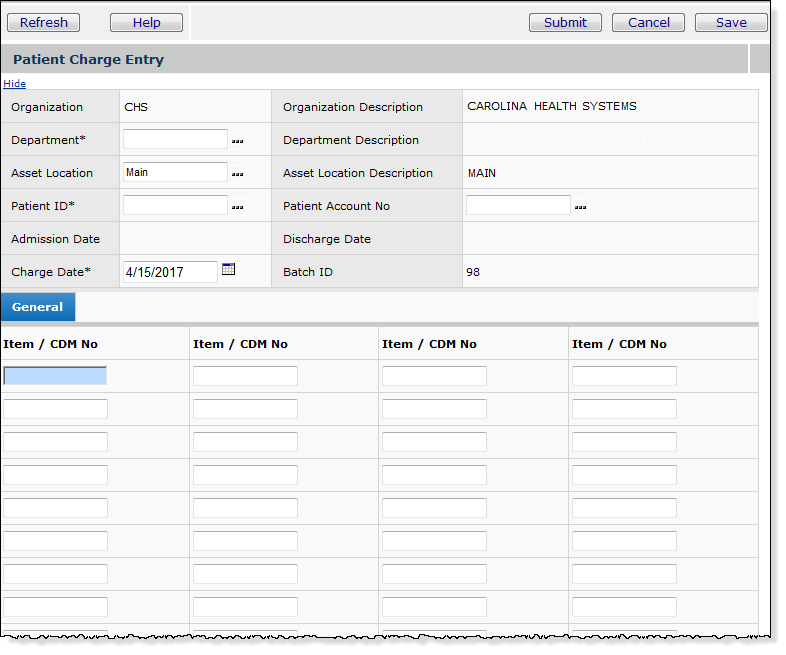
Figure 4 - Patient Charge Entry Panel
-
Enter values in
the header fields as follows:
Department
- The department.
Asset Location
- The asset location supplying the charged item(s). If the asset location that
appears in this field is incorrect, select the correct asset location.
Patient
ID - The number that identifies a patient at your site.
Charge
Date - The date of the charge.
Patient charge processing checks whether the Charge Date is in the range between the patient admit date and the discharge date.
Depending on the result of the check, the user receives one of the following messages:
- The charge date is greater than today's date.
- The charge date is before the admit date or after the discharge date. (Figure 5 is an example.)
- The charge date is greater than today's date and the charge date is before the admit date or after the discharge date.

Figure 5 - Patient Charge Entry Warning
The user can either cancel (by clicking Cancel) or continue (by clicking OK).
Item
/ CDM No - The Item Number (or the CDM Number) of each item charged to the
patient for the given date, department, and asset location.
Patient
Account No - The patient's account number (for billing purposes).
You
can enter multiple item numbers for the same patient. If you need to charge
an item multiple times, you have two choices:
Enter the item as many times as you need.
Enter the item once. When you are finished entering all items, save the entries,
and then edit the entries for
the correct quantity.
- Click Save
when you are finished entering data.
- If you need to enter
items for a different patient, enter new information in the Department,
Asset Location, Patient ID, Charge Date, Item / CDM No and Patient
Account No fields as needed.
- When you are finished
scanning all items for all patients that you wish to enter, click Save.
Important: Your patient charges will not be recorded unless you click Save.
-
Click Submit.
The system returns to the Patient Charges list.
You can edit the
patient charge data that you just created or export it to your network
systems.
Using
a barcode scanner to enter patient charges
You can
use a barcode scanner connected to the desktop computer running ERP to read patient charge item labels.
The bar
code on the labels for each item scanned must encode the Item Number.
The item must be defined in the system's Item Catalog, and the definition must
include a Patient Charge Number (CDM).
To enter patient charges with a bar-code
scanner:
- Turn on your scanner
and collect the items that you wish to scan.
- From the
Materials Management main Contents, select Imports
/ Exports and Financials > Patient Charge Entry.
The list of patient charges already entered (if any) appears.
- Select New.
The Patient Charge Entry panel appears (Figure 4).
- Enter the correct
information in the Department, Asset Location, Patient
ID, Charge Date, and Patient Account No fields.
- Position the cursor
next to the first Item / CDM No field.
- Scan the barcode
on the first item that you wish to enter. Wait a few seconds. The system enters
the number in the first Item / CDM No field, and moves to the next
Item / CDM No field.
If you need to charge an item multiple times, you have two
choices:
Scan the item as
many times as you need.
Scan the item
once. When you are finished scanning all items, save the entries, and then
edit the entries for the
correct quantity.
- Click Save
when you are finished entering items for a patient. (It is also a good idea
to Save periodically as you enter items, especially if you
are entering many items.)
- If you need to enter
items for a different patient, enter new information in the Department,
Asset Location, Patient ID, Charge Date, and Patient
Account No fields as needed.
Click Save.
Begin scanning
item information for the new patient into the Item / CDM No fields.
- When you are finished
scanning all items for all patients that you wish to enter, click Save.
Important: Your patient charges will not be recorded unless you click Save.
- Click Submit.
The system returns to the Patient Charges list.
You can edit
the patient charge data that you just created, or, if it is correct, you can
export it to your network files.
To
edit patient charge entries:
- From the Materials Management main Contents, select Imports / Exports & Financials >
Patient Charge Entry. The list of patient charges appears.
- In the list, locate
the patient charge batch file containing the data that you need to edit.
Review the User ID and Batch Creation Date
columns to find the batch job. You can sort these columns if you wish.
- Next to the User ID of the batch file, click
the edit icon, or select Menu > Edit. The Patient Charge Entry panel
appears (Figure 6).
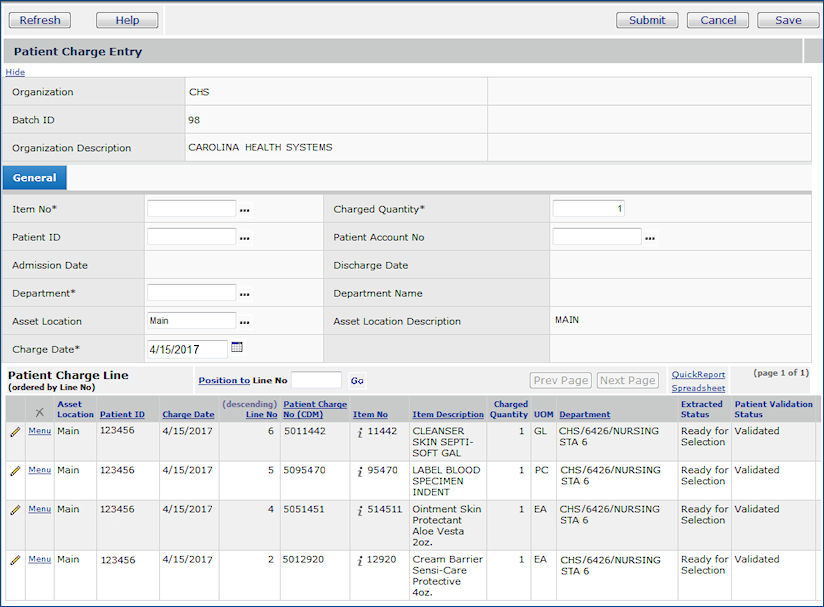
Figure 6 - Patient Charge Entry Edit Panel
All Patient ID values are fictional.
Note: All patient identifier fields in Figure 6 and in other figures contain fictional values and are not associated with any actual individual(s).
- Change information on the panel as needed.
-
To enter new
patient charges, use the fields on the General tab.
- Enter the correct information in the Item No, Patient ID,
Department, Asset Location, Charge Date, Charged
Quantity, and Patient Account No fields.
-
To change information
for an item that you have already entered, locate the item on the Patient
Charge Line portion of the panel.
- Next to the Patient ID for the item you wish to
edit, click the edit icon, or select Menu > Edit.
- Change information in the fields as needed.
Note: You
can delete an item by selecting Menu > Delete.
- Click Save.
The system saves your changes.
Important: Your patient charges will not be recorded unless you click Save.
- Click Submit.
The system returns to the Patient Charge Entry panel.
If you wish, click Refresh
to see your changes.
- Click Save again.
- Click Submit. The Patient Charges list appears.
To
export patient charges manually:
-
From the
Materials Management main Contents, select Imports / Exports & Financials >
Patient Charge Export. The Patient Charge Export list appears (Figure
7).
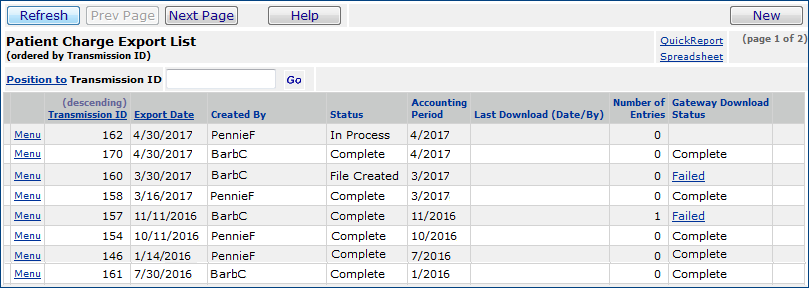
Figure 7 - Patient Charge Export List
The Patient Charge Export List shows the Transmission ID, the Export
Date, the user ID of the person who created the export file (Created
By), the "create" Status of the export file, and the Accounting
Period.
The
Last Download column shows the date and time when the file was last downloaded,
and the user responsible for the download. The Number of Entries is a
tally of the transactions in the export file.
When
Pulse (the "gateway" appliance) is configured to handle the export, the export status appears in the
Download Status column.
Note: If the export file is empty, the Status is Complete as long as the site's system values flag Auto-Complete Empty Exports is set to on (Figure 8). (The location of the System Values panel is: Work in Administration > Administration > System Values > > Other tab.)
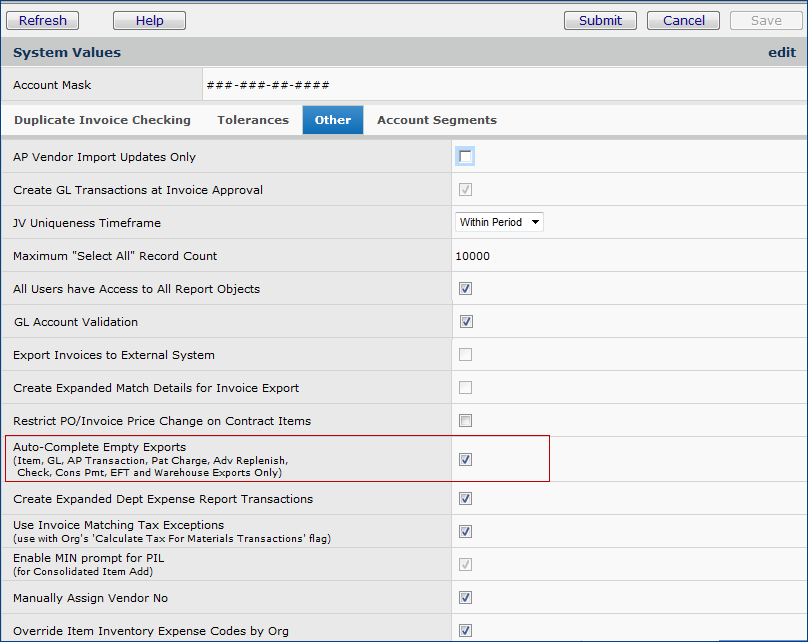
Figure 8 - The System Values "Other" Panel in Administration
-
Click New.
The Patient Charge Export Selection Parameters panel appears (Figure 9).
Under Patient Charge Transaction PREVIEW is the list of patient charge batch
files ready for export.
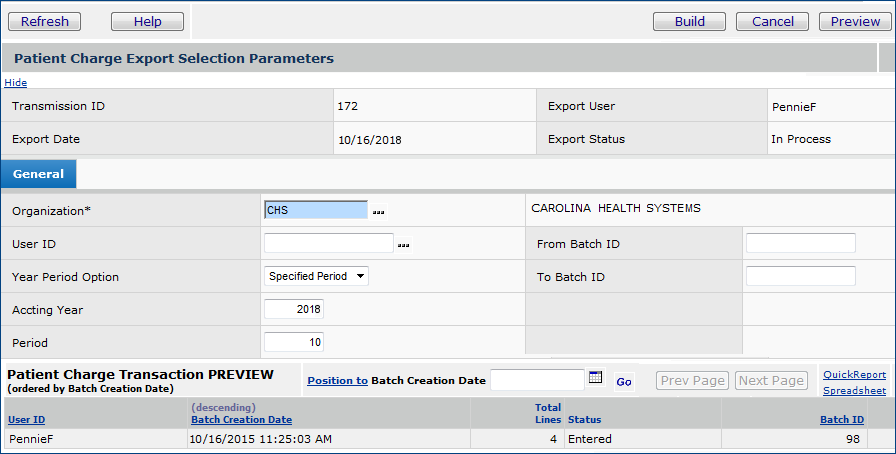
Figure 9 - Patient Charge Export Selection Parameters Panel
- In the From
Batch ID and To Batch ID fields, enter the beginning and ending
Batch ID for the range of patient charge files that you wish to export.
You can also enter your user ID in the User ID field (optional).
- Click Preview.
The system displays the batch you have selected in the PREVIEW panel
- Click Build.
The system returns you to the Patient Charge Export List.
- Click Refresh.
Messages display the status of the export file as it is being built. (Click
a message to read it.)
- Click Menu > Download file next to
the export file that you wish to download. The Windows File Download panel appears.
- On the File Download window, click Save.
The Save As window appears.
- In the File Name field, verify the filename
and the path to the folder where the file will be saved. If you wish to save
the file using a different name or to a different directory, edit the path.
Note: Your file is saved as an HL7 file.
- Click Save.
When the download is complete, the Download
Complete window appears.
- Click Close to close the window.
The system returns you to the list.
Importing patient charges:
When you upload a file containing patient charges, The system
performs these steps:
-
Validates the file - The system verifies that the file
is a patient charge file and determines if the file format is correct.
-
Reads the file - The system reads the file.
-
Processes the file to update patient charge
information - The system updates its patient charge records based on the information
in the import file.
If the system cannot complete any step because of errors,
it logs the errors. You can view the
errors and correct them.
To
create and edit the .csv file
- Generate a .csv export file using your patient records system utilities,
or create the file manually. The file name must be unique.
- Your patient records system may have a utility that can save records as
.csv files. If so, create a .csv export file containing your patient charge
information. Write the file to a directory that you can access with a text
editor program. You will need to edit the file.
- Alternately, open a new file and populate it with the data that you will
import into the system. If you use a spreadsheet program, make sure that your
spreadsheet program can save the file in .csv format, and that the columns
and column headers are formatted according to the examples.
Important: Click BACK
on your browser when you finish viewing the example files described in the
next paragraph. Or, close the tab, if you are using Internet Explorer tabs. If you click File > Exit or File > Close, the system may also
close.
- Open the .csv file that you made in the previous step in a text editor (e.g.,
Word Pad) and edit it so that the format matches the Example
File. Study the field descriptions, and structure your data accordingly.
Note: All patient identifier fields in the Example File contain fictional values and are not associated with any actual individual(s).
- The following are formatting rules:
- Commas separate all fields.
- The last field of a row has no trailing comma.
- If a field contains a comma then the field value should be surrounded by
double quotes, for example:. "Smith, John"
- If the field contains a double quote, the quote should be doubled up and
the whole field surrounded by double quotes;
e.g., "You are 5' 2"" - - tall"
- Each row should end with a Carriage Return Line Feed.
- Any Date field should have the format MM/DD/YYYY.
- Save the file and close the text editor.
To import patient charge data
into the system
- From the Materials Management main Contents, select Imports / Exports
& Financials > Patient Charge Import. The Patient Charge Import
List appears. The list contains patient charge files that have been uploaded.
- Click New. The Patient Charge Upload panel appears.
- Enter the file that you wish to import in the File to Upload
field.
You can also click Browse to locate the file.
- At this step, you have a choice. You can work through the import process
in two stages or in one stage. For new users of this feature, we recommend
the two-stage approach.
- The two-stage approach first loads the .csv file and validates
it. Once the file has successfully loaded, you can import the information
into the system.
- Select the box labeled Load and Verify, No Import.
- Click Submit.
The system attempts to upload your file and validate it. If successful, the system
sends you a message. If the system cannot upload your file and validate it,
error messages appear. Read and close the error messages. Make changes as
needed in your .csv file and try the upload again. Click here
to read debugging information.
- The Import List for Patient Charges appears.
- Click Refresh to see your file listed.
- The one-stage approach loads and immediately updates the system's
data using the file records. This method is efficient if you are confident
that your .csv file will not contain many errors.
- Click Submit.
The system attempts to upload your file and validate it. The Import List for
Patient Charges appears.
- Click Refresh to see your file listed.
- Review the import list entry for your file. Click Help
for detailed descriptions of the fields. The following fields provide useful
status data:
Import Status Desc - The successful or unsuccessful status of
the upload.
Incomplete: The .csv file could not be read or validated.
(Check for errors.)
Ready for Processing: If you have used a two-stage upload,
the file is ready for the second (update) step.
Processed - The number of data records processed out of the total
uploaded. This number shows how many of the import file records successfully
updated the system records.
n of X: X is the number of data records
uploaded and n is the number of records processed.
For a one-stage upload, this field indicates whether the system
was able to update its data using the imported file's records, and, if so,
how many updates were successful. 0 of X means that the system
was not able to update any of its data using the imported file's records.
Click Menu > View Import Details. The import details list appears,
and you can review your data for errors.
For a two-stage upload, 0 of X is normal.
To complete processing of your import file
If you are using the one-stage approach, the system has
run the import step for you. You can review any errors, and begin fixing
any problems.
If you are using the two-stage approach, you need to
process the file that you uploaded so that the system records are updated.
Do the following:
- From the Materials Management main Contents, select Imports
/ Exports & Financials > Patient Charge Import. The patient charge
import list appears.
- Locate the file that you wish to process.
- Click Menu > Reprocess. The system asks you to verify
that you wish to reprocess the file.
- Click Submit
- The system tells you how many records were successfully processed,
and how many contained errors.
- If you have no processing errors, then you are finished
with the update, and the Import Status Desc is Complete.
- If you have errors, Import Status Desc contains
the value Errors. See To debug
your import file to correct the errors and click Menu > Reprocess
again. You may need to make changes in your .csv file and re-import the
file.
To debug your import file:
You can encounter errors at any or all of the stages of patient
charge record import and update. Error messages provide information about problems
with the .csv file. In most cases, you will wish to alter your .csv file.
A. At the validation and reading stages:
- Check that the file name and path are correct.
- Make sure that the import file is a .csv file.
- Verify that your file has the header line.
- Check that you have included a line containing the correct
column names, in the correct order, and that none are missing.
- Check that the correct number of fields are in the import
file for each record.
- Check that the file fields are correctly formatted. See the formatting
rules.
- Check that the file contains <EOF> on the last
line.
B. At the update stage:
When you select Menu > Reprocess, the system attempts
to update its patient charge records using the imported file. The number
of records successfully updated appears on the import list, and errors in processing
each record are logged. To see the errors:
- Click Menu > View Import Details. The imported
records appear.
- Review the Processed field for each record to determine
which have errors. Yes indicates that the record successfully updated
the system. If the field is empty, the record has a problem, and could not update
the system.
- Click View Errors to get a list of the problems with
the record. In most cases, you will want to go back to the .csv file, correct
the data, and re-import the file.
To run the Patient
Charge Reconciliation Report:
The Patient Charge Reconciliation Report shows you quantities
of patient chargeable items that have been issued, the quantity of each item
issued that has been charged to patients, and the quantity "lost"
or not charged to patients. This report is typically run by period as a management
tool. It cannot be used to identify daily lost charges.
- From the Materials Management main Contents, select Reports
> Standard Report Definitions. The list of reports defined in the system
appears. The Patient Charge Reconciliation Report has been predefined for
you, and is on the list. (With the reports in alphabetical order, page forward
about three pages to find it.)
- To run the Report, select Menu > Print Report.
A panel appears with fields for you to enter the accounting year (Acct
Year), the department (Dept), and the organization (Org)
for which you want report data.
- Enter information in the fields as needed.
- If you leave the fields empty, you will get all years,
departments, and organizations.
- Click Submit.
- A message appears directing you to My Archived Reports
to see the report.
- To view the report, you can click Completed Reports
next to the Patient Charge Reconciliation Report, or you can select Reports
> My Archived Reports, and click View Report next to
the report.
To print patient charge labels:
Detailed instructions for printing labels are in the topic Printing Labels. The steps below direct you to the correct part of the system for printing patient labels.
- From the main menu, select Inventory > Item Inventory.
The Quick Click menu appears.
- On the Quick Click menu, select Item Inventory.
- Enter the Item No in the box under For....
Click Go. The Item Inventory list appears.
- elect Menu
> Print Patient Charge Labels.
The system sends you a message that patient charge labels are being printed,
and that you can access them from Reports > My Archived Reports.
Note: Patient charge labels print 44 to the page. See the detailed discussion in Printing Labels.
Copyright © 2023 by Premier Inc. All rights reserved.