Using an Order Guide to Requisition Items Version
Contents
Overview
Using an Order Guide is the easiest way to requisition items that are listed in your
Item Catalog. You can use an order guide to request supplies that you
often need, over and above your department's usual par items. Or, if
you keep a stock of supplies in your department, you may prefer to
specify the quantity of each item when you restock it, rather than assigning
it a fixed par level. In this case, an order guide can help you replenish items
that you normally keep on hand.
Warehouse staff typically set up one or more order guides for a department, depending
on the types of items that the group needs to order. For example, a department
may have one order guide for training materials and another order guide for
office supplies. Of course, you can always requisition items without an order
guide, but using an order guide is generally more efficient. The system treats
a requisition created from an order guide the same as any other requisition.
Once you have opened an order guide requisition, you can view
the requisition. You can also edit your requisition
to make changes (until it is approved).
If your site uses the iPad mobile application to manage supplies, you can make order guide requests with the iPad. The mobile application lets you access departmental order guides, and
enter the quantity of each item. The sections
below explain how to open a requisition from an order guide manually.
Security
The "Requisitions" role object controls access to requisitioning functions. To create requisitions, the "Requisitions" role object must be set to All.
To access and requisition from order guides for all departments, the role object "OrderingByDept" must be set minimally to All. This role object is associated with the Materials Management menu Requisitioning > Order Guides for Requisitioning – My Departments.
To add file items to an order guide requisition — that is, items that are not on the order guide — you must have a permission field set in your user profile. See the discussion below.
Using Order Guides
Figure 1 displays the workflow for placing an Order Guide. The workflow diagram shows all the steps for placing and fulfilling stock or non-stock item requisitions.
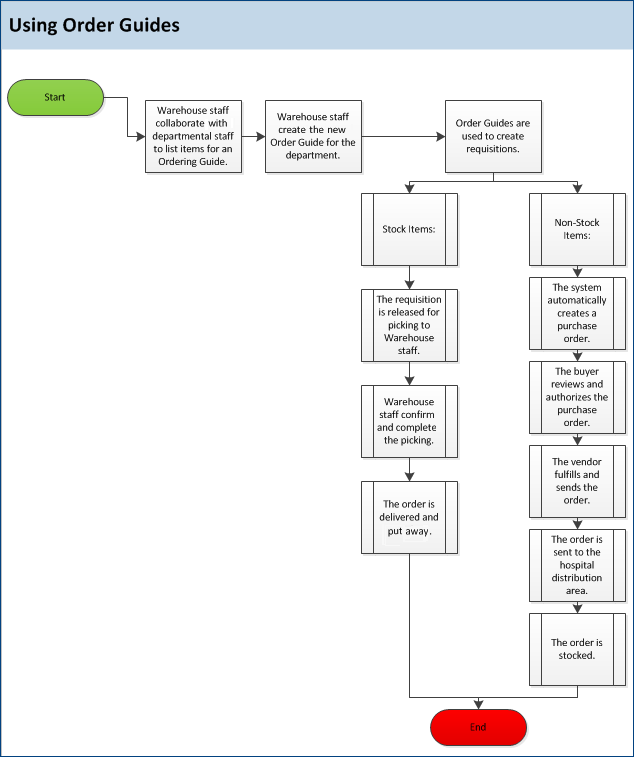
Figure 1 - Using Order Guides
Opening an Order Guide Requisition
Opening a requisition has two major
steps. First, you create the requisition header; then, you specify the items
and quantities that you need. The requisition header contains information that
identifies you, your department, the order guide that you are using, the date,
and so on. Figure 2 shows a requisition header form ready for input.
With an order guide requisition, after
you create and submit the requisition header, the system shows you all the items
on the order guide. You specify the quantity that you need for each item. When
you are finished ordering items, you can preview the entire requisition — header
and item lines — before submitting it.
To
open a requisition from an order guide:
-
From the main Contents, click Requisitioning > Order Guides for Requisitioning or Order Guides for Requisitioning – My Departments.
The Quick Click menu appears.
-
Under I would like to..., select Create Requisition from Order Guide.
-
Under Order Guide, enter the order guide code or number. (This code identifies
an order guide.)
- Click Go. The header of the Create Requisition
from Order Guide panel appears (Figure 2).
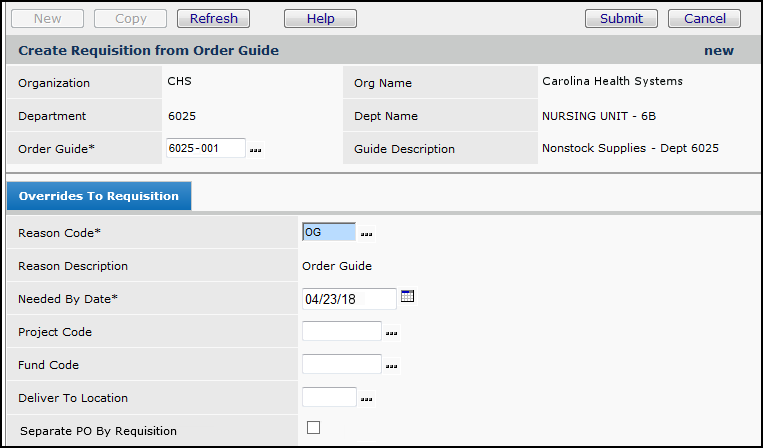
Figure 2 - Create Requisition from Order Guide Panel - Header
The
name of the order guide that you have selected is in the box next to Order
Guide. You can select another order guide from the prompt (...),
but this box must be filled in.
-
Select a Reason Code from the drop list, or accept the default reason code.
- Select a Needed by Date.
- Enter a Project Code and/or Fund Code, if appropriate.
- Click Submit.
The Order Guide Lines panel appears (Figure 3). The Order Guide Lines panel shows all the items on the order guide.
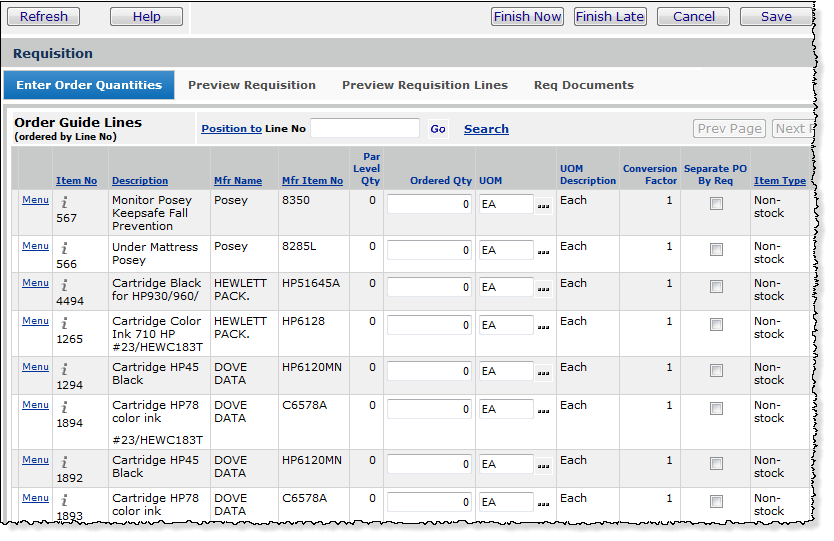
Figure 3 - Enter Item Quantities on Order Guide Requisition
-
On
the Order Guide Lines panel (Figure 3), for each item that you wish to order, enter a quantity (or zero) in the Ordered Qty field. If your
requisition contains duplicate lines, you will get a warning message asking you to verify that you want the duplicates.
Notes:
- Override charge department on requisition lines:
A requisition created from a par cart/order guide will use the Override Charge Department field for an item specified by the order guide/par cart line.
- When an item is added to an order guide or par cart, the Override Charge Department field will be populated according to the information in the header. However, this information can be deleted or changed.
- If the order guide or par cart line contains no Override Charge Department value for the item, a requisition created from the order guide or par cart will utilize the Override Charge Department from the item inventory.
- The units of measure available
for selection in the UOM field are valid for issuing the item.
If you are opening a direct delivery requisition, the UOM in this field must also be a purchase UOM defined in the item record. The reason is that direct delivery requisitions generate
direct delivery purchase orders. If the Order UOM is not also a purchase
UOM, you get an error message when you submit the direct delivery requisition.
In this case, you have two options:
- Select a different UOM value in this field for the requisition.
- Go to the item record and change the Order UOM that you need for
the requisition so that it is also a purchase UOM.
- On an order guide requisition, you can designate non-file, non-stock, or direct delivery lines as Separate PO by Requisition. (This designation is useful when requesting capital project items.) Requisition lines specified as Separate PO by Requisition are entered on one or more separate POs by vendor. See Separate POs by Requisition.
- Also, an entire requisition (and all its lines) can be designated as "separate." This feature allows separate POs at the requisition header level, and prevents lines from multiple requisitions to be combined on a purchase order. Also, for requisitions whose lines are all "Separate PO," it avoids having to select the field on each line. To designate the entire order guide requisition as "separate," select the field Separate PO by Requisition at the bottom of the Overrides panel (Figure 2).
- Click the prompt (...) next to the UOM field to select a unit of
measure for each ordered quantity, or accept the default UOM.
- To view the requisition header, click the Preview Requisition tab. (Figure 4).
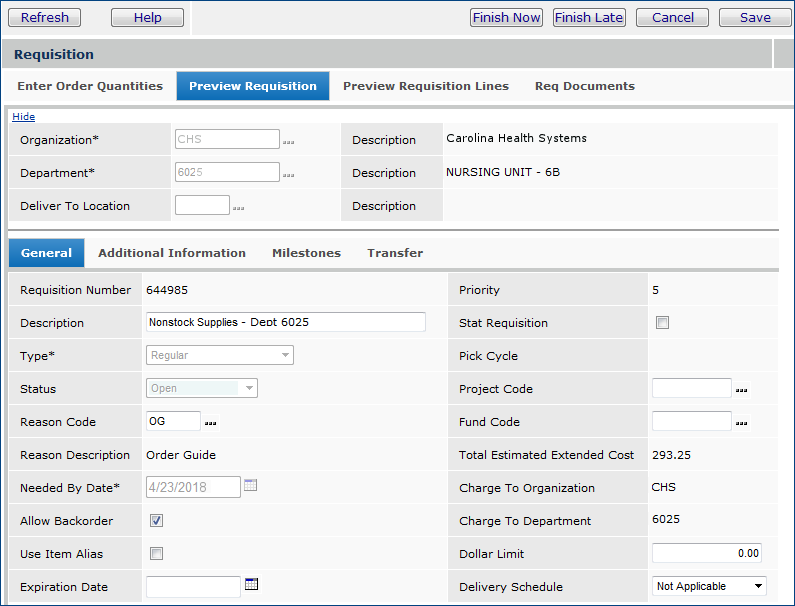
Figure 4 - Order Guide Preview Requisition Tab With Header Information
- To view the requisition lines, click the Preview Requisition Lines tab (Figure 5).
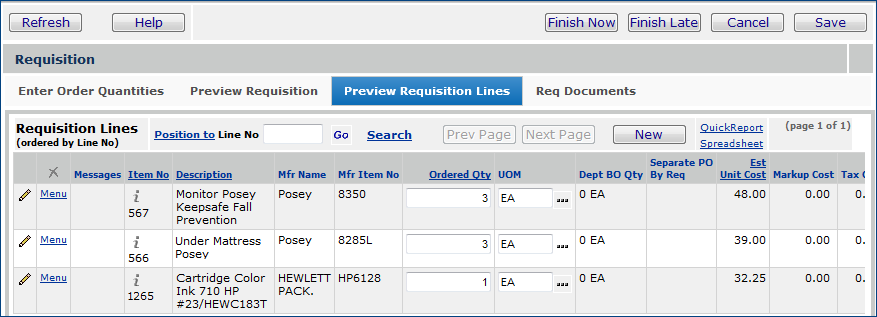
Figure 5 - Order Guide Preview Requisition Lines
- Click the Additional Information tab. Enter any information that is needed.
- You can also view cost and tax data for the requisition on the Additional Information
tab. Notice that your Requisition Number is entered automatically.
You may wish to make a note of your requisition number.
- If you want to see
the exact contents of the requisition lines, click the Preview
Requisition Lines tab.
- You can make changes
to item lines on the Requisition Lines panel.
- When you are viewing requisition lines, pressing the down arrow key moves you to successive
lines.
- Also, note that clicking a line when it is highlighted in blue opens
a table showing you column information that you cannot see unless you
scroll left or right.
-
Select either Finish Now or Finish Later.
-
Finish
Later lets you
come back to your requisition and
submit it for approval later. If you come back to your requisition
later, you access your requisition through the Materials Management main Contents
by selecting Requisitioning > Requisitions - Current Dept.
(See View requisitions.)
-
Save
saves your requisition.
- Finish Now
immediately submits your requisition for approval.
- Click Finish Now. The system asks if you want to submit the requisition for approval.
- Click Submit. The system submits your requisition and returns
you to the Order Guides list.
- To see your requisition, from the main Contents, select Requisitioning
> Requisitions - Current Dept.
Adding Items to an Order Guide Requisition Manually
You can manually add non-file items to a requisition created from an order guide. If you have the appropriate permission, you can also add file items to the requisition.
To add items to an order guide requisition:
- Open the order guide requisition and select the items that you wish from the order guide.
- Click Save.
- Click the Preview Requisition Lines tab.
- Click New.
The Requisition Line Edit panel appears (Figure 6).
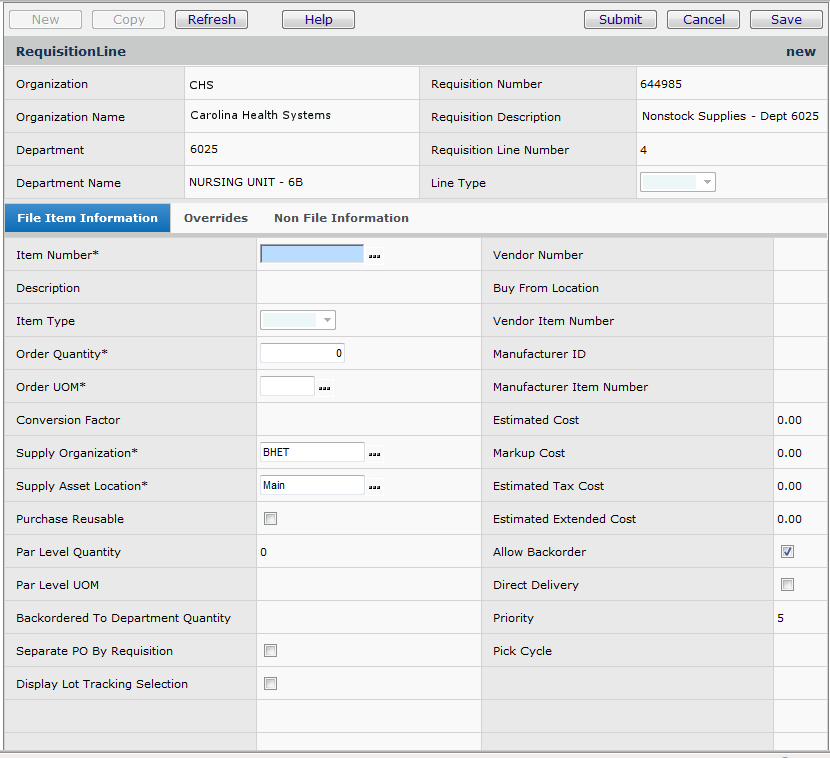
Figure 6 - Enter a File Item on a Requisition
 On the File Item Information tab:
- Select the Item Number, enter the Order Quantity, and select the Order UOM for the item you
are requesting.
- If you select Separate PO by Requisition for a non-stock or direct delivery line, when the requisition is approved and released, the system enters the line on a separate purchase order for the vendor.
- Click Help for detailed information on completing fields in the panel.
On the Non File Information tab:
- Enter as much information as you have about the item that you need. You must enter data in the fields: Item Description, Order Quantity, Order UOM, and Expense Code.
- Under some circumstances, you may need to enter a Commodity Code.
You may also need to go back to the requisition header's Additional Information tab to enter a Project Code.
The system displays messages if entering either a commodity code or a project code (or both) is required.
(See Using Project Codes with GL Accounts for details. Also, click Help and read the information for the Commodity Code field.)
When the requisition is submitted and approved, the non-file line request is reviewed and costed by staff in your Purchasing
organization.
For suggestions on entering non-file requisition lines, see Tips on Completing
the Non File Item Information Panel.
- Save and Submit the requisition as usual.
Permission to add file items to an order guide requisition
To add file items to an order guide requisition, you must have a permission field set in your User Profile. The field is Allow File Item Adds to Req Created by Order Guide and it is located on the Users panel Authorities tab. The default setting is "checked" (allow). If this field is not set, an error message is displayed when you attempt to add a file item to an order guide requisition. Your System Administrator can modify User Profile settings.
To
print an order guide report:
This report prints the contents of an order guide.
-
From
the main Contents, click Requisitioning > Order Guides for Requisitioning, or Order Guides for Requisitioning – My Departments. The
Quick Click menu appears.
-
Under
I would like to..., select Print Order Guide.
-
Enter
the Order Guide code. Click Go. A
formatted version of the order guide appears. Click File > Print
to print it on your local printer.
To
submit an order guide requisition for approval:
-
From
the main Contents, select Requisitioning > Requisitions
- Current Dept.
-
On
the Quick Click menu, under I would like to..., select Submit
for Approval/Release.
-
Enter
the Requisition Number in the box.
-
Click Go. The system asks you if you are sure that you want to submit your
requisition for approval.
-
Click
Submit. The Requisitions list shows the changed Status
of the requisition. You can follow the progress of your requisition by reviewing
the Status field for the requisition in the list.
To print order guide item barcode labels:
- From the Materials Management main Contents, select Requisitioning > Order Guides for Requisitioning, or Order Guides for Requisitioning – My Departments.
The Order Guides list appears.
- Locate the order guide of interest.
- Select Menu > Print Order Guide Labels.
Copyright © 2023 by Premier Inc. All rights reserved.
requisiton requistion recasition recwasition reqesition reqestion