Import Local Supply Contracts
Version
Contents
Overview
The Contract Import feature brings new and updated local contracts into Sourcing and Contract Management. The imported data include contract header information and contract detail lines; i.e., the items on the contract, units of measurement, tier levels, prices at each tier, price effective dates, and similar information. You can import data for current and future contracts, and for existing contracts in use, and unused. Sourcing and Contract Management handles file format conversion for GPO contracts.
- Once a contract is imported, you can accept the contract and activate item prices. The contract prices are then available for purchasing. Price activation is discussed in a separate chapter.
Awarded contracts from Sourcing and Contract Management Projects: When you award a contract to a bid, it is brought into the Supply Contract Workbench where you can accept and activate it.
Import from the Excel Contract Template: The Contract Template lets you create contracts in the application's contract format as Excel worksheets. Once created, contracts can be saved to a local network folder, emailed to a supplier, and imported into Sourcing and Contract Management. This feature also lets you export a contract that already exists, copy or revise the contract, and re-import the contract.
Import from a GPO: To import a contract, you normally download the contract from the GPO's website to a local network folder and then upload the contract into Sourcing and Contract Management from the local folder.
Restrictions for Users of the
- With the , you cannot import new or updated -managed contracts. A -managed contract is any contract created in 's Supply Chain Advisor (SCA) or synchronized via the automatic contract synchronization process. Only the "SCA price activation sync" process can update SCA price-activated contracts.
- You can load local (non--managed) contracts into SCM using the single-tier or multi-tier Generic format. New local contract numbers that begin with the following list of restricted prefixes are considered
-managed contracts and cannot be imported into SCM: PP, FA, GB, GS, PS, AS, EB, RS, IC, SD, SP-, IN-, PIMS, or GH.
If you are using the Integrated SCM/SCA Platform, you should also review the topic "Integrated SCM/SCA Contract Management."
Security
- To award contracts to bids, the role object "CAProjects" must have the minimal setting of Create.
- ERP - Materials Management users: To import contracts, you must have Sourcing and Contract Management enabled. If you wish to use Sourcing and Contract Management, contact the Help Desk.
- User authority to access the "Load and Activate Workbench" page and import contracts is controlled by the "Contract" role object.
- Importing contracts requires the setting All on the "Contract" role object.
- If a contract is limited to one or more departments, organizations, and/or regions, you cannot display the contract and contract notes unless your data profile settings are compatible.
Your System Administrator can adjust your user profile and data profile as needed. Role objects and data profiles are available from the Administration table of contents. (See Administration and Security Settings.)
Workflow
Here are the steps in importing a contract.
GPO or application-format contract
- For a GPO contract, upload the contract from the GPO site to a local network folder.
- Use the "Load and Activate Workbench" tools to import the contract into Sourcing and Contract Management.
Import from Excel Template
- Open the contract in the application's Excel Contract Template.
- From the Excel spreadsheet, sign in to the system , and click Upload Contract.
Then, for both types of upload:
- Review and correct any upload errors. Re import the corrected contract, if necessary.
- Optional: Open the contract to do the following:
- Review its lines,
- Add documents,
- Edit the contract header to enter a review date, or to indicate that the contract is a replacement for an expiring contract.
- Optional: Set system or contract alerts for yourself or other users; for example, an alert when a contract needs review.
Import Local Supply Contracts
You can import non- contracts that you have downloaded to your network from a GPO website. Sourcing and Contract Management handles any GPO file format conversion. When the contract pricing structure changes, you can re-import the contract. Sourcing and Contract Management maintains continuity in the contract statistics.
You can also import contracts in the application's native ("generic") format using the Excel Contract Template. You can create one -- or multiple -- contracts from the same Excel document. You can also upload several contracts in a single file. You can import contracts using the Load Contracts panel, or import the contracts directly from the Excel file using the Excel Upload Add-In.
Both methods are outlined in the sections below.
Notes:
- Some GPOs include all contract tiers in a single file for upload. Other GPOs use a separate file for each contract tier. Depending on the GPO, you may need to upload multiple files for a single contract to get all the applicable tiers.
- Tier start and end dates must be populated and have valid values.
- When your site implements Sourcing and Contract Management, implementation staff set up the GPO links that you will use to import contracts. The setup step is done for you. However, you can add new GPO's. If you need to set up a new GPO portal, see "To set up a GPO link." From the setup panel, you can create a new link to any GPO.
- For contracts in the generic format, any tier description longer than 100 characters is truncated to 100 characters when the contract is uploaded. Tier dates must be populated.
Import Contracts Using the Load and Activate Workbench
The instructions below explain how to use Sourcing and Contract Management panels to import GPO contracts that you have stored in a local network folder.
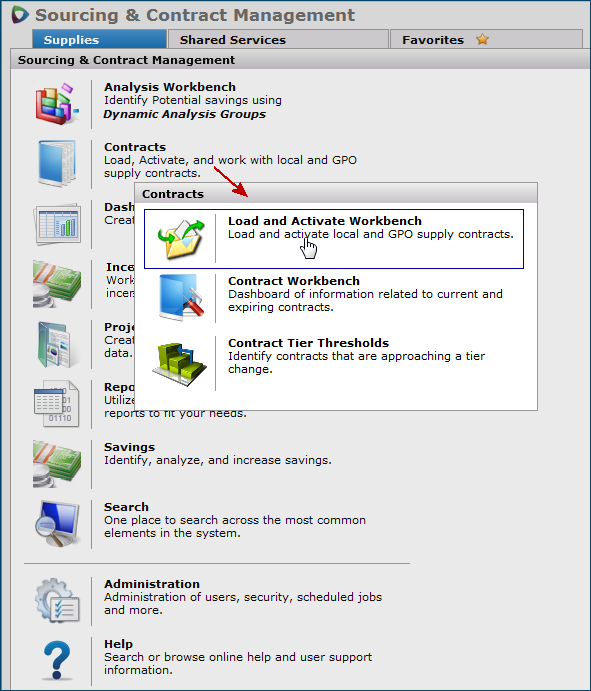
- From the main Contents (Supplies tab), select Contracts > Load and Activate Workbench (Figure 1). The "Load and Activate Workbench" page appears (Figure 2).
Figure 1 - The Load and Activate Supply Contracts Menu

Figure 2 - The "Load and Activate Workbench" Page
The Upload Status panel is open.
- Click Upload New Contract (Figure 2).
The GPO Portals panel appears.
- On the GPO Portals panel, click Upload (name) Contract. (name is the GPO.)
The Import Contract panel appears (Figure 3)

Figure 3 - The Import Contract Panel
- In the File to Upload field, enter the path and file name for the contract that you wish to import.
- Click Browse to locate the file.
- Select the file.
- Click Open.
The system fills in the field with the file path and file name.
- If you wish, you can enter a control number (15 characters, max.) to associate with the contract file and with item details. See Using Control Numbers.
- Click Submit.
The system sends you a message that it has uploaded the contract file, and that you should close the window.
- Click Close Window.
The "Load and Activate Workbench" page appears. The system immediately processes
the file.
- Click Refresh.
You can view the status of the upload and processing in the Upload Status panel (Figure 4).

Figure 4 - The Upload Status Panel
If there are no errors when the contract finishes processing, the contract is listed on the Accept/Activate Contracts panel. If the upload and/or processing are not successful, you may need to visually inspect the contract file to look for problems.
Note: When you create any new contract, the system checks to make sure that the contract number is unique. If another contract has the same number, an error message appears.
- Click the Accept/Activate Contracts tab to view the list of uploaded contracts (Figure 5).
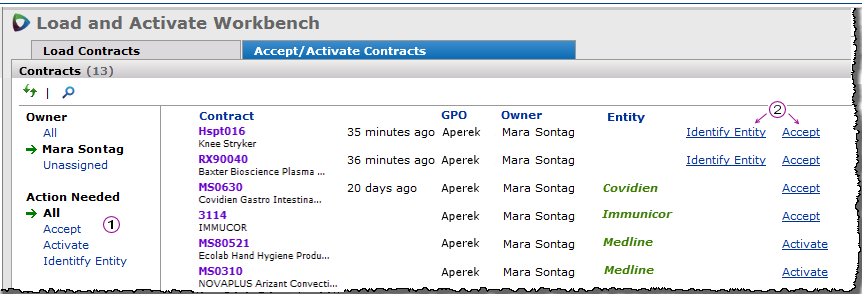
Figure 5 - The Load/Activate Contracts Panel
On the list of contracts (Figure 5), you can switch the owner display by clicking the different links (All, Unassigned, and your name). Your name is the default.
 The Action Needed options let you filter the list of contracts depending on whether the contracts need to be accepted, to be activated, or to have a missing manufacturer entity identified. See Identifying manufacturer entities with invalid IDs for instructions.
 The columns on the far right display the action (or actions) needed by the contract:
Accept – The contract has not been accepted. Accepting a contract makes its data available for use by the SCM analysis tools and the Savings feature. You must accept a contract before you can activate it.
- Click Accept to accept the contract.
Activate – The contract has been accepted, and is ready for price activation.
Identify Entity – The manufacturer entity from the contract was not found in the PIL.
- Click Identify Entity to associate the correct PIL entity with the contract manufacturer.
Import a Contract From an Excel Worksheet
Important: Make sure you have downloaded and installed the latest version of the Excel Upload Add-In.
For instructions, see Download and install the Excel upload add-in.
- Open the Excel document that contains the contract(s).
For example, you can open an Excel file containing one or more contracts created with the Excel Contract Template.
- Click Sign-on.
- Excel 2007: The Sign-on button is visible on one of the toolbars (Figure 6).
- Excel 2010: Click the Add-Ins menu to access the Sign-on button (Figure 6A). Other buttons may also be available from the Add-Ins menu.
- Excel 2013: Click the , Inc. tab (center, last on right) to access the key-shaped Sign-on icon (Figure 6B).

Figure 6 - Opening the Sign-On Panel in Excel 2003 or Excel 2007
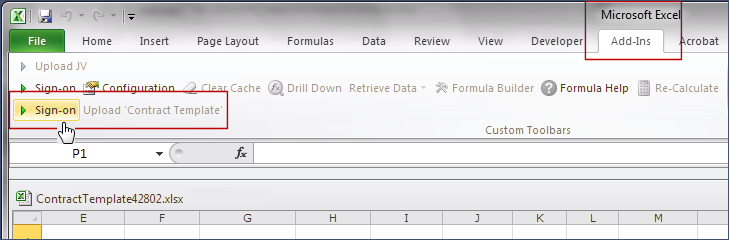
Figure 6A - Opening the Sign-On Panel in Excel 2010

Figure 6B - Opening the Sign-On Panel in Excel 2013
A panel opens for you to sign on to Sourcing and Contract Management.
Sign On for Uploading Contracts Using the Contract Templates
After you click the Excel Add-In Sign On button, a Sign On panel appears (Figure 7).
The first time you sign on to the Excel Add-In, you will need to select a host (Figure 7).
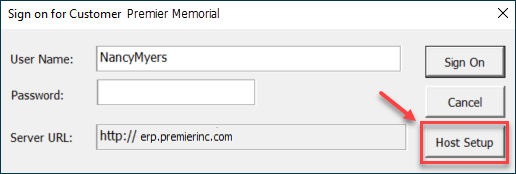
Figure 7 - The Sign On Panel for an Excel Add-In Feature
- Click Host Setup to identify the host location (Premier/SSO or Aperek) that you are accessing.
The Host Setup panel appears. Below is an example of the Host Setup panel (Figure 8). Aperek is the default.
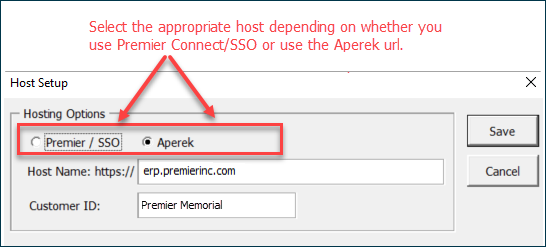
Figure 8 - Host Setup Panel for Excel Add-Ins
- Select either Premier/SSO or leave the default Aperek.
- Premier/SSO is for users who access ERP/SCM via Premier Connect as single sign-on (SSO) users.
- Aperek is for users who access ERP/SCM directly via the ERP application URL for their site.
- The default is the last option selected.
When you select Premier/SSO, the panel changes to resemble Figure 9.
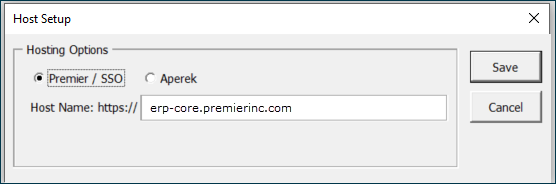
Figure 9 - Host Panel for SSO
- Click Save. The sign on panel appears again.
Signing on with the "Aperek" host option
- Enter your User Name (if not already entered) and password.
- Click Sign On.
Signing on with the Premier/SSO option
- Enter your email address/User Name (Figure 10).
- Click Sign On.
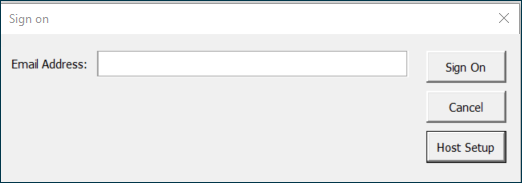
Figure 10 - Excel Add-In SSO User Sign On
Your site's network/application login panel appears. Your site administrator can set you up with the correct URL and other parameters.
- Enter your normal login credentials, and sign on.
Then, the sign on proceeds as follows;
- The Excel Add-In directs control to the Premier Connect page.
- The Premier Connect page looks at the email address and decides if you are an SSO user or not.
- In case of incorrect credentials, tyou will get an invalid login message.
- Otherwise, the Sign On panel disappears and you are signed on.
The Sign on button changes to Sign off.
Next to Sign Off, the Upload 'Contract Template' button appears.
Uploading the Contract
- On the Excel panel, click Upload 'Contract Template'.
Sourcing and Contract Management imports the contract. When the contract upload is finished, a message appears.
If the import was successful, the contract appears in the Load and Activate Workbench panel.
If import was unsuccessful, error messages appear in the Upload Status panel.
- Review the error messages, make corrections to the Excel worksheet, and then repeat this step.
-
Close the message window.
- Return to Sourcing and Contract Management.
- From the supply contracts page menu, select Contracts > Load and Activate Workbench.
The "Load and Activate Workbench" page appears. You can accept and activate the contract.
Viewing a Contract's Upload Status
The Upload Status panel displays the status for newly uploaded local contracts. The Status is generated when the import routine processes the contract.
- When a contract processes successfully, the contract is cleared from the Upload Status panel, and the contract number, name, time of import, and GPO appear in the Contracts panel on the Accept/Activate tab.
Note: Often a contract processes too quickly to generate status messages and the contract does not appear on the Upload Status panel. If a contract does generate a status message, you can view changes to the status by clicking the refresh icon  .
.
- If a contract import fails (Figure 11) or if processing errors occur, click the Status message to view information to help in diagnosing the import problem. Handling Import Error Messages contains examples.
- To clear an error message from the Upload Status panel, open the message and click Mark as Read.
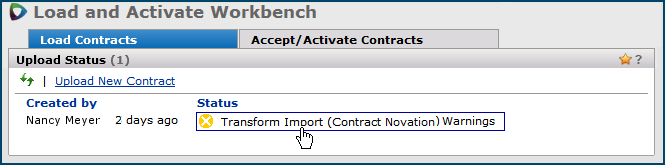
Figure 11 - Viewing the Upload Status for a Newly Imported Contract
Create a Contract with the Excel Contract Template
The Contract Template is an Excel document used to create one — or multiple — contracts from a single Excel file. The contracts are in the application's native "generic" format, which is independent and different from any GPO's contract format. You can import the contracts using the Load Contracts panel, or you can import the contracts directly from Excel using the Excel Upload Add-In, as explained above.
There are three versions of the contract template:
- Single-Tier Contract Template: For use when creating a one-tiered contract.
- Multi-Tier Contract Template: For a contract with multiple tiers, or for multiple contracts that you are uploading in the same file.
- Mass Contract Upload Template: For a single file containing multiple contracts in comma separated values (CSV) format; can contain both new and previously uploaded contracts.
For single-tier and multi-tier contracts: You must first download the Contract Template and save it in an accessible location. If you are planning to upload contracts directly from the Excel file, you must also download and install the Excel Add-In.
For mass contract uploads: See Mass Contract File Format Instructions for details on file format specifications, layout, and naming conventions.
Download a contract template
To download a contract template:
- From the Administration > Other menu, select Download Multi Tier Contract Template (Figure 12, purple box) or Download Single Tier Contract Template (Figure 12, red box).
The panel for downloading the Contract Template appears (Figure 13).

Figure 12 - Downloading a Contract Template
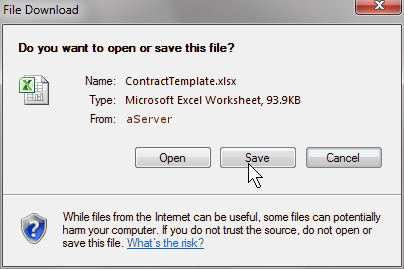
Figure 13 - The Microsoft Windows File Download Panel
- Click Save to save the Contract Template to a local or network location.
- On the Save As panel, open the folder where you want to save the Contract Template.
- Click Save.
Multi-Tier Contract Template – Basic Concepts
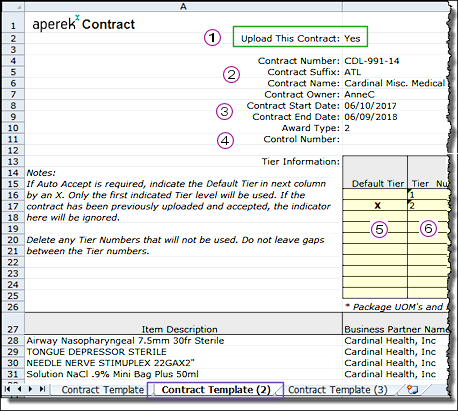
Figure 14 is an example of the multi-tier template. The example contains two contracts: Contract Template 1 (on the first worksheet) and Contract Template 2 (purple box, on the second worksheet, below the first).
Note: You can change the text on the worksheet tabs as long as the new text contains the words "Contract Template."
On the multi-tier contract template (Figure 14), enter an overall Contract Number for the manufacturer and a Contract Name. Next, enter information for additional contracts — for the same manufacturer — on additional tabbed worksheets. Space for up to ten tiers is available for each contract. You can enter a separate Contract Suffix on each worksheet. On import, each Contract Suffix for each worksheet is appended to the overall contract number.
For example: Contract number ASA915 "Reagents" for manufacturer SciTech has worksheets with suffixes: SFR, BOS, ATL, CIN. The uploaded contract numbers would be: ASA915-SFR, ASA915-BOS, ASA915-ATL, ASA915-CIN.
You can upload all the worksheets in the Excel file or only those that you select. A separate field — Upload this Contract — on each worksheet lets you specify Yes or No. You can also upload one or more sets of tier prices per contract.
|
Figure 14 - Excel Contract Template |
Entering data in the contract template fields
Below is a discussion of each area of the template, following the numbered fields in Figure 14.
Contract Header Fields
For each contract that you wish to upload, set the field Upload This Contract to Yes. This field is located at the very top of each worksheet (Figure 14, green box). The default for the first worksheet (Contract Template 1) is always Yes. For all other worksheets, the default is No. If you have multiple contracts to upload, you need to set this field to Yes on each worksheet. The user for the example contract (Figure 14) has entered Yes on the second worksheet.
Enter the Contract Number. If you are uploading multiple contracts, enter a different Contract Suffix on each contract's worksheet.
 Complete the optional Contract Owner field and the following required fields: Contract Start, End Dates, and Award Type. (If you leave the Contract Owner blank, it defaults to the ID of the person uploading the contract.)
 You can enter an optional Control Number with a maximum of 15 characters. (See the online topic Using Control Numbers.) Also, any Related Contracts can be entered, separated by commas.
Tier Fields (yellow)
When you download the contract template, it originally contains space for ten tier levels (Figure 15).
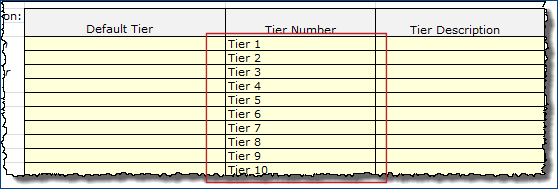
Figure 15 - Ten Tiers Can Be Used on the Contract Template
 Optionally select the default tier by entering X in the Default Tier column.
You can upload multiple tiers, but only one can be the default. If two tiers are accidentally both marked as default, the system uses the first one in order. In the example, tier 2 is the default.
- If you designate a default tier, the contract is automatically accepted when it is uploaded. The acceptance date is the same as the upload date.
- If you do not designate a default tier, then you need to accept the contract manually from the Contract Workbench.
 If you are using less than ten tiers, blank out fields for the tiers that you do not need (Figure 14).
The contract in Figure 14 has only two tiers. The other eight are not applicable, so the user has blanked out the columns for those tiers. (Notice that the yellow rows in the Tier Number column in the example under Tier 2 are empty.) For each tier, you can enter the Tier Number and Tier Description. The Tier Start Date and Tier End Date fields are both required.
 The From Amount and To Amount values define the lower and upper dollar boundaries for each tier.
 The Alert Threshold Percent is the point at which you wish to be alerted about spend on the contract tier. For example, if the upper tier boundary (To Amount) is $100,000.00, and you want to know when you are at $90,000 (or 90 percent of the way to the upper tier boundary), set an Alert Threshold Percent of 90 by entering 90 in the column. You can also use an integer with a fractional value; e.g., 85.250.
 The Spend From Date and the Spend To Date define the time period within which you want to monitor spend on the tier, and receive an alert if you reach the Alert Threshold Percent. (Note: You need to set the actual alert message separately. See Use tier boundary spend alerts.) You can also review progress towards the tier threshold percent on the Contract Tier Thresholds dashboard.
Item Fields (white)
Enter the following for each item:
 The Item Description.
 The Business Partner Name and Business Partner Entity ID.
These values are associated with a manufacturer entity in the Product Index Layer. You can look up business partners using the Administration menu. Click Administration > Product Index Layer > Manage Contract Entities.
 The Manufacturer Catalog Number (this value is the manufacturer's item number or MIN) and the contract number of any Related Contract.
 The Price, UOM, conversion factor (UOM/QTY), Price Start Date, and Price End Date for each item, for each applicable tier.
Red text in the tier column header indicates unused tiers. Since there are only two tiers in the example contract, Unused appears where tier 3 data would go (and also for any subsequent tiers).
If you need to enter packaging information for any item on any tier, the packaging columns (Pkg UOM, Pkg Conversion Factor) are at the far right of the worksheet. Scroll left.
User-Defined Fields on the Contract Templates
Two user-defined fields are available on the single- and multi-tier contract templates. The user fields are located in the last two columns of each item row (Figure 16). You can enter values for either or both of these fields for each item.
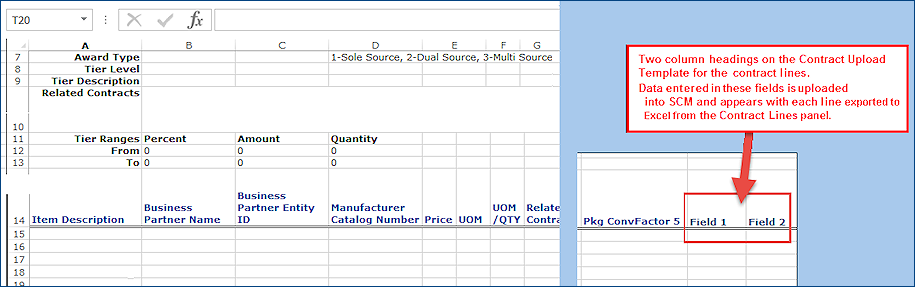
Figure 16 - The Contract Upload Template with User Fields Columns
When the contract is uploaded, the field values are uploaded as well and appear on panels that contain item details. On the uploaded contract, you can...
- Display the fields from panels that contain contract detail lines, and edit their values.
- Change the field names and/or descriptions from the user-defined fields table in the Administration setup area.
Edit user-defined field names and descriptions
To edit user-defined field names and descriptions:
- From the Administration main Contents, select Tables > User Defined Fields.
- Under Table (left side) click the Contract Detail table to open it.
- Click All. Figure 17 is an example.
On the right side (Figure 17) are the user fields.
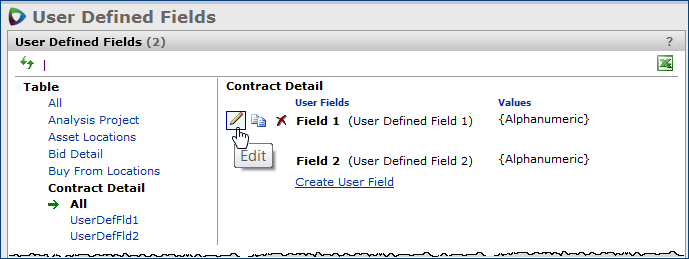
Figure 17 - Edit Contract Template User-Defined Fields
- Mouse over the field that you wish to work with. Icons appear.
- Click the edit icon to edit the field name and/or description.
Edit values in user-defined fields on a contract line
To edit values in user-defined fields on a contract line:
- Mouse over the contract line and click the user fields icon
 .
.
A panel containing the fields appears (Figure 18).
- Enter field values as needed.
- Click Save.

Figure 18 - Editing a User Field on a Contract Line
When you export contract data (by clicking the Excel icon  ), the application writes user-defined fields from contract lines to the Excel export file. If you export contract lines, unmatched contract items, managed items, or data from other relevant panels (by clicking ), the user fields and their values are included in the export. For example, Figure 19 is the Contract Lines panel containing data the user is exporting.
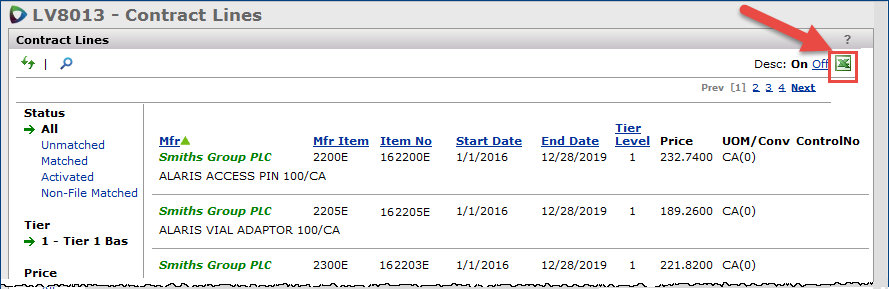
Figure 19 - The Excel Export Link on the Contract Lines Panel
The contract details user fields are also available on these report objects:
- Contract Header and Detail
- Contract Header and Detail (CaA)
- Contract Header and Detail With Prices
Details on user-defined fields are located in the Work with User Defined Fields topic.
Mass Contract Upload Process
The mass contract upload option is an automated process for uploading multiple contracts within a single CSV file. During a mass contract upload, the system breaks down the contracts within the file and processes them individually. If one of the contracts included in the file fails to upload, the process will ignore that contract and continue processing the remaining contracts.
The mass upload process ignores distributor contracts (those that contain more than one manufacturer).
Important: When performing a mass contract upload, it is important to select an Upload Generic Contract GPO format. This format is required when working with CSV files.
Mass Contract File Format Instructions
The mass contract upload process requires a comma delimited or CSV (comma separated values) file format.
For contracts that have already been uploaded, only lines that include changes or additions to the original contract are processed and uploaded to the system. You can remove an item from a contract by end dating it (changing the PriceEndDate to the Date of Upload or earlier).
The file must follow these rules:
- Comma delimited file; commas must separate all fields.
- The file name cannot have any spaces and must end in .csv.
- The last field of a row has no trailing comma.
- If a field contains a comma, then the field value must be surrounded by double quotes.
Example: "Vendor,1234"
- If a field contains a double quote, the quote must be doubled up and the entire field surrounded by double quotes.
Example: "Medtronic 4.5"" x 4.1 Gauze"
- Each row should end with a Carriage Return Line Feed.
- Date fields must have the format YYYY/MM/DD when present, otherwise they should be left blank.
To download an Excel file containing further instructions on the basic file format, contract layout, and a contract sample:
- From the Administration > Other menu, select Download Instructions for Mass Contract Upload (Figure 20).
The panel for downloading the Excel instruction file appears.

Figure 20 - Downloading Instructions for Mass Contract Upload
- Click Save as to select the local or network location where you want to save the file.
- Click Save.
Turning Off Protection on the Contract Worksheet
You can unlock columns in the single-tier or multi-tier contract worksheet using the Review tab on the Excel ribbon (Figure 21).
- Click Review > Unprotect Sheet.
When you turn off protection, no password is required to edit column values.

Figure 21 - Unprotecting an Excel Contract Template Worksheet
Warning: Keep in mind that if you unprotect a worksheet and insert incorrect values — or incorrectly formatted values — in columns that were once locked, the contract may not upload. Or, if the contract does upload, the system may not be able to import the data. Also, if you alter the position of columns, or change the column header labels, the contract will not import.
Handling Local Contract Import Errors
Trying to import a local contract in the wrong GPO format or with misaligned data generates error messages, and the contract will not upload. Upload error messages appear on the Upload Status panel. When you read an error message, you can remove the message from the display by clicking Mark as Read. The message disappears from the Upload Status panel.
Other errors that do not hinder the upload process may also occur in contracts. Those errors may involve elements that are missing from contract lines, or are present, but invalid. Examples include: a contract UOM does not exist in your item records; a contract item that is already activated on another contract; a manufacturer that cannot be identified, etc. Errors associated with contract items (exceptions) must be cleared before the items can be activated. See Detailed Instructions for Resolving Exceptions in the Activation topic.
The following information details upload errors only.
Pipe character in the contract number field
Contracts being imported into Sourcing and Contract Management cannot have the pipe character | in their contract number fields. The pipe character | causes the import to fail. An error message is produced:
The contract number [contract #] cannot contain a "|" character. Please check the ContractNo and import again.
Users will need to remove the pipe character from the contract number field in the upload file and re-import the contract.
Error Message for Invalid Formats
This upload problem occurs when the format of the contract being imported is not the same as the selected GPO. For example, if you try to upload a contract for Novation, but mistakenly select on the GPO Portals panel, you will receive an error message, and the contract will not upload. Figure 22 is an example of the message.

Figure 22 - Wrong Format Import Message
In this situation, select the correct GPO format and re-import the contract. If you still get an error message, a different problem may exist with the contract file. Column data may be misaligned, or critical data (such as the Contract Number) may be missing. Open the contract in Excel and inspect it.
Error Messages from Misaligned Rows on the Contract Spreadsheet
Misaligned rows (particularly in CSV files) or missing data can happen, so that columns do not contain either the data value or the data type that the upload format expects. Figure 23 is an example. Notice that for Row 2, the value PK appears in a column that expects a quantity value.
A typical import error message for the problem is shown in Figure 24.

Figure 23 - Part of a Contract to Be Imported: Column Data is Skewed One Column to the Right

Figure 24 - Import Error Message Generated for Misaligned Row
In this situation, correct the problem in the upload file, and re-import the file.
Restricted Prefixes
You can load local (non--managed) contracts into SCM directly using templates for the single-tier or multi-tier Generic format, or in the GPO format; e.g., Novation. However, new local contract numbers that begins with initial character prefixes used by are considered -managed contracts and cannot be imported into SCM. A contract upload that begins with any of these restricted prefixes will fail with an error like that in Figure 25.
The following list of restricted character codes cannot be used as contract prefixes:
PP, FA, GB, GS, PS, AS, EB, RS, IC, SD, SP-, IN-, PIMS, or GH.
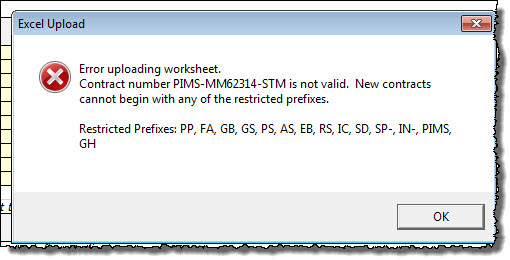
Figure 25 - Error Message When Uploading New Contracts Using Restricted Prefixes
Updating Contracts via Imports: Notes
Importing a new contract version to update an existing contract has some considerations that you need to know:
- When a contract is re-imported (if prices change, for example), the import process checks units of measure against the previously imported version.
- Suppose an item's price changes in a contract update, and the application needs to create a new contract detail record with a new price, new UOM, and new conversion factor. In this case, the system automatically de-activates the item on the old contract, and re-activates it with the UOM and conversion factor from the newly imported contract update.
- If the contract has multiple tiers, there may be additional considerations. See "Contract tier and contract date alignment in local contracts."
Working a Contract
After successfully importing a contract, you will need to work the contract to make its item prices available for purchase. In many cases, working the contract is as simple as accepting the contract and activating item prices for all its vendors.
You may need to perform other tasks as well, depending on how "clean" the contract is. For example:
- Identifying a missing manufacturer entity.
- Resolving vendor exceptions. If vendor exceptions exist — such as items missing an ordering unit of measure — you will want to resolve the errors so that you can activate the items.
- Resolving any pending price changes. Contract items that have user-initiated price changes or GPO price changes must be reviewed, and the change approved or rejected.
Accepting a contract and activating prices are outlined in the topic "Activate Contract Prices and Resolve Exceptions."
After importing a contract, you may also want to open the contract and look at its matched items, set review dates, set alerts, or export the contract.
Locate and view contract data
Contracts can be opened from many points in the application. In general, clicking a contract number opens the contract.
As you are working with newly imported contracts or activating contracts, you can conveniently access your contracts from several panels:
On the "Accept/Activate Contracts" Contracts panel (Figure 26)

Figure 26 - Opening a Contract from the Load and Activate Workbench
 From the "Supply Contract Workbench" panels (Contracts,Contracts Expiring, and Contracts for Review tabs). These panels contain several filters on the left side (Figure 27).

Figure 27 - Opening a Contract from the Supply Contract Workbench
In Figure 27:
- The Contracts filter on the left lets you filter the list for All contracts, Current contracts (the default), Expired contracts, or Completed contracts. (Completed contracts are contracts that you are finished working with, as described in "Designating a contract as Completed.")
-
You can filter the contracts list for your own contracts only (the default) or for all contracts. Use the links under the Owner filter.
- Recently Viewed lets you return to contracts that you recently opened.
- User Fields appears if you have created user fields for supply contracts and entered values. You can filter the list on the value of any of the user fields. Click a value.
Instructions on setting up user fields are in "Designating a user-defined field as a filter for services and supply contracts."
To open a contract:
- Locate the contract of interest.
- Click the contract number.
The "Work with Contract" page appears Figure 28.
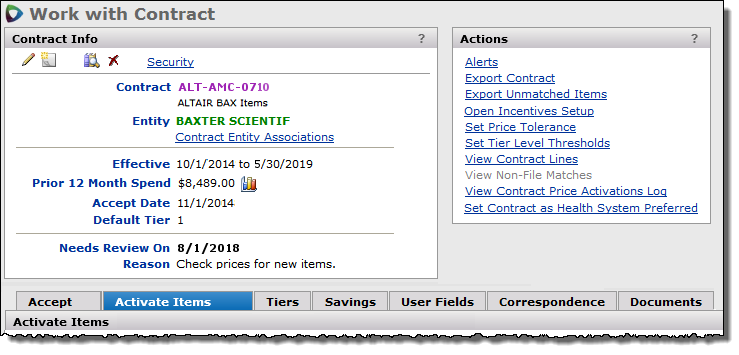
Figure 28 - The"Work With Contract" Page for a Supply Contract
If you are authorized, you can edit the contract header and perform other activities with the contract.
Note: If your User Profile Role only allows you View access to contracts, you can display contract header data, but you cannot exercise other links on the page.
The Actions panel on the "Work with Contract" page contains links to activities such as setting alerts and exporting the contract to Excel. (Many other areas of the application use similar Actions panels.)
When a link is grayed out, the action is not available or not relevant. For example, View Non-File Matches in Figure 28 is grayed out because no non-file items that have been purchased in the past are on the contract.
- To export a contract to an Excel spreadsheet, click Export Contract on the Actions panel (Figure 28). (Details are in the Export Contract discussion.)
- To view contract lines, click View Contract Lines on the Actions panel (Figure 28).
Using Control Numbers
When you upload a local contract, you can assign it a Control Number (Figure 29). The control number appears on the Contract Lines list (Figure 30). The control number helps you identify items from different uploads of a contract.

Figure 29 - Assigning a Control Number to a Contract on Upload
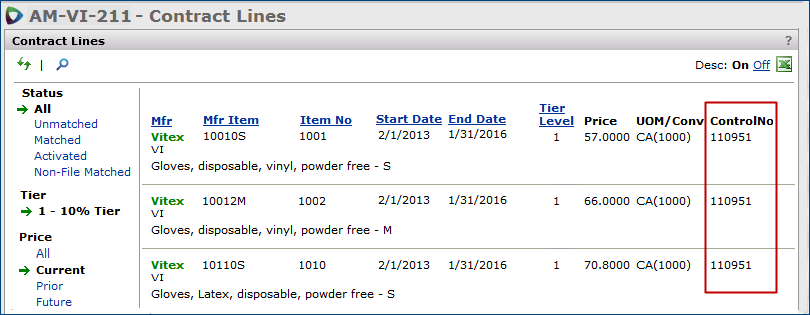
Figure 30 - Control Number for the Contract Document Associated with Contract Item Lines
A copy of the contract document is written to the Documents list, and associated with the control number. In Figure 31 for example, two files were uploaded — a "main" contract (green arrow) and an update with extra items (purple arrow). At upload, one file was assigned the control number 110951. The other file was assigned the control number 110951-B. The documents panel displays both. You can create additional documents for the contract and assign a control number to the new documents as well (red arrow).
If you upload a contract with the same control number as an existing upload, the existing uploaded contract file is overwritten.
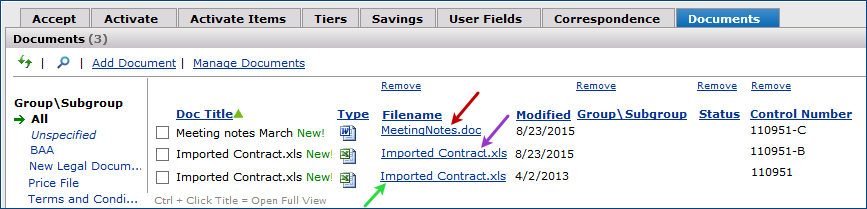
Figure 31 - Documents List for a Contract: Documents Include Control Numbers
Setting up GPO Links
Most of your links to GPO portals for downloading local (non-)contracts are created for you during conversion. From time to time, however, you may need to set up new links. Here is the process.
To set up a GPO link
To add a new GPO portal:
- From the main Contents (Supplies tab), select Contracts > Load and Activate Workbench (Figure 32).
The "Load and Activate Workbench" page appears (Figure 2). The Load Contracts Upload Status panel is open.
Figure 32 - The Load and Activate Contracts Menu
- Click Upload New Contract (Figure 2).
The GPO Portals panel appears.
- Click Edit at the top of the GPO Portals panel.
The GPO Portals Setup panel appears (Figure 33).
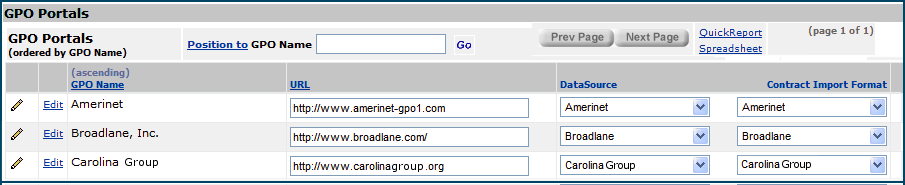
Figure 33 - The GPO Portals Setup Panel
- Locate the GPO in the GPO Name column.
(If the GPO does not appear in the column, you need to add the GPO record.)
- In the URL field, enter the URL for signing on to the GPO's website.
- In the Data Source field, enter the data source for the GPO. Normally, this value is the GPO name.
Different GPOs have different identifiers for elements such as vendor and manufacturer. The system normalizes the different values by associating them with reference values. The source of the data is important to the process.
- In the Contract Import Format column, click the down arrow for the GPO name that you entered. Select the import format.
- Click Save.
- Click Submit.
Adding a Record for a New GPO
A table stores information about each GPO that you use. If you need to link to a new GPO for contract uploads, and you do not see the GPO portal listed on the GPO Portals panel, you need to add the GPO record.
To add a GPO record to Sourcing and Contract Management:
- From the main Contents, select Administration > Tables > Group Purchasing Organizations (Figure 34).

Figure 34 - Opening the GPO Table
The list of GPOs opens. Figure 35 is an example.
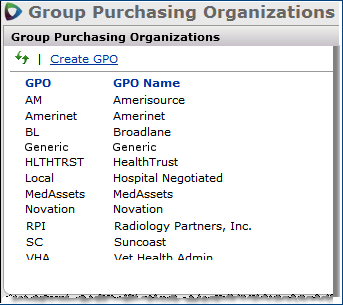
Figure 35 - List of GPOs Defined for a Hospital
Note: The GPO type Generic is the "vanilla" format for contracts that do not otherwise use a GPO format. The SCM Contract Template uses this format.
- Click Create GPO.
The GPO Edit panel appears (Figure 36).
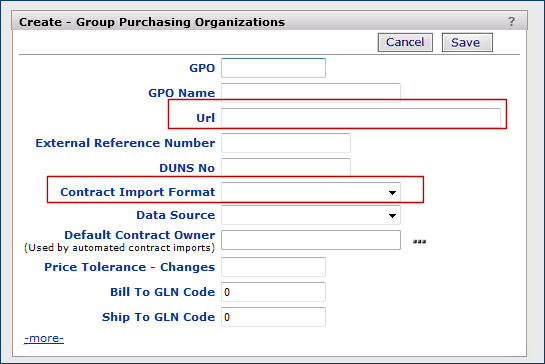
Figure 36 - New GPO Edit Panel
- On the Edit panel, enter information for the GPO.
- Click Help for a description of the field values.
Important: To download contracts for the GPO, you must enter a value in the URL field.
Click the arrow in the Contract Import Format field and select an import format from the drop list.
- When you are finished, click Save and Submit.
- Open the GPO Portals Setup panel (Figure 33).
- Click Refresh.
The new GPO appears on the list.
Configuring Links on the Upload Panel for Generic Contracts
You can define an identifier for the link that uploads contracts in the generic formats including: the single tier contract format template, the multi-tier contract template, and the multi-contract template for mass uploads.
To define a link that uploads contracts in the SCM native format:
- Open the GPO definition panel: Administration > Tables > Group Purchasing Organizations.
- Click Create GPO (Figure 37, ). The GPO Purchasing Organizations panel appears (Figure 37).

Figure 37 - The GPO Panels for Setting Up a Contract Upload Link
- For the GPO field, enter the identifier that you wish to use for generic contracts. Similarly, enter a GPO Name (Figure 37, ).
- For the Contract Import Format and the Data Source (Figure 37, ), select Generic for the SCM native contract formats.
- Click Save.
When you open the GPO Portals panel in Supply Contracts to upload a contract, you will see the link for generic contract uploads as you identified it in the GPO and GPO Name fields (Figure 38).
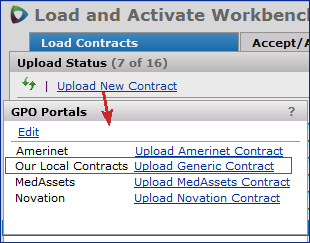
Figure 38 - A Link for Uploading Contracts in the SCM Native ("generic") Format
Copyright © 2023 by Premier Inc. All rights reserved.