Document Management
Version
Contents
Overview
You can upload and manage a wide variety of document types from within Supply contracts, Services contracts, and projects. Documents are associated with a specific contract or project and can include emails, notes, images, and other relevant files.
Security
Before you can work with documents that are attached to a contract or project, the ServicesDocuments, ContractDocuments, and/or AnalysisProjectDocs role objects in your user role must have the appropriate security level settings dependent upon the features you are using (see Table 1 for the document deletion setting). You must have a minimum security level of View to see the contents of the Documents tab. If the setting is None, you will not be able to use Documents.
For details on user security and other role object settings for contracts and projects, see Administration & Security in Sourcing and Contract Management. Note that managing user security requires Administrator privileges.
Table 1 - Important Document Management Role Objects and Security Settings
| Role Object |
Security Level |
Location of Documents |
Purpose |
| ContractDocuments |
All |
"Work with Contract" page > Correspondence and Documents tabs |
Restricts the deletion of supply contract documents, user notes, and emails to users with this security level. |
| ServicesDocuments |
All |
"Work with Services Contract" page > Correspondence and Documents tabs |
Restricts the deletion of services contract documents, user notes, and emails to users with this security level. |
| AnalysisProjectDocs |
All |
"Work with Project" page > Correspondence and Documents tabs |
Restricts the deletion of project documents, user notes, and emails to users with this security level. |
Internet Explorer Settings for Uploading and Downloading Files
Certain options within Internet Explorer must be set in order for files to upload and download correctly. You should verify that these settings are correct if you are experiencing issues when working with document files:
- You must set the File download option to Enable in order to upload and download documents. The setting for this option is required.
- The Automatic prompting for file downloads option contains settings that determine how uploads and downloads are completed. If your site requires that this option is set to Disable, you will receive a message on the Information Bar that Internet Explorer has not downloaded a file because of security.
In this case, follow these steps to download a Sourcing and Contract Management Documents file:
- Click the Information Bar message and OK the download.
- On the Documents panel, click the filename again.
The standard Windows panel appears, and you can proceed to download the file.
You can set the Internet Explorer option "Automatic prompting for file downloads" to Enable—if this setting is consistent with your site's security policy—to avoid getting the Information Bar message. You may want to consult your IT staff about Internet Explorer security settings.
Documents Panel
The Documents panel for a Supply contract, Services contract, or a Project is the central location for uploading and managing various types of documents from within the application. This panel lists all documents associated with a contract or project and makes them available for you to read, revise, save, and delete. Sourcing and Contract Management keeps a version history and previous versions of documents. This feature works the same way for Supply contracts, Services contracts, and projects.
The Documents panel is located on the Work with Contract, Work with Services Contract, or Work with Project page, depending on which you are working with.
The following document types can be added to a contract:
- Adobe Acrobat (PDF)
- Microsoft Word (DOC, DOCX)
- Microsoft Excel (XLS, XLSX)
- Microsoft PowerPoint (PPT, PPTX)
- Image documents (JPG, PNG)
- HTML documents (HTM, HTML)
- Plain text (TXT)
- Comma-separated values (CSV)
Add Documents to a Contract or Project
Use the Documents panel to upload documents to a contract or project. For the first document that you upload, this panel is empty. Newly uploaded documents are flagged as New. You can also manage documents—view, edit, delete, and upload versions—from this panel.
To add a document to a contract or project:
- On the Work with Contract, Work with Services Contract, or Work with Project page, click the Documents tab.
The example in this section uses a Services contract, but the steps are the same for each type unless otherwise noted.
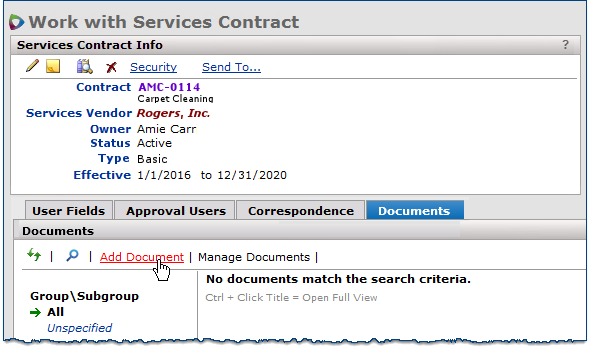
Figure 1 - Adding a Document to a Contract
- Click Add Document (Figure 1).
The Add Documents panel appears (Figure 2).
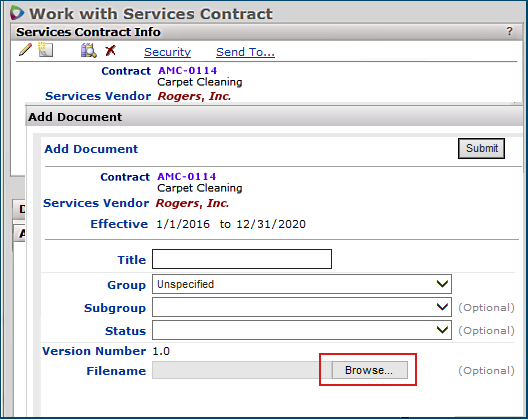
Figure 2 - Add Document Panel for a Services Contract
- Fill out the appropriate information for your type of document (Figure 2).
For all contracts and projects:
- Enter a name in the Title field.
This title identifies the file on the Documents panel once the file is uploaded.
- Optional: Select a Group, Subgroup, and Status for the document.
When you search the documents within a contract or project, you can filter them into their assigned groups, making it easier to find the information you are looking for. If you do not make a selection, the default Group is Unspecified and the other fields remain blank.
For Supply contracts only:
- Optional: Enter a Control Number, if one is associated with the document.
See Using Control Numbers for details.
For projects only:
- Optional: Select a Source.
- Click Browse (Figure 2).
The Choose File to Upload window appears.
- Browse to the file that you want to upload, and then click Open to add the document's path to the Filename field on the Add Document panel.
- Click Submit.
- A confirmation message informs you that the document was uploaded successfully.
Click outside of the message area to close the message.
- Click the Refresh icon
 on the Documents panel.
The document appears on the Documents panel for the contract (Figure 3).
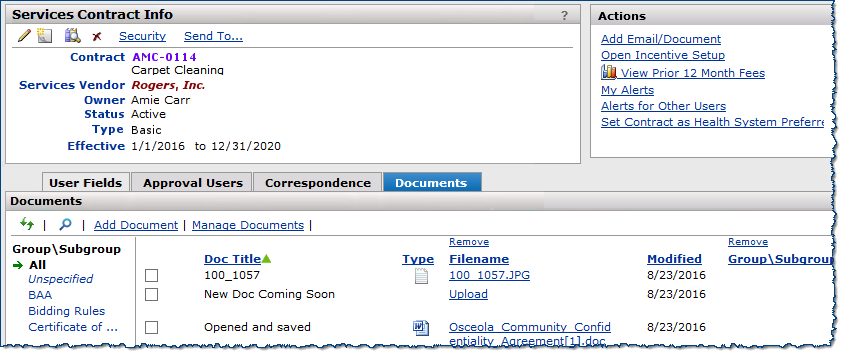
Figure 3 - Document Added to a Services Contract
Once these steps are complete, you can:
Delete an Uploaded Document
To delete a document from a contract or project:
- On the Work with Contract, Work with Services Contract, or Work with Project page, click the Documents tab.
- Hover your mouse to the left of a Doc Title, and then click the Delete icon
 .
.
The Delete - Document confirmation window appears.
- Click Delete to confirm deletion of the document.
The document is immediately removed from the Documents panel.
Document Placeholders
You can create a document placeholder and upload content to it at a later time. A document placeholder contains details about a particular document—sometimes just a title, if that is the only information known at the time of creation—but no file is uploaded. For example, you can create a placeholder for a document that is expected to arrive at a later date.
Create a document placeholder
To create a document placeholder:
- On the Work with Contract, Work with Services Contract, or Work with Project page, click the Documents tab.
- Click Add Document.
The Add Document panel appears
- Enter a name in the Title field and add an optional Group, Subgroup, and Status for sorting purposes. The Control Number field is optional for Supply contracts only.
Important: Do not browse for a file path. Leave the Filename field blank.
- Click Submit. See Figure 4.
A confirmation message appears stating that a placeholder was created successfully, but no upload was performed.
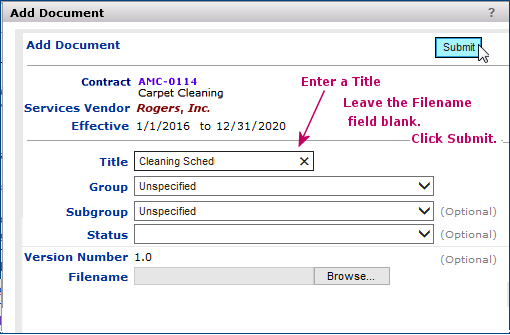
Figure 4 - Creating a Document Placeholder for Later Upload
- Click outside of the message area to close the message.
- Click the Refresh icon on the Documents panel.
The document title appears on the Documents panel with an Upload link in the Filename column.
Upload new content for a document placeholder
Once you create a document placeholder, you can upload new content to that placeholder at any time:
- Locate the name of the document placeholder on the Documents panel.
- Click Upload in the Filename column.
The Add Document panel (Figure 5) appears. The Version Number of the document is 1.0 by default.
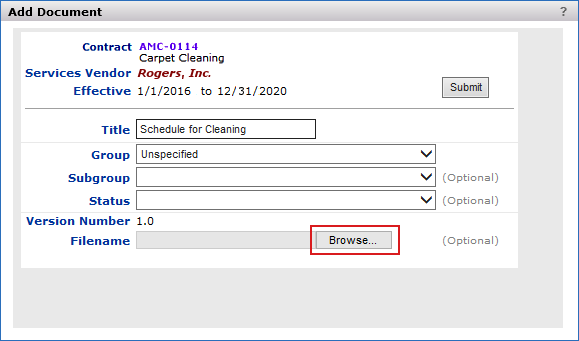
Figure 5 - Uploading Version 1.0 for a Document Placeholder
- Fill in the document fields or make any changes.
- Click Browse (Figure 5) to locate and select the file on your local drive that you want to upload.
- Click Submit.
- Click the Refresh icon on the Documents panel.
The document appears on the Documents panel with the completed Filename and Type information.
Locate and View Uploaded Documents
You can quickly locate an uploaded document on the Documents panel by clicking any of the column headers to sort the list by that field, or by clicking the Remove link (top image, Figure 6) above a column to remove information that is not relevant to your search. Removing a column in this way will hide it from view until you click the corresponding Show link (bottom image, Figure 6) in the Documents panel. In this example, clicking Show Filename will return the Filename column to the panel.
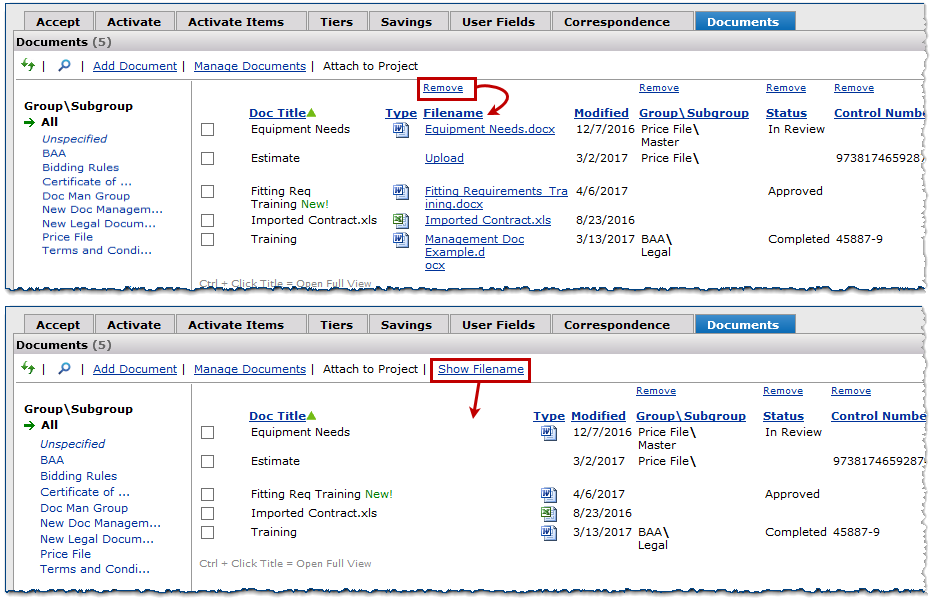
Figure 6 - Removing and Adding a Column on the Documents Panel
To view an uploaded document within a contract or project:
- On the Work with Contract, Work with Services Contract, or Work with Project page, click the Documents tab.
- Click the document filename in the Filename column.
- You can also click the title of the document in the Doc Title column and select View Latest Version in the Document Information panel.
The browser security pop-up prompt asks you to open or save the file.
- Click Open to view the file without saving, or click Save or Save as to save the file to a local or network drive.
Designate a Primary Document
A primary document is typically the most important document in your contract or project—often the imported contract file, a proposal, or another document of similar importance. One primary document per contract or project is allowed. Setting a document as primary creates a View Primary Document link in the header of the contract or project, providing a quick way to view or download the selected document. You can designate any uploaded document within a supply contract, services contract, or project as primary.
To designate a primary document:
- On the Work with Contract, Work with Services Contract, or Work with Project page, click the Documents tab.
- Click a document in the Doc Title column to open its Document Information panel (Figure 7).
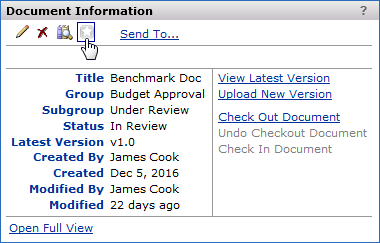
Figure 7 - Setting a Primary Document in the Document Information Panel
- Click the Primary Document icon
 (Figure 7) to designate it as the primary document for the selected contract or project.
The Document Information panel closes, the screen automatically refreshes, and a View Primary Document link appears in the contract or project info panel next to the gold Primary Document icon  (Figure 8).
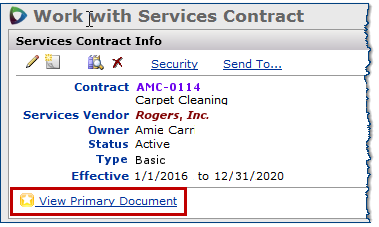
Figure 8 - The View Primary Document Link in the Services Contract Info Panel
- To remove the primary designation, open the Document Information panel and click the Primary Document icon again.
Note: Once set, you can click the View Primary Document link (Figure 8) at any time to download the designated primary document. If the link is not present, no primary document has been set.
The “primary document” indicator appears on the Documents tabbed panel to identify documents marked as primary. Figure 9 is an example of the indicator on a contract’s Documents panel. Figure 10 illustrates the primary indicator on the Supply Contract Workbench Documents panel.
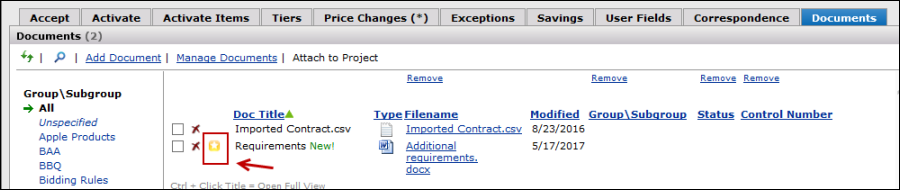
Figure 9 - Primary Document Indicator for a Contract
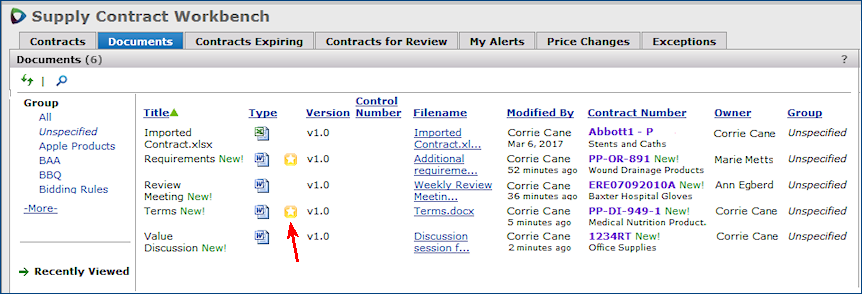
Figure 10 - Primary Documents on the “All Documents” Search Panel
If you attempt to delete a Primary Document from a supply contract, services contract, or analysis project, a confirmation message is now displayed to warn that you are about to delete a Primary Document. If the document is associated with another contract or project, the associations are listed and you must check the box at the bottom of the message to delete the document from all areas.
Manage Document Attributes
You can assign attributes to uploaded documents to make searching easier. When you search the documents within a contract or project, these attributes allow you to filter the documents into their assigned groups, making it easier to find the information you are looking for.
Note: Attributes are defined for your use in SCM Administration. The path is: Administration > Admin > Document Management Setup.
You can manage documents individually or work with multiple documents at one time. When selected individually, the Manage Documents window also allows you to edit the title of an uploaded document.
To assign or manage the attributes of an existing document:
- On the Documents panel, check the box at the beginning of each row you want to manage (Figure 11).
You can select as many documents as necessary.
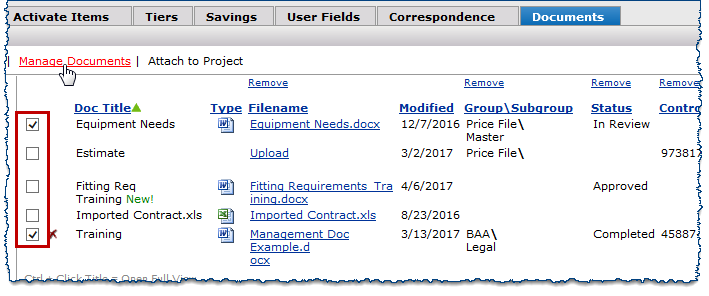
Figure 11 - Selecting Multiple Documents to Manage
- Click the Manage Documents link (Figure 11).
The Edit - Manage Documents window appears.
- If necessary, edit the Document Title.
Note: The Document Title is only editable when a single document is selected at a time.
- Click the drop-down box to the right of the attribute category you want to add, and then select the appropriate Group, Subgroup, or Status (Figure 12).
Note: Source is only available for projects; Control Number is only available for Supply contracts.

Figure 12 - Managing Attribute Values for Documents
- Click Submit to save your changes, which are applied immediately to the Documents panel.
Attach Documents to a Contract or Project
Attaching project documents to a contract—or contract documents to a project—makes those documents viewable from their attached location. For example, if you open a contract and attach one of its documents to an associated project, you can now view and manage that document directly from the Documents panel of the project. You no longer need to open the contract to access the document file from its original location.
You can attach a document to multiple contracts or projects, depending on the type you are working with. When you update a document, your changes are automatically reflected in all of the document's attached locations. For example, changing the title of a contract document will also change the title in every project that the document is attached to.
Attach a project document to a contract
To select existing documents from a project and attach them to an associated contract:
- On the Work with Project page, click the Documents tab.
- Check the box at the beginning of each document row that you want to attach to a contract. You can select multiple documents (red box, Figure 13).
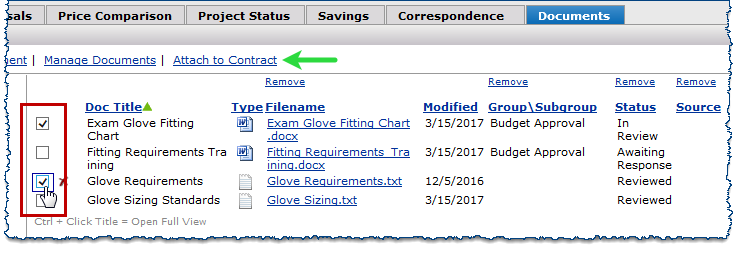
Figure 13 - Selecting Project Documents to Attach to a Contract
- Click Attach to Contract (green arrow, Figure 13).
If no documents are listed on the panel, the option to Attach to Contract is grayed out and you cannot complete the process.
- In the Attach to Contract panel, select the Entity/Contract you want to attach the document(s) to. You can select multiple contracts, if listed.
Note: If you need to verify the contents of a contract, click the Contract number to the right of the Entity name (red square, Figure 14). The links in this column open the Work with Contract page for each contract.
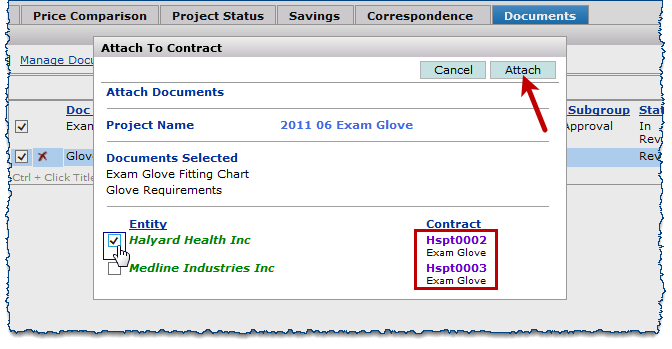
Figure 14 - Selecting the Entity/Contract from the Attach to Contract Panel
- Click Attach (Figure 14).
The Documents panel returns to its original state and the documents are now attached to the contract(s) you selected.
- To locate the attached documents:
- Open the contract you attached the document to and click the Documents panel.
The documents are listed along with any other uploaded documents for the contract (highlighted in yellow in Figure 15).
- You can view, edit, and manage the attached documents from this location.
See Deleting an attached document for details on deletion.
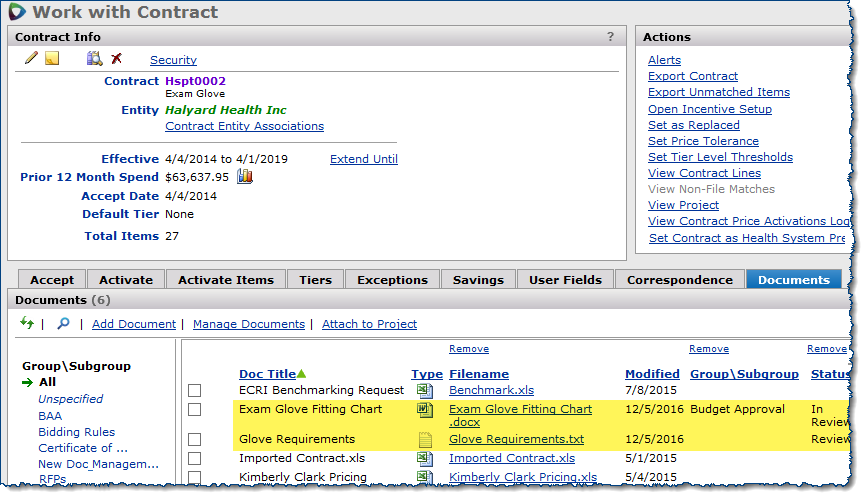
Figure 15 - Project Documents Attached to Contract
Attach a contract document to a project
To select existing documents from a contract and attach them to an associated project:
- On the Work with Contract page, click the Documents tab.
- Check the box at the beginning of each document row that you want to attach to a project. You can select multiple documents (Figure 16).
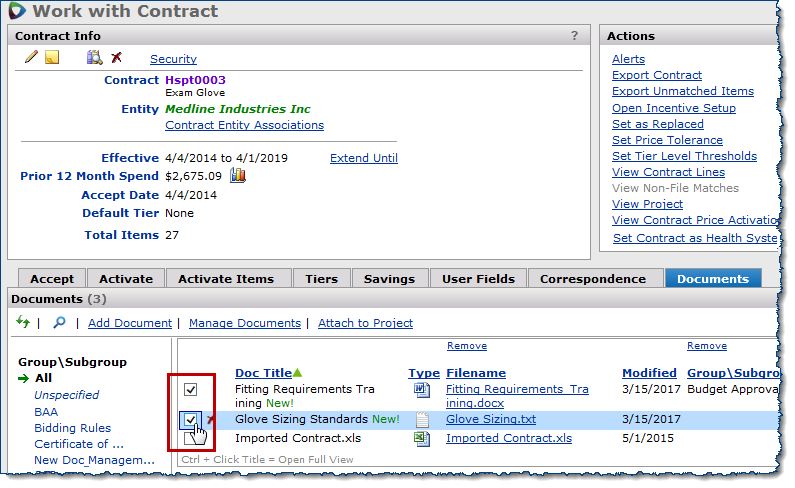
Figure 16 - Selecting Contract Documents to Attach to a Project
- Click Attach to Project.
If no documents are listed on the panel or no projects are associated with the contract, the option to Attach to Project is grayed out and you cannot complete the process.
- In the Attach to Project panel, select the Project Name/Project Number you want to attach the document(s) to. You can select multiple projects, if listed.
Note: If you need to verify the contents of a project, click the Project Name (red square, Figure 17). The links in this column open the Work with Project page for each project.
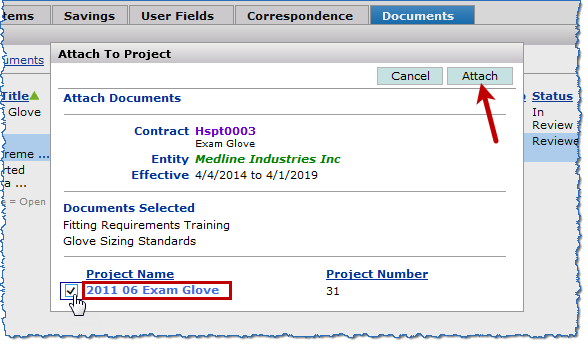
Figure 17 - Selecting the Project Name from the Attach to Project Panel
- Click Attach (Figure 17).
The Documents panel returns to its original state and the documents are now attached to the project(s) you selected.
- To locate the attached documents:
- Open the project you attached the document to and click the Documents panel.
The documents are listed along with any other uploaded documents for the project (highlighted in yellow in Figure 18).
- You can view, edit, and manage the attached documents from this location.
See Deleting an attached document for details on deletion.
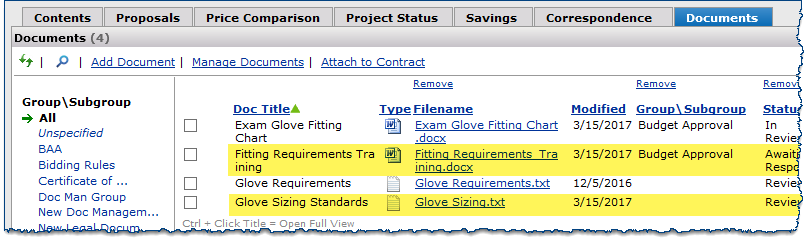
Figure 18 - Contract Documents Attached to Project
Delete an attached document from a contract or project
Deleting an attached document from a contract or project does not delete the document from the system, it only removes the association (attachment) to the original document. When you attempt to delete an attached document, the confirmation message states that you are removing the document, not deleting it. The document is still available from the Documents panel of its original contract or project, and any other attachments to the document remain intact.
Important: If you delete a document that is not attached to any contracts or projects, you are deleting the original upload of the document and it is permanently deleted from the system. When permanently deleting a document, the Delete - Delete confirmation window prompts you with the message in Figure 19:
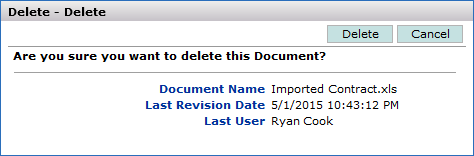
Figure 19 - Delete Confirmation Message for Document Deletion
To delete an attached document (remove the association to the original document) from a contract or project:
- On the Work with Contract or Work with Project page, click the Documents tab.
- Hover your mouse to the left of the Doc Title, and then click the Delete icon .
The Delete - Removal confirmation window appears (Figure 20).
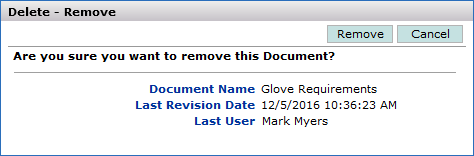
Figure 20 - Remove Confirmation Message for Document Deletion
- Click Remove.
The document is removed from the list and is no longer attached to the contract or project.
Correspondence Panel
The Correspondence panel on the Work with Contract, Work with Services Contract, and Work with Project pages contains the tools for adding and viewing emails, attachments, and notes.
Size limit: The maximum size of an email, including its attachments, is 25 MB.
Add Correspondence to a Contract or Project
You can send an email—with or without attachments—from within Sourcing and Contract Management and associate it with a contract or project:
- On the Work with Contract, Work with Services Contract, or Work with Project page, click the Correspondence tab (Figure 21).
Figure 21 - Adding an Email to a Services Contract
- Click the Add Email icon
 (Figure 21).
An email is generated in your default email application.
- Compose your message and add any necessary attachments:
- Multiple file attachments are allowed.
- The To... field (Figure 22, red arrow) contains a pre-populated email address for your Sourcing and Contract Management module. Do not modify this address.
Note: The To... field in the figure contains an example email address; the actual address will vary.
- The Supply Contract Number, Shared Services Contract Number, or Project Name/Number appears in the body of the email message (Figure 22, green arrow). Enter your message above this number, but do not include text below it. The contract/project number should be the last element in the message body to ensure that the email is routed correctly.
Note: You can also send the email without a contract number in the message body. Emails of this nature are routed to the Supply or Services Contract's Email panel as unknown. From this panel, you can associate unknown emails with any contract.
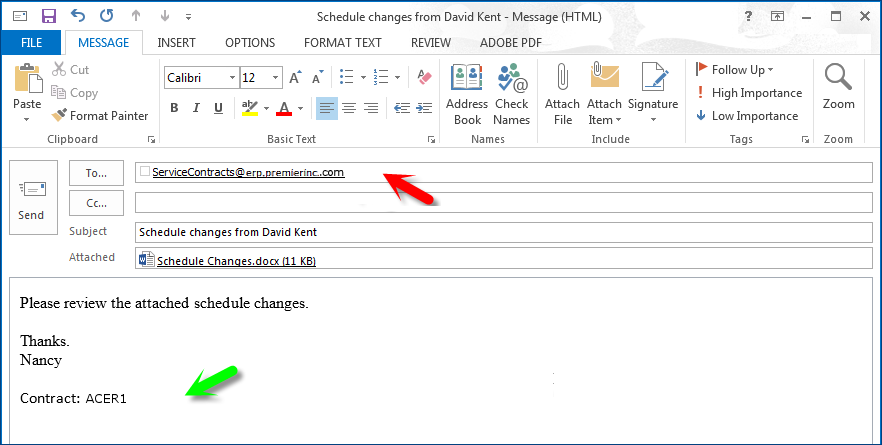
Figure 22 - An Email Message for a Services Contract
- Send the email.
When the email arrives in Sourcing and Contract Management, it is listed on the Correspondence panel for the associated contract or project. A link to the attachments is included on the Correspondence panel, and the file attachments are also listed individually on the Documents panel.
Delete Correspondence
To delete correspondence, including emails and notes, from a contract or project:
- On the Work with Contract, Work with Services Contract, or Work with Project page, click the Correspondence tab.
- Hover your mouse to the left of a Subject, and then click the Delete icon .
The Delete - Correspondence confirmation window appears.
- Click Delete to confirm deletion of the correspondence.
The item is immediately removed from the Correspondence panel.
View an Email or Attachment
You can view emails and attachments that have been associated with a contract or project in the following ways.
To view an email, perform one of the following actions:
- On the Correspondence panel, click the text in the Subject column of the email you want to view.
- On the Documents panel, click the View Email iconnext to a file attachment to view the email from which it originated.
To view an attachment, perform one of the following actions:
- On the Correspondence panel, click View Document in the Attachments column.
If the link states the number of documents attached, click the link to open a Documents panel containing only those attachments specific to the selected email. In the Documents panel, click a Filename to open an attachment.
- On the Documents panel, click the Filename of the attachment.
Add a Note to a Contract or Project
You can add a note to a contract or project at the detail level and include it in the list on the Correspondence panel:
- On the Work with Contract, Work with Services Contract, or Work with Project page, click the Correspondence tab (Figure 23).
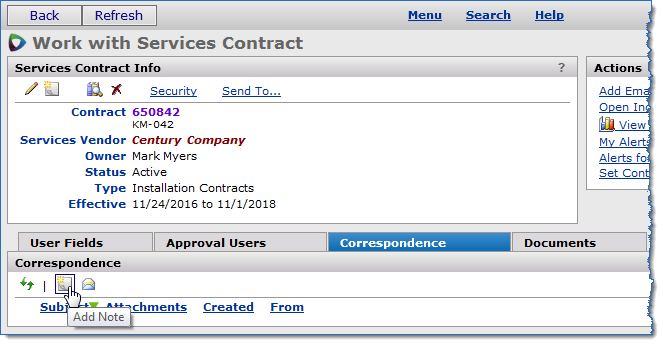
Figure 23 - Adding a Note on the Correspondence Panel
- Click the Add Note icon
 (Figure 23).
The Create - User Note window appears.
- Enter your note in the text box.
The first several words of your note are shown in the Subject field as an identifier once the note is saved.
- To add an attachment to the note, enter the path of the attachment file in the lower box:
- To find a network file, click Find file. Prefix the path with two backslashes \\.
For example: \\C:\MyFolder\MyFile
- To enter a web file, add the prefix http:// to the path.
- Click Save.
Your note appears in the Correspondence panel list (Figure 24).
Figure 24 - A Note Added to the Correspondence Panel
Document Versions
You can check documents out of a contract or project for review or editing purposes. When you check out a document, it is locked so that no one else can simultaneously change it. Checking the document back in makes it available again for others to edit.
Check Out a Document
To check out a contract or project document for editing:
- On the Work with Contract, Work with Services Contract, or Work with Project page, click the Documents tab.
- Click the title of the document in the Doc Title column.
The Document Information panel appears (Figure 25).
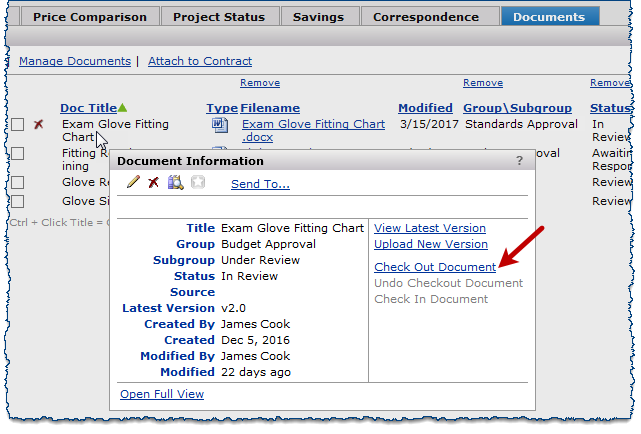
Figure 25 - Check Out a Document from the Document Information Panel
- On the Document Information panel, click Check Out Document (Figure 25).
The browser security pop-up prompt asks you to open or save the file.
- Click Open to view the document.
- Change the document as needed.
- When you are finished editing the document, click File > Save As within the application you are working in order to save the document to your local system.
Note: When you check the document back in, you identify the location of the saved document and upload the revised file to Sourcing and Contract Management.
Important information about saving checked-out documents: When you edit a document and are ready to save your changes, you must select Save As and save the document back to your local network location. Using Save alone will not save the changes.
Check In a Revised Document
Important: Only the user who originally checked out a document may check in a revised version. The options to Upload New Version, Check Out Document, Undo Checkout Document, and Check In Document are grayed out for all other users until the checkout is undone or the document is checked in by the original user.
To check in a contract or project document version once editing is complete:
- On the Work with Contract, Work with Services Contract, or Work with Project page, click the Documents tab.
- On the Documents panel, click the document Doc Title.
The Document Information panel appears (Figure 26).
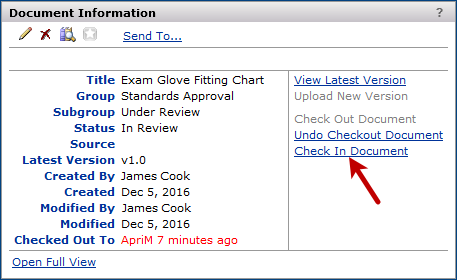
Figure 26 - Check In a Document
- Click Check In Document (Figure 26).
The Check In Document panel appears.
- At the right of the Document field, click Browse to locate and select the path and file name of the document.
- Assign a version number to the document from the Check In As field. You can assign one of the following:
- The current version number.
- The next highest minor version number. A minor version number is the decimal portion of the number; e.g., 1.2, 1.3, etc.
- The next highest major version number. For example, if the current version is 1.4, you can assign 2.0 to the document.
- Click Submit.
Check In an Unchanged Document
Important: Only the user who originally checked out a document may perform these steps. The options to Upload New Version, Check Out Document, Undo Checkout Document, and Check In Document are grayed out for all other users until the checkout is undone or the document is checked in by the original user.
- On the Documents panel, click the document Doc Title.
The Document Information panel appears (Figure 26).
- Click Undo Checkout Document.
View and Open Document Versions
You can view versions of contract and project documents that you or others have uploaded:
- On the Work with Contract, Work with Services Contract, or Work with Project page, click the Documents tab.
- On the Documents panel, click the document Doc Title.
The Document Information panel appears.
- Click Open Full View in the lower left of the Document Information panel.
The Work with Document page appears, listing each version of the document in the Revisions panel. If no revisions have been made, then version 1.0 of the document—the original upload—is the only file listed.
- In the Revisions panel, click the document Filename next to the Versions number to open it (Figure 27).
The browser security pop-up prompt asks you to open or save the file.
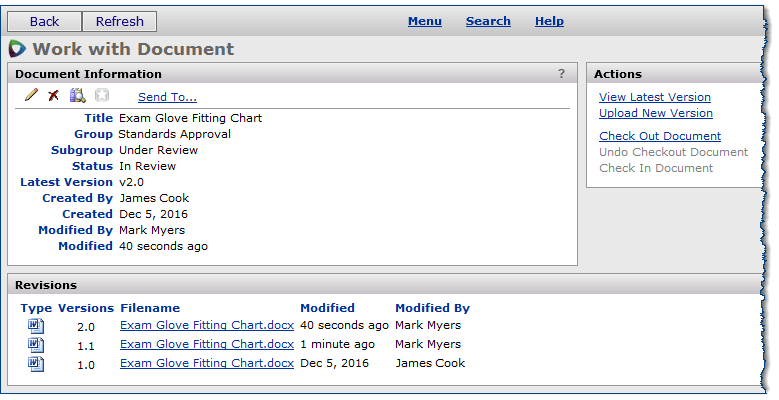
Figure 27 - Document Versions Panel for a Services Contract
- Click Open to view the selected version.
Full-Text Search of Documents
A full-text search allows you to search for text strings within the documents of a specific contract or project, or within all uploaded documents of a particular contract type (Supply or Services).
Search options are dependent upon which page you use to perform your search:
- Projects and Contracts: Available from the Documents tab on the Work with Contract, Work with Services Contract, and Work with Project pages. Search for text strings within the set of documents for a specific contract or project. This search locates all documents that contain your text string in the Doc Title or Filename fields, as well as in the text of the document file.
Useful when you need to quickly find a specific document within a contract that contains multiple documents.
- Contracts only: Available from the Documents tab on the Supply Contract Workbench and Services Contract Workbench pages. Search for text strings within the full text of all uploaded documents in the contract type you are working (Supply or Services)—the search does not extend to the Doc Title, Filename, or other document fields.
Useful when you need to locate a specific document or contract, but you don't know the contract number. Results include details about the document and a link to the associated contract.
The Search icon on the Documents panel provides access to the full-text search option. This panel also contains the Recently Viewed filter, which returns a list of documents that you most recently examined.
Important: This search feature must be enabled at your site before you can use it. If your site is not set up for this feature, you will receive an error message if you attempt to perform a search. Contact the Help Desk for further information.
Searchable File Formats
The full-text search applies to files stored in several common formats:
- Adobe Acrobat (PDF)
- Microsoft Word (DOC, DOCX)
- Microsoft Excel (XLS, XLSX)
- Microsoft PowerPoint (PPT, PPTX)
- Web pages (HTM, HTML)
- Text files (TXT)
- Other types of searchable document formats
Note: Adobe Acrobat PDF files must be optical character recognition (OCR) enabled for the full-text search to work with them. The OCR option must be set within Adobe Acrobat when the file is created. A PDF is OCR-enabled if you can search for text and highlight areas within the file using Acrobat Reader.
Tips for Effective Searches
- If you enter two sets of characters with a space between them, the search looks for documents that contain both the first and second set of characters.
For example, if you enter cling wrap, the search returns documents that contain both cling and wrap.
- You can enter partial words to find matches.
For example, if you enter deliver, your search results will also include instances of deliverable and undeliverable.
- To sort your search results by a specific field, click the link at the top of any column in the results.
- To open a document from the search results, click the Filename.
- To open the contract associated with the document, click the Contract Number.
- To view the Document Information panel, click the title of the document in the search results. From this panel, you can open the latest version of the document and perform other actions related to document management.
Search Documents Within a Specific Contract or Project
Search for text strings within the set of documents of a specific contract or project. This search locates all documents that contain your text string in the Doc Title or Filename fields, as well as in the text of the document.
To perform a full-text search of documents within a specific contract or project:
- From the Work with Contract, Work with Services Contract, or Work with Project page, click the Documents tab.
- Click the Search icon.
A blank search box appears at the top.
- Enter your search string in the box (red circle, Figure 28).
- Press Enter or click the Search icon to initiate your search.
If the characters that you enter exist in any documents within the contract, the search results panel appears with a list of those documents and their details. If your search string was found in the Doc Title or Filename fields, the characters are highlighted in those locations (Figure 28).
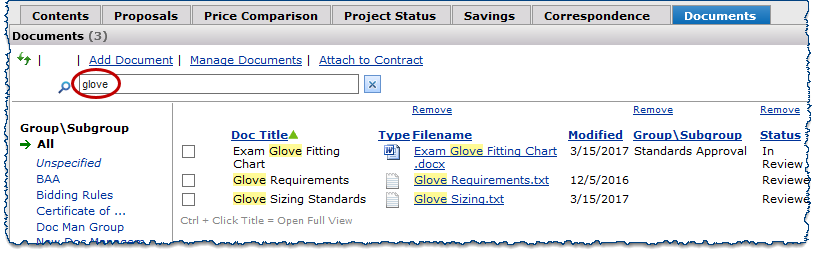
Figure 28 - Results of a Full-Text Search on Documents Within a Specific Contract
Search All Uploaded Documents
Search for text strings within the full text of all uploaded documents in the contract type you are working (Supply or Services)—the search does not extend to the title, filename, or other document details.
To perform a full-text search of all uploaded documents:
- From either the Supply Contract Workbench or Services Contract Workbench page, click the Documents tab.
- Click the Search icon.
A blank search box appears at the top.
- Enter your search string in the box.
- Press Enter or click the Search icon to initiate your search.
If the characters that you enter exist in any documents within a contract, the search results panel appears with a list of documents, owners, links to the associated contracts, and other pertinent information (Figure 29).
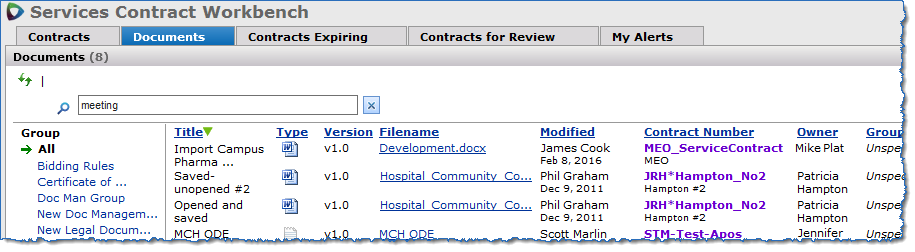
Figure 29 - Results of a Full-Text Search on Documents in Services Contracts
Copyright © 2023 by Premier Inc. All rights reserved.