This topic describes how to view, authorize, and confirm prices on POs that you create manually, or that the system creates from requisitions. The primary focus is on purchase orders communicated by phone, FAX, email, or print (via USPS or other mail service). This topic discusses EDI purchase orders only briefly.
EDI purchase orders can be authorized manually (you authorize and send them) or automatically (The system authorizes and sends them). EDI 855 confirmation transactions from vendors are returned for EDI POs. The system imports the EDI 855 transactions and processes them. You can view the EDI confirmations; and accept or reject any price changes. Detailed information is in EDI Purchase Orders, Confirmations, and Invoice Matching.
To access organization, department, or asset location data, the organization, department, or asset location must be included in your data profile.
The "Purchasing" role object setting Modify or higher allows users to authorize purchase orders.
After you create a purchase order manually, you have the option of authorizing it immediately, or setting it aside to authorize later.
Authorizing a PO does the following:
System-generated EDI, FAX, and email purchase orders can be also authorized automatically. Some setup is needed on the vendor buy-from location panel, and your system administrator must create a scheduled job that runs the auto-authorization. Setup instructions and details are in Auto-authorize EDI, email, or FAX POs by buy-from location. Typically, automatic authorization is used for purchase orders that the system creates through the Response Formula process, or through imported requisitions from supply-dispensing units (Pyxis).
STAT purchase orders must be authorized when they are created. A STAT PO is any PO with a STAT line. See STAT Purchase Orders and Purchase Order Lines.
You can optionally confirm prices on a (non-EDI) purchase order before or after you authorize it.
- If you select Authorize Now when you are finished
creating a PO, you can confirm the PO at a later time.
-To keep a PO available for confirmation and authorization after you
create it, select Authorize Later.
When you confirm a PO, you can enter
a Confirmation Number, if you have one, on the PO Edit Other tabbed panel. You can also mark the PO as "confirmed." If your PO vendor is Cardinal,
you can view Cardinal prices and enter the prices on your PO automatically (as
long as your PO is Incomplete).
When an EDI purchase order goes to a vendor, the vendor returns an EDI 855 confirmation. You can view EDI 855 import files and process them either manually, or by running a scheduled processing job. You can also view and process EDI Confirmation Exceptions.
Important for users of Sourcing and Contract Management: If the item price is determined by contract, when you attempt to update the price, the application displays a warning before changing the price.
If an EDI PO is sent with an invalid or missing Vendor Item No , the EDI 855 confirmation will acknowledge those items as rejected, and the buyer must work with the vendor to resolve the discrepancy manually. For more information on EDI purchase orders, see EDI Purchase Orders, Confirmations, and Invoice Matching.
Credit and Stat purchase orders are automatically authorized when they are created. If, during the creation of a Stat or Credit PO, no lines are added, the Status is Incomplete. Once one line is added, the status is Authorized.
The exception to this automatic authorization is if the organization requires review of Return-to-Vendor Quick Credits. If the Credit PO Review Enabled flag is selected on the organization record's MM Info tab, then Return-to-Vendor Quick Credits are directed through a two-step review process of buyer review and shipment confirmation. For details, see Review of Quick Credit Return-to-Vendor Purchase Orders.
For unauthorized POs, you can change an item's Unit Cost and update the Item Vendor UOM record. Any Discount Amounts or Discount Percentages are applied, reducing the PO Total Cost. When the Manufacturer and/or Vendor Item Number are changed on a PO line, any associated requisition lines are also updated with the new information
Once a PO has been authorized, you can still edit fields on the PO including: Buyer, Payment Terms, Discount Terms, PO Match Type, shipping information, and PO Comm Type. On the Other panel, you can optionally specify a Reason Code for the PO, a Reason Code for the PO Change, a Confirmation Number, a Project Code, a Fund Code, and a flag to include the PO in lead time estimates. Lines can be added to a PO. If none of the PO lines has been received, lines can also be deleted. Quantities can be changed, but not set lower than any received quantities.
Unit cost changes for authorized POs appear in the Next Est Receipt Unit Cost field. The Next Est Receipt Unit Cost is only used for future receipts. If quantity changes are made, the system recalculates the total PO cost at the original unit cost, not the Next Est Receipt Unit Cost.
When the item is received, the application checks the received UOM and the ordered UOM for the item, and if they are different, the Next Est Receipt Unit Cost is converted to a Lowest UOM cost. The system then applies the conversion factor for the received UOM to generate a unit cost for the received UOM.
Note: In order to verify prices, authorize price changes, and authorize purchase orders, you must be a buyer, and your system permissions must be set accordingly.
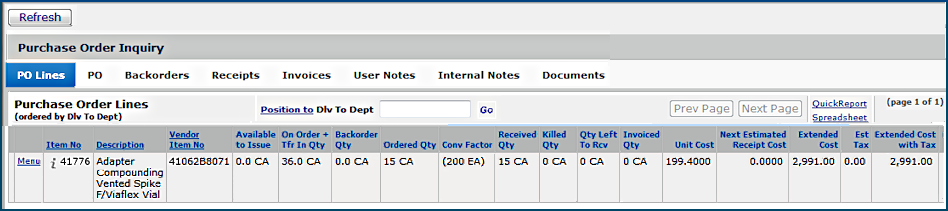
If the purchase order had associated credit POs, an additional tab would appear on the Inquiry panel. The tab would display a list of credit POs cross-referenced to the original PO.
Notice in Figure 1 that you can display either regular user notes (by clicking the User Notes tab) or internal notes (click the Internal Notes tab). Regular user notes are printed on the purchase order. Internal notes are intended for internal communication at a hospital, and are not printed on the PO.
Note: You can also access details about your PO
from the Purchase Orders list, as follows:
- On the Purchase Orders Quick
Click menu, click Show All.
- Locate your PO on the PO List and click i. The tabbed panel appears .
Note: You can also view item notes from the Item Catalog list by clicking the yellow note icon ![]() next to an item. (The icon only
appears for items that have notes.) You can create a user note by clicking Menu > User Notes. On the User Notes panel that appears, click New.
next to an item. (The icon only
appears for items that have notes.) You can create a user note by clicking Menu > User Notes. On the User Notes panel that appears, click New.
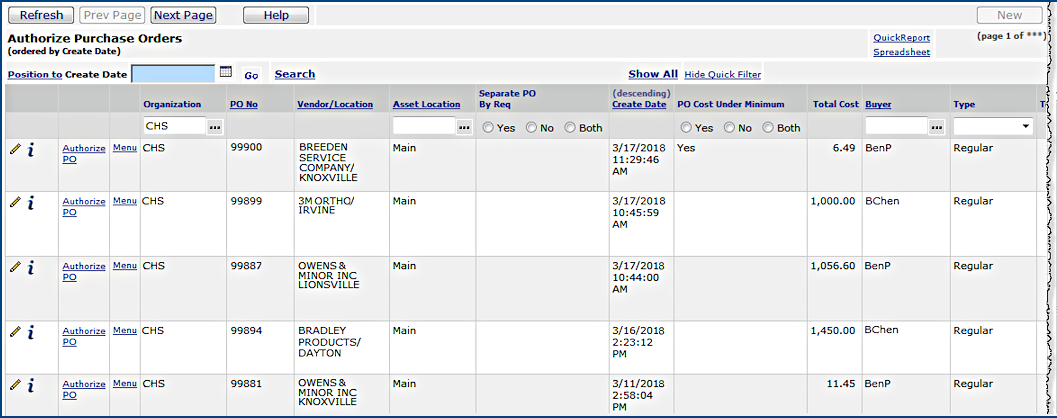
Purchase orders with a total cost below the vendor buy-from location minimum are marked as such on the Authorize Purchase Orders list (Figure 2). The column PO Cost Under Minimum is a filter that sorts the list to display all purchase orders (Both), purchase orders below the minimum (Yes), or purchase orders at or above the minimum (No).
When you select a purchase order that is under the vendor minimum for editing, a message appears. You can continue to edit the purchase order, if you wish to change it; or cancel.
You can immediately authorize a purchase order after you finish entering lines by clicking Authorize Now. If you click Authorize Later, the PO is added to the Authorize Purchase Orders list. The list contains purchase orders awaiting authorization, including manually-created POs or system-generated POs that the system created from requisitions.
The following instructions are for manual authorization of POs from the Authorize Purchase Orders list.
EDI, email, and FAX purchase orders can be authorized manually or, if system generated, automatically. Setup instructions and details are in Auto-authorize EDI, email, or FAX POs by buy-from location.
Note: If you click Authorize Later for an purchase order that is set up for auto-authorization, the PO will be authorized and sent when the authorization job runs (unless a delay has been set).
To authorize a PO, you must be a buyer, and authorize permission must be set for your User ID.

You can unauthorize a purchase order if none of its lines have been received.
When you try to unauthorize an EDI purchase order that has been sent, a warning message appears. If the EDI PO is a test PO, unauthorizing it should not cause problems. Otherwise, if you unauthorize a sent EDI PO, you will need to contact the vendor.
Note: Unauthorizing a PO removes the Price Confirmation Date and checks the Update Vendor Cost box on every PO line.
On the Authorize Purchase Orders list, next to a PO, click Menu > Copy
PO Standard Notes.
A a panel appears from which you can select and copy notes. The selected
PO standard notes are added to the PO header record.
Copyright © 2023 by Premier Inc. All rights reserved.