The EDI (Electronic Data Interchange) feature lets you send purchase orders to vendors who accept EDI orders. A purchase order is an EDI 850 document. Vendors return confirmations on your orders via an EDI 855 transaction. The ERP application also imports EDI 810 invoice files from vendors, builds the invoices, and matches the invoices with receipts for POs. Receipts can be created by warehouse/distribution staff, or by an EDI 856 -- advance ship notice -- transaction.
A system user can create EDI purchase orders, or the system can generate EDI purchase orders from the Suggested Order List or from requisitions. You can also set up ERP to authorize and send non-manual POs automatically for vendors that you specify.
To create a manual EDI purchase order, select an EDI vendor from the Vendor list, write the purchase order, and authorize it. (You must manually authorize EDI purchase orders that are created manually.) You can send the PO when you authorize it or send it later. The system extracts the order information from its databases and exports the EDI PO to central transmission processing. Transmission processing performs various checks, determines routing, and forwards the PO to the vendor. You can review the PO's progress during both steps: extraction and forwarding.
When a vendor confirms a purchase order in an EDI 855 document, the system imports the EDI 855 confirmation data, and updates the status of the PO. The application retains the data from the vendor, including any exceptions and makes the data available for your viewing. Exception information may refer to one or more lines on the PO, or all of the lines. You can review the information for individual lines, and for the PO as a whole. You can also open a list of all EDI PO confirmations with exceptions, and view individual confirmations from the list.
The EDI 856 Advance Ship Notice feature lets you create and pre-populate receipts for purchase orders.
The EDI 810 Invoice Import feature imports invoice information, builds invoices, and matches invoice detail with receipt detail for referenced POs. EDI invoice matching follows the same match rules and tolerances used in regular invoice matching. Once an invoice has been built, exceptions and error corrections for the imported invoice use the same processes as manually entered invoices. You can process EDI 810 invoices for blanket, standing, bill-only, and regular POs.
Features are built into the application to ensure the privacy of electronic protected health information (ePHI), in compliance with HIPAA requirements. One applicable area is processing purchase orders: creating, editing viewing, and printing purchase orders. For bill-only purchase orders, for example, the Case Info panel contains patient information.
On a User Profile, the Hide ePHI Data field determines whether a user can access patient data. When Hide ePHI Data is checked, a detailed series of restrictions apply to the user's access to ePHI records. Patient information on purchase orders is subject to restrictions governed by this User Profile field.
In sum, if Hide ePHI Data is checked, the user cannot access patient-identifying information.
- All areas of working with purchase orders are affected. Users who do not have permission to work with patient information cannot create, edit, or display that information on POs.
- Also, in printing or faxing of a PO with patient information, the patient data is hidden.
The list of restrictions and examples is outlined in the ePHI documentation.
To access organization, department, or asset location data, the organization, department, or asset location must be included in the user's data profile.
The lists referenced below are available from the Materials Management > Imports/Exports & Financials contents.
The lists referenced below are available from the Materials Management > Purchasing contents.
Note: EDI 855 documents older that 30 days (from the Acknowledge Date) are purged.
The lists referenced below are available from the Materials Management > Invoicing contents.
For certain vendors, your site may automatically generate EDI purchase orders for stock item replenishment and non-stock item requests. You can also create EDI purchase orders manually. Creating an EDI purchase order is similar to creating any other purchase order, with only a few differences.
Follow the instructions for creating a manual purchase order. The following information describes values in fields that are important for EDI POs.
Buy From Location - The application automatically fills in the Buy From Location (from the default location in the vendor record). Be aware that a vendor may have multiple Buy From Locations, and that some of the locations may not accept EDI orders. Verify that the Buy From Location entered in the field is one that can handle EDI. If not, select a different Buy From Location.
When you finish entering information on the PO header and tabbed panels,
click Submit.
The Purchase Order header panel and the tabbed panels reappear.
When you are ready to authorize a PO that you have saved for later, do the following:
Once a PO is authorized, to send the PO later, do the following:
You can also use this method to re-send a PO if you have a network or communication
problem, and the first Send fails.
Notes:
- If you make changes in an EDI PO that has been
sent (but not confirmed), the system records the changes and the user ID. You
should review the changes with the vendor, since the PO is in transit.
- If an EDI PO is sent with an invalid or missing Vendor Item No ,
the EDI 855 confirmation will acknowledge those line items as rejected, and
the buyer must work with the vendor to resolve the discrepancy manually.
If you use EDI purchase orders, you can authorize the EDI POs when you create or review them. Some sites find it convenient, for selected vendors, to let the system automatically authorize and send generated EDI purchase orders. One efficient use of automatic authorization involves purchase orders that are generated from requisitions imported from dispensing units (such as Pyxis).
Note: Manually-created purchase orders cannot be auto-authorized.
To use auto-authorization, you must configure the vendor buy-from location. (The topic Working With Vendor Information explains the fields on the vendor Buy-From Location panel.)
- If no Vendor Order Cycle is established, the system assumes "today" and authorizes the PO.
- If a Vendor Order Cycle exists and is valid for the current day, the system authorizes the purchase order.
- Otherwise, the system does nothing until the auto-authorize job runs again. Then the PO is evaluated again, and compared with the Vendor Order Cycle value.
Your system administrator must also create a scheduled job for running the authorization. Hospitals that use auto-authorization often find it efficient to create a daily scheduled job to run the authorization before the earliest vendor order cutoff time. If you are setting up auto-authorization for POs based on imported requisitions, be sure to schedule the auto-authorization job so that its timing meshes correctly with the timing of the requisition import.
Below is a discussion of the setup steps. To set up automatic authorization, you need permission established in your user profile for purchase order authorization and for scheduling jobs.
General setup information for EDI processing is in Set Up and Maintain EDI Vendor Relationships.
On the EDI vendor Buy-From Location panel,
The Auto Authorization Status field on the Purchase Order edit panel's Other tab
provides information about authorization. Values are:
Not evaluated - Default value. The PO's vendor buy-from location
has not been evaluated. If the PO is an auto authorize EDI PO, the
auto authorization process updates this value when the scheduled authorization
job runs.
Not eligible - The PO is not an EDI PO.
Eligible - The PO is EDI and the Buy From Location is set to
auto authorize.
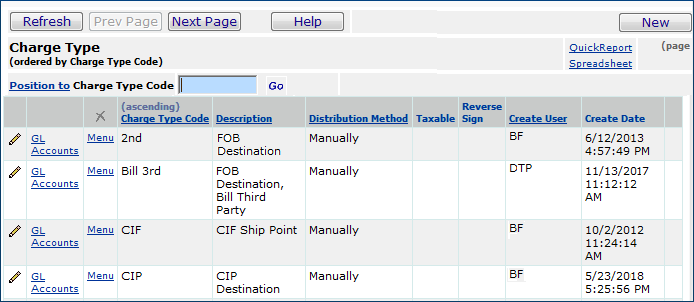
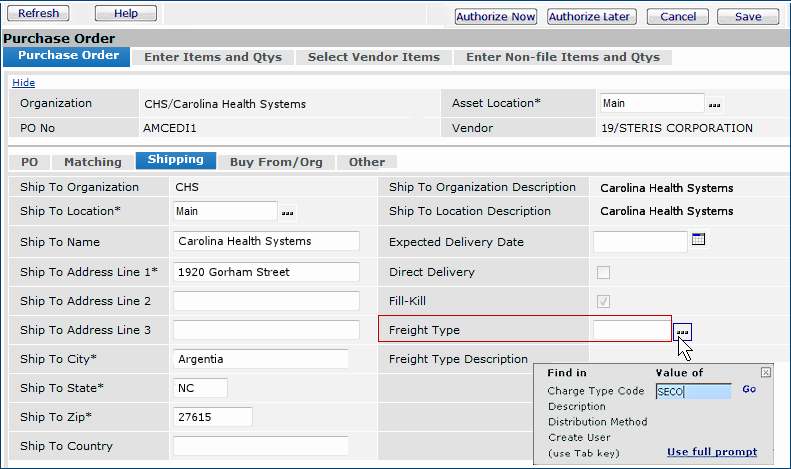
A set of keywords for expedited shipping methods is available for GHX members. Users can select the appropriate keywords for a purchase order's Freight Type field. Selecting one of the keywords applies the shipping method to the entire order. The system copies the keywords to the EDI document's MSG segment.
STANDARD NEXT DAY
NEXT DAY 8:00 AM
NEXT DAY 10:30 AM
SECOND DAY
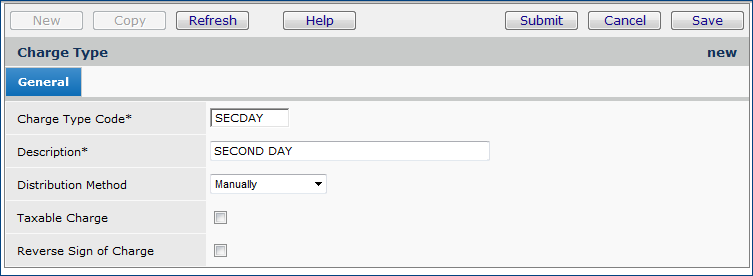

Repeat the steps to enter all the freight keywords that you plan to use to create up to four new charge types.
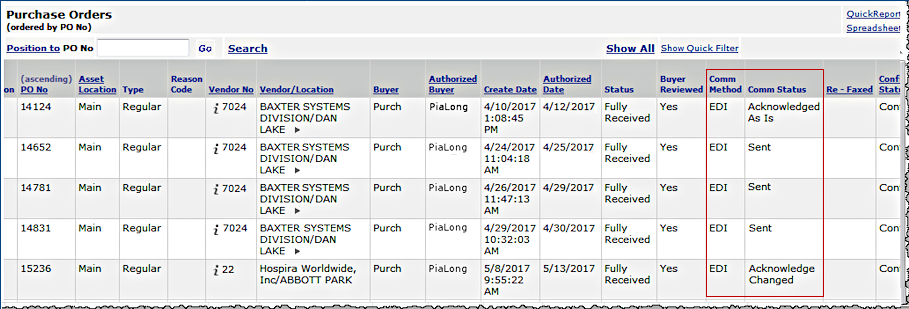
Comm Method - For EDI purchase orders, the value in this field is EDI.
Comm
Status -Contains the communication status of the PO. Values are:
Sent: The PO has been sent.
Not Sent: The PO has not been
sent.
Acknowledged As Is: The vendor
has acknowledged the PO and there are no problems or changes in any lines.
The next action on the PO is shipping by the vendor.
Acknowledge/Changed: The vendor
has acknowledged the PO, and has noted changes needed to one or more of
its lines. Some lines may be rejected entirely. The buyer needs to review
the problems, and contact the vendor to resolve them.
Rejected: The vendor has acknowledged
the PO, and has rejected all of its lines.
Scrolling to the far right (not visible on Figure 5) displays two other columns of interest:
Extract
Status - Contains the export status of the PO.
Extracted for Transfer: The PO has been
extracted and exported, but not yet forwarded to the vendor.
Transmission Complete: The PO
has been extracted, exported, and forwarded to the vendor.
- To view detailed export information,
select Menu > View Exports. The following information is displayed:
Export Date - The date and time
when the PO was sent.
Export User - The user who sent
the PO.
Total Cost - The total cost of the
PO (for all lines).
Total Lines - The total number of
lines.
Extract Status - The extract status.
Message - Any relevant messages
or diagnostics.
Confirm
Status
- For EDI purchase orders, the Confirm Status is Confirmed
when a PO Confirmation Import is processed.
- The Confirm Status is set to Confirmed/Reviewed when
the View EDI Confirm Exceptions menu option is selected from the
Purchase Orders list menu.
When an EDI PO is confirmed by the vendor, the application imports the confirmation information as an EDI 855 file. The PO's Confirm Status changes to Confirmed. (When you review the PO lines, the status becomes Confirmed/Reviewed.) A confirmed EDI PO has a Comm Status of Acknowledged As Is, Acknowledge/Changed, or Rejected. If the status is Acknowledge/Changed or Rejected, the vendor will have identified exceptions -- changes or problems -- with one or more of the lines. You need to review the lines, and determine how to handle the exceptions.
You can review the status of EDI 855 vendor confirmation import files if you suspect that a vendor may have sent a confirmation, but a confirmation does not appear for the PO. You can view the list of confirmation imports from the path: Purchasing > PO Confirmation Imports.
From
the Materials Management main Contents, click Purchasing > Purchase
Orders (by PO) or Purchase Orders (by Create Date).
The list of POs ordered by PO number or by create date (as you selected) appears.
If
the PO has a Comm Status of Acknowledged As Is, the vendor
has accepted all of the items on the PO with no changes.
The next action
by the vendor will be to ship the items.
If the PO has a Comm Status of Acknowledge/Changed, or Rejected, you need to review the lines with exceptions.
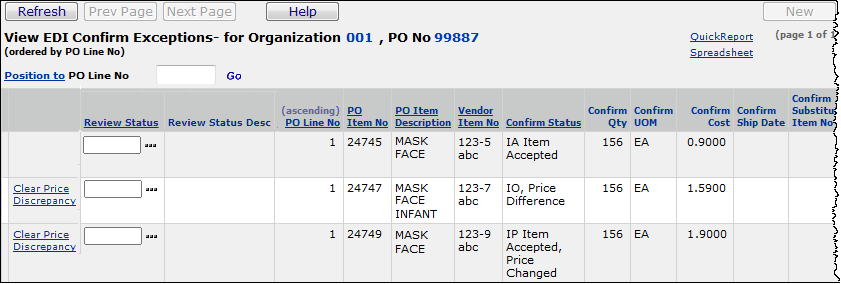
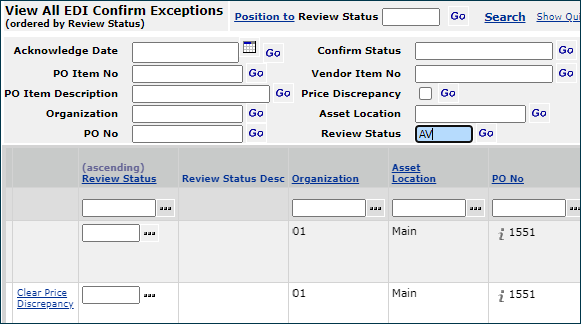
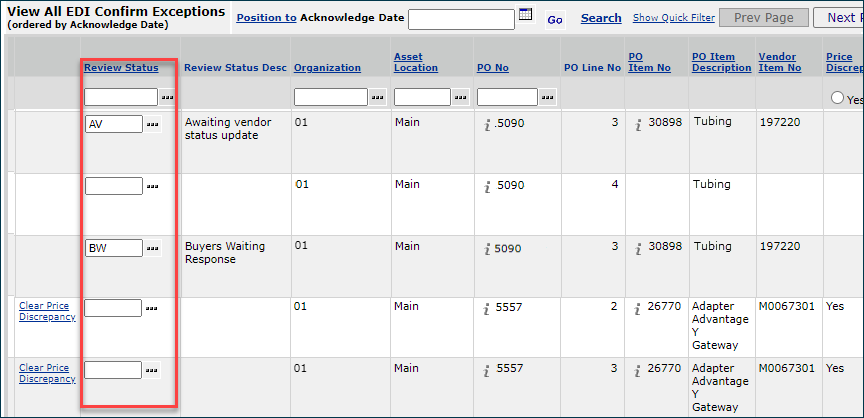
Review the Confirm Status column for each PO line.
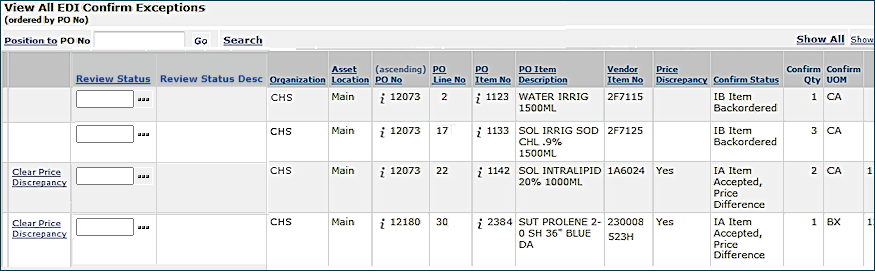
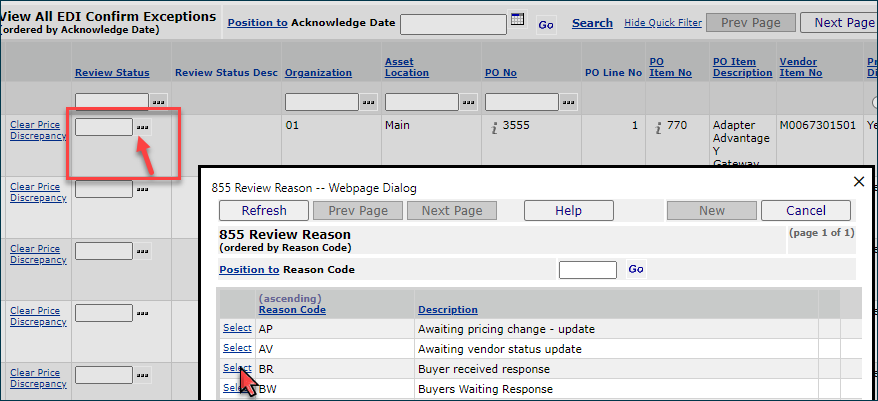
The new Review Status column is available on the EDI Confirm Exceptions list. A Reason Code table is available for sites to define Review Status values. You can assign a review status for an 855 exception in the list and filter the list to find 855 exceptions with any particular review status. The Review Status field has also been added to the list Search.
Notice that you can use the Position To fields and the quick filter to locate a review status of interest (Figure 8).
 |
 |
Materials Management >Purchasing > EDI Confirm Exceptions
The fields Review Status and Review Status Description will be added to the 855 report objects in a future release.
To use this feature:


To set a reason status value on an EDI 855 exception:
With an increase in EDI imports, users need to save time in reviewing exceptions. Filtering EDI 855 confirmation exceptions by buyer and by status is needed.
ERP provides the capability to send an email notification to the requester and buyer, when an 855 for PO lines goes to DR / IB/ SP/ IS (exception statuses.
To review, these statuses are:
DR - Item Accepted: Date Rescheduled
IB - Item Backordered
SP - Item Accepted: Schedule Date Pending
IS - Item Accepted: Substitution Made.
The User Profile contains enhanced settings to allow this extended notification.
The User Profile Requester Limits tab contains a new field Notify 855 exception status on DR/IB/SP/IS Action. Use this field to select the type of notification. Options are No Notification, Requestor Only, Buyer Only, Requestor and Buyer. See Figure 12.
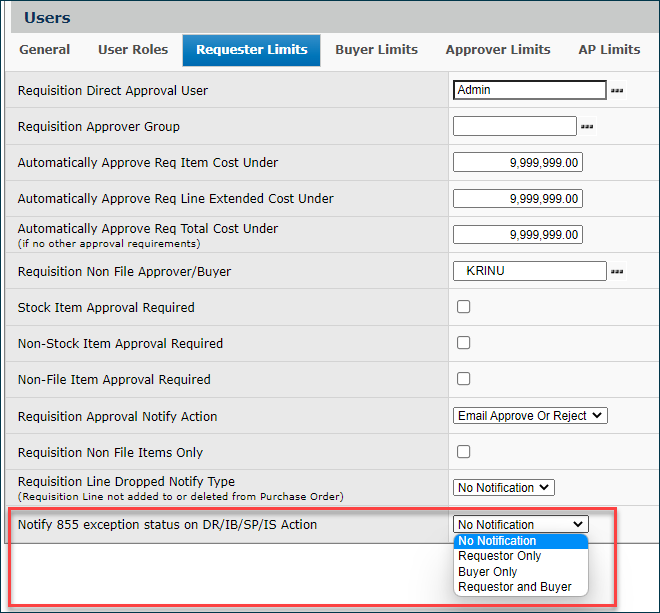
Work in Administration > Administration > Users > locate/edit user > Requester Limits tab
When an EDI 855 confirmation exception occurs with any of these status types: DR / IB/ SP/ IS, either the requester, buyer, or both are notified via email, as specified. Otherwise, if No Notification is set, no email is sent.
The Notify 855 exception status on DR / IB/ SP/ IS Action field is also available on the User Maintenance Import.
When an EDI purchase order has a Confirm Status of Confirmed, you can view the PO lines to determine if pricing information is what you expect. If an EDI purchase order confirmation shows a price discrepancy, the Update Item Price field on the purchase order line can be used to change the price in the system's item record. Clearing a price discrepancy on a PO confirmation normally moves the new price into the Next Estimated Receipt Cost field. When Update Item Price is set to Yes, then the item vendor price for the UOM is updated. If Recalculate All Prices is also set for the item, then prices for the other UOMs are recalculated. Locate the PO on the Purchase Orders list. (Purchasing > Purchase Orders by PO or Purchase Orders by Create Date).
Note: For Sourcing and Contract Management sites: When you clear an exception with a cost difference less than .01 for an item on a Sourcing and Contract Management contract, the item vendor cost is updated.Next to the PO, select Menu > View EDI Confirm Exceptions. A list of PO lines with problems or changes appears. You can use this panel to make corrections in POs with problems, and to automatically update prices.
When you return to the Purchase Orders list, the system sets the Confirm Status field for the entire PO to Confirmed/Reviewed.
Note: Cardinal defines the IE code as follows:
When customers transmit an EDI 850 Purchase Order with an "expected price" that does not align with Cardinal Health price, the customer will now receive an acknowledgment code of IE (Item accepted, Price pending) instead of the IP (Item accepted, Price Changed) acknowledgment code that is being returned currently.
The IE acknowledgment code more accurately reflects the status of the line and the price, since the price misalignment will be investigated by Cardinal Health and corrective action taken if necessary.
Select Clear Price Discrepancies to view price information. The PO Line Confirmation Price Discrepancies panel appears. (Figure 13).
![]()
This panel shows the cost of the item on the original PO (PO Unit Cost) and the cost of the item transmitted in the vendor's confirmation (Confirm Cost).
Choose one of the following:
Accept PO is selected by default. If you wish to specify that the cost on the PO is the correct cost, do not change the selection. The application writes a System Note to the Item Vendor UOM record stating that the price listed is the confirmed price. The system does not change the item price, nor make a change to the PO.
Select Accept Confirmation to specify that the confirmation price is the correct price. The application updates the Next Estimated Receipt Cost on the PO. (See the Help for PO Inquiry.)
By
default, Update Vendor Price is selected. Update Vendor Price
updates the Vendor Cost in the Item Vendor Record. Unselect Update Vendor
Price if you do not want the item cost in the vendor record updated.
Important: If the item price is determined by contract, when you attempt to update the item record with the new 855 price, the application displays a warning before changing the price.
When the same item has a price exception on multiple EDI 855 confirmations, these multiple exceptions for the same item can be annoying to clear. With this release, the multiple 855 confirmations with price exceptions for the item can be cleared at one time as a group .
This feature is sensitive to the departments, organizations, and asset locations specified in the Data Profile of the person working with the invoice exceptions. Users of this feature must also have the new role object "MassClear855PriceExc" set to Modify or higher.
Clearing of multiple price exceptions is available for items with the same values in these fields:
- Exception=price
- Item number
- Item description
- Vendor item number (VIN)
- Manufacturer ID
- Manufacturer name
- Manufacturer item number (MIN)
- PO Line Confirmed Unit Cost
- PO Line Confirmed UOM
- Contract number (if the item is on a contract).
When EDI 855s with price exceptions have identical values in these item fields, ERP groups them together for you to review and clear. You can also view individual details. A panel contains the exception groups, and lets you clear each entire group or by individual PO in a group.
Note: The exception 855s are still displayed on the EDI Confirm Exceptions list.
Materials Managment or AP main Contents, select Purchasing > Mass Clear EDI 855 Price Exceptions
![]()
- On the top of the panel are the exception clearing fields.
For any invoice or for all 855 confirmation, you can choose Accept 855 or Accept PO, and, if you wish, update the item cost in your item file.
- On the bottom of the panel are the 855s price exceptions for the item and their associated POs. By default all are selected, but you can unselect any whose price you do not wish to clear.
-
If messages exist, the Message column contains Yes. Click View Messages to display them.
If you clear all the exceptions on the Mass EDI 855 Price Exception Clearing panel (Figure 15), the row containing the item disappears from the Mass Clear EDI 855 Price Exception Summary List (Figure 14), since there are no more exceptions to clear. Otherwise, if you only clear some of the exceptions, the row on the summary list remains so that you can come back later and clear the remaining ones.
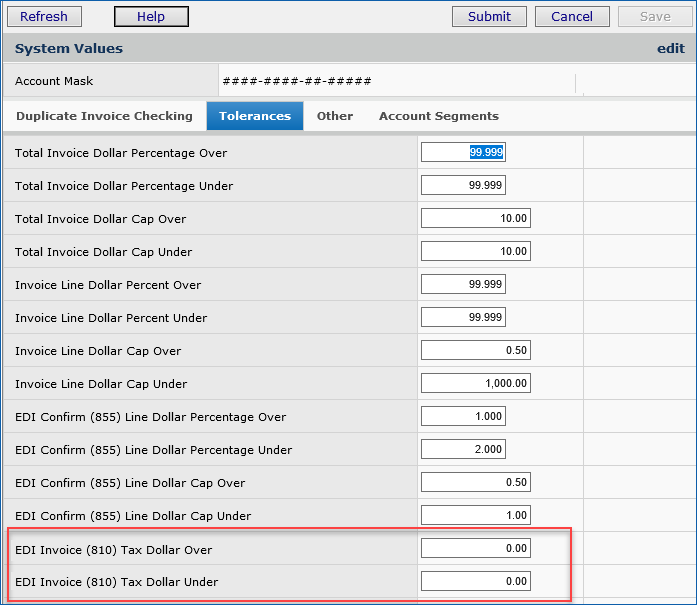
In System Values (Administration > Administration > System Values > New/Edit), the Tolerances tab includes four rows for setting EDI tolerances.
The values for EDI Confirm (855) Line Dollar Tolerances (Figure 16) cannot be greater than Invoice Line Dollar tolerances. Percentage values must be entered a a whole number followed by a decimal (e.g., 4% is entered as 4.00).
You cannot set a tolerance of zero if the Price Tolerance flag is set (checked) for ANY Org (MM > Tables > Organizations > MM Information).
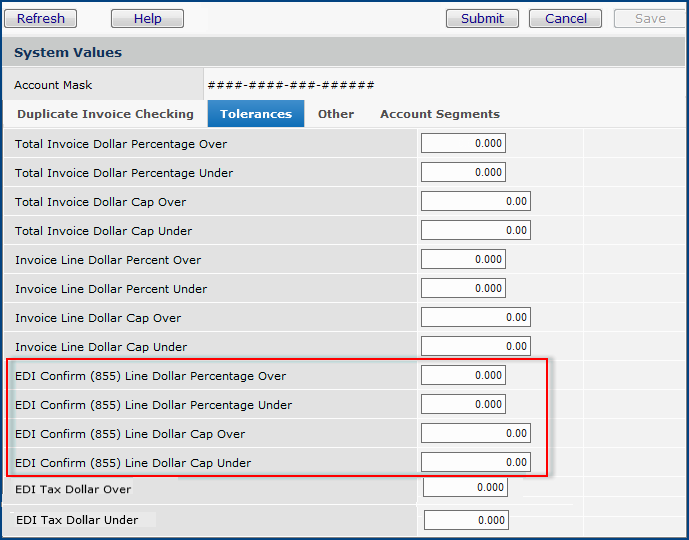
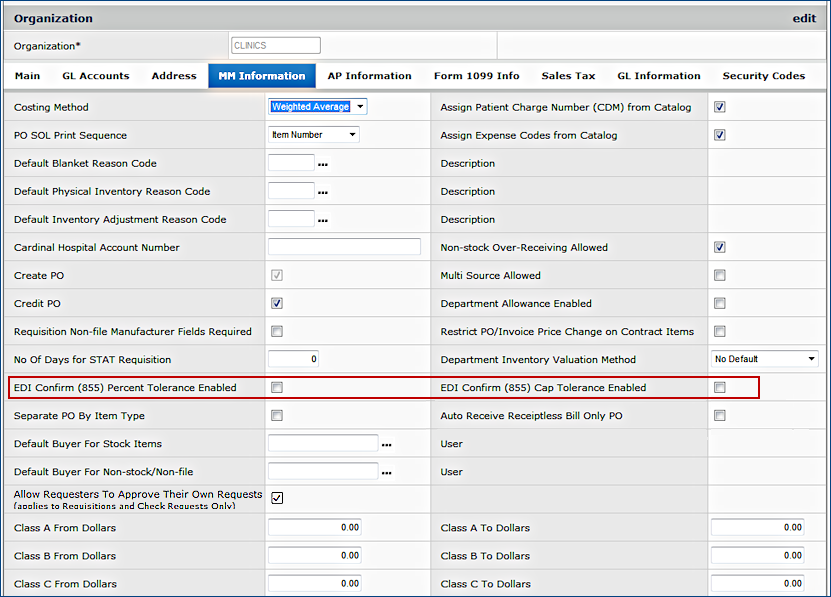
To allow the 855 tolerance to be performed, you must also select one or both of the two flags on the organization's MM information Tab (Figure 17). These flags cannot be selected until the tolerances have been set up.
The ERP application imports EDI 810 records and processes them to create invoices. Once invoices are created, they can be matched either automatically by the application, or manually by a user. EDI 810 invoices can be imported for regular, blanket, standing, and bill-only purchase orders.
The following steps are needed to import, process, and match EDI 810 invoice files.
The application only imports 810 records for valid EDI vendors mapped to the system EDI Vendors table. If a vendor is not defined in the system database, or not associated with a customer vendor, an import exception is indicated.
For assigning approvers to EDI 810 invoices, several possible paths exist. See the topics below.
Figure 18 illustrates the steps involved in importing and matching EDI 810 invoice files The discussion following the figure contains technical details.
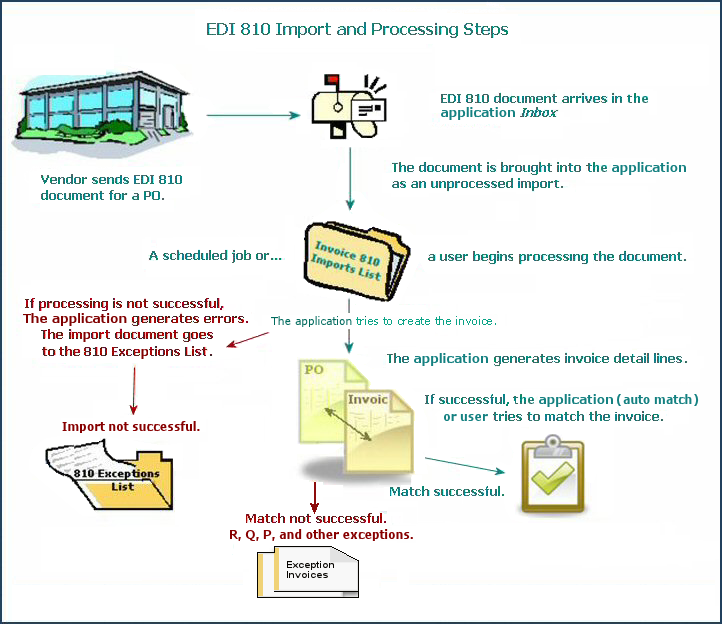
The vendor transmits 810 EDI (X12) documents to the application's Inbox.
The system imports EDI 810 files from the Inbox. The step brings the 810 information into the system. (See To view EDI 810 invoice import files.)
An import can fail if any of the conditions below apply:
A scheduled batch job can be set up to process the import to create an invoice, or a user can do the processing manually.
Import Header Validation Step: the system performs basic validation on the imported 810 document.
Note: If an EDI invoice creation process is running, you cannot start another EDI invoice creation process simultaneously. If you attempt to do so, an error message appears.
Invoice Header Creation Step: If the import header validation succeeds, the system proceeds to create the invoice header. The information on the header and summary records are compared with the purchase order header.
When an import looks like a duplicate of an existing invoice: If an imported 810 Invoice matches an existing invoice’s Org, Vendor No, Invoice No, Invoice Date, and Invoice Total, the 810 Invoice will be set to Invoiced with no invoice being created when the 810 invoice is processed. Otherwise, an invoice will be created or the 810 will remain with a status of Exception – not Invoiced.
When the invoice header is created, the application begins to generate the invoice detail lines. The system compares the invoice lines to the purchase order lines.
How the system matches item numbers on the EDI document
- The line type from the PO is retrieved and if the item is non- file or it is a file item with the item number provided, then the EDI document and the PO are matched using the item number, PO information (line number, PO number) and quantity.
- If the item is a file item, and the item number is not provided, then matching is done by PO information, quantity, and VIN.
- When an 810 is processed, and before the invoice match header is created, ERP checks the 810 details for duplicates.
A duplicate is another 810 detail with the same PO line number, item number, invoiced UOM,vendor item number, and invoice unit cost.
-
ERP finds a duplicate 810 detail, the values for the Invoice Quantity and Invoice Line Amount are summarized into one 810 detail, and the duplicate 810 detail line(s) deleted.
The processing then continues normally, allowing the invoice to match as originally designed.
For details, see the listing of Status messages for processing problems below.
- Exception – Item/PO Line
The 810 invoice indicates a PO Line number. The line number exists on the PO, but the Item Number on the PO does not match the Item Number on the invoice. (For non-files items, the item number is blank.)
- Exception – Item Vendor No
A match was made on the PO line and Item Number. However, the Vendor Item Number on the 810 invoice does not match the Vendor Item Number on the PO line.
- Exception – Invoice Qty is 0
The PO line, Item Number, and Vendor Item Number are the same, but the invoice quantity was zero.
- Exception – PO Line does not exist
The invoice contains a PO line number that does not exist in the PO.
- Exception – Invalid UOM for Item
A match was made on the PO line, item number and vendor item number. However, the UOM in the 810 was not valid for the item. For example the 810 invoice contained BX and the item does not have BX as a valid UOM.
- Exception – Mixed UOM
The item has had activity that resulted in the Mixed UOM flag being set. For example, the item had BX with a conversion factor of 5 and on hand quantity. A change was made so that BX has a conversion factor of 10 and additional inventory was received. The application has no way of knowing exactly what is in a BX that is being invoiced. The Mixed UOM may be reset by the Materials personnel after adjusting inventory. This line will reprocess with the next pass of the scheduled job.
- Exception – Qty invoiced exceeds Qty Ordered
For Direct Delivery and non-file lines, the invoice quantity may not exceed the PO line quantity. You can edit the line and change the quantity in the 810 invoice, or adjust the PO line.
- Exception – Invalid Unit Cost
When you import an 810 detail line and add it to an invoice, the system checks to see if the unit costs for the receipt and invoice are different when the two UOMs are different. If the unit costs are the same, an error occurs and the import 810 detail line is marked with the exception. To resolve the exception, you need to correct either the UOM or the unit cost.
- Exception – Other error
This is a programming error or time out. If you receive this error message, call the Help Desk.
Often, because EDI 810 invoices are received and processed before their items are delivered, the invoices are created with receipt exceptions. This result is too many receipt exceptions appearing in the Invoices in Exception list. To alleviate this situation, users can set a time delay for processing an 810 file after its Import Date. This feature is available for scheduled processing only.
To implement the processing delay, a new field is available on the Organization record AP Info tab: Days to Delay 810 Processing from Import Date (Figure 19). Manually processed 810 imports ignore this field.

This value is used when the 810 processing job is run. When the job is run, the system adds the value to the Import Date to determine when to process the file.
For automatic matching of EDI 810 lines, both the organization record and the vendor record must have the field Auto-Match EDI Invoices selected. You can match the invoice manually if your organization does not use automatic matching.
If your organization and vendor records have the correct setting, the system performs the match step automatically once the invoice is created. The system matches detail lines, and if any detail lines cannot be matched, the application generates receiving (R) , price (P), and quantity (Q) exceptions. Invoices with receiving exceptions will process when the receipts are created.
Tolerances in the System Values table are available for matching EDI invoices. If the match is outside of tolerance, the invoice is in exception and routed to the Invoicing > Exception Invoices list. Invoices with receiving, price, and quantity exceptions are Incomplete until the exceptions are cleared.
If an item on the purchase order is identified as Receipts not required, a receipt is written for the 810 detail line quantity following the process for invoicing receiptless lines.
If matching is successful, the Extracted Status on the Invoices list
is changed to Ready for Selection and the PO Match Status becomes Part Matched or Matched. If the invoice is incomplete,
the system attempts to match any remaining unmatched detail lines.
Invoices created by the automatic matching process have the User ID System.
When matching is successful, the system completes the invoice.
When EDI 810 records come in to the system, you can view them and their import status from Accounts Payable or from Materials Management.
From the Materials Management or Accounts Payable main Contents, select Imports / Exports > Invoice
810 Imports.
The Invoice 810 Imports list appears.
Note: This list is restricted to the organizations/departments allowed by the user's data profile.
To view all EDI 810 imports, the role object "Import810Admin" in your user profile must be set to View or higher. This will allow you to see the menu item Invoice (810) Imports - All under Imports/Exports (see Figure 20).
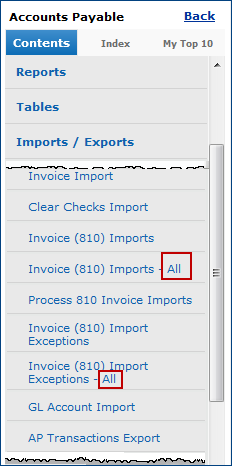
(These menu items for All EDI 810 imports and exceptions are visible only to users with role object "Import810Admin" set to View or higher.)
You will need to work with your site administrator to determine who in your group will be responsible for processing invoice import files.
The reason is that processing will only affect 810 imports for organizations that are in the data profile of the user running the job.
When a processing job finishes, 810 invoices for any organization not in the user’s data profile are not processed. These invoices are available from the Invoice Exceptions list (Imports/Exports > Import 810 Invoice Exceptions) to users who do have the relevant organization in their data profile.
Making the change in the above Note (resetting the role object "Import810Admin") will allow you to see the menu item Import (810) Invoice Exceptions - All (see Figure 21).
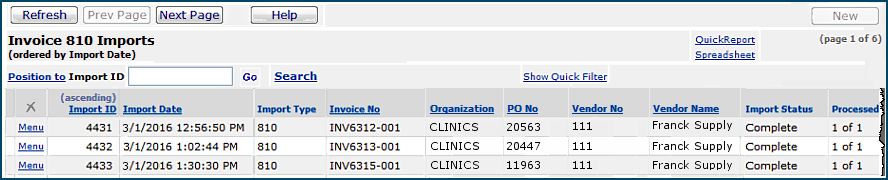
Note that the invoice information in Figure 21 shows an Import Status Desc of Complete for both imports. Complete means that the import was successful, and not necessarily that invoices were created. After processing, you can view the file details to determine if an invoice was created successfully.

- Clicking the i in the PO No column displays purchase order information.
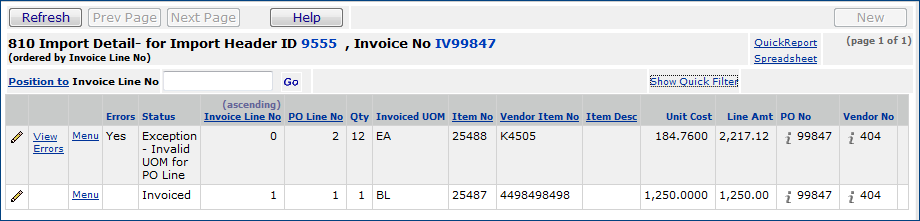
You can drill down again from the details list (select Menu > Detail Lines) to get more information. Specifically, if a processing exception occurred, you can view a statement of the problem that triggered the exception. Values for the Status are:
- Invoiced
- Ready for Processing
- Bypass - $0 Line Amt and PO Line does not exist
- Exception – Item/PO Line
- Exception – Item Vendor No
- Exception – Invoice Qty is 0
- Exception – PO Line does not exist
- Exception – Invalid UOM for Item
- Exception – Mixed UOM
- Exception – Qty invoiced exceeds Qty Ordered
- Exception – Invalid Unit Cost
- Exception – Other error
(An example is marked in red on Figure 23).

Note that you can set up EDI 810 invoice import file processing as a scheduled job, if you have Administrator privileges. See To schedule EDI 810 invoice processing.
As described previously, EDI 810 invoices can have exceptions such as quantity, price, and tax exceptions -- just like any other invoice -- that prevent the system from matching them to purchase orders.
EDI 810 invoices can also have import exceptions when the EDI document and its corresponding details are not processed because of various import problems. These include an unreadable document, a missing purchase order line, a duplicate invoice, etc. In this case, you can review and work with individual detail lines.
Other, relatively minor errors can prevent an invoice from being matched, when everything else on the invoice is correct; for example, incorrect or duplicate PO lines. For this situation, you can look at the overall invoice and adjust line numbers.
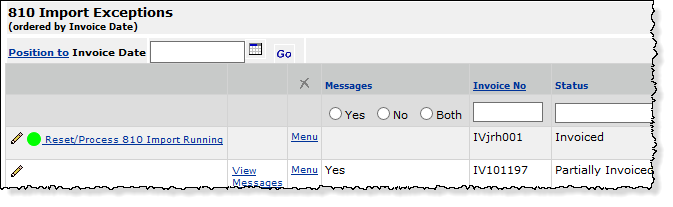
The system displays EDI 810 invoices with errors and exceptions on the 810 Import Exceptions panel.
Note: The Invoice (810) Import Exceptions list is restricted to the organizations/departments allowed by the user's data profile. The list is pre-filtered by Organization.
Initially, the list displays exception invoices for the organization in Current Settings. By changing the Current Settings organization, users can view exception invoices for other permitted organizations. If the role object "Import810Admin" in your user profile is set to View or higher, you can access all import exceptions from the Imports/Exports table of contents.
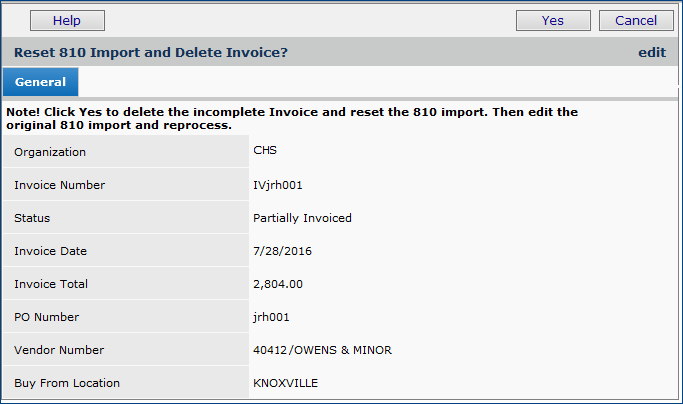
An option on the 810 Invoice Exceptions panel lets you reset an invoice with errors back to the way it was when it arrived as an import before it was processed. The system deletes the processed version of the invoice with errors, and makes the original 810 version available for editing. You can then edit the 810 invoice to correct issues such as line numbers that do not match the POs, incorrect vendor item numbers, and other errors that are keeping an otherwise correct invoice from matching. When editing is complete, the 810 invoice can be submitted again for processing and matching.
Most often, the Status of an invoice that can be reset and edited is Partially Invoiced.

A confirmation panel appears (Figure 25).

For example, Figure 18
contains two lines with the same number 1. In this case, you could change the 1 to 2 in the second PO Line No field, if that will solve the problem. Or, you could renumber all the lines to match the PO, if that is needed.
When the processing finishes, the invoice is matched, and disappears from the Exceptions list.

Notes:

The Status values for detail lines are listed in the previous section.
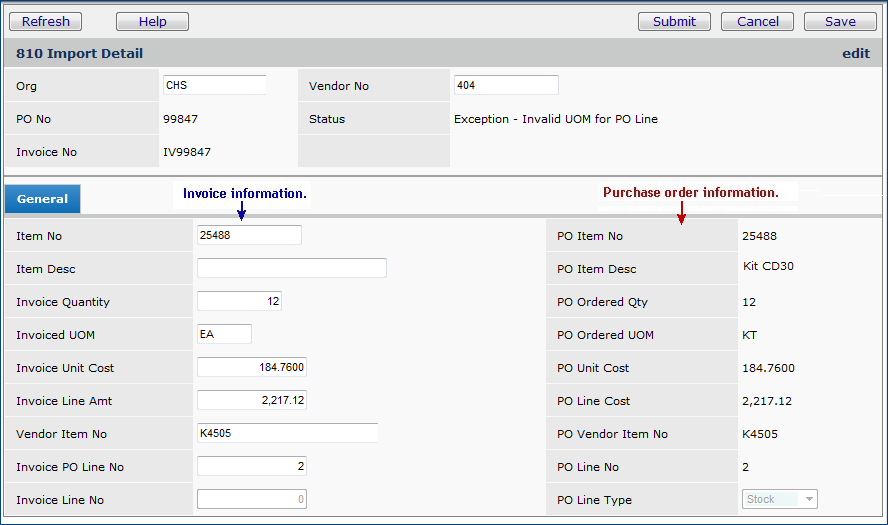
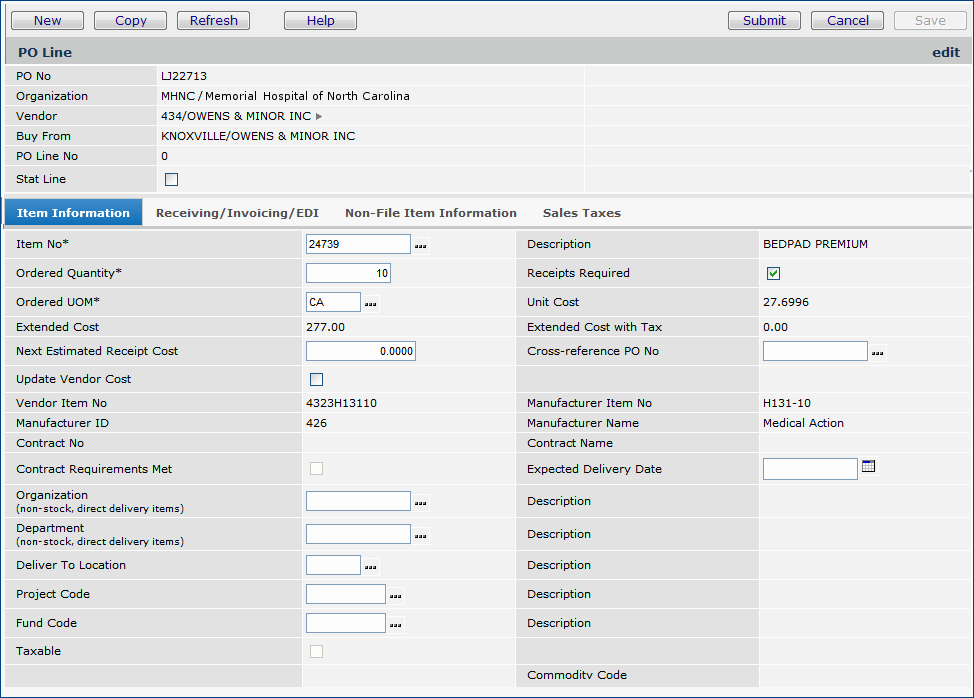
You must click Menu > Create Missing PO Line on the 810 Import Detail panel (see Figure 30) to clear the exception. The PO Line panel (Figure 32) will appear with the fields completed with the information from the exception line on the invoice. Make any changes necessary, and click Submit. (This action is not available for consignment, credit, bill-only, fill-kill, and completed POs.)
Processing an invoice can generate an error message that the "taxable amount cannot be greater than the invoice total," even when the taxable amount is not greater than the total.
This message occurs more commonly in invoices with a single detail line.
When the organization's Materials Tax flag is checked, and the Freight Taxable flag is unchecked, for a single detail line invoice with tax, the taxable amount is calculated as:
Taxable Amt = InvoiceTotal - TotalTax - FreightAmt - OtherAmt
Unless there are other exceptions, the invoice is created normally and is available for matching.
However, when the organization's Materials Tax flag is checked and the Freight Taxable flag is checked, an error message can still occur if the Taxable Amt is greater than the Invoice Total. The invoice is routed to the Invoice (810) Import Exceptions list (Invoicing > Invoice (810) Import Exceptions).
![]() Open the organization record and uncheck the Freight Taxable flag. (When you re-process the invoice, the taxable amount is re-calculated using the formula above.)
Open the organization record and uncheck the Freight Taxable flag. (When you re-process the invoice, the taxable amount is re-calculated using the formula above.)
![]() Reprocess the invoice lines:
Reprocess the invoice lines:
On the Invoice (810) Import Exceptions list, next to the invoice, click Menu > Reprocess Lines. After re-processing, the invoice is created successfully.
If a purchase order associated with an EDI 810 has tax specified, but the EDI 810 invoice shows no tax, the invoice is in exception at the line level for tax. The EDI 810 invoice appears on the Invoices in Exception list (Figure 33), with the Exception Type of Tax.

You resolve a tax exception of this type on an EDI 810 invoice using the normal process for non-810 invoices. See the online documentation topic "Resolving a Sales Tax Exception."
Notes:
This feature is enabled by selecting the flag Create Exception for Missing Tax on EDI Invoices for the organization (Figure 34, bottom left). The default setting is "unselected." This field is also audited.
Do not confuse this sort of tax exception (when a PO has tax and the invoice does not) to the situation where a calculated AP tax is outside of a tolerance that you set. See the subsequent discussion.

With
810 invoice processing, if the system cannot find the receipt line associated with an invoice line, the invoice line is not processed. The system uses different combinations of the item number, purchase order information, and quantity to locate receipt lines. But, if incorrect data exists in the invoice line -- for example, an incorrect item number -- then the line is skipped. The exception "Receipt line not found" is written to the invoice line.
You need to review the invoice line to locate the error. Check the invoice number, vendor item number, and manufacturer item number. If those are correct, review the other fields. Fix any errors and and reprocess the invoice.
When an EDI 810 Invoice has a failure (inability to process), you can manually complete the invoice directly, instead of working through the EDI 810 exception process. Previously the 810 Status was not updated, and the only way to remove the 810 from the EDI (810) Import Exceptions list was to delete the 810.
This feature will avoid the extra work for EDI 810s that could not be completed because of exceptions: i.e., print the 810, delete the exception, send the printed 810 to the Accounts Payable department who finish the invoice. Now, it will be clear that the invoice was finished when the exception clears. Also if staff were to complete an incomplete 810 invoice, the 810 exception will clear. The person responsible for the 810s will not get an error and then have to delete the 810 to remove the exception.
Here is the process:
This report is available to view 810 invoice exceptions by organization and/or vendor. You can access this report definition from Reports > Standard Report Definitions. You can build the report for one or more invoice header exception types (e.g., "Partially Invoiced") and for invoice detail line exception types (e.g., "Exception - Items/PO Line.")
When an 810 invoice is taxable, the tax for the invoice is not taken from the 810 invoice. Rather, ERP calculates tax as the invoice is created. Sometimes, a slight difference occurs in the calculated tax amount causing the invoice to be out of balance. You can set a tolerance level so that 810 tax differences within that tolerance can flow through without having to be edited.
When an EDI 810 invoice has a tax amount variance within a tolerance that you set, the application does not consider it an exception.
This feature lets you avoid manually adjusting EDI 810 invoices whose calculated tax amount has an acceptable variance.
For in-tolerance variances, ERP creates a distribution line containing the variance, so that you can complete the invoice.
Out-of-tolerance tax variances need to be cleared, as outlined below.
You define EDI tax tolerances in the application's System Values. Using EDI tax tolerances is optional, and can be set on or off via another field in System Values.
Security: The ability to set system values requires administrator privileges (appropriate user profile role and security object settings). If you need tax tolerances defined for EDI 810s, contact your site's system administrator.
The tax amounts appear when you inquire on an EDI 810 invoice.
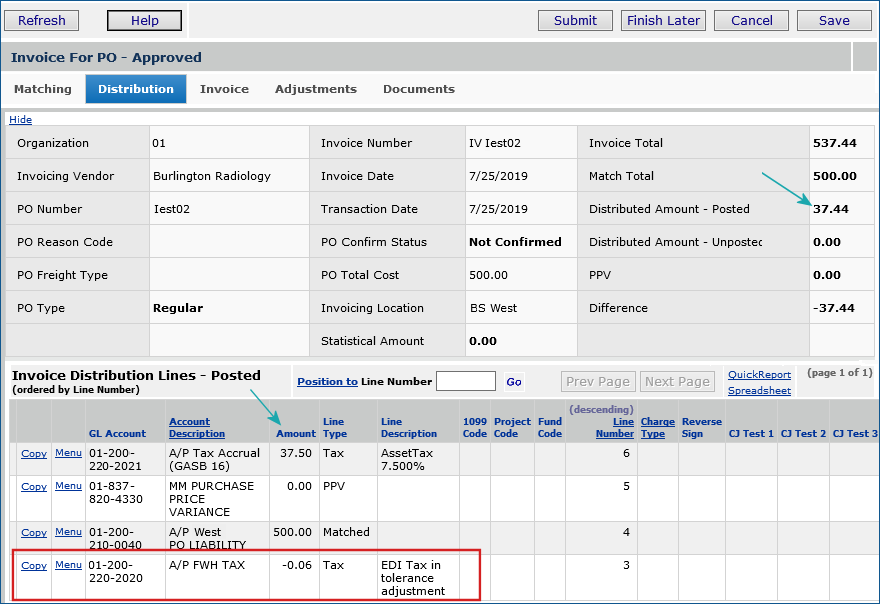
Figure 36 is an example invoice.

ERP compares the Tax Amount (Figure 36, red arrow) and the EDI 810 Tax Amount (Figure 36, green arrow).
The Tax Amount is calculated based on the Taxable amount and the tax rate, while the EDI 810 Tax Amount comes from
the imported 810. The two amounts are within tolerance if the difference between them is less than the tolerance
value (EDI Invoice (810) Tax Tolerance over/under) in System Values. Figure 37 is the tax tolerance settings for the site
whose invoice is in Figure 36.

The "over" tolerance setting is $3.00. The "under" tolerance setting is $2.00. The variance is greater than $3.00,
so the invoice in Figure 36 has an out-of-tolerance tax exception. The invoice also appears on the Invoices in Exception list with the Exception Type TaxEDI.
The field Use EDI Invoice Tax Tolerances on the System Values panel, Other tab (Figure 38) enables or disables the EDI invoice tax variance tolerance feature for your site.

At implementation, this field is unselected and tax tolerance is not enabled. The System Values fields EDI Invoice (810) Tax Dollar Over and EDI Invoice (810) Tax Dollar Under (Figure 35) are not visible.
When the field Use EDI Invoice Tax Tolerances is selected, tax tolerance for EDI invoices is enabled, and functions as described in this document.
The Use EDI Invoice Tax Tolerances field is audited.
During 810 invoice processing, ERP compares the total tax on the created invoice with the total tax amount from the 810 invoice.
The application uses the AP tax hierarchy, as described in How ERP identifies the correct tax rate to use to calculate AP tax. If a variance in the tax amounts exists, the application checks the system values fields EDI Tax Dollar Over and EDI Tax Dollar Under to determine if the variance is within tolerance.
If the tax variance is within the tolerance, the application creates a new invoice distribution line (of Type Tax) in the amount needed to balance the invoice. The amount will be posted to the the Tax Expense account. The description of the tax distribution line is "EDI Tax in tolerance adjustment".
After the distribution line is created, the invoice can proceed to completion and approval.
If the tax variance is outside of the tolerance, the invoice has the exception type TaxEDI. Instructions for clearing an out-of-tolerance variance are below.
For example, Figure 39 displays tax tolerance settings (in System Values) for a site. The "over" amount and the "under" amount are each $0.10.

An EDI 810 invoice is processed with tax amounts that are not the same. Figure 40 is an inquiry on the invoice. The variance -- $0.06 -- is within the defined tolerance.

Editing the invoice and opening the Distribution tab displays the distribution line that ERP created for the in-tolerance tax variance
(Figure 41).
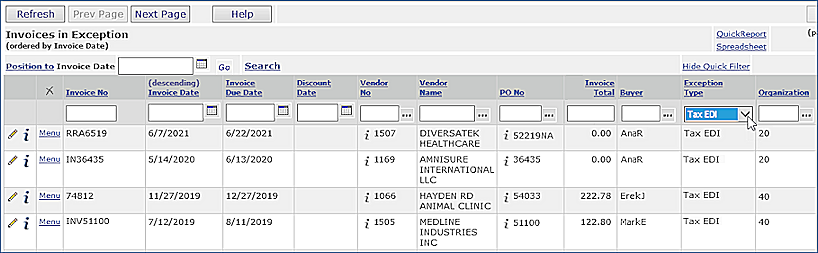
EDI invoices with an out-of-tolerance tax variance have the exception type TaxEDI. Invoices with this exception are incomplete and are displayed on the Invoices in Exception list (Materials Management or AP Main Contents > Invoicing > Exception Invoices) An example is in Figure 42. You will need to work with these invoices to complete them.
Note: The TaxEDI field is also available for you to use on reports created with the "Invoice Match Header" report object.
To clear a TaxEDI exception, you can edit the invoice to bring the (calculated) invoice tax and the EDI tax amounts into balance, or bring them within the tolerance amounts. You also have other options that involve resetting the location in the hierarchy for the default tax, and changing the Default Tax Group value on the vendor, department, organization, or asset location.
Many sites use auto-approval routing for EDI 810 invoices from specific vendors. Others need the ability to route EDI 810s for approval independently of who the vendor is. For auto approvals, you can assign approvers on a vendor panel to route invoices for that vendor to those approvers (Materials Management main Contents > Vendors > Vendor Approvals for Invoices).
If you are not using automatic approval routing by vendor, you can specify approvers for EDI 810 invoices for these requisition/PO types:
Regular, including order guide requisitions, blanket requisitions, standing requisitions, and bill only.
Assign approvers as follows:
- On the purchase order. The assigned approver/approver group propagates to the EDI 810 invoice and back-copies to the associate requisition.
- On the requisition. The assigned approver/approver group propagates to the associated purchase order and EDI 810 invoice.
- On the EDI 810 invoice (if not assigned on either the PO or the blanket requisition). The ERP application then back-copies the approver/approver group to the PO and the requisition.
For blanket EDI 810 invoices, you can also require approval routing on an organizational basis, and, at the same time, "turn off" any automatic routing that you already have set up for the vendor.
Follow the standard process to create a blanket (bill-only, regular, or standing) requisition. (This example uses a blanket requisition.)
![]()
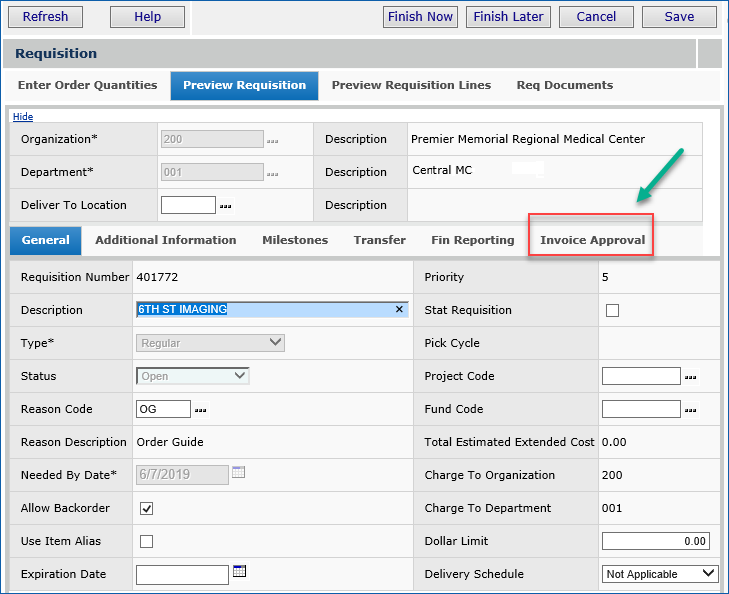
The application displays the requisition header information, and lines. A new tab Invoice Approval is available (Figure 44).
![]()
![]()
When an EDI 810 invoice is processed for the PO, ERP verifies the invoice approver(s) and routes the invoice to the named approver or approver group.
Note: You can also enter EDI 810 invoice approvers on the PO itself, instead of on the requisition. If approvers were entered only on the PO, they will be back-copied to any associated requisition, and copied to the invoice.
Follow the standard process to create a purchase order. The example below uses a blanket PO.
![]()
Order guides generate regular requisitions. EDI invoice approvers entered on an order guide requisition propagate to any associated purchase order, and to the EDI 810 invoice. The location of the invoice approver fields for order guides is on the Preview Requisition tab.
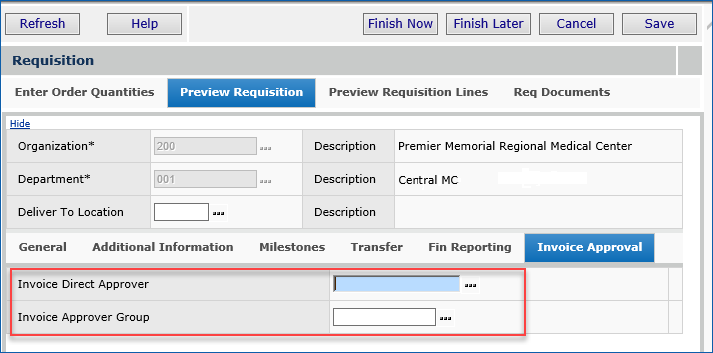
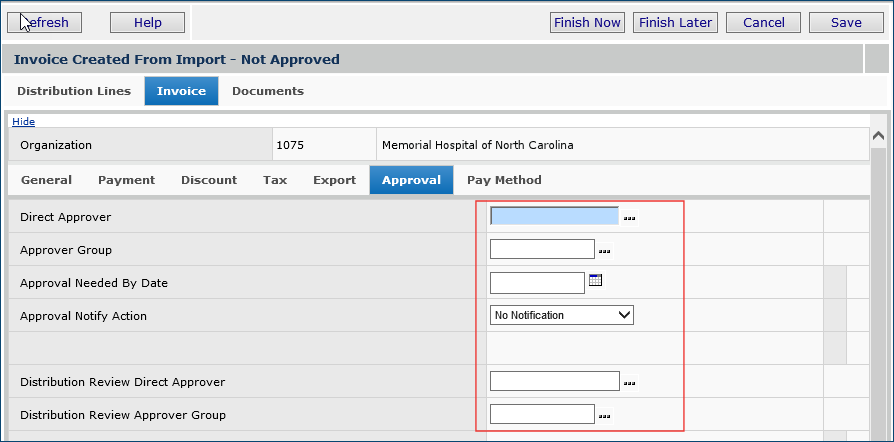
EDI invoices contain an invoice Approval tab where you can assign approvers, if none have been specified in the PO or requisition. An example is in (Figure 49).
For blanket invoices (only), a field on the Organization record lets you "turn off" automatic approval routing (if you have that feature set up on the vendor). At the same time, the field "turns on" a requirement to use approvers that you assign on the requisition, purchase order, or manually, on the invoice.
The field is: Invoice Approver for Blanket Req/PO required (Figure 50).
![]()
Unselected: The default setting is unselected. When the field is unselected, ERP uses any approver/approver group set up on the vendor record for automatic approval routing.
Selected: When you select the field, any approver assignments set up on the vendor panel are ignored, and you must create approver assignments on the invoice (PO, or requisition).
Approver assignments propagate from the requisition to the PO to the respective EDI invoice.
When a requisition is released, ERP first looks for an existing, unedited PO with the same vendor and buy-from location.
If an open, unedited PO exists,
- ERP adds item lines from the requisition to an the existing PO.
- Identical items are combined on PO lines. If a PO line for a requisition item is not on the existing PO, then a new line is added.
- For blanket POs, the Dollar Limit on the PO is increased by the Dollar Limit amount on the blanket requisition being added.
Also, the Expiration Dates are compared. If the new blanket requisition has an Expiration Date later than the existing PO's Expiration Date, the existing PO's Expiration Date is changed to the requisition's Expiration Date.
If no usable PO exists for the vendor buy-from location, a new PO is generated for the requisition.
ERP also needs to match the correct requisition/PO with the incoming EDI vendor invoice, and the correct invoice approvers. Since you can assign invoice approvers on requisitions, when multiple requisitions (for the same vendor) contain different invoice approvers, ERP accounts for the invoice approver assignments in generating POs.
- For example, if an open PO already exists for the same vendor with the same invoice approvers, ERP will add the requisition lines to it.
- If no open PO exists for the vendor with the same approvers, then a new PO is created.
This feature helps you handle an EDI 810 invoice and PO mismatch.
When an 810 message is received, while the invoice is building, the system tries to match and reconcile the invoice with a purchase order (line by line). During the match process, if either of these situations exists...
- The EDI 810 invoice contains lines missing from the associated PO
or
- The EDI 810 invoice has lines that do not match the associated PO.
you need to handle the missing lines, and proceed to complete the invoice.
Here are the examples of situations that this feature addresses:
Example 1:
A purchase order is created with a single line item, for example, a leg brace.
The vendor sends an EDI 810 invoice with multiple line items; namely, a line-by-line item list for the components that make up the one leg brace.
The invoice is valid, but the multiple lines don’t exist on the purchase order.
Example 2:
A purchase order is created with four lines. Two of the lines have been invoiced and matched. The vendor sends an EDI 810 with all four lines. In this situation, ERP allows the 810 to be created, but it is an exception, and must be cleared.
Missing lines can be processed from the Invoice Matching panel. When the missing line is added, the invoice has a missing line exception. You can then clear the missing line exception, and add the line either to the PO or invoice. Adding the line generates a receipt exception, which you can also then clear. (Also see Resolving Invoice Receiving Exceptions for more details.)
Add the missing line
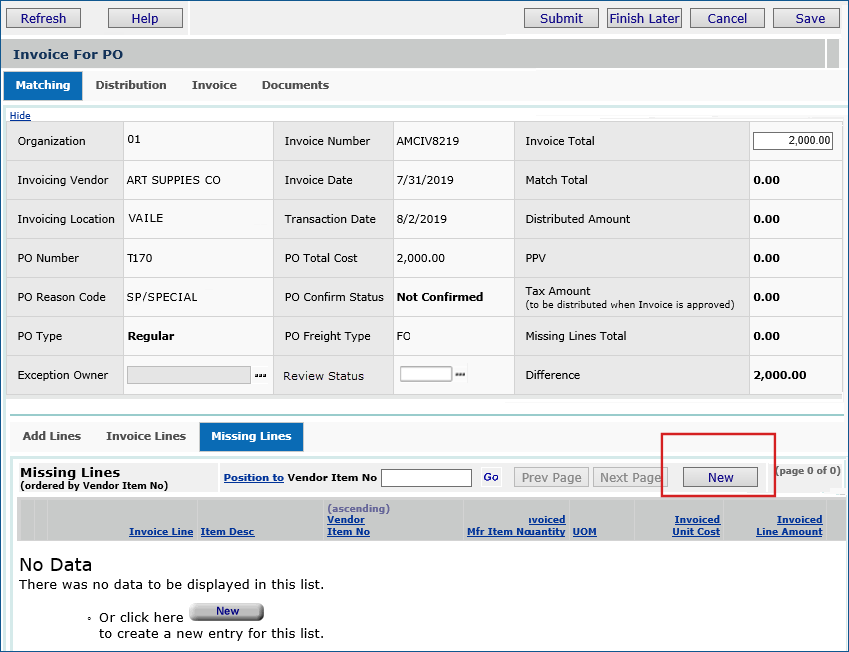
Clear the missing line exception
![]()
- To add a line from the invoice to the PO, select Create a new PO Line and match Invoice Line.
This selection would be a solution for Example 1 (above).
-
For this action, you must also enter a line number to add to the PO in the field PO Line Number.
- To add a line from the PO to the invoice, choose Select existing PO Line and match Invoice Line.
This selection would be a solution for Example 2 (above).
Clearing the receipt exception
After you clear the missing line exception and the receipt exception, you can finish matching the invoice. The invoice disappears from the Exception Invoices list.
On occasion, you will have EDI 810 invoices containing lines that have zero-dollar amounts, with no matching lines in the associated purchase order(s). This situation can occur with invoices that include “information only” lines with no amounts (examples are bill-only or capitated pricing invoices, among others). The system provides a feature that allows each organization to handle these types of invoice without working them manually. Each organization allow (or disallow) EDI invoices with zero-dollar lines to be automatically matched successfully.
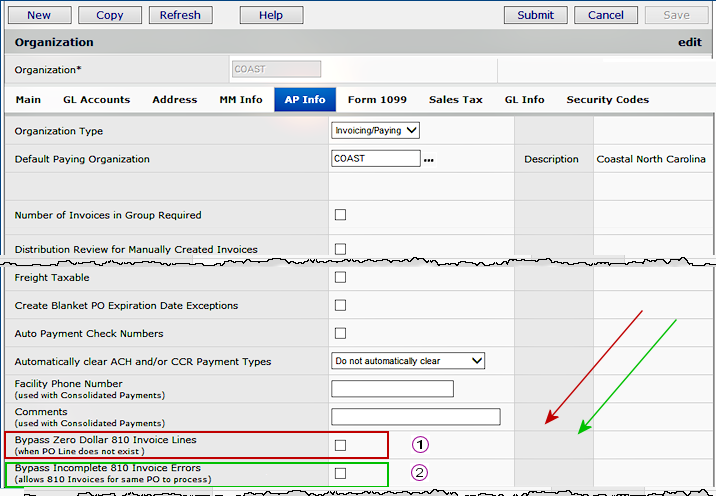
When an EDI 810 is imported and the Bypass field has been selected, the 810 detail line Status shows the new value Bypass - $0 Line Amt and PO Line Does Not Exist (Figure 54). The invoice is then matched, assuming that no other errors are present. The 810 header status is Invoiced.

When the field is not selected, the 810 detail Status is Exception - PO Line Does Not Exist and the invoice is created as an exception (Figure 55). The 810 header status is Partially Invoiced and the invoice is created as Incomplete.

You can set a field on the organization record to allow incoming available EDI 810s to process when an incomplete 810 invoice exists for the same PO. This feature is useful when you have multiple EDI 810 invoices for a PO: one is incomplete, with exceptions, but others are available for matching.
The Organization AP Info panel contains the new field Bypass Incomplete 810 Invoice Errors.
Field not selected: A new EDI 810 will not process when an incomplete invoice is present for the same PO.
Field selected: A new EDI 810 will attempt to process when an incomplete invoice is present for the same PO. The system deletes the existing incomplete invoice and resets the 810 that created the invoice to a status that will allow it to reprocess as a new import.
Customers want to prevent capital POs from being transmitted via EDI. Currently, to handle this situation, sites can set buy-from locations for these POs to transmit via Print. However this method is not ideal because it requires a user to remember to choose those particular buy from locations. A better solution is available.
An
organization-level field controls the PO communication method and automatically sets it to Print when a Project Code is entered on a manual or system-generated PO. (No particular Project Code is needed. You can use any Project Code.)
The check box is on the Organization record's MM Info panel (Figure 56).
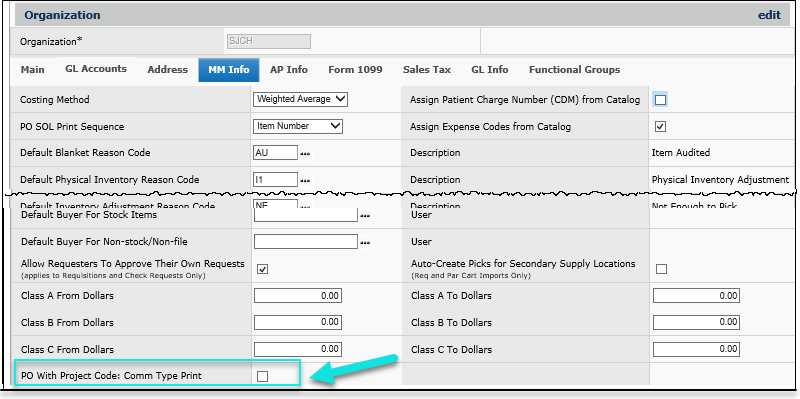
Purchase orders that use this method to avoid EDI transmission need to have an associated project code.
Below are two images (Figure 58) of the Additional Information tab for a capital PO. The organization record flag PO With Project Code: Comm Type Print has been set.
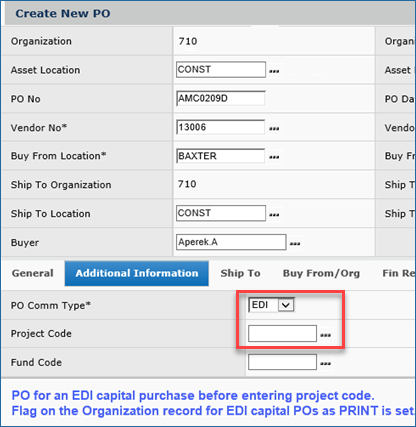 |
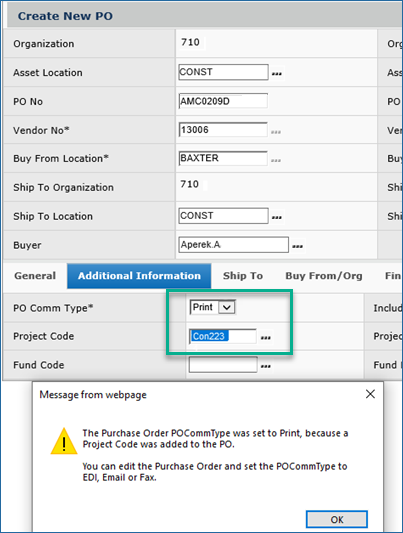 |
|
A. Capital PO Before Entering a Project Code |
B. Capital PO After Entering a Project Code |
In Figure 58A, the user has not yet entered a project code, so the EDI PO Comm Type setting is still visible. In Figure 58B, when the user enters a project code, the PO Comm Type changes to Print. The PO Comm Type is still editable, if desired, and can be changed.
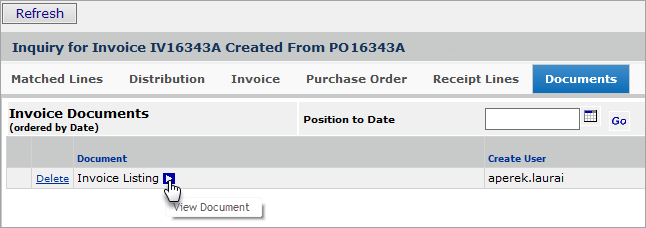
Once the 810 is processed an invoice has been created, the invoice can be printed from one of two panels in the application.
Copyright © 2023 by Premier Inc. All rights reserved.