Creating purchase orders and moving through the purchasing workflow is streamlined with Supply Chain. The application automatically performs purchase order tasks for you; for example, generating a purchase order for a stock item when the on-hand quantity runs low. The application uses the Response Formula to create purchase orders that replenish inventory.
If you wish, you can manually create a purchase and authorize purchase orders for stock, non-stock, or non-file items. Item types can also be combined on a purchase order. Manual purchase orders trigger the automatic creation of a parallel requisition (if none exists in the system). The system uses the Item Description on the purchase order to generate the requisition. The requisition has a Status of Approved. The requisition's description is in the form "Created for Org XXX PO YYY." Items are listed as backordered until the PO is received. (When items are received, the system automatically releases the items from backorder. See Note at the end of this topic.)
Supply Chain supports EDI purchase orders created automatically through the requisitioning process, or manually. See Set Up and Maintain EDI Vendor Relationships for instructions on setting up your organization for EDI.
Features are built into the system to ensure the privacy of electronic protected health information (ePHI), in compliance with HIPAA requirements. One applicable area is processing purchase orders: creating, editing viewing, and printing purchase orders. For bill-only purchase orders, for example, the Case Info panel contains patient information.
On a User Profile, the Hide ePHI Data field determines whether a user can access patient data. When Hide ePHI Data is checked, a detailed series of restrictions apply to the user's access to ePHI records. Patient information on purchase orders is subject to restrictions governed by this User Profile field.
In sum, if Hide ePHI Data is checked, the user cannot access patient-identifying information.
- All areas of working with purchase orders are affected. Users who do not have permission to work with patient information cannot create, edit, or display that information on POs.
- Also, in printing or faxing of a PO with patient information, the patient data is hidden.
The list of restrictions and examples is outlined in the ePHI documentation.
To access organization, department, or asset location data, the organization, department, or asset location must be included in your data profile.
The "Purchasing" role object setting Create (or All) allows you to create and copy purchase orders.
The "Documents" role object controls access to PO documents. The setting Create (or All) allows users to create and copy documents. The default setting is Create. Only users with the setting All can delete documents.
If you are creating a purchase order to be sent to an internal vendor, read Creating POs for Internal Departments, in addition to the procedures below.
Fields on the header:
PO No - Insert a PO number, or let the system assign
a PO number when you submit the form. If you wish to supply your own PO number,
it must begin with a letter value, e.g., "A12345, CHC1551, MAIN3342, etc."
Vendor No - The Vendor No is a required field. Click the prompt (...)
to select the Vendor No. You can use the prompt to search by Vendor Name, Default Buy-From Location, Vendor Number, Vendor ID, or Vendor Group.
Buy From Location - The application automatically
fills in the Buy From Location using the default buy-from location from the vendor
record.
Ship To Organization, Ship To Location -
The Ship To fields are populated from the asset location in your current
settings. You can change the values in these fields if needed, however.
Buyer - Select the id of the buyer from the prompt (...)
Required fields on the tabbed panels:
General tab fields:
PO Type field - Select Regular from the prompt (...). Regular is the default.
PO Match Type field - The application defaults to Invoice.(See the discussion of invoice matching.) No Match is used for internal vendors.
Additional Information tab fields:
PO Comm Type - Click the prompt (...)
to select the method you will use to transmit the PO to the vendor. The default
is set in the vendor records, but you can override the default.
- Select EDI (if it is not the default) to
send EDI purchase orders.
Note: the The vendor must
be set up for EDI processing.
- Select Fax to fax the PO if you have automatic faxing turned on. In that case, when you authorize the PO by clicking Finish Now, it is faxed to the vendor buy-from location. See Using the automatic fax feature.
Note:
Automatic faxing of POs requires the feature to be enabled. You also must include a fax number in the vendor buy-from location record.
Ship To tab fields:
These fields default to the address designated in the Ship To Location fields.
ERP allows EDI 810 invoices for regular, blanket, bill-only, and standing POs. You can assign invoice approvers on the requisition (and they will propagate to the PO and invoice), on the PO (and they will propagate to the invoice and back-copy to the requisition), or on the invoice itself. Use the fields on this tab to assign invoice approvers i in case the vendor sends you an EDI 810 invoice for the PO. See Approver Assignments for EDI 810 Invoices for details. Also, see Approval Processing for EDI 810 Invoices.
Review the information in fields on the tabs: PO, Matching, Shipping,
Buy From / Org, Other, and Invoice Approvers. Make changes or add information
as needed. Click Help for information about each
field.:
Header
Asset Location: The default Asset Location for your department
appears in the box. You can use prompt (...) to select
any Asset Location that you are authorized to use.
PO tab
Buyer: Select the buyer from the prompt (...).
Matching tab
Payment Terms, Discount Terms, PO Match Type
Shipping tab
On the Shipping tab, If the department needs direct delivery of the items,
review the information in the separate POs discussion.
You may need to enter values in the Ship To Location and other
Ship To fields.
- Ship to Location: This field lets you specify a delivery location
for the PO (other than the normal Asset Location, if one exists). Use the
prompt to select a department from the list.
- Ship To Name, Address Line 1-3, Ship To City, Ship To State, Ship
To Zip, Ship to Country: Address elements.
- Expected Delivery Date: The date when you expect the PO
to be delivered.
- Freight Type: The freight type, if known.
Other tab
Fields you can change:
PO Comm Type, Reason Code PO, Include in Lead Time, Confirmed, Confirmation
Number, Project, Fund - See the Help.
Send EDI When Authorized - Authorizing the PO triggers its being sent.
If this field is not checked, you can manually send the PO when it is authorized.
Information fields on the Other tab:
Send EDI When Authorized - For EDI purchase orders, checking this box
sends the PO when it is authorized. If you wish to authorize and send EDI
purchase orders in two separate steps, leave this box blank.
Auto Authorization Status - For EDI system-generated purchase orders, FAX purchase orders, and email POs: if purchase
orders for the vendor are automatically authorized, information about the
PO's authorization status appears in this field. If the PO is not eligible for auto-authorization, the value in this field is Not Eligible.
Note: Manually-created purchase orders cannot be auto-authorized.
Receive Consignment PO - All When Authorized - If the purchase order
is for a consignment item, when this box is checked, a receipt is created
for the entire Ordered Quantity at authorization.
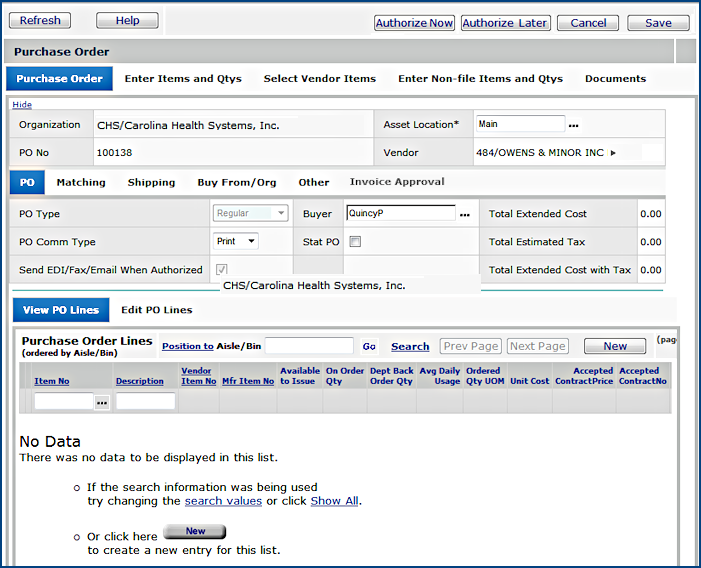
Several different methods are available to you for entering purchase order item lines.
Enter Items and Qtys Tab*
For quick entry of file item lines, click the Enter
Items and Qtys tab.
This tab is useful when you need to provide very little information about
a file item.
Note: If financial reporting fields are enabled for your site, and you wish to enter them on a PO line, with this method, you must edit the line after you create it.
The edit panel contains a tab for financial reporting fields.
Select Vendor Items*
To select file items from a list, click the Select
Vendor Items tab.
Note: If financial reporting fields are enabled for your site, with this method, you must edit the line after you create it to enter the fields.
The edit panel contains a tab for financial reporting fields.
Enter Non-File Items and Qtys*
For quick entry of non-file item lines, select Enter
Non-File Items and Qtys.
"Traditional" PO Line panel
For either file or non-file lines that require some detailed
information, click New (in the lower section of the
Purchase Order panel)
The "traditional" PO line entry panel is displayed.
*You can only use this panel with a regular, blanket or standing PO.
The sections below describe each panel for entering PO lines.
The Enter Items and Qtys panel (Figure 3) is useful for quick entry of file (stock and non-stock) items Little information is required to create a PO line.
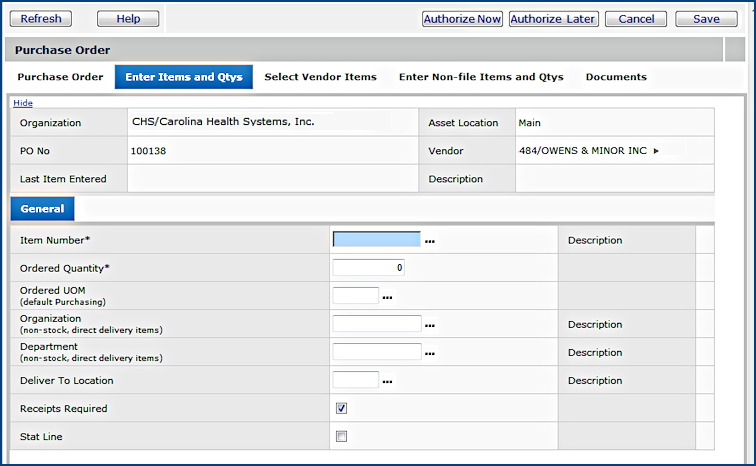
Supply Chain uses the data you provide to automatically create a requisition for the item. The requisition is a backorder, since the PO is for a non-stock item. (The application will not allow POs to be authorized unless there is an associated requisition for all non-stock items.) Alternately, the application may add the item to an existing requisition for the department or departments.
The Select Vendor Items panel (Figure 5) displays a list of items for the vendor, asset location, and buy-from location identified in the PO header.
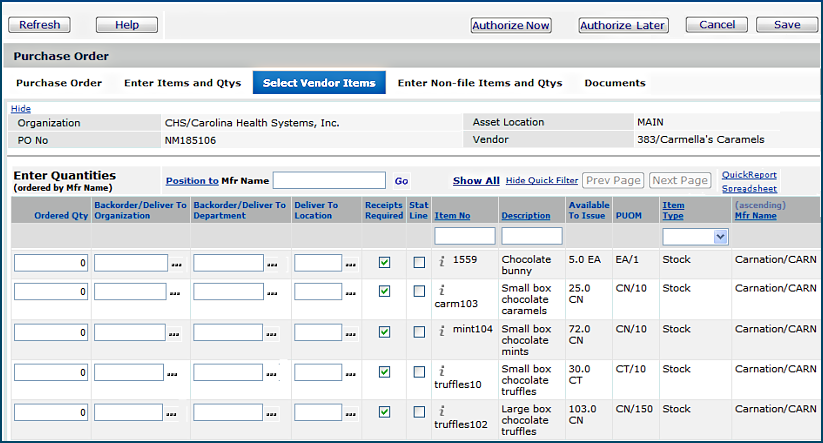
If the line is a non-stock or direct delivery
item for distribution among several departments, you need
to complete the Backorder panel before the application will let you authorize the
PO.
Do the following:
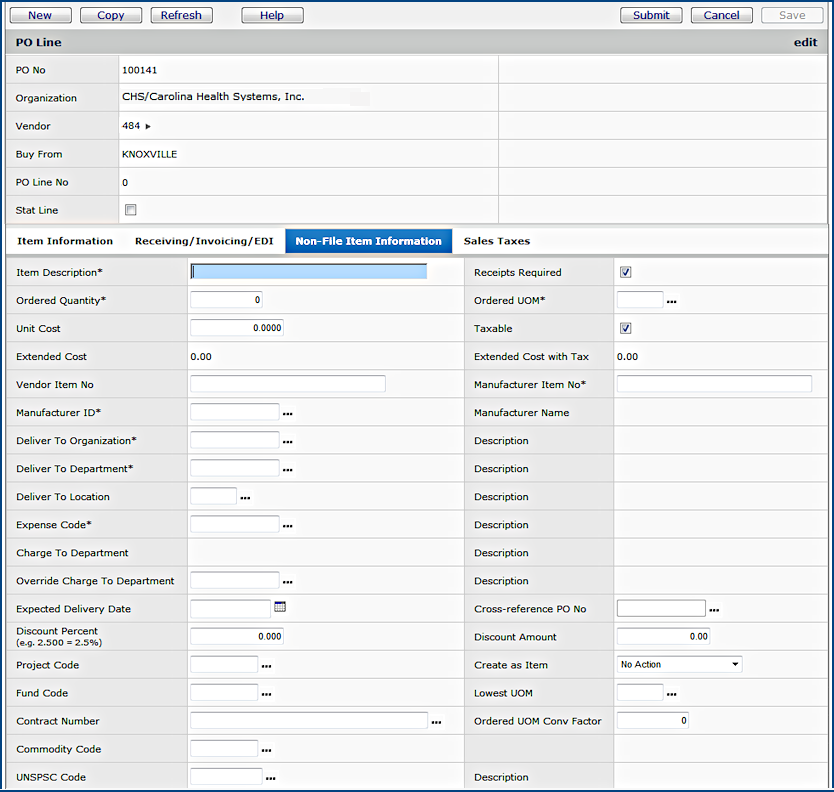
The Enter Non-file Items and Quantities panel (Figure 6) lets you order non-file items quickly. The panel lets you specify the minimum information that you need to order a non-file item.
Non-file purchase order lines are one-to-one for a department: The entire quantity of the item is delivered to the department designated. You cannot split the quantity on a non-file line among multiple departments.
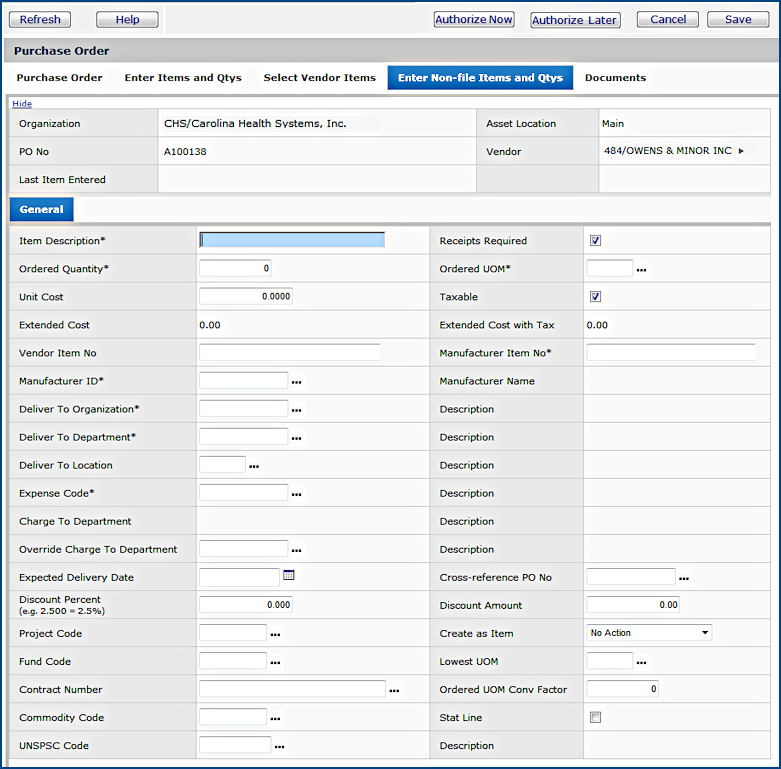
Complete the required fields on the panel (See Figure 6.)
Required fields in the panel contain an asterisk *, Only eight fields are
required:
| Item Description | Deliver To Department |
| Ordered Quantity | Expense Code |
| Manufacturer ID | Manufacturer Item Number |
| Deliver To Organization | Ordered UOM |
To enter more lines, you can use the panel again for any non-file items. For file items, you can use the Enter Items and Qtys, Select Vendor Items, or the Traditional PO panels.
All the PO lines appear at the bottom on the Purchase Order Lines panel. If
you wish to change or delete lines, you can do so. (See Tools
on the Purchase Order Lines Panel.)
You can authorize the PO immediately (Authorize
Now) or authorize the PO later (Authorize Later).
The application uses the item information you provide to automatically create a requisition for the item. Alternately, the item may be added to an existing requisition.
You can include the same item multiple times on any manually-created PO. If the PO contains duplicate lines, a message appears asking you to verify that you want the duplicates.
At the bottom of the Purchase Order panel is a space for purchase order lines. The New button appears on the right. Click New to add lines to the purchase order. The PO Line header appears along with tabbed panels (Figure 7).
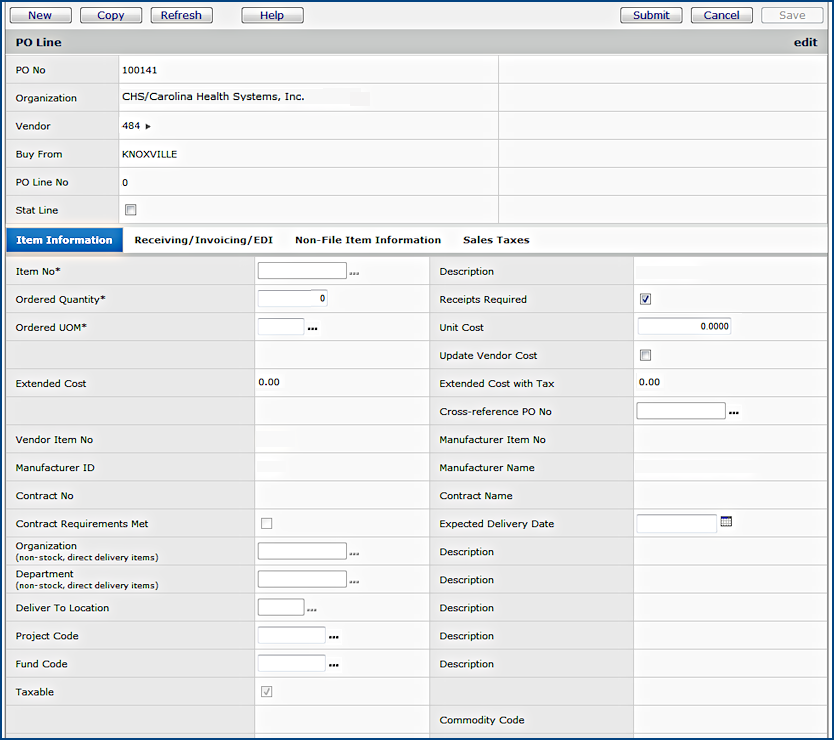
On the Item Information tabbed panel, select the Item No from the prompt (...).
Enter a quantity
in the Ordered Quantity field.
The system completes the Ordered UOM (unit of measure) field
using the Default Purchase UOM for the item.(You can change the
value of the Default Purchase UOM to any valid purchasing UOM.)
Click New to add more lines to the PO. You can also use one of the tabs at the top of the Purchase Order panel to enter PO lines: Enter Items and Qtys Tab, Select Vendor Items, or Enter Non-File Items and Qtys.
When you finish entering lines, click the Purchase Order tab. All the PO lines appear at the bottom on the Purchase Order Lines panel. If you wish to change or delete lines, you can do so. (See Tools on the Purchase Order Lines Panel.)
You can include the same item multiple times on any manually-created PO. When a PO contains duplicate lines, a message appears asking you to verify that you want the duplicates.
You can authorize the PO immediately (Authorize Now) or authorize the PO later (Authorize Later).
To create more lines for the PO, click New.
Alternately, select one of the tabs at the top of the Purchase Order panel to
enter PO lines: Enter Items and Qtys Tab, Select
Vendor Items, or Enter Non-File Items and Qtys.
You can include the same item multiple times on any manually-created PO. When a PO contains duplicate lines, a message appears asking you to verify that you want the duplicates.
- When you are finished entering lines, click the Purchase Order tab. All the
PO lines appear at the bottom on the Purchase Order Lines panel. If you wish
to change or delete lines, you can do so. (See Tools
on the Purchase Order Lines Panel.)
- You can authorize the PO immediately (Authorize
Now) or authorize the PO later (Authorize Later).
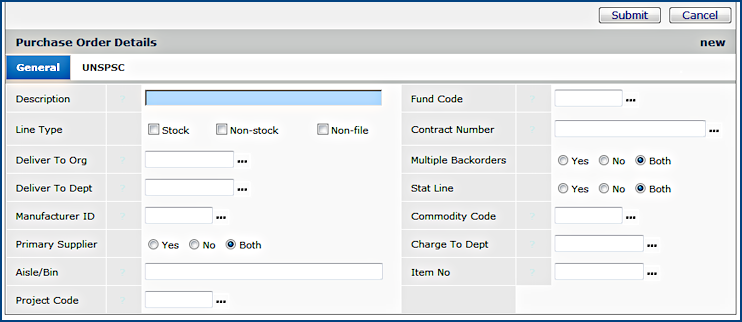
Select the Non File Item Information tab to order non-file items.
Complete the required fields on the Non File Item Information tab. (See
Figure 8).
Fields that you can enter are in the table below. Not all fields in the table are required. Required fields are marked with an asterisk *.
|
|
Verify, change, or complete the fields as needed.
Select a Deliver to Location if applicable.
Note: Non-file purchase order lines are one-to-one
for a department: The entire quantity of the item is delivered to the department
designated. You cannot split the quantity on a non-file line among multiple
departments.
Click New to enter more lines. You can also use the tabs Enter Items and Qtys, Select Vendor Items, or Enter Non-File Items and Qtys at the top of the Purchase Order panel to enter PO lines:
All the PO lines appear at the bottom on the Purchase Order Lines panel. If
you wish to change or delete lines, you can do so. (See Tools
on the Purchase Order Lines Panel.)
You can authorize the PO immediately (Authorize
Now) or authorize the PO later (Authorize Later).
The application uses the item information you provide to automatically create a requisition for the item. Alternately, may be added the item to an existing requisition.
You can include the same item multiple times on any manually-created PO. When a PO contains duplicate lines, a message appears asking you to verify that you want the duplicates.
The Create as Item field (Figure 8, in the lower right) adds the item on the PO Line to the Item Catalog. The application creates the item as a stock item, and returns an Item No. when you submit the PO line. The new item is located in the Item Inventory that is specified for the PO you are building.
The system uses the information from the purchase order to create the item, including the UNSPSC code, if you assign one. However, the item record will be missing significant information. If you create an item from a PO, you should plan to edit the item record to add information; for example, to put the new item in a different inventory, or in additional inventories.
When you create an item from a purchase order, the PO goes out with the original non-file item that you ordered. After that, you can order the item as a file item. If you delete the PO line, the item record is still created.
The Purchase Order Lines panel contains separate tabs for viewing PO lines and editing PO lines.
On the Purchase Order Lines tabs, the column Multiple Backorders tells you if the Ordered Quantity is destined for a single department, or for multiple departments. A Yes value means that several departments have backorders for the item (Figure 9, blue arrow).

The Quick Delete symbol ![]() appears at the top of the PO Lines panel above the Menu column.
You can use Quick Delete to delete multiple lines on a page. See the
instructions for Quick Delete.
appears at the top of the PO Lines panel above the Menu column.
You can use Quick Delete to delete multiple lines on a page. See the
instructions for Quick Delete.
From the Menu at the beginning of each line, you do the following as well:
| Copy PO and requisition standard notes to the
line. Cancel an unreceived quantity Inquire about item inventory Edit the PO line Reset the manufacturer or vendor item number |
Copy the line Audit changes to the line View user fields Delete the line. |
The Edit PO Lines tab and the View PO Lines tab each have a search facility, which is helpful in working with large purchase orders.
To use the search facility, click Search at the top of the PO Lines list. The Search panel appears (Figure 10).
Notice that you can search for Stat lines in a PO, and for lines with multiple backorders. To use the Search panel, select values in the fields of interest, and click Submit. The system displays the PO Lines List sorted according to your search specifications.
You may have an unauthorized PO whose lines have updated prices since the PO was first created. In this case, the menu option Get Latest Prices instructs the system to find the latest price and write it to the PO line.

The confirmation panel opens (Figure 12).
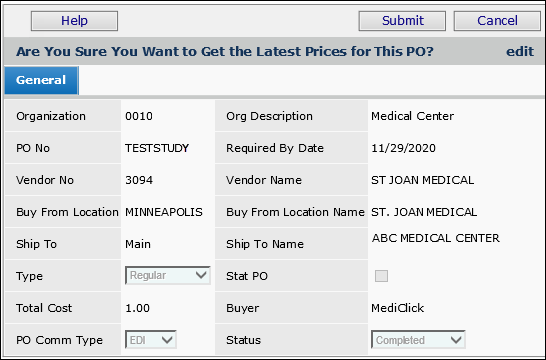
If there is a difference between the Item Inventory price for the vendor and the price on the PO line, ERP writes the new price to the PO line.
Select the Purchase Order tab to view all the lines you entered for the PO. The system displays the PO header and PO lines along with authorization buttons at the top right.
Click Authorize Now to authorize the PO immediately. The system sends a message that the PO has been authorized.
Click Authorize Later to come back to the PO and authorize it at another time. You can select the purchase order from the Purchase Orders list to authorize it, or from the Authorize Purchase Order list.
Note: Manually-created purchase orders cannot be automatically authorized. System-generated EDI, email, and FAX purchase orders can be auto-authorized if the vendor buy-from location is set up for this purpose. See Auto-authorize EDI, email, or FAX POs by buy-from location.
When you print (or FAX) a purchase order, the way the PO lines are ordered depends on whether the PO is bill only, or non-bill-only, and whether any of the lines are receiptless. Here is a summary:
Non-stock, non-file, and direct delivery items can be requisitioned as STAT. The system can put both STAT and non-STAT requisition lines on the same purchase order. Any PO with a STAT line (even if other lines are not STAT) is a STAT PO.
If an existing PO has a STAT requisition line, and an incoming, approved requisition adds the same item to the PO, a second line is created. The PO then contains two lines for the same item. The entire PO is marked STAT.
You can also create manual STAT purchase orders for non-stock, non-file, and direct delivery items. STAT POs are authorized when submitted.
STAT should be reserved for emergent purchase orders that must be placed immediately.
Blanket purchase orders cannot be marked as STAT. A blanket PO is utilized over time and not placed immediately with the vendor. By definition, you can't create a blanket PO for an anticipated STAT need in the future.
To create a STAT PO, follow the steps for a regular PO. On the General tab, check the box labeled Stat PO. Complete any other fields as needed. Click Authorize Now when you are finished entering information. STAT POs must be authorized when they are created; that is, click Authorize Now when you are finished creating the PO lines.
Note: Once you set a PO as STAT, you cannot turn the STAT flag off.
You can find STAT POs using the Advanced Search for POs.
A blanket PO exists for a specific period of time and may have a dollar limit. Blanket POs specify Blanket in the PO Type field (instead of Regular). The steps in creating a blanket PO are essentially the same as for regular POs. However, blanket POs do have special characteristics that you should know about. See Work with Blanket POs.
Blanket purchase order lines with zero cost, zero quantity are defaulted by the application with Receipts Required turned off. If you turn this field on, the system will reset it to off for these lines.
Blanket POs cannot be created as STAT.
A standing PO exists for a specific period of time, may have a dollar limit, and the items it orders are shipped on a schedule. To create a standing PO, specify Standing in the PO Type field (instead of Regular). The steps in creating a standing PO are similar to those for regular POs. See Work with Standing POs for the special characteristics of these POs.
A consignment PO replaces a consignment item. Consignment POs specify Consignment in the PO Type field. The steps in creating a consignment PO are similar to those for regular POs. See Processing Consignment Items for details.
Estimated sales taxes are not calculated on an initial consignment purchase order since this purchase order is "invoiceless." On the purchase orders that replace the first, and subsequent consignment items, estimated taxes are calculated.
You can move purchase order lines from a purchase order for one vendor to a new or existing PO for another vendor. The purchase order whose lines you are moving must be unauthorized.
If a PO for the Target Vendor exists, and is unauthorized, the system transfers the lines to that PO. If no PO exists for the Target Vendor, the system creates a new PO. When you change the vendor for a line, the system deletes the source PO line. Any other lines on the source PO remain unauthorized. If you change the vendor for all the lines on a PO, The system changes the status of the source PO to Complete. When the PO move process ends with the source PO having no lines, the PO's InvoiceMatchStatus is set to No Match.
Note that when a PO Line is moved, and multiple item vendors exist for the Target Vendor and buy-from location, the vendor with the lowest cost for the item is selected. Selecting the lowest cost vendor may cause the Manufacturer, Manufacturer Item Number, and Vendor Item Number to change as well.
If your site uses financial reporting fields, a tab appears for you to enter field values for the moved line(s). The View PO Lines and Edit PO Lines panels display any financial reporting field values that you have entered.
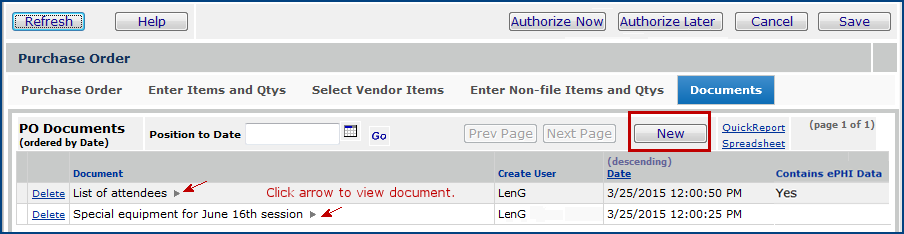
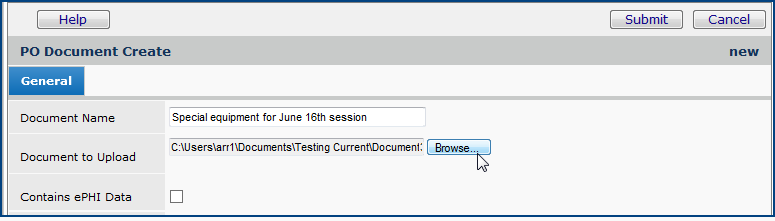
Documents can be added, viewed, and deleted when editing or inquiring on a purchase order.
On the PO Documents panel (Figure 11), if you do not have ePHI access, and the "Contains ePHI Data" checkbox is selected, you cannot view a document. When you click the arrow to open the document, the Insufficient Authority message appears. For more information, see Securing Electronic Protected Health Information (ePHI).
For Bill Only documents, if the checkbox has previously been selected for "Contains ePHI Data," then only the Administrator can change the status of the document and select or unselect the "Contains ePHI Data," checkbox. This checkbox remains locked for everyone else.
A list of documents attached to the purchase order is displayed, if any have been uploaded.
Note: When a document has been copied from a requisition or requisition line to a PO, Delete removes all references to the document being deleted.
A credit PO is used to return goods to a vendor. Credit POs contain the word Credit in the PO Type field, (instead of Regular).
Credit POs have these special characteristics:
The Credit PO permission box must be set in your organization's system records. Otherwise, you cannot create credit POs.
For
medical centers that inventory stock items:
- To return goods to a vendor, on-hand quantities and available-to-issue
quantities must be greater than--or equal to--the quantity to be returned.
- If the on-hand quantity or available-to-issue
quantity is less than the return quantity, you must create a credit
requisition to return items from a department to inventory. A credit requisition
increases on-hand and available-to-issue quantities, and reduces usage for
a department.
You can edit a credit purchase order after the PO is completed.
An excellent way to create credit POs for multiple items at one time is by using Return to Vendor Quick Credits. If your vendor charges a restocking fee, you can specify the restocking fee when you create the quick credit. Details are in the online documentation.
Click
Submit.
The Credit Purchase Order header panel and new tabbed panels
appear. The Credit Purchase Order Lines panel appears at the bottom
and shows No Data.
Review
the information in fields on the PO, Matching, Return from
Inventory and Ship to Vendor tabs. Make changes or add
information as needed.
Click Help for information on the fields.
Click New to add lines to the purchase order. The PO
Line header appears along with tabbed panels.
- Use the Item Information panel to return stock or non-stock
items.
- Use the Non-File Item Information panel to return non-file items.
Note: Check that the UOM for the ordered quantity from the cross-reference PO is the same as the UOM in which the on-hand quantity is counted. If they are different, you may get an error message indicating that the on-hand quantity is too low.
If no cross-reference PO is entered, the system uses the last receipt that exists for the item line to retrieve the price of the item.
If you wish to add more lines to the PO, click Save, then New. When you are finished adding lines, click Submit. The Credit Purchase Order panel reappears.
Click Refresh to view the PO lines.
Note: You can achieve the same result by selecting Complete Credit PO Process from the Menu next to the PO on the Purchase Order list or on Quick Click.
If you do not want to create a receipt or reduce the on-hand quantity,
click Submit. Submit authorizes the credit PO, but
does not complete it.
- You can complete the credit process later by selecting Menu >
Complete Credit PO Process next to the PO.
- To edit an authorized PO, you must first unauthorize the PO (select
Menu > Unauthorize PO). Then, after you edit the PO, you
must authorize it again (select Menu > Authorize PO) before
you can complete it.
The credit PO is entered into the system. The list of POs appears. Click Refresh.
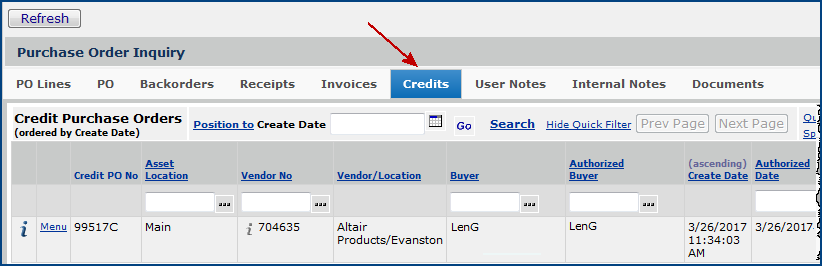
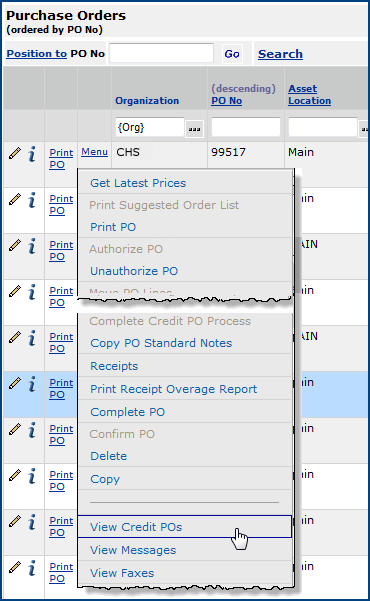
A Credits tab appears on the PO Inquiry pane when a PO has associated credit POs. The tab displays a list of credit POs cross-referenced to the original PO (Figure 15).
A menu option "View Credit POs" also appears on the main Purchase Orders list (Figure 16) to display the same list of credit POs associated with a regular PO.
Note: The menu option is only active for regular POs with associated credit POs. Otherwise, the option is grayed out.
Users who create credit purchase orders now have the option of being notified on approval or rejection of the PO.
When a user opens a credit PO, he/she needs to know when the PO is approved so that Distribution or Receiving can be alerted to pick up the items for return. For this goal, a field is available on the User Profile Buyer Limits panel (Figure 17) that sets up an eMail alert for the user when a credit PO is approved or rejected.

To edit the User Profile notification settings, from the Work in Administration main Contents, select Users. Click the edit icon and open the Buyer Limits tab.
A completed credit purchase order can be edited (unless invoice transactions exist for the PO).
Technical Note: When you edit a completed credit purchase order, the system creates a batch for the purchase that it uses to store the editing changes. (A batch is a collection of records in tables; in this case, records associated with the credit purchase order.) When you click Finish Now, the system starts an async process that posts the changes stored in the batch to the credit PO. The advantage of this approach is that you do not change the credit PO in "real-time," but make changes that are only applied to the credit PO when you click Finish Now.
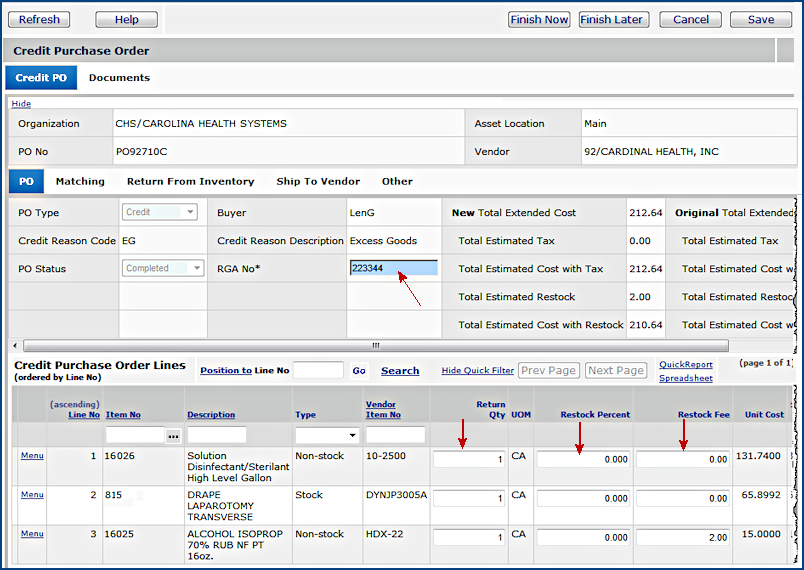
You can edit the RGA Number (on the PO header); and, on the PO line, the Return Qty, Restock Fee, and Restock Percent. Figure 18 is an example.
When you click Finish Now, the system makes the following updates:
![]() Changing the Return Qty to zero
Changing the Return Qty to zero
When you edit a credit PO and enter zero in the Return Qty field, the credit PO line and receipt line are updated/changed to zero. Inquiry on the PO and opening Audit displays the changed quantity of the line as zero, and a a system note is written to the PO header.
- To access system notes for a PO, on the Purchase Orders list next to the PO, select Menu > System Notes.
![]() The Return Qty entered on the edit panel cannot be greater than the original quantity on the credit PO.
The Return Qty entered on the edit panel cannot be greater than the original quantity on the credit PO.
![]() Credit POs with invoice transactions
Credit POs with invoice transactions
You cannot edit a completed credit PO once it enters the invoice matching process. If invoices exist for a credit PO, the invoices must first be deleted before the credit PO is available for editing. Also, if another user has a completed credit PO open for editing, you cannot create an invoice for the same credit PO until the editing is finished.
![]() User notes on credit PO lines
User notes on credit PO lines
You can create user notes when you edit completed credit POs. User notes on the Quick Credit carry over to the credit PO.
![]() Multiple users opening the same credit PO for editing.
Multiple users opening the same credit PO for editing.
Important: You should not edit a PO that is opened for editing by another user -- but you can, if rare circumstances require you to.
If one user at a site has a credit PO open for editing, and a second user attempts to edit the same PO, a warning appears:
"This credit purchase order is being edited by another user, do you want to continue?
Click Yes to continue with editing this credit purchase order.
Warning: Choosing "yes" may cause unpredictable results. Do not select this option when edits are actively being performed by another user.
Click Cancel to return to the Purchase Orders list. Recommended."
Your site may have internal departments (such as a Print Shop or a Food Service Catering group) set up as vendors. Each internal vendor must have a vendor record. When you create and send purchase orders to an internal vendor, you should be aware of the following:
Purchase orders for internal vendors have a PO Match Type of No Match. (No Match POs must have receipts.)
Purchase orders for internal vendors have a PO Type of Regular.
If items on a No Match PO are non-stock or non-file, the system generates a requisition when the PO is created.
If the internal vendor produces non-stock or non-file items, the ordering department is charged for the materials.
If the internal vendor produces stock items, the on-hand quantity and its value are increased so that the items can be issued when they are requisitioned.
When a PO from an internal vendor is received, the following transactions
are created:
- Debit to Organization/Asset Location inventory
- Credit to Department/Expense code specified on the Vendor record.
Initial requisition of a reusable item, requisitions to purchase a reusable item, purchase orders for reusable items, or issues of reusable items are treated just like normal stock or non-stock item requisitions, POs, or issues.
The procedure for creating a direct delivery PO is the same as for a regular PO. When a department requester creates a direct delivery requisition, the requisition quantity (either in the lowest UOM or not) and the ordered UOM are transferred to a Direct Delivery Purchase order as is. No best purchase package process occurs at the PO line. The application accepts the quantity and UOM at face value. For example, if the someone orders 15 EA and 15 EA = 1 BX, the ordered quantity and the UOM will be 15 EA.
When a direct delivery requisition contains an item available from several of the vendor's buy-from locations, the system uses the first vendor buy-from location (in alphabetical order) that is direct delivery. If no "DD" buy-from location exists, the application uses the Default Vendor Buy-From Location.
If a vendor ships more than requested on a direct delivery PO, the system displays a message that an overage exists. If the overage is accepted, the system creates a new completed requisition for the overage, and the direct delivery department will be issued all items received. On the Requisitions List, the requisition will carry the tag: Created For Overage Receipt #[receipt number].
When you enter a purchase order line, clicking the prompt next to Deliver To Location displays a list of delivery locations (or No Data if none exist). Click the New button at the top of the list to create a new Deliver-To location, if the location you need is not listed.
Note for Warehouse: When non-stock (or non-file) items are received, the system automatically releases the items from backorder. The items appear on the receiving document. Use this report to identify items that go to your staging area for delivery to departments (or as a put list for stock items for inventory).
Copyright © 2023 by Premier Inc. All rights reserved.
requsition requistion reqisition reqesition