Handling Receipts Version
Contents
Overview
This topic outlines how to receive purchase orders at an asset location.
The normal receiving
process involves locating purchase order records and creating a receipt
for the purchased items that have been delivered. The items can then be distributed to departments, and invoices for the items can be matched with the receipts. As items are received, the item expense is written to the expense account. General Ledger Transactions contains a summary of the transactions that occur when matching purchase order receipts and invoices.
Security: User Access to Receipt Documents
The "Documents" role object controls access to receipt documents. The setting Create (or All) allows users to create and copy documents. The default setting is Create. Only users with the setting All can delete documents.
Over-Receiving
A purchase order can be received in part, in full, or with overages. The Non-stock Over-Receiving Allowed field on the Organization panel (MM Information tab) determines whether over-receiving of non-stock PO lines is permitted for the organization.
-
When the Non-stock Over-Receiving Allowed flag is checked -- the default setting -- receipt overages are allowed. The system handles an
overage -- receiving more of an item than ordered on the PO -- by creating an exception
receipt. An exception is a record of a mismatch between
what you ordered or received, and what was actually invoiced. (Other kinds of
exceptions...for price and quantity...are described in Matching
POs and Invoices.) Your administrator can set
the permissions for the system to generate exception receipts. If your organization
does not use the exceptions receipt feature, you can still view the report on receipt
overages.
- When the Non-stock Over-Receiving Allowed field is unchecked, over-receiving is not permitted. The system compares the quantity being received to the quantity left to receive on the PO Line. If the receiving quantity is greater, this error message appears: "Over-receiving of non-stock items is not allowed. Please reduce the quantity being received or increase the quantity ordered on the purchase order." The user must make the necessary correction (either on the purchase order or on the receipt) and re-submit the receipt.
Multiple Asset Locations
- In addition to receiving purchase orders, an organization with multiple asset locations may transfer items internally between the asset locations - a situation that also involves receiving. Transfer receipts are discussed separately in Transferring Supplies Among Asset Locations.
- Also, receiving
fill-kill purchase orders and receiving blanket purchase orders are separate topics.
To View POs Ready for Receiving:
- From the Materials Management main Contents, select
Receiving > Receive Purchase Orders.
- On the Quick Click menu, select View Purchase
Orders for Receiving.
- Click Show All. The list of purchase
orders ready for receiving (Figure 1) appears.
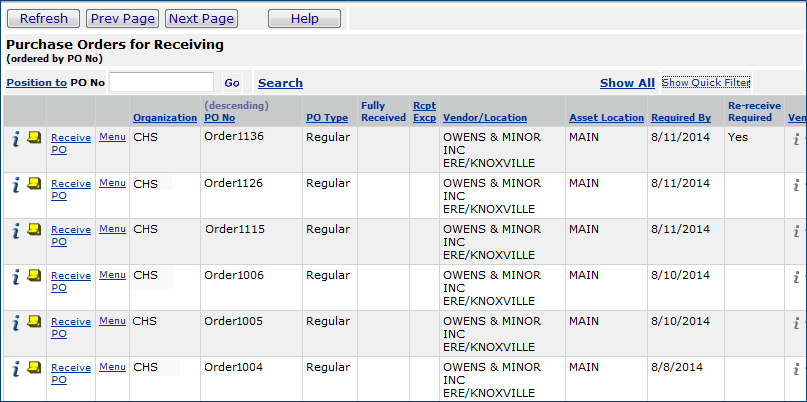
Figure 1 - Purchase Orders Ready for Receiving
Note:
When the value of the field Re-Receive Required is Yes, you need
to re-receive items on the PO. This occurs when the processing of a receipt
produces an error and the receipt does not finish processing. In this case,
the system sends you an error message. You will also get a message that you need
to re-receive the PO items. The re-receive process will receive those lines
that were not processed correctly, and will complete the receipt. Follow the
steps below to receive the PO again.
To receive a PO:
Note:
If you are receiving items from blanket POs for the first time, you may wish
to read Receiving Blanket POs.
- From the main Contents, click Receiving >
Receive Purchase Orders.
- Click Show All. The system shows the complete list
of all POs that are ready to be received.
Note: The Purchase Orders for Receiving list also displays fully received POs whose last receipt was on "today's date."
- Locate your PO on the list.
- Click Receive PO.
If your User ID is set for
blind receiving, the system displays the Receiving panel with the Receive
Purchase Order lines. You must edit the Received Qty, changing
zeros to the appropriate amounts.
Otherwise, the system displays a panel asking
you if you want to receive all the items on the PO. Click Yes, No,
or Cancel, as appropriate.
- "Click 'Yes' to prepopulate the Received
Quantity with the Quantity Left to Receive for each item." This selection
receives all unreceived items on the PO. It's a quick way to receive the complete
order, so that you don't have to fill in each quantity. You can change the quantities
that the system enters, however. For example, if you want to fully receive all
items on the PO except for one, you can enter zero for quantities the system displays
for the item, or you can enter new quantities.
If you are receiving a
standing PO, this selection prepopulates the Received Quantity as calculated
by the receipt formula for standing POs. (See Receiving
Standing POs.)
- "Click 'No' to
prepopulate the Received Quantity for each item with zeros." This selection
is useful if you are receiving part of the order. You can change the zeros to
the actual quantities.
If
you are receiving an overage (and your site is set up for exception receipts),
an exception receipt is created.
- "Click 'Cancel'
to return to the Purchase Orders for Receiving list."
The system displays the PO
information with the item lines and quantities (or zero quantities, for blind
receiving). Edit the Quantity data as needed. Fields marked with *
are required, and must contain a value.
(Click
Cancel if you do not wish to receive the PO.)
- Change the fields as needed on the header of
the Receipt panel.
Received By - The
id of the person receiving the order.
Received Date -
The date the items were received.
Received Time -
The time of receipt.
Reference No - An
alphanumeric value that you can use to reference anything related to the receipt;
e.g., an invoice number, if it is on the packing slip; a packing slip number;
etc.
- If you clicked Yes to receive all items,
the Received Qty and Received UOM are set to the total quantity
left to be received for the PO, and the unit of measure. Verify that these
values are correct. You can also change these values.
- If you clicked No to receive only part
of the order, at the bottom, on the Receive Purchase Order panel, enter
the quantity of items that you are receiving in the Received Quantity
field. Edit the Received UOM field if needed.
Important:
Verify that the quantities you entered in the Received Quantity fields
are accurate and that you have not made any typing errors. Once you finish receiving
all the items, you cannot go back to the receipt to edit quantities. You can
cancel the receipt, however.
- Click Finish Later to work more on the receipt at a later time.
If you click Finish Later, the system saves any changes you made to the
fields, and puts the PO back in the Purchase Orders for Receiving list.
(The Cancel button deletes the receipt record you created.)
- Click Finish Now if you are completely finished.
- The Purchase Orders for Receiving list appears again.
- Non-stock items on the
received PO are issued immediately.
- You can print the receipt as a put/pick list, as described below.
Receiving on a Mobile Device
If your site is using mobile devices for receiving, you will find the receiving process nearly identical to that on the server version of ERP
For mobile receiving, data profiles must be appropriately defined for users, and authorizations set up. Detailed instructions for mobile receiving are on the Mobile ERP device in the User Guide (under Support). Here are additional details:
- The list of POs for receiving on the ERP server version (Figure 1) displays all POs that have items to receive, except for those that have already been downloaded to a mobile device.
- On a mobile device for creating a receipt, when you tap Yes or No to populate or enter PO item quantities, the application locks the PO for receiving by anyone else, including other mobile users and anyone working with the receiving feature on the server ERP. Tapping Cancel unlocks the PO for receiving.
- POs that are being received with a mobile device do not appear on the ERP server POs for Receiving list (Figure 1). However, if the list has not refreshed for a while, the list may contain a PO open for receiving on another users mobile device. In this case, a message appears if a server ERP user tries to receive the PO.
Adding/Viewing Documents on Receipts and on POs Ready for Receiving
Documents can be added, viewed, and deleted when editing or inquiring on a purchase order that is ready to be received or when creating or editing a receipt.
Documents attached to a receipt or to a PO are listed on the Documents panel.
- Click the Documents tab to display documents.
Documents Containing Electronic Protected Health Information (ePHI)
Documents uploaded to POs and receipts may contain ePHI data. The person uploading documents can select a checkbox
Contains ePHI Data on upload. In that case, users not authorized to view ePHI data cannot open the uploaded document.
On the Documents panel (Figure 2), the column Contains ePHI Data will contain Yes. For users without authorization, clicking the arrow to try to open the document displays the Insufficient Authority message. For more information, see Securing Electronic Protected Health Information (ePHI).
For Bill Only documents, if the checkbox has previously been selected for Contains ePHI Data, then only the Administrator can change the status of the document and select or unselect the checkbox. This checkbox remains locked for everyone else.
To view and work with a Purchase Order's documents:
- On the Purchase Orders for Receiving list, locate the PO of interest.
- Next to the purchase order, click i for inquiry (or, if available for editing, click the pen icon
 ).
).
- Click the Documents tab. The PO Documents panel appears (Figure 2).
A list of documents attached to the purchase order is displayed, if any have been uploaded.
- To view a document, click the arrow next to the document.
The Microsoft Windows Download panel appears.
-
Click Open.
- You can attach a new document to a purchase order by clicking New (Figure 2, red box).

Figure 2 - The Documents Panel for POs Ready for Receiving
To add a document to a purchase order:
- Click the Documents tab when editing or inquiring on the purchase order.
- Click New (Figure 2, red box).
The PO Document Create panel appears (Figure 3).
- Enter a name in the Document Name field.
The name will be displayed on the PO Documents panel when the document is uploaded.
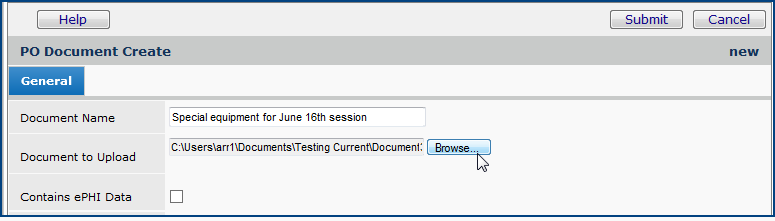
Figure 3 - Adding a Document Panel for POs Ready for Receiving
- Click Browse.
The Microsoft Windows Choose File panel appears.
- Locate and select the file for the document that you wish to upload and add.
When you select the file, Windows populates the File name: field on the Choose File panel.
- Click Open (on the bottom right of the Windows Choose File panel).
The document path and file name appear in the Document to Upload field on the PO Document Create panel.
- If the document contains ePHI data, select the box. This field prevents unauthorized users from viewing the document. (See Protecting Patient Data in Attached Documents for details.)
- Click Submit.
A message tells you that the document is uploaded.
- Click the back button or close the tab to close the message.
- Click Refresh.
The document appears on the PO Documents panel (Figure 2).
To delete a document attached to an purchase order:
- Click Delete next to the document.
The system asks you to confirm the deletion.
- Click Delete.
Uploading an External Document to a Receipt
When you create a receipt, you can upload an external document to the receipt. The document is then available to view or edit, and you can access it from the Documents tab on the Receipt Header panel (Figure 4).
Figure 4 - A Receipt Header with the Documents Tab
To upload a document to a receipt
- Click the Documents tab on the receipt header when you are editing the receipt or line quantities.
- Click New (Figure 5). The Receipt Document Create panel appears (similar to Figure 3).
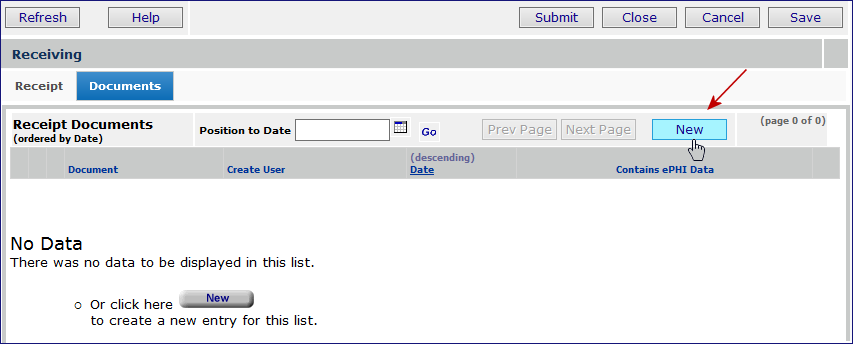
Figure 5 - A Receipt Header with the Documents Tab
- Enter a name in the Document Name field.
The name will be displayed on the Receipt Documents panel when the document is uploaded.
- Click Browse.
The Microsoft Windows Choose File panel appears.
- Locate and select the file for the document that you wish to upload and add.
When you select the file, Windows populates the File name: field on the Choose File panel.
- Click Open (on the bottom right of the Windows Choose File panel).
The document path and file name appear in the Document to Upload field on the Receipt Document Create panel.
- If the document contains ePHI data, select the box. This field prevents unauthorized users from viewing the document. (See Protecting Patient Data in Attached Documents for details.)
- Click Submit.
A message tells you that the document is uploaded.
- Click the back button or close the tab to close the message.
- Click Refresh.
The document appears on the Receipt Documents panel.
Optional: To Enter Shipping Information on a Receipt
You may encounter situations when you need to record carrier and tracking information for an item.
Fields for this purpose are on the receipt for each item line. You can enter tracking information when you create a new receipt line or edit an existing receipt line.
To enter tracking information when you create a receipt line,
- Open the Receive Purchase Order panel (as explained previously).
- Click Yes to receive all item quantities, or No to enter quantities received.
The receipt opens. Lines are at the bottom.
-
If you need to enter or change information for the Received Quantity and/or Received UOM fields, do so.
- Next to the item line of interest,
click Menu > Enter Shipment Tracking.
The Enter Tracking Info panel appears (Figure 6).
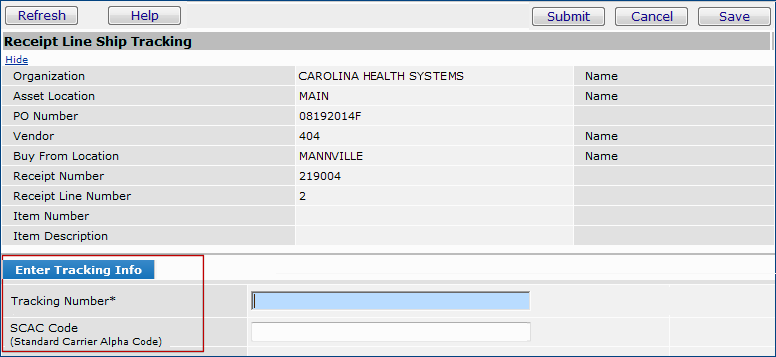
Figure 6 - Entering Tracking Information for a Receipt Line
- On the Enter Tracking Info panel, in the SCAC Code field, enter the ID for the carrier; e.g., UPS. This field is optional.
- In the Tracking Number field, enter the tracking number from the carrier.
- Click Save.
At this point, if needed, you can enter an additional tracking number for the line; for example,
if the item is shipped in multiple packages and each has a separate tracking number.
The system remembers the SCAC Code, but you can change it.
(Note: if you are using blind receiving only, you will need to click New to get another set of tracking fields.)
- Click Submit when you are finished.
To edit existing receipt lines and enter tracking information
- Open the list of Receipts: Materials Management > Receiving > All Receipts.
- On the list, locate the receipt of interest.
- Next to the receipt, click Menu > View Receipt Lines. Lines created for the receipt appear.
- For the line of interest, click Menu > Tracking Information.
If no tracking information exists for the line, the No Data panel appears.
Otherwise, tracking entries appear.
- Click New.
Enter the carrier ID and tracking number as illustrated in Figure 6.
- Click Save and Submit. The list of tracking entries appears.
- Click Refresh to display the tracking entry list for the receipt lines.
- If you need to enter another tracking number for the line, click New to get a new panel for entering that information.
Printing a Delivery Document for a PO
After you receive a PO, you can also print out a delivery document. You can set up a printer for auto printing, or you can print manually.
For each receipt, the system prints a pick
list for the lines on the receipt that need to be delivered to a department
(non-stock items). The system will generate a put list for a receipt if the receipt
contains stock items that need to be put away in inventory. If there are
only non-stock items in the receipt, there is no put list (but any overages appear
on the Receipt Overage Report.) If there are only stock items in the receipt,
there is no pick list. Any Notes that may have been made on the
requisition for the items print on the delivery document.
Figure 7 and Figure 8 contain examples of a pick list and a put list. These lists were generated (Menu > Print Receiving Document) for a received purchase order that had one stock line, and one non-stock line.

Figure 7 - A Sample Pick List
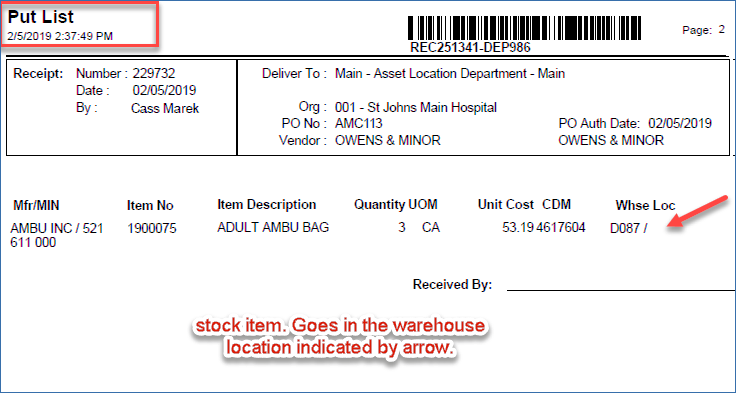
Figure 8 - A Sample Put List
For a non-stock item, the application will print the the requisition unit of measure and quantity on the pick lists. This capability lets distribution staff see the same UOM on the Receipt Pick List as is on the requisition, so that they can compare the two UOMs without having to use a calculator to convert up or down. To enable this capability, you need to set a flag for the asset location. The flag is Print Req UOM Quantity on Receipt Pick List. See Entering
Asset Location Details for details.
The Put List report contains two optional columns Onhand Qty Incl Receipts and Actual Onhand Qty. You can set a flag that adds the columns to the report for any asset location. The columns are:
- Onhand Qty Incl Receipts - Shows the actual on-hand quantity from the Item Inventory record for the asset location and item.
- Actual Onhand Qty - Contains no data. Just prints an underline so that warehouse staff can write in quantities.
Figure 9 is an example of the report with the optional columns (red arrows). See Creating a Data Record for an Asset Location for instructions on how to set the flag that enables the columns.
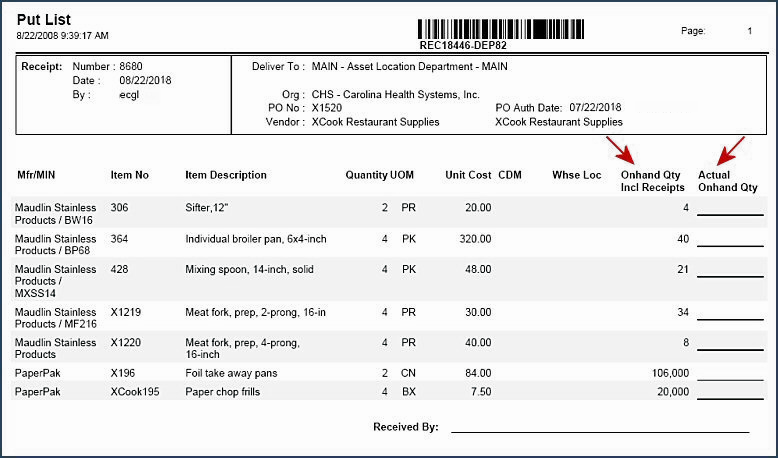
Figure 9 - A Put List with Optional Columns
Print a Receiving/Delivery Document Automatically
When you receive a purchase order, you can have the receiving documents (e.g., pick lists and put lists) routed directly to a printer and printed. Multiple users can automatically print receiving documents on different printers, or on the same printer. This feature must be set up and enabled for your site by the Technical Support. In addition, each user of the feature must have a printer identified in her/his user profile. Also, the field Make Delivery Docs auto-available to My Reports field on the user profile Authorities tab must be selected.
System Administrators: Setup for Automatic Delivery Document Printing
The auto print feature runs on an existing client gateway (provided via the Pulse appliance) and executes a print command to a defined printer. If your site has multiple networks (for multiple buildings, for example), the "gateway" must be running on each network, and printers set up for each network. If you use a single network, receipts will print at any printer location identified in the client gateway for the single network.
For individual users, two fields on the user profile must be set, as described below.
 The Printer Name field on the Users edit panel General tab identifies a printer for the user.
To Identify a Printer for a User:
- From Work in Administration on the Materials Management main Contents, select Administration
> Users.
The list of users appears.
- Locate the user of interest on the list.
- Click the edit icon or Menu > Edit.
The Users panels appear (Figure 10).

Figure 10 - Selecting a Printer for a User to Auto Print PO Receipts
- Click the prompt next to Printer Name.
A list of printers appears (Figure 11).

Figure 11 - Selecting a Printer for Auto Printing PO Receipts
- Click Select.
The printer name populates the field.
Note: You can identify a new printer by clicking New. A panel appears for entering
the Printer Name, Printer Description, the IP Address, and for setting the new printer to active.
- Click Submit to make the change to the user profile.
To set the auto-print authorization:
The Make Delivery Docs auto-available to My Reports field on the Users edit panel Authorities tab lets the user print automatically.
- On the Users edit panel, click the Authorities tab.
- Select the field Make Delivery Docs auto-available to My Reports (Figure 12).
- Click Submit.
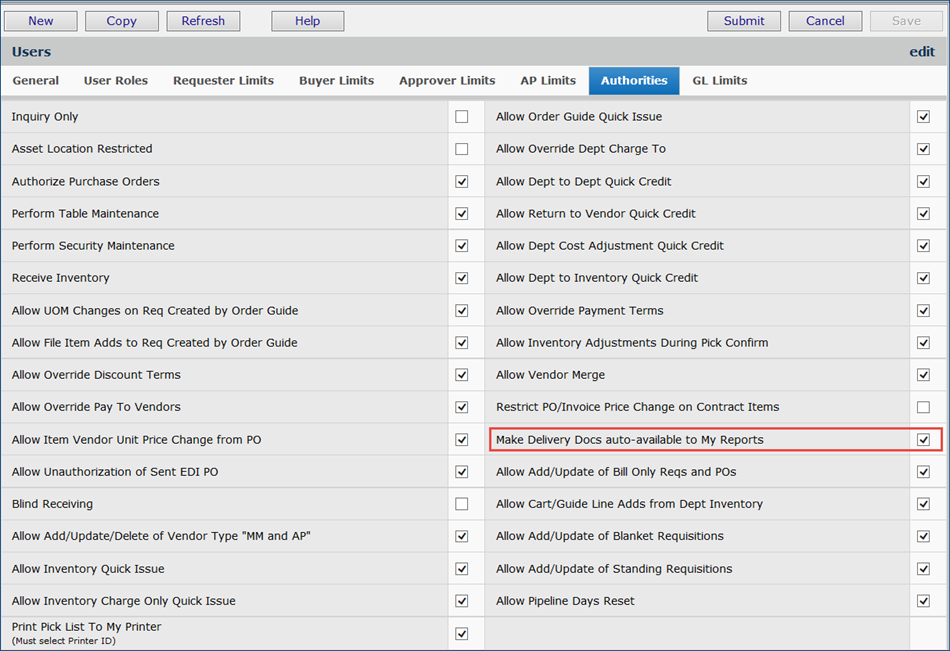
Figure 12 - Authorizing Automatic Printing of Delivery Documents
To automatically print a receiving/delivery document
- From the main Contents, click Receiving > Receive Purchase Orders.
The list of purchase orders available for receiving appears.
- Locate the PO of interest.
- Receive the PO as usual.
- When you click Finish Now, the receipt prints on the printer associated with your user profile.
To change your default printer for auto printing a receiving document
- From the Work in Administration main Contents, click Misc Functions > Change My Printer (Figure 13).
The Change Printer panel appears.
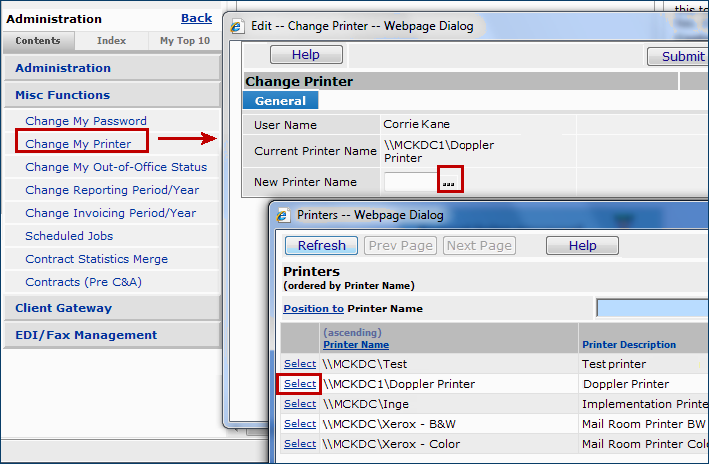
Figure 13 - Selecting a Different Printer for Auto Printing Receiving Documents
- In the New Printer Name field, click the prompt to select a new printer.
A list of printers for selection appears.
- Select a printer.
- Click Submit.
Manually Print Receiving Documents
If you are not set up for auto printing, you can print receiving documents manually.
To print a put / pick list manually:
You can print a pick/put document from the Purchase Orders for Receiving list or from the Receipts list.
- Fully-received POs whose last receipt was on "today's date" are displayed on the Purchase Orders for Receiving list, and a delivery document can be printed from there.
- Otherwise, if the fully-received time frame is longer than a day, the purchase order will not be on the Purchase Orders for Receiving list, and you will need to print receiving documents (for each of the purchase order's receipts, if more than one) from the All Receipts list.
- Receiving staff can print a delivery document when its associated PO receipt is Saved or Finished Later. The receipt does not have to be completed in order to print. (At least one receipt line on the incomplete receipt must have a quantity greater than zero in order to print the receipt.)
From the Purchase Orders for Receiving List:
- From the main Contents, click Receiving > Receive Purchase Orders.
The list of purchase orders available for receiving appears.
- Locate the PO of interest.
- Next to the purchase order, select Menu > Print Delivery Document.
A pick/put list for the purchase order is displayed in Adobe Acrobat Reader.
Important: The put/pick list is based on the last receipt that was created.
- Click the Acrobat Reader printer icon
 to send the document to a printer.
From the Receipts List:
- From the main Contents, click Receiving > All Receipts.
The list of receipts appears.
- Locate the receipt you need on the list. You can search the list by clicking
Search and entering search fields.
- When you locate the receipt, click Print Delivery Document.
- The pick/put list is displayed in Adobe
Acrobat Reader format.
- Click File > Print or select the printer icon to print the document
on your local printer.
Note:
A purchase order may originate with an order guide requisition. The system enters
the order guide name in the Description field on the requisition.
In turn, the Description field becomes the Deliver To field
on the delivery document. This way, you can enter the department name when you
use an order guide, and it will be printed on a delivery document.
To print a delivery document before you complete the receipt
This feature lets distribution staff confirm that a received shipment is accurate; and tag, sort, and separate the goods before submitting the final receipt.
- From the Materials Management main Contents, select Receiving > Receive Purchase Orders.
- Locate the purchase order to receive.
- Click Receive PO.
- On the panel Do you want to receive all? you can select No to receive one item, and print out the delivery document for all items.
- Enter a receipt quantity for the one item.
- Click Save and Finish Later (Figure 14).The application returns to the POs for Receiving List.
- To print the delivery document, select Menu > Print Delivery Document.
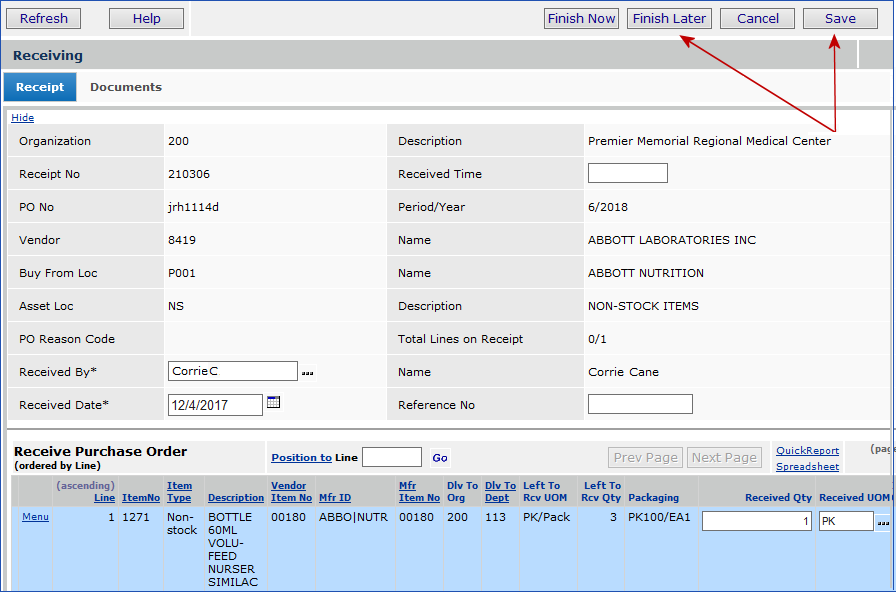
Figure 14 - New Buttons on the Receiving Panel
An image of the delivery document appears. The label Pre-Receiving appear in the upper left (Figure 15).
- Use the document to check in the delivered items, then return to the POs for Receiving List to enter remaining item quantities, and complete the receipt.
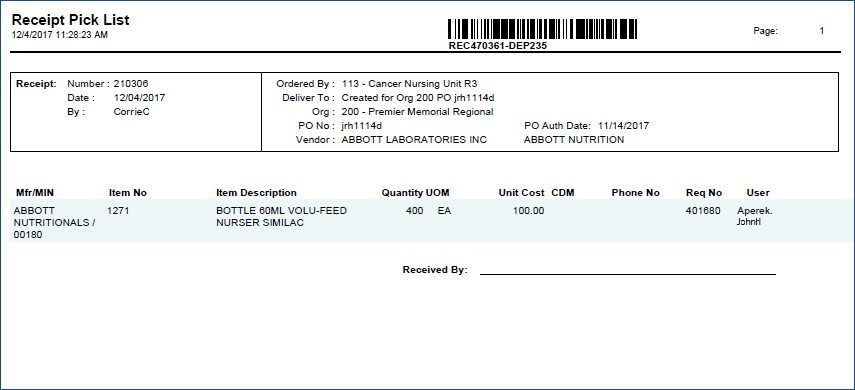
Figure 15 - Receiving Document for Printing, Receipt is Not Completed
Canceling Unreceived Quantities of Items
Under some circumstances, you may need to receive part of an item on a purchase
order, and cancel the unreceived quantity of the item. The system provides ways
to cancel the unreceived portion of stock or non-stock items on a purchase order
so that you can complete the purchase order. The canceled quantity is maintained
in the purchase order record.
Note: You cannot cancel an unreceived item on a purchase
order if the PO has any incomplete receipts. Also, the PO cannot be open on
an invoice with a receipt exception.
Figure 16 is a sample purchase order for three non-stock items. Figure 17 displays
the associated requisitions that the system created for the PO. In Figure 18, two
of the items from the PO are completely received, and one (Item 1492) is partially
received. How to cancel the unreceived portion of the item is discussed in the
following section.
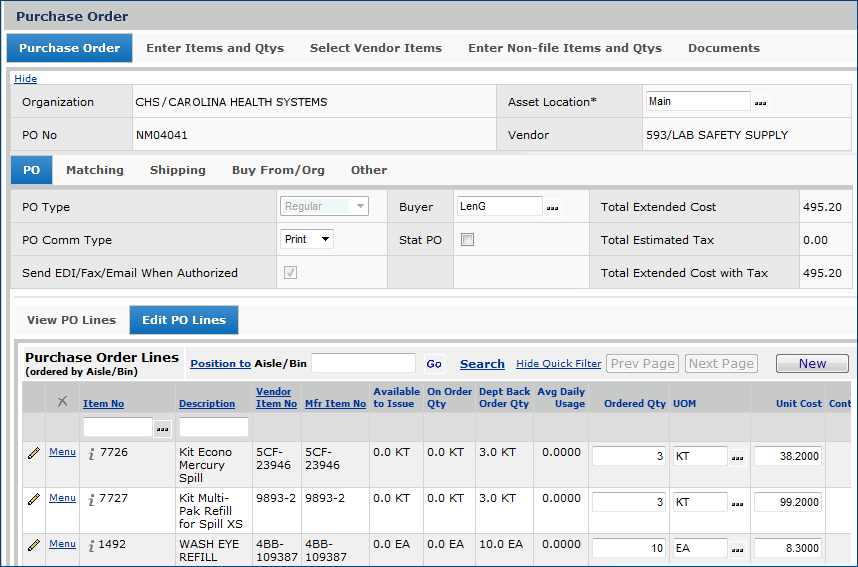
Figure 16 - Purchase Order for Several Non-Stock Items
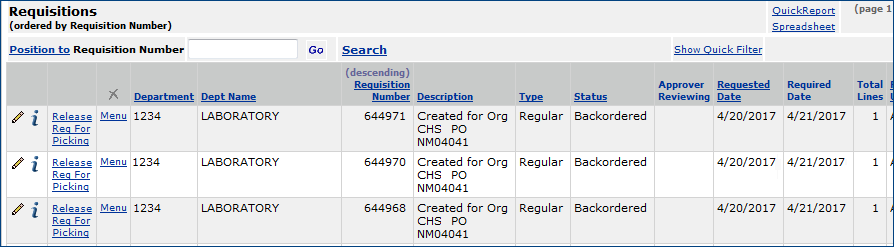
Figure 17 - Requisitions Created for a PO (from Figure 2)
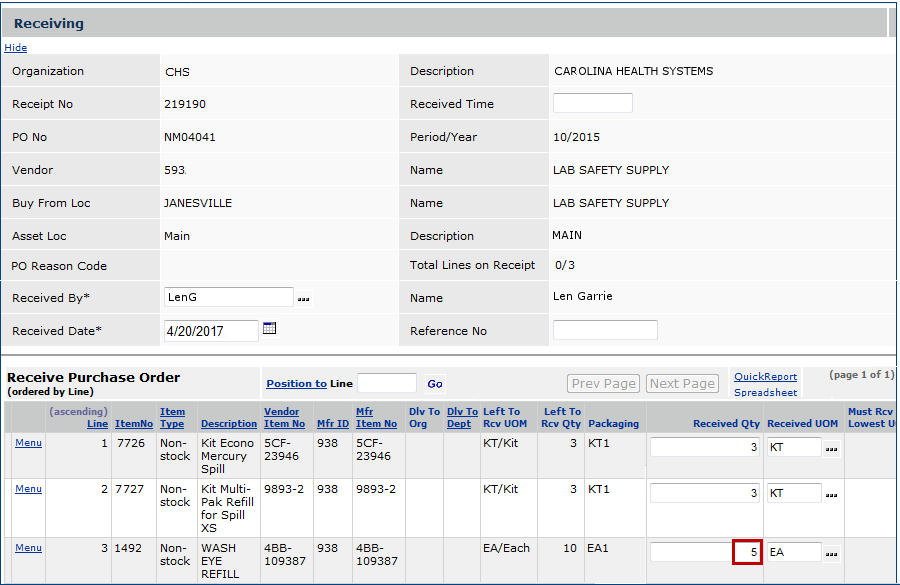
Figure 18 - Creating Receipts and Partially Receiving an Item
To cancel an unreceived quantity by editing a purchase order:
- From the Materials Management main Contents,select Purchasing > Purchase Orders (by PO) or Purchase Orders (by Create Date).
The list of POs ordered by PO number or by create date (as you selected) appears.
- Locate the purchase order on the list.
- Next to the purchase order, click the edit icon
or Menu > Edit.
The Purchase Order Edit panel appears. At the bottom is the Purchase Order Lines with two tabs.
- Click the Edit PO Lines tab.
-
Locate the PO line with the unreceived quantity to cancel.
- Next to the line with the unreceived quantity to cancel, select Menu
> Cancel Unreceived Quantity.
A panel appears that asks you to confirm that you wish to cancel all unreceived
quantities.
- Click Submit.
The system runs the job to cancel the unreceived quantity.
You can view the Killed Qty field for the item line on the
Purchase Order Lines inquiry panel (Figure 19).
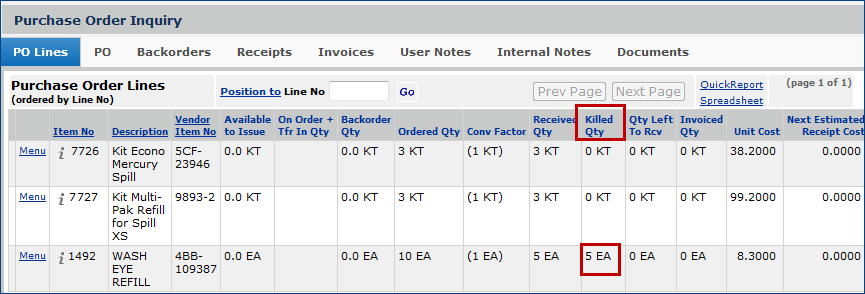
Figure 19 - Purchase Order Inquiry Panel Displays the Canceled
Unreceived Item Quantity
When a purchase order quantity for a non-stock item is part received, the unreceived
quantity is still backordered to the department. Another method of canceling
an unreceived quantity on a PO line to cancel the backorder.
- You will need the backorder Requisition Number for the PO line.
- Click the Backorders tab on the Purchase Order Inquiry panel, and locate
the Requisition Number for the line.
To cancel an unreceived quantity by canceling a department backorder:
- From the Materials Management main Contents, select Requisitioning
> Departments.
- On the Quick Click menu, select Backorders to Department.
- Enter the department number in the Department box.
- Click Go.
The list of backorders to the department appears, ordered by Requisition
Number.
- Enter the Requisition Number in the Position
To box.
- Click Go.
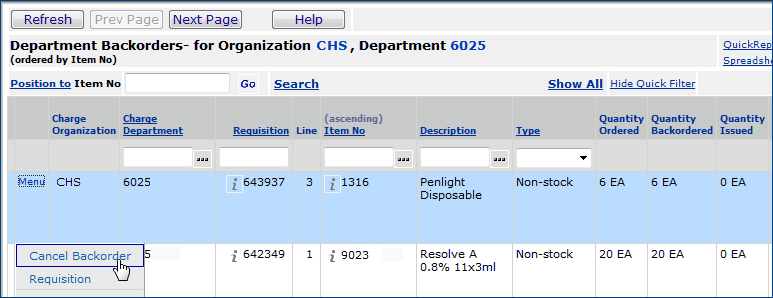
The backorder requisition appears at the top of the Department Backorders list.
- Select Menu > Cancel Backorder. (Figure 20).
Figure 20 - Canceling a Backorder for an Unreceived Item Quantity
A panel appears for you to confirm that you wish to cancel
the backorder.
- Click Submit.
The backorder is canceled.
The Department Backorders list is refreshed, and the backorder requisition
disappears from the list.
To cancel an unreceived quantity backorder through Item Inventory:
- From the Materials Management main Contents, select Inventory
> Item Inventory.
- On the Quick Click menu, select Department Backorders.
- Enter the item number in the Item No box.
- Click Go.
The list of backordered requisition lines appears. The list is ordered by
department.
- Use the Position To box and the Quick Filter to locate the
backorder requisition that contains the unreceived item quantity.
- Click Cancel Backorder.
A panel appears asking you to confirm that you wish to cancel the backorder.
- Click Submit.
The backorder is canceled.
The Requisition Lines list is refreshed, and the backorder disappears from
the list.
The Receipt Overage Report
The sample Receipt Overage Report in Figure 21 displays two purchase orders (from the same vendor) with receiving overages. One PO (1900) had an overage quantity of 12 for each ordered quantity (12 and 24). The second PO (5926) had an overage quantity of 12 for an ordered quantity of 144. The report also displays the overage dollar amount.
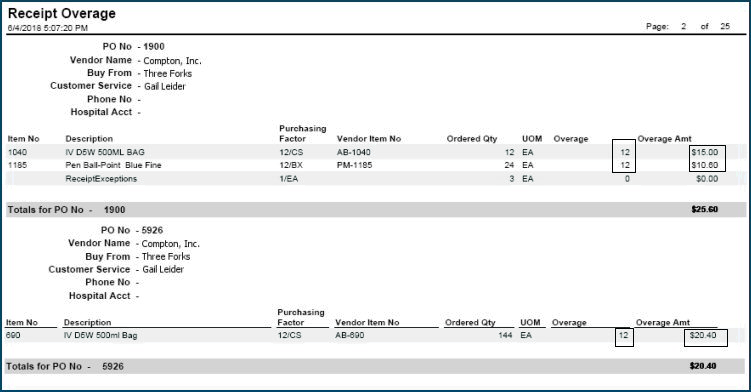
Figure 21 - Receipt Overage Report
To access the Receipt Overage Report:
- From the main Contents, select Reports > Standard Report Definitions.
- Scroll the list to locate the report: Receipt Overage.
- Select Menu > Print Report.
- Click Menu > Completed Reports to select and view the printed report.
Note: You can copy and customize the report definition, if you wish. For details, see Creating Custom Reports.
EDI 856 Ship Notices
To allow processing of EDI 856 shipping notices,
the Auto Process 856 Ship Notices as Receipt field on the vendor
(Buy-From Location) record must be set. Then, once a new 856 file is imported,
the system will attempt to process the 856 as a receipt.
If the Auto Process 856 Ship Notices as Receipt field is not set
on the vendor record, EDI 856 shipping notices are not processed as receipts,
and are available from the Unprocessed Shipping Notices list. You will need to process them manually to generate receipts.
- From the Materials Management Receiving menu, select Unprocessed Advanced Ship Notices 856.
The Unprocessed Shipping Notices list appears.
- Click Process Import to process an EDI 856 ship notice and generate receipts.
If no errors occur, then the system creates a receipt record and transaction.
The notice disappears from the list. If receipts cannot be created -- for example, if the PO has already been received -- an error message appears. Only detail lines
with errors are displayed.
Before you use EDI 856 processing, you must set up the vendor relationship.
See Set up and maintain EDI vendor relationships.
Reference: Table of SCAC Codes for UPS
The Wikipedia site for carrier codes contains a more detailed list. The URL is:
http://en.wikipedia.org/wiki/Standard_Carrier_Alpha_Code
(This is not a link. Cut and paste the URL into your browser's address window.)
Figure 22 lists the codes that UPS uses.
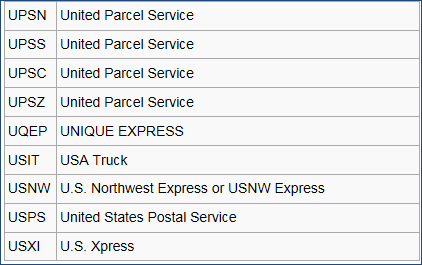
Figure 22 - UPS Codes
Copyright © 2023 by Premier Inc. All rights reserved.