
This topic discusses: |
Links to related topics: |
| Search Online Doc | |
| Current Release Notes | |
To set up users quickly, you can copy user information, and change the copied information as needed for each new user.
You can create several user IDs quickly by making multiple copies of a user profile that is already established in the system. On each copied user profile, you will need to change the user name and password, specify a role, data profile, and report profile (if relevant). Also, you can change other settings such as authorizations.
You can also copy user roles and data profiles.
A role encompasses the activities performed by a person in a particular type of job. The application contains templates for several pre-defined user roles. (The templates are marked with the application release number 1.1.) You can use the templates to quickly define user roles and set up user security. Copy the templates that you need and edit the copies to tailor the roles and security settings for your site.
Important: Be sure to copy the templates before you change them. Otherwise, updates of the application could overwrite the original templates, and you would lose any changes you made on the originals.
A detailed discussion of user security is in Set Up and Maintain Users.
Display, editing, creating, and copying of roles is controlled by the "Administration" role object. The minimum setting to create or copy a role is Create. The setting Modify allows you to edit existing roles. Only users with the setting All can delete roles.
Locate the user whose information you would like to copy and use for creating a new user.
After you define a new user, you will want to set authorities and permissions for the users. See Specify the User Settings.

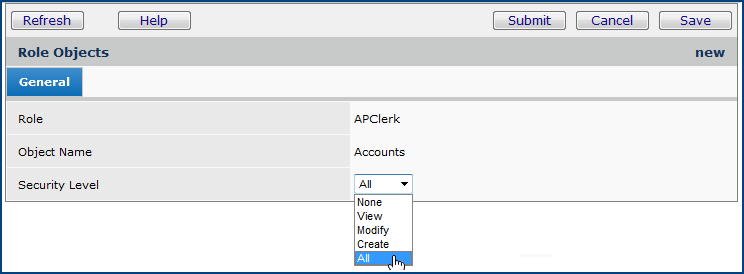
Each role is associated with several role objects. A role object is a category of system data such as Invoicing or Distribution. Users perform different activities with the data as part of their work.

View - Users in the role can view the data.
Modify - Users can change the data.
Create - Users can create new data. For the Item Catalog, for example, users with this security level can create new items.
All - Users can view, modify, or create data.
None - Users have no access to the data.
You may also wish to customize the table of contents for the role so that users in that role will have access only to specific system features.
From
the Administration main Contents, select Administration > Roles.
The Roles list appears.
Locate the role that you created when you copied a template.
Click
Menu > Omit Menu Options.
The Menu Options panel appears.
Select
the check box next to any menu item that you wish to exclude. Users
assigned to the role will not see menu items that you check.
Note: The menu options are listed on several pages.
Be sure to scroll forward so that you do not miss any.
Also see the instructions
on how to create data profiles.
Set Up and Maintain Users contains a detailed discussion of the settings
and authorities panels for creating user IDs.
Copyright © 2023 by Premier Inc. All rights reserved.
