Tracking Lot Information and Patient Information for Items Version
Contents
Overview
Through lot tracking, the system keeps
records of lot numbers, serial numbers, and/or expiration dates for inventory
items.
- A lot number identifies a group of pieces of inventory. For example,
an inventory may have two lots of Item 334455 -- Latex Gloves: lot number
011 and lot number 022. Lot number tracking can be used alone, or in combination
with serial number tracking and/or expiration date tracking.
- A serial number identifies one unique piece of inventory for a given
item number and description. Serial numbers can be tracked alone, or in combination
with lot numbers and/or expiration dates.
- An expiration date is a date by which an item must be used. You can
record expiration dates alone for an item, with serial numbers and/or lot
numbers.
Once you enter a lot number, serial
number, or expiration date for an item into the system, you can associate the
lot information with patient data such as patient ID, case number, and physician.
The system maintains lot tracking data and patient data for an item permanently.
Lot tracking is enabled in the system
by asset location and item number. For each asset location, lot tracking must
be "switched on" and the type of lot information to be tracked must
be specified. Items in an asset location use the lot tracking settings specified
when the items were assigned, but you can override the settings, if you wish.
Lot tracking involves entering and
associating lot and patient information.
- You enter lot and patient information into an item's inventory records.
You can enter this information when an item is received, for example, and
during several other activities, listed below. You can also edit the inventory
record at any time to enter the information.
- You then associate a particular item lot, expiration date, and/or
serial number with a particular patient when you issue the item. Once an item
is issued, it is consumed -- used up, and no longer in inventory.
You can record lot/patient information
during activities that change the on-hand quantity of an item. These activities
include:
- confirming picks
- making quick issues
- recording quick credits
- creating receipts
- canceling receipts
- recording physical inventory counts
- transferring inventory
- manually adjusting inventory
- making department returns to inventory
- making returns to vendors.
Examples of using lot tracking during
several of these activities are explained in sections below:
Requisitions and purchase orders can
include lot tracking information. For consignment purchase orders, this information
is useful because it identifies the consumed item to the vendor. (A consumed
item is gone from inventory.) Recording lot information when you open regular
POs and requisitions is not usually needed, however, since the lot information
may change when the item is received or issued.
Barcode Note: Lot tracking
information on an item's barcode is scanned into the system along with other item
data. If the information includes an expiration date, and no day of the month
is present, the system uses the first day of the month (e.g., November 1).
Security
ePHI Records
Features are built into the system to ensure the privacy of electronic protected health information (ePHI), in compliance with HIPAA requirements. One applicable area is lot tracking.
- On a User Profile, the Hide ePHI Data field determines whether a user can access patient data. When Hide ePHI Data is checked, a detailed series of restrictions apply to the user's access to ePHI records. Patient information in the lot tracking feature is subject to restrictions governed by this User Profile field.
In sum, if Hide ePHI Data is checked, the user cannot access patient-identifying information.
The list of restrictions and examples is outlined in the ePHI documentation.
Note: All patient identifier fields in this document's figures contain fictional values, and are not associated with any actual individual.
Role Objects
- The role object "LotTrack" controls access to lot tracking in general. The minimal setting to display the Lot Tracking Details list is View.
Details are in the next section.
- For the asset location enable step, the ability to edit asset locations is controlled by the role object "MMTables." To edit an asset location, the minimum setting is Modify.
- Displaying the item inventory list requires the "Inventory" role object to be set to View, minimally. To edit an inventory record, the setting must be Modify or higher.
Setting
Up Lot Tracking
To use lot tracking, setup is needed
for users, asset locations, and items. Also, you must import patient data from
your admissions system if you plan to associate patient IDs with lot information,
and enter physician and case records into the system's tables.
User Setup
Users entering lot information
and patient data must have the Lot Track role object in their
Role. The security setting should be Create, at a minimum, or All.
(A role is part of a user profile. See Set
Up and Maintain Users for details.)
To set up lot tracking at an asset location, the field Allow Changes to Asset Location and Inventory on the Data Profile Asset Location panel must be selected. This field controls permission to edit asset location records and edit item inventory records at the asset location. The topic Restrict Users from Editing Asset Location Records and Item Inventory Records outlines how to access and use the Allow Changes to Asset Location and Inventory field.
Note:
You must have system administrator privileges to be able to change user settings.
Asset Locations
Asset locations
must have lot tracking enabled. Also, the lot information fields (lot number,
serial number, expiration date) tracked for items at the asset location must
be specified.
- Edit an asset location record to switch on lot tracking and to specify
the lot tracking fields.
- From the Materials Management main Contents, select Tables > Asset
Locations.
- Locate the asset location of interest, and click the pen icon (
 )
to edit it. The Asset Location edit panel appears.
)
to edit it. The Asset Location edit panel appears.
- Select the Lot Tracking tab. The Lot Tracking panel appears (Figure
1).
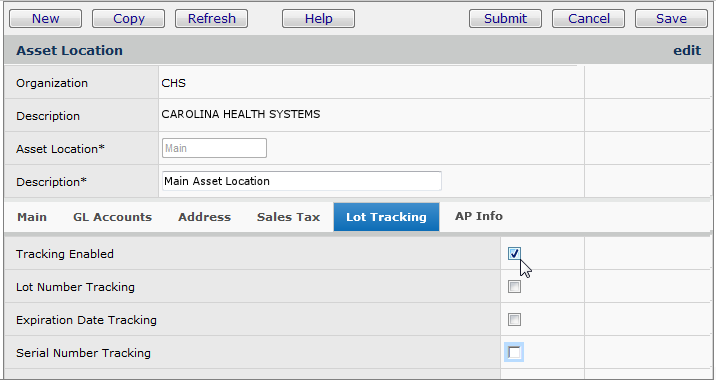
Figure 1 - Asset Location Lot Tracking Panel
- Select Tracking Enabled to switch on lot tracking for the asset
location.
- Select the default lot information fields that you wish to track. You
can select Lot Number Tracking, Expiration Date Tracking,
or Serial Number Tracking individually; you can select two of the
three; or you can select all three.
- These fields are only defaults for the asset location. You can set different
fields at the item level as long as Tracking Enabled is
set for the asset location.
Patient Information
Patient
ID tables are imported into the system using ADT Patient Import. Case and physician
data can be entered directly into the system's tables.
To be able to view patient information, the field Hide ePHI Data on the user's User Profile must be unchecked. See the previous discussion.
- Import patient record data so that you have a list of patient IDs to associate
with lot tracking information.
- From the Materials Management main Contents, select Imports/Exports
& Financials > ADT Patient Import.
- Select New to identify a file of patient data to upload.
See Import Admission, Discharge, and
Transfer Patient Data for details on the process.
- Populate the Cases list.
- From the Materials Management main Contents, select Tables > Cases.
- Select New to enter case information.
- Populate the Physician list.
- From the Materials Management main Contents, select Tables > Physicians.
- Select New to enter physician data.
Editing an Item's Lot Tracking Settings
An asset location has default lot tracking settings for all its items. You
can enable or disable lot tracking fields for individual items if you do not
wish to accept the asset location's defaults. You can turn lot tracking off
for an item, or track fewer or more fields than specified for the asset location.
You can change the defaults, if you wish, when you create a new item, when you
assign an item to an asset location, or when you edit an item inventory record.
The discussion below shows the item inventory record.
To edit an item's lot tracking fields:
- From the Materials Management main Contents, select Inventory
> Item Inventory.
The list of items appears.
- Locate the item of interest by entering the item number in the Item No box next to Position To.
- Next to the item, click Menu > Edit or click the edit icon .
The Item Inventory edit panel appears.
- Click the Lot Tracking tab to view the Lot Tracking panel. (Figure 2).
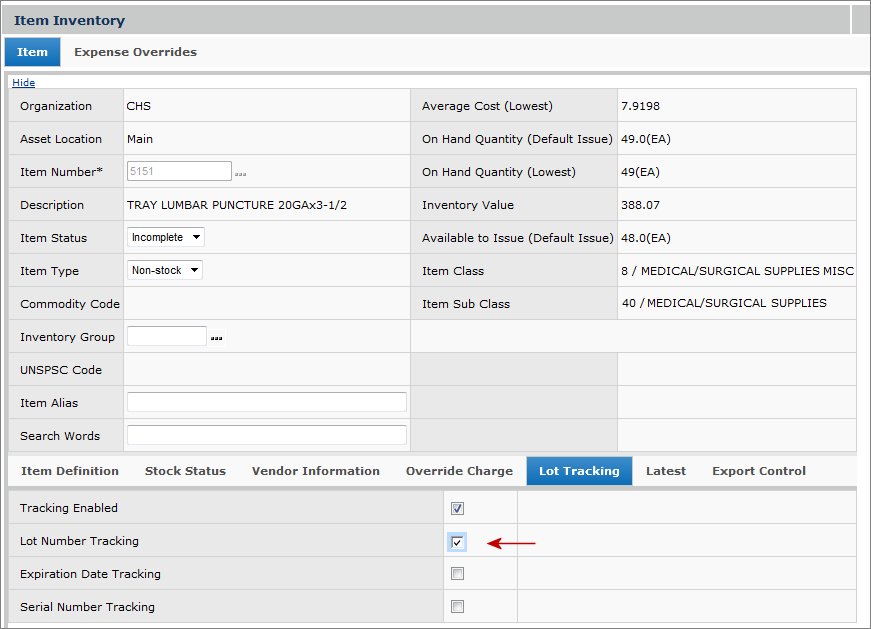
Figure 2 - Item Inventory Lot Tracking Edit Panel
- Select the type of tracking that you wish. You can select Lot
Number Tracking, Expiration Date Tracking, Serial Number Tracking,
any combination, or all three.
- If you want to turn lot tracking off for an item, click Tracking
Enabled to remove the check from the box.
- Click Save.
- Click Submit. The Item Inventory list is displayed.
Note: The Lot Tracking tab does
not appear if the asset location is not enabled for lot tracking.
Entering Lot and Patient Information for
an Item
The system gives you the opportunity to record lot information and patient information
that you associate with individual items when the items are issued. The procedure
below shows you how to enter lot tracking information from the item inventory.
Other activities, such as opening a requisition or purchase order, or confirming
a pick, allow you to enter data as well. The panels for entering this data,
as discussed below, are fairly uniform from activity to activity.
To be able to view and work with patient information, the field Hide ePHI Data on the user's User Profile must be unchecked. See the previous discussion.
To enter lot tracking and patient information:
- From the Materials Management main Contents, select Inventory
> Item Inventory.
The list of items appears.
- Locate the item of interest by entering the item number in the Item No box next to Position To.
- Click Go.
Note: You can filter the Inventory List for all lot-tracked items by clicking Search (instead of using Position To) and selecting Lot Tracking - Yes on the Search panel.
- Next to the item, click Menu > Lot Tracking.
The Lot Tracking panel appears. (If lot tracking is not enabled
for the item, only part of the panel with the Consumed field appears.)
Figure 3 is a Lot Tracking panel with lot information recorded for an item,
and a record in progress for another item.
Note: For some activities, such
as requisitioning, that allow (but do not require) you to enter lot information,
an OK button appears. In requisitioning, for example, the system displays
the Lot Tracking panel for you to enter information if you wish. You can click OK to close the panel without entering information.
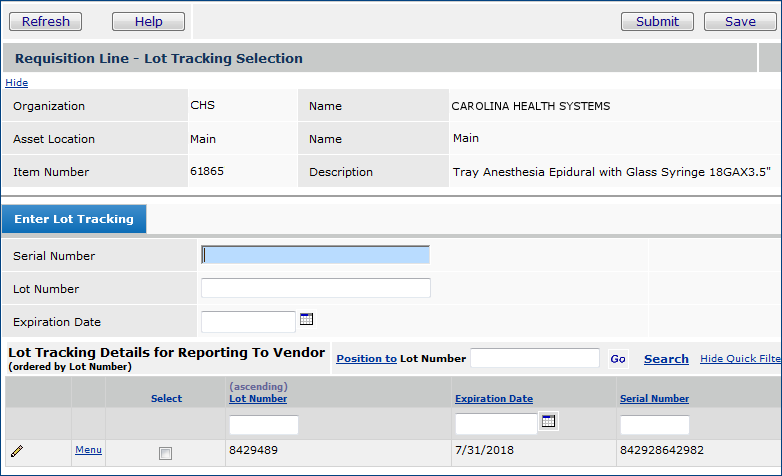
Figure 3 - Enter Lot Tracking Information
- To enter patient data with an item's lot information, on the Lot Tracking
Details panel, click Menu in a row containing the lot information (Figure
4).

Figure 4 - Patient / Physician / Case Menu
- Select Patient/Physician/Case from
the menu.
The Patient/Physician/Case panel appears (Figure 5). If no patient
information exists for the item, the lower part of the panel contains "No
Data." Also, if you are not authorized to work with patient information, you will not be able to enter (or display) patient information. (See Securing Electronic Protected Health Information (ePHI) for details.)
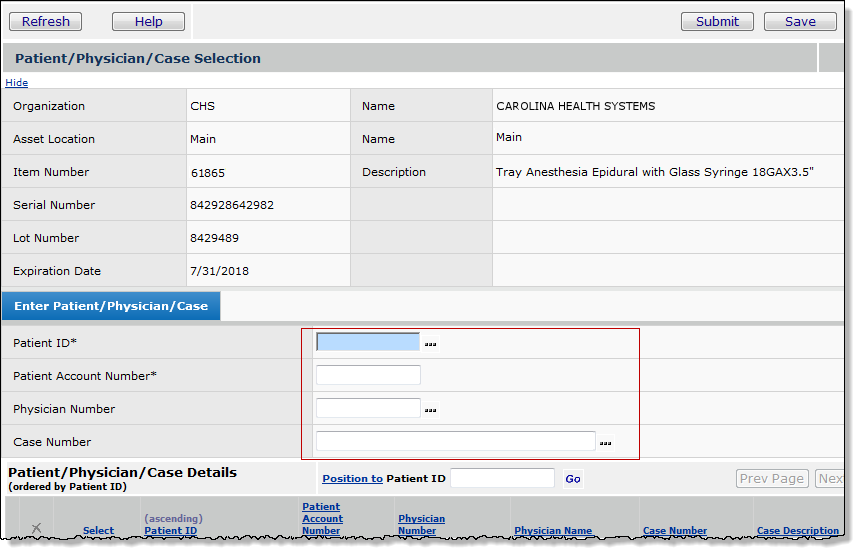
Figure 5 - Enter Patient / Physician / Case Data
Note: All patient identifier fields in Figure 5 and in other figures contain fictional values. The values are not associated with any actual individual.
- Enter the Patient ID in the center of the panel under the Enter
Patient/Physician/Case tab.
- Similarly, enter the Physician Number and Case Number, if
applicable. (The system completes the Patient Account Number field.)
- Click Save.
- The patient/physician/case information is displayed in the lower part
of the panel.
- Click Save.
The patient information is saved for you to select later when the item
is issued.
- To leave the panel, click Finish Now.
You are returned to the Lot Tracking panel.
Issuing a Lot-Tracked Item
When you issue a lot-tracked item, you associate the lot information recorded
for the item with patient data. The paragraphs below explain how to both enter
and associate lot and patient records with an item during the confirm step of
a pick. (Performing a Confirm Pick issues items.)
Entering and Associating Lot Information with
Patient Data when Confirming a Pick
When you have created and run a pick, and picked the requested items, the system
asks you to confirm that the pick is complete. In confirming a pick, the system
gives you the chance to enter lot and patient information and associate the
information for each item being issued.
To associate lot information with patient data during a pick confirm:
- From the Materials Management menu, select Warehousing > Pick List.
- Locate the pick that you have finished and click Pick Confirm.
The Pick Confirmation panel appears (Figure 6). On the lower part of the panel
(Requisitions in Pick), each line shows a requisition with items in the pick
list.
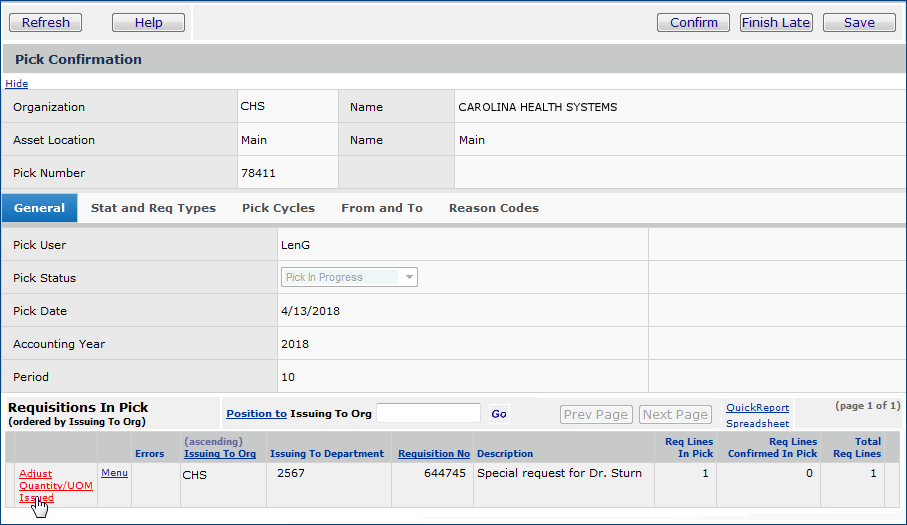
Figure 6 - Pick Confirmation Panel
- Next to a requisition, select Adjust Quantity/UOM Issued.
Note: Permission must be set in
your user profile for this activity.
The Adjust Quantity/UOM Issued panel is displayed (Figure 7). This panel
lists items in the requisition that are on the pick list.

Figure 7 - Pick List Adjust Quantity/UOM Issued
- Next to any item, select Menu. The system displays the pull-down menu
for the item.
- If the item is set up for lot tracking, Lot Tracking Selection
is available from the menu.
- Otherwise, Lot Tracking Selection appears in light gray.
Note: To enter lot tracking information, the "LotTrack" role object in your user role must be set to Modify or higher.
- Click Lot Tracking Selection.
The lot tracking panel appears (Figure 8).
- The center part of the panel contains fields for entering lot information.
- The lower part of the panel lists lot tracking data that has been
entered, if any. (Otherwise, No Data appears.)
Items can track expiration date, serial
number, or lot number, any combination, or all three.
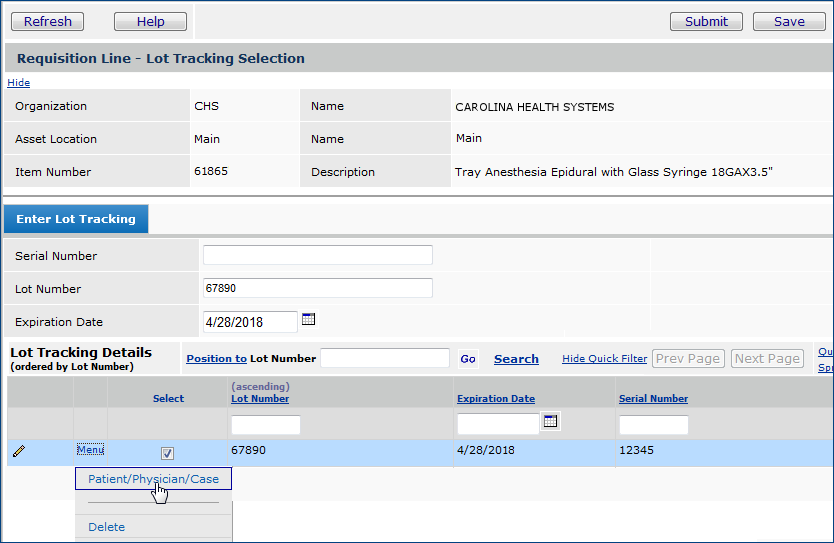
Figure 8 - Lot Tracking: Entering Patient Information During
a Pick Confirm
- Look at the list under Lot Tracking Details. If lot tracking information
exists for the item, locate the information that you wish and click the Select
field. This step identifies the particular lot information that you wish to
associate with patient data.
- If no lot data exists, enter new information in the center panel's fields.
The new lot tracking information appears in the Lot Tracking Details on
the lower part of the panel. The Select field is checked.
- In the Lot Tracking Details list, click Menu > Patient/Physician/Case
in a row that you have selected. (You can access this menu item for any Selected
row.)
The Patient/Physician/Case panel appears (as in Figure 5).
- Click OK when you are finished entering patient information. The Lot Information panel is
displayed.
You can enter and/or select more lot information to associate with patients
if several items are being issued.
- Click OK when you are finished entering and associating lot/patient
information for items on the pick list. The Adjust Quantity/UOM
Issued panel is displayed.
- Click Submit. The Pick Confirmation panel is displayed.
- Click Pick Confirm to confirm the pick and issue the items.
Quick Issues of Lot Tracked Items
The procedure for entering lot tracked items is the same as any other quick
issue, except for entering and selecting lot and patient information.
- From the Materials Management main contents, select Warehousing > Quick
Issues.
- Create a new Inventory Quick Issue (or Inventory Quick Issue Charge Only).
See the instructions. You can also edit an existing
Quick Issue. The Inventory Quick Issue panel appears (Figure 9).
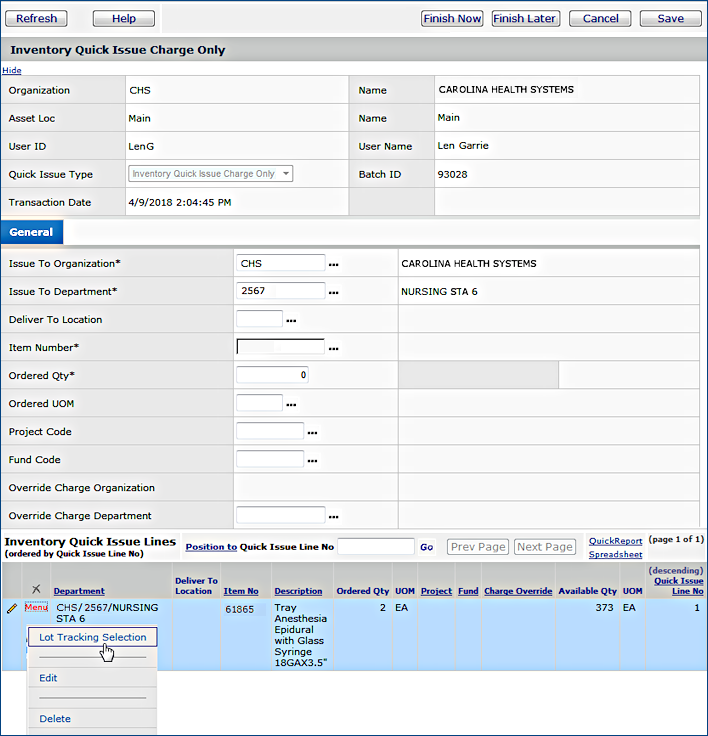
Figure 9 - Lot Tracking for Items in a Quick Issue
- On the Inventory Quick Issue panel, next to the item that you
wish to issue, select Menu > Lot Tracking Selection.
The Lot Tracking Selection panel appears (see Figure 3). You can enter lot
information and patient information as described
in the previous section.
- When you Submit an Inventory Quick Issue, the system creates a
pick list. The pick confirm process associates the patient information
with the lot tracking information.
- When you Submit an Inventory Quick Issue, Charge Only job, since
the item has already been picked, the system associates the lot and patient
information with the item, and marks the item as consumed -- used
and no longer available in inventory.
Viewing Consumed Items
Once you issue an item that has lot information and associated patient data,
the item is no longer available in inventory. The item is consumed. For any
item number, you can view individual consumed items from the Item Inventory.
To view consumed items:
- From the Materials Management main Contents, select Inventory
> Item Inventory.
The list of items appears.
- Locate the item of interest by entering the item number in the Item No box next to Position To.
- Click Go.
Note: You can filter the Inventory list for all lot-tracked items by clicking Search (instead of using Position To) and selecting Lot Tracking - Yes on the Search panel.
- Next to the item, click Menu > Lot Tracking.
The Lot Tracking panel appears. At the bottom of the Lot Tracking panel
is the Lot Tracking Details list.
The Lot Tracking Details may contain no information (No Data appears)
if no items have been assigned lot tracking information. Otherwise, as in
Figure 2 and Figure 10 (below), lot information appears.
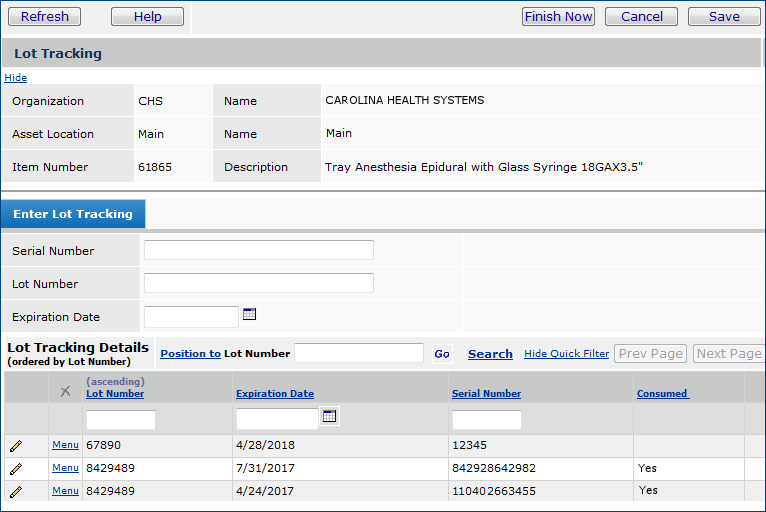
Figure 10 - Lot Tracking Details with Consumed Items
-
For each row of lot information in table, the Consumed column contains
Yes if the item has been used.
Receiving
Lot Tracked Items
You can associate patient and lot
information with a receipt line when a purchase order is received.
Enter
and Associating Lot Information with Patient Data when Creating a Receipt
To receive a purchase order, follow
all the normal steps (see Handling Receipts
for details):
- From the Materials Management main Contents, select Receiving > Receive
PO.
- Locate the purchase order on the list of POs for receiving.
- Click Receive PO. The Receiving panel appears with the PO lines at
the bottom (Figure 11).
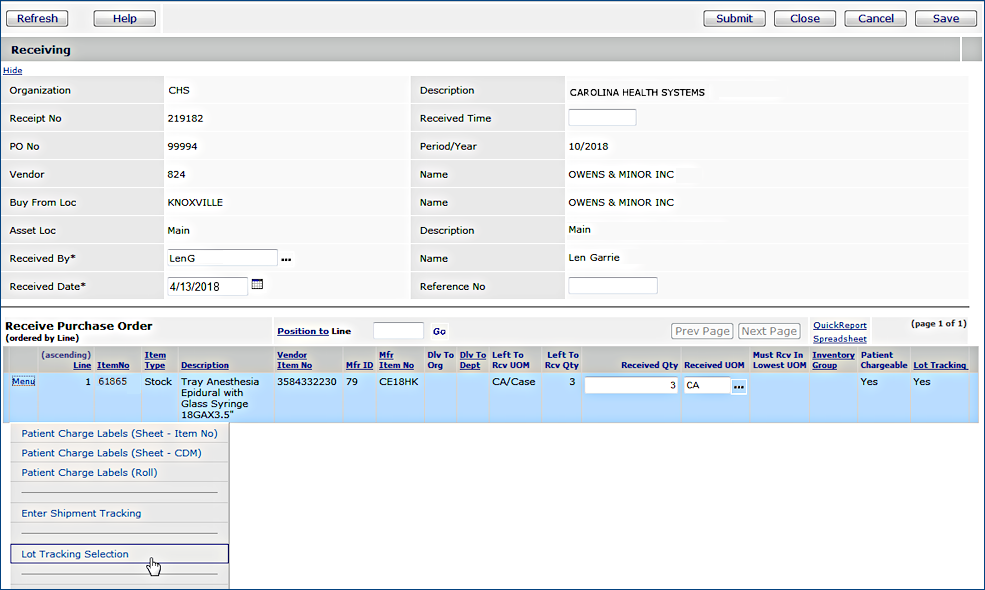
Figure 11 - Lot Tracking when Receiving a Purchase Order
- Locate the PO line for a lot-tracked item. Next to the item, select
Menu > Lot Tracking Selection.
The Receive PO Line - Lot Tracking Selection panel appears (Figure 12).
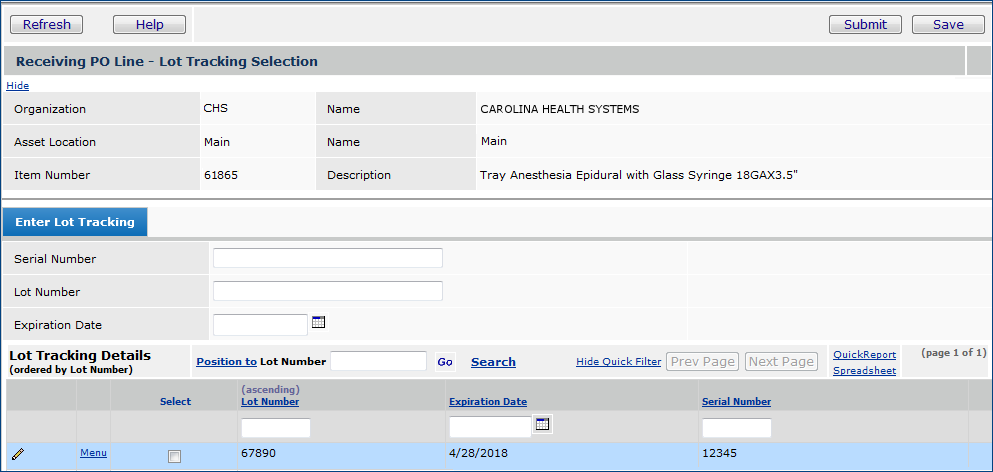
Figure 12 - Lot Tracking Selection Panel for Receiving
- Enter lot tracking information on the panel following the previous
instructions. You can enter patient information
as well.
- Click Save.
- Then click OK.
The Receiving panel is displayed. You can continue receiving other items
as needed.
Physical
Inventory with Lot Tracked Items
You enter physical inventory counts
through the physical inventory panels. When lot-tracked items are counted, any
items with lot tracking information that are not selected for the count are
considered consumed.
To count lot-tracked items:
- From the Materials Management main Contents, select Warehousing > Physical
Inventory.
- From the list, next to a physical inventory that is In Progress,
select Menu > Enter Counts.
A list of items for the selected Physical Inventory appears with a space
to enter the counts. (Figure 13).
Yes in the Lot Tracking column indicates that lot tracking is enabled
for the item in the row.
Figure 13 - Physical
Inventory Count Entry Panel with Lot-Tracked Items
- Click Lot Tracking Selection to identify the lot-tracked
items that you wish to include in the count. The Lot Tracking Details panel
appears (Figure 14).
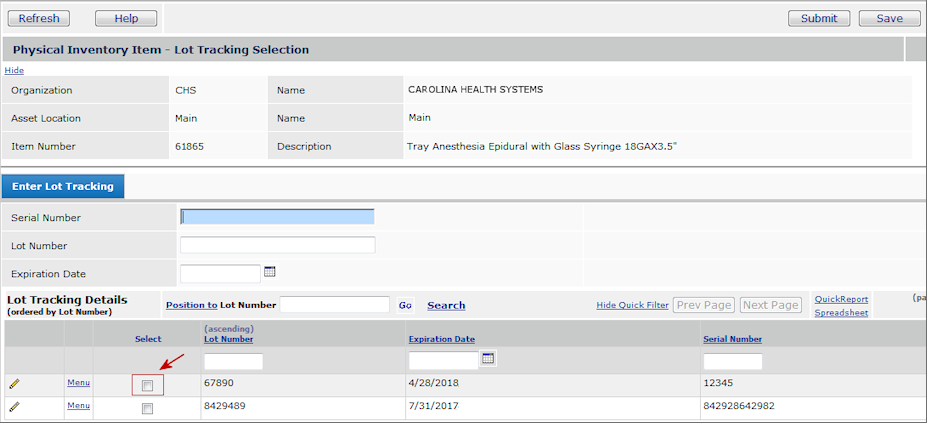
Figure 14 - Lot Tracking
Details Panel for a Physical Inventory
- Use the panel, as described previously,
to enter lot tracking and patient information for items, as needed.
- Select the items with the lot tracking data that you wish to count for the
inventory.
- Important:
If the inventory count reduces the quantity of items, the system marks
unselected lot-tracked items as consumed.
On the other hand, if the inventory count increases the quantity of items,
you can select items previously marked as consumed.
The arrow in Figure 14
indicates an unselected item.
- Save the lot tracking information
and click OK.
- Proceed with the physical inventory process as normal.
Detailed procedures are in Perform a Physical
Inventory.
Notes
on the Consumed Indicator
For inventory adjustments that increase
on-hand quantity, the system lets you identify lot-tracked items that are
marked as consumed to add to inventory. The status of the items changes
to unconsumed so that they are again available to issue.
For example, suppose a lot-tracked
item is issued to a department, and then the department later returns the item
to inventory. When the item is issued, it is marked as consumed since the on-hand
quantity is reduced. However, when the department later returns the item, the
lot tracking entry has the consumed indicator removed, since on-hand quantity
is increased.
Only items with serial number tracking
are automatically marked as consumed. When you issue an item with a serial number,
the system sets the Consumed flag for you. For items with lot number or
expiration date tracking, you must set the consumed field yourself.
Working
with Lot Tracking Details
The Inventory Lot Tracking
menu provides access to a list of lot tracking details for items. You can sort
the Lot Tracking Details list by organization, asset location, item number,
lot number, serial number, and/or expiration date. You can also sort items according
to their consumed status.
For expiration date or lot-number
tracked items, you need to set the Consumed indicator yourself when the
item is issued. Using the Lot Tracking Details list menus, you can set the consumed
indicator for items, or you can change consumed to unconsumed. The Consumed
field is also audited. Viewing audited fields on the Lot Tracking Details list
shows you which activities, such as confirming a pick list, caused a change
in the consumed indicator for an item.
The Lot Tracking Details list menu
also lets you enter patient data, view inventory transactions for items, and
view general ledger transactions.
To access the Lot Tracking Details list menus:
You can work with lot tracking details
from the Lot Tracking contents selection.
From the Materials Management main Contents, select Inventory > Lot
Tracking.
The Lot Tracking Details list appears (Figure 15).
The list is originally filtered by Organization and Asset Location.

Figure 15 - Lot Tracking Details List
- To filter the list on another field, click the underlined name of the column
that you wish to use as the filter. You can also specify a particular value
that you wish to locate in a column; for example, a value of 01993 in the
Lot Number column. Finally, you can click Search to specify
sort criteria.
- To mark an item as consumed, locate the item on the list and click
Menu > Mark as Consumed. (If the item is already marked, this menu
selection is grayed out.)
- To mark an item as unconsumed, locate the item on the list and click
Menu > Mark as Unconsumed. (If the item is already marked, this
menu selection is grayed out.)
- To view inventory transactions for the lot tracked item, click Menu >
Inventory Transactions. The list of inventory transactions appears.
- From the list of inventory transactions, you can view GL Transactions or
enter patient data by clicking Menu.
- To enter patient data to be associated with lot information, click Menu
> Patient/Physician/Case. The patient information panels appear. See
Entering Patient Information.
You can also view lot tracking details from the Inventory Transactions list.
- From the Materials Management main Contents, select Item Inventory > File Transactions
or select Item Inventory > Non-file Transactions.
A list of transactions appears.
- Click Menu > Lot Tracking on any list row.
The list of lot tracking details appears. You can use the menu on any row
of lot tracking details to enter patient/physician/case information, if needed.
Copyright © 2023 by Premier Inc. All rights reserved.