Transferring Supplies Among Asset Locations Version
Contents
Overview
If your site maintains multiple item inventories, you can set
up a single asset location as a supplier for one or more other asset locations.
Inventory transfers between asset locations are implemented in the system by using
an Inventory Transfer Requisition. You can create Inventory Transfer
Requisitions manually, or let the system create them automatically, as needed, from a supplying asset location. You can also
create Credit Inventory Transfer requisitions to return items from one inventory to its supplying
inventory.
Transfers can occur between asset locations in the same organization:
intra-organization transfers. You can also transfer items between asset
locations in different organizations: inter-organization transfers. For
intra-organization transfers, you need to set a flag on the asset location
record. For inter-organization transfers, you need to set a flag on the
organization record. In addition, you must identify the accounts to be used
to track the transferred assets.
Transfers can create a purchase order automatically when the item in the supplying asset location is a non-stock item. For example, items in asset location Clinics for organization 001 are stock and supplied to 001/Clinics from asset location Main in organization 001. In 001/Main, the items are non-stock. So, when the transfer requisition is created/approved, a PO for 001/Main is created for the non-stock items.
The sections below describe how to set up asset locations for transfers,
with detailed instructions for intra-organization transfers, and general
instructions for inter-organization transfers. For multi-organization
sites, more information is in Processing Items
Across Organizations.
At the end of this topic are "walkthrough instructions" for creating manual Inventory Transfer Requisitions between asset locations in the same organization. The instructions are basic, and are intended for users whose sites are already set up for transfer requisitions. Other users should read the detailed material that begins in the next section "Define Asset Locations."
Security
To edit asset location records, the asset location must be included in your data profile. Additionally, you must have permission to maintain records for the asset location. See "Restricting Users from Editing Asset Location Records."
The role object that controls access to the required functions is "DeptReq," minimally set to View.
Define Asset Locations
To transfer materials between asset
locations, you must create the asset locations in the system and establish the
item inventories.
When you create an asset location, it
is automatically defined as a department, and you can search for the asset location
in the Departments list.
Important: After you create an asset location, you will need to reset your user permissions
so that the asset location is included in the departments that you can access.
If you are a system administrator, you can set user permissions through the
the system Administration facility. If you are not a system administrator, you
will need to contact that person for assistance. To implement transfers of items,
you must have the appropriate permissions for the supplying and supplied asset
locations, and for both organizations (if your site uses inter-organizational
item processing).
Identify
Supplying Asset Locations for Departments and for Other Asset Locations
A department receives items from a supplying asset location. A department may be able to request items from several asset
locations, depending on the type of items needed. In that
case, each of the several asset locations is defined in the department's records as a supplying asset location. Although a department may be able to
access several inventories, one asset location is defined as the default
supplying asset location. This asset location normally handles the department's
needs.
An asset location may also receive its items from another asset location. In this case the supplied asset location's record identifies its supplying asset location in the Replenish From Asset Location field.
The following discussion presumes that you
already have created the asset location records, and that you wish to set them up for item transfer.
If you have not created the asset location records, see To
identify an asset location for instructions.
To identify
the asset location(s) that supply a department:
- From the Materials Management main Contents, select Requisitioning
> Departments. The Quick Click menu appears.
- Under I would like to..., select View the Departments
List.
- Under Ordered by..., select Departments.
- Enter the department number in the field under Starting
With... Click Go.
The Departments list appears with the department you specified at the
top.
- Next to the department, click Menu > Supplying Asset
Locations.
A list of supplying asset locations already established for the department
appears.
If no supplying asset locations are associated with the department, No
Data appears.
- Select New.
- Enter values in the Supplying Organization and Supply Asset Location fields by clicking the prompt and selecting
a location.
This location will supply the department.
- Click Submit. The system returns you to the Supplying
Asset Locations list.
- Click Refresh to refresh the list and view the supplying
asset location that you have just assigned to the department.
To
set the default supplying asset location for a department:
- From the main Contents, select Requisitioning > Departments.
The Quick Click menu appears.
- Use the Quick Click menu to locate the department you need.
- Edit the department information by clicking the edit icon
 or Menu > Edit.
- If your site uses a multi-organization supply structure,
you can replenish the asset location from a different organization. Enter
the appropriate value in the Default Supply Organization.
- Click the prompt and select the Default Supply Asset Location.
- Click Submit.
To identify an asset location that supplies
another asset location:
A medical center may be structured so that a "larger" asset location
supplies one or more "smaller" asset locations. The larger asset location
is a supplying asset location, and replenishes the smaller ones. The
following steps link the larger and smaller asset locations in a supply chain.
- From the main Contents, select Tables > Asset Locations.
- Locate the asset location that you wish to associate with
a supplying asset location.
- Click the edit icon or select Menu > Edit.
The Asset Location edit panel appears (Figure 1).
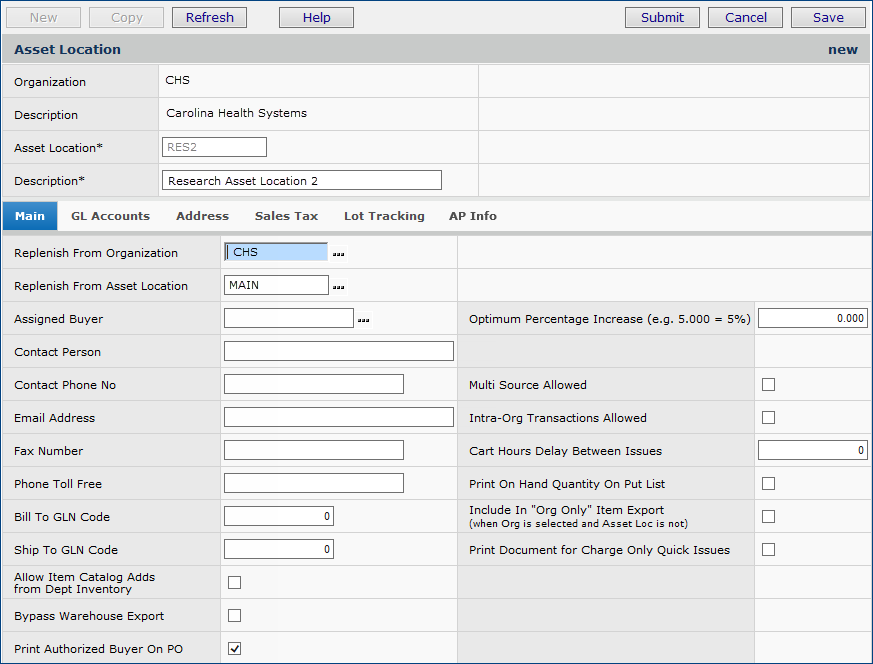
Figure 1 - Asset Location Edit Panel
- Identify the supplying asset location and organization.
- Select the replenish-from asset location:
- On the Main tab, click the prompt next to Replenish From Asset Location.
Asset locations are displayed.
If your site uses a multi-organization supply structure, you can replenish
the inventory in one asset location from an asset location in a
different organization. Both organizations must allow inter-organization
transfers.
- Click the asset location that you wish.
The selected asset location
replenishes the asset location identified in the header.
If the Replenish From Asset Location is in a different organization,
the system fills in the Replenish From Organization field.
- Set permissions for transfers.
- For intra-organization transfers:
- If you plan to replenish
items for the asset location from a supplying asset location in the
same organization, select the checkbox Intra-Org Transactions Allowed.
- For inter-organization transfers:
- You will need to
set a permission for the transfer on the records for the supplying and
supplied organizations. The instructions are in To set permission for inter-organization transfers, below.
- Click Submit.
You are returned to the Asset Location list.
- Click Refresh to view the asset location
in the list.
Set
Transfer Permission for an Asset Location
An asset location that either supplies
or is supplied by another asset location in the same organization must
be identified as such:
- For intra-organization transfers,
select the Intra-Org Transactions Allowed checkbox on the asset location
record (Figure 1), as described below.
- For inter-organization transfers, permission
must be set for both organizations involved in the transfer. Select the Inter-Org
Transactions Allowed field on each organization's record.
To set permission for inter-organization
transfers:
- From the Materials Management main contents, select Tables
> Organizations. The list of organizations appears.
- Locate the organization whose permission you wish to
set.
- Click the edit icon .
The edit panel for the organization appears.
- Select the field labeled Inter-Org Transactions Allowed.
- Click Submit. You are returned to the Organizations list.
Specify Transfer
Accounts for Asset Locations
Accounts must be established for each
asset location that another asset location supplies, and for each asset location
that is a supplier.
To identify accounts for intra-organization
transfers:
The steps below explain how to identify accounts that the system should use
for inventory transfer between asset locations in the same organization.
Note: Your site must have accounts
of different types already defined in the system for each organization. An expense
account for each department (including asset locations) is specified in the
department's record.
- From the main Contents, select Tables > Asset Locations.
The list of asset locations appears
- Locate the asset location you need, and select Menu >
Intra-Org Accounts.
The Intra-Org Accounts list for the asset location appears.
(For an asset location where no intra-organization accounts exist, No Data appears.)
- Click New.
The Asset Location Intra-Org Accounts panel appears (Figure 2).
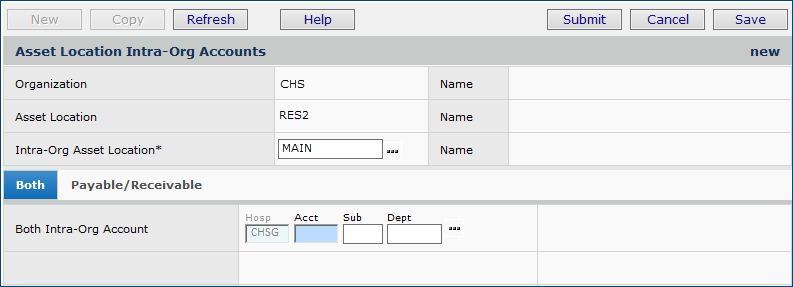
Figure 2 - Asset Location Intra-Org Accounts Panel
- Enter data in the header fields and in the fields on the tabs,
as needed.
- On the Intra-Org Asset Location field, select the supplying asset location.
In Figure 2, for example, asset location Main supplies the asset
location RES2.
- Do one of the following:
- On the Both tab, specify a single transfer account that
the asset location will use for both payables and receivables. Use the
prompt to select the General Ledger account number that transfer transactions
will be written to.
or
- On the Payable / Receivable tab, select two transfer account
numbers: an account for payables and an account for receivables.
- Click Submit. The system associates the intra-organization account(s)
with the asset location.
To identify accounts for inter-organization
transfers:
If you are transferring items across organizations, you need to perform
some additional steps.
On each organization's record:
- Set transfer permissions for both organizations, as described previously.
- Identify payables and receivables transfer accounts.
These additional steps are detailed in Processing
Items Across Organizations.
Transferring Items
Between Asset Locations - Basics
An asset location can
create Inventory Transfer requisitions to request items from another asset
location that supplies it. The default requisition
type is Inventory Transfer.
An asset location can
create Inventory Credit Transfer requisitions to return items to its supplying
asset location. Credit Inventory Transfer is a selection on the Requisition
Edit/Create panel.
Both types of requisitions use the
normal process. Special
considerations are discussed in the requisitioning section. A walkthrough of the entire process follows in the section Create a Manual Inventory Transfer Requisition: Within an Organization.
Manual Transfers
When you create a requisition for items from a department that is designated
as a supplied asset location (the requisition type is automatically set to
Inventory Transfer), you should review the requisition's Transfer
tab (which is populated by the system.) This tab contains the supplying asset location that provides the
items requested. Similarly, when a supplied asset location needs to return items
to its supplier (the requisition type is Credit Inventory Transfer),
you must enter the appropriate Transfer
tab fields. Items entered on transfer requisitions must be defined in the item
inventories of both the "from" and "to" asset locations.
All items in transfer requisitions must be entered in the lowest unit of measure.
Non-file items are prohibited.
Automatic Transfers
Items defined in the item inventory
can optionally specify a Replenish From Org / Asset Location
as the supplying asset location. In this case, items are ordered from an asset
location instead of a vendor. When the replenishment process determines that
an item needs to be ordered, it automatically creates a Transfer Requisition which appears in the requisition listing with an open status. Once the requisition is reviewed and user clicks Finish Now, the requisition is sent to the Replenish From Location.
(If the requisition is for a non-stock or non-file item, a purchase order line is created (or amended, on an existing open PO), and the request enters the purchase order process. Periodically, the "from" asset location personnel
must review, release, and pick these requisitions for delivery to the requesting
asset location, just as with any other requisition.
Transfer Quantities
The fields Preferred Order Factor and Preferred Order UOM on the item inventory record (Stock Status tab) apply to transfer requisitions. These fields identify the minimum divisor (at the lowest UOM) for an ordered quantity. When values exist in these fields, the ordered quantity must be evenly divisible by the preferred order factor. If not evenly divisible, the quantity is rounded upwards to the next evenly divisible quantity.
When the Order from Vendor field on the Item Inventory record panel is not checked, ordered quantities for transfer requisitions are adjusted upwards by the specified Preferred Order Factor and Preferred Order UOM. See the discussion of the Item Inventory panel.
Receiving Items from a Supplying Asset Location
Manual transfers: At the supplied asset location, the approved manual transfer requisition appears on the list of Requisitions - Current Department. The requisition also appears on the list Requisitions - All Departments. From either list, the requisition can be released for picking. When the pick is confirmed, the requisition is available for receipt at the supplied asset location. The supplied asset location receives the transfer (Receiving > Receive Transfers).
Automatic transfers: For regular requisitions that departments send to a supplied asset location, if the asset location cannot fill the requisition, the system creates the transfer requisition, and the item amount on the original departmental requisition is backordered. The transfer requisition appears for approval at the supplying asset location, and can be released for picking. The transfer requisition is then available for receiving at the supplied asset location, and the original departmental request can be issued.
To receive transfers:
Once items have been picked at the supplying asset location, and the pick has
been confirmed, the requisition appears on the Receive Transfers list for the supplied asset location.
- In Current Settings, use the prompt (...) to change the
value of Asset Location to the target inventory. If you are receiving
a transfer from your supplying asset location, the target inventory is your
own asset location.
- From the Materials Management main Contents, select Receiving > Receive
Transfers. The Quick Click menu appears.
- On the Quick Click menu, under I would like to...,
select Receive Transfer. Enter the requisition number in the field
under For...
- Click Go.
A panel appears, asking
you if you want to receive all the items. Click Yes, No,
or Cancel, as appropriate.
- "Click 'Yes' to prepopulate the Received
Quantity with the Quantity Left to Receive for each item." This selection
receives all unreceived items on the requisition. It's a quick way to receive the complete
order, so that you don't have to fill in each quantity. You can change the quantities
that the system enters, however.
- "Click 'No' to
prepopulate the Received Quantity for each item with zeros." This selection
is useful if you are receiving part of the order. You can change the zeros to
the actual quantities.
- "Click 'Cancel'
to return to the Purchase Orders for Receiving list."
The receipt
information is displayed with the item lines and quantities (or zero quantities).
-
Edit the Quantity data as needed. Fields marked with *are required, and must contain
a value.
- Do one of the following:
- Click Finish Later to receive the transferred
items later. If you click Finish Later, the system saves any data you
entered in the Received Qty field, and puts the requisition in the
Receive Transfers list. (The Cancel button deletes the receipt
record you created.)
- Click Finish Now if you are completely
finished.
If there are no errors, receipts are created and the requisition disappears from the
list. If an error message appears next to the requisition, click the
message, read it, and correct the problem. (For example, you will get an error
message if you attempt to receive zero quantity of the item. You need to enter
a quantity in the Receive Qty field.)
Once transfers are received in the target (supplied)
inventory, the on-hand quantity is updated. (The system's transfer-in "bucket"
is emptied.) General Ledger transactions are written to the target and the source
inventory.
Flow of Transfer Requisitions
When submitted for approval and released, transfer requisitions automatically attempt
to allocate the inventory at the "from" asset location. Items allocated
are eligible to be put on a pick list and picked. When an item is ordered, the
"to" asset location's item inventory shows the item as a "Transfer
In" quantity. Items backordered are allocated once the available inventory
can be provided. The pick confirm process issues the items to the "to"
asset location, but on hand quantity does not reflect the items in the "to"
location's inventory until the transfer has been received.
The File Transfer Balancing Report
The File Transfer Balancing Report displays items transferred between supplied and supplying asset locations for an organization. For example, Figure 3 displays two pages of the report containing data on transfers from asset location MAIN to asset location Warehouse W; and from asset location OR to asset location MAIN within the organization CHS. For each asset location, a total inventory value is calculated. (Also, but not shown in the figure, a total is calculated for the entire organization.)
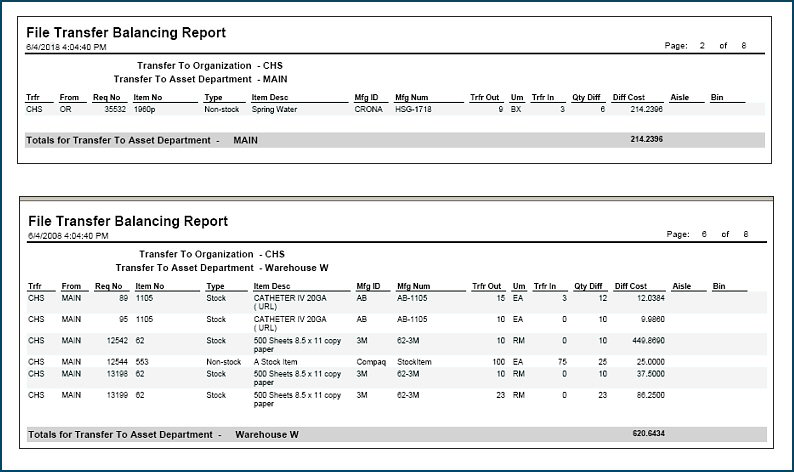
Figure 3 - File Transfer Balancing Report
To access the File Transfer Balancing Report:
- From the main Contents, select Reports > Standard Report Definitions.
- Scroll the list to locate the report: File Transfer Balancing Report.
- Select Menu > Print Report.
- Click Menu > Completed Reports to select and view the printed report.
Note: You can copy and customize the report definition, if you wish. For details, see Creating Custom Reports.
Create a Manual Inventory Transfer Requisition: Within an Organization
The instructions below explain how to use an inventory transfer requisition to transfer a quantity of an item from a supplying asset location to a supplied asset location. In the examples, the "to" asset location OR is supplied by the "from" asset location MAIN. Both asset locations are in the same organization (CHS).
The steps below assume that the user has all the appropriate permissions for creating, releasing, and receiving requisitions at the supplied asset location, and for confirming picks at the supplying asset location. You may need to discuss your user profile settings with your system administrator if you expect to perform all the steps that follow.
The steps are:
Step 1. Create the inventory transfer requisition at the "To" asset location.
Step 2. Submit the requisition for approval.
Step 3. Release the requisition for picking at the "From" asset location.
Step 4. Confirm the pick at the "From" asset location.
Step 5. Receive the items on the transfer requisition at the "To" asset location.
Step 6. Print a Put List for the transferred items at the "To" location.
If you are unfamiliar with creating, approving, and releasing manual requisitions, read Requisition File and Non-File Items before you try to follow the steps below.
Step 1. Create the Inventory Transfer Requisition at the "To" Asset Location.
- In Current Settings, click the prompt next to Asset Location, and select the asset location that you need to transfer items to.
Figure 4 displays Current Settings with Asset Location MAIN.
The user has clicked the prompt (...) to get a list of asset locations and to select OR. OR is the "to" asset location.
Figure 4 - Selecting the "To" Asset Location in Current Settings
- In Current Settings, click the prompt next to Department and select the "to" asset location department (Figure 5).
The asset location department for this example is also OR.
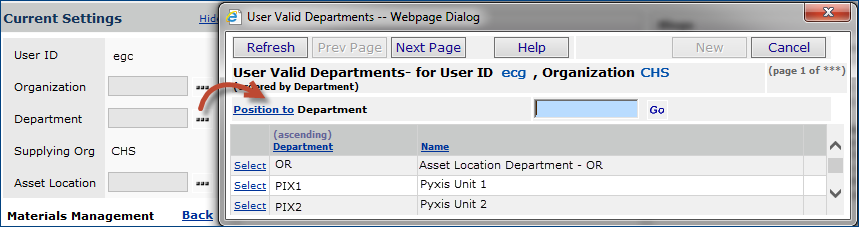
Figure 5 - Selecting the "To" Asset Location Department in Current Settings
- From the Materials Management main Contents, select Requisitions > Requisitions All Departments.
- Click New.
The Requisition edit panel appears with the General tab on top (Figure 6).
the system populates the Type field with 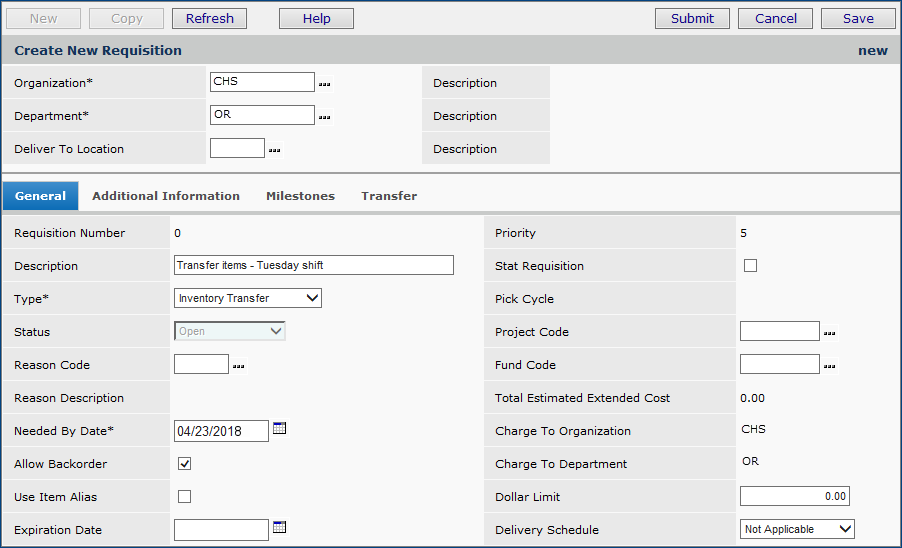 >Inventory Transfer (Figure 6 ).
Note: In the Type field, you can also select Credit Inventory Transfer if you are returning items to an asset location.
Figure 6 - Create New Requisition Panel: General Tab
- Enter a Description for the inventory transfer requisition (Figure 6).
- Click the Transfer tab.
The Transfer tab displays the asset locations and organizations that the items are being transferred from, and to (Figure 7).
the system populates the fields in the Transfer tab with the transfer-to organization (CHS), department (OR), and asset location (OR); and the supply-from organization (CHS), department (MAIN) , and asset location (MAIN) from Current Settings.
- Verify that the Transfer From/Return to Organization and the Transfer From/ Return To Dept are correct.
If not, click the prompt to make another selection.
(In Figure 7, MAIN is also the name of the department associated with asset location MAIN.)
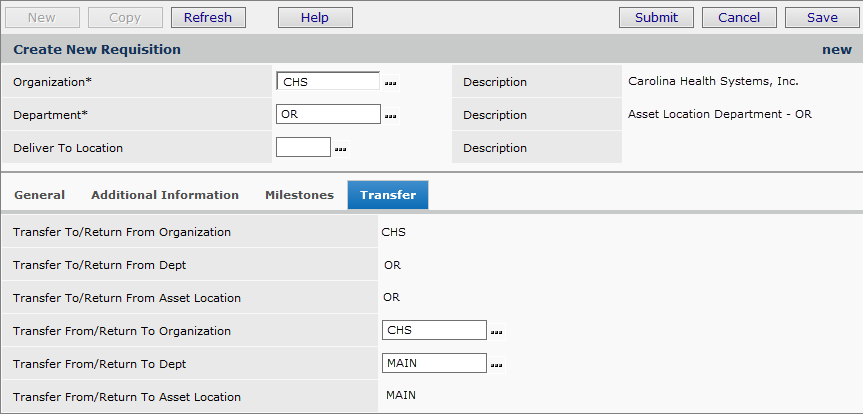
Figure 7 - Create New Requisition Panel - Transfer Tab
- Click Save and Submit.
The Requisition panel appears. The requisition lines are at the bottom and contain No Data.
- In the Requisition Lines section of the panel, click New.
The Create Requisition Line panel appears.
- Create a line in the File Item Information tab for each item to be transferred:
- Enter the Item Number and click the prompt.
The Find In box appears.
- Use the Find In box to locate the item (Figure 8).
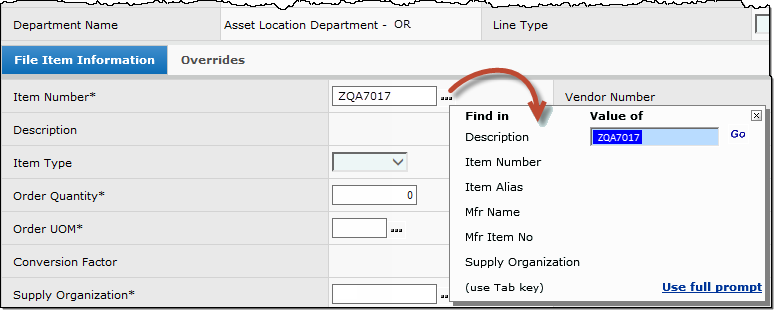
Figure 8 - Using the Prompt and the Find In Box to Locate an Item for a Transfer Requisition
The item is listed for each asset location that inventories the item (Figure 9).
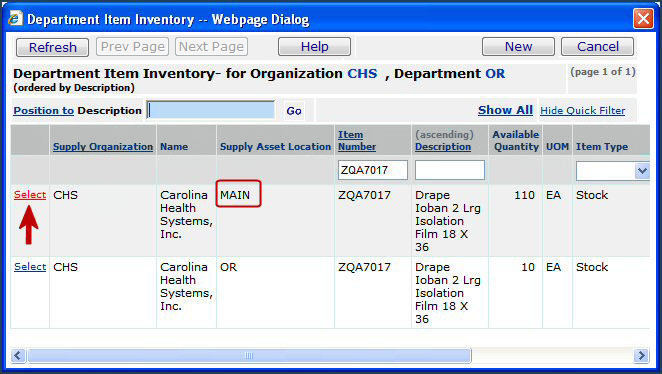
Figure 9 - Selecting an Item for a Transfer Requisition
- Select the item for the Supply Organization and Supply Asset Location that are the "from" organization and "from" asset location; in this case - CHS and Main (Figure 9).
The item appears in the File Item Information panel (Figure 10).
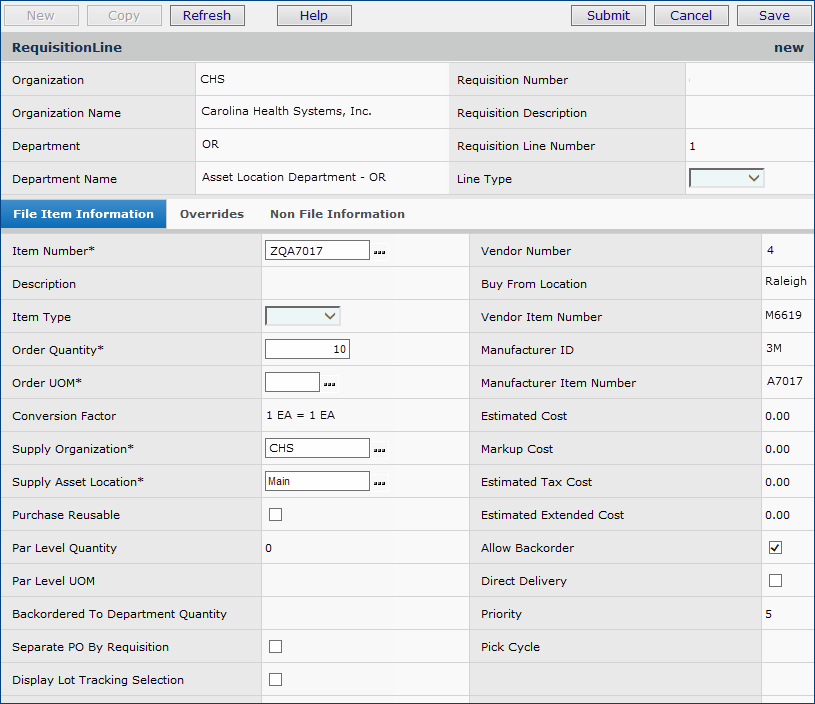
Figure 10 - Transfer Requisition File Information Tab
- Enter the Order Quantity that you wish to transfer.
- Click Save and Submit.
the system returns to the Requisition panel.
- Click Refresh to see the item line (Figure 11).
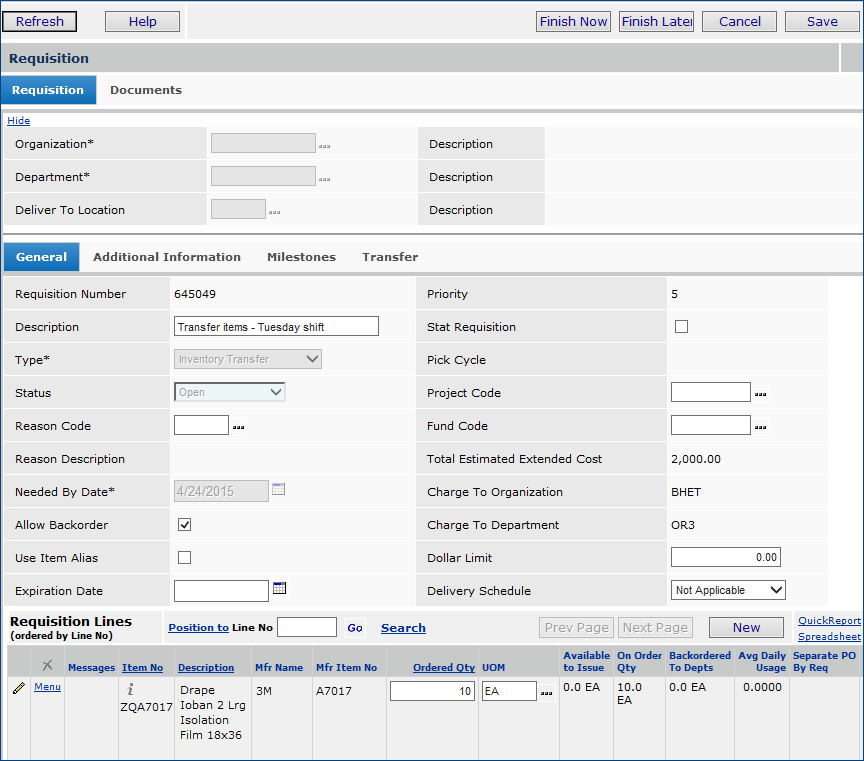
Figure 11 - Transfer Requisition with Item Line
Step 2. Submit the Requisition for Approval
- When you are finished entering item lines, click Save and Finish Now on the Requisition panel (Figure 11).
the system asks if you are sure that you wish to submit the requisition (Figure 12)
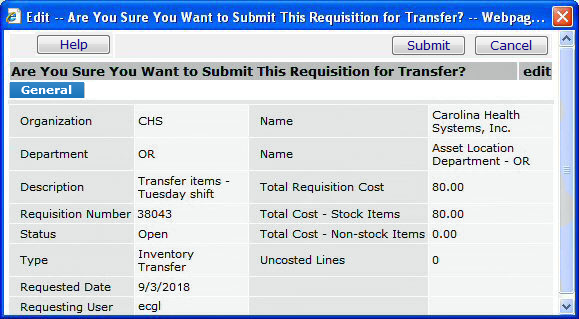
Figure 12 - Submitting an Inventory Transfer Requisition for Approval
- Click Submit.
- To view the requisition, from the Materials Management main Contents, select Requisitions > Requisitions - All Departments.
- Locate the requisition on the list.
Figure 13 displays the requisition 34043 (created previously) as Submit Requisition Pending.
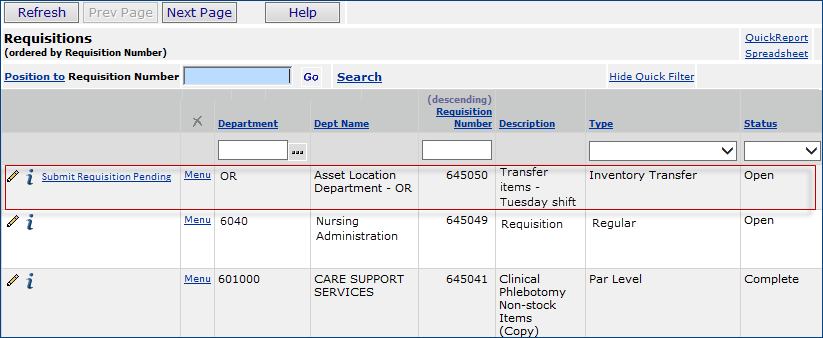
Figure 13 - Requisitions List with Inventory Transfer Requisition Pending
- Click Refresh to view the status of the requisition as it changes.
When the requisition is approved, its Status changes to Approved.
Step 3. Release the Requisition for Picking at the "From" Asset Location
- Change the Asset Location in Current Settings to the supplying asset location -- the "from" asset location for the transfer requisition.
(In our examples, this value is MAIN.)
- Return to the Requisitions list.
- From the Materials Management main Contents, select Requisitions > Requisitions - All Departments.
- Locate the approved requisition on the list.
- Click Menu > Release Req for Picking (Figure 13).
This step puts the requisition items on a pick list at the supplying asset location (MAIN).
The system asks you to verify that you wish to release the requisition (Figure 14).
- Click Submit.
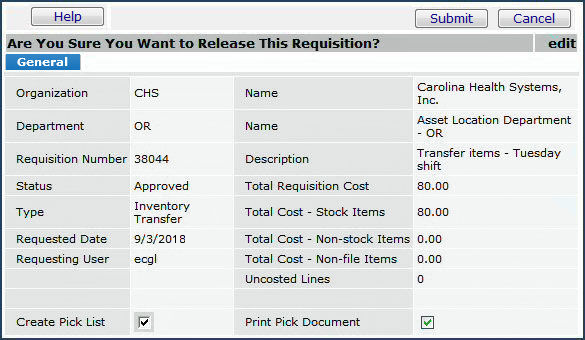
Figure 14 - Releasing a Transfer Requisition for Picking
Step 4. Confirm the Pick at the "From" Asset Location
- When the items for transfer have been picked, from the Materials Management main Contents, select Warehousing > Pick Lists.
- Locate the pick list for the requisition. (Figure 15).
- Click Confirm Pick.
The Pick Confirmation panel appears.
- Click Confirm.

Figure 15 - Pick Lists In Progress
Step 5. Receive the Items on the Transfer Requisition at the "To" Asset Location
When the items are delivered, you can create receipts.
- Change the Asset Location in Current Settings to the "to" asset location for the transfer requisition.
(In the example, the "to" asset location is OR.)
- Change the Department in Current Settings to the asset location department.
(In the example, the asset location department is also OR.)
- From the Materials Management main Contents, select Receiving > Receive Transfers.
- Use the Quick Click menu to locate the transfer requisition that is ready to be received, or click Show All to view the list of transfer requisitions for receiving and search the list to find the requisition (Figure 16).

Figure 16 - List of Inventory Transfer Requisitions for Receiving
- Next to the requisition, click Receive Transfer.
- Fill out the receipt panels to receive the transfer requisition. The process is similar to receiving a purchase order. If you need further details, see the previous section Receiving Transfers.
VI. Print a Put List for the Transferred Items at the "To" Location
- Click Receiving > All Receipts. The list of receipts appears.
- Click Show All to display receipts for all asset locations in the organization, including transfer receipts.
- Locate the receipt for the transferred items.
- Click Print Delivery Document (Figure 17).

Figure 17 - Receipts List: The First Line Is an Inventory Transfer Requisition Receipt
Adobe Acrobat Reader displays a put list for the items on the requisition (Figure 18).
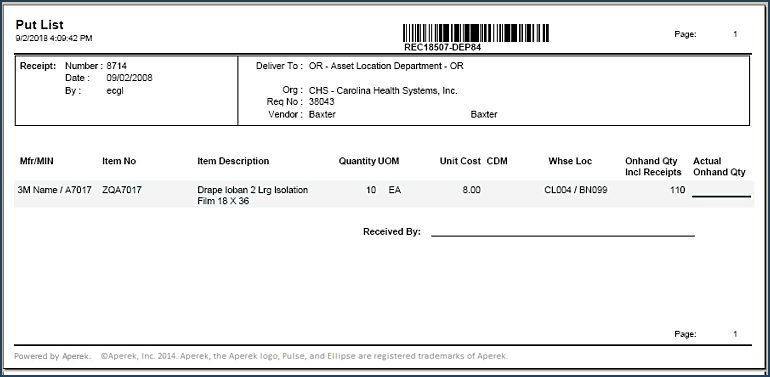
Figure 18 - A Put List for a Transfer Requisition
- To print the put list, click the printer icon on the top left of the Acrobat Reader browser.
Copyright © 2023 by Premier Inc. All rights reserved.