Materials Management provides a requisition import process to generate requisitions from external systems (such as Strata) and to handle replenishment of items in supply-dispensing units (such as Pyxis or Omnicell).
For supply-dispensing units, item quantity data is uploaded from departments' local units. Materials Management generates requisitions from the data and processes the requisitions to replenish the dispensing units. The application then exports information about the replenished item quantities back to the supply dispensers' data files.
Creating and processing requisitions from external applications -- or, to replenish a supply-dispensing unit -- has the steps below.
Some external applications and supply-dispensing systems produce .csv item information files automatically. Depending on your site's network structure, you may need to relocate the files to a network folder where Materials Management can find them, if they are not easily accessible.
Materials Management accepts .csv files that contain item data. The files can come from supply-dispensing units, or elsewhere. The .csv files must be formatted according to the Requisition Import Template. You will need to edit the files produced by the supply units or by an external application so that they match the Requisition Import Template. The import process generates requisitions from the .csv file data. See To get data for items to be replenished.This step uploads the .csv file to Materials Management. If you have the Pulse appliance configured to upload files, the upload occurs automatically. (Call the Help Desk for assistance with obtaining and configuring Pulse.) Otherwise, you can upload files manually, as described in To manually upload item data.
Validation checks the file for viruses and determines if the .csv file is formatted as the system expects.
Materials Management transforms the file into its own data records.
Materials Management processes uploaded .csv files to create requisition lines. A requisition line is created for each valid item record in the file. When either the organization or department code changes from one record to the next, a new requisition is created, so that one requisition exists for each department/organization combination.
The system determines if each newly-created requisition needs approval, based on the approval rules defined for users at your site. If a requisition needs approval, its status is Pending Approval, and the requisition is sent to the appropriate approver. Otherwise, the requisition status is Approved. (See Set Up and Maintain Users for details on user authorities.) If you are setting up auto-approval for imported requisitions, be sure to schedule the job so that its timing meshes correctly with the timing of the requisition import.
Each approved requisition is released for picking. If the items need to be ordered, the system either creates purchase
orders or adds the items to existing, unauthorized POs.
-
You can generate separate purchase orders by requisition: on the import template, set the field Separate PO by Requisition.
If new purchase orders are created as EDI POs, the system can automatically
authorize and send the purchase orders. Using EDI with automatic authorization
eliminates paperwork and requires little human intervention (except for approval
of the requisitions). For details on setting up EDI transaction processing, see Setting Up
EDI Vendors.
For items that can be issued, Materials Management displays a message that the pick list has been created, along with the pick list number. If items cannot be allocated, the system also displays a message, and no pick list is created.
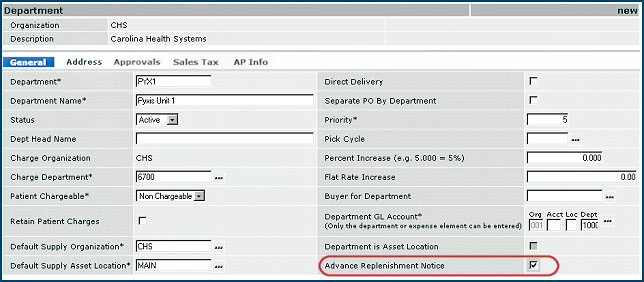
Materials Management creates a replenishment notice for supply-dispensing units' item files. The notice contains the items and quantities to be restocked in the supply units. Materials Management can export the notice automatically if you have the Pulse appliance set up for that purpose. Otherwise, you can export the replenishment notice manually.
If you need assistance obtaining or configuring Pulse, contact the Help Desk. Use the file type Advance Replenishment Notice when you set up Pulse for the supply unit.Note for users of blanket and standing requisition types: Requisition imports do not create blanket or standing requisitions.
The "Requisitions" role object must be set to Modify in order to perform the the functions required for the process of replenishing supply-dispensing units and importing requisitions.
Below are the procedures for importing data from a supply dispenser (such as Pyxis SupplyStation®) or from an external system (such as Strata). The import data is then used to generate requisitions.
Important: Your file must contain <EOF>, by itself, on the last line.
In the table below, column names in red are for non-file items. You can include both file and non-file items in the same import batch. The column name in bold following each column letter must be entered exactly as it appears in the list. The column letter is for reference only - do not enter it on the spreadsheet.
Fields in the table below with red text are used for non-file lines and bill-only lines.
CSV File Fields for Importing Requisition Item Data |
|
| Field | Entry |
| Row 1 - Header | |
| Column A: REQUISITION | The word REQUISITION or one of the following words is required: REQUISITIONCRED, REQUISITIONCHRG, or REQUISITIONMIXD. Requisition - used for standard requisitions (required pick and confirmation) RequisitionBill - used for bill-only requisitions |
| Column B: CustomerID | Your customer ID as defined by the system. Contact customer support if you do not know your ID. |
| Column C: Time Stamp | The date of the export in MM/DD/YYYY format; e.g., 05/06/2005 for May 6, 2005. |
| Row 2
- Column Names
Enter the column names exactly as they appear below, e.g., SUPPLYINGORG in Column C. |
|
| Column A: Org | Your organization's ID, up to 15 characters. This field is required. |
| Column B: Dept | Your department ID, up to 15 characters. This field is required. (You can also specify an asset location in this field.) |
| Column C: SupplyingOrg | The code for the organization that supplies you, up to 15 characters. This field is required. |
| Column D: SupplyingAssetLoc |
Your supplying asset location, up to 15 characters. This field is required. |
| Column E: ItemNo |
An item number, up to 15 characters. Required. |
| Column F: OrderedQty | The ordered quantity -- a whole number up to 9 places long. Required. |
| Column G: OrderedUOM |
The ordered UOM, up to two characters (e.g., CS). If no UOM is given, the system uses the default issuing UOM. |
| Column H: AllowBackordYN | Allow backorders? 0 if No; 1 if Yes. Required field. |
| Column I: CaseCartLineID |
The ID associated with a line on a case cart, if there is one. Must be a whole number up to 10 places long. If no value exists, enter 0. Required field. |
| Column J: RequestedDate | The requested date in MM/DD/YYYY format. This field is optional. |
| Column K: UserID |
The user's ID, up to 20 characters. This field is optional. If a value is not entered, the default is the UserID performing the import. If a value is entered, it must be the same for each row of data. |
| Column L: ReqDescription | A description of the requisition. |
| Column M: ChargeType |
0=Regular Req, 1=Credit Req, 2=Charge Only Req |
| Column N: LotNo | Optional, indicates Lot Number for a Lot Tracking enabled item. |
| Column O: ExpDt | Optional, indicates Expiration Date for a Lot Tracking enabled item date in MM/DD/YYYY format. On import, the date is dropped if its format is invalid. |
| Column P: SerialNo | Optional, indicates the Serial Number for a Lot Tracking enabled item. |
| Column Q: BypassQtyAdjustYN | Optional, determines whether the Order Qty should be adjusted based on previous activity. |
| Column R: PatientID | Optional. If used a patient charge is created. |
| Column S: ChrgDeptOvrd | Optional. If used, populates the Charge Department Override on a requisition line. The requisition line Charge Organization Override is derived from the organization record. |
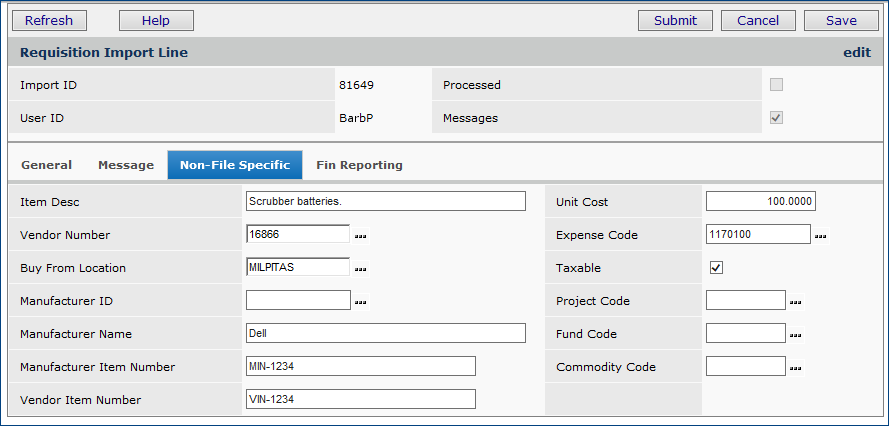
| Column T: ItemDesc | Required if the import line is a non-file line. Non-file lines use this column, instead of Item Number. If both an Item Description and Item Number are present on the import line, the import returns an error, and the import line is bypassed. Both file and non-file line can be included in the same import. |
| Column U: VendorNo | Optional. Contains the vendor's identifier in the application. |
| Column V: BuyFromLoc | Optional. Contains the vendor buy-from location name. |
| Column W: MfrID | Optional. Contains the manufacturer's identifier in the application. |
| Column X: MfrName | Optional. Contains the manufacturer's name. |
| Column Y: MfrItemNo | Optional. Contains the manufacturer's identifier for the item. |
| Column Z: VendorItemNo | Optional. Contains the vendor's identifier for the item. |
| Column AA: UnitCost | Optional. |
| Column AB: ExpenseCode | Optional. |
| Column AC: TaxableYN | Defaults to not taxable (N). |
| Column AD: ProjectCode | Optional ID for a project. |
| Column AE: FundCode | Optional ID for a fund. |
| Column AF: CommodityCode | Optional commodity code. |
Columns AG, AH, AI: |
Optional fields for financial reporting, if defined at a site. |
ColumnAJ: |
Optional code to generate separate purchase orders for requisitions. 1=Generate separate POs 0=Do not generate separate POs (default). |
Column AK: DiscountPct |
Required for non-file items. 7 characters max. |
Column AL: DiscountAmt |
Required for non-file items. 19 characters max. |
Column AM: BO ReceiptsReqYN |
Used with REQUISITIONBILL type. Indicates if receiptless (0) or receipts required (1). No= 0; Yes =1. Sets to 0 (zero) if not entered. |
Column AN; BOPhysicianID |
50 characters max. Optional for bill-only requisition imports |
Column AO: BOPatientID |
50 characters max. Optional for bill-only requisition imports |
Column AP: BOPatientAcctNo |
50 characters max. Optional for bill-only requisition imports |
Column AQ: BOCaseNo |
50 characters max. Optional for bill-only requisition imports |
Column AR: BOCaseType |
50 characters max. Optional for bill-only requisition imports |
Column AS: BOCaseDate |
20 characters max. Optional for bill-only requisition imports |
| Rows 3 and on - Data records | |
| Last Row - <EOF> | |
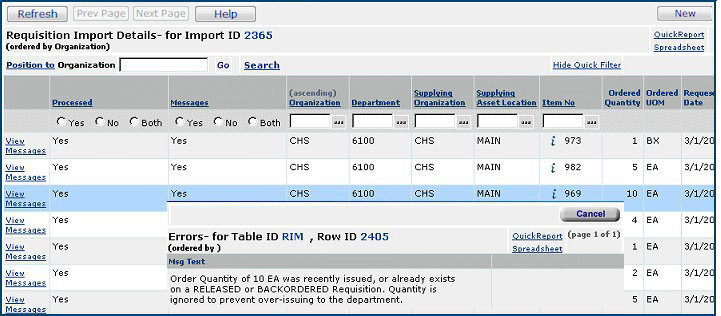
Note on the field BypassQtyAdjustYN: Imported requisitions from external systems (such as surgery systems) that come into Materials Management may need this field set. If the imported requisitions have the same item (for the same department) on them and the field is not set, when the first item is written to a pick ticket, the next item is rejected with messages such as:
"Order Quantity of 1 EA was recently issued, or already exists on a RELEASED or BACKORDERED Requisition. Quantity is ignored to prevent over-issuing to the department."
To handle this situation, set the BypassQtyAdjustYN field to 1 (yes) to bypass the logic that adjusts ordered quantity based on previous activity.
Note on the field Separate PO by Requisition: Select this field to generate separate purchase orders for requisitions imported into Materials Management. For example, for sites that import requisitions from applications such as Strata, when the Separate PO by Requisition field is set, ERP does not combine like items across multiple requisitions, but instead generates separate POs for each requisition number.
The steps below import item data from supply dispensing units or other external locations.

- Select the box labeled Load and Verify, No Import.
- Click Submit. The system attempts to upload your file and validate it. If successful, you will receive a message. If your file cannot be uploaded and validated, error messages appear. Read and close the error messages. Make changes as needed in your .csv file and try the upload again. Click here to read debugging information.
- The Import List for Type Requisition appears.
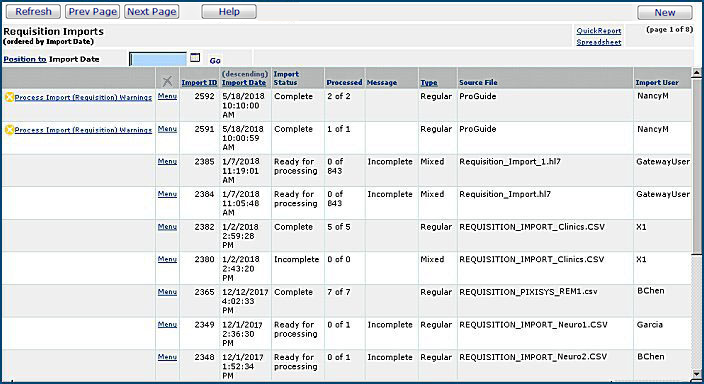
- Click Refresh to see your file listed.
- The Processed field displays the number of data records processed out of the total uploaded. This number shows how many of the import file records successfully created requisition lines.
n of X: X is the number of data records uploaded and n is the number of records processed.
For a one-stage upload, this field indicates whether
the system was able to create requisition lines using the imported file's records,
and, if so, how many were successfully created. 0 of X means that the system was
not able to create requisition lines using the imported file's records. For
a two-stage upload, 0 of X is normal.
Click Menu > View Import Details. The Requisition Import Details list
appears, and you can review your data, and look for errors, if you have any.
Figure 3 shows the Requisition Import Details list with the Messages panel for
the table row that is highlighted in blue.
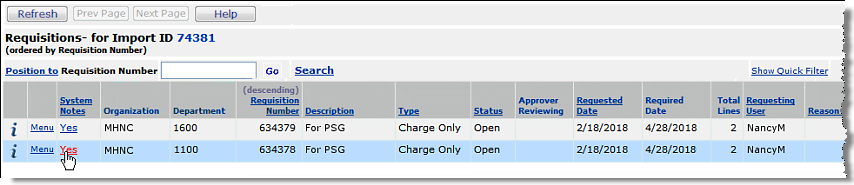
If you are using the one-stage approach, the system has run the import step for you. You can review any errors, and begin fixing any problems. If no errors exist, you can view requisitions created from the import process. (From the Materials Management main Contents, click Requisitioning > Requisitions - Current Dept.)
If you are using the two-stage approach, you need to process the file that you uploaded so that the requisition lines can be created. Do the following:
You can encounter errors at any or all of the stages of file upload and import. Error messages provide information about problems with the .csv file. In most cases, you will wish to alter your .csv file.
When an error occurs during the processing of an imported requisition, error messages are available.
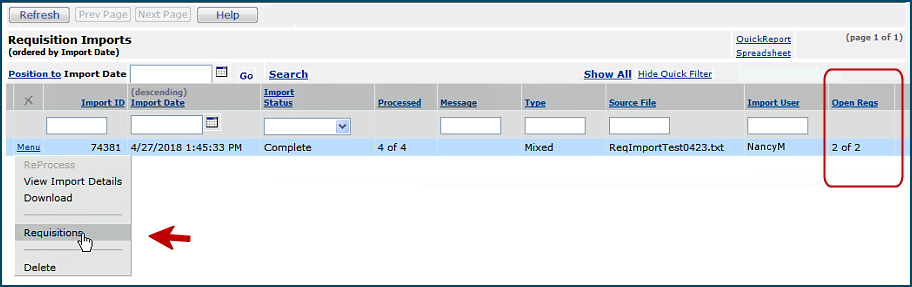

When you select Menu > Reprocess, the system attempts to create requisition lines using the imported records. The number of records successfully processed appears on the Import list, and problems with each record are logged as errors. To see the errors:
The system fills requisitions created from item data that is imported from external supply unit systems (Omnicell, Pyxis, HealthLine, Percon, ParEx, etc.) and Surgery Case Cart Systems (SurgiServer, Orsos, etc.). When items are issued, the system exports an advance replenishment notice. An advance replenishment notice (aka advance shipment notice) contains information for the supply units and systems that summarizes what has been issued to them from the Materials Management system. This feature is designed specifically for external requisitioning systems.
Note: Fill / kill procedures apply to stock items on the generated requisitions, but do not apply to non-stock items. For any given supply unit, non-stock items will be placed on separate generated requisitions, so that the fill rules can be applied to stock items.
Once exported, an advance replenishment notice automatically updates the item information in the supply unit system. From the supply-unit side, you can accept the exported data, or edit it using your supply unit system's tools. When stock is released from the inventory, or a receipt is created for a non-stock or non-file item, the system sends the ASN automatically.
Important: There is no way to track that the ASN was sent to an external system, except for asking the Premier Pulse Team to look for it. This activity must be done within the three day purge limit.
Important: When this box is checked, you can only issue to the selected department using the requisition import. The department must be a "ship to" not a "charge to" department. No audit exists for this field, so there is no way to check when it was turned on, or off. The number of users able to work with this function must be limited, and careful when making updates. Also, no report object contains this field, so you cannot build a report to check the status of this flag at this time. If this field is unselected, even after a requisition is created, it does not. The system follows the current setting on the department
When stock is released from the inventory, or a receipt is created for a non-stock or non-file item, the system sends the ASN automatically.
The system follows the "current" setting on the department. If the flag has been unselected, the ASN is not sent.

Copyright © 2023 by Premier Inc. All rights reserved.