Working with Journal Vouchers Version
Contents
Overview
General Ledger lets you create and post journal vouchers. The following paragraphs are a brief, and highly simplified summary of the accounting cycle as it applies to journaling. Using General Ledger requires a basic knowledge of accounting principles and methods. You may wish to refer to an accounting textbook, or other reference source for a detailed discussion of the accounting cycle.
When you perform various activities, such
as paying an invoice or adjusting inventory, the system creates a transaction
in one or more accounts at your site. Transactions of this type are chronological.
For example, you may have an account called "Inventory Adjustment"
in which the system records plus or minus dollars every time you add or remove
items from inventory. An account called PO Liability may record dollars that
you owe to vendors as a result of authorizing and sending purchase orders and receiving goods. You
may have accounts for interest earned on investments, etc. Such accounts record
your spending and revenues on a day-to-day basis. However, to show a coherent
financial picture of your hospital, the many individual transactions in each
account must be collected and recorded as a single credit or debit to the account. This information can then be used to create
financial reports showing assets, liabilities, revenues, expenses, and equity.
You can require approvals for manual journal vouchers. Several options are available for approval processing, which requires setup. (The approval process is not used with recurring and statistical journal vouchers.) See Journal Voucher Approval Processing for details.
Financial Reporting Fields
Your site may be set up to use Financial Reporting Fields in various parts of the application. Similarly, you may also be using Project Codes and Fund Codes.
Financial Reporting Fields, along with Project Code and Fund Code, let you generate reports on non-account code fields. For example, your site might define Physician as a financial reporting field. Users could then select the physician associated with a journal voucher.
If financial reporting fields are used by your site, the tab Fin Reporting appears on the panels. (Otherwise, this tab does not appear.) You can enter field values on the tabbed panel.
Details are located in Using Financial Reporting Fields in ERP.
Security
The "GLJVs" role object controls access to all Journal Voucher menu items except Journal Voucher Mass Posting.
- The minimum setting is View.
The "FINTables" role object controls access to Journal Voucher Mass Posting.
- The minimum setting is View.
Special controls are available for security of imported journal vouchers that contain payroll data. See Security for payroll accounts.
User Access to Journal Voucher Documents
The "Documents" role object controls access to JV documents. The Create setting (or All) allows users to create and copy documents. The default setting is Create. Only users with the All setting can delete documents.
The Journaling Process
Essentially, the journaling process collects information
that you already have in the system. The journaling process takes the many daily
transactions in accounts (such as Inventory Adjustment) and summarizes them
in a source journal. The summary is balanced.
- A balanced group of entries in a source journal is
a journal voucher.
Each journal voucher is numbered with a numeric or alphanumeric code.
You can establish multiple source journals to classify
transactions. For example, you may wish to set up an AP source journal, and
label all of its journal vouchers beginning with "AP". Or, you may want
a source journal for materials transactions only. Source journals for your site
are set up in your tables. (See Viewing Source
Journals.)
Once you create a journal voucher, you post the entries in the journal
voucher to the General Ledger. This step records the summary debit and credit
amounts to the appropriate General Ledger accounts. Typically, journal vouchers
are created and posted to accounts on a monthly basis. Accounts are balanced
for each month. Year End Close balances accounts for a financial year.
You can build templates for common journal voucher entries. Templates simplify
the process of inputting data for the journal voucher. In addition to regular
journal vouchers, you can create journal vouchers for statistical accounts.
You can also create reversing and recurring journal vouchers.
- A reversing journal voucher reverses a journal voucher made previously.
- A recurring journal voucher repeats, up to a specified period and year, then stops.
You can create journal vouchers and import
them directly from an Excel spreadsheet file using a standard template. The template allows import of a single journal voucher or multiple
journal vouchers in a single spreadsheet. Contact Technical Support
for information about downloading the template. In addition to creating manual journal vouchers, you
can also import journal vouchers into the application from an external system.
When you create a journal voucher in the application, if an
entry account number does not exist in the Account Master table, General Ledger gives
you the opportunity to add the account to the table of accounts. However, if
you are importing a journal entry, and the account does not exist, you
do not have the option of creating the account.
The journaling process may become clearer if you look
at some sample entries for GL Accounts and see what the journal vouchers contain
and how entries in each are structured. The sections below contain examples.
User Requirements and Organization Requirements
Your user profile
must have the correct security authorizations and settings to allow you to use
General Ledger. If you are allowed to enter GL data for prior and/or future periods,
and to create, post, or unpost journal vouchers, permissions must also be set.
The GL Limits tab on the User panels
contains the appropriate permissions fields. Also, you need to be assigned the
correct role and data profile for work in finance. See Set
Up and Maintain Users.
If you are allowed to unpost journal vouchers, unposting
must also be allowed for your organization. Similarly, if you are creating journal
vouchers for multiple organizations, inter-organizational processing must be
enabled on the organization's records. (See Fields
on the Organization Main tabbed panel.) Several other settings on
the Organization panels are relevant to General Ledger. You may wish to review Identify Administrative and Operational Units.
Using General Ledger Account Information
Most often, General Ledger accounts are brought into the system during implementation. You can view your General Ledger accounts from the main Contents. For each account, you can view balances and journal vouchers by period, as well as individual entries in each journal voucher.
- From the the General Ledger main Contents, select Account Management > GL
Accounts. The GL Account Codes list appears (Figure 1).
You can specify the Organization in the Organization Quick Filter. Otherwise, the list displays accounts for all organizations.
The organizations that you can display are those allowed by your Data Profile.
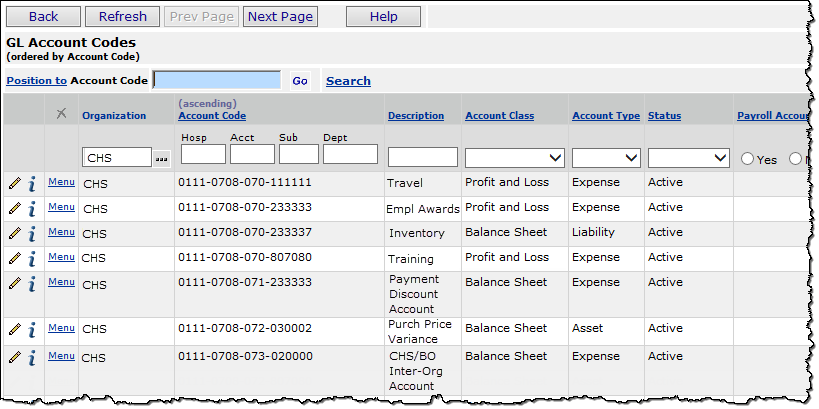
Figure 1 - GL Account Codes List
- Click Help for a description of the fields on the list.
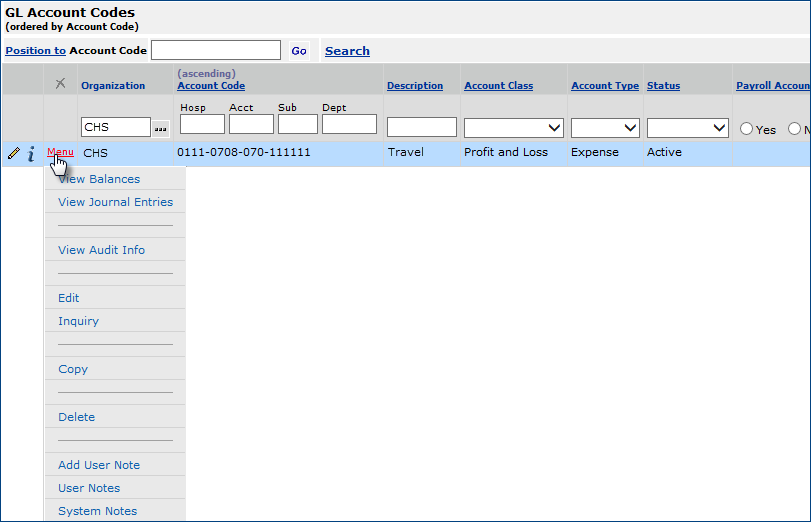
- Figure 2 shows the menu next to an account.
Figure 2 - GL Account Codes List with Menu
- To view balances in any account, select Menu > View Balances.
The balances in the account are displayed by period (Figure 3). Period 5 shows a balance in 2006.
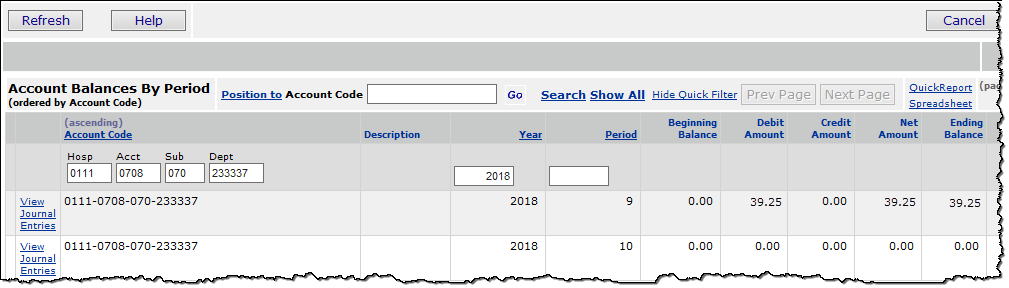
Figure 3 - GL Account Balances by Period
- You can drill down to journal entries for each period from this panel (Figure
3), or from the menu on the previous panel (GL Account Codes list).
- On the Account Balances by Period panel, click View Journal Entries in any row for a year and period.
A list of posted journal vouchers are displayed (Figure 4) — in this
case, one journal voucher exists for the year 2006 and period 5.
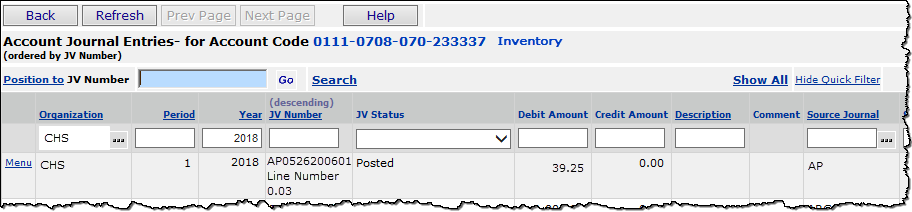
Figure 4 - Posted Account Journal Entries
- In Figure 4, the journal voucher number for the posted journal
voucher is AP0526200601. The source journal is AP. The total amount
in the journal voucher is $39.25. You can drill down further to see
the actual entries in the journal voucher.
- Click Menu > Journal Voucher to see the entries in the journal voucher AP0526200601.
A panel with two tabs appears: the Journal Entries tab which contains individual entries and the Journal Voucher
tab which contains general information about the journal voucher. The journal voucher in Figure 5 only contains one entry.
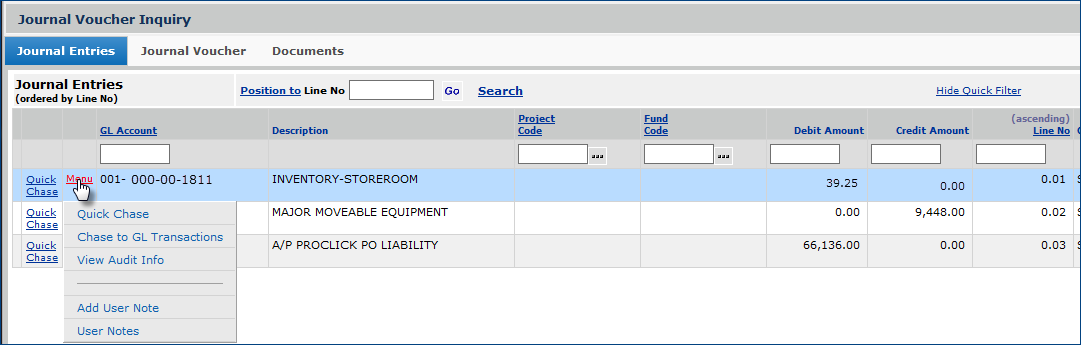
Figure 5 - Journal Voucher Inquiry Panel
- Each entry on the Journal Entries panel summarizes one or more GL transactions.
- Click Menu > Chase to GL Transactions to see the transactions
summarized by an entry on the journal voucher.
Figure 6 shows the Chase.
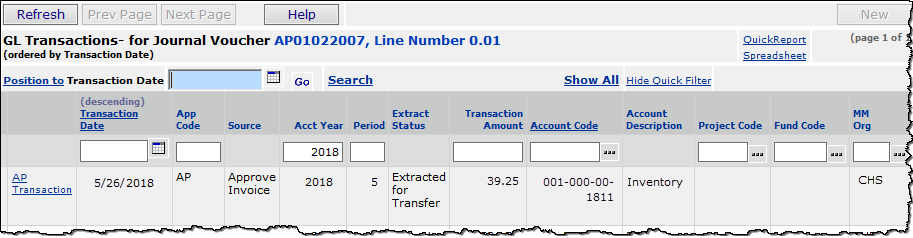
Figure 6 - GL Transactions for a Journal Voucher Entry
- The GL transaction in Figure 6 is for Account Code 001-000-00-1811
(in the 9th column from the left) described as Inventory (column
10). The Source (red arrow) is an Invoice Approval.
- Click AP Transaction to see what occurred to trigger the general ledger transaction.
Figure 7 shows the result of clicking AP Transaction. From the information on the AP Transactions panel, the Transaction Type is an invoice approval.
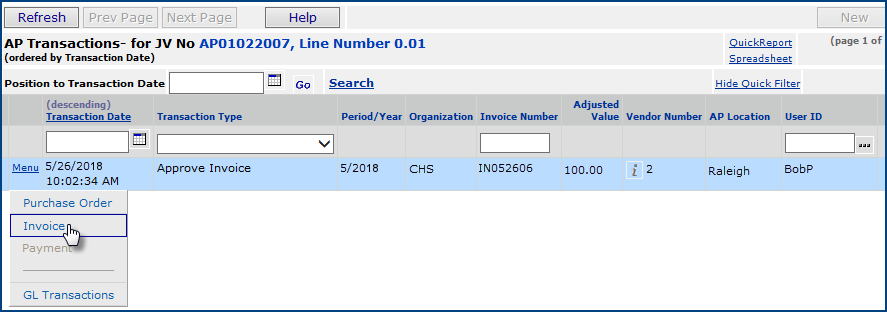
Figure 7 - Inventory Transactions for Journal Voucher Entry
- Click Menu > Invoice to view an inquiry on the invoice.
- Clicking the i next to the vendor number in the Vendor Number column displays the vendor record inquiry.
- Selecting Menu > GL Transactions provides more information about this journal entry (Figure 8).

Figure 8 - General Ledger Transactions for an Invoice
- Return to the GL Accounts list.
- If you are using Internet Explorer tabs, click the tab for the GL Accounts list.
- If you are not using Internet Explorer tabs:
- Click X (in the upper right corner) to return back to each previous panel until you reach the Journal Entries panel.
- Then click Back to return to other panels until you reach the GL
Accounts list.
Manual Journal Vouchers
Depending on routines and work flow at your site, you can create journal vouchers
manually, or import them in spreadsheet format. Below are instructions on viewing
journal vouchers, creating regular journal vouchers manually, and importing
journal vouchers.
Notes:
- For the same period, if you delete a journal voucher, you can create a new journal voucher with the same journal voucher number (JVNumber), type (JVType), Organization, Period, Accounting Year (AcctYear), and recurring count (RecurCount), if used.
- If a journal voucher has not been deleted, a duplicate journal voucher is not allowed.
To view the list of journal vouchers:
From the General Ledger main Contents, select Journal Vouchers > Journal
Vouchers. The list of journal vouchers appears (Figure 9) or No Data
if none exist.
Figure 9 - Journal Voucher List
- By clicking JV Print, you can output a copy of a journal voucher to Adobe Acrobat Reader, and then print the journal voucher on a printer.
- For each journal voucher, the list shows:
- the Organization that the journal voucher was created for
- the journal voucher number (JV Number)
- the Period and Year from the financial calendar
- The JV Type column can be blank, or can show the value Reversing or Recurring.
- Reversing specifies that the journal voucher summarized in the line is a reversing journal voucher. The Reversing Period and Reversing Year are also displayed.
- Recurring means that the journal
voucher repeats up to a specified period and year.
- Payroll is a payroll journal voucher. Specific security applies to this type of JV.
- A blank journal voucher field indicates a "regular" journal voucher.
- The JV Status line can contain these values:
- Entered - The journal voucher has been entered, but not posted
to the General Ledger.
- Incomplete - The journal voucher has been created, but is
not complete.
- Posted - The journal voucher has been posted.
- Deleted - The journal voucher has been deleted.
- Note: You can create a new journal voucher that reuses the JVNumber, Organization, Period, AcctYear, Type, and RecurCount from the deleted journal voucher.
- The Total Debit Amount contains the amount debited to the account.
- The Profit Effect shows the positive or negative effect on profit
for the journal voucher, calculated as follows:
Credits to Account Class 2 (Profit and Loss) accounts increase
profit.
Debits to Account Class 2 accounts decrease profit.
- A code for the source journal is in the Source Journal column.
For information on other fields, click Help.
To create and post a regular journal voucher:
- From the General Ledger main Contents, select Journal Vouchers > Journal
Vouchers. The list of journal vouchers appears (Figure 8) or No Data
if none exist.
- Click New. The New Journal Voucher panel appears (Figure 10).
Figure 10 - New Journal Voucher Panel
- Enter fields on the New Journal Voucher panel.
Click Help for a description of all the fields.
- Select a Source Journal.
- Number the journal voucher, or let the application auto-number it.
If your Organization record specifies that journal vouchers should automatically
be numbered, then a Journal Voucher Number is assigned based on system values established in your site's System Values table.
- To set up your organization for auto-numbering of JVs, from the General Ledger main Contents, select Tables > Organizations.
The organization list appears.
- Locate the organization on the list, and click the edit icon.
- Click the GL Info tab and select the field Auto Number JVs (Figure 11).
Figure 11 - Organization Edit Panel: GL Info Tab - Setting JV Auto Numbering
- If you do use auto numbering, you can override the assigned number and enter a different value
in the Journal Voucher Number field, if you wish.
- The Auto Number JVs field, when set, also allows you to auto number journal vouchers imported on the JV Excel Template. (Details are in a subsequent section.)
Important: If you enter your own
Journal Voucher Number, it cannot exceed 12 digits (or 12
characters and digits combined, if you use characters in your JV numbers). You will not be permitted to enter more than 12 digits on the New Journal Voucher Panel. However, if you are creating journal vouchers using the Excel JV Template,
each JV number must be no more than 12 digits long
For information on the Organization record, see Fields
on the Organization General Ledger (GL) Information Panel.
- If Inter-Org Transactions Allowed is selected, accounts with different
organizational segments (Segment 1) are allowed in the journal voucher. If
this field is not selected, all accounts in the journal voucher must have
the same value for Segment 1, and the same organization specified in the journal
voucher header. Inter-organizational processing must be set for the organizations
on their Organization records.
- Select Auto Create Inter Org Entries when you wish to create inter-organizational
journal vouchers. The Inter-Org Transactions Allowed field must also
be selected.
If the organization allows inter-org transactions, this field will automatically populate when you save or submit your journal voucher.
- The person creating the journal voucher may have a user profile setting
that requires entry of a dollar value in Total Debit Batch Control.
This field contains the total dollars being processed in the journal voucher.
When required in the user's settings, the value in this field must match the
Total Debit Amount, calculated as the total debits for
the journal voucher (sum of debits of the entries).
- Similarly, when required by the user profile, Entry Count Control
must match Entry Count -- the total count of entries in the journal
voucher.
- Click Save.
- Click Submit.
The Journal Voucher Entry Edit panel appears. Figure 12 shows a journal voucher with one line entered, and another in progress.
- Use the General tab to create the entries for the journal voucher.
- Click Save after each you create each entry. Entries accumulate in the lower part of the panel under Journal Entry Lines.
- Use the Documents tab to upload a document to the Journal Voucher.
Figure 12 - Journal Voucher Entry Panel
- When you have finished entering information, click Save.
(You may wish to click Save periodically, if you have a lot of entries.)
Your journal voucher must be balanced; that is, the Difference between
Total Credit Amount and Total Debit Amount (in the upper right
hand corner) must equal zero. Otherwise, you will have errors in the journal
voucher, and will not be able to post it.
- Click Finish Now or Finish Later.
If you click Finish Now, and no errors exist, the journal voucher is
posted to the General Ledger, and its Status is Posted.
If you click Finish Later, and no errors exist, the Status of
the journal voucher is Entered. You can post it later.
The system asks you to verify that you wish to create the journal voucher.
- Click Submit.
You are returned to the Journal Voucher list.
- Click Refresh to view the journal voucher and its status.
- Click Menu > Post to post an Entered journal voucher. This is next to the journal voucher on the Journal Voucher list.
The Status changes to Posted.
Attaching a Document to a Journal Voucher
You may attach a document to any journal voucher via the Documents tab. On the Journal Vouchers list, click the i icon next to the journal voucher of interest. (If the journal voucher has not been posted, you can also use the edit icon  ). (See Figure 9, above.) When the next panel displays, click the documents tab. (See Figure 13 below.)
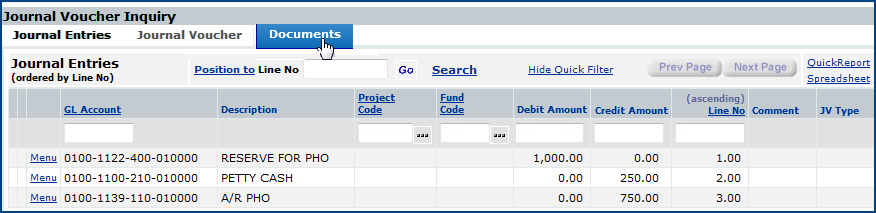
Figure 13 - Inquiring on a Journal Voucher
The documents list is displayed. Click New to upload a document. (See Figure 14 below.)
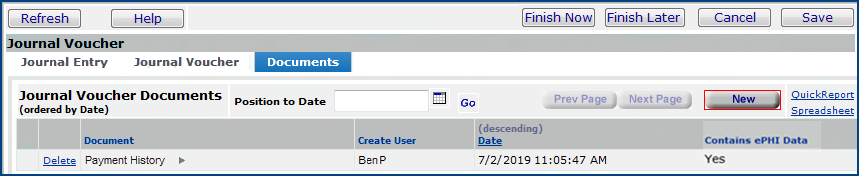
Figure 14 - Journal Voucher Documents List
An upload panel will appear. Browse for the file you wish to attach, and give it a name. (See Figure 15 below.) When you return to the documents list, click Refresh to see the newly added document displayed.
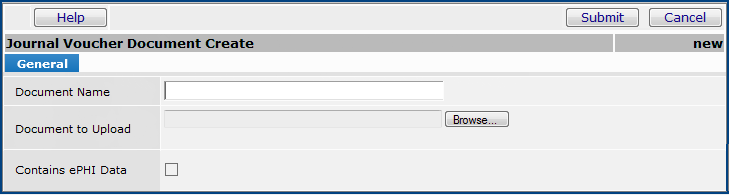
Figure 15 - Upload a Document to a Journal Voucher
To view a document:
- Click the arrow next to the document.
The Microsoft Windows Download panel appears.
-
Click Open.
- You can attach a new document to a check request by clicking New (Figure 14, red box).
You can also view documents from the JV row on the Journal Vouchers list (Figure 16). The last column is Documents. This column contains the names of documents attached to the journal voucher.
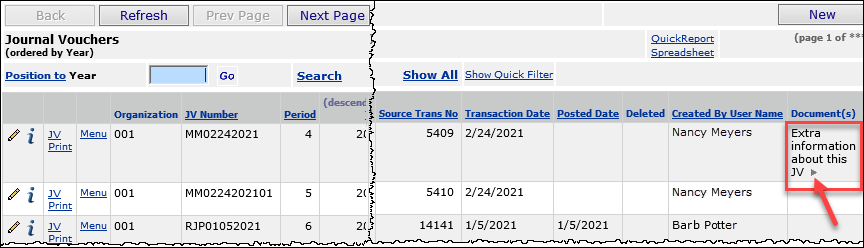
Figure 16 - The Documents Column on the Journal Voucher List
If a single document is available , the document name and arrow  are visible.
- Click the to open the document for viewing.
If multiple documents are available, the most recent document that was uploaded appears, followed by the word "Multiple."
- Click the arrow to open the document.
Documents Containing Electronic Protected Health Information (ePHI)
If you do not have ePHI access and the "Contains ePHI Data" checkbox is selected, you cannot view a document. When you click the arrow to open the document, the Insufficient Authority message appears. For more information, see Securing Electronic Protected Health Information (ePHI).
For Bill Only documents, if the checkbox has previously been selected for "Contains ePHI Data," then only the Administrator can change the status of the document and select or unselect the "Contains ePHI Data," checkbox. This checkbox remains locked for everyone else.
Posting and Unposting Journal Vouchers
When you click Finish Now during creation of a manual journal voucher,
the journal voucher is posted to the General Ledger. You can also "unpost"
journal vouchers from the Journal Vouchers list by selecting Menu > Unpost.
When you unpost a journal voucher, its Status becomes Entered.
If you want to delete a posted journal voucher, you must unpost it first.
Mass Posting Utility
If you have a large number of journal vouchers to post, you can use the journal
voucher mass posting utility:
- To use this utility, from the General Ledger main Contents, select Journal
Vouchers > Journal Voucher Mass Posting.
The Journal Voucher Mass Posting Selection panel appears.
- Use the Selection panel to specify the journal vouchers that you wish to
post.
You can select journal vouchers by Organization, Period/Year,
Source Journal, Type (e.g., recurring, regular, or statistical),
Journal Voucher Number, and/or Transaction Date. You can specify
ranges in these fields if you need to select a range of journal vouchers.
Click Help for detailed information about the fields.
- Click Submit to post the journal vouchers specified in the selection
criteria.
Prior Year Journal Vouchers
Prior year journal vouchers have a fiscal year that is prior to the Balance
Sheet Current Year specified on the Organization Record. The user creating
prior year journal vouchers must have permission (set on the user profile) to
do so. Posting or unposting to a prior year updates the net profit effect on
the next fiscal years' Retained Earnings. Prior posting also updates opening
balances of balance sheet accounts for each successive year, including the current
year.
Statistical Journal Vouchers
The process of creating journal vouchers for statistical accounts is the same
as the process for regular journal vouchers, with these differences:
- Non-applicable fields on the New Journal Voucher panel (Figure 8) are missing for statistical journal vouchers.
- The accounts available for selection on the Journal Voucher Edit panel are
statistical accounts only.
- The path for creating and viewing statistical journal vouchers is:
From General Ledger main Contents: Journal Vouchers > Statistical Journal Vouchers.
- Statistical journal vouchers do not need to balance.
Users processing invoices may create distribution lines for statistical GL accounts. When imported into GL, the transactions create statistical journal vouchers.
Using Reversing Journal Vouchers
A reversing journal voucher reverses a previous journal voucher's debit and
credit entries. Creating a reversing journal voucher has these differences from
creating a regular journal voucher. (See Figure 10.) The Reversing Period/Year field must be completed. The journal voucher Type is then set to Reversing.
- The Reversing Period/Year values must be greater than the Fiscal Period/Year.
When a reversing journal voucher is posted:
- The sign on the Profit Effect is reversed.
- The system creates reversing detail records for the journal voucher: Debits become credits; credits become Debits.
Importing statistical journal vouchers with a reversing year/period generates an error. Instructions in a subsequent section explain how to handle these imports.
Recurring Journal Vouchers
Recurring journal vouchers contain entries for dollar amounts that need to
be journaled regularly, often at predictable intervals such as monthly or quarterly.
You can specify and store information for the journal entries that you wish to make, and then process the information
to actually create the journal vouchers when needed.
Using a recurring journal voucher has two parts:
- Creating and storing the information for the journal voucher in the system.
- Processing the information to create the journal voucher. You can post the
journal voucher at the same time, or you can create the journal voucher, and
post it later.
The processing step creates the journal voucher from the information that
you set up. Many users prefer to process a group of recurring journal vouchers
all at once.
To make this step easier, the system panels let you build a
batch job to process one, or many recurring journal vouchers at the same time.
To set up a recurring journal voucher:
- Collect the information that you need for the journal voucher, including
how often the journal voucher should be created and when recurrence stops.
- From the General Ledger main Contents, select Journal Vouchers
> Recurring Journal Vouchers.
A list of recurring journal vouchers appears (or No Data if none exist yet).
- Click New.
The Recurring Journal Voucher Edit panel appears (Figure 17).
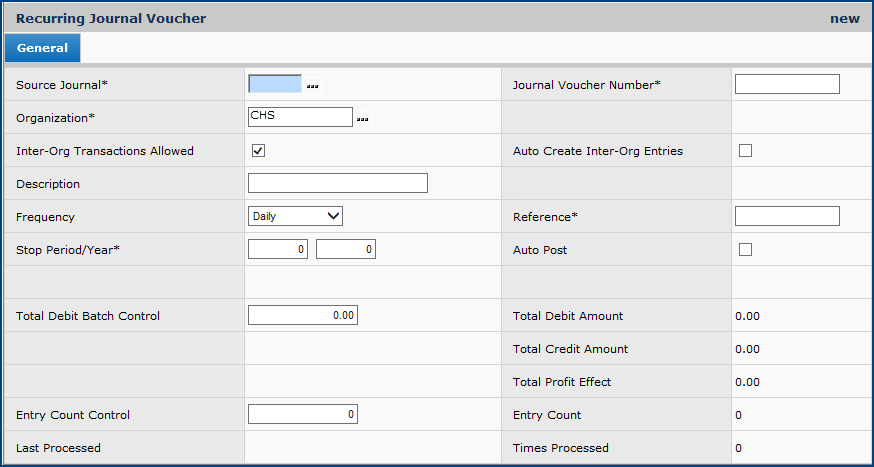
Figure 17 - Recurring Journal Voucher Edit Panel
- Complete the fields on the panel as follows:
- Complete the Source Journal, Organization, and Description
fields. (Click Help for more information.)
- Select the Frequency. This field specifies how often the journal
voucher recurs. Options are:
Daily, Weekly, Bi-Weekly, Monthly, Bi-Monthly (every two months), Semi-Monthly (twice a month), Quarterly,
and Miscellaneous (can be run at any time).
- Except for Monthly, you can process journal vouchers for any Frequency at any time.
- If you select Monthly, once you create the journal voucher for a given period and year, you will not be permitted to process the recurring journal voucher again in the same month for the same period/year. You can however process the Monthly journal voucher for a different period/year.
- Enter the Stop Period and Year from your financial calendar.
The system processes the recurring journal voucher up to but not including the Stop Period and Stop Year.
- Enter Total Debit Batch Control and Entry Count Control, if
required.
- Enter the Journal Voucher Number. When you view the journal voucher, it
will have the number you assigned. However, internally, for each recurring
journal voucher, the system does build a unique journal voucher number.
For example, if you enter 1215, journal voucher
numbers
such as 1215REC0001, 1215REC0002, etc. may be built. Each recurring
journal voucher is displayed as 1215, however.
- Complete the remaining fields, if needed.
- Click Save.
- Click Submit.
The Recurring Journal Voucher Lines panels appear.
- Enter information in the panels, which are similar to Figure
12.
- Click Save periodically.
- When you are finished, click Finish Now or Finish Later.
The Recurring Journal Vouchers list is displayed.
- Click Refresh to see your new recurring journal voucher on the
list.
To process a recurring journal voucher:
- From the General Ledger main Contents, select Journal Vouchers
> Process Recurring Journal Vouchers.
A list of batch jobs that process journal vouchers appears (or No Data if none exist yet).
- Click New to create a new batch job.
The Recurring Journal Voucher Selection panel (Figure 18) appears.
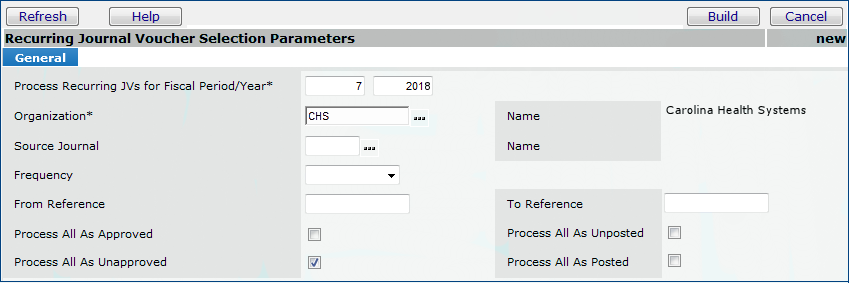
Figure 18 - Recurring Journal Voucher Selection Parameters Panel
- Use this panel to specify attributes of the recurring journal voucher(s)
that you wish to include in the batch processing job.
You must complete the field: Process Recurring JVs for Fiscal Period/Year.
You can enter the current period/year, or another period (if you have authorization).
The entries in Figure 18 create a batch processing job that includes all journal
vouchers for the Organization CHS, Source Journal MM,
with a Monthly Frequency. You could have entered information
in other fields — for example, a range of Reference values — if you
wanted to identify other characteristics of journal vouchers to process.
- Click Build.
The system displays lines containing journal voucher information that match
the selection criteria. The Select box is checked by default.
Note: A Monthly recurring journal voucher that has already been created for the specified Period/Year will not be available for processing again in the current month. (The recurring journal voucher is not included on the select list for processing if the Period/Year are the same and the month is the same as a previous run.)
- Click the Unselect box for any row on the list that you do not
wish to process as a journal voucher.
- Click Process as Posted if you wish to post the journal voucher(s)
immediately.
- Click Finish Now.
If there are no errors, the system creates the journal voucher and displays
it on the Journal Vouchers list (Figure 9). You can post the journal voucher if you have not done so.
Payroll Journal Vouchers
To access payroll journal vouchers, a user must have the following security settings:
- On the user profile, GL Limits tab, the field Allow Access to Payroll
Journal Voucher Detail must be selected.
- In the user's role, the following role objects must be set to minimally to Modify to edit payroll journal vouchers. Create allows the user to Create payroll journal vouchers. All allows all access. (See Work with User Roles.)
- "PayJV"
- "PayJVDtl"
If you are importing a payroll journal voucher from Excel, note that this format has additional fields at the bottom for employee information. Also, be sure to install the Excel Add-In so that you can upload the journal voucher.
Journal Voucher Templates
Most hospitals have general ledger accounts whose account numbers follow a
pattern; for example, inventory accounts for asset locations that may differ
only in one or two account segments. You may create and post journal vouchers
to such accounts regularly. Or, you may simply have many accounts that you create
journal vouchers for. To avoid entering a lot of information over and over,
you can set up a template that generates the account information on journal
vouchers. (You complete the dollar amounts.) This process is useful, especially
if you journalize and post entries for many of the same accounts regularly,
but with different dollar values
To build a template for journal vouchers:
- From the General Ledger main Contents, select Journal Vouchers
> Journal Voucher Templates.
A list of templates appears.
- Click New.
The Journal Voucher Template panel appears. Use this panel to specify the
account and other information for your journal vouchers.
- Enter information in the center of the panel, under General. Click
Help for details on the panel fields.
- Click Save.
Lines are built at the bottom of the panel.
- Click OK.
You are returned to the Templates list.
Click Refresh to view your new template on the list.
To create a journal voucher from a template:
- From the General Ledger main Contents, select Journal Vouchers
> Journal Voucher Templates.
A list of templates appears.
- Locate the template of interest and click Menu > Create JV.
The New Journal Voucher panel appears (Figure 10).
Follow the previous instructions for this panel.
- Click Submit when you are finished entering information on the New
Journal Voucher panel.
The system displays the Journal Voucher Created From Template panel containing
the lines it has generated using the accounts on the template.
- Enter the dollar amounts for each account, as appropriate.
- Click Save.
- Click Preview to view the journal voucher that is generated.
If you have no changes, click Submit.
Otherwise, click Cancel to return to the previous panel to make corrections.
- Click Finish Now or Finish Later to produce the journal voucher.
The difference between a recurring journal
voucher and a journal voucher template
- A recurring journal voucher enters the same
dollar amounts for the same accounts. Both the accounts and the amount
are repeated.
- A journal voucher template is a shortcut
way to specify accounts, particularly if you have many accounts that follow
a pattern. The amounts journaled differ.
Importing Journal Vouchers From an Excel Spreadsheet
Your site may find it efficient to create journal vouchers using a Microsoft
Excel spreadsheet, and import them into the system. To simplify the creation and
import process, a template and an Excel add-in are available as downloads from General Ledger. You should download the template and the add-in to a network location where you can access them from Excel.
The current version of the template and add-in replace versions in formats earlier than Excel 2010. If you need to install them, you must first disable (by unselecting) the old versions that you are currently using. The instructions below explain how to install, enable, and disable these tools.
- The add-in has the .xlam file extension.
- Templates with embedded macros now have the file extension .xlsm.
To download and install the Excel journal voucher template and add-in:
These instructions download and install the Budget Template for Excel 2010 and the Excel add-in (which lets you upload data to the General Ledger).
Important: members accessing the ERP General Ledger application through must use the new template and add-in.
Users (working with a version of Excel earlier than 2010) can continue with old templates that they have downloaded in the past, as long as they do not need to sign on through .
Caution: The download and install process overwrites any existing Excel worksheet
with the same name. If you have an existing worksheet with the same
name, you may wish to rename it so that its data are
preserved.
To download and install the Budget Template for Excel 2010 and the Excel add-in:
- From the General Ledger main Contents, select Journal Vouchers > Excel
JV Template.
The Download panel appears (Figure 19).
- Select Click here to download this File.
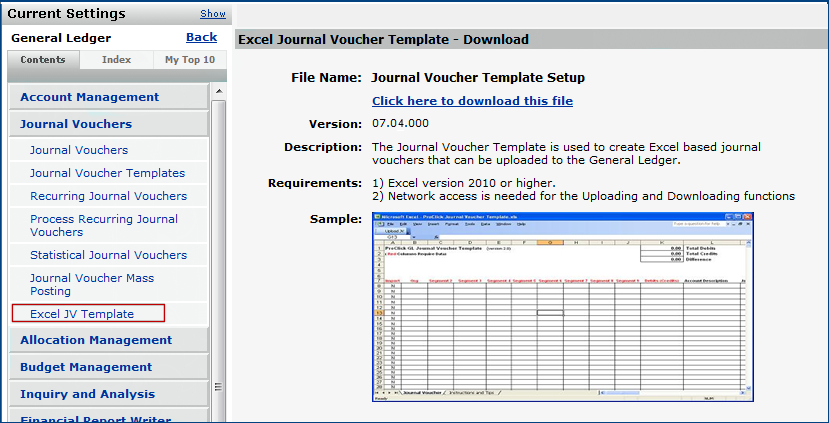
Figure 19 - Excel JV Template Download Panel
- Click Run.
Depending on your Internet Explorer Security Settings, a verification panel may appear.
- If the verification panel appears, click Run.
The installation wizard panel appears (Figure 20).
- Click Next.
Follow instructions on the install Wizard, clicking Next as you move
through the panels.
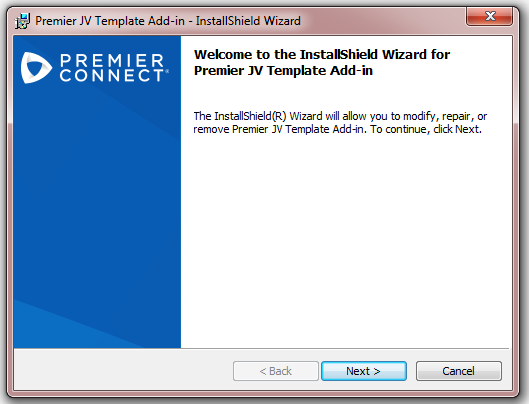
Figure 20 - The First Panel of the JV Template Install Wizard
- The Destination Folder panel appears (Figure 21).
The Destination Folder panel specifies
the Destination Folder where the add-in and the template will be installed.
If you wish to install
in another location, click Change and specify the location.
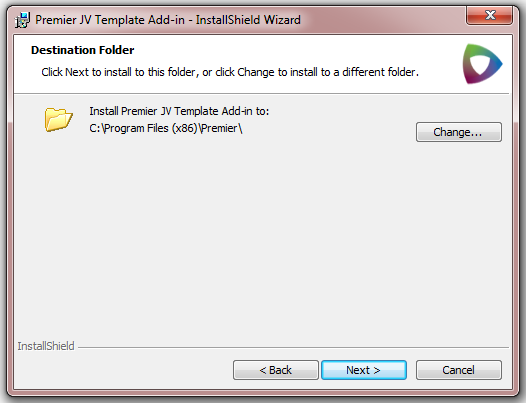
Figure 21 - Destination Location for
Installed Journal Voucher Template
- Click Next.
The Start Installation panel appears (Figure 22).
- Click Install.
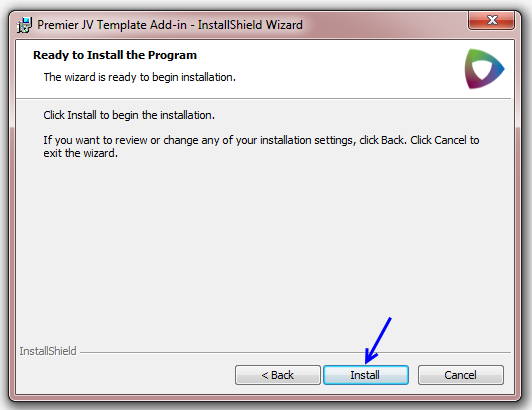
Figure 22 - The Start Installation Panel
The template and add-in ares installed in the location specified. A
message appears when installation is complete (Figure 23).
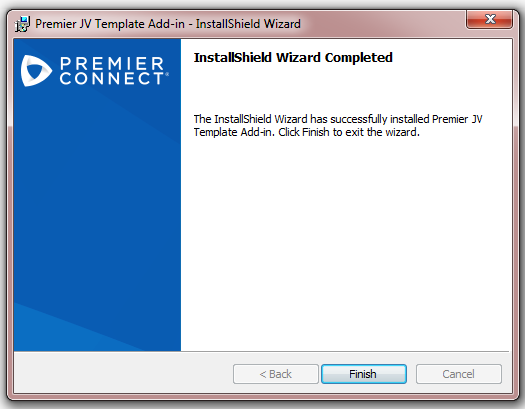
Figure 23 - Finish Template Installation
Panel
- Click Finish. The add-in and template are installed and available on
your local system in the location you specified. You are returned to the system. Next, you need to enable the add-in.
Enabling/Disabling Excel Add-Ins
The steps for enabling an Excel add-in (once you have installed it) are the same as the steps to disable an existing Excel add-in (before you install a new version). The difference is that to enable the add-in, you select the box next to the add-in in the steps below (Figure 27). To disable the add-in, you unselect the box.
Note: You only need to perform the enable step one time.
To enable an add in
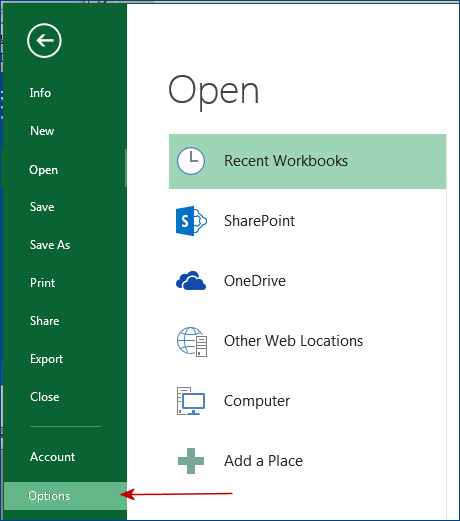
- On the Excel ribbon, click File. The Excel Menu appears (Figure 24).
Figure 24 - Opening the Excel Options Panel
- Click Options (Figure 24).
The Options panel appears (Figure 25).
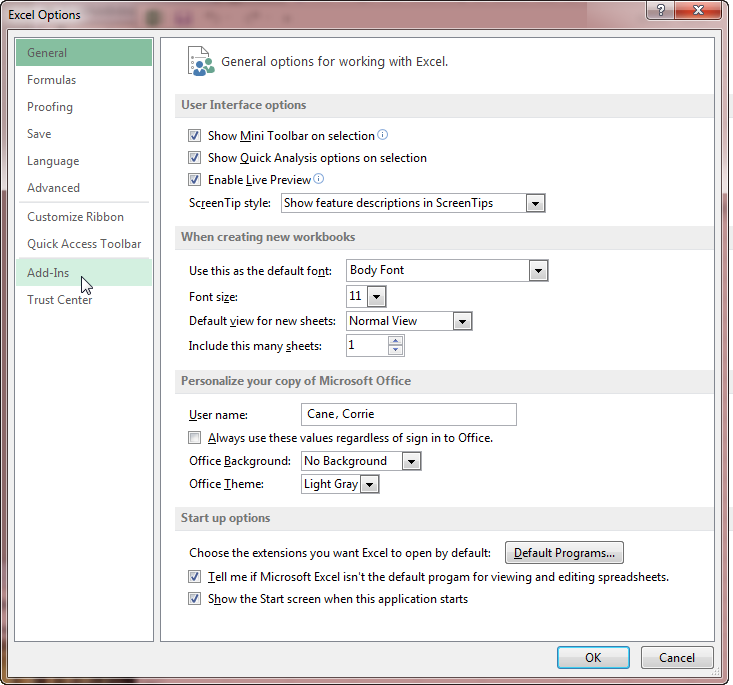
Figure 25 - The Excel Options Panel
- Click Add-Ins.
The Add-Ins panel appears (Figure 26).
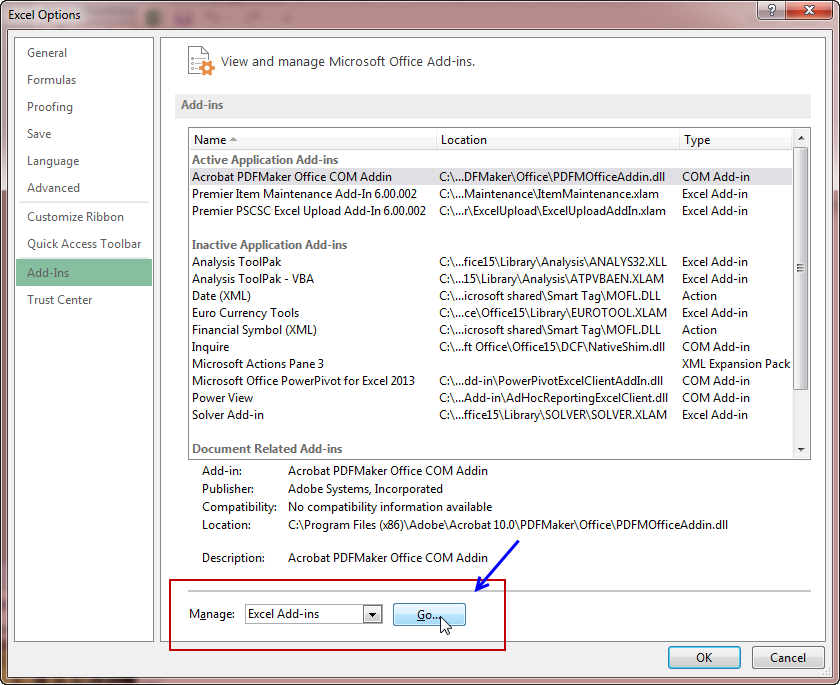
Figure 26- Accessing the Excel Add-ins List
- At the bottom of the panel next to Manage: Excel Add-ins, click Go. (Figure 26).
The list of Add-ins Available appears (Figure 27). (Note: Your list may contain more, or fewer add-ins.)
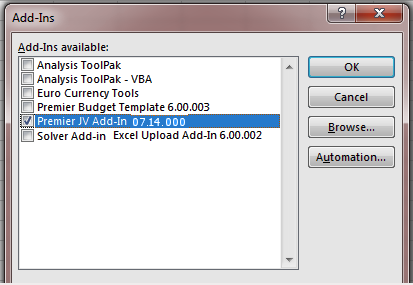
Figure 27 - List of Available Add Ins for a User
- Select the JV Add-In.
If this add-in does not appear on the list:
-
Click Browse (Figure 27, right side).
- Open the location where you saved the download. Figure 28 is an example.
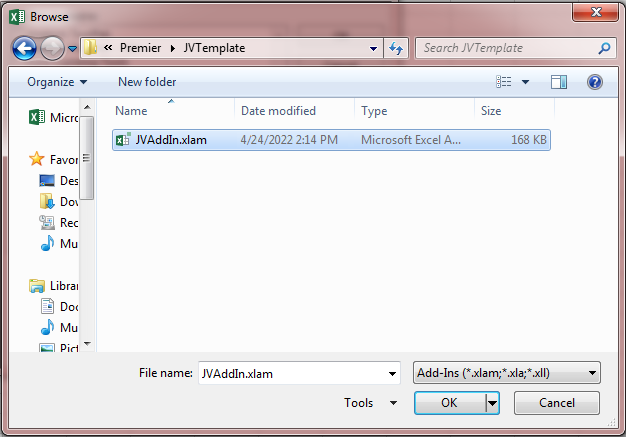
Figure 28 - Using the Browse Button to Find the JV Add-In File
- Select JVAddIn.xlam.
The add-in appears on the Add-Ins Available list (Figure 27). Select it.
- Click OK. The system enables the add-in on Excel.
To disable an add in
- Follow steps 1 through 4 in "To enable an add-in."
- At step 5, click the box for the selected add-in so that it is unselected.
- Click OK.
Note: If you are removing an add-in completely (perhaps to replace it), you must not only delete/uninstall it from the appropriate folder, but also delete it from the add-ins list (Figure 27).
Using the Excel Journal Voucher Template
An example of the journal voucher template is in Figure 29.
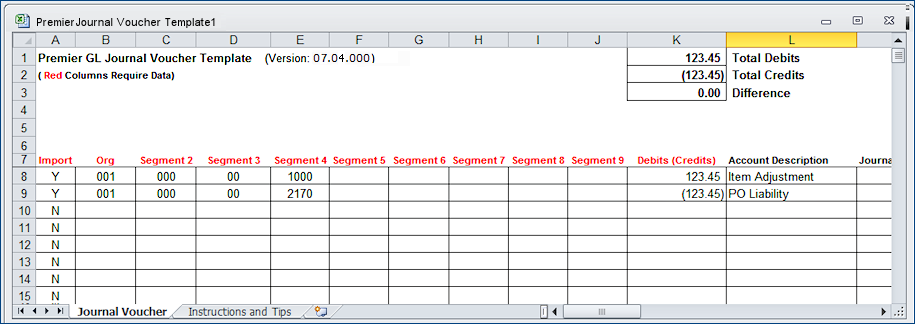
Figure 29 - Excel Spreadsheet JV Template
- Open the template file from the Destination Folder where you installed it.
Normally, this location is: C:\Program Files(x86)\\JVTemplate\.
The
template file is named Journal Voucher Template.xlsm
You receive a message about enabling macros.
- Click Enable Macros.
If you get an error message after enabling macros, your Excel security settings
may be wrong.
- To change your security settings, from the Excel
menu, select Tools > Macro > Security Level.
- Select a Security Level of Medium.
- Click OK to close the Security panel.
Enter journal voucher information in the template
- Enter journal voucher information in the columns and rows. You can use the template just like any other Excel spreadsheet.
If you are auto-numbering journal vouchers, see the instructions below. There is a setup step.
- Click the Instructions and Tips tab for detailed information
about the template.
- You can enter multiple journal vouchers on a single spreadsheet. Leave
a blank row between each journal voucher.
- If you enter a full account number in the Org column, the spreadsheet
breaks it into segments, and populates each segment column.
You can rename the segment columns, if you wish.
- When you are finished, save the spreadsheet.
Note: If you use the Excel journal voucher template and add worksheets to the spreadsheet, the JV template must be the first worksheet.
If it is not the first worksheet, the spreadsheet will not import into the system, but you will not get an error message of any sort.
Auto-numbering journal vouchers for import on the Excel template
- Make sure that your organization is set up for auto-numbering of journal vouchers, and that you have the latest version (available after Release 6.002, 2015) of the journal voucher template.
- In the column JV Number on the Excel template, enter the value *AUTO for each journal voucher (Figure 30).

Figure 30 - Using Journal Voucher Auto Numbering for Imports
When you import the journal vouchers, the application will create journal voucher numbers using the System Keys values for journal vouchers.
(To view system keys, from the Work in Administration main Contents, select Administration > System Keys.
You must have Administrator privileges to use Work in Administration.)
Note: If you use *AUTO with the organization's Auto Number flag turned off, an import error occurs.
Upload the journal voucher(s) to the system
The Upload link is located on the , Inc. tab of the Excel worksheet.
- When you are finished entering data, save the spreadsheet.
- On the , Inc. tab of the worksheet, click Upload JV to send your spreadsheet to the system (Figure 31)
- Click OK.
If you are not logged in to the system, a sign-on panel appears. Sign-on instructions are below.
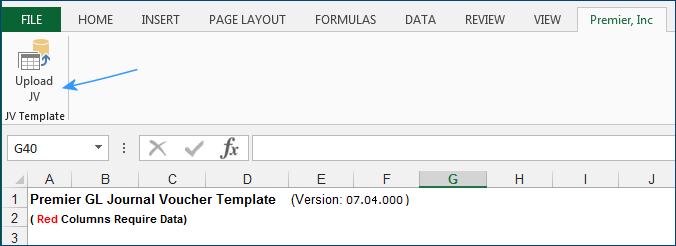
Figure 31 - The Journal Voucher Upload Button on Excel
Viewing the Import File on General Ledger
To view the import file:
- From the General Ledger main Contents, select Imports/Exports > Journal Voucher Imports.
A list of imported spreadsheet files appears. Scroll the list or use Search to find your imported file.
- To view the journal voucher(s) created from the import file, select Journal
Vouchers > Journal Vouchers.
The Journal Voucher list appears (Figure 8).
The Status of your journal voucher(s) created from the import file
is Entered.
- Click Menu > Post if you wish to post the journal voucher(s)
to the General Ledger.
Sign On to General Ledger for Uploading JV Templates
Sign on panels appear when you click Upload JV on the Excel , Inc. tab (Figure 31).
- Click Upload JV to send your spreadsheet to the system (Figure 31).
The sign-on panel appears (Figure 32).
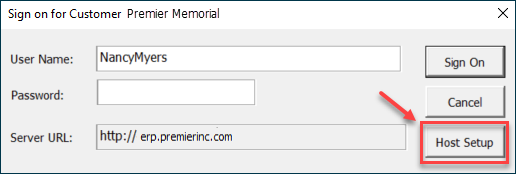
Figure 32 - The Sign On Panel for an Excel Add-In Feature
The first time you sign on to the Excel Add-In, you will need to select a host.
- Click Host Setup (Figure 32) to identify the host location (Premier/SSO or Aperek) that you are accessing.
The Host Setup panel appears (Figure 33).
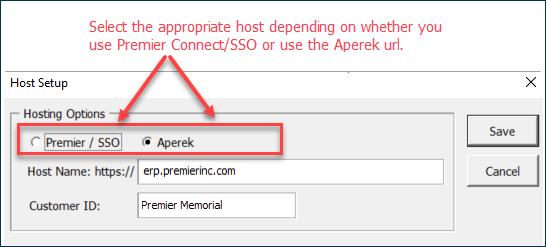
Figure 33- Host Setup Panel for Excel Add-Ins
- Select either Premier/SSO or Aperek.
- Premier/SSO is for users who access ERP/SCM via Premier Connect as single sign-on (SSO) users.
- Aperek is for users who access ERP/SCM directly via the ERP application URL for their site.
- The default is the last option selected.
When you select Premier/SSO, the panel changes to resemble Figure 34.
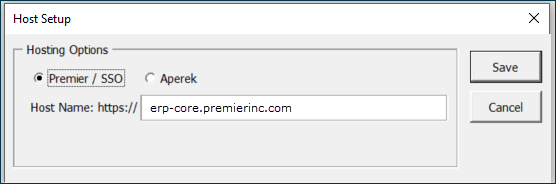
Figure 34 - Host Panel for SSO
- Click Save. The sign on panel appears again.
Signing on with the "Aperek" host option
- Enter your User Name (if not already entered) and password.
- Click Sign On (Figure 32).
- If there are no errors, you are signed on to the Add-In.
Signing on with the "Premier/SSO" option
- Enter your email address/User Name (Figure 35).
- Click Sign On.
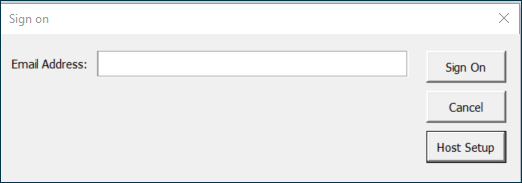
Figure 35 - Excel Add-In SSO User Sign On
Your site's network/application login panel appears. Your site administrator can set you up with the correct URL and other parameters.
- Enter your normal login credentials, and sign on.
For SSO, the sign on proceeds as follows:
- The Excel Add-In directs control to the Premier Connect page.
- The Premier Connect page looks at the email address and decides if you are an SSO user or not.
- In case of incorrect credentials, the user will get invalid login message.
- Otherwise, the Sign On panel disappears and you are signed on.
Closing/Opening GL Accounts by Period
General Ledger users would like to close GL accounts for a particular period or for a few periods, so that staff cannot create any GL transactions for the closed period(s). Reopening closed accounts is also desirable.
This capability allows closing periods by organization. For a closed period, users cannot post or unpost to the relevant journals.
ERP maintains an audit trail of closed periods.
Security: This feature is controlled by a field in System Values: Close Periods by Org (Figure 36). By default, this flag is not set.
Users closing periods when this field is set to "on" must have the new role object "OrgPeriodStatus" set minimally to Modify.
Using this feature - Setup
- In System Values (Work in Administration > Administration > System Values > menu edit > Other) select the field Close Periods by Org (Figure 36,
 ).
).
- Save and Submit
- For the user who will be closing periods, open the user's role and set the role object "OrgPeriodStatus" to Modify or higher.
(Work in Administration > Roles > Role Objects) (Figure 36,  ).
).
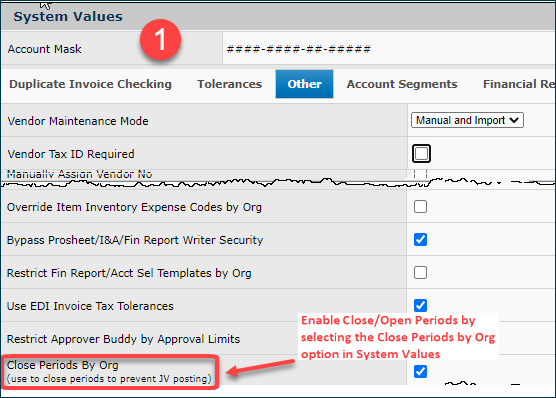

Setting the System Value Close Periods by Org and Adjusting the User's Role Object to Modify
For an inter-organization journal entry (when the organization creating the journal entry and the Primary account segment's organization are different), ERP uses the Primary segment organization to determine if the posting period is open or closed.
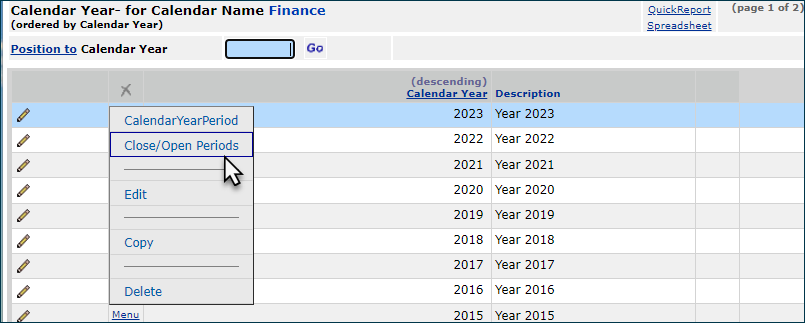
Using this Feature - Closing/Opening Periods
When the system values flag is set "on," users can open/close periods from the Organizations list and from the Calendar Year list by selecting the menu option Close/Open Periods.
When the System Values flag Close Periods By Org is checked ("on") and the role object "OrgPeriodStatus" in the user's profile is less than Modify, then the menu option Close/Open Periods does not appears.
When the System Values flag Close Periods By Org is not checked ("off") and the role object "OrgPeriodStatus" in the user's profile is Modify, or higher, the menu option Close/Open Periods is grayed out.
From the calendar:
- In Materials Management, AP, or GL, select Tables > Calendars > Financial Calendar.
- Open the financial calendar that you are using.
- Next to the year of interest, select Menu > Close/Open Periods. Figure 18 is an example.
From the Financial Calendar: Close/Open Periods
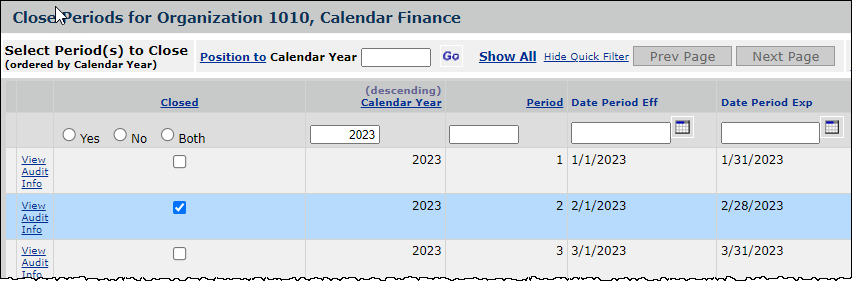
The list of periods in the year appears with a selection field for closing or reopening each (Figure 19).
Periods are open by default. You can sort the list by Organization, Year, Period, and other column headers. The Position To filter works as on other lists.

From the Financial Calendar: Selecting Periods to Close or Open
- Click the Closed box to close each period.
- Uncheck the Closed box to open a period.
The Closed setting is audited.
- Click Submit.
From the Organizations List
The procedure is the same to close periods by organization as for using the calendar.
- In Materials Management, AP, or GL, select Tables > Calendars > Organization.
- Open the organization of interest..
- Next to the organization, select Menu > Close/Open Periods. Figure 20 is an example.

From the Organizations List: Close/Open Periods
The list of periods in the year appears with a selection field for closing or reopening each (Figure 21).
From the Organization List: Selecting Periods to Close or Open
Follow the instructions for the Calendar path (above) to close/open any periods.
A report that shows an audit of the period closed settings
is available.
Automatically Posting Imported Journal Vouchers
You can direct the system to automatically post journal vouchers imported from
Materials Management, Accounts Payable, and any external subsystem. To use this capability, you must select
the field Auto Post Imported JVs on the Organization record, GL Information panel. You must also have the proper authorizations in your user profile.
When a journal voucher created and imported from a GL Export is auto-posted, the system checks the status of the posting, and rolls back the posting if an error occurred. If the posting is successful, the Status of the JV is Posted. Otherwise, if the posting is not successful, the Status of the JV is Entered.
Importing Journal Vouchers From Within General Ledger
You can use the import facility within General Ledger to upload and process journal vouchers. This strategy is useful for files from an external system — .csv files, for example — which you do not want to open in Excel.
- From the General Ledger main Contents, select Imports/Exports > Journal Voucher Imports.
The list of JV imports appears (Figure 36).
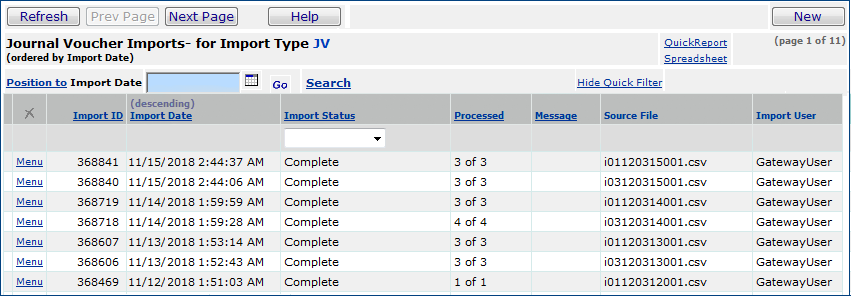
Figure 36 - The Journal Voucher Import List
- Click New. The Upload Panel appears (Figure 37).
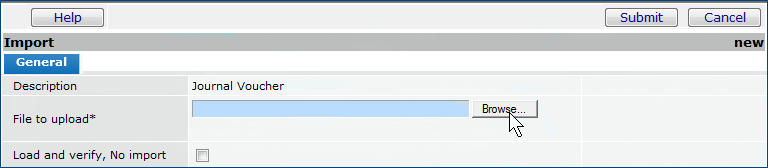
Figure 37 - The Journal Voucher Import Panel
- Click Browse (on Microsoft IE or Edge) or Choose File (on Chrome) to locate the journal voucher CSV import file on your local network.
- Select the file. The file name appears in the File to upload field.
- Click Submit to upload the journal voucher file to the system.
A message tells you if the upload is successful (or not).
- Click the message to return to the list of imports.
- Click Refresh. If the upload was successful, the file that you just imported appears on the list.
- If no errors exist and the import is successful, the Import Status is "Complete" and the Message column is blank.
If you have the authority to post journal vouchers and your organization allows auto-posting, the JV will post.
- If the file contains errors, the Import Status is "Ready for Processing" and the Message column contains "Incomplete." See Handling Import Errors below.
Handling Errors in Imported Journal Vouchers
Journal voucher import users need a quick way to determine if errors in an import require a new import, or whether the errors can be manually fixed. Fields on JV imports panels display import errors at the header and line level. When a file imports with errors, It may be possible to fix the errors from within the system and reprocess the file. (Otherwise, you will need to edit the local file, and re-upload it.)
- From the General Ledger main Contents, select Import/Exports > Journal Voucher Imports.
Locate the imported file on the Journal Vouchers Import list. For the file, the Import Status is "Ready for Processing" and the Message column is "Incomplete."
The list displays the View Errors link and the column ImportErrors. The Import Errors column displays the top error for each Import ID.
- To view all errors for all journal vouchers for the Import ID, click View Errors. Figure 38 is an example.
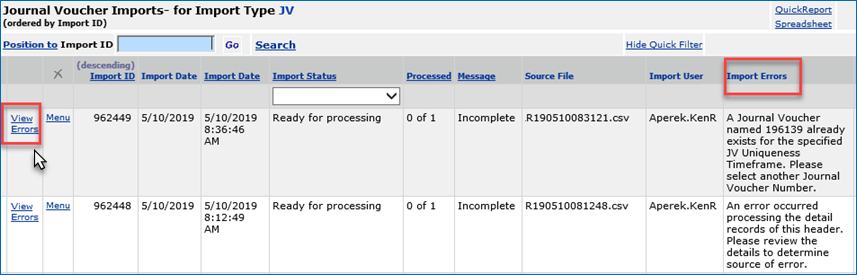
Figure 38 - The View Error Link and the Import Errors Column on the JV Imports List
ERP displays the All Errors panel for the import (Figure 39). Errors appear on the left. On the right, the Table ID field gives you information about the location of the error: JVI means JV header; JEI means JV detail.
From this information, you can tell if the error is in the import header, or in a detail line, and that may help you decide what is the next action to take.
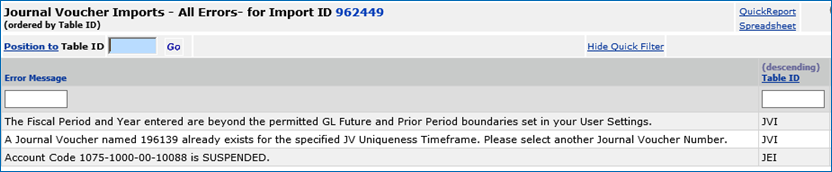
Figure 39 - Drilling Down on View Errors to Display All JV Import Errors for an Import ID
- On the Journal Voucher Imports list (Figure 40), click Menu > View Import Details.
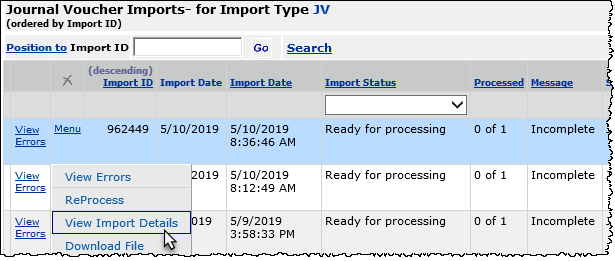
Figure 40 - Opening the JV Header Import Details
The application displays the JV Import Voucher Headers panel. The column Import Errors displays the top #1 header error (if any exist) (Figure 41) .
- To view all errors, click View Errors.
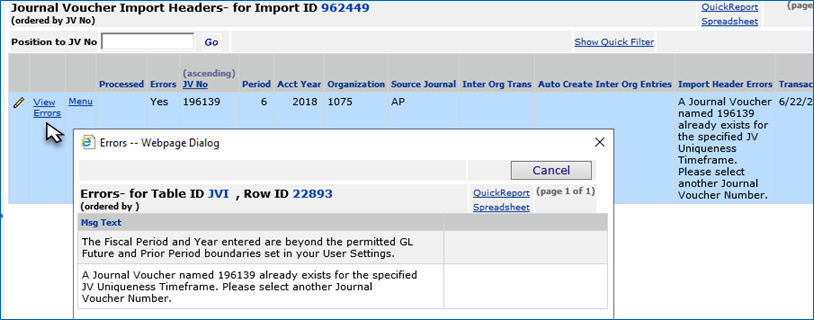
Figure 41 - Displaying JV Import Header Errors
You can also review and fix errors.
- On the import list next to the file that you just imported, click Menu > View Import Details. The list of JV headers appears (Figure 42).
- If errors exist, click the edit icon
 to see if you can fix them without re-importing the file.
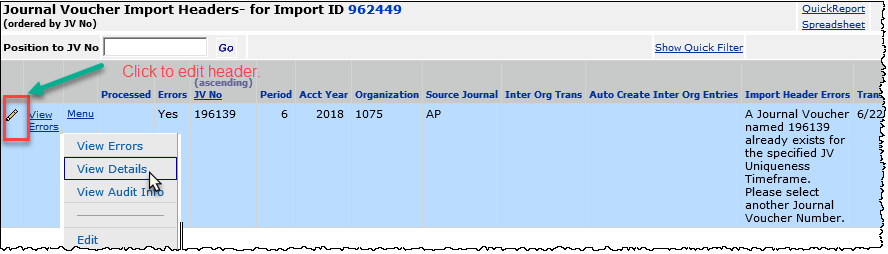
Figure 42 - Drilling Dow to Header Details
- To drill down to lines, click Menu > View Details. The Journal Voucher Import Details panel appears (Figure 43).
- Click the edit icon to edit a line and fix the error, if possible. (Otherwise, you will need to correct the import file, and re-load it.)

Figure 43 - Drilling Down to Line Details
- If you edit any lines or headers to remove errors, be sure to click Save.
- Go back to the list of imported JVs and locate the one that you just edited (presumably, at the top of the list).
- Click Menu > Reprocess to reprocess the journal voucher so that it completes normally.
If you have the authority to post journal vouchers and your organization allows auto-posting, the JV will post.
Import reversing statistical journal vouchers
With imports of a reversing statistical journal voucher, a system warning stops the import process so that you can remove the reversing period and year.
- Follow the steps outlined above for imports with errors.
When you click View Errors, a message tells you that you cannot include a reversing year/period in a statistical journal voucher.
- Click the edit icon to edit the journal voucher and remove the reversing year/period from the upload.
- Click Save.
- Go back to the list of imported JVs and reprocess the import.
Journal Voucher Approvals
The journal voucher approvals process enables designated approvers to review and approve or reject manual journal vouchers created in General Ledger.
A journal voucher can be reviewed by a single "direct" approver or routed to several approvers in an approver group. In the routing process, the journal voucher amount is compared to each approver group member's maximum approval limit to determine if the person should review the journal voucher. Each approver group member can approve or reject journal vouchers up to his/her maximum approval limit.
Approvals can be required for any user who originates journal vouchers. An organization can also require approvals for any of its manually-created journal vouchers. An approval requirement can be set for a source journal itself. Individual account codes can be flagged as requiring journal entry approvals. Source journal approvers and account code approvers are identified at the organization level.
Journal voucher approvals is outlined in a separate topic. See Journal Voucher Approval Processing. The topic includes setup instructions and also outlines how to monitor a journal voucher through the approval process.
Source Journals
Your site may have a single source journal; or, more
likely, several source journals. The use of multiple source journals lets you
label and segregate journal vouchers and their associated journal entries according
to categories that you define, for example, "AP" or "Materials."
Each source journal has an identifier that is used in journal entries. You can
review your source journals, edit them, and add new ones if you wish.
To view your source journals and create a new
source journal:
- From the General Ledger main Contents, select Tables > Source Journals.
The list of source journals appears. Figure 44 displays sample source journals
ordered by Description.
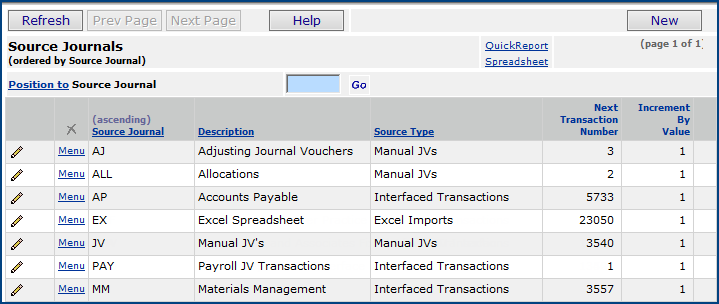
Figure 44 - List of Source Journals
- To enter a new source journal in the system, click New.
The
Source Journal Edit panel appears (Figure 45).
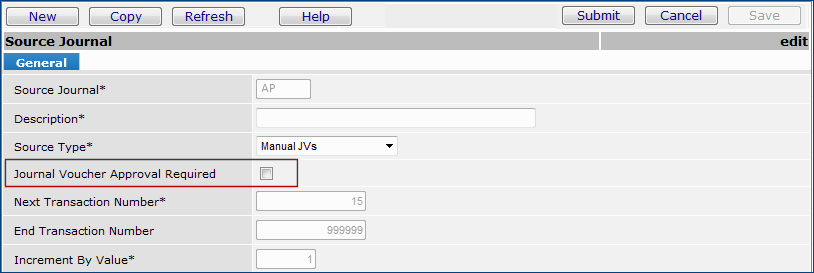
Figure 45 - Source Journal Edit Panel
- Complete the fields on the General tab to enter the new source journal
in the system.
- Select an identifier for the source journal, and enter it in the Source
Journal field.
- Enter a Description for the source journal.
- Select a Source Type. The Source Type specifies how the transactions
in the journal are created; for example, "Excel imports."
- Enter the Next Transaction Number and the End Transaction
Number for the source journal.
- Enter the Increment by Value. This value is the amount used to
increment transaction numbers. For example, "4" would generate transaction
numbers: 1, 5, 10, etc.
- If manual journal vouchers posted to the source journal require approval, select Journal Voucher Approval Required (Figure 45).
Note: You must also identify a direct approver or approver group for any organization that posts journal entries needing approval. See Assign Journal Voucher Approvers to Organizations.
- Click Save when you are finished.
- Click Submit.
You are returned to the Source Journal list.
Security for Payroll Accounts
To protect sensitive employee pay data, Human Resources Managers want to be able to allow a user visibility to organizations’ and departments’ JV details, except for payroll information. Security for payroll journal vouchers lets managers prevent a user from viewing imported journal voucher payroll data for specified organizations/departments, while retaining visibility to other types of journal vouchers for a department.
This security feature covers both payroll accounts and statistical payroll accounts, and applies to ERP departments only (not SCM departments). It applies to imported journal vouchers whose Journal Voucher Type is Payroll. (Manually created journal vouchers cannot be defined with the Journal Voucher Type of Payroll.)
Enabling a User’s Restriction for Payroll Data
Security is set in these areas:
- In a Data Profile, selecting/unselecting a new flag that governs access to payroll JVs for any department/organization in the Data Profile. For any selected departments, any user assigned the Data Profile cannot see payroll journal voucher details, but can display details for other types of journal vouchers.
- In a user’s role through the role objects PayJV (General Ledger Payroll Journal Vouchers) and PayJVDtl (General Ledger Payroll Journal Vouchers Detail).
- Selecting the field Allow Access to Payroll Journal Voucher Detail on the User Profile GL Limits tabbed panel (Figure 46). (Work in Administration > Administration > Users > edit > GL Limits)
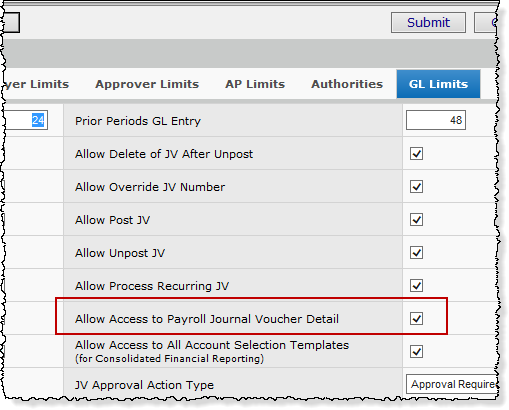
Figure 46 - The User Profile Field That Allows Access to Payroll Data
Important: The permission for payroll data by department (in a Data Profile), the appropriate values on the role objects, and the flag on the GL Limits panel must be set for a user to access payroll data.
To set the flag to allow payroll data access for a department:
- From the Work in Administration main Contents, select Data Profiles. The list appears.
- Locate the Data Profile of interest.
- Click Menu > Restrict Access to JV Payroll (Figure 47).
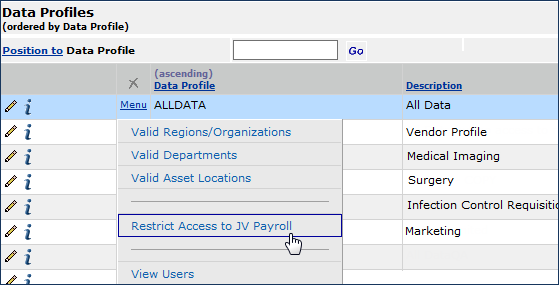
Figure 47 - Data Profiles Menu Item for Restricting Payroll Access
The Restrict Access to JV Payroll panel opens with a list of departments and organizations included in the Data Profile (Figure 48). In Figure 48, the departments where payroll data access is allowed are in the green box. The red box indicates departments where payroll data access is not allowed.
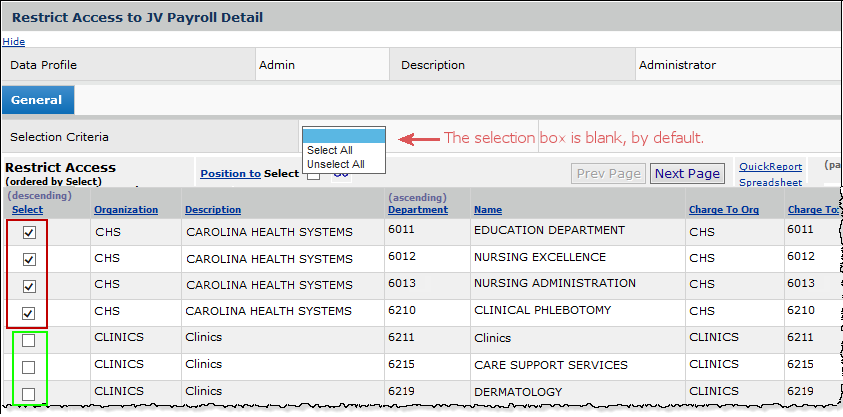
Figure 48 - Granting Payroll Information Access to Data Profile Departments
- In the Select column, check any organization/department for which you need to deny access to payroll details.
Unchecked departments will have payroll details available to users assigned the Data Profile. The default is "unchecked."
Note: If you add an organization/department to a Data Profile, the new department’s flag for access to payroll data will be unselected; i.e., "allowed." If you need to restrict access to payroll data for the newly added department, return to the Restrict Access to JV Payroll panel and check the Select box.
Application Areas Controlled for Payroll JV Access
Access to payroll data for users who have department access is controlled in the application in several areas, outlined below. A few examples are included.
Viewing payroll JV import details.
If the user is restricted, then a message appears explaining why the user cannot see payroll data on the import. (Figure 49 is an example.)
In Figure 49, the user does not have permission (department settings, role object settings, and user profile authority) to view payroll data. The user can see debit and credit totals, but not individual lines which are associated with employee amounts. A message informs the user. If the user were authorized to view this department’s payroll data, individual journal entry lines would appear with the payroll dollars for each.
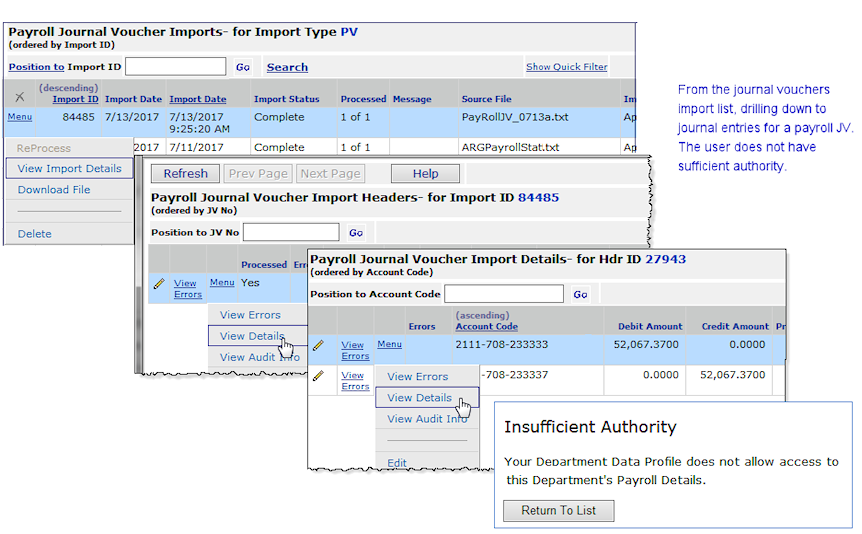
Figure 49 - Drilling Down to Journal Entry Details from an Imported Payroll Journal Voucher
GL > Imports/Exports > Import External Chase Journal Vouchers > Menu > View Import Details
Inquiring on journal vouchers and drilling down to details
From the list of journal vouchers, unauthorized users cannot drill down to payroll journal entry lines. When a user clicks Payroll Details (Figure 50) to display the lines, if the user is authorized, the lines appear (Figure 51). If the user is unauthorized, the "Insufficient Authority" message appears with no payroll lines.

Figure 50 - Drilling Into Payroll Details from a JV Inquiry: User Is Authorized
GL main Contents > Journal Vouchers > Journal Vouchers
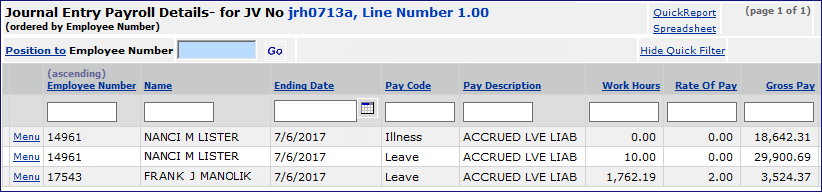
Figure 51 - Payroll Entries for a Payroll Journal Voucher
(All identities are fictional)
GL main Contents > Journal Vouchers > Journal Vouchers > Payroll Details
Displaying Account Balances and Drill Down to Journal Entries
For any account, you can display account balances and journal entries for a selected year (Figure 52).
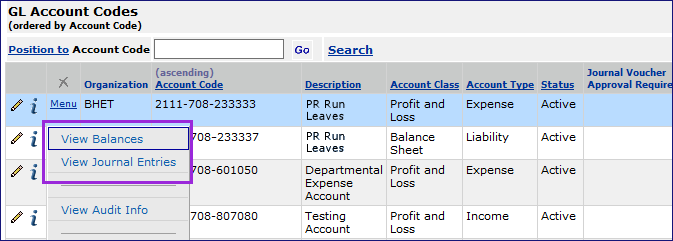
Figure 52 - Viewing Balances / Journal Entries for a Payroll Account
GL main Contents > GL Accounts > Account Management
Drilling down to journal entries for a payroll account displays the same menu as (Figure 50). If you are authorized to view payroll data, you can click Payroll Details to open a display similar to (Figure 51). Otherwise, the "Insufficient Authority" message appears.
Payroll data is also protected from unauthorized users for these additional user activities:
- Drilling into an unauthorized organization/department from Inquiry and Analysis to view payroll detail
- Retrieving payroll detail for an organization/department from ProSheet.
- Retrieving payroll detail for an organization/department from the Financial Report Writer.
Note: Restriction for organization/department set up for imported payroll journal also apply to statistical payroll journal vouchers are the same as payroll journal vouchers.
Statistical payroll journal vouchers differ from regular payroll journal vouchers in these ways:
- The statistical Journal Voucher Number must begin with ST.
- The statistical JV Type on the import (if imported) is STA.
- The statistical Source Journal cannot be PAY.
- The account codes must be statistical accounts.
Increasing the End Value for Journal Vouchers in a Source Journal
If you run out of journal voucher numbers for a source journal, the system sends a message when the first journal voucher over the limit is being created. In this case, you can edit the source journal record to increase the end value. Editing the source journal record requires system administration privileges: the "Administration" role object must be set for your system UserID.
To change the source journal voucher ending number:
- From the Work in Administration main Contents, select Administration > System Keys.
The list of key values appears.
- In the Table column, look for the entry Source Journal.
- In the Source Journal rows, scan the Item Key column for the name of the source journal whose end value you are changing.
- Click the edit icon (or Menu > Edit) to edit the source journal record.
- Increase the End Key Value on the source journal record.
- Click Save and Submit.
Close GL Accounts by Period
This capability allows closing periods by organization and reopening closed accounts. For a closed period, users cannot post or unpost to the relevant journals.
ERP maintains an audit trail of closed periods.
Security: This feature is controlled by a new field in System Values: Close Periods by Org (Figure 53). By default, this flag is not set.
Users closing periods when this field is set to "on" must have the new role object "OrgPeriodStatus" set minimally to Modify.
Using this feature - Setup
- In System Values (Work in Administration > Administration > System Values > menu edit > Other) select the field Close Periods by Org (Figure 53, ).
- Save and Submit
- For the user who will be closing periods, open the user's role and set the role object "OrgPeriodStatus" to Modify or higher.
(Work in Administration > Roles > Role Objects) (Figure 53, ).
Figure 53 - Setting the System Value Close Periods by Org and Adjusting the User's Role Object to Modify
For an inter-organization journal entry (when the organization creating the journal entry and the Primary account segment's organization are different), ERP uses the Primary segment organization to determine if the posting period is open or closed.
Using this Feature - Closing/Opening Periods
When the system values flag is set "on," users can open/close periods from the Organizations list and from the Calendar Year list by selecting the menu option Close/Open Periods.
When the System Values flag Close Periods By Org is checked ("on") and the role object "OrgPeriodStatus" in the user's profile is less than Modify, then the menu option Close/Open Periods does not appears.
When the System Values flag Close Periods By Org is not checked ("off") and the role object "OrgPeriodStatus" in the user's profile is Modify, or higher, the menu option Close/Open Periods is grayed out.
From the calendar:
- In Materials Management, AP, or GL, select Tables > Calendars > Financial Calendar.
- Open the financial calendar that you are using.
- Next to the year of interest, select Menu > Close/Open Periods. Figure 54 is an example.
Figure 54 - From the Financial Calendar: Close/Open Periods
The list of periods in the year appears with a selection field for closing or reopening each (Figure 55).
Periods are open by default. You can sort the list by Organization, Year, Period, and other column headers. The Position To filter works as on other lists.
Figure 55 - From the Financial Calendar: Selecting Periods to Close or Open
- Click the Closed box to close each period.
- Uncheck the Closed box to open a period.
The Closed setting is audited.
- Click Submit.
From the Organizations List
The procedure is the same to close periods by organization as for using the calendar.
- In Materials Management, AP, or GL, select Tables > Calendars > Organization.
- Open the organization of interest..
- Next to the organization, select Menu > Close/Open Periods. Figure 56 is an example.
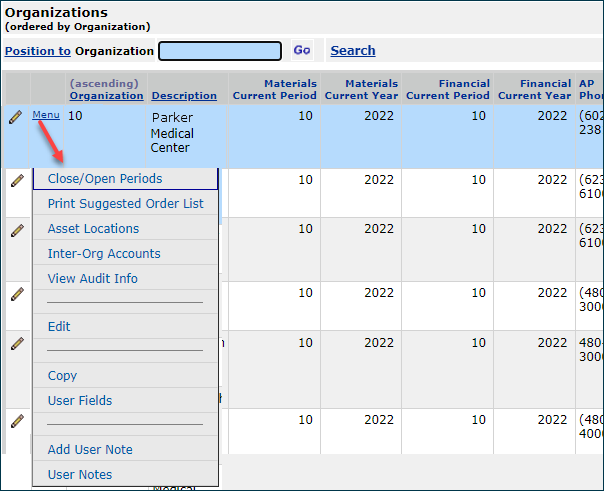
Figure 56 - From the Organizations List: Close/Open Periods
The list of periods in the year appears with a selection field for closing or reopening each (Figure 57).
Figure 57 - From the Organization List: Selecting Periods to Close or Open
Follow the instructions for the Calendar path (above) to close/open any periods.