| This topic discusses: |
Links to related topics: |
|
For requesters: |
|
| Search Online Doc | |
| Current Release Notes | |
An order guide is a shopping list of items tailored for a department. Order guides not only make it easier to requisition items, but also provide a control on the items that can be requisitioned. Order Guides focus on items a department might occasionally need, as opposed to par level supplies, which are automatically replenished on a regular schedule. Order guides are also useful in cases where a department needs items from an asset location that it cannot normally access. A buyer who can access the location may set up an order guide for the item. The department then uses the order guide.
Your site may be set up to use Financial Reporting Fields in various parts of the application. Similarly, you may also be using Project Codes and Fund Codes.
Financial Reporting Fields, along with Project Code and Fund Code, let you generate reports on non-account code fields. For example, your site might define Physician as a financial reporting field. Users could then select the physician associated with an order guide.
If financial reporting fields are used by your site, the tab Fin Reporting appears on the panels. (Otherwise, this tab does not appear.) You can enter field values on the tabbed panel.
Details are in Using Financial Reporting Fields in ERP.
The user's data profile controls the organizations, asset locations, and departments whose data the user can work with.
The "Ordering" role object controls access to order guides. To view the Order Guides list, the minimal setting is View. The Create setting is required to create or copy an order guide. Modify is required to edit an order guide.
See Work with user roles for details on roles and role objects.
For a stock item,
- If this box is not checked, and there is not enough on-hand quantity of the item to fill the order, the remainder (requested amount – available amount) is killed.
- If the box is checked, and there is not enough on-hand quantity to fill the order, the item goes into the normal SOL process, and gets filled when quantity is available.
- The exception is when the stock items is direct delivery. In this case, the application treats the stock item as a non-stock item, and ignores the Allow Backorder setting.


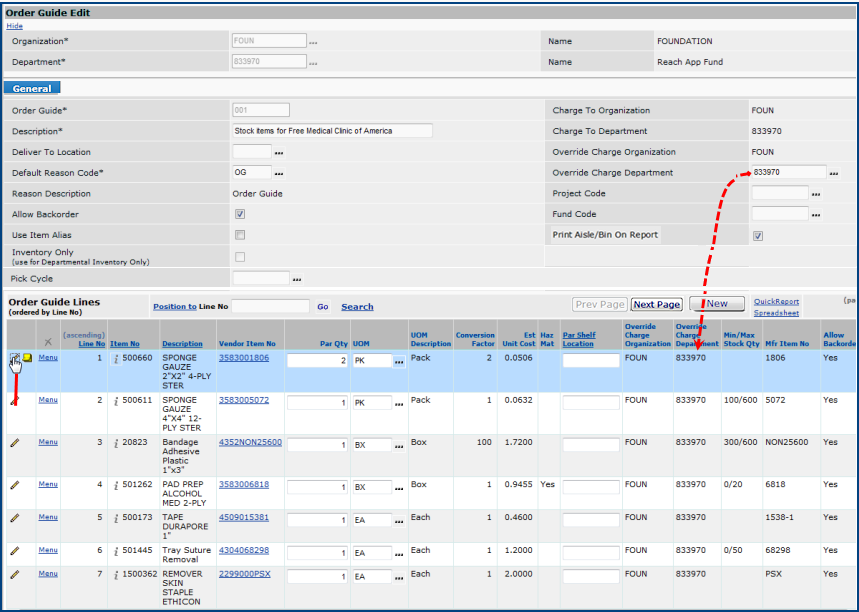
From the Order Guide list, you can:
- Click Print Order Guide to print the order guide.
-
Click Menu to print order guide labels, copy the order guide, edit the order guide, delete it, and perform other activities.
Copying an order guide and changing the relevant lines is a good way to generate multiple order guides for the same department.
To requisition items from an order guide, From the Materials Management main Contents, select Requisitioning > Order Guides for Requisitioning. Additionally, users working with the mobile ERP application on an iPad can call up order guides and order more items by scanning the item labels and entering quantities.
Note: If you also are responsible for creating new purchase orders, you can add an item to department Order Guides from the Purchase Order Non-File Item Entry panel. For details, see Create a PO Manually - Using the Enter Non-File Items Panel.
You can import order guide data to ERP to create new order guide lines for subsidiary organizations and departments.
Administrators can control who has access to this feature with a security setting.
The first step is to export existing order guide lines to an Excel worksheet. A new panel is available for the export task. Then, using the worksheet as a template, make changes as needed to order guide lines or add new order guides. Save the worksheet as a .csv file, and finally upload it to the application.
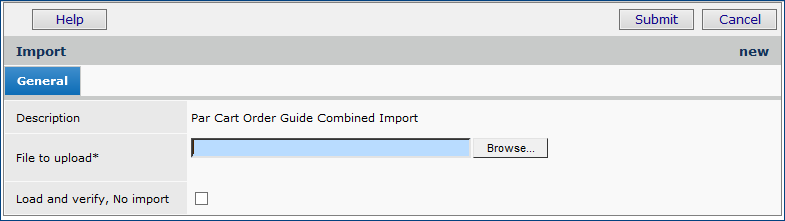
The upload is the standard upload process. A panel lets you work with uploaded order guide line files.
The following steps upload lines from an order guide:
From the Materials Management main Contents, select Imports/Exports and Financials > Order Guide/Par Cart Lines.
The Order Guide and Par Cart Lines panel appears (Figure 4).

This panel displays a consolidated list of all par cart and order guide lines filtered for the department in your Current Settings.
Figure 5 is an example of the worksheet filtered for order guide IVS.
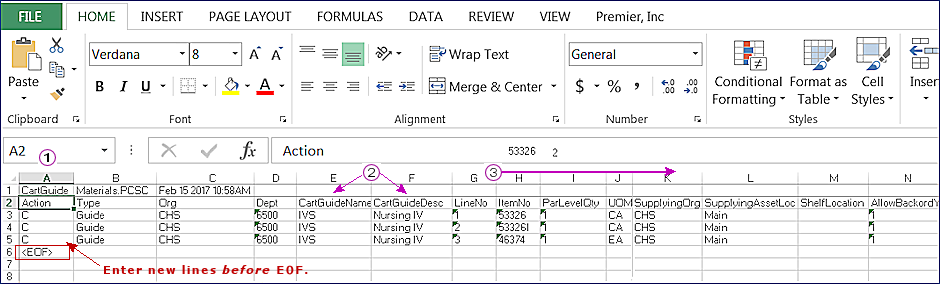
The first column -- Action -- contains the action that the application should perform. Enter an action:
A - New line. Add a line to the order guide identified in Columns E and F
.
D - Current line: delete the line from the order guide.
C - Current line: update the line.
Leaving the Action column blank (no code entered) causes an error.- In Column B, be sure that the Type is Guide for an order guide.
- You can enter a new department and organization for a new order guide in columns C and D.
To create a new line or an entire new order guide: On the worksheet, insert rows ahead of the EOF marker, or blank out existing columns and enter new values.
The remaining columns G through N are for order guide line data. You can edit these columns to change existing lines or add new lines.
- In column G enter the line number if known, enter 0 if you want the system to assign the line number.
- EOF must be the last data element in the worksheet.
Hospitals sometimes need duplicate items on order guide/par cart imports when, for example, supplies for the same item are located in different storage areas in a department. Duplicate items are allowed on par cart/order guide imports. The application issues an information message when a duplicate item is processed on import.
Important: On the import, set the Line Number of the duplicate item to zero or to another number value that does not exist in the set of lines; in other words, the duplicate item must have a unique Line Number.
This feature is controlled by the role object "CartGuideLinesAdmin." The initial security setting for this role object defaults to None. Displaying the Order Guide/Par Cart Imports and Order Guide/Par Cart Lines list requires a minimum security level of View.
A requisition created from a par cart/order guide will use the Override Charge Department field for an item specified by the order guide/par cart line.

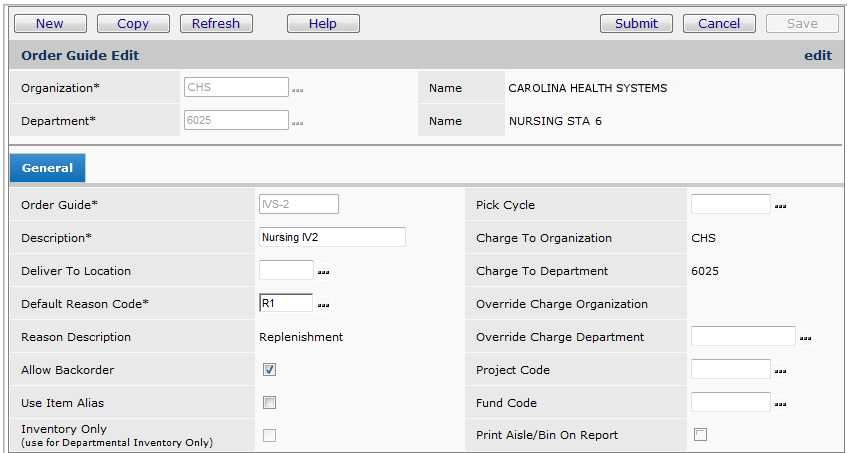
This report prints the contents of an order guide.
Note: If you would like to print the aisle/bin number on the report, then select the Print Aisle/Bin On Report checkbox located on the General tab of the order guide record.
A formatted version of the order guide appears. Click File > Print (or select the printer icon) to print the order guide on your local printer.
Order guides should simplify the requestor's task. Users of an order guide also want to find the items they need easily. A few tips may help you achieve these goals when you set up order guides:
Copyright © 2023 by Premier Inc. All rights reserved.