Bill-only requisitions are used for items that are not procured through the usual process. For example, a device may be provided by a manufacturer whose representative brings the item to the hospital and works with the surgeons who implant it. The item is consumed, and must be paid for. "Bill-only" requisitions and POs are designed to accommodate this situation. Bill-only requisitions go through any normal approval processes set up for the hospital, then flow to bill-only POs, and to vendors. The vendors send invoices for payment.
1. Line types: Bill-only requisitions and POs can contain true "bill-only" lines or "bill-and-replace" lines.
|
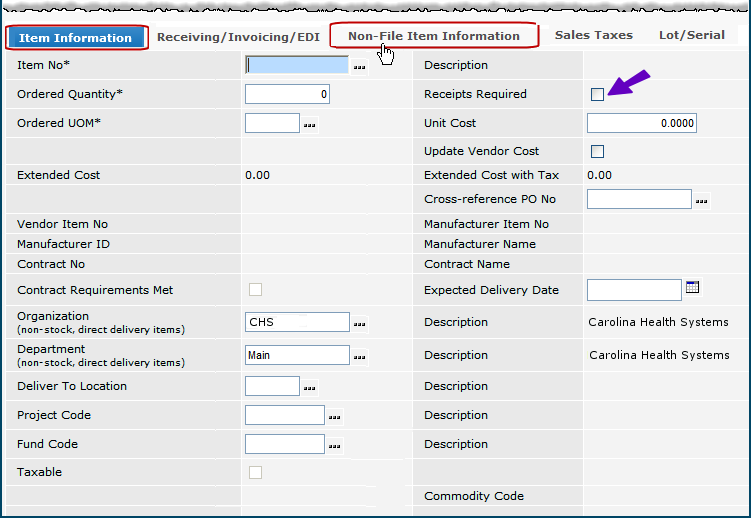
2. Bill and Replace: On a bill-only purchase order line, if you select Receipts Required, the system creates a bill-and-replace line.
|
3. Non-stock lines: A non-stock line on a bill-only requisition does not allocate inventory if on-hand quantity is available.
|
4. Vendor: A bill-only requisition and its associated PO must contain items for the same vendor buy-from location, supplying organization and asset location.
|
5. Separate PO by Requisition: A one-to-one relationship exists between the requisition and its associated PO: all requisition lines flow to a single, new, bill-only PO.
|
6. Approvals: Bill-only requisitions may optionally go through an approvals process.
|
7. Approval Reminders: You can set up and use approval reminders for bill-only requisitions.
|
8. Cannot be EDI: EDI bill-only purchase orders are not supported.
However, ERP does support EDI 810 invoices for bill-only POs. You can assign invoice approvers on the bill-only requisition (and they will propagate to the PO and invoice), on the PO (and they will propagate to the invoice and back-copy to the requisition), or on the invoice itself. See Approver Assignments for EDI 810 Invoices. Also, see Approval Processing for EDI 810 Invoices. |
| 9. Authorization: Bill-only purchase orders are routed to the appropriate buyer or buyers for authorization. |
10. Invoice matching for authorized, bill-only purchase orders follows the usual process.
|
11. Lot tracking is available for bill-only item lines.
|
| 12. Bill-only requisitions can be imported. The standard .csv import is used. The requisition import contains several columns at the end (AM to AS) for bill-only case and physician data. |
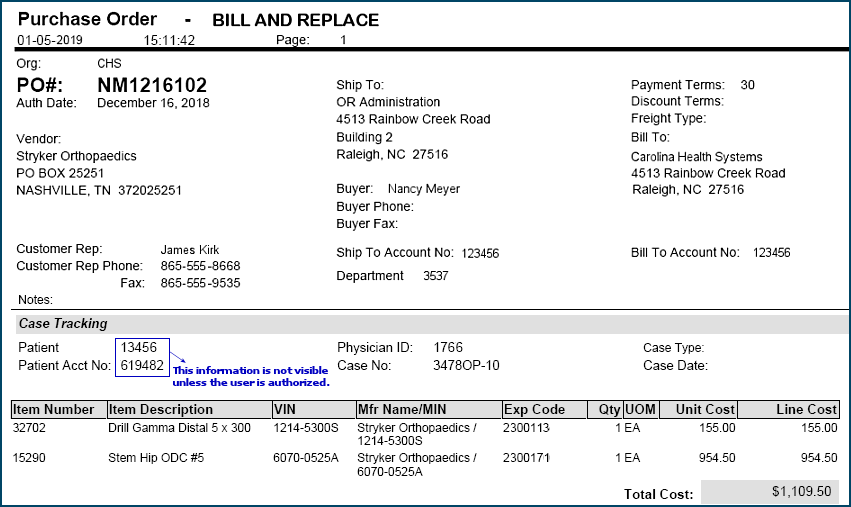
Features are built into the application to ensure the privacy of electronic protected health information (ePHI), in compliance with HIPAA requirements. One applicable area is processing purchase orders and requisitions: creating, editing viewing, and printing. For bill-only POs and requisitions, the Case Info panel contains patient information.
On a User Profile, the Hide ePHI Data field determines whether a user can access patient data. When Hide ePHI Data is checked, a detailed series of restrictions apply to the user's access to ePHI records. Patient information on purchase orders and requisitions is subject to restrictions governed by this User Profile field.
In sum, if Hide ePHI Data is checked, the user cannot access patient-identifying information.
- Users who do not have permission to work with patient information cannot create, edit, or display that information on POs or requisitions.
- Also, in printing or faxing of a PO or requisition that contains patient information, the patient data is hidden.
The list of restrictions and examples is outlined in the ePHI documentation.
Note: All patient identifier fields in this document's figures contain fictional values, and are not associated with any actual individual.
Documents Containing Electronic Protected Health Information (ePHI)
If you do not have ePHI access, and the "Contains ePHI Data" checkbox is selected, you cannot view a document. When you click the arrow to open the document, the Insufficient Authority message appears. For more information, see Securing Electronic Protected Health Information (ePHI).
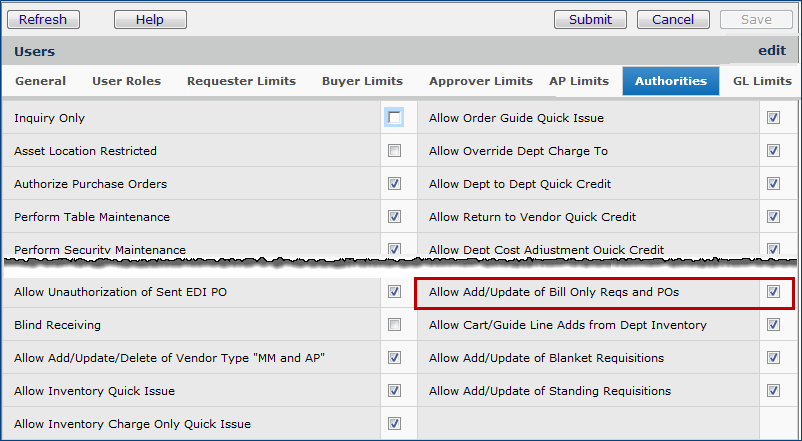
Security for bill-only requisitions and purchase orders is controlled by the following:
The first setup step involves enabling the User Profile flag "Allow Add/Update of Bill Only Reqs and POs," as described in the previous section.
Additional set up steps are outlined below.
Note: this section covers a legacy feature -- Implant Tracking, aka "Pulse" that is no longer offered. The "Pulse" utility now refers to a different Premier gateway product.
Item inventory records contain a field that lets you specify whether requisition lines for the item should default to "bill-only" or "bill-and-replace." The field is Bill-Only. This field is located on the Item Inventory panel's Item Definition tab (Figure 2). This flag appears only when the Implant tracking application Requisitioning is enabled.
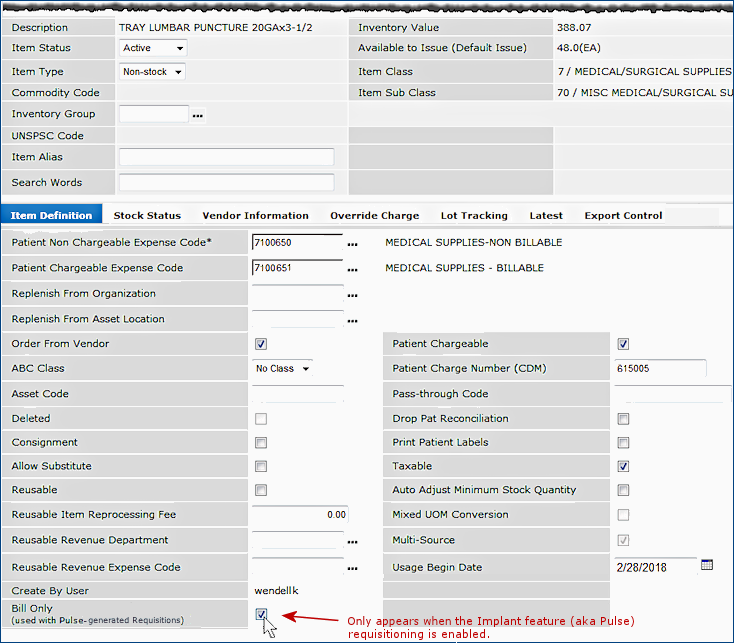
You can requisition an item as bill-only or bill-and-replace based on the setting of the item inventory Bill Only field. The field is unselected, by default.
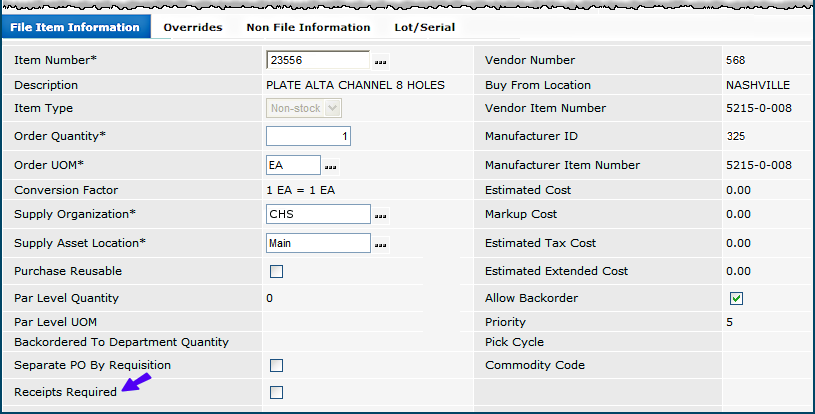
By default, bill-only requisition and PO lines are receiptless. For receiptless PO lines, the application normally creates a receipt during invoicing. The auto-receiving feature lets you automatically receive bill-only receiptless lines so that no receipt is created for the invoice, but is instead created when the PO is authorized.
A new field on the Organization record implements the auto-receive feature (Figure 3). The field is Auto Receive Receiptless Bill Only PO.
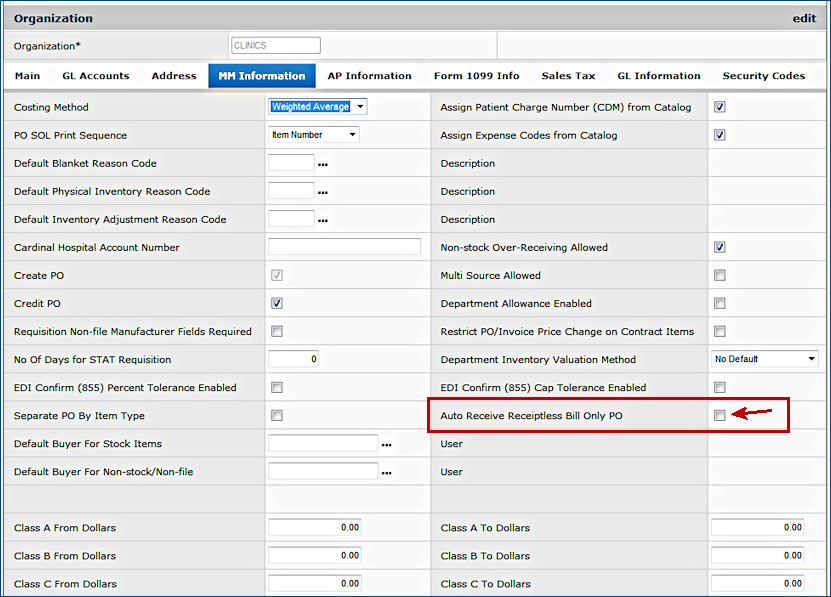
When the auto-receive flag is selected, any bill-only PO line whose Receipts Required field is unchecked produces a receipt when the PO is authorized. Creating an invoice for the bill-only PO does not generate a receipt.
A costing buyer is identified for each user who creates requisitions. This buyer completes costing, manufacturer, vendor, and other information for non-file requisition lines. After the costing buyer completes non-file lines, dollar limit and/or item type approval may also be required. If so, the requisition is routed to either a direct approver (single person) or an approver group (a group of approvers with different dollar limits).
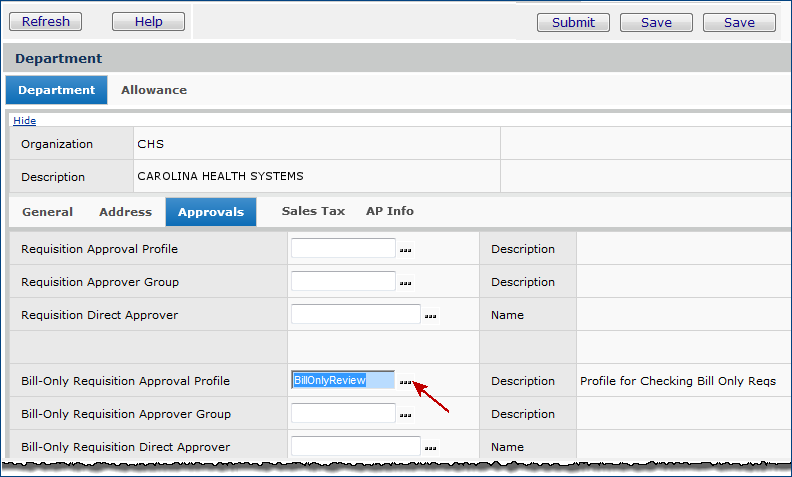
For bill-only requisitions, you can specify an approval profile (containing item and dollar limits), and a direct approver or approver group for any department. The application routes the bill-only requisition as specified in the department record.
You can set up and use approval reminders for bill-only requisitions. Details are in the topic Approval reminders and redirected approvals.
The Approval History panel displays information about the approval routing and approval status for your requisition. You can identify approvers, and if several, note which approver currently has your requisition in his/her queue. You can also see the length of time that each approver has/had the requisition and other information.
The topic Approval Information on Inquiry Panels: Examples contains some sample Approval History panels.
For purchase orders, an authorizing buyer is designated for each organization. Purchase order authorizations are explained in Assigning Buyers to Organizational Units and Vendors.
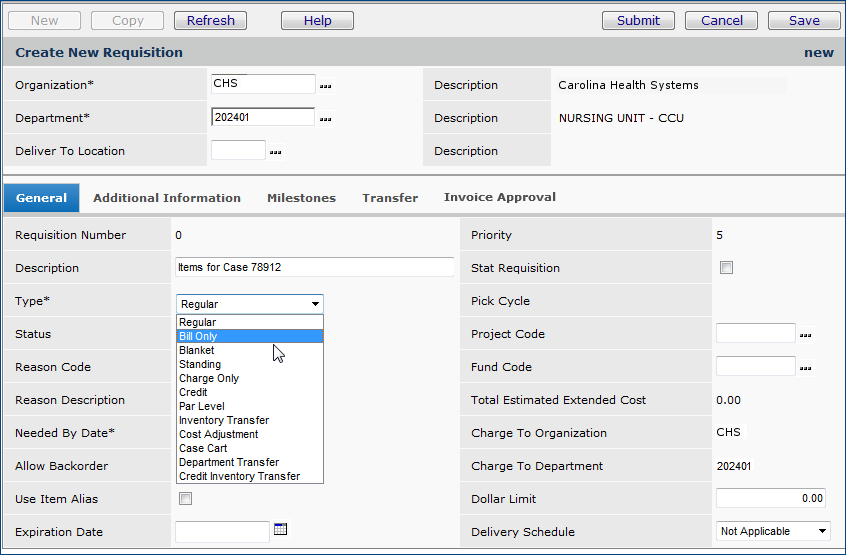
Creating a bill only requisition follows the usual process. The differences are: you select the requisition Type: Bill Only. Also, you can enter a patient ID, case number, and physician ID for the requisition, and lot tracking data for each item.
Note: Supply Chain uses the department address as the Ship-To address on the PO associated with a bill-only requisition. When you submit a bill-only requisition, the system checks that the department address is complete. If, for some reason, the department record does not contain a complete ship-to address a warning message appears. The message is "The department for this bill-only request has incomplete address information. Address information must be complete before the associated purchase order can be authorized." In this case, you must either open the department record and complete the address or enter a ship-to address on the purchase order created for the requisition.
From
the Materials Management main Contents, click Requisitioning > Requisitions
- All Depts or Requisitions - Current Dept.
The Quick Click panel
appears.

Note: All patient identifier fields in figures contain fictional values and are not associated with any actual individual(s).
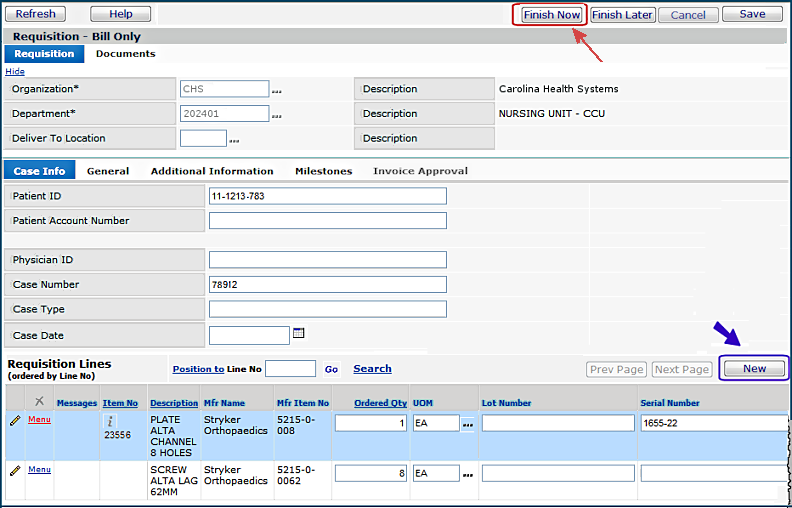
The Case Info tabbed panel is displayed (Figure 6).
The Requisition Lines section contains "No Data." When you enter and save requisition lines, they are displayed at the bottom of the panel.
Note: The Case Info fields contain patient-identifying information. You must have permission set on your User Profile to work with this information. See HIPAA Requirements in the Security section.
On
the Requisition Lines part of the panel, click New. The
requisition line tabbed panels appear (Figure 7).
- For non-stock items, use the tabbed panel File Item Information. This panel appears by default (Figure 7).
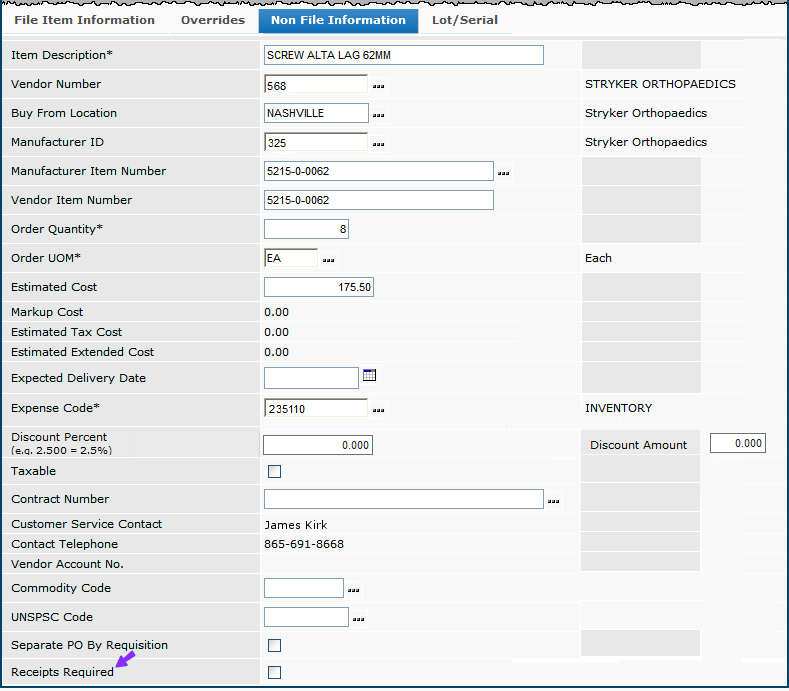
- For non-file items, click the tab Non File Information and use the Non File Information panel.
Enter information about the item in the panel's fields.
For non-file item requisition lines, see Tips on Completing the Non File Item Information Panel in the general online documentation for requisitions.
Figure 10 - Bill-Only Requisition with Two Lines
Note: All patient identifier fields in figures contain fictional values and are not associated with any actual individual(s).
Figure 11 is the Requisitions List with a bill-only requisition that has been entered and is awaiting approval. A bill-only purchase order is created for the requisition.
Figure 12 is the purchase order list entry for the requisition in Figure 11.
Purchase orders created from bill-only requisitions have the Status: Unauthorized.
Note: If, for some reason, the department record does not contain a ship-to address, you will get an error message when you try to authorize the PO. In this case, you can manually enter a Ship-To address and authorize the PO, or you can complete the address on the department record and authorize the PO.
Once authorized, the Status of a bill-only purchase order (all lines are bill-only) is Fully Received. When a purchase order contains bill-only and bill-and-replace lines, the Status is Part Received until the bill-and-replace lines are received.
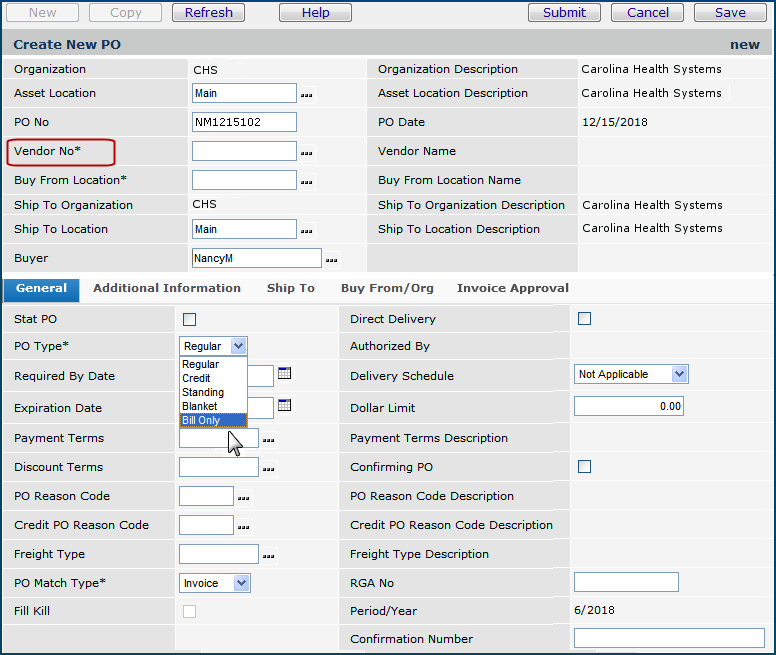
When you create and release a bill-only requisition, the system automatically generates the associated purchase order. The opposite is also true: you can manually create a bill-only purchase order, and the system generates the associated requisition.
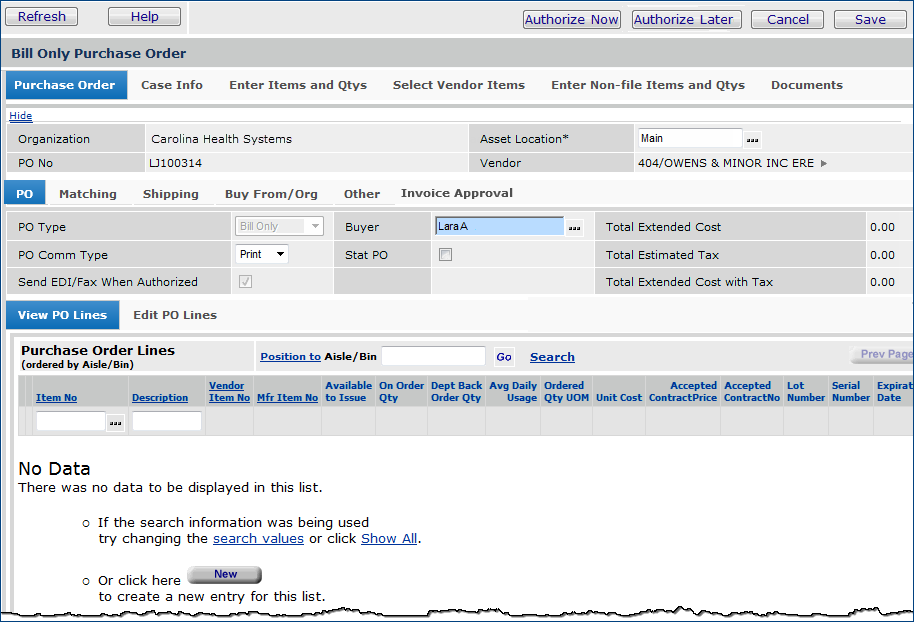
When you create the first line on a bill-only PO, you are defining the Deliver To Org and Department for the associated bill-only requisition. Subsequent PO lines default to the same department as the first PO line, and the items in the subsequent lines must be for that department.
Note: The Case Info fields contain patient-identifying information. You must have permission set on your User Profile to work with this information. See HIPAA Requirements in the Security section.
To add lines to a purchase order, you have several options:
Enter Items and Qtys Tab*
For quick entry of file item lines, click the Enter
Items and Qtys tab.
This tab is useful when you need to provide very little information about
a file item.
Select Vendor Items*
To select file items from a list, click the Select
Vendor Items tab.
Enter Non-File Items and Qtys*
For quick entry of non-file item lines, select Enter
Non-File Items and Qtys.
"Traditional" PO Line panel
For either file or non-file lines that require some detailed
information, click New (in the lower section of the
Purchase Order panel)
The "traditional" PO line entry panel appears.
*You can only use this panel with a regular, blanket or standing PO.
Each method is outlined in the online documentation Entering Lines on a Purchase Order.
Note: A purchase order can contain both bill-only and bill-and-replace lines. You can require receipts for some lines -- those lines are "bill-and-replace" -- and not require receipts for other lines, which are "bill-only."
Figure 16 is the requisitions list entry for the purchase order created in Figure 14.
Requisitions created from purchase orders have the Status: Backordered. When you match an invoice for a receiptless line, the application makes a receipt available for matching. At that point, you can complete the requisition. See Notes on Receiptless PO Lines for more discussion.
You can print bill-only purchase orders from the Purchase Orders list.
When you print a purchase order, the way the PO lines are ordered depends on whether the PO is bill only, or non-bill-only, and whether any of the lines are receiptless. For bill-only purchase orders, with non-file and file lines, and both receipts required and receiptless: PO lines are grouped by receipt required and receiptless. Within each group, the lines are printed in line-number order.
Note: Unless your user profile has the field Hide ePHI Data unchecked, patient information on printed bill-only requisitions and purchase orders will not be visible.
Note: All patient identifier fields in figures contain fictional values and are not associated with any actual individual(s).
Note: All patient identifier fields in figures contain fictional values and are not associated with any actual individual(s).
Note: All patient identifier fields in figures contain fictional values and are not associated with any actual individual(s).
Users need to import bill-only requisitions into ERP, in particular, because bill-only requisitions must often be passed between surgery management programs and ERP. A bill-only requisition import is available.
The bill-only requisition import uses a revision of the requisition import, with additional fields and the Type REQUISITIONBILL (Table 1). Protection rules for ePHI apply to bill-only and all requisition imports.
The bill-only requisition import contains these additional fields:
Additionally, for bill-only requisitions, values are required in fields Vendor, Buy From Location, Manufacturer ID, Manufacturer Item Number, Vendor Item Number. Bill-only requisition lines created from imports default to receiptless unless the Receipts Required column is set to "yes.".
Bill-only requisitions can be imported as "mixed" with other non-bill-only requisitions. A new requisition is created when the department, case information, or Vendor/Buy From Location changes in the import batch.
Note: Stock items are not allowed in bill-only requisitions. If you enter stock items on the bill-only import template, upon upload, the line will fail to be imported, and an error message will result.
The bill-only requisition import uses the standard import from the menu location: Materials Management > Requisitioning > Requisition Imports. See the online documentation topic "Requisition Import and Replenishment of Supply-Dispensing Units" for details on the import process.
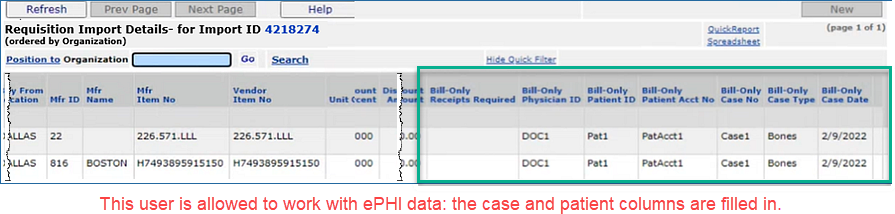
In the ERP application, the bill-only fields are visible on the Requisition Import Details list (Figure 20). If the user is not allowed to work with ePHI data, the case and physician columns do not appear (Figure 21).

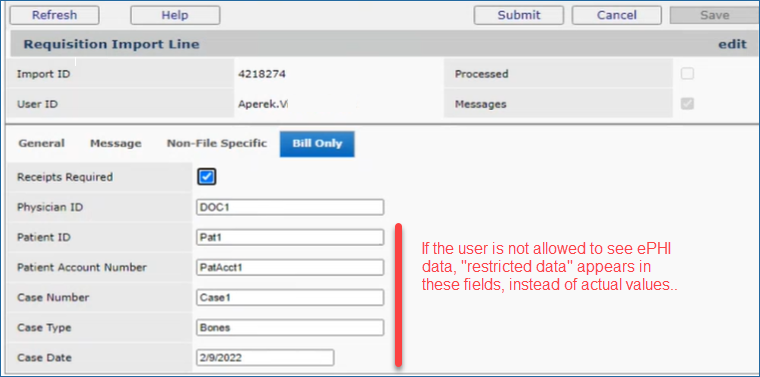
A Bill Only tab is available on the requisition import lines edit detail (Figure 22). This tab displays values for the case and physician fields above. The values are protected by the ePHI rules and user settings.
The import file fields are described below in Table 1. The new columns AM to AS are for bill-only imports. The import must be in .csv format with the final line <EOF>
Contact the Help Desk for a copy of the template. It includes detailed instructions on the worksheet tabs.
Table 1 - CSV File Fields for Importing Requisition Item Data |
|
| Field | Entry |
| Row 1 - Header | |
| Column A: REQUISITION | The word REQUISITION or one of the following words is required: Requisition - used for standard requisitions (required pick and confirmation) RequisitionBill - used for bill-only requisitions |
| Column B: CustomerID | Your customer ID as defined by the system. Contact customer support if you do not know your ID. |
| Column C: Time Stamp | The date of the export
in MM/DD/YYYY format; e.g., 05/06/2022 for May 6, 2022. |
| Row 2
- Column Names Enter the column names exactly as they appear below, e.g., SUPPLYINGORG in Column C. |
|
| Column A: Org | Your organization's ID, up to 15 characters. This field is required. |
| Column B: Dept | Your
department ID, up to 15 characters. This field is required. |
| Column C: SupplyingOrg | The code for the organization that supplies you, up to 15 characters. This field is required. |
| Column D: SupplyingAssetLoc | Your supplying asset location, up to 15 characters. This field is required. |
| Column E: ItemNo | An item number, up to 15 characters. Required. |
| Column F: OrderedQty | The ordered quantity -- a whole number up to 9 places long. Required. |
| Column G: OrderedUOM | The ordered UOM, up to two characters (e.g., CS). If no UOM is given, the system |
| Column H: AllowBackordYN | Allow backorders? 0 if No; 1 if Yes. Required field. |
| Column I: CaseCartLineID | The ID associated
with a line on a case cart, if there is one. |
| Column J: RequestedDate | The requested date in MM/DD/YYYY format. This field is optional. |
| Column K: UserID | The user's
ID, up to 20 characters. This field is optional. If a value is
not entered, |
| Column L: ReqDescription | A description of the requisition. |
| Column M: ChargeType | 0=Regular Req, 1=Credit Req, 2=Charge Only Req |
| Column N: LotNo | Optional, indicates Lot Number for a Lot Tracking enabled item. |
| Column O: ExpDt | Optional, indicates Expiration Date for a Lot Tracking enabled item date in MM/DD/YYYY format. On import, the date is dropped if its format is invalid. |
| Column P: SerialNo | Optional, indicates the Serial Number for a Lot Tracking enabled item. |
| Column Q: BypassQtyAdjustYN | Optional, determines whether the Order Qty should be adjusted based on previous activity. |
| Column R: PatientID | Optional. If used a patient charge is created. |
| Column S: ChrgDeptOvrd | Optional. If used, populates the Charge Department Override on a requisition line. The requisition line Charge Organization Override is derived from the organization record. |
| Column T: ItemDesc | Required if the import line is a non-file line. Non-file lines use this column, instead of Item Number. If both an Item Description and Item Number are present on the import line, the import returns an error, and the import line is bypassed. Both file and non-file line can be included in the same import. |
| Column U: VendorNo | Required for bill-only requisition imports. Otherwise, optional. Contains the vendor's identifier in the application. |
| Column V: BuyFromLoc | Required for bill-only requisition imports. Otherwise, optional. Contains the vendor buy-from location name. |
| Column W: MfrID | Required for bill-only requisition imports. Otherwise, optional. Contains the manufacturer's identifier in the application. |
| Column X: MfrName | Optional. Contains the manufacturer's name. |
| Column Y: MfrItemNo | Required for bill-only requisition imports. Otherwise, optional. Contains the manufacturer's identifier for the item. |
| Column Z: VendorItemNo | Required for bill-only requisition imports. Otherwise, optional. Contains the vendor's identifier for the item. |
| Column AA: UnitCost | Optional. |
| Column AB: ExpenseCode | Optional. |
| Column AC: TaxableYN | Defaults to not taxable (N). |
| Column AD: ProjectCode | Optional ID for a project. |
| Column AE: FundCode | Optional ID for a fund. |
| Column AF: CommodityCode | Optional commodity code. |
Columns AG, AH, AI: |
Optional fields for financial reporting, if defined at a site. |
ColumnAJ: |
Optional code to generate separate purchase orders for requisitions. 1=Generate separate POs 0=Do not generate separate POs (default). |
Column AK: DiscountPct |
Required for non-file items. 7 characters max. |
Column AL: DiscountAmt |
Required for non-file items. 19 characters max. |
Column AM: BO ReceiptsReqYN |
Used with REQUISITIONBILL type. Indicates if receiptless (0) or receipts required (1). No= 0; Yes =1. Defaults to 0 (zero) if not entered. |
Column AN; BOPhysicianID |
50 characters max. Optional for bill-only requisition imports |
Column AO: BOPatientID |
50 characters max. Optional for bill-only requisition imports |
Column AP: BOPatientAcctNo |
50 characters max. Optional for bill-only requisition imports |
Column AQ: BOCaseNo |
50 characters max. Optional for bill-only requisition imports |
Column AR: BOCaseType |
50 characters max. Optional for bill-only requisition imports |
Column AS: BOCaseDate |
20 characters max. Optional for bill-only requisition imports |
| Rows 3 and on - Data records | |
| Last Row - <EOF> | |
Copyright © 2023 by Premier Inc. All rights reserved.
requsition requistion reqisition requstion