- From the Work in Administration main Contents, select Administration > Users.
- The Users list appears. Locate the user of interest.
- Click Menu > Edit or click the edit icon
- Click the Authorities tab. (It is the second to the last tab.)
The vendor data import feature provides a convenient way to add or change Materials Management and AP vendor information. The feature also allows you to synchronize vendor information in the system with an external (i.e., non-) AP application's vendor records. The data that you import are records that describe the vendor, one or more buy-from locations, and/or AP locations. Information might include; for example, address, discount terms, payment terms, default buy-from location, and so on. (If you wish to import vendor catalogs into the system, use the EDI 832 facility.)
You can add a new vendor record, change vendor information, logically delete a vendor, suspend vendors, reactivate vendors, and more. You can add, change, suspend, or delete AP locations and buy-from locations independently of the vendor that they belong to.
This topic explains how to add vendors to ERP using imports. You can also enter vendor data manually, which is covered in this topic: To add a vendor manually.
Note: A system setting, described below, lets you decide if you will enter vendor data manually, import vendor data, or do both. If your site is set up to import vendor data only, you will not be able to change or create vendor records manually.
Display of vendor imports (Imports/Exports & Financials > Vendor Import) is controlled by the role object "Vendors." The minimal setting is View.
Users must have the proper authorization to update vendor information via an import file.
Authorization is set on the Users - Authorities tabbed panel, and through role objects "Vendors" and "VendorsMMandAP."
The flag on the Authorities panel is Allow Add/Update/Delete of Vendor Type "MM and AP." The flag is set "on" by default.
To access the Authorities panel:
-
From the Work in Administration main Contents, select Administration >
Users.
- The Users list appears. Locate the user of interest.
- Click Menu > Edit or click the edit icon ![]() .
.
- Click the Authorities tab. (It is the second to the last tab.)
Below are instructions on how to add vendors to ERP manually. You can also import vendor data, which is covered in this topic: Import Vendor Data.
Users want to add vendors to ERP with both the import method, or manually, as they choose. A feature field Vendor Maintenance Mode is available for this purpose (Figure 1).
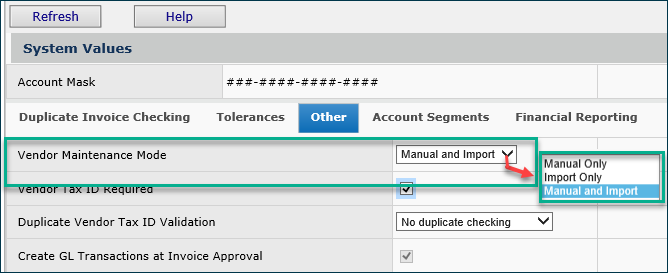
Before you add a vendor to ERP, check this field and set it as you wish.
Importing vendor information has these steps:
When you upload a vendor file, the system performs these steps:
Validates the file - the system checks the file for viruses, verifies that the file is a vendor update file, and determines if the file format is correct.
Reads the file - the system reads the file to determine the action(s) needed; for example, adding or changing a vendor record. You set the actions in the import file's ACTIONCODE field for each vendor record. See "How ACTIONCODES work."
Processes the file to update the system vendor information - the system updates its vendor records based on the information in the import file.
If the system cannot complete any step because of errors, it logs the errors. You can view the errors and correct them.
Note:
The field Help on the Authorities panel explains how the Allow Add/Update/Delete of Vendor... flag works, in concert with the relevant role objects.
- Click the Help button. Tabbed help information appears; click the Authorities tab.
Several types of imports are available for vendors. The file format is the same for each type, except that data will be needed in different fields, depending on what you are importing. You can ...
Important Note: For editing the file, a text editor is preferable to a spreadsheet program. Spreadsheet programs (e.g., Excel) add commas for blank columns. The system cannot process trailing commas. Also, the spreadsheet column formats must match the formats expected by the system. Simply saving your file from the spreadsheet does not guarantee that the column formats will be correct. For this reason, editing and saving a .csv file in a text editor is better.
Open the .csv file that you made in the previous step and edit it so that the fields and field values are consistent with the fields and values that the system expects. (See the Important Note above.)
Add Rows 1 and 2.
| Field | Format | Enter: |
| ImportType | text | VendorExt |
| Customer | text | e.g., CHS (Carolina Hospital System) |
| Date | MMDDYYYY | e.g., 11092010 |
Note: The data values that you enter in each column in the .csv file must match any parallel data values that you have defined in the system tables. For example, if your Discount Table contains the value: 2/10, you cannot enter 2%-10 as data in your .csv file. The import process will reject 2%-10.
<EOF>
Important: Your file must contain <EOF>, by itself, on the last line.
Figure 2 displays the fields and their order on the comma-separated import file.
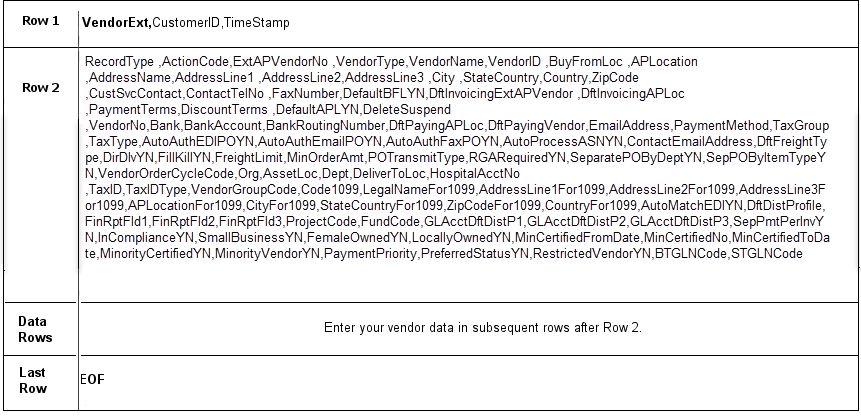
Table 2 provides details about fields that let you import different types of vendor data.
Several numeric fields that contain numeric data on the vendor edit panels automatically default to zero when you use those panels and leave the fields blank. This situation is not the same when you use the vendor import template. These fields, which you might normally leave blank (for "no") in the application panels must contain a value on the import template. Thus, the table below describes these fields as "required=Yes" when importing data.
| VENDOREXT | CustomerID | Time Stamp | ||||
| Column Name | Max Character Length | Max Numeric Length | Decimal Positions | Required | Notes | Used With |
| RecordType | 1 | Yes | 1=Vendor, 2=AP Loc |
All | ||
| ActionCode | 1 | Yes | All | |||
| VendorNumber | 15 | Yes | ||||
| ExtAPVendorNo | 15 | Yes | All | |||
| VendorType | 1 | No | 1=MM, 2=AP, 3=MM/AP Used for Vendor Adds only |
1,4,5,6 | ||
| VendorName | 50 | No | 1,4,5,6 | |||
| VendorID | 15 | No | 1,4,5,6 | |||
| BuyFromLoc | 15 | No | 3,4,6,7,8 | |||
| APLocation | 15 | No | 2,5,6 | |||
| AddressName | 50 | No | 2,3,4,5,6 | |||
| AddressLine1 | 50 | No | 2,3,4,5,6 | |||
| AddressLine2 | 50 | No | 2,3,4,5,6 | |||
| AddressLine3 | 50 | No | 2,3,4,5,6 | |||
| City | 30 | No | 2,3,4,5,6 | |||
| StateCountry | 2 | No | 2,3,4,5,6 | |||
| Country | 30 | No | 2,3,4,5,6 | |||
| ZipCode | 10 | No | 2,3,4,5,6 | |||
| TaxID | 15 | No | 1,4,5,6 | |||
| Code1099 | 10 | No | 1,4,5,6 | |||
| CustSvcContact | 50 | No | 2,3,4,5,6 | |||
| ContactTelNo | 30 | No | 2,3,4,5,6 | |||
| FaxNumber | 30 | No | 2,3,4,5,6 | |||
| ContactEmailAddress | 30 | No | 3,4,6 | |||
| DefaultBFLYN | 1 | 0 | Yes | 1=Yes, 0=No Sets BuyFromLoc as Vendor default (MM, MM/AP) |
1,4,5,6,8 | |
| DftInvoicingExtAPVendor | 15 | No | 1,4,5,6 | |||
| DftInvoicingAPLoc | 15 | No | 1,4,5,6 | |||
| PaymentTerms | 10 | No | 1,4,5,6 | |||
| PaymentMethod | 10 | 1 | Yes |  |
2,5,6,8 | |
| Bank | 15 | No | 2,5,6 | |||
| BankAccount | 15 | No | 2,5,6 | |||
| BankAccountRouting | 15 | 2,5,6 | ||||
| DiscountTerms | 10 | 1,4,5,6 | ||||
| DefaultAPLYN | 1 | 0 | Yes | 1=Yes, 0=No Sets AP Loc as Vendor default (AP only) |
1,4,5,6,8 | |
| DeleteSuspend | 1 | No | 1,4,5,6 | |||
| VendorGroup | 15 | No | 1,4,5,6 | |||
| PaymentPriority | 15 | Yes | Value may be 1 through 9 | 1,4,5,6,8 | ||
| POTransmitType | 15 | 1 | Yes | 3,4,6,8 | ||
| MinOrderAmt | 19 | 4 | No | 3,4,6 | ||
| DftFreightType | 15 | No | 3,4,6 | |||
| VendorOrderCycleCode | 10 | No | 3,4,6 | |||
| SeparatePOByDeptYN | 1 | 0 | Yes | 1=Yes, 0=No | 3,4,6,8 | |
| SepPOByItemTypeYN | 1 | 0 | Yes | 1=Yes, 0=No | 3,4,6,8 | |
| AutoAuthEDIPOYN | 1 | 0 | Yes | 1=Yes, 0=No | 3,4,6,8 | |
| AutoAuthFaxPOYN | 1 | 0 | Yes | 1=Yes, 0=No | 3,4,6,8 | |
| AutoAuthEmailPOYN | 1 | 0 | Yes | 1=Yes, 0=No | 3,4,6,8 | |
| FillKillYN | 1 | 0 | Yes | 1=Yes, 0=No | 3,4,6,8 | |
| AutoProcessASNYN | 1 | 0 | Yes | 1=Yes, 0=No | 3,4,6,8 | |
| Org | 15 | Yes | 7,8 | |||
| AssetLoc | 15 | Yes | 7,8 | |||
| Dept | 15 | Yes | 8 | |||
| DeliverToLoc | 15 | Yes | 8 | |||
| HospitalAcctNo | 15 | Yes | 7,8 | |||
| DftPayingAPLoc | 15 | No | 2,5,6 | |||
| DftPayingVendor | 15 | No | 2,5,6 | |||
| EmailAddress | 30 | No | 2,5,6 | |||
| TaxGroup | 10 | No | 2,5,6 | |||
| TaxType | 10 | Yes | 2,5,6,8 | |||
| DirDlvYN | 1 | 0 | Yes | 3,4,6,8 | ||
| FreightLimit | 19 | 4 | Yes | Decimal value for the approximate amount allowed as a freight charge. The Freight Limit is transferred to a PO header when the PO is created, but can be changed on the PO. | 3,4,6,8 | |
| RGARequiredYN | 1 | 0 | Yes | 1=Yes, 0=No | 3,4,6,8 | |
| TaxIDType | 10 | No | 1,4,5,6 | |||
| LegalNameFor1099 | 50 | No | 1,4,5,6 | |||
| AddressLine1For1099 | 50 | No | 1,4,5,6 | |||
| AddressLine2For1099 | 50 | No | 1,4,5,6 | |||
| AddressLine3For1099 | 50 | No | 1,4,5,6 | |||
| APLocationFor1099 | 30 | No | 1,4,5,6 | |||
| CityFor1099 | 2 | No | 1,4,5,6 | |||
| StateCountryFor1099 | 30 | No | 1,4,5,6 | |||
| ZipCodeFor1099 | 10 | No | 1,4,5,6 | |||
| CountryFor1099 | 30 | No | 1,4,5,6 | |||
| AutoMatchEDIYN | 1 | 0 | Yes | 1=Yes, 0=No | 1,4,5,6,8 | |
| DftDistProfile | 15 | No | 1,4,5,6 | |||
| FinRptFld1 | 10 | No | 1,4,5,6 | |||
| FinRptFld2 | 10 | No | 1,4,5,6 | |||
| FinRptFld3 | 10 | No | 1,4,5,6 | |||
| ProjectCode | 10 | No | 1,4,5,6 | |||
| FundCode | 10 | No | 1,4,5,6 | |||
| GLAcctDftDistP1 | 15 | No | 1,4,5,6 | |||
| GLAcctDftDistP2 | 10 | No | 1,4,5,6 | |||
| GLAcctDftDistP3 | 10 | No | 1,4,5,6 | |||
| SepPmtPerInvYN | 1 | 0 | Yes | 1=Yes, 0=No | 1,4,5,6,8 | |
| InComplianceYN | 1 | 0 | Yes | 1=Yes, 0=No | 1,4,5,6,8 | |
| SmallBusinessYN | 1 | 0 | Yes | 1=Yes, 0=No | 1,4,5,6,8 | |
| FemaleOwnedYN | 1 | 0 | Yes | 1=Yes, 0=No | 1,4,5,6,8 | |
| LocallyOwnedYN | 1 | 0 | Yes | 1=Yes, 0=No | 1,4,5,6,8 | |
| MinCertifiedFromDate | 10 | No | 1,4,5,6 | |||
| MinCertifiedNo | 15 | No | 1,4,5,6 | |||
| MinCertifiedToDate | 10 | No | 1,4,5,6 | |||
| MinorityCertifiedYN | 1 | 0 | Yes | 1=Yes, 0=No | 1,4,5,6,8 | |
| MinorityVendorYN | 1 | 0 | Yes | 1=Yes, 0=No | 1,4,5,6,8 | |
| PreferredStatusYN | 1 | 0 | Yes | 1=Yes, 0=No | 1,4,5,6,8 | |
| RestrictedVendorYN | 1 | 0 | Yes | 1=Yes, 0=No | 1,4,5,6,8 | |
| BTGLNCode | 13 | 0 | Yes | 1,4,5,6,8 | ||
| STGLNCode | 13 | 0 | Yes | 1,4,5,6,8 | ||
| AsianIndianYN | 1 | 0 | Yes | 1=Yes, 0=No Set to zero (0) if not entered |
1,4,5,6,8 | |
| AsianPacificYN | 1 | 0 | Yes | 1=Yes, 0=No Set to zero (0) if not entered |
1,4,5,6,8 | |
| BlackYN | 1 | 0 | Yes | 1=Yes, 0=No Set to zero (0) if not entered |
1,4,5,6,8 | |
| HispanicYN | 1 | 0 | Yes | 1=Yes, 0=No Set to zero (0) if not entered |
1,4,5,6,8 | |
| NativeAmericanYN | 1 | 0 | Yes | 1=Yes, 0=No Set to zero (0) if not entered |
1,4,5,6,8 | |
| VeteranYN | 1 | 0 | Yes | 1=Yes, 0=No Set to zero (0) if not entered |
1,4,5,6,8 | |
| VeteranServiceDisabledYN | 1 | 0 | Yes | 1=Yes, 0=No Set to zero (0) if not entered |
1,4,5,6,8 | |
| LGBTQYN | 1 | 0 | Yes | 1=Yes, 0=No Set to zero (0) if not entered |
1,4,5,6,8 |
Table 3 explains field settings that implement different import types, and provides examples.
| To do this: | Use Field Settings: | Notes: |
| Add a vendor only (no buy-from location or AP location) | Record Type 1, VendorType 3. | Example: Add a vendor ActionCode field = A |
| Add an AP location only | RecordType 2, VendorType blank, DefaultAPLYN 1 (if applicable). | Example: Add an AP location ActionCode field = A |
| Add a buy-from location only | RecordType 3, VendorType blank, DefaultBFLYN 1 (if applicable), DftInvoicingExtAPVendor, DftInvoicingAPLoc. | Example: Add a buy-from location ActionCode field = A |
| Add an MM vendor and buy-from location at the same time | RecordType 4, VendorType 1 |
Example: Add an MM vendor and buy-from location ActionCode field = A |
| Add an AP vendor and AP location at the same time | RecordType 5, VendorType 2 | Example: Add an AP vendor and AP Location ActionCode field = A |
| Add an MM/AP vendor, AP location, and buy-from location at the same time | RecordType 6, VendorType 3 | Example: Add an MM/AP vendor, a buy-from location, and an AP location ActionCode field = A |
| Change a vendor | RecordType 1, VendorType blank. | ActionCode field = C |
| Change buy-from location data | RecordType 3, VendorType blank. | ActionCode field = C |
| Change AP location data | RecordType 2, VendorType blank. | ActionCode field = C |
| Make a buy-from location the vendor default | RecordType 3, VendorType blank, DefaultBFLYN 1. | Example: Change a buy-from location address and make it the buy-from location the default. ActionCode field = C |
| Make an AP location the vendor default | RecordType 2, VendorType blank, DefaultAPLYN 1. | ActionCode field = C |
| Change the default invoicing location on a buy-from location | RecordType 3, VendorType blank, DftInvoicingAPLoc, DftInvoicingExtAPVendor | ActionCode field = C |
Suspend a vendor |
RecordType 1, DeleteSuspend 3 |
ActionCode field = C |
Suspend a buy-from location |
RecordType 3, DeleteSuspend 3 |
ActionCode field = C |
| Suspend an AP location |
RecordType 2, DeleteSuspend 3 |
ActionCode field = C |
Delete a vendor |
RecordType 1, DeleteSuspend 1 |
ActionCode field = C |
| Delete a buy-from location Undelete a buy-from location |
RecordType 3, DeleteSuspend 1 |
ActionCode field = C |
| Delete an AP location Undelete an AP location |
RecordType 2, DeleteSuspend 1 |
ActionCode field = C |
The add (A) and delete (D) ActionCodes add and delete vendor records, including buy-from locations and AP locations. The C (change) code changes vendor information, suspends, and reactivates vendors. The C code works as follows:
When you enter C in the ACTIONCODE field, and a date in the SUSPENDEDDATE field, the system checks to see if the vendor is already suspended, and if not, suspends the vendor.
When you enter C in the ACTIONCODE field, and leave the SUSPENDEDDATE field empty, the system checks whether the vendor is already suspended, and if so, reactivates the vendor.
When you enter a C in the ACTIONCODE field, and the changes you wish to make in other appropriate fields, the system first checks to determine if you intend to suspend or reactivate a vendor. If there is no date in the SUSPENDEDDATE field, and if the system's record for the vendor shows that the vendor as active, the system assumes that you wish to make other changes.
Note about suspended vendors: When you "unsuspend" a vendor using an import, the system unsuspends all AP and Buy-From locations for the vendor. You can suspend and unsuspend AP locations and buy-from locations separately.
Note about adding vendors: When you add a new vendor, the system creates a new vendor number for the vendor, and associates the new vendor number internally with the ExtAPVendorNo value from the input file.

At this step, you have a choice. You can work through the import process in two stages or in one stage. For new users of this feature, we recommend the two-stage approach.
- Select the box labeled Load and Verify, No Import.
- Click Submit. The system attempts to upload your file and validate it. If successful, the system sends you a message. If the system cannot upload your file and validate it, error messages appear. Read and close the error messages. Make changes as needed in your .csv file and try the upload again. Click here to read debugging information.
The Import List for Import Type Vendor appears.
- Click Refresh to see your file listed.
- Click Submit. The system attempts to upload your file and validate it. The Import List for Import Type Vendor appears.
- Click Refresh to see your file listed.
Import Status Desc - The successful or unsuccessful status of the upload.
Errors: The .csv file could not be read or validated.
Ready for Processing: If you have used a two-stage upload, the file is ready for the second (update) step.
Complete: Update of system data from the import file is complete and successful.
Incomplete: The file could not be brought into the system. (You may have the wrong file name or path.)
Processed - The number of data records processed out of the total uploaded. This number shows how many of the import file records successfully updated the system vendor records.
n of X: X is the number of data records uploaded and n is the number of records processed.
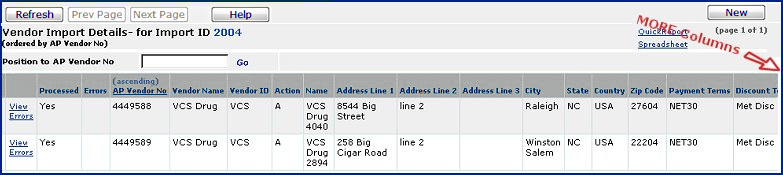
For a one-stage upload, this field indicates whether the system was able to update its vendor data using the imported file's records, and, if so, how many updates were successful. 0 of X means that the system was not able to update any of its vendor data using the imported file's records. Click Menu > View Import Details. The Vendor Import Details list appears, and you can review your data for errors.
For a two-stage upload, 0 of X is normal.
If you are using the one-stage approach, the system has run the import step for you. You can review any errors, and begin fixing any problems.
If you are using the two-stage approach, you need to process the vendor file that you uploaded so that the the system records are updated. Do the following:
You can encounter errors at any or all of the stages of vendor record import and update. Error messages provide information about problems with the .csv file. In most cases, you will wish to alter your .csv file. Sometimes, you may wish to change values in the system tables, such as establishing new Discount Terms to accommodate a particular vendor's data.
When you select Menu > Reprocess, the system attempts to update its vendor records using the imported records. The number of records successfully updated appears on the Import... list, and errors in processing each record are logged. To see the errors:
On a vendor import, you can add multiple buy-from and AP Locations for a vendor.
| To do this: | Use Field Settings: |
| Add an MM/AP vendor, AP location, and buy-from location at the same time | RecordType 1, VendorType 3, DefaultBFLN 1(if applicable), DefaultAPLYN 1 (if applicable). |
| To do this: | Use Field Settings: |
| Add an AP location only | RecordType 2, VendorType blank, DefaultAPLYN 1 (if applicable). |
| Add a buy-from location only | RecordType 3, VendorType blank, DefaultBFLYN 1 (if applicable), DftInvoicingExtAPVendor, DftInvoicingAPLoc. |

Copyright © 2023 by Premier Inc. All rights reserved.