This topic explains how to set system values such as users' access to report objects, duplicate invoice checking (which prevents duplicate invoices from being created), identify your organization's account segments, and others. Also, a discussion of setting system defaults is in this topic. System values and defaults can only be modified by an Administrator at your site.
The role object "Administration" controls access to system values and system keys. The minimum setting to edit system values is Modify.
Duplicate invoice checking prevents identical invoices from entering the system. When you start to create an invoice, the application checks to see if an invoice from the same vendor with the same Invoice Number already exists. You can set various options for invoice checking. You specify the invoice checking options on a System Values panel.
For example, suppose that Invoice Number 5678 for a vendor already exists, and you re-enter Invoice Number 5678 on a new invoice for the same vendor. When you submit the new invoice, the application displays an error message, and does not accept the new invoice.
Invoice checking always includes invoice number and vendor. You may also create settings to include a check of the invoice dates, or the invoice totals, or both. In this way, the invoice-checking options let you define what you mean by duplicate. You may choose any of the following definitions:
Tolerances are limits that you set on dollar differences between invoices and purchase orders. You can use the Tolerances tab to specify default tolerances. If you wish to use vendor tolerances, you must enter them on the Tolerances tab in the vendor record. You must also "uncheck" the field Use System Tolerances. Tolerances is a separate topic that you may wish to read in detail if you are a system Administrator.
On the Tolerances tab, you can set a tolerance as a percentage of a total dollar amount, as a total dollar cap, as a percentage of a line item cost, or as a line item dollar cap.
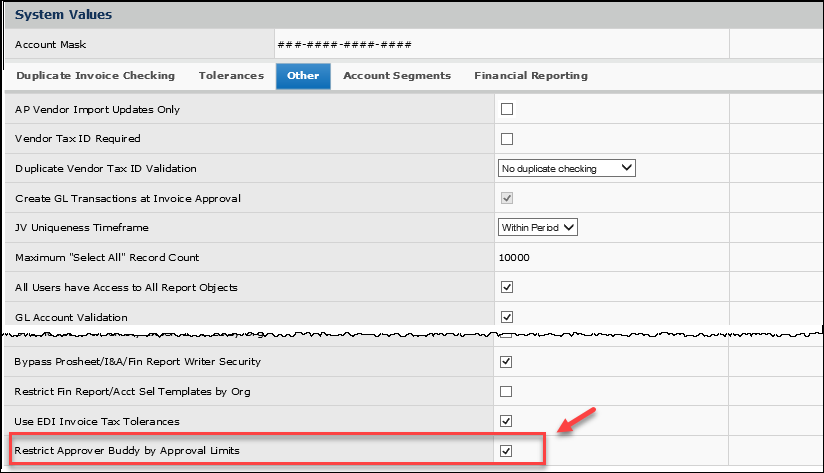
You can specify dollar limits on approvers so that an approver going out-of-office can select a buddy approver who has the same (or higher) approval limits. This feature requires setting a field in System Values, and assigning Requisition Approval Limits and/or Invoice Approval Limits to users who approve requisitions, invoices, and/or check requests, as appropriate. See "Using Dollar Limits for Approver Buddies" for details on setting up users. The Limits fields are on the User Profile.
This feature applies to approvals for requisitions, check requests, and invoices. (Journal voucher approvals and vendor approvals are not included.)
A System Value "Restrict Approver Buddy by Approval Limits" enables this feature for requisition, check request, and invoice approver buddies. When the system value is enabled, approvals route to assigned approver buddies with the appropriate limits. When the system value is not enabled, approvals route without the restriction of approval limits defined for approver buddies. This system value field is audited.
Several system values, summarized below, are set on the Other tab of the System Values panel. Several of these values will be set for you when the system is implemented at your site.
AP Vendor Import Updates Only - When checked, you can only update vendor records in the application by importing vendor information. See Importing Vendor Data for details.
Vendor Tax ID Required - When selected, newly created vendors must have a Federal Tax ID.
Duplicate Vendor Tax ID Validation -
When a new vendor is created, this field specifies how to handle any duplicate Federal Tax IDs in existing vendors.
Options are:
No duplicate checking (default)- This setting does not warn the user or prevent the user from creating a duplicate Federal Tax ID with a new vendor.
Warning if duplicate found. - The system displays a warning message when the new vendor with a duplicate Federal Tax ID is saved, but does not prevent the vendor from being created..
Error if duplicate found. - The system displays an error message when the new vendor with a duplicate Federal Tax ID is saved. The new vendor cannot be created.
When selected, the Vendor Number field appears on the Add Vendor panel (MM/AP > Vendors > Vendors > New). You are allowed to create and enter your own Vendor Number.
If you leave this field unselected (the default), the system generates Vendor Numbers. For details, see Add vendors and vendor locations.
Create GL Transactions at Invoice Approval - This field controls the setting of the Extracted Status field for GL transactions created through Accounts Payable. This field is selected (or not) when your system is implemented, and cannot be changed, except by system staff.
GL Account Validation - If this box is selected, GL account codes constructed by the system for purchase orders are validated to make sure that the accounts actually exist. See Using General Ledger Account Validation for details.
JV Uniqueness Timeframe - Indicates if duplicate journal voucher numbers are allowed at your site, and if so, when. Values are:
Create Expanded Dept. Expense Report Transactions
This field expands the set of departmental accounts whose GL transactions are included in the Department Expense Report. For details, see Expanding the types of reported account transactions for a department.
Important: Only system staff can change this setting. When the setting is changed, a message reminds the user that the content of the Department Expense Report is impacted.
Export Invoices to External System - The extracted status of all invoices depends on the setting for this field. If this field is checked, then the extracted status of any approved invoice is Ready for Selection.
Create Expanded Match Details for Invoice Export - When set, creates an expanded export table that contains match lines.
Restrict PO/Invoice Price Change on Contract Items for an Entire Site
When the field Restrict PO/Invoice Price Change on Contract Items is selected, all users at the site
are prevented from changing the PO Unit Cost and the Next Estimated Receipt Unit Cost on a purchase order line for a contract item. The setting also restricts users from selecting the Invoice Correct field in clearing exception prices for contracted items. The restriction forces payment of an invoice at the PO price.
Price changes to contract items on purchase orders and invoices can be restricted for individual users, organizations, or for an entire site.
When this field is selected, the restriction is set at the site level.
![]() To use the restriction at the different levels:
To use the restriction at the different levels:
User:
- If the restriction is not selected in a user profile, the user can change cost/exception prices, as long as the restriction is not set at either the Organization or System Values level. Also, the user can select the Invoice Correct field when clearing price exceptions for contracted items.
- If the restriction field is selected, the user cannot change prices. For details on restricting individual users, see User Restriction against Changing Prices on Contract Items.
Organization:
- If the restriction is not selected, users in the organization -- who are not restricted individually -- can change contract item prices in purchase orders and invoices.
- If the restriction field is selected for the organization, no user in the organization can change prices.
For details on restricting an organization see Organization Restriction for Contract Price Changes.
System:
- If the field is not selected, price changes can be controlled at the Organization level and/or the User level.
- If the restriction field is selected in System Values, no one at the site can change a PO price for a contracted item.
Use Invoice Matching Tax Exceptions
When selected, tax exception processing for invoices is enabled. To set the necessary flag, go to Tables>Organizations in the Materials, General Ledger, or Accounts Payable menu.
For details, see Setting up an organization.
All Users Have Access to All Report Objects - When checked, users can access all reports that they created, and all shared reports. This is the top level of security for report data. See Work with Report Profiles.
This feature addresses the situation in which a large volume of exports is processed and many of the export files are empty.
This feature is available for GL exports, AP transactions exports, item exports, and warehouse exports only.
Maximum "Select All" Record Count
Many features let you select elements from a list. For example, if your site maintains multiple item inventories, you can assign an item to one or more of your asset locations. You can select the asset locations from a list one by one, or you can "Select All." The Maximum "Select All" Record Count field sets a limit on the number of list elements that the application selects when you specify "Select All." Establishing a limit in this field can avoid errors, particularly in very long lists, such as lists of catalog items.
Lets you use the Product Index Layer (PIL) to find the correct MIN (manufacturer item number) when creating a new catalog item with Consolidated Item Add. This action is only available for PIL-enabled clients.
Override Item Inventory Expense Codes by Org
When selected, enables the use of Expense Code Overrides. The Expense Code Overrides are entered through the Item Inventory Edit panel, on the Expense Overrides tab. If GL Account Validation is on, the the expense code overrides that have been defined are used to validate the GL Account. (See Expense Overrides for a detailed discussion.)
Restrict Fin Rept/Acct Sel Templates by Org
When selected, lets you restrict identified financial reports/account selection templates to organizations defined in a user's data profile.
When financial reports or account selection templates have been restricted by organization, reports/templates can only be displayed/edited by users with data profile access to at least one of the restricted organizations. This feature helps you avoid having organizations inappropriately read and/or edit each other's financial data.
The initial setting for the Restrict Financial Reports... field is "off" -- financial reports and account templates are not restricted. Once you enable the option, if a user tries to disable it, a warning message appears. The warning states that existing restrictions will not be enforced when the flag is disabled.
Note: The ability to change the Restrict Financial Reports... field on the System Values Other tab is controlled by the role object "GLFINRptWtr." This role object must be set to All.
When the Restrict Financial Reports/Selection Templates by Org field is enabled, the menu option Restricted by Org is available on the list of Financial Report Definitions and on the list of Account Selection Templates. Also, on the list of Financial Report Definitions and Account Selection Templates, the sortable column Restricted by Org (Yes/No) appears. This field is audited.
Details on setup are in the online documentation topic "Restrict a Financial Report by Organization" and "Restrict an Account Selection Template by Organization."
The Account Segments panel lets you define each segment that your accounts numbers contain. Account numbers in the system can have up to nine segments. Each segment contains the following fields:
Segment Length - The length of the segment. In Figure 1, Segment 1 contains 3 to indicate that the first segment of the account number (up to the first – ) has three integers.
Segment Description - A description of the segment.
Short Description - An abbreviation for the description.
Materials Cross-Reference - The materials management component associated with the segment. The options are: Organization, Department, and Expense.
Important: You must not edit these values without specific authorization from your accounting management. Changing the values will have serious repercussions for your account data.

The Financial Reporting tab appears if financial reporting fields are enabled.
Financial reporting fields are site specific. When set up and entered on application records -- such as invoices and requisitions -- financial reporting fields propagate to general ledger transactions. The financial reporting fields can be then used to identify, sort, and categorize GL data in reports and on list panels. Up to three financial reporting fields are available.
The Financial Reporting Fields panel lets you identify (assign names) to three fields that you will use for financial reporting.
Once you have identified the fields, you create selectable values for the fields in a GL table. You can also flag any GL accounts for which you wish to require financial reporting fields.
For details on this feature, see Using Financial Reporting Fields in © ERP. If you wish to have financial reporting fields enabled for your site, contact the Help Desk.
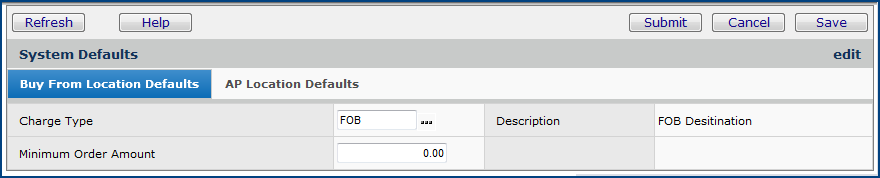
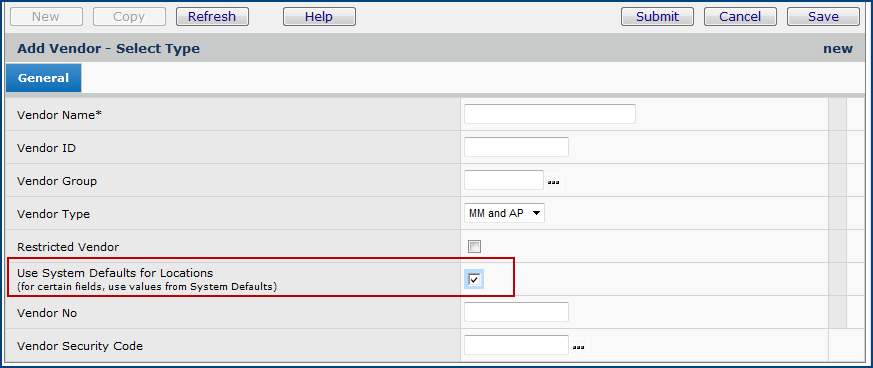
System defaults let you establish default settings when users create records of various kinds.
You can establish default values for several fields on vendor buy-from location and AP location records. A flag on the Vendor panel lets you specify that the defaults are to be used. When the vendor flag is set and an AP and/or buy-from location record is created, edited, or copied, the system populates the record with the defaults. The user cannot change the default values unless the system defaults are removed.
The fields that can contain defaults are:
To take advantage of the system defaults for vendor records, you must first define the default values. After defining the defaults, you must instruct the system to use the defaults for a particular vendor. Both of these steps are outlined in the following sections.
A panel appears with two tabs: Buy From Location Defaults and AP Location Defaults

For example:
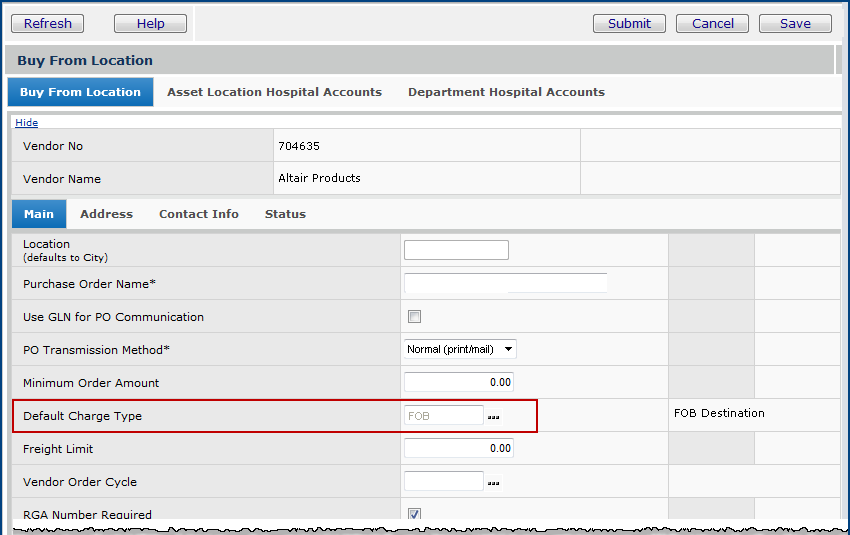
Using the settings from Figure 4, the Charge Type field is populated on the Buy-From Location edit tab when a user creates a new buy-from location (Figure 6).
Using the settings from Figure 5, the fields Payment Terms and Discount Terms are populated when a user creates a new AP Location (Figure 7).

Notice that the field values are grayed out. The user cannot change the values from the default.
Copyright © 2023 by Premier Inc. All rights reserved.