Email a Purchase Order Version
Contents
Overview
You will want to communicate some purchase orders to vendors via email. This section describes the setup steps and basic procedures.
When you email a purchase order in the system, the From address will be the email address of the Buyer or Authorized Buyer. A flag on the Asset Location table controls whether the Buyer or Authorized Buyer prints on the PO. If there is not a valid email address in the Buyer/Authorized Buyer's User settings, an error will occur.
Security
ePHI Features -- Bill-Only Purchase Orders
Features are built into the system to ensure the privacy of electronic protected health information (ePHI), in compliance with HIPAA requirements. One applicable area is emailing or faxing (and printing) of bill-only purchase orders which contain patient-identifying data (on the Case Info panel).
On a User Profile, the Hide ePHI Data field determines whether a user can access patient data. When Hide ePHI Data is checked, a detailed series of restrictions apply to the user's access to ePHI records. Patient information in the Email PO feature is subject to restrictions governed by this User Profile field.
In sum, if Hide ePHI Data is checked, the system does not display patient-identifying information.
The list of restrictions and examples is outlined in the ePHI documentation.
User Access to Purchase Orders
To access organization, department, or asset location data, the organization, department, or asset location must be included in your data profile.
The "Purchasing" role object setting Create (or All) allows you to create and copy purchase orders.
Set Up Email Purchase Orders for a Vendor Buy From Location
- From the Materials Management main Contents, select Vendors > Vendors.
The list of vendors appears.
- Locate the vendor of interest. Select Menu > Buy-From Locations.
- Locate the buy-from location to which you will be emailing POs.
Click Menu > Edit or  . The buy-from location record appears (Figure 1).
- On the Main tab, select the PO Transmission Method of "Email."
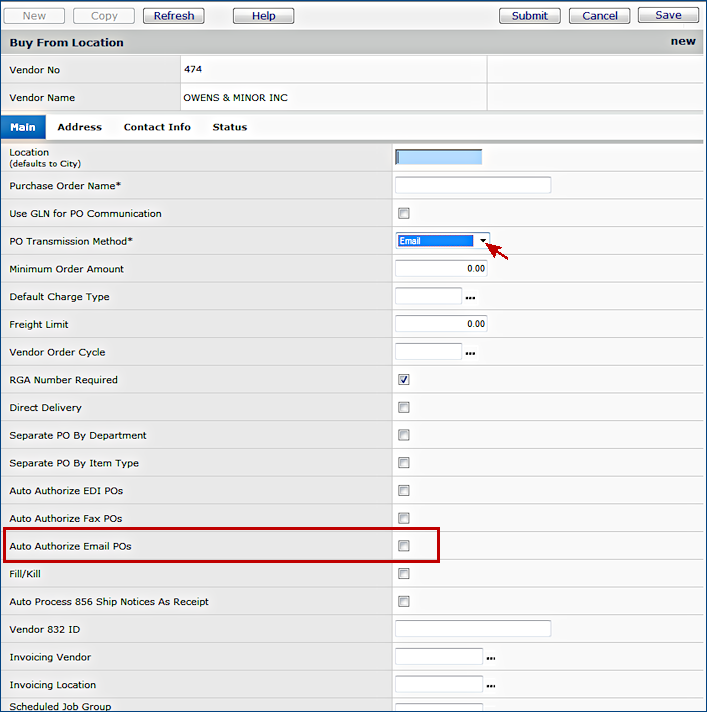
Figure 1 - Vendor Buy-From Location Record Main Tab
- On the Contact Info tab, enter a Contact Email address. (See Figure 2 below.)
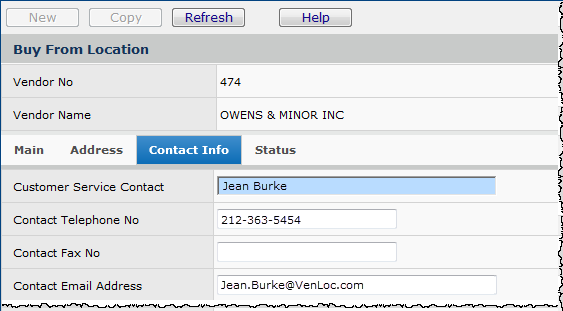
Figure 2 - Contact Information
You can view the PO Comm Type on the Purchase Order list or on the PO Inquiry panel for any purchase order.
- In the Purchase Orders list, click the i next to a PO number. The PO inquiry appears.
- On top, click the PO tab. The PO General panel appears on the bottom.
The PO Comm Type is included on the left of the General panel.
On email purchase orders, the buyer who created the PO is automatically entered on the "CC" line. The person creating the email PO must be designated as a Buyer in his/her User Profile.
Auto-Authorize Email POs
- You can set the option to automatically authorize email POs from the Buy From Location. Select the Auto Authorize Email POs flag on the Buy From Location panel (see Figure 1).
- To process the auto-authorization, you must create a scheduled job.
- Go to the Administration menu and click Administration Scheduled Jobs.
- Select the Job Name "Process Auto-Authorize Email POs." (See Figure 3.)
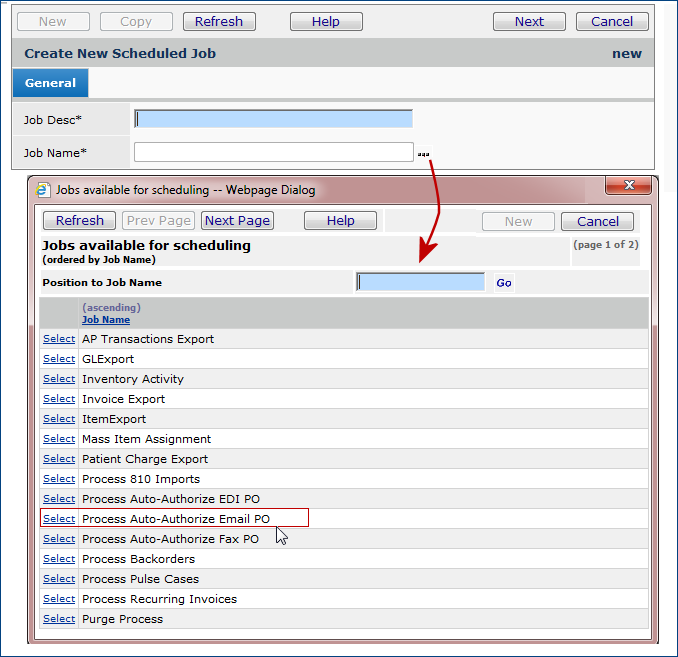
Figure 3 - Process Auto-Authorize Email POs
- Once you have selected the Job Name, click Submit.
- Complete the fields as desired for Job Frequency and Job Parameters.
The Org field on the Job Parameters tab is required. a default value is supplied, but can be changed.
Click OK.
- The auto-authorization process for emails works the same as the process for EDI and Fax auto-authorizations.
- Important: Stat POs (created from Stat requisitions) are not included in the automatic authorization unless the Auto Authorize Stat POs flag has been set on the asset location record.
- For detailed instructions on creating scheduled jobs, see the chapter on Scheduled Jobs.
Note: Automatic authorization works together with the Vendor Order Cycle established
for a vendor buy-from location. For each purchase order to be automatically
authorized, when the auto-authorization job runs, the system looks for a Vendor
Order Cycle for the PO's buy-from location.
- If no Vendor Order Cycle is established, the system assumes "today" and authorizes the PO, unless there is a delay established (in the scheduled job). If a delay is defined, the PO authorizes in the next cycle after the delay has passed.
- If a Vendor Order Cycle exists and is valid for the current day, the system
authorizes the purchase order; again, factoring in any specified delay.
- Otherwise, the system does nothing until the auto-authorize job runs again (factoring in any delay).
Then the PO is evaluated again, and compared with the Vendor Order Cycle value.
Hospitals that use auto-authorization often find it efficient to create a daily scheduled job to run the authorization before the earliest vendor order cutoff time.
Security: To set up automatic authorization, you need permission established in your user profile for purchase order authorization and for scheduling jobs. You may also need permission to edit vendor records and tables.
Create an Email PO
- Go to the Purchase Orders list. Materials Management > Purchasing > Purchase Orders or Purchase Orders (by Create Date).
The list of POs ordered by PO number or by create date (as you selected) appears.
- On the Quick Click Menu or on the Purchase Orders panel, click New.
- Complete the header information and click Submit.
- Enter lines on the PO for the items that you are ordering.
When you are finished entering lines...
- To authorize and send the PO as an email attachment right away, click Authorize Now.
- Or, to authorize the PO later, and send it as an email attachment, click Authorize Later.
The PO will be available from the list of POs ready for authorization.
(From Materials Management select Purchasing > Authorize PO.)
- On the Purchase Orders List:
Clicking Menu > Authorize PO authorizes the purchase order and sends the PO as an email attachment.
Re-Sending an Email Purchase Order
If an email PO fails, the Comm Status on the Purchase Order panel will display Email Error, and the PO may be resent. (Any purchase order that has been emailed and not acknowledged can be re-sent.)
- From the Materials Management main Contents, select Purchasing > Purchase Orders (by PO) or Purchase Orders (by Create Date).
The list of POs ordered by PO number or by create date (as you selected) appears.
- Locate the PO of interest on the list.
- Click Menu > Send/Resend EDI/Fax/Email POs.
A confirmation panel appears.
- Click Submit to re-send the PO.
(Clicking Cancel cancels the re-send.)
Add a Note to Email POs
You may wish to include a standard note in the message of all email POs. To enter the text of your note, go to the Materials Management main table of contents and click Purchasing > PO Email Notes. (See Figure 4 below.)
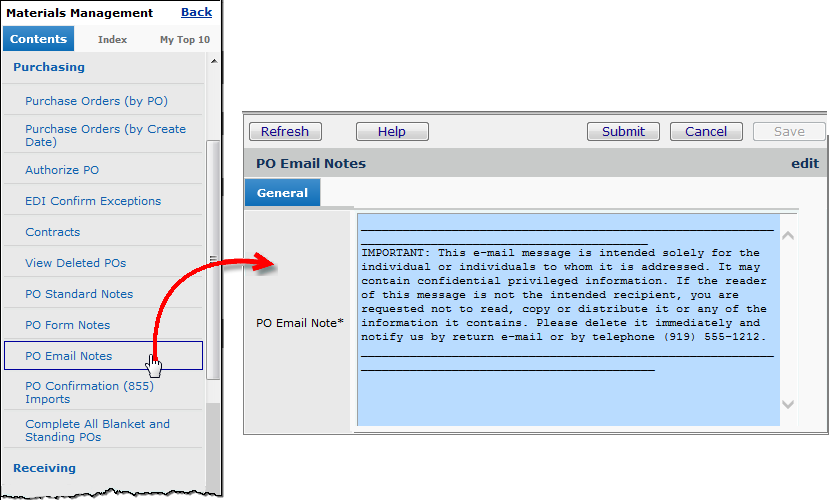
Figure 4 - PO Email Notes
A new panel appears with a text field. Enter your text and click Submit.
Copyright © 2023 by Premier Inc. All rights reserved.