Sourcing and Contract Management enables strategic, enterprise-wide study of spend patterns and contract savings based on spend goals.
The application utilizes a variety of tools to provide the user with easy navigability. These features can help you . . .
Note: The only feature in the application that does not use the features discussed in this chapter is Reports, which uses the features of the Materials Management, AP and GL products. A discussion of these features is available in the online Help.
Sourcing and Contract Management uses the normal calendar year, rather than a fiscal calendar year (if one exists for a site). For example, incentives are calculated and reported using a normal calendar.
At the top of every page*, you will find links to the main Menu, Search, and online Help. (See Figure 1.) Use the links to access application features without returning to the Table of Contents page. (*Exception: Reports, as noted above.)
The Table of Contents is tabbed, allowing you to access the specific Table of Contents for Supply or Shared Services pages, or go to the pages/panels you have designated as favorites.
The Supply and Shared Services tabs are similar. However, Sourcing and Contract Management handles supply contracts differently from services contracts. The differences are outlined in the table below.
Feature |
Supply |
Shared Services |
Analysis Workbench |
Choose to analyze one of the following segments of spend: |
Analyze all Shared Services spend. |
Contracts |
Load and Activate: Allows you to upload and activate Contracts Workbench: Allows you to work with supply contracts |
Contracts Workbench allows you to create or work with shared services contracts. |
Dashboards |
Create new or view saved analysis graphics. | Create new or view saved analysis graphics. |
Incentives |
Incentives: Work with incentives. Incentives Setup: Create and maintain incentives. | Incentives: Work with incentives. Incentives Setup: Create and maintain incentives. |
Projects |
Create and monitor analysis projects. | Not applicable to Shared Services |
Reports |
Create and view reports. | Create and view reports. |
Savings |
Contract Savings: View savings for items within Project Savings:View savings for items within a project Savings Opportunities: Identify purchases at higher than |
Not applicable to Shared Services |
Search |
Search for Contract Numbers, Contracts, Manufacturers, Items, Vendors, Notes, or UNSPSC codes. |
Search for Contract Numbers, Contracts, Vendors, or Notes. |
Administration |
View tables, manage users, view/manage batch jobs, rebuilds, downloads, etc. |
View tables, manage users, view/manage batch jobs, rebuilds, downloads, etc. |
Help |
Access online help and service pack notes. | Access online help and service pack notes. |
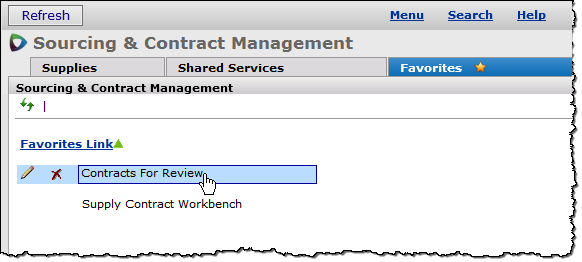
The Favorites tab can give you quick access to panels you work with frequently. You select the contents of this tab by clicking on the star in the top right-hand corner of the page or panel you want to list as a favorite. For example, if you work with contracts, you may want to set Contracts for Review as a favorite. To select this panel as a favorite, simply click the star at the top right of the panel. (See Figure 2.) When you select it from the Favorites tab (See Figure 3), only the Contracts for Review panel will display, not the entire Supply Contracts Workbench.
To select a page as a favorite,

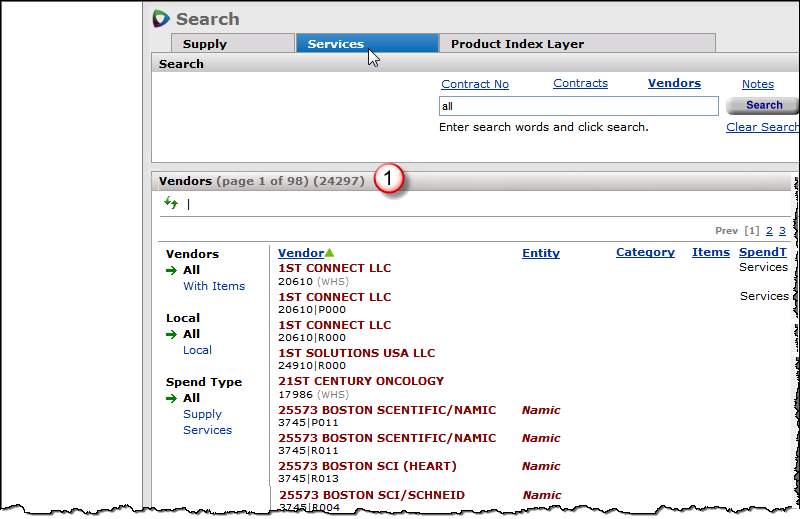
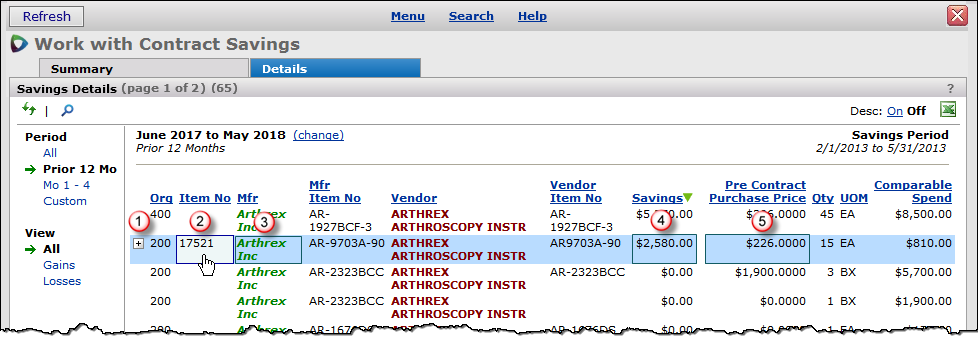
The title of the panel is displayed on the left side of the green bar at the top of the panel. For list panels, the number of pages of data is given in parentheses (if greater than 1), as well as the total number of lines of data. (See Figure 4, item 1.)
A security object may be required to view the data on a panel. Mouse over the tab title to see what security object setting is required (if any); the security object requirement is displayed at the bottom of the page. (See Figure 4, item 2.)
Detailed Help for each panel is available by clicking ? in the panel's upper right corner. The ? Help explains how to use each panel, and links to more information, and the documentation's full-text search.

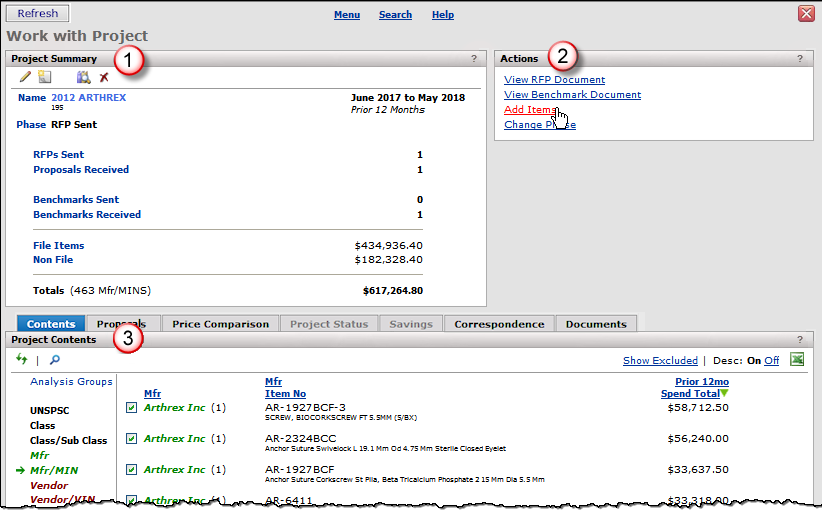
The "Work with Contract" and "Work with Project" pages feature at least three panels. (See Figure 5.) At the top of the page are the Summary panel (item 1) and the Actions panel (item 2). At the bottom of the page is a list panel that displays the detailed information for the selected tab (item 3).
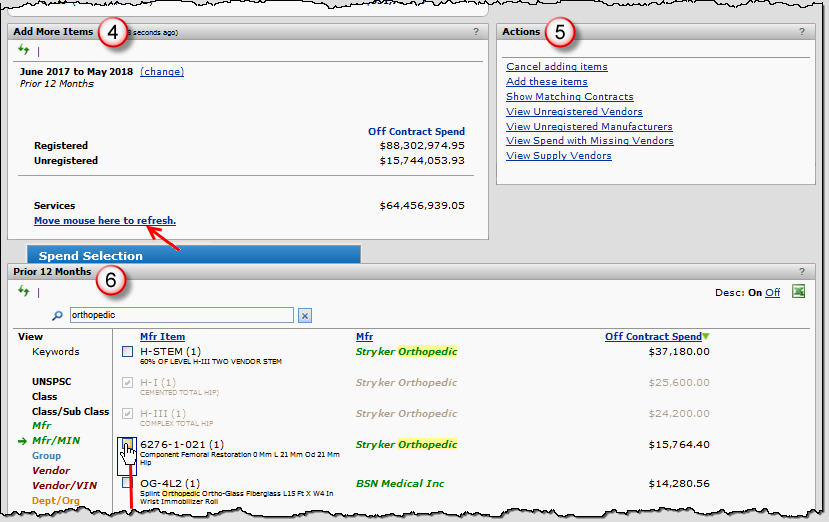
When Add Items is selected from the Actions panel in Figure 5, two panels appear in the middle of the page: the Add More Items panel and a second Actions panel. (See Figure 6, items 4 and 5.) Items selected in the list panel (item 6) appear in the Add Items panel after you mouse over the Move mouse here to refresh link.
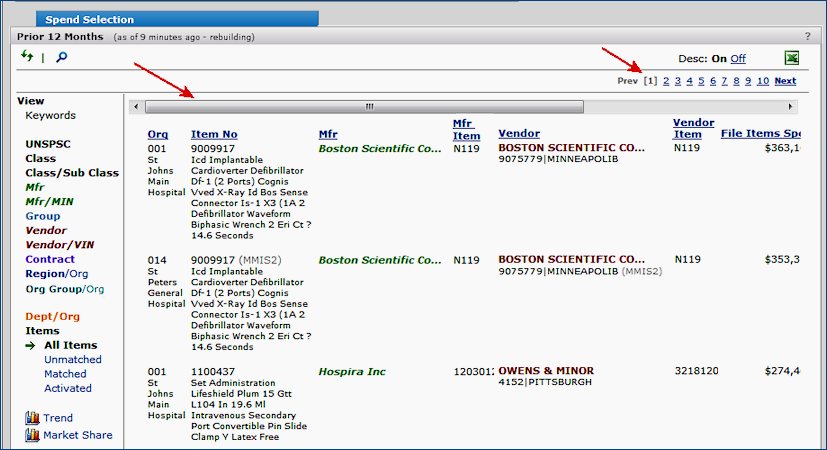
Panels with multi-page lists to display contain a page navigation menu at the top and bottom. Analysis Workbench panels (and other panels) that are wider than the viewing area (such as the Analysis Workbench Prior 12 Months Items View), a horizontal scroll bar appears at the top and the bottom of the panel. Figure 7 is an example.
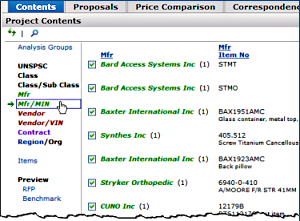
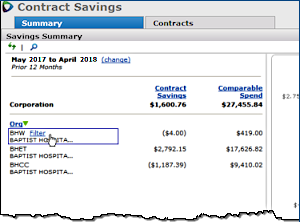
On panels that display lists of data, filters are provided to allow you to narrow the lists. On the Project and Contract lists, the filters are located on the left side of the panel. (See Figure 8.) On Savings Summary views, you may hover over the name of an Organization to select it as a filter. (See Figure 9.) To clear the filter, click the Clear link at the top of the Filters field on the left (Figure 10).
 |
 |
|
Figure 8 - Project Filters |
Figure 9 - Savings Filters |
Figure 10 - Clear a Filter |
Several icons may appear on panels which provide various functions. This table contains a list of the icons and what they do. (The Example column contains a path to the panel that it mentions.)
Icon |
Location |
Name of Icon |
Function |
Example |
|
Top left; next to Search icon |
Refresh |
Refreshes the data on a panel with current data from the server. |
Contents > Search > enter vendor name/number in search box > on results, click vendor b buy from location > on "Work with Vendor " page Actions panel, click Markup Sets. |
|
Top left; next to Refresh icon |
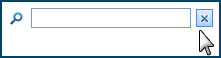
Search |
Open the Search box so that you can search for data. |
|
 | Top right | Favorites | Enables you to list the page on the Favorites tab |
Contents > Contracts Workbench > Contracts Expiring tab |
|
Top right |
Import to Excel |
Imports panel information into an Excel spreadsheet. |
Import the list of vendors into an Excel spreadsheet. Contents > Search > enter characters or All for all vendors > click Vendor |
|
Column header |
Direction of sort |
Clicking a sortable column in a list sorts the column in either descending or ascending order. When you sort a column, an icon appears indicating the direction of the sort. |
|
|
Left of list item |
Add user note |
Opens the User Note Add panel so that you can enter and save a user note. |
Add a note to a contract. Contents > Search > enter contract name/number in search box > click Contract > Open contract |
|
Left of list item |
Note | Indicates that user notes exist. Opens the user notes for viewing. This icon only appears if notes exist. To add a note , hover to the left of the item and click the icon that appears. |
When this icon appears on the Contract Info panel, click the icon to display the user notes. Contents > Search > enter contract name/number in search box > click Contract > Open contract |
|
Left of list item |
Copy |
Makes a copy of panel information. |
Set up a new user by copying an existing user profile. Contents > Administration > All Users > locate user that you wish to copy > open user |
|
Left of list item |
Delete |
Deletes data Note: For some types of data, this icon only appears when you hover the cursor over the data element. |
Delete a document from a project. Contents > Projects > click a project to open it |
|
Left of list item |
Edit |
Edits panel information |
Edit a contract header. Contents > Search > enter contract name/number in search box > click Contract > Open contract |
| Left of list item |
Detail | Opens Item Details popup panel. | Display detail for a contract item. Contents > Savings > Project Savings > Savings Detail link > Work with Contract Savings panel, Detail tab |
|
Manufacturer or Benchmark line on "Work with Project" page |
Opens an Email document. On the Projects Correspondence tab, clicking this icon opens an empty Email form for you to compose a new Email. |
Compose an Email for a Project. Contents > Projects > click project to open it > click Correspondence tab |
|
|
Documents tab of "Work with Project" page |
Email attachment |
Opens an attachment to an Email |
View Email document attachments in a Project. Contents > Projects > click project to open it > click Correspondence tab |
|
Top of Contract Info panel |
User fields |
Indicates that user fields have been set up. Opens the user fields for editing. |
Contents > Search > enter contract name/number in search box > click Contract > Open contract |
|
Bottom left |
Audit changes |
Opens an audit so that you can see what changes were made to audited fields on a panel. |
Audit changes to a contact. Contents > Search > enter contract name/number in search box > click Contract > Open contract |
|
Bottom left |
Graph |
Creates a data graph.
|
Contents > Analysis Workbench > Create analysis group > View panel |
|
Left of contract name | Documents icon | Opens a list of contract documents. |
See Managing Contracts, Figure 2. |
You can drill down to details on elements within the "Contracts" and "Savings" pages. If hovering over an element causes a box to appear, then clicking that element will bring up details in a new page or popup.
For example, anywhere in the "Contracts" or "Savings" pages, you can hover and click over a contract identifier (Figure 11) to bring up the Work with Contract Page (Figure 12).
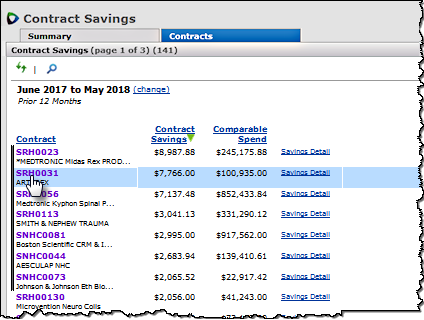 Figure 11 - Click Contract Identifier |
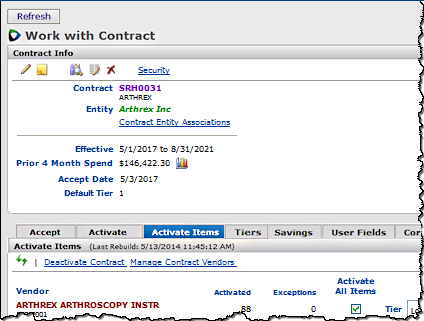
Figure 12 - "Work with Contract" Page |
The Savings Details panel (Savings > Contract Savings > Contracts > Saving Details link) has several fields where you can hover and click to drill down to details on an item. (See Figure 11.) Hover and click on the items in Figure 13 to view the following popup panels:
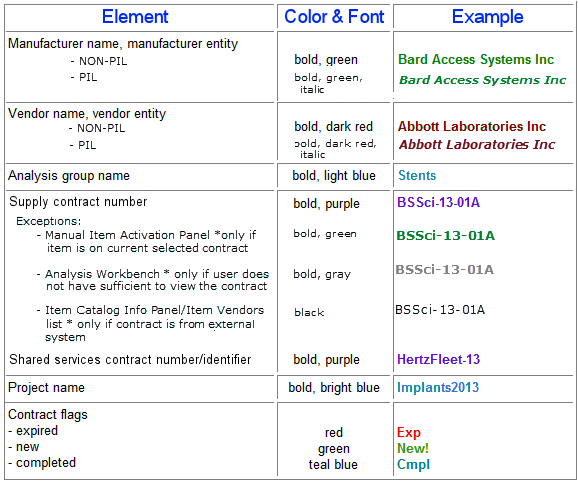
Throughout Sourcing and Contract Management , the following conventions are used for the color of various elements.
Copyright © 2023 by Premier Inc. All rights reserved.